

")
")


")


")
")
")


")
")


")
")
")


")
")
")


")
")
")
")
")
")
")
")
")
")
")
")
")
")
")
")


")
")
")

 Электроника
Похожие презентации:


Встроенный пульт дистанционного управления CM Survivable
1.
Install the CM Survivable Remote Embedded© 2012 Avaya, Inc. All rights reserved.
2. Survivable Remote Servers
© 2012 Avaya, Inc. All rights reserved.3. Survivable Remote Server–Overview
A complex solution might have two types of Avaya Aura® Survivable Remoteservers roles:
– Survivable Remote Simplex/CM_SurvRemote
– Survivable Remote Embedded/CM_SurvRemoteEmbed
Each Survivable Remote Server maintains a copy of the main server's
translations, which are regularly updated from the main server over the IP network.
In normal conditions, the Survivable Remote Server is idle, meaning it has no
controlling function.
The Survivable Remote Server comes online when a media gateway processor
(MGP) or an IP phone attempts to register with it because the main server is no
longer available.
If the network comes back online by itself and the main server becomes available:
– The gateway automatically connects back to the main server (normal license mode) if a
recovery rule has been configured for that gateway at the main server. After all media
gateways register back to the main server, the survivable server denies service to all
endpoints, returning them to normal mode (main server).
– The main server automatically recovers call processing control back from the survivable
server upon re-registration of media gateways and endpoints.
© 2012 Avaya, Inc. All rights reserved.
4. Survivable Remote Server–Overview (continued)
Survivable Remote Server:– Controls the branch gateway(s) in the event of network or main server failure
– Ensures reliability and near-identical functionality as the main server for the branch
Two type of Survivable Remote Server templates:
– CM_SurvRemote
– CM_SurvRemoteEmbed
Module/Template
Server
Former Name/New Name
CM_SurvRemote
VM
ACS*
Enterprise Survivable Server (ESS)
Survivable Remote Simplex
S8300D
Local Survivable Processor (LSP)
Survivable Remote Embedded
CM_SurvRemoteEmbed
*Avaya Common Servers = HP DL360 G7, Dell R610
Failover to the Survivable Remote Server:
– Stable calls maintained
– Reduced feature functionality
– Possible interruption of service
© 2012 Avaya, Inc. All rights reserved.
5. Survivable Remote Server–Overview (continued)
An active Survivable Remote Server functions in "license-error mode," whichgives the user 30 days for repair and reconnection to the main server.
In prior releases, the main server and the LSP could run different software
versions because both servers had separate license files.
Beginning with Release 6.0 and later the CM_onlyEmbed (LSP) and
CM_SurvRemote (ESS) templates:
– License File = No
– Must be of the same software version or later than the software on the main server.
Always upgrade branches before upgrading the main server.
The difference between the main server’s and the Survivable Remote Server’s
date/time should not differ by more than about five minutes, otherwise, the
translation synchronization might fail because of memory requirements.
Note
Survivable Remote Servers require careful synchronization
of software version and translations.
© 2012 Avaya, Inc. All rights reserved.
6. Survivable Remote Embedded Template
In this module we will install the CM_SurvRemoteEmbed template on the S8300Dserver, which will become a Survivable Remote Embedded server.
The Survivable Remote Embedded server functionality (fka Local Survivable
Processor or LSP) is set on the S8300D’s Server Role page (SMI).
Several administration processes are unique to Survivable Remote Servers:
– Defining the S8300D as a Survivable Remote Embedded Server (LSP) server
– Defining the Survivable Remote Server in the main server‘s administration
– Creating multi-entry MGC list
– Setting the transition point in the MGC list
– Setting gateway primary search timer
– Setting gateway and endpoint timers in relation to the gateway primary search timer
© 2012 Avaya, Inc. All rights reserved.
7. Survivable Remote Server—Normal Operation
1The S8800 server controls the entire system in normal operation
(Main and Branch locations).
2
The S8300D servers in the branch gateways run on standby
(Survivable Remote Server) mode.
1
LAN
Duplex Main Servers
Branch 2
2
G450/S8300D Survivable
Remote Server
LAN
WAN
LAN
Main location
PN #1
PN #2
Branch 1
2
G450/S8300D Survivable
Remote Server
Branch 3
2
G450/S8300D Survivable
Remote Server
© 2012 Avaya, Inc. All rights reserved.
8. Survivable Remote Server—Failover Operation
1The WAN connection to Branch location 2 fails, and the G450 gateway loses
registration with its primary gatekeeper.
2
The G450 in Branch 2 has its own S8300D server configured as an alternate
gatekeeper and attempts registration with it (or alternate controller), which
provides local call process services for Branch 2.
Branch 2
LAN
Duplex Main Servers
G450/S8300D Survivable
Remote Server
LAN
WAN
LAN
Main location
Branch 1
PN #1
PN #2
G450/S8300D Survivable
Remote Server
Branch 3
G450/S8300D Survivable
Remote Server
© 2012 Avaya, Inc. All rights reserved.
9. Survivable Server vs. Main Controller Configuration
G450/S8300DVM or ACS*
Simplex
WAN
Survivable Remote Server
Delete S8300D configuration
(if present)
Install the CM_SurvRemoteEmbed
template
Configure S8300D as LSP
Update the MGC list--add the IP
addresses of the main controller
(S8800) and the S8300D Survivable
Remote Server
Reset the S8300D Survivable
Remote Server
Main Controller
Add the branch gateway to be
controlled by the main server
Enter the gateway to be controlled
also as Survivable Remote Server
Allocate a network region to the
Survivable Remote Server
Modify fallback rules
Enable data polling with Survivable
Remote Server
Finally: The translations must be shared from the main controller to the Survivable Remote Server
*Avaya Common Servers = HP, Dell
© 2012 Avaya, Inc. All rights reserved.
10. Hardware Configuration
© 2012 Avaya, Inc. All rights reserved.11. Hardware Configuration
Installs Avaya Aura® System Platform and the Communication ManagerEmbedded Survivable (CM_SurvRemoteEmbed) in this configuration:
Communication Manager
Main Simplex Template
Communication Manager
Embedded
Survivable Template
VM or ACS*
Switch
S8300D
G450
G450
*Avaya Common Servers = HP, Dell
© 2012 Avaya, Inc. All rights reserved.
12. Hardware Configuration (continued)
Checklist:1. Verify S8300D server is inserted into slot V1 of the G430/G450.
2. Ensure that the media modules are inserted in the correct slots.
3. Connect LAN cable from the Eth LAN 5 or 6 on gateway to the switch.
Switch
Eth LAN
Port 5 or 6
4. Connect power cable to the gateway.
© 2012 Avaya, Inc. All rights reserved.
13. Deployment of the CM OVA
© 2012 Avaya, Inc. All rights reserved. Page 1314. Deploy the CM OVA
At the end of this lesson, you should beable to:
Identify the steps to deploy the CM
OVA.
© 2012 Avaya, Inc. All rights reserved. Page 14
15. Deployment and Servers
Virtualized Environment (VE) – Avaya and customer work together to enable the solution:• Avaya supplied server and VMware® (AVP)
• Customer supplied server and VMware® (VE)
Avaya Appliance Model - Deploy or upgrade to Avaya Aura® Release applications on the following
servers:
• Dell™ PowerEdge™
• HP ProLiant DL360
• S8300D
Deployment into the blade, cluster, and server is managed as follows:
• Avaya Appliance Virtualization Platform (AVP) from System Manager Solution Deployment
Manager or the Solution Deployment Manager client
• Virtualized Environment (VE) – VMware ® vSphere or
VMware ® vCenter
Note The deployment method used in our labs is VE
(vCenter/vSphere).
© 2012 Avaya, Inc. All rights reserved. Page 15
16. Planning and Configuration
Ensure that you complete the following before deploying the Communication Manageropen virtual application (OVA):
Task
Description
1
Identify the hypervisor and verify that the capacity
meets the OVA requirements.
See Server hardware and resources.
2
Plan the staging and verification activities and
assign the resources.
See Communication Manager virtual machine
resource requirements.
3
Purchase the required licenses.
Go to the Avaya Product Licensing and
Delivery System at https://plds.avaya.com/.
Note: WebLM Licensing for CM is covered in Lesson 2.
4
Download the required Communication Manager
OVA.
See Downloading software from PLDS.
5
If applicable, migrate from Communication
See Migration data.
Manager 5.2.1 or Communication Manager 6.3 to
Communication Manager .
.
© 2012 Avaya, Inc. All rights reserved. Page 16
17. Communication Manager Resource Requirements
The CM virtual machine requires the following set of resources to be available on the ESXi hostbefore
deployment. CM OVA specifies the required resources.
VMware
Resources
CPU Core
CPU Reservation
Simplex Values
CPU to support up to 1000 users on a Main
server
•1 CPU to support up to 1000 users on a
survivable server
•2 CPU to support up to 2400 users on a
Main server
•2 CPU to support up to 36,000 users on a
Main server
•3900 MHz to support up to 1000 users on a
Main server
•1950 MHz to support up to 1000 users on a
survivable server
Duplex Values
3
7800 MHz to support up to
36,000 users
6600 MHz to support up to
30,000 users
© 2012 Avaya, Inc. All rights reserved. Page 17
18. Communication Manager Resource Requirements (cont’d)
The CM virtual machine requires the following set of resources to be available on the ESXi hostbefore
deployment. CM OVA specifies the required resources.
VMware
Resources
CPU Resources
(cont’d)
Simplex Values
4400 MHz to support up to 2400 users on a Main
server
•4400 MHz to support up to 36,000
users on a Main server
•For a S8300D or S8300E Server:
When you deploy Communication Manager using
System Manager Solution Deployment Manager,
the CPU reservation is reduced to 0.
•For an Midsize Enterprise
deployment: The CPU reservation is reduced to
2200 MHz.
Minimum CPU speed 2400 MHz
based on Xeon
E5620 or equivalent
processor
Duplex Values
To reduce reservation on
Communication Manager
Duplex server, see
Reducing
reservation on CM
Duplex Server in the
Deploying Avaya
Aura® Communication
Manager in Virtualized
Environment Guide
2900 MHz to support
up to 36,000 users
• 2400 MHz to support
up to30,000 users
© 2012 Avaya, Inc. All rights reserved. Page 18
19. Communication Manager Resource Requirements (cont’d)
The CM virtual machine requires the following set of resources to be available on the ESXi hostbefore
deployment. CM OVA specifies the required resources.
VMware
Resources
Simplex Values
Duplex Values
•3.5 GB to support up to 1000 users on a Main 5.0 GB
server
•3.5 GB to support up to 1000 users on a
survivable server
•4.0 GB to support up to 2400 users
on a Main server
•4.0 GB to support up to 36,000 users on a
Main server
Minimum CPU speed
2400 MHz
• 2900 MHz to support
based on Xeon E5620 or
up to 36,000 users
equivalent
• 2400 MHz to support
processor
up to30,000 users
Memory Reservation
© 2012 Avaya, Inc. All rights reserved. Page 19
20. Communication Manager Resource Requirements (cont’d)
The CM virtual machine requires the following set of resources to be available on the ESXi hostbefore
deployment. CM OVA specifies the required resources.
VMware
Resources
Simplex Values
Duplex Values
Storage Reservation
64 GB
64 GB
Shared NICs
Two vmxnet3 @ 1000 Mbps
Three vmxnet3 @ 1000 Mbps
IOPS
4
4
Average Network
usage
3500 Kbps
3500 Kbps
CM duplication bandwidth requires
1Gbps for CM duplication link
bursts.
For more information about
Communication Manager
duplication
bandwidth, see PSN003556u.
© 2012 Avaya, Inc. All rights reserved. Page 20
21. VMware Software Requirements
The following VMware software versions are supported:• VMware vSphere ESXi 5.0
• VMware vSphere ESXi 5.1
• VMware vSphere ESXi 5.5
• VMware vCenter Server 5.0
• VMware vCenter Server 5.1
• VMware vCenter Server 5.5
• VMware vSphere ESXi 6.0
ESXi 5.0 can be added under vCenter Server 5.0 and vCenter Server 5.1. However, ESXi 5.1
can be added only under vCenter Server 5.1 and ESXi 5.5 under vCenter Server 5.5. To view
compatibility with other solution releases, see VMware Product Interoperability Matrices at
http:// partnerweb.vmware.com/comp_guide2/sim/interop_matrix.php.
Note:
ESXi 4.1 is not supported.
© 2012 Avaya, Inc. All rights reserved. Page 21
22. Deploy Communication Manager
Gather the following information before you deploy theOVA:
© 2012 Avaya, Inc. All rights reserved. Page 22
23.
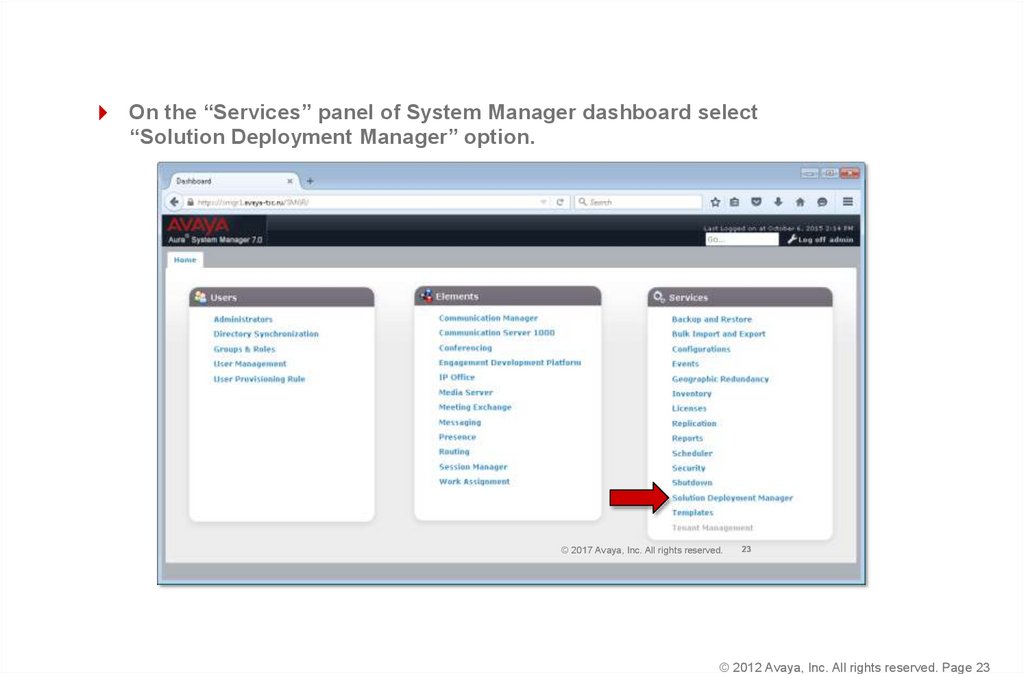
On the “Services” panel of System Manager dashboard select“Solution Deployment Manager” option.
© 2017 Avaya, Inc. All rights reserved.
23
© 2012 Avaya, Inc. All rights reserved. Page 23
24.
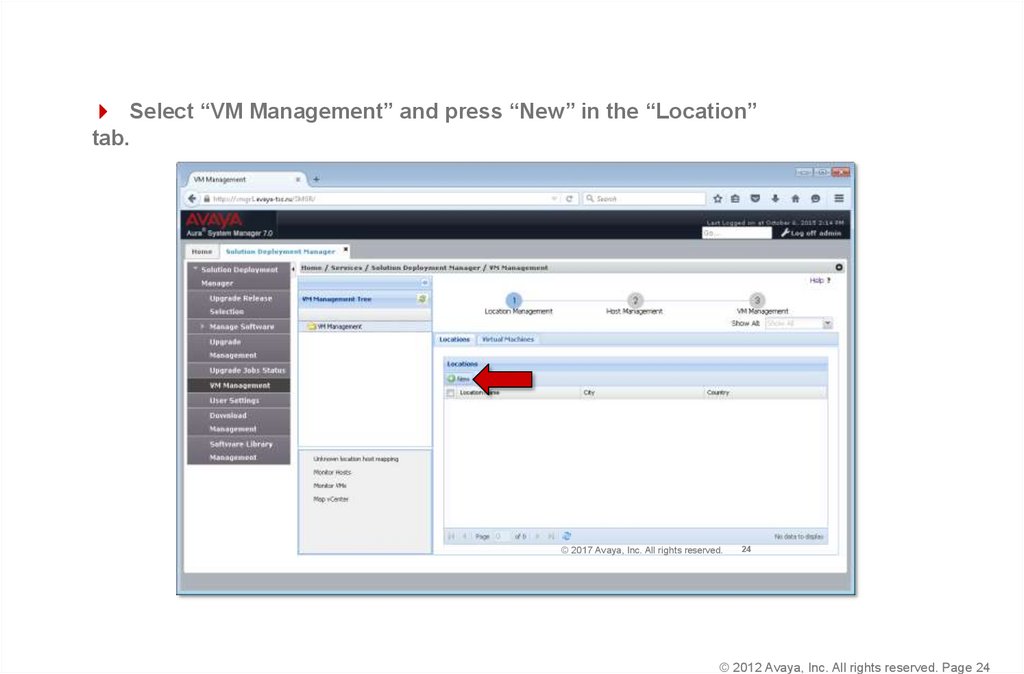
Select “VM Management” and press “New” in the “Location”tab.
© 2017 Avaya, Inc. All rights reserved.
24
© 2012 Avaya, Inc. All rights reserved. Page 24
25.
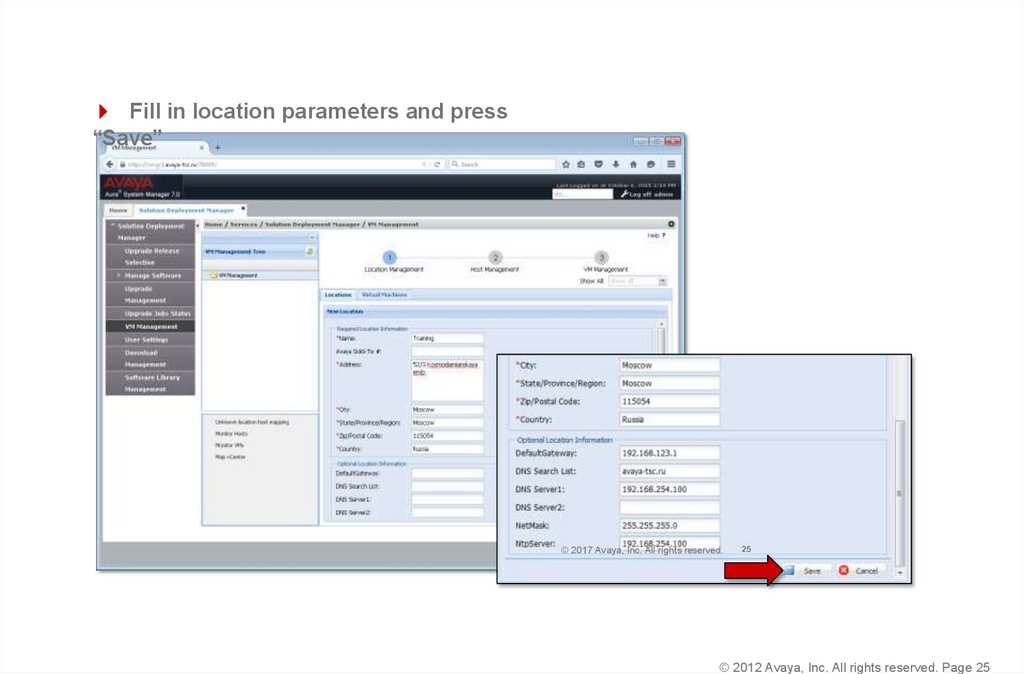
Fill in location parameters and press“Save”
© 2017 Avaya, Inc. All rights reserved.
25
© 2012 Avaya, Inc. All rights reserved. Page 25
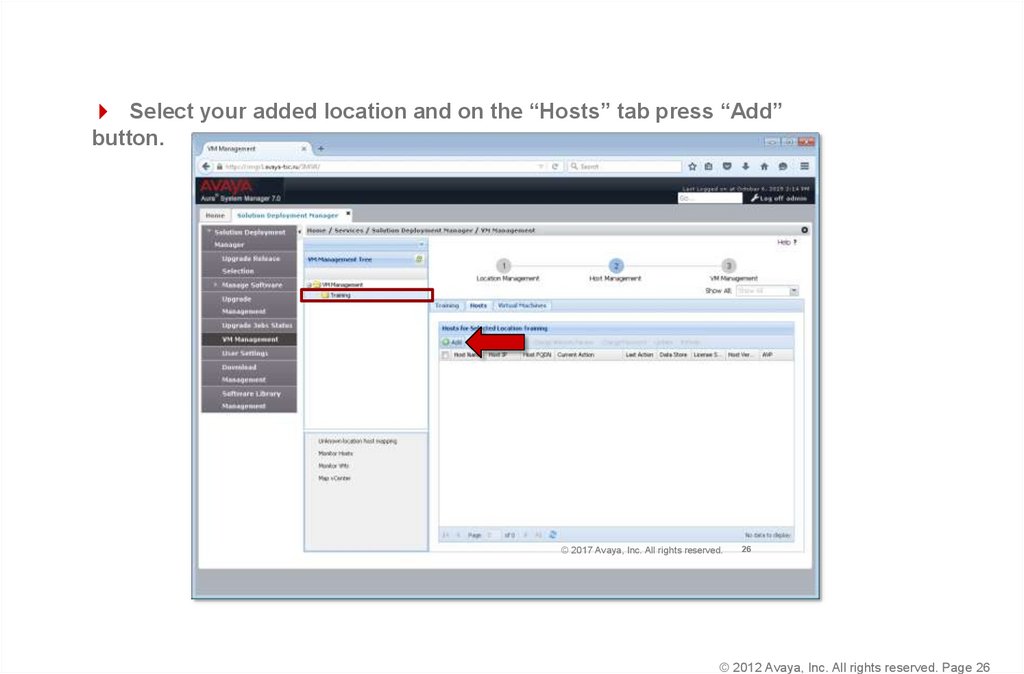
26.
Select your added location and on the “Hosts” tab press “Add”button.
© 2017 Avaya, Inc. All rights reserved.
26
© 2012 Avaya, Inc. All rights reserved. Page 26
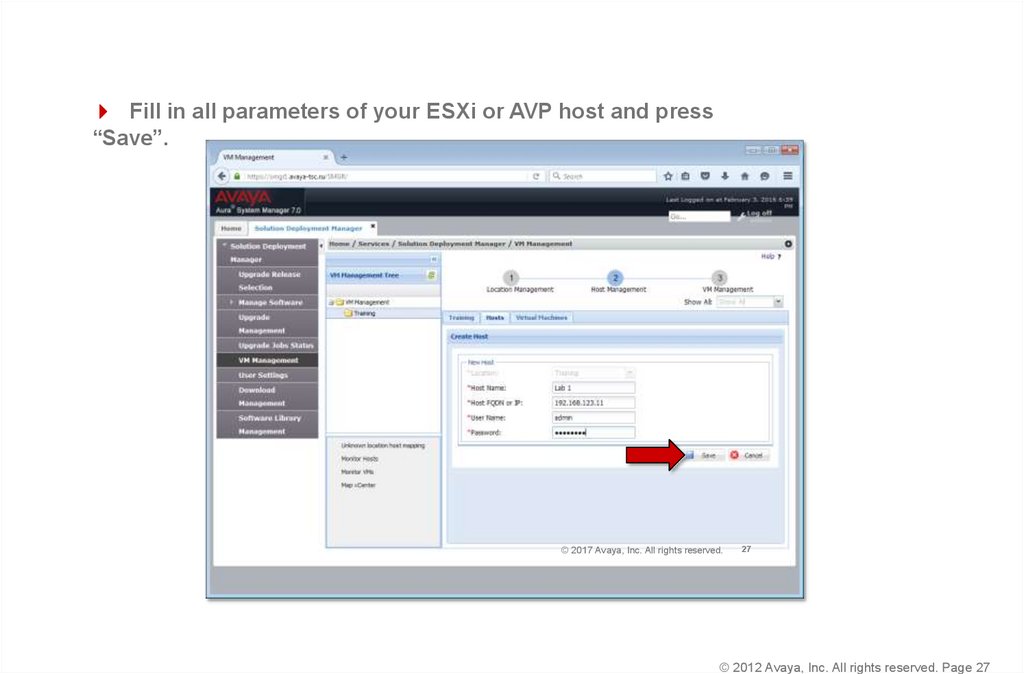
27.
Fill in all parameters of your ESXi or AVP host and press“Save”.
© 2017 Avaya, Inc. All rights reserved.
27
© 2012 Avaya, Inc. All rights reserved. Page 27
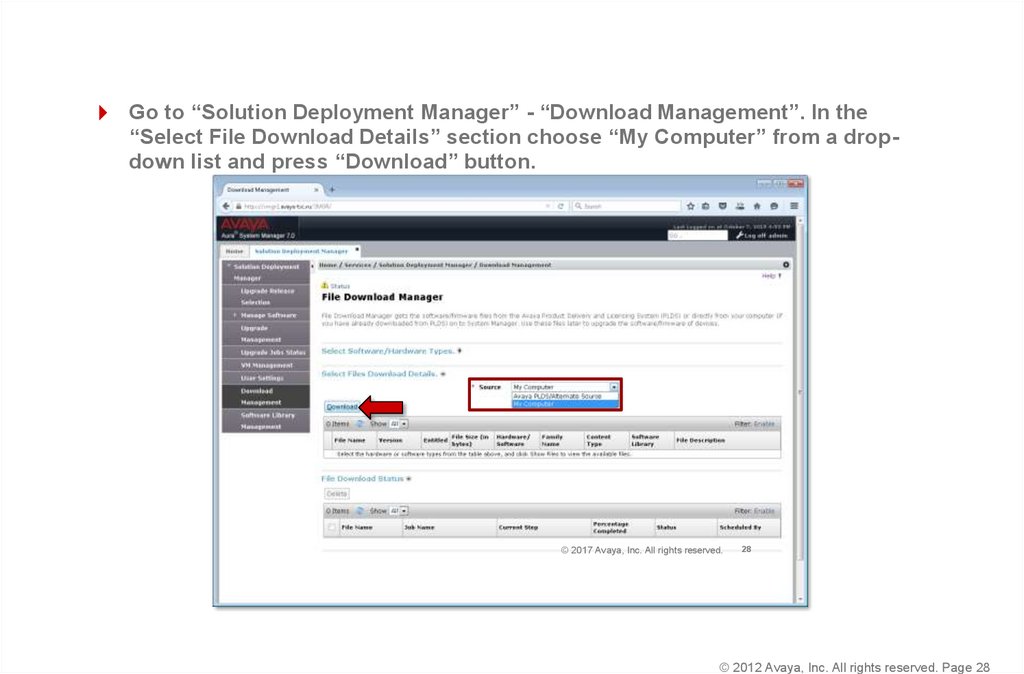
28.
Go to “Solution Deployment Manager” - “Download Management”. In the“Select File Download Details” section choose “My Computer” from a dropdown list and press “Download” button.
© 2017 Avaya, Inc. All rights reserved.
28
© 2012 Avaya, Inc. All rights reserved. Page 28
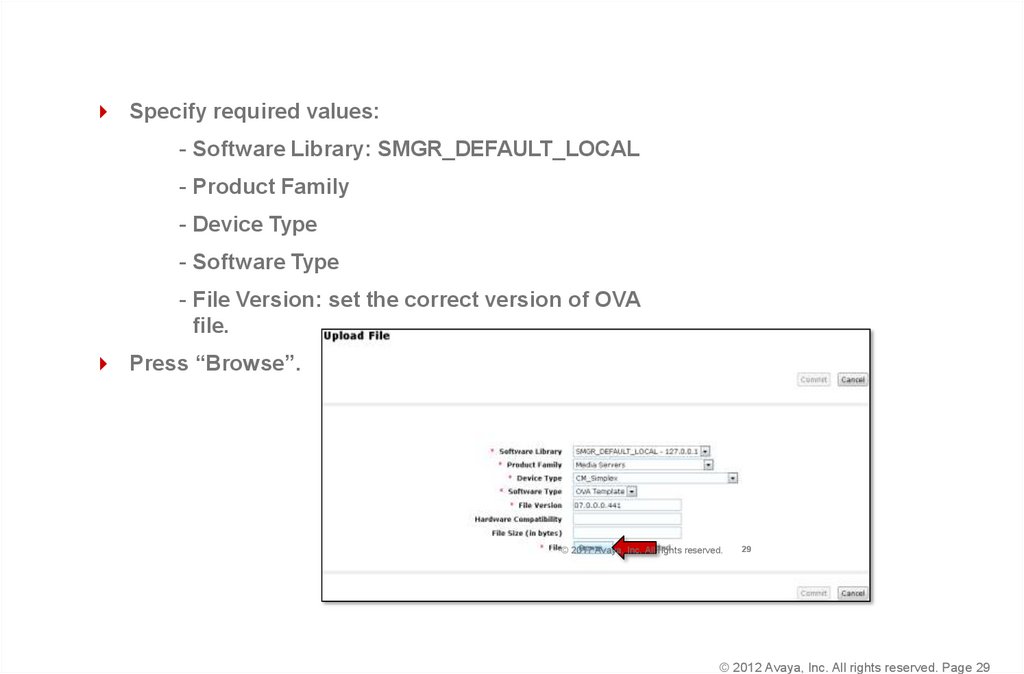
29.
Specify required values:- Software Library: SMGR_DEFAULT_LOCAL
- Product Family
- Device Type
- Software Type
- File Version: set the correct version of OVA
file.
Press “Browse”.
© 2017 Avaya, Inc. All rights reserved.
29
© 2012 Avaya, Inc. All rights reserved. Page 29
30.
Select the OVA file and press“Open”.
Now press
“Commit”.
© 2017 Avaya, Inc. All rights reserved.
30
© 2012 Avaya, Inc. All rights reserved. Page 30
31.
Wait until your file upload is finished (“File is uploaded successfully”message will indicate that). Do not navigate away from this page or upload
will fail.
© 2017 Avaya, Inc. All rights reserved.
31
© 2012 Avaya, Inc. All rights reserved. Page 31
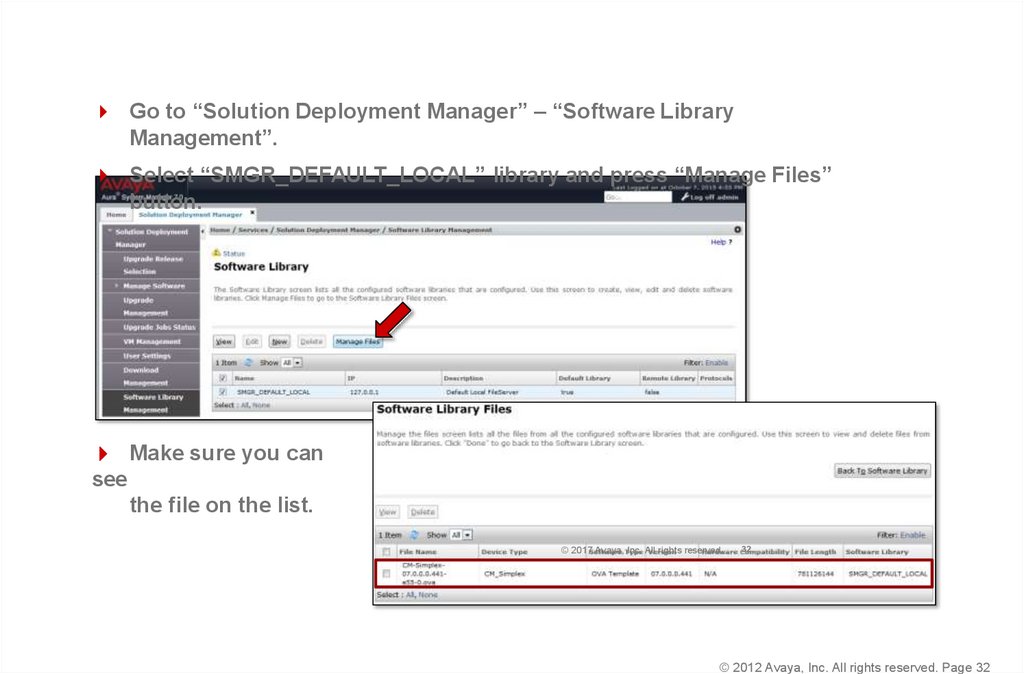
32.
Go to “Solution Deployment Manager” – “Software LibraryManagement”.
Select “SMGR_DEFAULT_LOCAL” library and press “Manage Files”
button.
Make sure you can
see
the file on the list.
© 2017 Avaya, Inc. All rights reserved.
32
© 2012 Avaya, Inc. All rights reserved. Page 32
33. Installing Communication Manager using Solution Deployment Manager
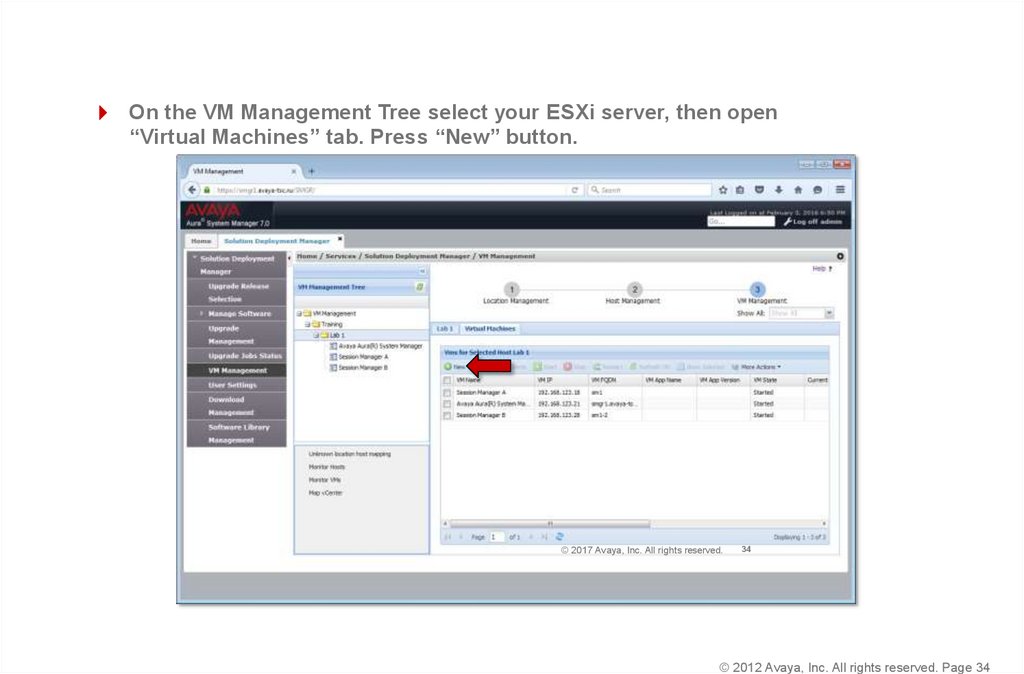
© 2012 Avaya, Inc. All rights reserved. Page 3334.
On the VM Management Tree select your ESXi server, then open“Virtual Machines” tab. Press “New” button.
© 2017 Avaya, Inc. All rights reserved.
34
© 2012 Avaya, Inc. All rights reserved. Page 34
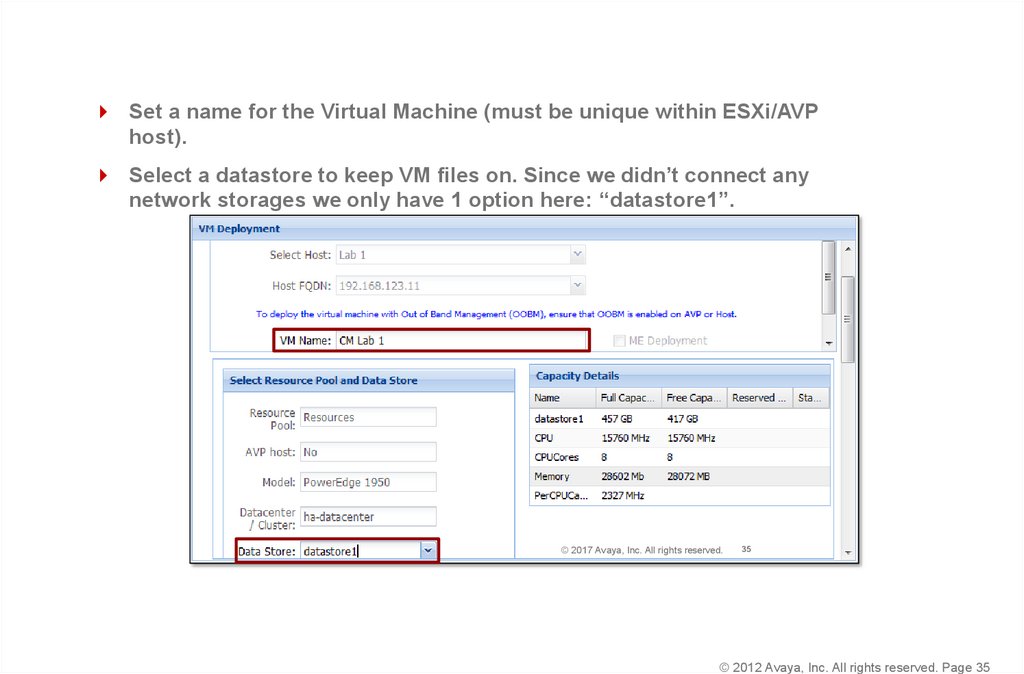
35.
Set a name for the Virtual Machine (must be unique within ESXi/AVPhost).
Select a datastore to keep VM files on. Since we didn’t connect any
network storages we only have 1 option here: “datastore1”.
© 2017 Avaya, Inc. All rights reserved.
35
© 2012 Avaya, Inc. All rights reserved. Page 35
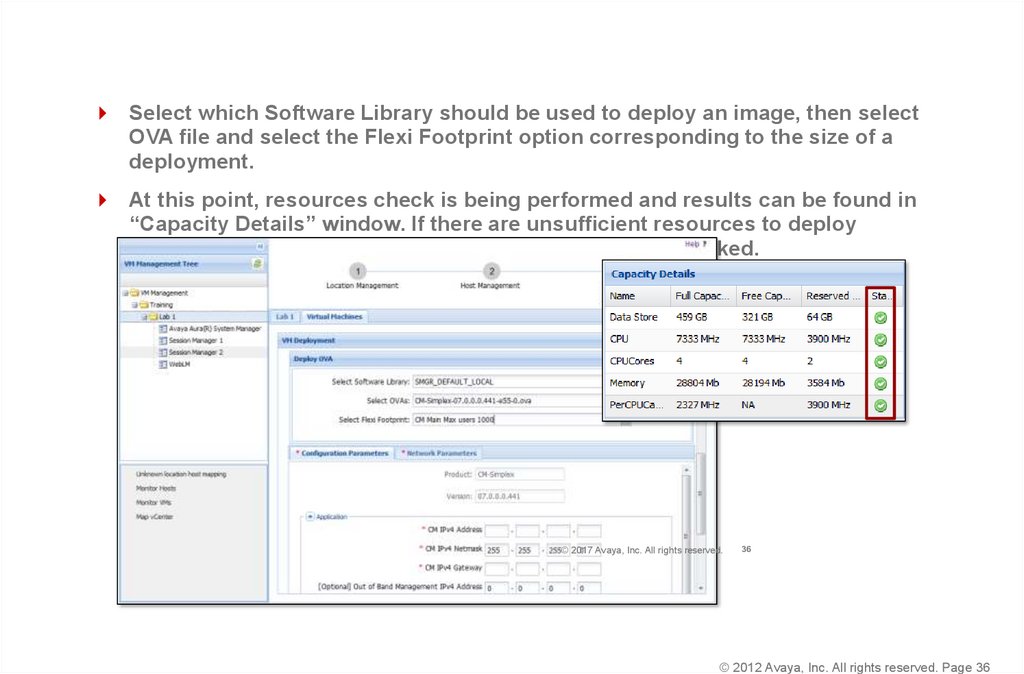
36.
Select which Software Library should be used to deploy an image, then selectOVA file and select the Flexi Footprint option corresponding to the size of a
deployment.
At this point, resources check is being performed and results can be found in
“Capacity Details” window. If there are unsufficient resources to deploy
selected Footprint further installation process will be blocked.
© 2017 Avaya, Inc. All rights reserved.
36
© 2012 Avaya, Inc. All rights reserved. Page 36
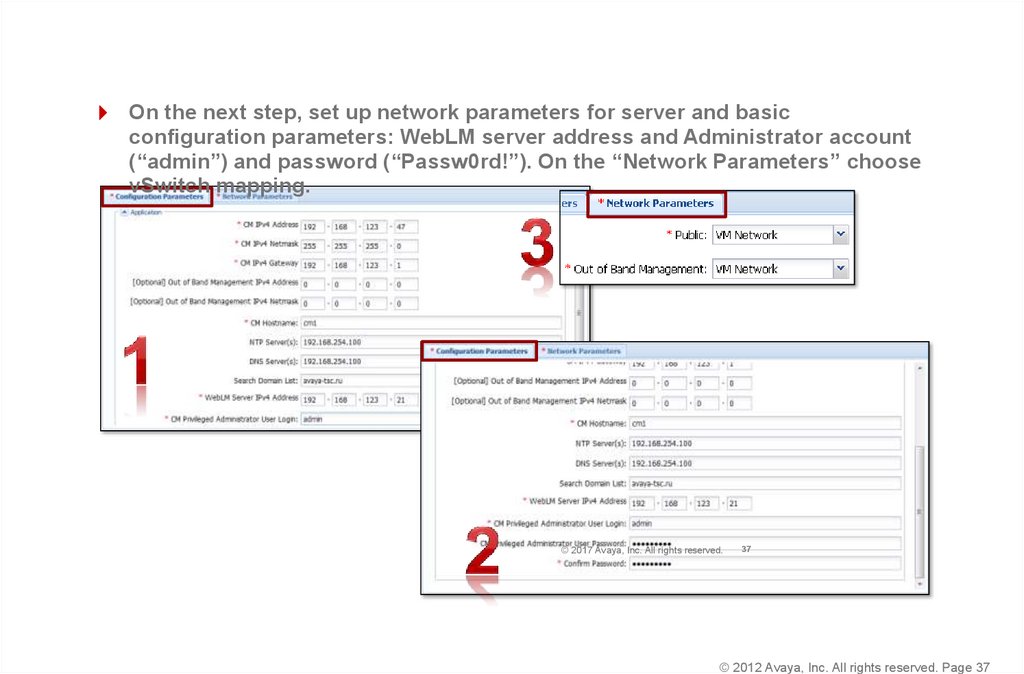
37.
On the next step, set up network parameters for server and basicconfiguration parameters: WebLM server address and Administrator account
(“admin”) and password (“Passw0rd!”). On the “Network Parameters” choose
vSwitch mapping.
© 2017 Avaya, Inc. All rights reserved.
37
© 2012 Avaya, Inc. All rights reserved. Page 37
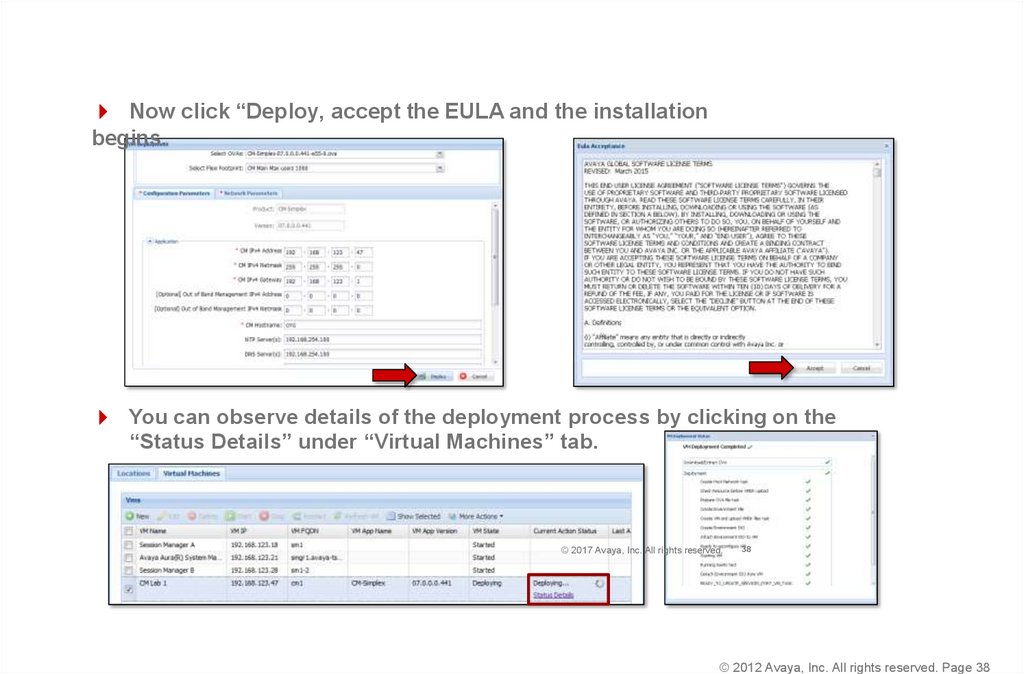
38.
Now click “Deploy, accept the EULA and the installationbegins.
You can observe details of the deployment process by clicking on the
“Status Details” under “Virtual Machines” tab.
© 2017 Avaya, Inc. All rights reserved.
38
© 2012 Avaya, Inc. All rights reserved. Page 38
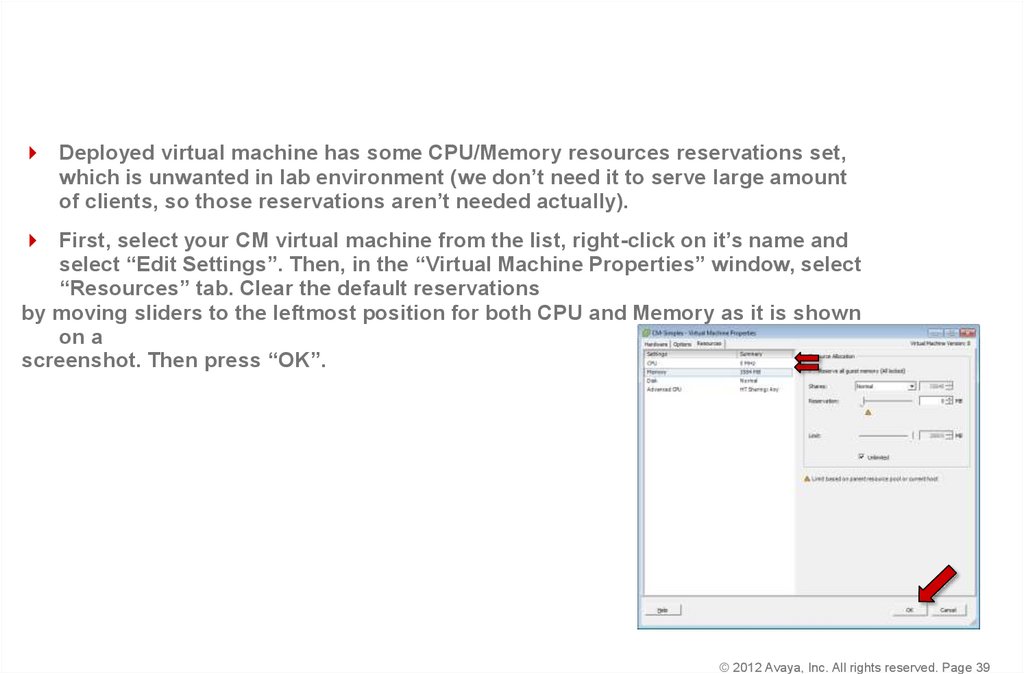
39.
Deployed virtual machine has some CPU/Memory resources reservations set,which is unwanted in lab environment (we don’t need it to serve large amount
of clients, so those reservations aren’t needed actually).
First, select your CM virtual machine from the list, right-click on it’s name and
select “Edit Settings”. Then, in the “Virtual Machine Properties” window, select
“Resources” tab. Clear the default reservations
by moving sliders to the leftmost position for both CPU and Memory as it is shown
on a
screenshot. Then press “OK”.
© 2012 Avaya, Inc. All rights reserved. Page 39
40. Check License Settings on the Main Server
© 2012 Avaya, Inc. All rights reserved. Page 4041. Check License Settings–Main Server
1. Log in to the SystemPlatform of the S8800
simplex server.
2. Click Launch WebLM
License Manager.
3. Log in the WebLM License Manager
with these credentials:
– User Name: admin
– Password: admin01
© 2012 Avaya, Inc. All rights reserved. Page 41
42. Check License Settings–Main Server (continued)
Select Licensed Products > Communication Manager.© 2012 Avaya, Inc. All rights reserved. Page 42
43. Check License Settings–Main Server (continued)
Scroll down the page and validate the licensed survivability features needed forthe Survivable Remote Server.
Log off of the WebLM License Manager.
© 2012 Avaya, Inc. All rights reserved. Page 43
44. CM Administration: System Management Interface
© 2012 Avaya, Inc. All rights reserved. Page 4445. Install the CM_SurvRemoteEmbed Template– CM SMI Administration
At the Communication Manager SMI of the S8300D server select ServerConfiguration > Server Role and administer the form like the example (top of
form shown). Consult the ATI02348IEN-VEN-Lab Logins, Hostnames, and IP
Addresses document for your unique IP addresses.
SID = System ID
MID = Module ID
CID = Cluster ID; MUST be equal to MID
SID must match license.
MID must be unique:
1 = Main
2 = Survivable Remote Server
Registration to Main
Server
File Synchronization to
Main Server
© 2012 Avaya, Inc. All rights reserved. Page 45
46. Install the CM_SurvRemoteEmbed Template– CM SMI Administration (continued)
Set the Memory Setting for the Survivable Remote Server and theMain servers at the bottom of the Server Role page.
Click Change.
© 2012 Avaya, Inc. All rights reserved. Page 46
47. Install the CM_SurvRemoteEmbed Template– CM SMI Administration (continued)
Click Restart Now.The confirmation message displays:
© 2012 Avaya, Inc. All rights reserved. Page 47
48. Install the CM_SurvRemoteEmbed Template– CM SMI Administration (continued)
Use the Server > Process Status page to ensure that all processes come up.© 2012 Avaya, Inc. All rights reserved. Page 48
49. Verify CM Administration from Avaya Site Administration
© 2012 Avaya, Inc. All rights reserved. Page 4950. Install the CM_SurvRemoteEmbed Template– Verify CM Administration in ASA
Using Avaya Site Administration log in to the Communication Manager SurvivableRemote Server.
Ensure that the opening screen shows that the server is a LSP:
© 2012 Avaya, Inc. All rights reserved. Page 50
51. Administer G450 Subtending to the S8300D Survivable Remote Embedded Server
© 2012 Avaya, Inc. All rights reserved. Page 5152. Install the CM_SurvRemoteEmbed Template– Administer G450
Log in to the G450 Gateway that is subtending to the S8300D Survivable RemoteEmbedded Server.
Use the clear mgc list command to delete all entries in the Media Gateway
Controller (MGC) list.
Recreate the Survivable Remote Server’s MGC list with the set mgc list
command followed a space, then the IP address of the main controller (the
S8800), a comma (no space), and then the IP address of the S8300D Survivable
Remote Server. Follow the syntax carefully!
Note
Except for the media gateway
controller (MGC) list all previously
configured data will remain the
same.
The clear mgc list command is
service affecting!
© 2012 Avaya, Inc. All rights reserved. Page 52
53. Install the CM_SurvRemoteEmbed Template– Administer G450 (continued)
If the connection between the G450 and its registered MGC is lost, the G450attempts to recover the connection using the next entry in the list, the
Survivable Remote Server.
Use the set reset-times transition-point command to configure the point at
which the primary MGCs in the list end and the Survivable Remote Servers begin.
For example, if there are three IP addresses in the MGC list and the
third address is the Survivable Remote Server, the transition point should be 2.
Use the set reset-times primary-search command and the set reset-times totalsearch commands to set the timeout for the G450’s search for the primary MGC
and the other MGCs on its MGC list, respectively.
Check the recovery timer administration with the show recovery command.
5 min. search for servers
above the transition point
Total search 10 min. for all servers
entered in the MGC list. No server
found
Reset gateway
Write this value down—
you will need it later.
© 2012 Avaya, Inc. All rights reserved. Page 53
54. Install the CM_SurvRemoteEmbed Template– Administer G450 (continued)
Use the show system command to display the gateway serial number.Write down this serial number of the gateway—it is required for Communication
Manager administration. DO NOT use the serial number in the example!
Serial number must
be administered in the server
later in order to register this
gateway
© 2012 Avaya, Inc. All rights reserved. Page 54
55. Install the CM_SurvRemoteEmbed Template– Administer G450 (continued)
1Copy the configuration from the volatile to the non-volatile memory of the G450
gateway (copy run start).
2
Reset the G450 gateway so that IP address is adopted.
1
2
© 2012 Avaya, Inc. All rights reserved. Page 55
56. Configure the Main Controller
© 2012 Avaya, Inc. All rights reserved. Page 5657. Install the CM_SurvRemoteEmbed Template– Configure Main Controller
Log in to the Communication Manager System Management Interface of the Main(S8800) Server.
Select Administration > Server (Maintenance).
© 2012 Avaya, Inc. All rights reserved. Page 57
58. Install the CM_SurvRemoteEmbed Template– Configure Main Controller (continued)
Select Server Configuration > Server Role and configure the SID accordingto the SID in the license file.
Configure the MID = 1 (Main Server).
Scroll down the page and click Change. CM will restart automatically.
SID must match license.
MID must be unique:
1=Main, 2=Survivable Remote Server
© 2012 Avaya, Inc. All rights reserved. Page 58
59. Install the CM_SurvRemoteEmbed Template– Configure Main Controller (continued)
Using Avaya Site Administration log in to the S8800 main server.Type add media-gateway 2 and press Enter.
Add the G450 that is subtending to the S8300D Survivable Remote Server
according to the example. Do NOT use the serial number in the example.
Assign Recovery Rule 1 for the gateway.
© 2012 Avaya, Inc. All rights reserved. Page 59
60. Install the CM_SurvRemoteEmbed Template– Configure Main Controller (continued)
Type list media-gateway and press Enter and ensure that the gateway that youjust added appears in the list and is registered:
Gateway must register
with CM Main server
(S8800 Simplex)
Gateway must
register with CM
© 2012 Avaya, Inc. All rights reserved. Page 60
61. Install the CM_SurvRemoteEmbed Template– Configure Main Controller (continued)
Type change system-parameters mg-recovery-rule 1 and press Enter.Add a media gateway recovery rule according to the example.
Fallback criteria:
Time for which the
network must at least be
stable again before
fallback is enabled
Immediately
0 active calls
time-day-window
time-window-OR0-active-calls
Immediately
if no call
time as set (for example only
between 6 p.m. and 6 a.m.)
if no call, then fallback also
outside set time
© 2012 Avaya, Inc. All rights reserved. Page 61
62. Install the CM_SurvRemoteEmbed Template– Configure Main Controller (continued)
Type change node-names ip and press Enter.Add the S8300D Survivable Remote Server and its IP address to the list using the
S8300D Survivable Remote Server IP address of your lab environment.
Use the IP address for
your vLab!
© 2012 Avaya, Inc. All rights reserved. Page 62
63. Install the CM_SurvRemoteEmbed Template– Configure Main Controller (continued)
Type add survivable-processor <Survivable Remote Server Name> and pressEnter. (The Survivable Remote Server Name is the value in the Name field on the
Node Names form (previous slide).
Add the S8300D Survivable Remote Server according to the example:
© 2012 Avaya, Inc. All rights reserved. Page 63
64. Install the CM_SurvRemoteEmbed Template– Configure Main Controller (continued)
Type change ip-network region 1 and press Enter.Administer the Link Bounce Recovery parameters according to the example:
If no Ack received on KeepAlive message for the IP
phone received after 20
seconds, then...
every 5 seconds, send a fresh
Keep-Alive message...
total of 5 repeated trials...
© 2012 Avaya, Inc. All rights reserved. Page 64
65. Install the CM_SurvRemoteEmbed Template– Configure Main Controller (continued)
If no Ack message is received over the entire Keep-Alive sequence, the IP phonesearches for alternative gatekeepers.
Go to page 3.
Changed parameters will only
be accepted by resetting the
H.323 endpoint.
© 2012 Avaya, Inc. All rights reserved. Page 65
66. Install the CM_SurvRemoteEmbed Template– Configure Main Controller (continued)
On page 3 assign a backup server for this Network Region.The IP address of the Survivable Remote Server will be sent to the H.323
endpoints for this network and entered in the lowest position in the H.323 endpoint
gatekeeper list.
© 2012 Avaya, Inc. All rights reserved. Page 66
67. Install the CM_SurvRemoteEmbed Template– Configure Main Controller (continued)
Use the change system-parameters ip-options command to configure theoptional H.248 Media Gateway and H.323 IP endpoint timers for the system
(default settings pre-configured). We will examine each timer individually.
Time during which the IP phone searches for
the main gatekeeper (several C-LANs), then
searches for the Survivable Remote Server.
Should be at least one minute longer than the
gateway primary search timer Calls are kept
established as long as possible.
© 2012 Avaya, Inc. All rights reserved. Page 67
68. Install the CM_SurvRemoteEmbed Template– Configure Main Controller (continued)
Set the Primary Search Time at least 30 seconds longer than the gatewayprimary search timer.
This is the time in seconds after which the H.323 endpoint searches for the first
Survivable Remote Server in its Alternative Gatekeeper List.
Set this value 30 seconds longer than
the gateway’s Primary Search Timer.
© 2012 Avaya, Inc. All rights reserved. Page 68
69. Install the CM_SurvRemoteEmbed Template– Configure Main Controller (continued)
Set the Periodic Registration Timer 30 seconds longer than the gateway’sPrimary Search Timer.
This is the time after which a hard phone is logged on again automatically, if used
previously as a soft phone.
Set this value 30 seconds longer than
the gateway’s Primary Search Timer.
© 2012 Avaya, Inc. All rights reserved. Page 69
70. Install the CM_SurvRemoteEmbed Template– Configure Main Controller (continued)
Set the gateway Link Loss Delay Timer at least one minute longer than thephone's Primary Search Timer.
This timer specifies the length of time that the CM server remembers the gateway
status after the link loss is detected.
© 2012 Avaya, Inc. All rights reserved. Page 70
71. Install the CM_SurvRemoteEmbed Template– Configure Main Controller (continued)
Use the change system-parameters maintenance command to enableautomatic file synchronization (save translation lsp) to the Survivable Remote
server during scheduled maintenance.
© 2012 Avaya, Inc. All rights reserved. Page 71
72. Install the CM_SurvRemoteEmbed Template– Configure Main Controller (continued)
Use the save translation lsp command to save translations from the active serverto the Survivable Remote Server(s).
All configuration changes to the running system will always be made in the
active server and thereafter written with "save translation lsp" or automatically
to the Survivable Remote Servers on a daily basis.
© 2012 Avaya, Inc. All rights reserved. Page 72
73. Install the CM_SurvRemoteEmbed Template– Configure Main Controller (continued)
Use the list survivable-processor command on the active server to see thestatus of the Survivable Remote Servers.
Verify that the Survivable Remote Embedded Server is registered to the main
server and that translations are updated.
IP address of
the Survivable
Remote Server
Must be "y"
(Survivable Remote
Server is registered to
the main server)
Timestamp when the
translation was last copied
successfully from the active
server into the Survivable
Remote Server (can take
approx. 3-5 minutes)
© 2012 Avaya, Inc. All rights reserved. Page 73
74. Test the Configuration
© 2012 Avaya, Inc. All rights reserved. Page 7475. Test the Configuration
To test the embedded survivable remote server:Issue the disable nr-registration 1 command at the main CM SAT:
© 2012 Avaya, Inc. All rights reserved. Page 75
76. Test the Configuration (continued)
Using Avaya Site Administration log in to the S8300D SurvivableRemote Server.
Type list media-gateway and press Enter.
The G450 Branch Gateway must show as registered to the S8300D Survivable
Remote Embedded Server.
© 2012 Avaya, Inc. All rights reserved. Page 76
77. Test the Configuration (continued)
When you have completed testing the survivable server:Issue the enable nr-registration 1 at the main CM SAT:
© 2012 Avaya, Inc. All rights reserved. Page 77
78. Test the Configuration (continued)
Using Avaya Site Administration log in to the S8800 Simplex Main Server.Type list media-gateway and press Enter.
After time, the G450 Branch Gateway must now re-register to the S8800 Simplex
Main Server.
© 2012 Avaya, Inc. All rights reserved. Page 78
79. Module Summary
You should now be able to:Describe the Survivable Remote Server functionality while
providing service and while idle
Cable all hardware components
Install and configure System Platform
Install and configure the Communication Manager Embedded
Survivable
Configure G430/G450 Gateway and Media Modules
Check License Settings on the Main Server (S8800)
Verify CM administration from the SMI and ASA
Administer the G450 Gateway Subtending to the S8300D
Survivable Remote Server.
Configure the Main Controller (S8800)
Test the configuration
© 2012 Avaya, Inc. All rights reserved. Page 79