


 Базы данных
Похожие презентации:


")


Development in AB Suite
1. Development in AB Suite
2. Objective
By the end of this module, you’ll be able to—• Implement advanced concepts of AB Suite to develop an
application
© 2017 Unisys Corporation. All rights reserved.
2
3. Module Topics
Model Hierarchy
Keys
Framework Methods
Dictionaries
Designing Presentations
Class Diagrams
Reference Elements
Developer Security
Documentation
Working Effectively with Your Model
© 2017 Unisys Corporation. All rights reserved.
3
4. Model Hierarchy
© 2017 Unisys Corporation. All rights reserved.5. Developing Model Hierarchy
When you develop the hierarchy, keep the following in mind:• Define relationships through inheritance and dependencies
• Instantiate classes through inheritance and reduce redundancy
• Use dictionaries to create common classes that are used throughout the
model
• Group classes logically within folders for better maintainability
• Encapsulate the model elements using the Visibility property
• Document the model for easy interpretation on the model-business
mapping
© 2017 Unisys Corporation. All rights reserved.
5
6. Developing Model Hierarchy
ModelSegment
Event
Ispec
Global Items
Dictionary
Profile
Folder
Method
Report
Attribute
Frame
Location
© 2017 Unisys Corporation. All rights reserved.
6
7. Keys
© 2017 Unisys Corporation. All rights reserved.8. Profile Keys
• What are keys?–
–
–
–
Keys provide an index to an ispec’s database records
Keys help to uniquely identify individual database records
Keys help in establishing the autolookup dependency between two ispecs
Define the order that records are retrieved from the database.
• Only persistent attributes can be defined as keys
Sale
autolookup
ProductDetails
<<Ispec>>
<<Ispec>>
saleID
dateTime
productID
quantity
payMethod
binding
productID
unitPrice
stockBalance
© 2017 Unisys Corporation. All rights reserved.
8
9. Multi Keyed Classes
• You can specify more than one attribute as keys in an ispec.• If more than one attribute forms the key, the combination of their values
must be unique for each record.
• You can define multi keyed classes by:
– Using profiles and adding more than one key to a profile
– Setting the IsKey property for more than one attribute
© 2017 Unisys Corporation. All rights reserved.
9
10. Multi Keyed Classes – Adding Keys to a Profile
To define multiple keys in an ispec:1. Define attributes that you want to
use as keys, but do not set the
‘IsKey’ property.
2. Define a profile and add the required
persistent attributes as keys in the
appropriate sequence.
3. You can specify the profile as the
‘default profile’ for an ispec.
Default Profile
PRODUCT and VENDOR are
the keys for the VPROD Ispec
© 2017 Unisys Corporation. All rights reserved.
10
11. Framework Methods
© 2017 Unisys Corporation. All rights reserved.12. Framework Methods
Framework methods are part of the runtime cycle of an element such as anispec. The following flow shows how framework methods are invoked in the
runtime cycle.
New ispec recalled:
Framework instance
automatically created
Construct()
Construct() method
invoked on Framework
instance
Recall/
Refresh
Framework
instance
destroyed
Prepare()
Prepare() method
invoked on Framework
instance
Framework instance
displayed/accepts
input from user
Automatic Update
Main()
Persistent attributes of Framework
instance stored in database (Maint =
ADD/CHG/DEL)
Main() method
invoked on
Framework
instance.
Automatic Validate
Record matching key
in Framework instance
read into default
instance (Cust)
Methods invoked on Framework instance may contain
variables and can also access data and methods of
default instance (“CUST”). For example:
DoWhen (MAINT = GLB.INQ)
Move CUST.NAM NAM
..........
Move CUST.ID Var1
…
Recall
End
CUST Database Table
Default instance
Framework
method variable
Customer
NAM
PostAdd3
C01
Sandra G
Australia
C02
William H
North America
C03
Rudi K
Europe
© 2017 Unisys Corporation. All rights reserved.
12
13. Framework Methods
• Framework methods are: Construct, Prepare, and Main.• Depending on the stereotype, the methods are invoked during the
runtime cycle of an element such as an ispec or a report.
• Framework methods of ispecs with presentation can be overridden. For
example, you can perform a specific validation check in the ispec’s
Construct method.
• Framework methods might include variables to:
– Temporarily hold values
– Reference a specific instance of a class
© 2017 Unisys Corporation. All rights reserved.
13
14. Dictionaries
© 2017 Unisys Corporation. All rights reserved.15. Dictionaries
• Dictionaries are useful for organizingclasses that define attributes and variables
in a model.
• When you add an element to the model,
System Modeler will look for a dictionary
item with the same name. If a match is
found, the element's Inherits property will
be set automatically to the item in the
dictionary.
Global
dictionary at
the model
level
Global dictionary
at segment level
• When searching for a matching dictionary
item System Modeler searches all
dictionaries within scope, starting with the
most local dictionary.
Local
dictionary for
the reports
folder
• The element definitions can be inherited
across the model depending on the relative
hierarchy where the dictionary is created.
© 2017 Unisys Corporation. All rights reserved.
15
16. Dictionaries
• You can create dictionaries anywhere in your model.• You can also create multiple dictionaries.
• A dictionary defined under a segment in System Modeler is available to
all elements under the segment.
© 2017 Unisys Corporation. All rights reserved.
16
17. Dictionaries
Example of members of CUST inheriting from the dictionary elements*
*
*
*
*
*
*
*
*
*
© 2017 Unisys Corporation. All rights reserved.
17
18. Dictionaries
• A dictionary can also contain class definitions that may or may not havethe Multiplicity set to = 0. This definition can then be inherited by an
attribute in an Ispec or a report, or a variable under a method.
• In the following example, ACTION_LINE class is defined in the Classes
dictionary. An attribute Action_Line within the PROD class automatically
inherits from the dictionary definition to create an instance of that class.
PROD.Action_Line automatically
inherits from the ACTION_LINE
class definition in the Classes
dictionary
© 2017 Unisys Corporation. All rights reserved.
18
19.
Designing Presentations© 2017 Unisys Corporation. All rights reserved.
20.
Designing Presentations• The Painter is used to design presentations or forms.
• A class can have a graphical presentation, a character-based
presentation, or both.
• Report frames can only have a character-based presentation.
• PresentationType property of a class determines its presentation type.
© 2017 Unisys Corporation. All rights reserved.
20
21.
PresentationType Property• The PresentationType property allows you to
choose the type of presentation for a class.
• The choices are:
Graphical
The class has a graphical presentation only.
Fixed
The class has a character-based presentation only.
Graphical and
Fixed
The class has graphical and character-based
presentations.
None
The class does not have a presentation.
Note:
If a class has a PresentationType of None, then the
Direction property is not available on its attributes.
© 2017 Unisys Corporation. All rights reserved.
21
22.
Direction in Presentation• Direction property of an attribute specifies how a control painted on a
presentation passes data.
• Attributes with a Direction property value other than None are
automatically painted on the presentation.
Direction options for an element
© 2017 Unisys Corporation. All rights reserved.
22
23.
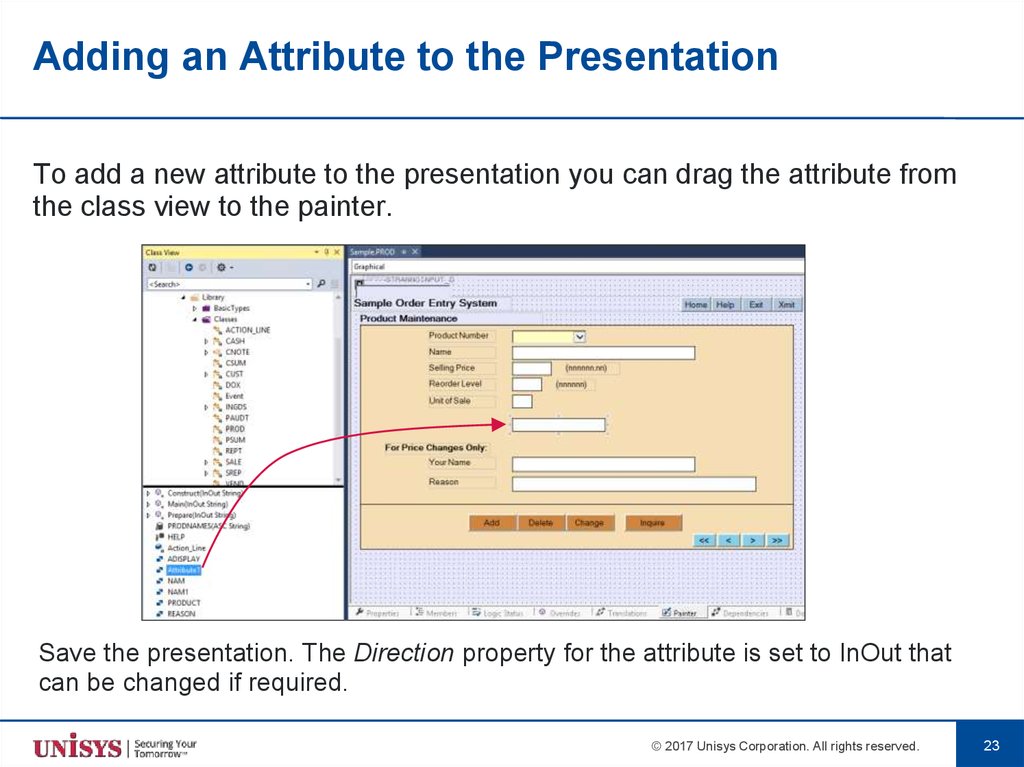
Adding an Attribute to the PresentationTo add a new attribute to the presentation you can drag the attribute from
the class view to the painter.
Save the presentation. The Direction property for the attribute is set to InOut that
can be changed if required.
© 2017 Unisys Corporation. All rights reserved.
23
24.
Adding New Controls to the PresentationYou can add controls to the presentation by dragging them from the tool
box.
GridPanels are used to group controls in the presentation.
Group Controls: Graphical objects that are grouped together to represent one attribute are called Group Controls.
Button, Checkbox, and Radio Button are called Group Controls.
You should use a panel to associate more than one RadioButton, CheckBox, or Button with a single attribute.
© 2017 Unisys Corporation. All rights reserved.
24
25. Working with the Grid Panel
• Grid Panels allow you to associate a set of group controls with oneattribute.
• To create a Group control:
1. Drag a Grid Panel from the ToolBox to the Painter.
2. Drag the Group control from the Toolbox into the Grid Panel in the Painter.
3. Repeat the controls for the number of occurrences required.
For example, the following is a Grid Panel containing two Radio Buttons
that represent one attribute - Question
© 2017 Unisys Corporation. All rights reserved.
25
26. Moving Controls into a Grid Panel
Using Ctrl keySteps
1. Select the controls that you want to
move.
2. Press and hold the left mouse button.
3. Press and hold the Ctrl key and then
move the controls in the Form.
© 2017 Unisys Corporation. All rights reserved.
26
27. Moving Controls within a Grid Panel
Using Alt key1. In the Grid Panel, select all
the controls that you want
to move
2. Press and hold the Alt key
and then move the
controls within the Grid
Panel
3. Place the controls in the
required position
© 2017 Unisys Corporation. All rights reserved.
27
28. Synchronizing an Element With the Class View
• The Synchronize Class View option synchronizes the selected item with theClass View.
• You can also select Synchronize Class View option from the Edit menu.
• You can use this option to:
– View some of the properties of the primitive data type associated with the
selected form objects such as button, check box, radio button, text field,
password field, or text area
– View the properties of the element associated with the form
• Synchronize Class View can also be used in other views, such as the
Members list, Search Results list, and Diagrams.
• To synchronize a selected element in the
Painter, perform the following steps:
1.
2.
3.
Make sure that the form is displayed.
Right-click a graphical object on the form.
Select Synchronize Class View option.
© 2017 Unisys Corporation. All rights reserved.
28
29.
Generalization in Presentation• Generalization is an Object-Oriented concept that describes “is a”
relationship between two classes
• With a generalization relationship between two classes, the common
structure and behaviour are used from the specialized class to the
generalized class
© 2017 Unisys Corporation. All rights reserved.
29
30.
Generalization in PresentationExample: Consider a class CUSTTAX
that represents customers who pay tax
that inherits from CUST
CUSTTAX class inherits
from CUST class
© 2017 Unisys Corporation. All rights reserved.
30
31.
Generalization in PresentationCUSTTAX class inherits
presentation from the CUST class
© 2017 Unisys Corporation. All rights reserved.
31
32.
Composition in Presentation• Composition is an Object-Oriented concept that describes a relationship
between two objects where one object owns, or is made up of, other
objects.
• A class with a presentation can be inherited by an object belonging to
another class. This way some of the common presentation elements
such as headers and footers can be reused and extended within a form.
© 2017 Unisys Corporation. All rights reserved.
32
33.
Composition in PresentationExample: Consider the CUST class that has
an attribute named Action_Line that inherits
from the ACTION_LINE class
Action_Line attribute
inherits from the
ACTION_LINE class
© 2017 Unisys Corporation. All rights reserved.
33
34.
Composition in PresentationCUST class inherits presentation
from the ACTION_LINE class
© 2017 Unisys Corporation. All rights reserved.
34
35. Logic Editor
© 2017 Unisys Corporation. All rights reserved.36. Logic Editor
• The Logic Status tab displays the list of methods. Double click a methodto invoke its Logic Editor.
• The Logic Editor is used to add, edit, save, and validate logic.
© 2017 Unisys Corporation. All rights reserved.
36
37. Logic Editor Highlights
• Dynamic Validation– Immediately identify logic errors with the red squiggle
• Quick Actions
– Quickly and easily resolve logic errors
• Code Definition and Peek Definition
– View and edit logic without leaving the current method
• Personalize the experience
– Customize the look, feel, and features to suit your development style
• Debugger Conditional Breakpoints
– Break when logic conditions are met or hit counts are reached
© 2017 Unisys Corporation. All rights reserved.
37
38. Logic Editor Settings
• The Logic editor options can be set from the Tools > Options menu.• In the Options window, navigate to the LDL+ folder for setting Logic
Editor features like Dynamic Validation, Quick Action, and Command
Style.
© 2017 Unisys Corporation. All rights reserved.
38
39. Class Diagrams
© 2017 Unisys Corporation. All rights reserved.40. Class Diagrams
• A diagrammatic representation of classes and their relationships.• In this class diagram, the CUST ispec has an AutoLookUp dependency
defined on the SREP ispec.
Stereotype Definition
and Class Name
AutoLookup
Relationship
Attributes
Methods/Profiles
© 2017 Unisys Corporation. All rights reserved.
40
41. Class Diagram Editor
To create a class diagram:1. Add a diagram to an element in your model.
2. Drag elements from the Toolbox or the Class View on to the Class
Diagram editor.
UML Toolbox
Class View
Class Diagram Editor
© 2017 Unisys Corporation. All rights reserved.
41
42. Modifying Class Specification
To modify class specifications:1. In the Class Diagram editor, right-click the class entity and select
Properties.
2. Modify the required class entity properties.
© 2017 Unisys Corporation. All rights reserved.
42
43. Defining Relationships
You can define all therelationships using the Toolbox.
© 2017 Unisys Corporation. All rights reserved.
43
44. Reference Elements
© 2017 Unisys Corporation. All rights reserved.45. Reference Elements
A reference is used:• To display an attribute that cannot be directly dragged onto the painter.
For example, arrays, and attributes of other classes.
• To avoid the need for additional attributes and supporting logic to move
values around.
© 2017 Unisys Corporation. All rights reserved.
45
46. Reference Elements—Example
1. Add a referenceelement to CUST Class
2. Set the Constraint property
to SREP.NAM
3. Drag the reference
element on to the CUST
form. Save the Form.
4. Change the
Direction property to
“Out” from “None”
© 2017 Unisys Corporation. All rights reserved.
46
47. Reference Elements—Example
When you transmit the CUST screen,SREP record is read, and the
appropriate SREP.NAM value is
shown in that field on the screen
without writing any logic.
© 2017 Unisys Corporation. All rights reserved.
47
48. Developer Security
© 2017 Unisys Corporation. All rights reserved.49. Developer Security
• Developer Security is similar to WindowsExplorer Security
• To set the security in Developer, the
AccessControlled property must be set to true
at the model level
• All elements in the model and the model itself
can have security privileges applied to it
• You can control the security for either the
entire model or individual elements within the
model
© 2017 Unisys Corporation. All rights reserved.
49
50. Developer Security
• AccessControlled property can be set by:– Administrative users
– Model database owner (db_owner)
– Security admin of the model database
(db_securityadmin)
– Security admin of the database server
(securityadmin)
© 2017 Unisys Corporation. All rights reserved.
50
51. Developer Security
To set security for any element:1.
2.
3.
4.
5.
From the View menu, select Class View to
open the Class View window.
Select an element in the Class View
window.
From the View window, select Properties
Window.
In the Properties window for the element,
select the Security property.
Click the ellipses button to the right of the
window, to open the Windows Security
dialog box.
© 2017 Unisys Corporation. All rights reserved.
51
52. Developer Security
• In the Windows Security dialog box, youcan add and remove users.
• Types of privileges you can set for the
users:
– Full Control – Allows or denies the user
to set the security information
– Read Logic – Allows or denies access to
the logic of a method
– Build – Allows or denies access to
perform a model build
– Write – Allows or denies access to
modify any attributes of an element and
all the privileges that applies to Read
permission
© 2017 Unisys Corporation. All rights reserved.
52
53. Developer Security
• The application user is denied write permission to theSampleDeploy folder.
• Select the Security option in the Build Comments
Pages… dialog box.
The Build Comments pages output displays the security
options to help administer permissions to users.
© 2017 Unisys Corporation. All rights reserved.
53
54. Documentation
© 2017 Unisys Corporation. All rights reserved.55. Build Comment Pages
• Used to create a detailed report ofyour AB Suite project
– Build the report of the entire model
or
– Build a report on individual
elements or classes
• Creates a hierarchical written
display of your AB Suite project
• The report
– Lists the base class, all subclasses,
and their members in the model.
– Identifies the name of the element,
any description that you have
provided for it, its member visibility,
and the base class to which it
belongs.
© 2017 Unisys Corporation. All rights reserved.
55
56. Build Comment Pages
– Is displayed in the HTML Browserwithin Visual Studio after the report
is generated as a file in a folder of
your choice.
– Includes the security details of an
element in the generated output
© 2017 Unisys Corporation. All rights reserved.
56
57. Build Comment Pages
1. Select the Model in ClassView.
2. Select Build Comment
Pages from the Build menu.
The Build Comment Pages…
dialog box appears.
3. To build a report on the entire
model, select the Entire Model
option. Select the Selection option
to build a report only on selected
classes or to include individual
elements in the report.
4. Browse for the location to save
the HTML file of the report. Click
OK to build the report.
© 2017 Unisys Corporation. All rights reserved.
57
58. Product Documentation
Product Information–
–
–
–
Developer CD
PI Only CD
Online Help
Unisys Support Web Site
© 2017 Unisys Corporation. All rights reserved.
58
59. Product Documentation – PI Only CD
All User Guides are published for a release
Except Generator Customization Kit document
Acrobat Reader display external to browser
Search function of Reader
Infopack
© 2017 Unisys Corporation. All rights reserved.
59
60. Product Documentation – Online Help
FavoritesIndex
Functions available for Online help:
–
–
–
–
–
Contents
Index
Favorites
Find
Context-sensitive help (F1)
Find
Contents
© 2017 Unisys Corporation. All rights reserved.
60
61. Readme Document
• AB Suite Readme document is supplied with every release of the productand provides information related to – New features and changes in the respective release
– Product limitations and known issues
– Installation specific instructions
• Readme document is updated for every Interim Correction (IC)
© 2017 Unisys Corporation. All rights reserved.
61
62. Product Documentation – Unisys Support Web Site
Documentation section– https://www.support.unisys.com/common/epa/DocumentationLibraries.aspx?
PLA=ABS&NAV=ABS
© 2017 Unisys Corporation. All rights reserved.
62
63. Working Efficiently with Your Model
© 2017 Unisys Corporation. All rights reserved.64. Working Efficiently with Your Model
• Better ways to define:– Insertables
– Group Attributes
– Ispecs
• Some points to remember
© 2017 Unisys Corporation. All rights reserved.
64
65. Better Way to Define Insertables
In AB Suite, an insertable stereotype is not required to define a commonpart of a screen.
– A class can have fixed, graphical, and print presentations.
– Presentation can be placed on ispec screens or frame layouts.
– Achieved by instantiating the class under the ispec or frame, and dragging
the attribute onto the Painter.
© 2017 Unisys Corporation. All rights reserved.
65
66. Better Way to Define Group Attributes
• A group stereotype is not required to visually group attributes.– Attributes can be modelled under any class.
– Assignment between instances of the same class is allowed – this will
perform a deep copy of all members.
• Groups are only required when moving an entire group to or from a
string or another group with a different structure.
• Avoiding the group stereotype avoids generated code and memory
used to express the whole group as a string.
© 2017 Unisys Corporation. All rights reserved.
66
67. Better Way to Define Ispecs
• In AB Suite, it is possible to create a class with no stereotype whichonly has persistent members. The behavior will be identical to an ispec
so long as no keys are defined.
– Ispec keys add a 1 character MAINT field to the table.
– Profiles can be added to any class with persistent members.
© 2017 Unisys Corporation. All rights reserved.
67
68. Better Way to Define Global Attributes
• In AB Suite, you can avoid unnecessary declaration of global attributes.Alternatives are:
– You can declare parameters and variables to use with a method
– You can declare local attributes to ispecs and reports rather than declaring
global attributes to be used in the application
– With the above two considerations, methods become ‘self-contained’ and do
not depend on global items, enhancing the maintainability
• You can use global attributes where it makes sense and is necessary, for
example, Latest_currency_value (banking application),
Today’s_discount (retail store application).
© 2017 Unisys Corporation. All rights reserved.
68
69. Points to remember...
• Understand the structure of your model and identify the elements froman object-oriented design perspective.
• Use the UML diagrams to create class diagrams.
• Use inheritance and dictionary elements to create new ispecs and
attributes instead of copying and pasting them to reduce redundancy in
your model.
• Use folders to logically group elements or build (generate) smaller sets
of elements.
• Familiarize with the Painter tab, Toolbox, and various controls in
Toolbox.
• Understand how attribute properties of the attributes influence the
rendering on Painter.
© 2017 Unisys Corporation. All rights reserved.
69
70. Summary
In this module, you have learned to:• Implement advanced AB Suite concepts in application
development.
© 2017 Unisys Corporation. All rights reserved.
70