Похожие презентации:
The Pulser and How to Test it. LWD 1
1. LWD 1
The Pulser and How to Testit
January 31, 2001
© 2001, Halliburton Energy Services, Inc.
1
2. Pulser Testing Objectives
At the completion of this presentation you should be able to:1. Describe the important differences between the MK VI, VII, & VIII pulsers.
2. You will be able to test the pulser and determine whether it should be
used.
January 31,
2001
© 2001, Halliburton Energy Services, Inc.
2
3. The Pulser
• The central component of all foursystems
• The same pulser can be used on
all four systems
• There are three current versions
of the pulser
January 31,
2001
© 2001, Halliburton Energy Services, Inc.
3
4. The Pulser
– Generates electrical and hydraulicpower
January 31,
2001
© 2001, Halliburton Energy Services, Inc.
4
5. Pulser’s Hydraulic Power
• Operates a poppet/orifice valvethat intermittently restricts the
fluid flow, producing a pressure
increase, or pulse. These pulses
are detected on the surface.
January 31,
2001
© 2001, Halliburton Energy Services, Inc.
5
6. Pulser’s Hydraulic System
PistonBypass Port
High Pressure
Fluid
Piston
Pump
Flow
Restrictor
Valve
Bypass Port
Port Seal
Main Valve
Control Valve
Low Pressure
Fluid
January 31,
2001
© 2001, Halliburton Energy Services, Inc.
6
7. Pulser’s Hydraulic System
• Control valve open– Flow through control valve
• Allows flow through main valve
– Flow through main
• Pressure drop across flow restrictor
moves port seal down against spring
• Valve bypass port opens
– Poppet fully retracted
January 31,
2001
© 2001, Halliburton Energy Services, Inc.
7
8. Pulser’s Hydraulic System
• Control valve closed– No flow through control valve
• Stops flow through main valve
– No flow through main valve
• Spring moves port seal up
• Valve bypass port closes
• Piston moves up
– Poppet partially extended
January 31,
2001
© 2001, Halliburton Energy Services, Inc.
8
9. Pulser’s Hydraulic System
• Control valve closed– No flow through control valve
• Stops flow through main valve
– No flow through main valve
• Spring moves port seal up
• Valve bypass port closes
• Piston moves up
• Piston bypass port opens
– Poppet fully extended
January 31,
2001
© 2001, Halliburton Energy Services, Inc.
9
10. Pulser’s Hydraulic System
January 31,2001
© 2001, Halliburton Energy Services, Inc.
10
11. Pulser’s Hydraulic System
• The control valve is operated bya signal from the telemetry
controller. Closing the control
valve causes the poppet to
extend into the orifice.
January 31,
2001
© 2001, Halliburton Energy Services, Inc.
11
12. Pulser’s Electrical Power
• Generator consists of six fixedcoils and eight rotating magnets.
• Electrical power is supplied to
the sondes attached to the
pulser.
January 31,
2001
© 2001, Halliburton Energy Services, Inc.
12
13. The Parts of a Pulser
Pump outer case2 inch case
Poppet shaft
Bulkhead
Intermediate case
Poppet shaft
housing
January 31,
2001
© 2001, Halliburton Energy Services, Inc.
13
14. Booted Vs. Bootless Pulser
BootJanuary 31,
2001
Bootless
© 2001, Halliburton Energy Services, Inc.
14
15. Booted Vs. Bootless Pulser
• Boot– Gas permeable
– Susceptible to damage
– No moving parts
– Transmits external pressure to pulser’s
internal fluid
January 31,
2001
© 2001, Halliburton Energy Services, Inc.
15
16. Booted Vs. Bootless Pulser
• Bootless– Increased reliability
– Requires seal pack assembly change
every 100 or 200 hours depending on
temperature
– Moving parts
– Transmits external pressure to pulser’s
internal fluid
January 31,
2001
© 2001, Halliburton Energy Services, Inc.
16
17. Pulser Connections
7-pin AmphenolConnector
January 31,
2001
© 2001, Halliburton Energy Services, Inc.
4 Cond. Rotational
Connector
17
18. Pulser Connection
• 7-pin Amphenol– Used for DWD
– Careful assembly required to avoid
damage
– Uses coil cord
January 31,
2001
© 2001, Halliburton Energy Services, Inc.
18
19. Pulser Connection
• 4-Conductor RotationalConnector
– Used for Solar
– Easy to make-up connection
– Increased reliability
January 31,
2001
© 2001, Halliburton Energy Services, Inc.
19
20. The Four Current Pulsers
• Mark 6 DWD• Mark 7 Solar
• Mark 8 Solar
• Mark 8 DWD
January 31,
2001
© 2001, Halliburton Energy Services, Inc.
20
21. Mark 6 DWD
• 7-Pin Amphenol Connector• Maximum Temperature 175 C
• Full Stroke (0.374 in.)
January 31,
2001
© 2001, Halliburton Energy Services, Inc.
21
22. Mark 7 Solar
• 4-Conductor RotationalConnector
• Maximum Temperature 200 C
• Full Stroke (0.374 in.)
January 31,
2001
© 2001, Halliburton Energy Services, Inc.
22
23. Mark 8 Solar
• 4-Conductor RotationalConnector
• Maximum Temperature 200 C
• Half Stroke (0.187 in.)
January 31,
2001
© 2001, Halliburton Energy Services, Inc.
23
24. Mark 8 DWD
• 7-Pin Amphenol Connector• Maximum Temperature 175 C
• Half Stroke (0.187 in.)
January 31,
2001
© 2001, Halliburton Energy Services, Inc.
24
25. How to Identify Pulsers
• Mark 6 DWD– 7-pin amphenol connector
– Lower filling screw NOT marked 8
– Poppet extends 9.5 mm (0.374 in.)
• Mark 7 Solar
– Rotational connector
– Lower filling screw NOT marked 8
– Poppet extends 9.5 mm (0.374 in.)
January 31,
2001
© 2001, Halliburton Energy Services, Inc.
25
26. How to Identify Pulsers
Lower Filling ScrewJanuary 31,
2001
© 2001, Halliburton Energy Services, Inc.
26
27. How to Identify Pulsers
• Mark 8 Solar– Rotational connector
– Lower filling screw MAY BE marked 8
– Poppet extends 4.8 mm (0.187 in.)
• Mark 8 DWD
– 7-pin amphenol connector
– Lower filling screw MAY BE marked 8
– Poppet extends 4.8 mm (0.187 in.)
January 31,
2001
© 2001, Halliburton Energy Services, Inc.
27
28. Testing the Pulser
• Two tests– Resistance
• Tests electrical resistance of the generator
coils and control valve solenoid
– Extension/retraction
• Tests hydraulic system
January 31,
2001
© 2001, Halliburton Energy Services, Inc.
28
29. Pulser Test Equipment
• DWD Electronic Test Kit• MWD Pulser Test Set and Leads
• Digital Multi-meter
• Coil Cord Pulser to MEP
• Pulser Ground Lead
• BNC Female/Banana Connector (2)
• BNC Cable (36 inch)
• Poppet Retraction Tool
January 31,
2001
© 2001, Halliburton Energy Services, Inc.
29
30. Additional Test Equipment for Solar Pulsers
• Solar 175 Test Cable Amphenol/9-pin• 4-pin Male Rotational Test Connector
January 31,
2001
© 2001, Halliburton Energy Services, Inc.
30
31. MWD Pulser Test Set
9V SwitchJanuary 31,
2001
© 2001, Halliburton Energy Services, Inc.
31
32. Digital Multi-meter
January 31,2001
© 2001, Halliburton Energy Services, Inc.
32
33. Coil Cord
7-Pin FemaleAmphenol Connector
January 31,
2001
7-Pin Female
Amphenol Connector
© 2001, Halliburton Energy Services, Inc.
33
34. Coil Cord
AB
C
Pulser
D
E
F
G
January 31,
2001
A
B
C
Probe
D
E
F
G
© 2001, Halliburton Energy Services, Inc.
34
35. Pulser Resistance Test Equipment
BNC/Banana adapterPulser Ground Lead
BNC cable (36 inch)
January 31,
2001
© 2001, Halliburton Energy Services, Inc.
35
36. Pulser Extension Test Equipment
Poppet retraction ToolJanuary 31,
2001
© 2001, Halliburton Energy Services, Inc.
36
37. Pulser Resistance Test Equipment
Solar 175 Test CableAmphenol/7-pin
4-pin Male Rotational
Test Connector
January 31,
2001
© 2001, Halliburton Energy Services, Inc.
37
38. Pulser Resistance Test Purpose
• Tests the pulser generator coilsfor shorts and open circuits
• Tests the pulser control valve
solenoid for shorts and open
circuits
January 31,
2001
© 2001, Halliburton Energy Services, Inc.
38
39. Pulser Resistance Test Procedure
• Set the 9v switch on the MWDPulser Test Set to off
• Set the meter to measure
resistance and ensure that the
scale selected is appropriate for
the resistance expected.
January 31,
2001
© 2001, Halliburton Energy Services, Inc.
39
40. Pulser Case Lead Continuity
•Measure thepulser case lead
resistance
• A reading of 0-1
ohms indicates
continuity.
January 31,
2001
© 2001, Halliburton Energy Services, Inc.
40
41. Pulser Resistance Test Procedure
Connect the meterto the ohms out
ports on the test
set using the BNC
cable and
adapters.
January 31,
2001
© 2001, Halliburton Energy Services, Inc.
41
42. Pulser Resistance Test Procedure
Connect thepulser case lead
to the case port
on the test set and
to the pulser with
the alligator clip.
January 31,
2001
© 2001, Halliburton Energy Services, Inc.
42
43. Pulser Resistance Test Procedure
Connect the coilcord from the
pulser to the
pulser port on the
test set.
January 31,
2001
© 2001, Halliburton Energy Services, Inc.
43
44. Pulser Resistance Test Procedure
• Check resistance readings byrotating switches S1 and S2
through all positions shown on
the Pulser Test Form.
January 31,
2001
© 2001, Halliburton Energy Services, Inc.
44
45. DWD Pulser Resistances
Switch S 1DWD Pulser Resistances
A
B
C
D
E
F
G
Case
Switch S2
A
B
C
D
E
0-1 340-608 >100k >100k >100k
0-1
>100k >100k >100k
0-1
9-11k 9-11k
0-1
0-1
0-1
F
G
Inf >100k
Inf >100k
Inf 9-11k
Inf
0-1
Inf
0-1
0-1
Inf
0-1
>100k >100k >100k Inf >100k
A = Solenoid, B = Ground, C = Generator A, D = Generator B,
E = Generator C, F = Not used, G = Jumped to E in coil cord
January 31,
2001
© 2001, Halliburton Energy Services, Inc.
45
46. Solar Pulser Resistances
Switch S1Solar Pulser Resistances
January 31,
2001
A
0-1
Switch S2
B
C
D
340-608
Inf
Inf
0-1
Inf
Inf
0-1
15-26
0-1
E
Inf
A
Inf
B
15-26
C
15-26
D
0-1
E
A = Solenoid, B = Ground, C = Generator A,
D = Generator B, E = Generator C
© 2001, Halliburton Energy Services, Inc.
46
47. Pulser Resistance Test Procedure
A to AJanuary 31,
2001
A to B
A to C
© 2001, Halliburton Energy Services, Inc.
A to F
47
48. Pulser Resistance Test Procedure
• If any readings are out ofspecification, check the coil cord
and the pulser test set and
isolate the defective part.
• Then complete a Failure Report.
January 31,
2001
© 2001, Halliburton Energy Services, Inc.
48
49. Pulser Resistance Test Procedure
What was all thatabout?
January 31,
2001
© 2001, Halliburton Energy Services, Inc.
49
50. Pulser Extension/Retraction Test Purpose
• Basic test of the hydraulicsystem
• Tests the seals on the main
valve, control valve, the pump
rams’ seals, and the piston seal
• Tests function of both the main
and control valves
January 31,
2001
© 2001, Halliburton Energy Services, Inc.
50
51. Pulser Extension/Retraction Test Procedure
• Clean the pulser; pay particularattention to the three threaded
location holes on the pump
housing.
January 31,
2001
© 2001, Halliburton Energy Services, Inc.
51
52. Pulser Extension/Retraction Test Procedure
Install an impellerassembly over the
intermediate case.
January 31,
2001
© 2001, Halliburton Energy Services, Inc.
52
53. Pulser Extension/Retraction Test Procedure
Prepare thepoppet retraction
tool by screwing
the adjuster nut
fully onto the shaft
Adjuster Nut
January 31,
2001
© 2001, Halliburton Energy Services, Inc.
53
54. Pulser Extension/Retraction Test Procedure
Slide theretraction tool
over the poppet
end of the pulser.
January 31,
2001
© 2001, Halliburton Energy Services, Inc.
54
55. Pulser Extension/Retraction Test Procedure
Insert the locatingscrews into the
threaded holes on
the pulser and
hand tighten.
January 31,
2001
© 2001, Halliburton Energy Services, Inc.
55
56. Pulser Extension/Retraction Test Procedure
Screw the adjusternut against the
poppet shaft until
the first groove on
the retraction
tool’s shaft is
aligned with the
face of the locking
ring.
January 31,
2001
© 2001, Halliburton Energy Services, Inc.
56
57. Pulser Extension/Retraction Test Procedure
Connect thepulser to the
poppet extend
socket on the
MWD Pulser Test
Set using the coil
cord
Turn on the 9v
switch.
January 31,
2001
© 2001, Halliburton Energy Services, Inc.
57
58. Pulser Extension/Retraction Test Procedure
Rotate theimpeller assembly.
The retraction
tool’s shaft should
extend to reveal
the second groove
on the shaft.
January 31,
2001
© 2001, Halliburton Energy Services, Inc.
58
59. Pulser Extension/Retraction Test Procedure
• Monitor the extension; theretraction tool’s shaft must
remain extended for 2 minutes
without bleeding off and
retracting all the way to the first
groove.
January 31,
2001
© 2001, Halliburton Energy Services, Inc.
59
60. Pulser Extension/Retraction Test Procedure
Rotate theimpeller assembly
until the retraction
tool’s shaft again
extends to reveal
the second groove
on the shaft.
January 31,
2001
© 2001, Halliburton Energy Services, Inc.
60
61. Pulser Extension/Retraction Test Procedure
• Turn off the 9v switch.January 31,
2001
© 2001, Halliburton Energy Services, Inc.
61
62. Pulser Extension/Retraction Test Procedure
• Monitor retraction– For a Booted Pulser
• The retraction tool’s shaft should retract to
the first groove in less than 2 seconds.
– For a Bootless Pulser
• The retraction tool’s shaft should retract to
the first groove in about 8 seconds.
January 31,
2001
© 2001, Halliburton Energy Services, Inc.
62
63. Pulser Extension/Retraction Test Procedure
• Record the results on the PulserTest Sheet.
January 31,
2001
© 2001, Halliburton Energy Services, Inc.
63
64. Pulser Extension/Retraction Test Procedure
• Should the pulser fail to meet theabove procedure, return pulser
for R&M, stating “Retraction
Fault”.
January 31,
2001
© 2001, Halliburton Energy Services, Inc.
64
65. Pulser Extension/Retraction Test Procedure
What was all thatabout?
January 31,
2001
© 2001, Halliburton Energy Services, Inc.
65
66. Testing an MWD Pulser Test Set
• Test S1 and S2 Switches• Test Ohms Out and Case Ports
• Test Pulser Connector
• Test Poppet Extend Connector
• Test Internal Batteries
January 31,
2001
© 2001, Halliburton Energy Services, Inc.
66
67. Test S1 and S2 Switches
Set the volt/ohmmeter to ohms
Connect the test
leads to the black
and white ohms
out ports.
A to A
January 31,
2001
© 2001, Halliburton Energy Services, Inc.
67
68. Test S1 and S2 Switches
• Check resistance readings byrotating switches S1 and S2
through all positions on Table 1
January 31,
2001
© 2001, Halliburton Energy Services, Inc.
68
69. Test S1 and S2 Switches Table 1
Switch S1Test S1 and S2 Switches
Table 1
January 31,
2001
A
B
C
D
E
F
G
A
B
0-1
Inf
0-1
Switch S2
C
D
E
Inf
Inf
0-1
Inf
Inf
Inf
0-1
© 2001, Halliburton Energy Services, Inc.
Inf
Inf
Inf
Inf
0-1
F
G
Inf
Inf
Inf
Inf
Inf
0-1
Inf
Inf
Inf
Inf
Inf
Inf
0-1
69
70. Test S1 and S2 Switches
A to BJanuary 31,
2001
© 2001, Halliburton Energy Services, Inc.
70
71. Test S1 and S2 Switches
G to GJanuary 31,
2001
© 2001, Halliburton Energy Services, Inc.
71
72. Test Ohms Out & Case Ports
Test Ohms Out & CasePorts
Connect the test
leads to the white
ohms out port and
the black case
port.
S2 A
January 31,
2001
© 2001, Halliburton Energy Services, Inc.
72
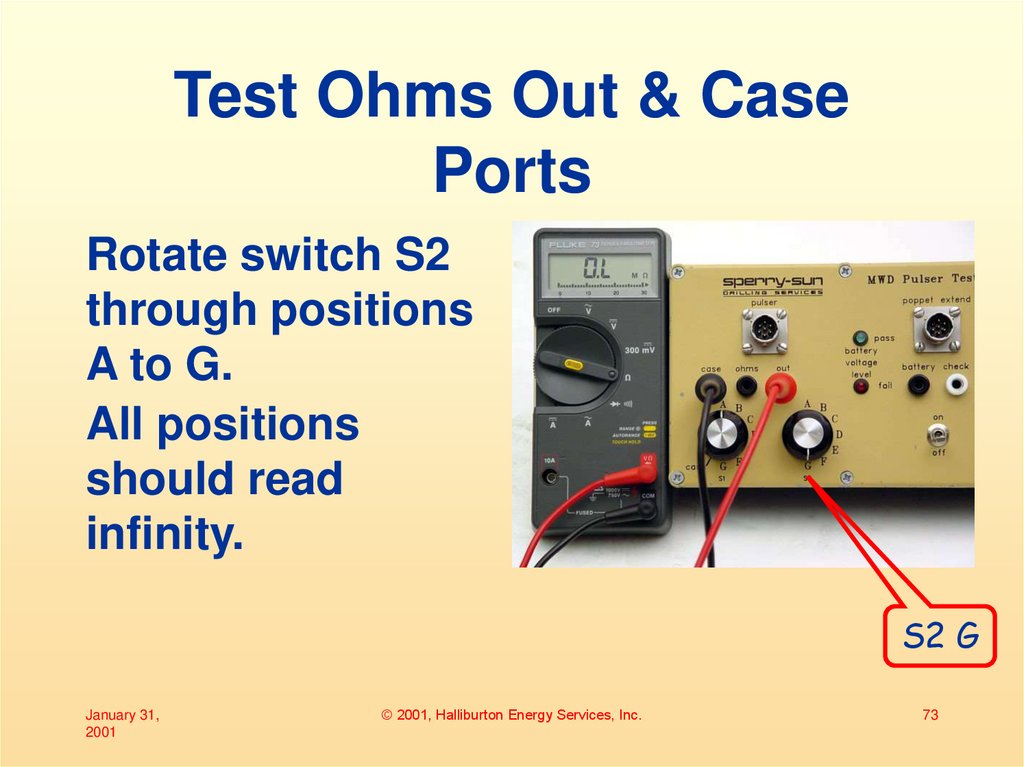
73. Test Ohms Out & Case Ports
Test Ohms Out & CasePorts
Rotate switch S2
through positions
A to G.
All positions
should read
infinity.
S2 G
January 31,
2001
© 2001, Halliburton Energy Services, Inc.
73
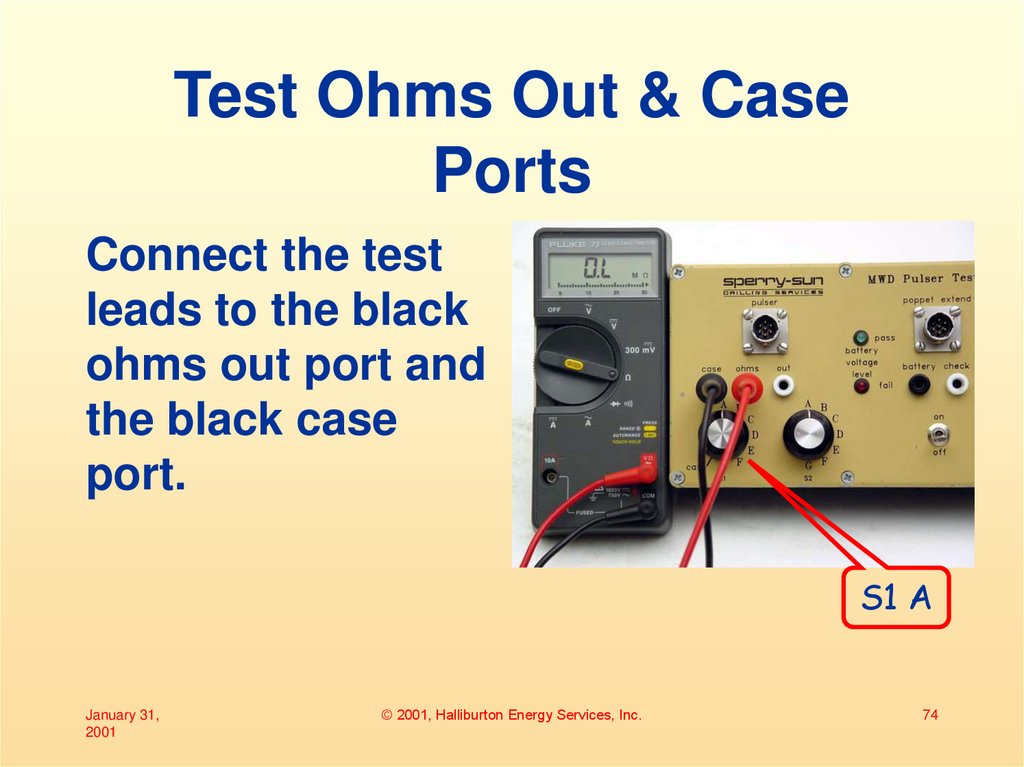
74. Test Ohms Out & Case Ports
Test Ohms Out & CasePorts
Connect the test
leads to the black
ohms out port and
the black case
port.
S1 A
January 31,
2001
© 2001, Halliburton Energy Services, Inc.
74
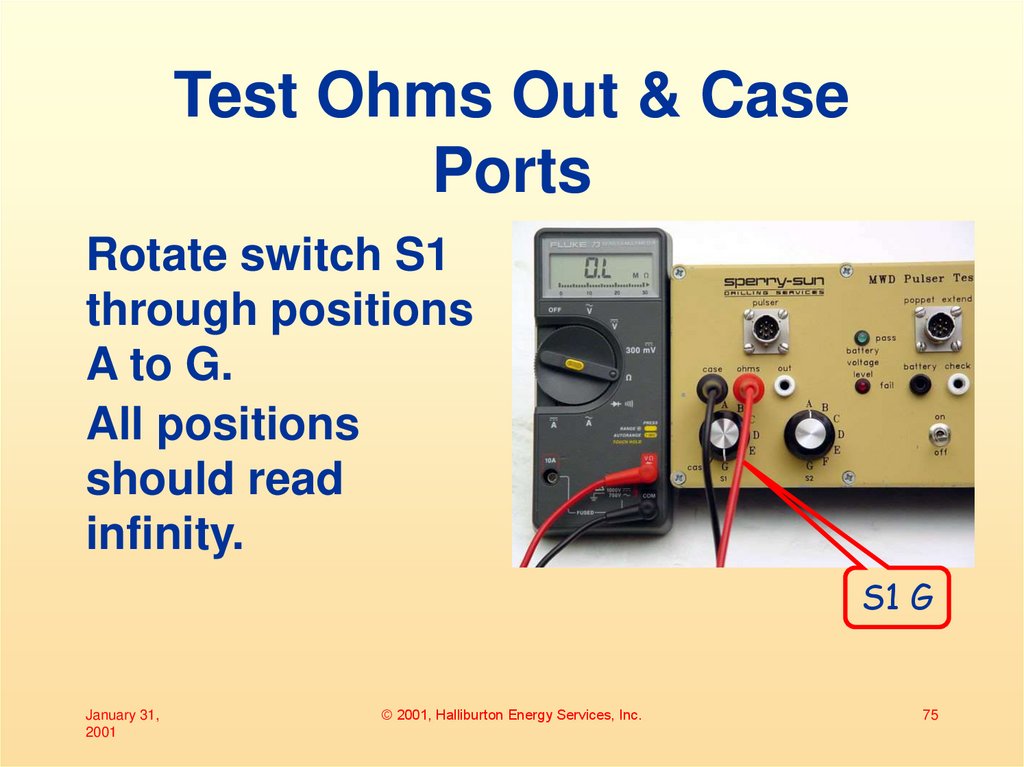
75. Test Ohms Out & Case Ports
Test Ohms Out & CasePorts
Rotate switch S1
through positions
A to G.
All positions
should read
infinity.
S1 G
January 31,
2001
© 2001, Halliburton Energy Services, Inc.
75
76. Test Ohms Out & Case Ports
Test Ohms Out & CasePorts
•Move switch S1
to the case
position.
•The meter should
read 0-1 ohms.
S1 Case
January 31,
2001
© 2001, Halliburton Energy Services, Inc.
76
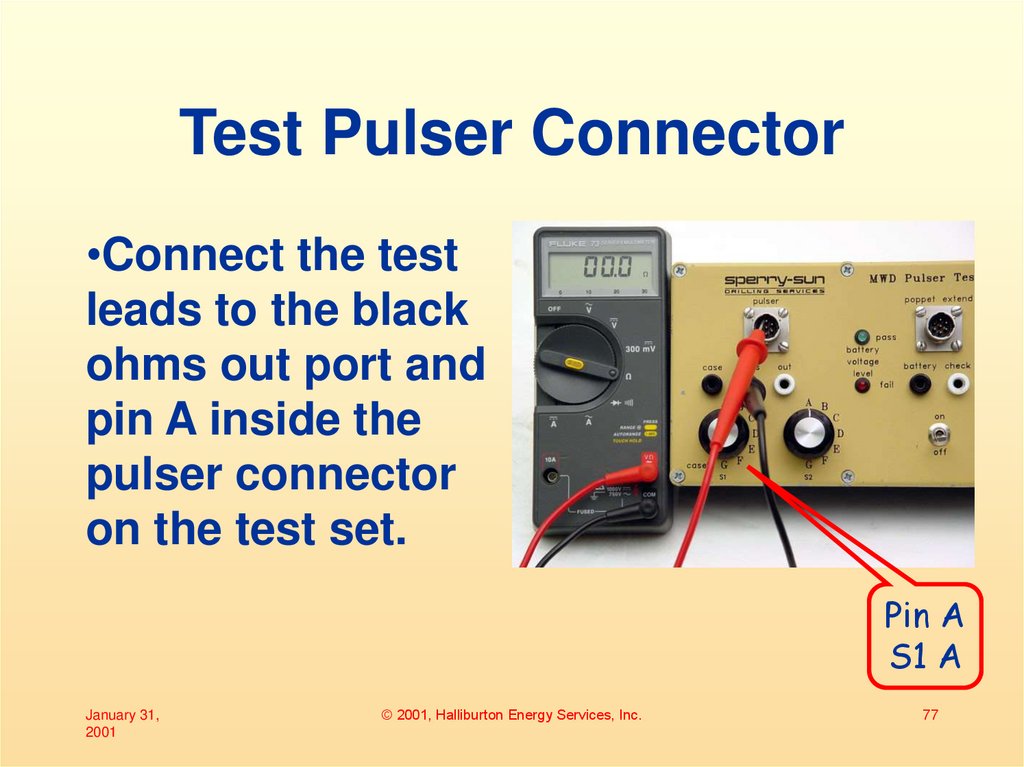
77. Test Pulser Connector
•Connect the testleads to the black
ohms out port and
pin A inside the
pulser connector
on the test set.
Pin A
S1 A
January 31,
2001
© 2001, Halliburton Energy Services, Inc.
77
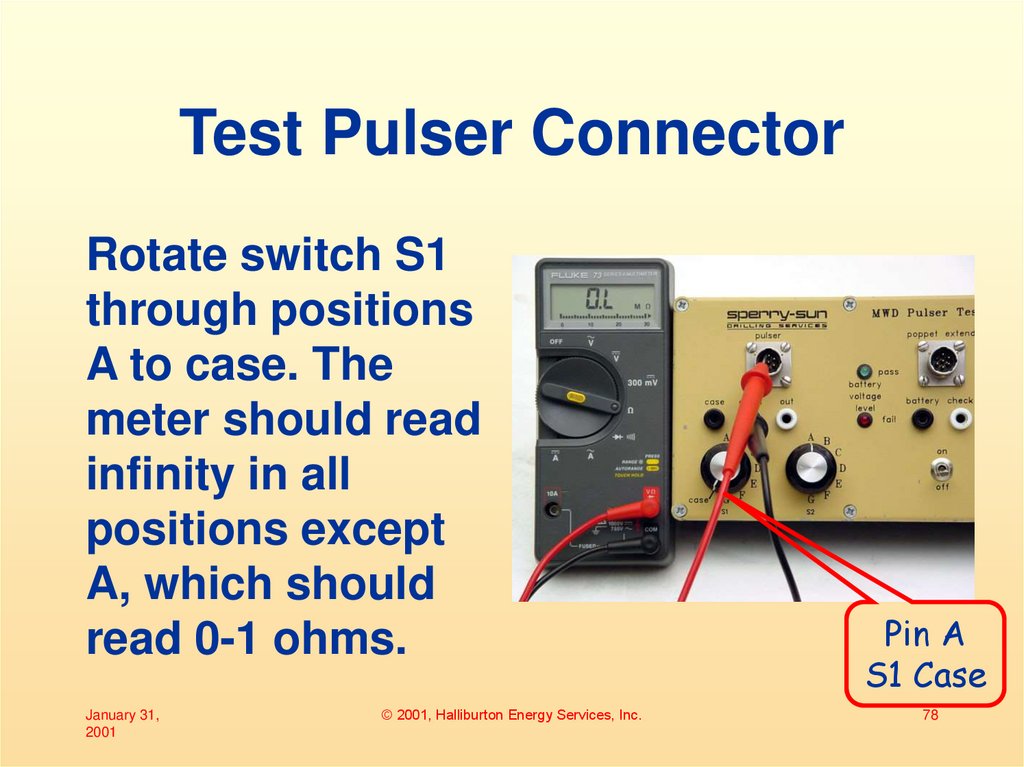
78. Test Pulser Connector
Rotate switch S1through positions
A to case. The
meter should read
infinity in all
positions except
A, which should
read 0-1 ohms.
January 31,
2001
© 2001, Halliburton Energy Services, Inc.
Pin A
S1 Case
78
79. Test Pulser Connector
• Repeat this for pins B through Gon the pulser connector for all
positions shown on Table 2
January 31,
2001
© 2001, Halliburton Energy Services, Inc.
79
80. Test Pulser Connector Table 2
Test Set PulserConnector
Test Pulser Connector
Table 2
January 31,
2001
A
B
C
D
E
F
G
A
B
0-1
Inf
0-1
Switch S1 or S2
C D
E
F
Inf
Inf
0-1
Inf
Inf
Inf
0-1
Inf
Inf
Inf
Inf
0-1
© 2001, Halliburton Energy Services, Inc.
Inf
Inf
Inf
Inf
Inf
0-1
G
Case
Inf
Inf
Inf
Inf
Inf
Inf
0-1
Inf
Inf
Inf
Inf
Inf
Inf
Inf
80
81. Test Pulser Connector
•Connect the testleads to the white
ohms out port and
pin A inside the
pulser connector.
Pin A
S2 A
January 31,
2001
© 2001, Halliburton Energy Services, Inc.
81
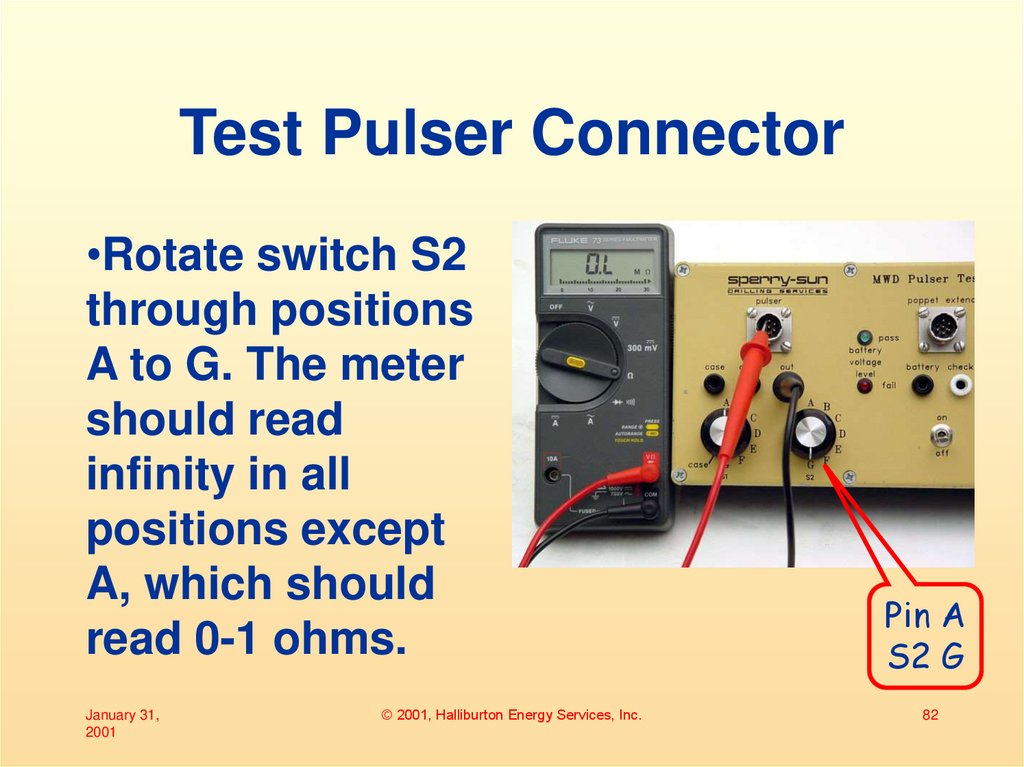
82. Test Pulser Connector
•Rotate switch S2through positions
A to G. The meter
should read
infinity in all
positions except
A, which should
read 0-1 ohms.
January 31,
2001
© 2001, Halliburton Energy Services, Inc.
Pin A
S2 G
82
83. Test Pulser Connector
• Repeat this for pins B through Gon the pulser connector for all
positions shown on on Table 2
January 31,
2001
© 2001, Halliburton Energy Services, Inc.
83
84. Test Poppet Extend Connector
• Ensure that the 9v switch is off.January 31,
2001
© 2001, Halliburton Energy Services, Inc.
84
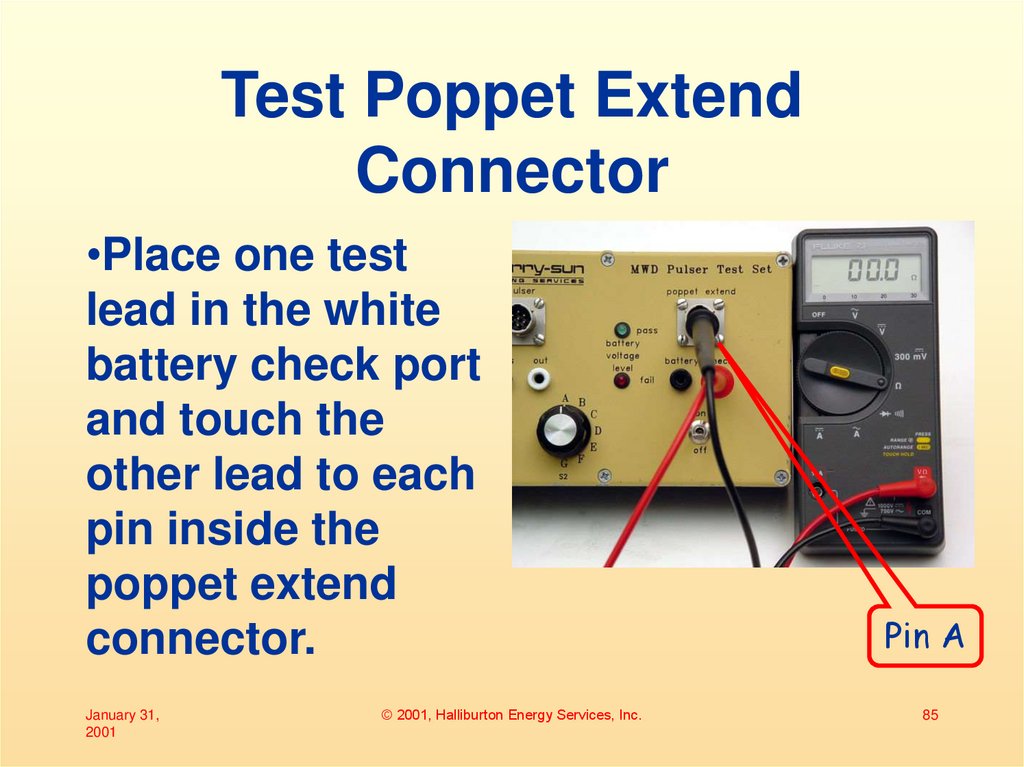
85. Test Poppet Extend Connector
•Place one testlead in the white
battery check port
and touch the
other lead to each
pin inside the
poppet extend
connector.
January 31,
2001
© 2001, Halliburton Energy Services, Inc.
Pin A
85
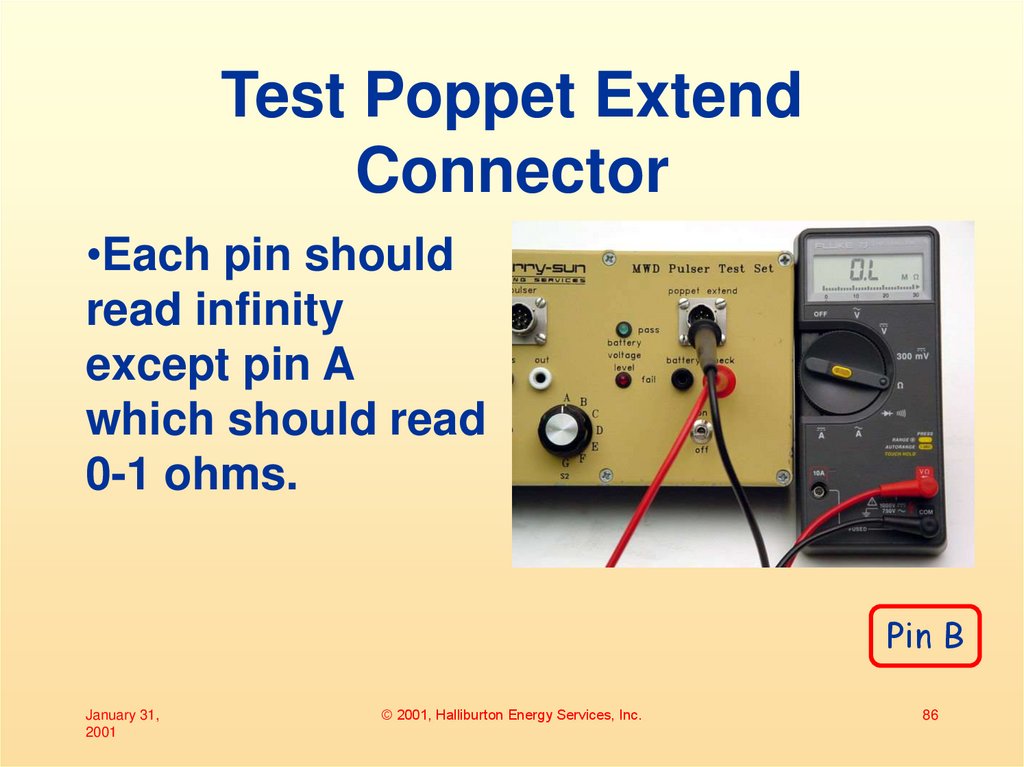
86. Test Poppet Extend Connector
•Each pin shouldread infinity
except pin A
which should read
0-1 ohms.
Pin B
January 31,
2001
© 2001, Halliburton Energy Services, Inc.
86
87. Test Poppet Extend Connector
• Remove the test lead from thewhite battery check port and
place it in the black battery
check port.
• Touch the other lead to each pin
inside the poppet extend
connector.
January 31,
2001
© 2001, Halliburton Energy Services, Inc.
87
88. Test Poppet Extend Connector
Pin AJanuary 31,
2001
© 2001, Halliburton Energy Services, Inc.
88
89. Test Poppet Extend Connector
Pin BJanuary 31,
2001
© 2001, Halliburton Energy Services, Inc.
89
90. Test Poppet Extend Connector
• Each pin should read infinityexcept pin B which should read
0-1 ohms.
January 31,
2001
© 2001, Halliburton Energy Services, Inc.
90
91. Test Internal Batteries
• Set the meter to the DC voltagerange to test the eight 1.5 volt AA
battery cells (12 volts).
January 31,
2001
© 2001, Halliburton Energy Services, Inc.
91
92. Test Internal Batteries
•Connect the testleads to the
battery check
ports. Black is
negative, white is
positive.
January 31,
2001
© 2001, Halliburton Energy Services, Inc.
92
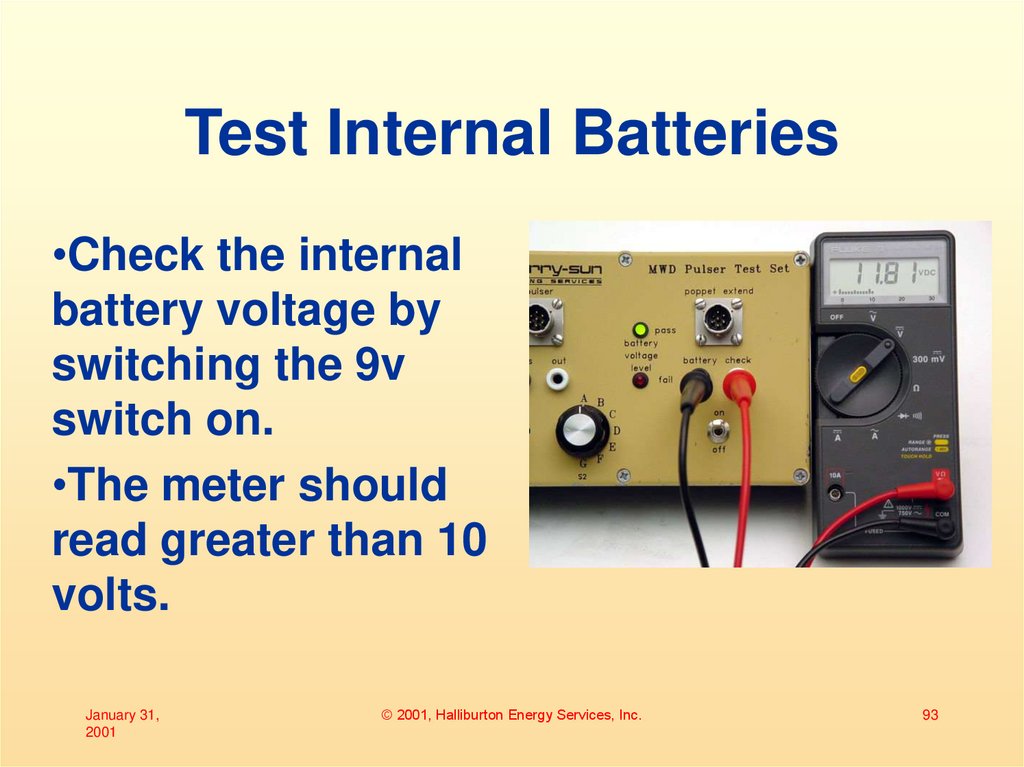
93. Test Internal Batteries
•Check the internalbattery voltage by
switching the 9v
switch on.
•The meter should
read greater than 10
volts.
January 31,
2001
© 2001, Halliburton Energy Services, Inc.
93
94. Test Internal Batteries
• Turn the 9v switch off andremove the meter leads from the
battery check ports.
January 31,
2001
© 2001, Halliburton Energy Services, Inc.
94
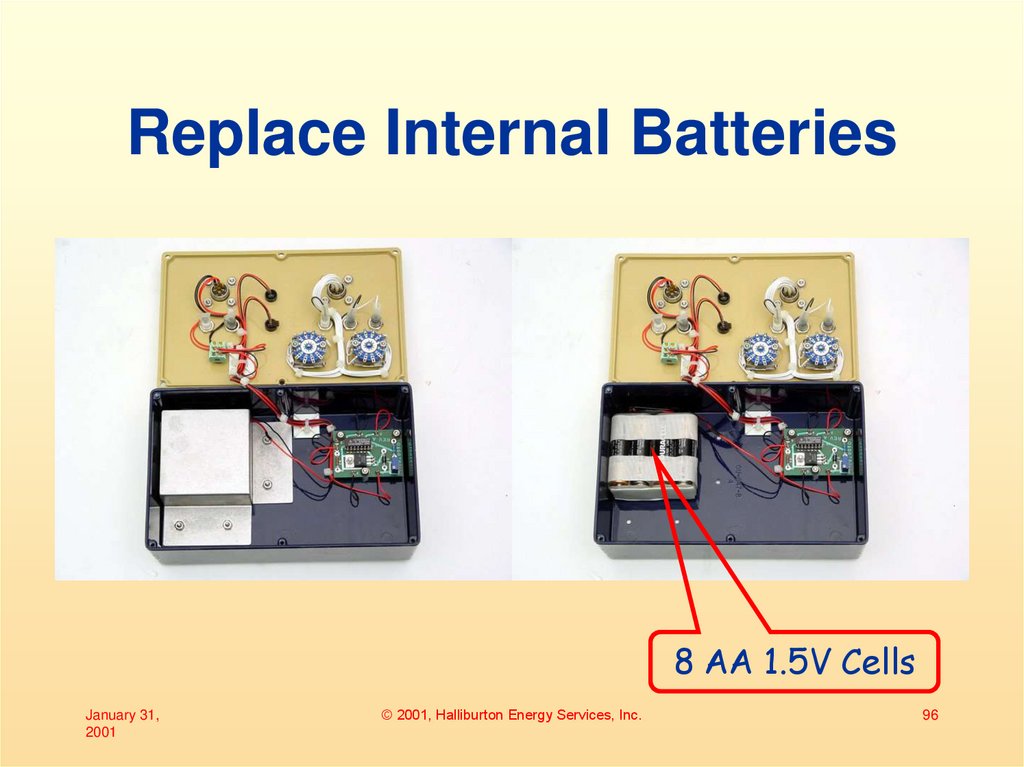
95. Replace Internal Batteries
• If the voltage is lower than 10volts, open the test set and
replace the eight 1.5 volt battery
cells.
January 31,
2001
© 2001, Halliburton Energy Services, Inc.
95
96. Replace Internal Batteries
8 AA 1.5V CellsJanuary 31,
2001
© 2001, Halliburton Energy Services, Inc.
96












 Механика


