Похожие презентации:
Analyst Documentation
1. ThinkVine Software - Analyst Documentation
Step by Step GuideThinkVine Software - Analyst Documentation
© ThinkVine. All Rights Reserved.
2. Table of Contents
TopicData Discovery Meeting
Setting Up the Project Instance
Configuring the marketplace (needs - modeled items)
Configuring the marketplace (sales, price, distribution)
Definte Seasonality
Sampling Variables to equal 100%
Agent Generation Demographics , Brands, Channel behaviors, Modeled Items, Purchasing Behaviors
Weekly Data Collection Meetings
Agent Generation (Media Activities)
Agent Generation (Targets, Influences, Needs, Weights)
Agent Generation Correlations
Agent Generation All Variables, Final Variables
Importing/Exporting Agents
Agent Generation Calibration/Tweaking
Reach Curve Generation
Put Marketing Objects into Model
Create/Import Marketing Patterns
Set up Base Marketing Plan
Set Up Calibrate/Scenarios Screen
Run Regression
Bug Check
Auto Calibration
Set up MAPE Calculation and Book
Flatten Awareness
Improve Impacts
Improve Fit
Fine Tuning
Future Prediction Awareness impacts
Smart Mix
Customer Specific Sections Runs
Saturation volume inputs runs
Segment Performance Runs
Change in Sales/Due-tos runs
Optimal Mix Runs
Marginal ROIs Runs
Training Prep Software
# of slides
8
5
10
5
4
4
8
5
7
8
9
6
4
8
7
6
6
8
4
12
6
11
11
5
10
16
5
5
9
4
6
6
7
4
7
6
© ThinkVine. All Rights Reserved.
Slide
11
16
26
31
35
39
47
52
59
67
76
82
86
94
101
107
113
121
125
137
143
154
165
170
180
196
201
206
215
219
225
231
238
242
249
3. Data Discovery Meeting
© ThinkVine. All Rights Reserved.4. Data Discovery Meeting (1/7)
Purpose:• To establish a global picture of all data required for modelling purposes. This
includes data such as executed media and promotional activities,
segmentation data, sales/output data, category information and competitive
brands.
Specifics:
• The meeting itself may take 1-2 hours, but knowledge of the data needed for
the project can be obtained via stakeholder interviews and refined via
discussions with the customer after the initial Data Discovery Meeting.
• The meeting will initiate the Data Collection Process. It should be completed
shortly after the stakeholder interviews in order to keep the project moving
forward.
• The entire Data Collection Process is iterative (learning along the way), so we
start at a high level and drill deeper during the Data Discovery Meeting.
© ThinkVine. All Rights Reserved.
5. Data Discovery Meeting (2/7)
Step by Step:• Prior to the meeting, send a high level survey of data [Pic 1] we might need.
• This will get the customer thinking about what marketing they have
executed, where they will get the data, and who will be the proper contacts
for ThinkVine to liaise with during the Data Collection Process
• During the meeting, we will drill deeper to explore the overlap of what data is
available, including breaks, and what data is needed (modeling decisions).
[Pic 2]
• The Analyst/Tech Director should be present, as well as those responsible for
the data on the customer side. This ensures that the overlap can be
adequately assessed during the meeting.
• Following the meeting
• A recap should be sent back to the customer and any misinterpretations
sorted out.
• The Data Collection Tracker (an inventory of the data needed, when
collected, when reviewed, when approved) should be generated. [Pic 3]
© ThinkVine. All Rights Reserved.
6. Data Discovery Meeting (3/7)
Typical Media Activities and Breaks:• Television: Daypart, Duration, Network vs Cable, Local vs. National, Syndicated
• Radio: Duration, Local vs. National, Satellite vs Streaming vs Broadcast
• Print: Newspaper, Magazine, Direct Mail, Catalogs
• Out-of-Home: Billboard, Cinema, Transit, Sponsorships
• Paid Public Relations: Media Vehicle delivering message
• Digital:
• Online Video, Display, Search, Email, Paid Social
• Device (PC, Tablet, Phone)
• Site or Originator (e.g., search engine or syndicator)
• For Display – Retargeted vs Mass Display
• For Search – Branded vs Unbranded
Other questions regarding media activities:
• Are any activities separable by Spanish Language vs not?
• What reach metric will be used? (also a question for analyst) – Spend, TRPs, GRPs,
Impressions, Clicks, Circulation, etc.
© ThinkVine. All Rights Reserved.
7. Data Discovery Meeting (4/7)
Typical Trade/Promotional Activities:• Coupons
• Temporary Price Reductions (TPRs)
• Feature, Display, Feature and Display
• FSIs/Rebates
• Shelftalkers
Other questions regarding possible data to be used:
• Is any competitive marketing and/or sales data available?
• Any additional information on any other structural factors such as
• Distribution (store counts, product shipments, etc.)
• Weekly Sales (the line(s) being modeling)
• Pricing time-series and margin(s)
• Other time dependent information to be included in the model/marketplace
• Any additional information on any external factors (non-marketing activity) that may have affected sales during the modeled time
period? For example,
• Category level seasonality
• Structural changes to the business (e.g., new product launches)
• Structural changes to the competitive environment (e.g., entry/exit of major competitors)
• Regulatory requirements (and changes to requirements)
• Company level internal shifts in policies/practices
• Links to the economy or other outside forces
© ThinkVine. All Rights Reserved.
8. (5/7)
Pic1
© ThinkVine. All Rights Reserved.
9. (6/7)
Pic2
© ThinkVine. All Rights Reserved.
10. (7/7)
Pic3
© ThinkVine. All Rights Reserved.
11. Creating a New Project Instance
© ThinkVine. All Rights Reserved.12. Creating a New Project Instance (1/4)
Purpose:• A project instance holds a particular implementation of the model. Simple
decisions need to be made before analysts can start working in the project
instance within the marketplace. This step guides those decisions.
Specifics:
• Setting up a project instance should only take a few minutes of analyst time.
• It should be completed as soon as the analyst is assigned to the project and
ThinkVine opens the marketplace.
• Before getting started it is helpful to know what population will be used for modeling
purposes, but this number can be adjusted at a later date if needed.
© ThinkVine. All Rights Reserved.
13. Creating a New Project Instance (2/4)
Step by Step:• Open the relevant marketplace
• On the home screen, find the section of the screen that says Project Instances
and push the new button. [Pic 1]
• Note: a marketplace can have many project instances. Copy project instances if you
are unsure of an outcome and want to make a back up copy.
• Once on the New Project Instance screen, Name the project [Pic 2].
• Pick a name that will explain the purpose of the instance (ex: Sandbox v2 with new
modeled items).
• Next decide if this will be you default project instance [Pic 2].
• A default instance will always open first when you select the marketplace.
• The end customer user (non-analyst) will only see the default project instance
• Select the Complete option when the marketplace is finished and has been turned
over to a customer.
• Work through the Settings field [Pic 3].
© ThinkVine. All Rights Reserved.
14. (3/4)
Pic1
Pic
2
© ThinkVine. All Rights Reserved.
15. (4/4)
Pic3 Settings Field:
(4/4)
Sales Units: Typically set to “Millions”. Thousands or billions can be substituted if the
category being modeled is extremely small or large. This setting will impact how all sales
are displayed in the software.
Number of Agents: Typically projects should start with 2,000 – 5,000 agents. This small
number of agents will allow the model to run quickly while major pieces of the model are
being calibrated. Once the model is in a good spot, the number of agents can increase up
to 50,000, allowing for a more precise reading of sales, though slower results.
Category Frequency: used for R&D purposes only – no input needed.
Category Penetration: used for R&D purposes only – no input needed.
Number of Consumers: This is the number of people or households that are included in
the forecast. Typically the US Household number is used. In some cases, more precise
populations are forecasted (households with kids, Hispanic, etc.). Note: in millions.
Default Iterations: Shows the number of times that a simulation will be run. Typically set to
1. Can be changed to 2, in which case the simulation is run twice and the average of the
runs is shown. This is done for greater accuracy though is not necessary.
Project Start Date: This should be reflective of the earliest actuals data that will be input
to the model (typically ~2 years back).
Duration in weeks: Number of weeks the marketplace will run (total of forward and
backward weeks). Typically set up for 5 years (2 years of actuals and 3 years of forecasts).
Distributions Visible: if visible, the customer/planner can see and make changes to the
weekly distribution values.
Price Index Visible: if visible, the customer/planner can see and make changes to the Price
Index values.
Use New Awareness Calculations: Always set to yes. Changed for R&D purposes only.
Viewing of different time options for targets and channels allowed: Normally turned off.
If changed to yes, you can see the weekly time series for each segment/channel. This is
done only when the model is calibrated at a segment/channel level.
Once complete, hit the save button (Pic 2)
Note: using the right side of this screen, you can compare to other existing project
instances within the marketplace.
© ThinkVine. All Rights Reserved.
16. Configuring the marketplace (needs, channels, external factors, seasonality, brands, modeled items
© ThinkVine. All Rights Reserved.17. Configuring the marketplace (needs, channels, external factors, seasonality, brands, modeled items) (1/7)
Purpose:• The purpose of this set of steps is to define some of the most basic elements
of the marketplace. Many of these elements must be established prior to
moving on to later steps such as agent generation and defining marketing
objects.
Specifics:
• While these steps should not take long (an hour or less) to mechanically enter
into the software, several decisions will need to be made prior to configuring
the marketplace. Decisions such as the # of channels, the # of brands/modeled
items, and relevant external factors to include should be informed by several
prior meetings, including stakeholder interviews, data review, and/or the
internal model planning meeting.
© ThinkVine. All Rights Reserved.
18. Configuring the marketplace (needs, channels, external factors, seasonality, brands, modeled items) (2/7)
Step by Step - Needs:• On the Needs screen, enter in the needs associated with the marketplace
• A “Need” is something that an agent experiences that drives them to purchase in the
category, it is akin to the category purchase frequency if you only have one need
• For many marketplaces, only one need will be necessary. In this example, the need is “Soda
Purchasing.”
• Click the Save button when you have entered all of the marketplace Needs.
Unique Needs are
required when there
are differences in
purchase frequencies.
© ThinkVine. All Rights Reserved.
19. Configuring the marketplace (needs, channels, external factors, seasonality, brands, modeled items) (3/7)
Step by Step - Channels:• On the Channels screen, enter in the channels associated with the marketplace
• For many marketplaces, only one channel will be necessary. In this example, two channels have
been used – “Online” and “Offline.”
• Channels define where the agents (consumers) can make purchases)
• Click the “Display in Results” box if you would like for the results for a particular channel
to be displayed in your results. The default is to have this box checked for all channels.
• Click the Save button when you have entered all of the marketplace Channels.
Additional channels
require more work in
calibration. They can
be used for specific
retailers, regions,
Food/Drug/Mass, etc.
© ThinkVine. All Rights Reserved.
20. Configuring the marketplace (needs, channels, external factors, seasonality, brands, modeled items) (3/7)
Step by Step – External Factors:• Work with your client to identify any variables that affect sales that are not typically
modeled, like the Dow or the number of retail stores in India
• Decide whether these variables primarily affect your brand, or whether the entire
category will grow or shrink
• In the near future, you will be able to specify a target to be uniquely affected by
these, as well.
• Decide whether this variable’s value in earlier weeks should still affect this week.
• If so, how many? Can correlate the rolling average to this week’s sales to determine
this.
• Fill in these answers as well as the weekly levels of the variables.
© ThinkVine. All Rights Reserved.
21. Configuring the marketplace (needs, channels, external factors, seasonality, brands, modeled items) (4/8)
The explanation should
help your client know what
values to put in future
plans
“T” is the number of
*additional* weeks in the
rolling average. Zero here
means only this week’s
values affect this week’s
sales.
If you client has been
involved in the inclusion of
these variables, they may
want to have control over
the future assumptions
about their weekly values.
Turn “Display in Plan” “On”
in this case.
Fill in the weekly values
© ThinkVine. All Rights Reserved.
22. Configuring the marketplace (needs, channels, external factors, seasonality, brands, modeled items) (4/7)
Step by Step - Seasonality:• On the Seasonality screen, enter your defined seasonality time series in the Finals column.
• The method for defining your marketplace’s seasonality will be discussed in the “Define
Seasonality” section.
• If your marketplace has more than one need, be sure to enter in a seasonality for each need.
• Click the Save button to save your changes before exiting the screen.
© ThinkVine. All Rights Reserved.
23. Configuring the marketplace (needs, channels, external factors, seasonality, brands, modeled items) (5/7)
Step by Step - Brands:• On the Brands screen, enter in the brands associated with the marketplace
• All marketplaces will have at least two brands at minimum – one for the brand you are
modeling (in this example “Coke”) and one for all other competitors in that category.
• Some marketplaces may have more than two brands if multiple customer brands or multiple
competitive brands are being modeled separately.
• Click the Save button to save your changes before exiting the screen.
© ThinkVine. All Rights Reserved.
24. Configuring the marketplace (needs, channels, external factors, seasonality, brands, modeled items) (6/7)
Step by Step – Modeled Items:• On the Modeled Items screen, enter a name and display name for the modeled items associated
with the marketplace
• All brands will have at least one modeled item. Some brands may have more than one depending on the
scope of the project.
Under the brand field, be sure to assign the modeled items to the correct brand.
Modeled items are what is purchased by the consumer when they buy an item
The Expiry Days field should be left at 0 by default.
Consumer Price should be filled in to the average price for the item during the modeling period,
and Product Satisfies Need field should be set to 1 if there is one need. If there are multiple
needs, this column should sum to 1.
• The Margin Per Unit field will need to be filled in before the software can generate ROI. The
Margin Per Unit is the $ margin associated with one unit of sales in the marketplace.
• If you would like a modeled item to be displayed in the results or affected by an external factor,
check the corresponding box.
• Click the Save button to save your changes before exiting the screen.
© ThinkVine. All Rights Reserved.
25. Configuring the marketplace (needs, channels, external factors, seasonality, brands, modeled items) (7/7)
Watch-outs:• Be mindful about the # of needs/channels/brands/modeled items entered. Do not
create multiple needs or channels when one is sufficient. Some marketplaces will
require multiple needs or channels, depending on the scope of the project, but the
majority will only need one of each.
• Examples of where multiple needs/channels/brands/modeled items are
appropriate:
• Needs: separate usage occasions that the customer would like to model separately
• Channels: online vs offline sales, grocery vs club sales
• Brands: customer has two or more brands in same marketplace (ex: Brawny and Sparkle
paper towels, Coke and Diet Coke) and at least some media impacts one brand more than
the other
• Modeled Items: customer has two or more “items” in the same marketplace, but media
impacts are relatively consistent between the two (ex: different sized SKUs of the same
brand)
• Most marketplaces should not display the results for the competitive modeled
item, so consider unclicking this box on the Modeled Items screen. Unless you
have agreed to share competitive results with your customer, you should not
display the competitive results.
© ThinkVine. All Rights Reserved.
26. Configuring the Marketplace (sales, price, distribution)
© ThinkVine. All Rights Reserved.27. Configuring the Marketplace (sales, price, distribution (1/4)
Purpose:• Finalizing the marketplace so it is accurately capturing real-world dynamics
concerning sales, price, and distribution of both the modeled brand and
competition
Specifics:
• Modeled Items and Channels must be configured first.
• Estimated Time: 2 Hours
© ThinkVine. All Rights Reserved.
28. Configuring the Marketplace (sales, price, distribution) (2/4)
Sales: Inputting sales into the model is fairly straightforward. Sales has no direct usein the model, but is only used to display an “Actuals” sales line on the Sales Forecast
graphs. Sales can be directly input into the model. Make sure you are copying in
values with the “correct” unit (i.e. Are you modeling in millions? Thousands?)
• The modeler is able to input sales by modeled item and by sales channel.
Therefore, it is important you’ve completed the Modeled Items and Channels
screens prior to inputting sales.
• Note, if you have allowed a channel to be displayed on the results on the Channels
screen, its Actual sales will be visible on the Sales Forecast screen. If the modeled
is not calibrated weekly by channels, the modeler should not include sales by
channel, or the channel should be excluded from the display in results. If this is the
case, just put the total sales in one of the channels. This will make the Actuals line
accurate for All Channels on the Sales Forecast screen, without showing the
customer fit by channel.
• The same holds for competition—if the model is not calibrated by competition, it is
best to either exclude the modeled item from the results, or to not put sales into
the software.
© ThinkVine. All Rights Reserved.
29. Configuring the Marketplace (sales, price, distribution) (3/4)
Price: Price can be input as either an index or direct price, and price must be input foreach modeled item. There is a toggle switch at the top of the Price screen where the
modeler can specify which option to use.
• If modeling as an index, data transformation will have to be done outside of the
software. Index the weekly price to the average price over the entire modeling
period. Note, the modeler must keep track of this value for future model updates.
After the index is created, the weekly values can be copied into the software.
• If you use direct price, you must enter a price to which the weekly values will be
indexed. This is input is found on the Modeled Item screen, and there is a separate
input for each modeled item (Consumer Price)
Distribution: Distribution is a weekly input where values must be between 0 and 1.
Values must be input weekly by channel, by modeled item.
• For CPG models, the input should be fairly straightforward and given to the
modeler directly from the customer. This measure tells you if a customer goes to
the store what is the likelihood that the item will be available on the shelf
• For modeling other distribution factors like quality of distribution or number of
stores it is better to model those in the external factor section
© ThinkVine. All Rights Reserved.
30. Configuring the Marketplace (sales, price, distribution) (4/4)
• Often, traditional “distribution” is not appropriate for the category beingmodeled in this case you can just use a 1 for every week effectively removing
the effect of distribution in the model. This would be appropriate for things
that are available to everyone online rather than through a retail store
© ThinkVine. All Rights Reserved.
31. Defining Seasonality
© ThinkVine. All Rights Reserved.32. Defining Seasonality
Purpose:• Defining seasonality to determine when agents are most likely to experience
a category need
Specifics:
• The modeler must specify category needs prior to determining seasonality
• 1 hour to complete
© ThinkVine. All Rights Reserved.
33. Defining Seasonality
Step by Step:• Seasonality is used to determine when agents are most likely to experience a
need. If the analyst has category sales and distribution, the software can
calculate the software.
• On the Seasonality screen, copy in sales and distribution. If your model has
multiple needs, you may enter in different seasonality for each of those needs.
There are 3 available methods for defining seasonality. The analyst should run
all three methods to see which is most appropriate for the category. The goal
is to find a pattern that follows the seasonal spikes of the brand while not over
fitting the data. If the model is over fit to seasonality, it will not only be harder
for the modeler to make media effective, but it could also lead to worse future
prediction.
• The modeler can also hand calculate seasonality and can be copied in directly
into the “Finals” column on the Seasonality screen. While there is no exact
method for calculating seasonality, two potential solutions are:
© ThinkVine. All Rights Reserved.
34. Defining Seasonality
Step by Step:• For each year of the calibration, divide each week by the average sales over
that year. This will create an index for each week in the year. Average those
indices over the 3 years of the calibration period to get a 52 week seasonal
curve. Repeat that curve for each year of the simulation.
• Run a regression with 52 indicator variables for each week (or 12 for each
month if the modeler is worried about over-fitting any seasonal spikes), with
any other key variables (trends over time, distribution, exogenous variables)
that may be appropriate for the category. Use the predicted values of the
regression and create indices as above.
• Finally, the modeler should be conscious of the average seasonality index for
each year. The final frequency of need for the agents is equal to their sampled
frequency X the average seasonality for that year. If the modeler’s goal is to
have no category growth trends, the average seasonality should be 1.
• However, if the category is growing, seasonality is a viable way to capture that
growth. As an example, having seasonality trend upwards so the average index
is 1.05 during the second year will create a 5% category growth.
© ThinkVine. All Rights Reserved.
35. Sampling Variables to get to 100%
© ThinkVine. All Rights Reserved.36. Sampling Variables to get to 100% (1/3)
• Certain variables are required to sum to 1 for each agent.• For example, if you have more than one Channel…
• Fraction of the category need satisfied in Channel 1 + Fraction of the
category need satisfied in Channel 2 = 1.
• This is an easy one to do.
• Sample the first variable from a Beta distribution.
• Calculate the second variable on the “Final Variables” screen as 1 – first
variable.
© ThinkVine. All Rights Reserved.
37. Sampling Variables to get to 100% (2/3)
• How do you deal with three channels?• Sample each of the three variables from a Normal distribution.
• On Final Variables screen, use the following formula.
• Exp([Channel 1]) / ( Exp([Channel 1]) + Exp([Channel 2]) + Exp([Channel 3]) )
• To determine the mean and standard deviation of each distribution, use solver
in Excel to obtain the correct average percentages for each of the three
channels.
• Example:
• 65% of category moves thru Channel 1
• 10% of category moves thru Channel 2
• 25% of category moves thru Channel 3
© ThinkVine. All Rights Reserved.
38. Sampling Variables to get to 100% (3/3)
• Use solver, change the green cells with red arrow, so that the three averagesequal the specified orange cells.
• Category 1 ~ N(2.35,1)
Category 2 ~ N(0.00,1)
Category 3 ~ N(1.09,1)
© ThinkVine. All Rights Reserved.
39. Agent Generation - Demographics
© ThinkVine. All Rights Reserved.40. Agent Generation (1/7)
Purpose:• Agent characteristics typically include demographics, placement on a brand
awareness continuum, category purchasing behaviors, shopping channel
tendencies, item purchase probabilities and price sensitivity. These are inputs
for the ThinkVine forecasting marketplace and the values for these variables are
sampled.
• It is important to code agents with these characteristics as they will impact how
the agents consume media and make purchases in the category. The more
similar the agents behave relative to actual consumers, the more realistic your
marketplace will be.
Specifics:
• Understanding of probability density functions is needed to perform this step.
• Most often used probability density functions include: Gamma, Beta, Normal, Categorical
• Histograms using data provided by customers (if available) can be used to approximate the
parameters that govern the shape of the specified probability density function. If
histograms aren’t available, it is acceptable for the analyst to use their judgment to inform
the shape.
© ThinkVine. All Rights Reserved.
41. Agent Generation (2/7)
Step by Step:• Open the relevant marketplace
• On the Agents tab, select Agents
• Once inside the agent generation screens, select Definitions.
• Click Click here to add new item [Pic 1]
• Select the p.d.f. you want to use to sample values from for the variable being created.
• Enter the parameter values that govern the shape of the p.d.f.
© ThinkVine. All Rights Reserved.
42. (3/7)
Pic1
© ThinkVine. All Rights Reserved.
43. Agent Generation (4/7)
Step by Step:• In the example provided, Income is
being sampled from a gamma
distribution with k=1.25 and a=40.
How is this handled:
• To the right is an illustration of the
distribution that is used to sample
Income.
Details:
• On the next page we will outline the
typical distributions used.
© ThinkVine. All Rights Reserved.
44. Agent Generation (5/7)
Probability Density Functions:• Beta(z, S)
• Sampled values are between 0 and 1.
• z mean S Dirichlet’s switching parameter
• NOTE: This parameterization is different from most statistics textbooks.
• Gamma(k, a)
• Sampled values are between 0 and positive infinity.
• ka mean ka2 variance
• Normal(mu, sigma)
• Sampled values are between negative infinity and positive infinity.
• mu mean sigma2 variance
• Discrete()
• Categorical i.e. gender, race
• Analysts specifies the percentage of agents sampled in each category
© ThinkVine. All Rights Reserved.
45. Agent Generation (6/7)
Demographics:• Many different distributions used: Income (gamma), Race (discrete), etc.
• Census should dictate
Brands:
• ThinkVine marketplace expects awareness to be a value between 0 and 1.
• Use a Beta distribution with a low mean (say 0.05) for media-based awareness
• Try a higher mean (say 0.5) for distribution-based awareness. This number may not change, and the smaller it
is, the more media may *be able* to do.
• Total Remembered Media Hits. Recommend not sampling, set all agents to one.
Channel Behaviors:
• Fraction of Need filled in Channel i expected to be between 0 and 1.
• If there are only two, consider using Beta
• If not, use normal and the utility trick to normalize to be between 0 and 1 on Final Variables.
Modeled Items:
• ThinkVine marketplace expects purchase probabilites to be between 0 and 1.
• Trial purchase probability is typically not used except for new products
• For Repeat, use a Beta with a switching parameter around 3 (in the absence of data) *unless* your
category or brand buyers are likely to be very loyal (think hypo-allergenic soap). Then use S<1.
Purchasing Behaviors:
• Price Sensitivity is expected to be a negative number.
• Typically use Gamma then multiply sampled value by -1 on Final Variables screen.
© ThinkVine. All Rights Reserved.
46. Agent Generation (7/7)
Watch outs:• If sampled values of media awareness are close to 1, media may not have
much of an effect since awareness is capped at 1.
• If sampled values of purchase preference are close to 1 (or close to 0), the
implication is that there are agents who love/hate the brand. Which means
trade (temporary price reductions) may not have much of an effect on agent
purchasing. You may also notice that media has a lesser impact as well.
• Agent price sensitivity is used to inform the effect of a change to a modeled
item’s non-promoted price. The more negative, the more elastic the effect.
• Do not add characteristics to agents that are unlikely to be important to the
marketplace. For example, if marital status, education level, or favorite color
are not important characteristics that differentiate real consumers in the
category, do not include these characteristics in the agents.
• Always export agents and diligently evaluate the composition of your agent set.
This will be covered in detail in later sections.
© ThinkVine. All Rights Reserved.
47. Weekly Data Collection Meetings
© ThinkVine. All Rights Reserved.48. Weekly Data Collection Meetings (1/4)
Purpose:• To facilitate frequent and regular communication between ThinkVine, the
customer, and all Data Providers to ensure timely and complete transfer of
accurate data for all inputs to the model.
Specifics:
• The meetings should be approximately 30 minutes for each marketplace, held
weekly, for 4-5 weeks (or until the Data Collection Process is complete).
• The ThinkVine team, the customer representative, and any representatives
from Data Providers should be in attendance at each meeting.
• An agenda [Pic 1] should be distributed prior to each meeting to guide the
discussion. The Data Collection Tracker [Pic 2] should also be updated and
circulated prior to each meeting.
© ThinkVine. All Rights Reserved.
49. Weekly Data Collection Meetings (2/4)
Step by Step:• Prior to the meeting, the updated Data Collection Tracker [Pic 2] should be
sent, as well as the agenda for the meeting [Pic 1].
• During the meeting, follow the agenda and record any updates to the status of
the data collection process (dates, transfers, issues, etc.)
• Following the meeting, a recap of the meeting should be sent back to the
customer (e.g., meeting minutes).
• Prior to the next meeting, offline discussions should occur with pertinent
parties to resolve outstanding issues.
© ThinkVine. All Rights Reserved.
50. (3/4)
Pic1
© ThinkVine. All Rights Reserved.
51. (4/4)
Pic2
© ThinkVine. All Rights Reserved.
52. Agent Generation – Media Activities
© ThinkVine. All Rights Reserved.53. Agent Generation – Media Activities
Purpose:• In order to simulate media consumption behaviors in the agents, the media
activities must be input into the software. Media minutes are important agent
characteristics because they represent how much time an agent spends with
specific media types. This impacts how likely an agent is to be exposed to each
type of media.
Specifics:
• This is one of the first steps in personifying the agents. It should take only a few
minutes, since the general parameters should already be available
• General media consumption behaviors for US studies are derived from USA
Touchpoint’s panel data, which is an external vendor
• Summary of the Touchpoint’s data is provided from the Marketing Science team,
in the form of statistical distribution (normal, gamma, beta, etc.) and is updated
quarterly
• Some customers might have more industry-specific media data that could be
incorporated in this process
© ThinkVine. All Rights Reserved.
54. Agent Generation – Media Activities
Step by Step:• Open the relevant marketplace
• From the dashboard, click on AGENTS on the top menu line to expand. Then
select AGENTS in the sub-menu [Pic 1]
• Once on the Agent Set screen, select Media Activities [Pic 2]
• To add a new media activity, click on Click here to add new item [Pic 2]
• Each media activity must have these four settings:
Name – enter a relevant name to describe the activity, e.g. “TV minutes”,
“Facebook time”, etc.
Distribution – select the distribution family from the drop-down list [Pic 3]
Parameter 1 – based on the distribution, enter the first parameter (e.g. mean)
Parameter 2 – based on the distribution, enter the second parameter (e.g.
variance)
Beside the distribution name in the drop down menu are references to what the
parameters represent. For example, after Normal is (mu, sigma). This indicates
that Parameter 1 should be for mu (mean) and Parameter 2 should be sigma
(variance)
© ThinkVine. All Rights Reserved.
55. Agent Generation – Media Activities
Step by Step (cont.):• A graph will appear on the right hand side after all the valid variables have
been entered (except for binomial & discrete distributions)
• For binomial & discrete distribution, there are a couple of additional steps:
After selecting binomial or discrete, the right hand side appears with three
additional inputs
Code – must be numeric. Please note this code, as any reference to this item
will be based on this number. Analysts should generally start coding with a 0 or
1 value.
Meaning – provide a description for this code
Target % – enter the percentage as a decimal (50% would be 0.5)
Total distribution must equal 100%
• Most media activities will be in the form of beta, gamma, or normal distributions
• After all media activities are added, click Save on the left hand side. See Pic
4 for a completed example
© ThinkVine. All Rights Reserved.
56. Agent Generation – Media Activities
Pic1
Pic
2
Pic
3
© ThinkVine. All Rights Reserved.
57. Agent Generation – Media Activities
Pic4
Any tactic from the marketing plan
has to have a corresponding media
activity. Out of home billboards?
You’ll need travel time. Coupons?
Need a coupon time.
© ThinkVine. All Rights Reserved.
58. Agent Generation – Media Activities
Noteworthy• Include as many media activities as available, even those that the customers currently
do not utilize, as they may decide to incorporate tactics later on. Adding activities
later, after calibration is complete, will cause your agent set to be re-sampled and
may cause minor changes to your results, which should be avoided.
• It is better to be more granular. For example, instead of total “internet minutes”, try
breaking out that tactic into “Online video viewing minutes”, “Facebook browsing
time”, or “Checking email frequency”. This will allow the marketplace to provide
greater insights and flexibility.
• Most of the media activities from the Touchpoint data can represented with Beta,
Gamma, and Normal distributions
• The most common media consumption distributions are time spend watching TV,
listening to radio, browsing the internet, and reading newspapers/magazines. Below
are these distributions as of Q2 2013:
Name
Television Minutes
Radio Minutes
Internet Minutes
Newspaper Minutes
Magazine Minutes
Distribution
Gamma (k,a)
Gamma (k,a)
Gamma (k,a)
Gamma (k,a)
Gamma (k,a)
Parameter 1 Parameter 2
2.392
884.175
1.221
1092.666
0.873
1488.526
0.133
563.658
0.13
568.951
© ThinkVine. All Rights Reserved.
59. Agent Generation (Targets, Needs, Influences, Weights)
© ThinkVine. All Rights Reserved.60. Agent Generation (Targets, Needs, Influences, Weights)
Purpose:• This step is important because the targets, influences, needs and weights will
influence the behavior of agents and segments within the agent population.
Targets allow the analyst to both target agents with media and measure the
impact on media on those subpopulations. Influences allow a subset of
agents to assign their preferences to other agents within the simulation.
Needs determine how frequently agents will purchase. Normally, all agents
represent the same (arbitrary) number of consumers, but weights allow the
analyst to use different agents to represent different weights.
Prerequisites:
• Desired targets must be agreed upon with the customer before finalizing
targets and moving on to the next step (see Watch-outs)
• Targets are often defined by age, gender, race, primary language, geography,
income, marital status, and age of children, among other factors.
© ThinkVine. All Rights Reserved.
61. Agent Generation (Needs)
Step by Step:Needs - for every need defined during marketplace configuration, there will be
four agent variables to configure:
a. Duration in Days: usually set to 1 in Final Variables (see Agent Generation
– Final Variables). This variable allows you to create needs of varying time
periods, which can introduce an additional layer of variability to the time
in between purchases for an agent.
b. Intensity: usually set to 1 in Final Variables (see Agent Generation – Final
Variables). This variable is used to
c. Next unmet date: usually set to 1 in Final Variables (see Agent Generation
– Final Variables). This variable allows you to
d. Frequency: this variable determines how often agents will need to make a
purchase, which is a key driver of total sales volume.
© ThinkVine. All Rights Reserved.
62. Agent Generation (Targets)
Targetsa. After establishing which targets you want to define (see Prerequisites),
navigate to Agents Agents Targets and name the targets accordingly
b. In most cases, you will define targets on the Final Variables screen so that you
can link each target with any relevant demographic or other variables.
i. If any targets are randomly assigned to agents as opposed to
demographically linked, you can use a probability distribution (preferably
beta) to assign agents to target groups
c. If you are assigning targets in Final Variables, determine which demographics
they should be linked with. For example, we’ll define a target of Women 2549, which is a common demographic targeted in TV buying.
i. First, we want to be sure that any agent who is a 25-49-year-old woman
will be completely associated with the target; in other words, we want all
25-49-year-old female agents to be 100% within the target. To ensure this
in the context of the software, we’ll use an (case-sensitive) if statement:
“if([Age] > 25 and [Age] < 49 and [Gender] = 1, 1,0)” (this assumes that a
[Gender] of 1 corresponds to female)
© ThinkVine. All Rights Reserved.
63. Agent Generation (Targets)
Targets (continued)1. Note that if you used a Beta distribution to enforce lower and upper bounds
on the Age variable, you’ll need to use the Age pre-transformation Age values
to achieve the desired result. In other words, if an Age variable of 0.1
corresponds to a 25-year-old agent, you would replace “[Age] > 25” with
“[Age] > 0.1” and so forth
i. Second, we may want to allow women outside of the target to still have a chance
of seeing media targeted at women 25-49. To do so, we’ll expand the “else” case
from the target statement from above using a nested if statement: “if([Age] > 25
and [Age] < 49 and [Gender] = 1, 1,if([Gender] = 1 and [Age] < 25,1-((25[Age])*0.02),if([Gender ]=1 and [Age] > 49,1-(([Age]-49)*.02 ),0)))”
ii. Last but not least, we may also want to allow men to see media that’s targeted at
women. To do so, we’ll add another layer to the if statement above (assuming a
gender of 0 represents male): if([Age] > 25 and [Age] < 49 and [Gender] = 1,
1,if([Gender] = 1 and [Age] < 25,1-((25-[Age])*0.02),if([Gender ]=1 and [Age] >
49,1-(([Age]-49)*.02 ),if([Age] < 49 and [Age] > 25 and [Gender] = 0,0.5,if([Age] <
25 and [Gender] = 0, 0.5*(1-(25-[Age])*0.02),if([Age] > 49 and [Gender = 0, 0.5*(1([Age] – 49)*0.02),0)))))
© ThinkVine. All Rights Reserved.
64. Agent Generation (Influences)
a. If you decide that you need to use the functionality of influences within yourmodel, first you will need to navigate to the Agents screen and click “Enable
Influences.” Next, if you click on “Influences” under the “Definitions” tab, you
will have four variables to configure.
b. Number of influences on agent: This represents the number of influencers
who can impart their preferences on a given agent.
c. Avg prob obey: must be between 0 and 1 (best suited to a beta distribution).
This represents the probability that a given agent will “obey” the
recommendation of an influencer.
d. Number this one is influencing: This represents the number of agents that can
be influenced by each influencing agent
e. Prob Insist: must be between 0 and 1 (best suited to a beta distribution). This
represents the probability that an influencer will “force” an agent to accept its
preferences.
© ThinkVine. All Rights Reserved.
65. Agent Generation (Weights)
a. Again, each agent in the model represents an arbitrary number of real-worldconsumers, and weights allow you to essentially change the number of consumers
represented by a given agent. Agents with greater weight represent more consumers,
and smaller weights represent fewer.
b. If you decide to use weights, you’ll probably want to use correlations and/or Final
Variables to connect agent weights with demographic data. For example, you may have
a customer who wants granular insights from New York state, which only represents
about 6% of the total population. In order to maximize the accuracy of New York
results, you can assign a lesser weight (the agents are then representative of fewer
consumers) to agents who are designated as living in New York, and a proportionally
greater weight to non-New York residents. To accomplish this, if you created a variable
called “Weight,” you could define it in Final Variables with a statement along the lines
of if([New Yorker] = 1, 0.2, 1.34).
a. If you implement a solution similar to this, you also have to increase by a factor of 5
the number of agents “living” in New York, as each of them now has a weight of 0.2,
or 1/5. At the same time, the number of agents “living” in other parts of the country
will decrease.
© ThinkVine. All Rights Reserved.
66. Agent Generation (Weights)
• Watch-outs• Nearly every project will make use of Targets and Needs. Most projects will not
need to use Influences or Weights. Only use these characteristics if necessary.
• Targets
• Try to ensure that all targets you will need are included before you begin the
calibration process. Whenever targets are added, agents are resampled, which
can change result output by ~1%, which can be frustrating if you’ve already
calibrated the model
• Needs
• You may have established different seasonalities if you created more than one
need; keep in mind that both seasonality and need frequency will have a
strong relationship with overall volume for each modeled item
• Functions on the Final Variables screen are case-sensitive, and all of them are
lower-case
• How Long Should This Take?
• Most projects won’t need influences or weights, and in the absence of those,
configuring targets and needs should take roughly 4-8 hours.
© ThinkVine. All Rights Reserved.
67. Correlating agent characteristics
© ThinkVine. All Rights Reserved.68. Correlating agent characteristics (1/8)
Purpose:• In order to make the agent population more realistic, the analyst must create
relationships between agent variables in the software. This relationship may
be positive, negative, non-linear or otherwise.
Specifics:
• Defining these relationships is of vital importance in agent-based modeling. An
analyst should expect to spend a few days on this step and diligently inspect
the agent population for the desired multidimensional relationships.
• An understanding of correlation, probability density functions and crosstabulation is needed to perform this step.
• Before getting started it is helpful to know which variables are intended to be related.
It is often helpful to draw or list out the correlations you intend to create beforehand.
• This is a fact/data-driven exercise. Remember, the analyst is not trying to uncover the
relationships in this phase. The relationships are known and the analyst is trying to
create an agent set that has these known relationships.
© ThinkVine. All Rights Reserved.
69. Correlating agent characteristics (2/8)
Step by Step:• Open the relevant marketplace
• On the Agents tab, select Agents
• Once inside the agent generation screens, select Correlations.
• Click Click here to add new item [Pic 1]
• Select the variable you want to be related to other variables.
• Click Click here to add new item to identify the other variables. [Pic 1]
© ThinkVine. All Rights Reserved.
70. Correlating agent characteristics (3/8)
Viewing habits oftotal population
Viewing habits of
younger people
Viewing habits of
older people
© ThinkVine. All Rights Reserved.
71. (4/8)
Pic1
Intensity of the
relationship
Gender value of 1
= Female
Less than/greater
than agent value
Direction of the
correlation
© ThinkVine. All Rights Reserved.
72. Correlating agent characteristics (5/8)
Step by Step:• In the example provided, the sampled value for Television Minutes is related to
the sampled values for Gender, Age, Income and Race.
• Make sure that Gender, Age and Income get sampled before Television Minutes
on the All Variables screen
© ThinkVine. All Rights Reserved.
73. Correlating agent characteristics (6/8)
How is this handled:• If I want higher sampled values of TV minutes to be associated with older
agents, and lower TV minutes to be associated with younger agents, I can use
the correlations tab to specify the positive relationship between TV and age.
This is done using the direction column.
Details:
• The higher the dilution value, the weaker the relationship between the two
variables.
© ThinkVine. All Rights Reserved.
74. Correlating agent characteristics (7/8)
Export Agents:• The analyst can export data [Export Agents] to a Microsoft Excel workbook.
• Once the analyst has the agent characteristics in Excel, the analyst can make
use of the Excel functionality to create scatterplots, inspect correlations, etc.
[Pic 2]. If the correlations are not meeting expectations, the analyst can go
back to the agent generation stage.
• Note: Agent generation is an iterative process that can take an extremely long
time – if you let it. As this is one of the early steps in the process, plan ahead
and account for your time wisely.
© ThinkVine. All Rights Reserved.
75. Correlating agent characteristics (7/8)
TV MinutesTV Minutes
Pic
2
Age
Income
© ThinkVine. All Rights Reserved.
76. Agent Generation: All Variables, Final Variables
© ThinkVine. All Rights Reserved.77. Agent Generation: All Variables, Final Variables
Purpose:• The purpose of the All Variables screen is to ensure that all of the agent variables
are ordered correctly in order to create correlations between them on the
Correlations screen.
• The All Variables screen is initially auto-populated based on the analyst’s decisions
regarding the marketplace configuration and agent properties. However, this order
will need to be changed to enable the Correlations that the analyst would like to
establish between agent variables.
• The purpose of the Final Variables screen is to allow any transformations or logic
statements to be applied to any of the defined agent variables.
Specifics:
• The ordering of the All Variables screen should take 30 minutes to an hour to
complete. Before moving on to this step, the analyst should have already
completed the Agent Generation – Correlations step
• The time needed to complete the Final Variables screen can vary depending on the
number of agent variables needing to be transformed. This step could take 30
minutes or less for simple marketplaces or 2-3 hours for very complex ones
© ThinkVine. All Rights Reserved.
78. Agent Generation: All Variables, Final Variables
Step by Step – All Variables:• Navigate to the All Variables tab within the Agents menu. The All Variables screen determines the order in
which variables will be sampled and assigned to agents.
• The current order of variables is auto-populated based on prior steps to configure the marketplace and create
agent variables. However, the order will need to be manually adjusted based on the Correlations between
variables that you established during the last step.
• On the Correlations screen, you made correlations between a variable (called the “Target Variable” hereafter)
and one or more Sampled Variables. See example in Pic 1 (Correlations tab) – TV Minutes is correlated with
Gender, Age, HH Income and Race. You can only correlate your Target Variable with other variables that have
already been sampled.
• In order for your Correlations to be valid, order all of your Target Variables such that they are sampled after all
of the corresponding Sampled Variables you are correlating with.
• Drag and drop variables on the All Variables screen to order them such that all Target Variables are ordered
after their correlated Sampled Variables. Target Variables do not need to directly follow their Sampled
Variables – they just need to come later in the order on the All Variables screen.
• See Pic 2 (All Variables tab) for an example – TV Minutes (the Target Variable) is lower than all of its
Sampled Variables (Gender, Age, HH Income, Race) in the All Variables order.
• Click the Save button on the left side panel when you have made all of the necessary changes.
Pic
1
Pic
2
© ThinkVine. All Rights Reserved.
79. Agent Generation: All Variables, Final Variables
Step by Step – Final Variables:• Navigate to the Final Variables tab within the Agents menu.
• If there are variables whose final values need to be transformed from their sampled value, as
designated from the Definitions tab. Enter statements to define those changes on this screen.
• Some common examples of variables that are transformed on the Final Variables screen:
• Price Sensitivity: this variable is commonly sampled as a positive value from a Gamma distribution on the
Definitions screen. Then a logic statement on the Final Variables screen is used to change the sampled
variable to a negative value. See Pic 1 for example.
• Targets that are defined demographically: Oftentimes, there are targets that are created as a combination
of demographic characteristics. One such example is in Pic 2 – “Moms” are defined based on variables
that designate them as female and having children in the same household.
• You can enter your statements directly into the Logic column or create them using the Edit
Equation button on the right side of the screen.
• Click the Save button on the left side panel when you have made all of the necessary changes.
Pic
1
Pic
2
© ThinkVine. All Rights Reserved.
80. Agent Generation: All Variables, Final Variables
Watch-outs:• All Variables screen
• Use this screen only to re-arrange the order of your agent variables. Do not change the variable
name, distribution, or parameters on this screen. If you wish to change any of these fields, do
so on the Definitions screen.
• Final Variables screen
• There are several variables that should be hard-coded to “1” on this screen by default. See Pic 1
for example. These variables are either no longer used within the software or used only on rare
occasions. These variables are:
In Store Freq
Prob Watch Ads
Ever Bought (for all Brands)
Duration in Days (for all Needs)
Intensity (for all Needs)
Next Unmet Date (for all Needs)
• When creating logic statements, variables names should be contained within brackets. Example:
[variable name].
Pic
1
© ThinkVine. All Rights Reserved.
81. Agent Generation: All Variables, Final Variables
Watch-outs:• Final Variables screen
• When initializing Ever Bought = 1 for all agents:
• Only the repeat preference value is used in the calculations.
• This makes sense when you are modelling established brands. People already have a preference for the
item we are modelling since the category is likely in equilibrium.
• Total Remembered Media Hits = 1 for all agents.
• Makes studies more comparable. If we want to create a database of strength parameters, we want to have
this varaible set to the same value for all studies.
• The engine uses TRMH in conjunction with the Saturation Constant (2) to change an agent’s media-based
awareness when touched by media in the simulation. Therefore, it is important to initialze TMRH =1 for all
agents.
• This is mainly so that strength parameters studies can be compared.
© ThinkVine. All Rights Reserved.
82. Importing/Exporting Agents
© ThinkVine. All Rights Reserved.83. Exporting Agents
Purpose:• Exporting agents allows the analyst to document and store all of the agent
characteristics.
Specifics:
• This step is typically completed after the agent characteristics are completed.
• This process should only take a couple of minutes.
© ThinkVine. All Rights Reserved.
84. Exporting Agents
Step by Step:• To export agents, navigate to the Agents tab and click the Export Agents
button on the side bar under Agent Set.
• After clicking Export Agents, a dialogue box will appear, allowing the analyst to
select the number of agents to export (with a max of 10,000 agents).
• After selecting the number of agents to export, click OK and save as an excel
file.
• Note: there is a tradeoff between choosing more or fewer agents. By
choosing more agents you get a better idea of the distribution of agents but
it takes longer to pull from the software.
• Usually, you would want to choose a smaller amount (<2,000) if you’re just
checking to see if the Final Variable calculations are working properly.
© ThinkVine. All Rights Reserved.
85. Exporting Agents
© ThinkVine. All Rights Reserved.86. Agent Generation Calibration/Tweaking
© ThinkVine. All Rights Reserved.87. Agent Generation Calibration/Tweaking
Purpose:• Calibrating the agent population to ensure it is a close representation of the
target population
Specifics:
• All other Agent Generation steps should be complete
• An agent generation calibration workbook will have to be set up in Excel
• Estimated Time: 2 Days
© ThinkVine. All Rights Reserved.
88. Agent Generation Calibration/Tweaking
Step by Step:• This step of the process is to try to ensure the modeled agent population is a
close representation of the population which the model is supposed to be
representing. Agents are a key distinguishing factor for ThinkVine, and,
therefore, the modeler should budget ample time for the agent calibration
process to ensure accuracy.
• Using data from the customer and key stakeholder conversations, the
ThinkVine team should have identified defining characteristics of the agent
population. During agent calibration, only focus on demographic or behavioral
characteristics that are relevant to the study. If the customer does not care
about marital status, and it does not factor into any segmentation work for the
project, the modeler should not feel obligated to “calibrate” on that
demographic.
© ThinkVine. All Rights Reserved.
89. Agent Generation Calibration/Tweaking
Step by Step:• To that point, unless the modeled population differs from the general US population (e.g. Dog
Owners, college students only, etc.), the default distributions and correlations taken from the
US population template should be sufficient for the modeler to feel comfortable that the
agent population is accurately capturing the demographic profile US population. Even in the
case where the modeled population is a subset of the total US population, the modeler
should consider if the distributions are going to differ significantly from the default
parameters. Does the modeler or client feel that the age distribution of pet owners differs
greatly from the total US population? If not, then any adjustment of the distribution
parameters or correlations is most likely unnecessary.
• To “check” or calibrate how the agent population compares to the target consumer
population, the modeler should create an Excel workbook that compares the agent
population to the “target” characteristic distributions. Typically, these workbooks have one
worksheet where exported agent sets can be copied in, and another sheet for the agent
summary. The summary tab lines up agent population distributions alongside the “target”
for that population.
• As an example, the target consumer population may have 35% Segment A, 50% Segment B,
and 15% Segment C. How close is our agent population to those figures? After summarizing
the agent download, we see that our agent population has 25% Segment A, 55% Segment B,
20% Segment C. Obviously, our agent population is currently under representing Segment A
and over representing the other two segments. The agent distribution parameters that
determine this segmentation must be revisited. How does the modeler go about adjusting
the agent population?
© ThinkVine. All Rights Reserved.
90. Agent Generation Calibration/Tweaking
Step by Step:• As a first step, the agent population must be downloaded from the web. On the agents tab in the
software, there is an option to export agents. A maximum of 20,000 agents can be exported, but
for the agent calibration process 5,000-10,000 should be sufficient. After the modeler has set up
all agent variables and correlations, the agents should be downloaded and saved. After
downloading, copy the agents into the summary/calibration workbook.
• At this point, the modeler can begin setting up the summary tab. A few common Excel functions
used to help summarize:
• COUNTIF or COUNTIFS—helpful to count how many of each demographic break (males/females,
married/unmarried, segment A/B/C, et.c)
• AVERAGEIF or AVERAGEIFS—helpful for determining the mean of a distribution (how close does
our average income of Segment A align to the “actual” Segment A’s expected income?
• The advantage to this approach of copying in the agent tab into the summary book is that the
modeler will not have to recreate the formulas each time the agents are updated.
• In a column next to the agent summary of any given characteristic/demographic break, write what
the “target” or “actual” percentage should be:
Married
Segment
A
B
C
Unmarried
Married
Unmarried
Married
Unmarried
Married
Target Agent Pop
45.9%
43.8%
54.1%
56.2%
44.0%
50.6%
56.0%
49.4%
45.2%
40.4%
54.8%
59.6%
© ThinkVine. All Rights Reserved.
91. Agent Generation Calibration/Tweaking
Step by Step:• This makes for easy comparisons to see where the agent population is and where it is not
aligning to the “real world” targets.
• If any target is significantly missed, the agent population will have to be revisited. Updating
the agent population can be done primarily in 3 ways:
• Correlations—If the modeler has used correlations to define segments, the strength/dilution
and order of those correlations can be updated
• Example: One of the modeler’s correlations is that if an agent has low income, it tends to
be in Segment A. However, Segment A’s mean income is significantly lower than it’s
“target” income. The strength of the correlation could be reduced
• Distribution parameters—this should be used when you need to change the whole mean of
a population.
• Example: Suppose the average income of the modeled population is supposed to $65k, but
it is currently $58k. The entire distribution can be shifted up to match the $65k
• Final variables tab on the agent screen—many times segments are specified on the final
variables tab. Perhaps the modeler needs to revisit and tighten/loosen requirements to
qualify for a segment to better achieve the demographic targets.
• Example: Do you currently have a threshold of “anyone over 30 is excluded from Segment
A,” and the mean income of Segment A consistently comes in too low? Since age is
correlated to income, maybe the threshold should be increased to 32.
© ThinkVine. All Rights Reserved.
92. Agent Generation Calibration/Tweaking
• Correlations are the most frequently used lever in agent calibration and shouldbe the first place the modeler should look for updating the agent population.
Changing the distribution parameters or final variables tab will change the total
agent population numbers, whereas correlations just alter tendencies of where
agents fall into those distributions. Since many of the distributions are
“standard” from the US population template, they should not be updated,
unless achieving targets is impossible through correlations alone.
• Updates to agent populations are not easily tracked, and the modeler should
ensure he or she is closely documenting what changes are behind each agent
export. Whether frequent screenshots of the correlation screen or just
manually tracking what changes go into each iteration of agent exports, it is
important to track what decisions were made to calibrate the agents. This will
facilitate peer or manager review.
• As stated before, this is a defining advantage of ThinkVine’s model, and the
modeler should plan on significant effort and time being devoted to the
calibration of the agent population. The typical agent calibration process may
take between 20 and 60 tweaks of the agent correlations and distributions.
© ThinkVine. All Rights Reserved.
93. Agent Generation Calibration/Tweaking
• That said, it likely impossible to “hit” every single agent characteristic perfectly.It is more important to capture the trends that emerge from the customers’
data on their target populations. Is Segment A less wealthy than Segments B
and C? Significantly so or just a bit? Getting these trends in line is more
important than ensuring Segment A’s mean income is $X.X and Segment B’s is
$Y.Y—the modeler just wants to ensure the trend of Segment B being more
affluent holds true in the agent population. The modeler should pay attention
to the ARCI time table and devote ample time, while avoiding falling behind on
the model calibration by spending too much time on agents.
• As a final recommendation, after the modeler feels the agent population is
“finalized” he or she should download a full 20k agent population to see if the
additional agents will significantly change means or splits of the agent
population. This is to avoid “over-fitting” the agents to a particular agent
sample, and to make sure the model does not have sample bias in the agents.
© ThinkVine. All Rights Reserved.
94. Reach Curve Generation
© ThinkVine. All Rights Reserved.95. Reach Curve Generation – Calculate the Reach Conversion Rate
Purpose:• Help the marketplace estimate the reach from the input of choice (“reach
surrogate”) of the customer. Calculate the reach conversion rate for each reach
surrogate for every marketing activity.
Specifics:
• The marketplace converts every marketing execution data input into the
percentage of agent who see or hear it (this percentage is called reach.) In order
for the marketplace to convert, you must provide it with conversion rates based
on the marketing data.
• The marketing execution data could be impressions, GRPs, TRPs, circulations,
views, Facebook likes, etc.
• Reach percentage is dependent of the target population. For most marketplace,
that population is the number of households in the U.S. As of 2012, that number
is 132.5 million.
• For the purpose of this guide, use 132.5 million as the base household number or
the denominator for most of the reach conversion.
• Use Microsoft Excel solver to find the right conversion rate quicker
© ThinkVine. All Rights Reserved.
96. Reach Curve Generation – Calculate the Reach Conversion Rate
• The marketplace calculates reach as follows:Reach = (1-EXP(Conversion Rate*Execution Data))*Reach Constant
• Therefore, the conversion rate is calculated as:
Conversion Rate =
Ln[1 – (Reach/Reach Constant)]
Execution Data
• Most of the time, the Reach Constant is 1, because the maximum reach is
100%.
Even if the maximum reach is less than 100%, users can keep this constant at 1.
Sampling the consumer activity associated with this marketing activity from a beta
distribution with low switching (S ~=0.5) and a mean close to the maximum reach
will cause the reach to saturate correctly.
• Since the Execution Data is provided by the customer, you will only need to
find the Reach to calculate the conversion rate
© ThinkVine. All Rights Reserved.
97. Reach Curve Generation – Calculate the Reach Conversion Rate
Step by Step (Calculate the Reach)Below are some equations that may help generate data points linking reach to your
customer’s input data. Because frequency increases with reach, your marketplace
cannot use these equations as they are, but you can use them to generate points.
• Gross Rating Points (GRP) (ex. TV or radio)
GRP = Reach x Frequency
Reach = GRP/Frequency
• Impressions (ex. online display or out of home)
Reach = Impressions/Frequency/Population
• Circulations or Drops (ex. Sunday newspaper or direct mail)
Reach = Circulation/Frequency/No. Households
• Views, Clicks, or Likes (ex. Facebook or website)
Reach = Views/Frequency/No. Households
© ThinkVine. All Rights Reserved.
98. Reach Curve Generation – Calculate the Reach Conversion Rate
Step by Step (Calculate Conversion Rate)Once you have calculated the reach, you can input it into the following formula:
Conversion Rate =
Ln[1 – (Reach/Reach Constant)]
Execution Data
• Example: In week 5, a customer spent $300,000 on TV advertisement and got 41
million household impressions with an average frequency of 2.5. Assuming the target
population is all U.S. household.
Reach = Impressions/Frequency/Population
Reach = 41,000,000/2.5/132,000,000 = 12.4%
Conversion Rate = [Ln(1 – (12.4%/1)]/41,000,000
Conversion Rate = -3.24E-09
• Since the calibrated period consists of many weeks, the input conversion rate
should be the average of all the rates for that period. Users may also use Solver
or a Maximum Likelihood Estimation.
© ThinkVine. All Rights Reserved.
99. Reach Curve Generation – Calculate the Reach Conversion Rate
Step by Step (Input Conversion Rate into the Marketplace)• To enter/update the conversion rate, click on MARKETING on the top menu line to
expand. Then select ACTIVITIES in the sub-menu [Pic 1]
• Enter the conversion rate for each marketing activity as the 1st conversion rate [Pic 2]
Pic
1
Pic
2
© ThinkVine. All Rights Reserved.
100. Reach Curve Generation – Calculate the Reach Conversion Rate
Noteworthy• For customers within an industry, their reach conversion rates should be very
similar.
• Instead of using the average of all the weekly conversion rate, you can also
use Excel solver to calculate for the conversion rate that minimizes the total
variance between actual reach and calculated reach.
• Set up an Excel workbook similar to the format below:
TV
Week Of
Week 1
Week 2
Week 3
Week 4
Week 5
Week 6
Week 7
Week 8
Week 9
Week 10
35+ Impressions
Spend
Actual
35,200,000
300,000
11%
41,000,000
300,000
12%
77,600,000
590,000
24%
89,100,000
790,000
27%
41,500,000
460,000
13%
58,800,000
600,000
18%
67,700,000
570,000
21%
104,100,000
990,000
32%
72,400,000
870,000
22%
88,400,000
1,000,000
27%
675,800,000
6,470,000
205%
Reach
Calculate
12%
13%
24%
27%
13%
18%
21%
30%
22%
26%
207%
Conversion Rate
-3.475E-09
1%
1%
0%
0%
1%
1%
0%
-1%
0%
0%
2%
© ThinkVine. All Rights Reserved.
101. Put Marketing Activities into Model
© ThinkVine. All Rights Reserved.102. Put Marketing Activities into Model (1/5)
• Purpose:• This step in implementation populates the model with the all of the marketing activities that can
be used to construct a marketing plan. During this step you are informing the model what
marketing type the activity is, as well as what channel or target it corresponds to, among other
things.
• Specifics:
• During beginning parts of implementation, especially the Data Review, you will have many
conversations about what inputs to have in the model. Through these conversations, you will
also be able to better understand any specifics on how the customer may want inputs
interpreted or grouped for ROI and output purposes, which will be crucial information for this
process
• Before you can get started, you must have completed agent generation. For each variable, you
will have to designate a brandcombo, channel, target, and activity. Ideally, you will also have
completed reach curve generation and be able to input those in this process
• Duration of this step is largely dependent on the project, but average completion time is 2 hours
© ThinkVine. All Rights Reserved.
103. Put Marketing Activities into Model (2/5)
Step by Step:• Open the relevant marketplace and project instance
• On the Home screen, find the Marketing tab and select the sub-tab Activities. [Picture 1]
• Once on the Activities screen, you will have numerous columns of information to input
• Select Click here to add new item to begin
• Insert the Unique Name that you want – this is how the variable will be identified for the rest of
the calibration process (ex. Television or Television 15s)
• Next, select the Brandcombo, Channel, Target, and Activity for the respective input.
• The only things that are available for selection under these four columns will be the things
you have put into the marketplace during previous parts of implementation. If you realize you
need another target, for example, you will have to exit out to agent generation and create it.
If a variable doesn’t have a specific target or channel, you can select All Channels or All
Consumers
• Media Output Group is the next column working left to right. In this box, you will put a name
that you wish the results of this input to be read out. For example, if you happen to have 5
inputs that are all variations of Television, you can have these 5 grouped together for output and
ROI purposes by putting the same Media Output Group for all 5.
© ThinkVine. All Rights Reserved.
104. Put Marketing Activities into Model (3/5)
Step by Step (cont.):• Marketing Plan Grouping is where you have the opportunity to group the activities together and
manipulate how they will appear to internal and external users in the Plan screen
• Note: These will vary by project. Sometimes they are the exact same as the Media Output
Group and sometimes they are an even more rolled up view
• In the Marketing Type, Timing & What to Calibrate column, you will be able to select from a
number of pre-populated options which will determine how the model will treat the respective
activity. What you ultimately select depends on a lot of factors around what the variable is and
how you want it to be interpreted. The screen defaults to Media – Typical Purchase – Reach –
Persuasion because it is the most frequently used, but you will see that there are also options for
trade, coupons, samples, and speedy media. [Picture 2] In the group of 4, the right two options
will be the two “levers” you will be able to utilize during the modeling process
• The next column you may need in the Marketing Input process is 1st Reach Substitute. In this
column, you input what the name is for the reach of the respective input (ex. GRPs, Spend,
Circulation)
• 1st Conversion Rate is where you will input the reach curve you derived during the Reach Curve
Generation process
• The last columns you will need to do during the process will enable you, or the customer, to use
the SmartMix suite. Spend Reach Constant and Spend Conversion Rate are where you will enter the
spend curves that you will have hopefully created during the Reach Curve Generation process. If
you’re already modeling spend, these conversion rates should be the same
• After selecting/typing the correct inputs for a variable, press Enter or click outside of the box and
your new variable will be added to the ordered list
© ThinkVine. All Rights Reserved.
105. Picture 1 (4/5)
© ThinkVine. All Rights Reserved.106. Picture 2 (5/5)
© ThinkVine. All Rights Reserved.107. Create Patterns for Marketing Objects
© ThinkVine. All Rights Reserved.108. Create Patterns for Marketing Objects (1/5)
Purpose:• Some marketing tactics, such as coupon and direct mail, have inherent delay
in response to action. Patterns help capture and automate the timing of the
impact of those marketing tactics.
Specifics:
• Not every marketplace will require a marketing object pattern. However, if it
does, then this should be the first step in creating marketing objects.
© ThinkVine. All Rights Reserved.
109. Create Patterns for Marketing Objects (2/5)
Step by Step:• Open the relevant marketplace
• From the dashboard, click on MARKETING on the top menu line to expand.
Then select PATTERNS in the sub-menu [Pic 1]
• Once on the Patterns screen, click New to create a new pattern [Pic 2]
• A default name “New Pattern” should appear in the Name box on the right
• Enter an appropriate name and description for the pattern:
Name – a relevant identifier to describe the activity, e.g. “Coupon FSI”, “Direct
Mail”, etc.
Description – enter a brief summary/purpose of the pattern
• Under the Percentages box [Pic 3], click on Click here to add new item
© ThinkVine. All Rights Reserved.
110. Create Patterns for Marketing Objects (3/5)
Step by Step (cont.):• Each box represents one week, therefore, enter the percentage of impact
that a particular week will have.
For example, a coupon is sent on Week 1. In that week, 10% of the total
respondents redeemed. In Week 2, 20% of the total respondents redeemed. In
Week 3, 50% redeemed. Finally, in Week 4, the remaining 20% redeemed.
The pattern would be entered in decimal format as follows:
• 0.1
• 0.2
• 0.5
• 0.2
• The percentages must sum to 1. If it does, then a green message will appear
stating that the Pattern is Valid [Pic 3]
• After all patterns have been added, click Save on the left hand side.
© ThinkVine. All Rights Reserved.
111. Create Patterns for Marketing Objects (4/5)
Pic1
Pic
2
Pic
3
© ThinkVine. All Rights Reserved.
112. Create Patterns for Marketing Objects (5/5)
Noteworthy• Coupons, direct mail, and email are the most common marketing objects
that require patterns.
• Patterns can be determined from analyzing redemption data or sometimes
through visually matching a particular sales spike with a media execution.
• Once a pattern is created, it appears as a drop down option when creating a
marketing activity. Therefore, it is recommended that you create a pattern
before creating marketing activities.
© ThinkVine. All Rights Reserved.
113. Set Up Base Marketing Plan
© ThinkVine. All Rights Reserved.114. Set Up Base Marketing Plan
• Purpose of this step• This step is required to proceed with the calibration process. Once the agents
and marketplace variables have been defined and input into the software, the
historical marketing data is stored in the base marketing plan; this data informs
the software which agents get hit with which marketing activities, and when.
• Prerequisites
• All marketing data must be collected from the customer before this can be
completed
• All marketing activities must have been created and assigned to the correct
marketing type
• Reach curves are not necessary to set up the base marketing plan, but they are
necessary to simulate the plan
• The data must be summarized into a separate weekly time series for each
marketing activity; these summaries are typically the core of the data review
conducted with the customer. It’s also helpful to summarize the data at quarterly
and annual levels by tactic for the customer to review, but those summaries
aren’t necessary for creating the marketing plan
© ThinkVine. All Rights Reserved.
115. Set Up Base Marketing Plan
• Prerequisites (continued)• The summaries must include, at a minimum, spend and a measure of reach; this
measure of reach varies by tactic, but it may be spend, GRPs, impressions,
circulation, or actual number of people reached by a given tactic
• Trade activities use ACV (all commodities volume) instead of reach; this indicates
the number of items discounted in a given week as a percentage of all items sold.
Trade activities also require a third variable – percent savings by week. This
represents the percent savings on the discounted items, not the average percent
savings across all items.
• If you want to vary the effectiveness of media by week using copy scores or other
data, you will need to calculate persuasiveness (indexed to 1) by week as well –
generally speaking, ThinkVine recommends creating separate marketing objects
for different kinds of messaging so that their effectiveness can be calibrated
separately, but adjusting weekly persuasion is applicable in some cases
• The start date of the base plan must be the same as the start date of the project
instance.
© ThinkVine. All Rights Reserved.
116. Set Up Base Marketing Plan
• Step-by-step instructions:1. Collect the files containing the weekly summaries of each marketing activity
included in the base plan
2. Click on the “Plan” tab and click the “Work on Plans” link:
3. In the Plan menu on the right side of the screen, select “New plan:”
4.
Type a name in the plan field, enter the number of weeks you’d like the plan
to run, add any notes you’d like, and click “Save”
© ThinkVine. All Rights Reserved.
117. Set Up Base Marketing Plan
5.Click on the plan you just created, return to the Plan menu and select
“Export”
a. An Excel workbook containing a blank marketing plan will begin to
download
6. Open this file, select the “Plan Data” tab, and paste as follows:
a. Paste the spend values for each tactic into both the “Spend” and
“Adjusted” columns (see watch-outs below for more information)
b. Paste values for the tactic’s reach measure into the appropriate column
(which will be named with that reach measure)
c. Unless you have created persuasion indices (see Prerequisites section), be
sure the Persuasion column contains all 1s.
7. Save the updated file
8. Return to the Plan menu and select “Import”
© ThinkVine. All Rights Reserved.
118. Set Up Base Marketing Plan
9.On the Import Plans screen, click “+ Add Files”
10.Select your updated file and click “OK”
11.Click “Start upload(s)” on the Import Plans screen
NOTE: You can import the same-named Excel file as many times as you want. It
just replaces the software weekly values with whatever current values are in the
Excel document.
© ThinkVine. All Rights Reserved.
119. Set Up Base Marketing Plan
• Watch-Outs• If you have data on marketing activities that were executed without any associated spend,
it’s best to use a placeholder value (e.g. 1) in the spend column – this will allow you to
easily adjust execution levels in these tactics during subsequent modeling periods
• Be sure that spend, impressions, and percent savings (if applicable) are pasted into the
correct columns!
• Spend gets two columns – initial and adjusted. These will be identical in the base
marketing plan, but they’re used during the planning process to quickly modify existing
plans without having to download a new
• If any data going into the base plan has changed between customer data review and
calibration, it’s very important that those changes are shared with key stakeholders.
Ensuring that stakeholders and modelers are aligned on
• By default, the base marketing plan will include all marketing activities that have been
defined. If you need to remove any unused marketing activities, do the following:
• Select the plan at the “Work on Plans” screen
• Click the “Work on Plan” button
• Click on the “Activities” button next to the Save and Simulate buttons
• Deselect any marketing activities that you want to omit
• Click “Save”
© ThinkVine. All Rights Reserved.
120. Set Up Base Marketing Plan
• How long should this step take?• Summary of the data depends entirely on the volume and formatting of data
provided by the customer. Generally speaking, data summary requires ~15-30
minutes per marketing activity, but that can vary substantially depending on the
following factors:
• Granularity of time series – if data isn’t provided at a weekly level, additional
time may be necessary to interpolate (if data is provided at a monthly, quarterly
or annual level) or aggregate (if data is provided at a daily or more frequent level)
• Comingled activities – if you receive a single file from the customer containing
data that has to be separated into a number of different time series, filtering it
appropriately may add overhead time
• Formatting – if the data provided is easy to manipulate using statistical software
or Excel, summarizing it will be much easier. Of course, that’s not always the
case.
• Qualitative data – if you have to incorporate qualitative marketing data, you may
need to construct estimates of spend, reach or ACV, and persuasion or savings.
Be sure to share these estimates with the customer before incorporating them!
• Adding the marketing data to the base marketing plan should take roughly an hour
at most. Again, it may vary some depending on the total number of marketing
activities.
© ThinkVine. All Rights Reserved.
121. Set Up Calibrate/Scenarios Screen
© ThinkVine. All Rights Reserved.122. Setting up Calibrate/Scenarios Screen
• Purpose of this step: This step is the beginning of your calibration. Thescenario parameters you choose here will allow your plan to run by telling the
agents what rules to obey.
• Prerequisites: You must have at least one marketing plan completed, and that
plan must
• Have at least one object with flighting during the simulated period.
• Start at the earliest simulation start date.
Pic 1
Pic 2
© ThinkVine. All Rights Reserved.
123. Setting up Calibrate/Scenarios Screen
Pic3
© ThinkVine. All Rights Reserved.
124. Setting up Calibrate/Scenarios Screen
• Recommendations for starting values of• Saturation Constant of 1.0 (no saturation) to 2.0 (which halves media
impacts with every increased media hit).
• Media Forgetting of 0.05.
• Purchase Power Probabilities for all items: 1.0. This does not adjust your
ingoing probabilities.
• Reach and ACV parameters should also be 1.0.
• Media parameters can start
• Persuasion at 2.0.
• Temporary Lift at 1.0 or smaller
• Elasticities at -2.0.
• Parameters that affect distribution awareness should begin at zero unless
your brand is new to market:
• Dist awareness increase
• Purchase awareness increase (by brand)
• Awareness loss (of brand)
© ThinkVine. All Rights Reserved.
125. Run Regression
© ThinkVine. All Rights Reserved.126. Running a Regression
Purpose:• Running a simple regression on your dependent variable and some of your most
important independent variables can help give you an idea of where you want
your results to end up, and where possible problems may lie (i.e. where getting
the model fit right may become problematic).
Specifics:
• Once you have the data streams (time series) ready, setting up a regression in Excel
should only take a few minutes of analyst time.
• It should be completed once you have collected most of the data (so it’s prepped)
and/or the client has signed off on it (so it won’t change), and probably before you
start modeling in the software (so you know how to tackle the problem).
• This isn’t a hard and fast requirement, but it can be a helpful diagnostic tool, especially
with products such as consumer packaged goods which have traditionally been modeled
using regression (so a new ABM client, assuming they have utilized a mix vendor in the
past, will most likely be accustomed to results using this approach).
• Additionally, CPG lends itself more readily to a regression methodology due to its typical
heavy dependence on in-store Trade activity to drive incremental volume. These are
generally one-week discount events which typically are highly correlated to sales.
© ThinkVine. All Rights Reserved.
127. Running a Regression
Step by Step:• Open up a blank workbook in Excel.
• Put the dates for your time series in column A leaving the top row for the
variable names. Typically this will be ‘week’ for column A.
• In column B, input the time series for your dependent variable (i.e. sales you
want to predict) aligned with the dates in column A.
• In columns C and beyond, input your most important independent variables,
with the dates aligned to column A. Blank weeks you can set to ‘0’.
• How to choose ‘important’ independent variables?
• Without knowing what the model results will be, you can generally assume
that marketing activities with higher spend will drive more volume (TV is a
big one). Also, don’t forget to include Trade activities (Feature, Display,
TPR, and F&D) for CPG. These almost always drive a lot of volume.
© ThinkVine. All Rights Reserved.
128.
Running a Regression© ThinkVine. All Rights Reserved.
129. Running a Regression
For the next step you will need to have the Data Analysis toolkit for Excelinstalled. In my version of Excel it shows up on the Data tab if you have it
already:
© ThinkVine. All Rights Reserved.
130. Running a Regression
If you don’t see it, try going to File->Options->Add-ins.Make sure Analysis ToolPak is selected and click OK. If that doesn’t work, contact
IT to get it working for you…
© ThinkVine. All Rights Reserved.
131. Running a Regression
So now you have the Data Analysis button on your Data tab. Click on that andselect “Regression” and click OK.
© ThinkVine. All Rights Reserved.
132. Running a Regression
Make the Y range equal to the range of your dependent variable in column B,including the label in the first row.
Make the X range equal to the range of your independent variables in columns C
and beyond, including the label in the first row.
Go ahead and check the Labels box and then click OK.
© ThinkVine. All Rights Reserved.
133. Running a Regression
Output should look something like this. I’ve highlighted the parts we’ll be interested in.The R-square is one measure of how accurate the regression model is. One way to think
about it is this is the percent of variation explained by the model (~49%). Not bad. Not
great either, but we’re not delivering this to the client- just using it for diagnostics.
© ThinkVine. All Rights Reserved.
134. Running a Regression
You can use the coefficients to build a simple algebra equation that, once you plug in the variables, will give you thesales value you are trying to predict for any given week.
Let’s call Sales ‘y’, Trade % ACV ‘x’, TV1 Spend ‘w’, TV2 Spend ‘z’ and Digital spend ‘u’.
If you take the coefficients below the equation (with rounding) should be y = 1.972 + 1.301x + 4.571x10⁻⁷w +
1.925x10⁻⁶z + 6.639x10⁻⁵u
Make sure you take all the input values from the same week!
© ThinkVine. All Rights Reserved.
135. Running a Regression
To figure out how much volume the regression predicts will be driven each week by any particularvariable, take that variable’s coefficient and multiply it by that variable’s input value for that week
(example: TV Spend). Add up all the weeks and divide by the total sales for the brand, and you get a
very rough idea of what the volume contribution for that activity might look like. TV1 comes out to
0.85. Total sales are about 142.5, so this TV tactic is driving ~ 0.6% of total brand sales.
© ThinkVine. All Rights Reserved.
136. Running a Regression
A few more points to consider. T-stat is a measure of the significance of each of the variables in the regression. Tosimplify, a t-stat of at least 1.65 indicates the variable’s coefficient reading is significant at the 95% confidence level
(2 standard deviations on the normal curve), but only if we know the direction the variable should be (positive or
negative). Due to marketing theory, we know that our own marketing activity should have a positive impact on our
brand, so we know that Trade, TV, and Digital should all be positive. (As an aside, if we have no such foreknowledge
regarding variable polarity (+/-) the absolute value of the t-stat needs to be at least 1.96 to attain the same level of
confidence). If the results are not positive or the t-stat is not significant, I would ignore results for that particular
variable in the context of this regression. But here we can see all results are positive, with one T-stat below our 1.65
threshold. That’s probably not a huge deal- it’s still directionally correct (and over 1.0) and we’re using the
regression as a tool to give us a very preliminary look at what the results might be.
© ThinkVine. All Rights Reserved.
137. Bug Check (Calibration)
© ThinkVine. All Rights Reserved.138. Bug Check
• Purpose:The model will not run if agents and/or marketing activities are not properly set up.
The model has bug checks in place prior to simulating, and all errors must be fixed
• Specifics:
• Agents and marketing activities should be completely set up; however agent
calibration and marketing activities should not be considered finalized until the
model can be started with no errors
• This step of the process can take between 1-3 hours, depending on the number of
and nature of the errors
• Step-by-Step:
• After the modeler perceives agents and marketing activities are complete, he or she
should attempt to simulate a plan. If there are any errors, a message will pop up
• The error message will specify what errors exist in the agent creation process (e.g.
number should be between 0 and 1, but there are negative values) and for what
variables
• Correct the error and attempt to restart
• Continue until the run can be successfully completed
© ThinkVine. All Rights Reserved.
139. Bug Check (General)
© ThinkVine. All Rights Reserved.140. Bug Check
• Purpose:By bug checking, you’re ensuring the validity and accuracy of the results. In the case where a
bug arises, following the step-by-step process of bug check will lead to an improved software
experience for internal and external users
• Specifics:
• An analyst will naturally be bug checking throughout the implementation process. In the event
that something looks out of place or has a result that is different than expected, the true bug
checking phase begins
• Once a bug is found, the analyst should contact the correct people, notifying them of the bug
and providing correct details to assist their process
• Duration of this process is dependent on the analyst’s actions – if the analyst tries to selfdiagnose the issue, it will be a longer process than if they just email support
• Step-by-Step:
• When you come across what you think could be a bug, the first step you should take is attempt
to recreate it (i.e. if your results are 20% lower than you would expect, the first step is to re-run
the plan or copy it and run the new plan)
• If you are still getting incorrect results, you might want to check the project files (depending on
what type of bug) or any other source where something could have been altered by you the
analyst
• Whether you are able to self-diagnose or not, the next step is to inform product management
and those who can take a deeper dive into the issue
© ThinkVine. All Rights Reserved.
141. Bug Check
• Step by Step (continued):• An email should be sent to support@thinkvine.com
• In this email, you should provide the following about the bug:
• Project (Marketplace – Project Instance – Plan Name)
• Description
• Steps To Reproduce
• Attach screenshots where applicable
• On the email, you should also copy your Account Director, Technical Director, or anyone else on
the team who should be informed of the issue and any possible delays in deliveries
© ThinkVine. All Rights Reserved.
142. Bug Check
Example Bug Check Email:SUBJECT: [Insert Name of Bug]
TO: support@thinkvine.com
FROM: marvin@thinkvine.com
CC: Anyone who should be informed (i.e. Technical Director and Account Director)
• Project: Starbucks > VIA > VIA Project Instance > 2014 Q1 Plan Post Release
• Description: Results for the 2014 Q1 Plan in the VIA Marketplace are ~20% lower than results
from before the production update. As an test, I copied a plan created before the update and
simulated it. The results came in lower despite no changes in any of the fundamentals of the
marketplace.
• Steps To Reproduce:
1) Log into Starbucks as TVC Analyst
2) Navigate to VIA Project Instance > Forecasts > Sales Forecasts
3) Select the two plans in question – 2014 Q1 Plan Post Release and 2014 Q1 Plan Old
4) Observe the gap in results despite the identical plans
© ThinkVine. All Rights Reserved.
143. AutoCalibrate
© ThinkVine. All Rights Reserved.144. Autocalibration
Purpose:• Once the initial plan is run, use auto-calibration to save time in the calibration
process.
• The calibration problem is under-determined: too few data points, too many
parameters.
• Calibration can be a long and frustrating process
• Get a good fit, customer does not believe it
• Impacts in particular can be a problem.
• We want to remove some of the work. As much as possible.
Specifics:
• AC should get you 80% of the way to a finished calibration
• Human fine-tuning will be needed
• Algorithm competes with you for speed
• Needs more iterations but less human intervention than manual calibration
• Note, it still cannot guarantee that a solution will meet your goals, and in some cases
autocalibration may not be appropriate for a project
© ThinkVine. All Rights Reserved.
144
145. Autocalibration
• Rough steps mimic what you do manually• Rotating rounds loop through your goal types
• Several iterations per round try to
• Minimize sum of MAPEs
• Minimize sum of awareness slope (per annum)
• Minimize sum of Euclidean distances from impact goals
• Individual rounds use Newton’s method to minimize the given goal
• Interpolates when the minimum is trapped between points
• If round goal met, that round type is skipped
• Best scenario of each type is saved
• Goals are met or iterations run out
• “Best” scenario still determined by minimal MAPE
• Run one more time to calculate impacts
• Scenario output
• “Actuals” are output
© ThinkVine. All Rights Reserved.
145
146. Autocalibration
• You can set the initial value for any parameter• If that parameter is not optimized, your input will be used in every simulation the
algorithm does
• Be cautious with DBA-changing parameters, decay, etc.
• When in doubt, zero for those
• MAIF (Media Awareness Increase Factor) is totally confounded with media
persuasion
• Set to 1 for autocalibrate process. While you may depart from 1 during fine-tuning, this
should help standardize persuasion parameters
• Algorithm picks your
PPPs
Media forgetting
Persuasion
Elasticity
Temporary Lift
Exogenous parameters!!
© ThinkVine. All Rights Reserved.
146
147. Autocalibration
• Recommendations for best outcomes:• Use a narrow media forgetting range, like 0.1 or even 0.05 between min &
max.
• Think about how fast media effects go away
• Use reasonable bounds on marketing parameters
• Persuasions from 0 to 20
• Elasticities from -4 to 0
• Temporary Lifts from 0 to 10.
• Exogenous C near zero
• Exogenous F near 1/(max input)
• Exogenous B & P very near 1
• Use a few reasonable impact and/or awareness goals!
• Impact & awareness goals help it not get trapped in local minimum errors
• (This will also take more time & Iterations)
© ThinkVine. All Rights Reserved.
147
148. Autocalibration
Autocalibration will help with parameter choices of Exo Variables• Use the “Minimum” and “Maximum” input for your adjustment
• Set initial parameter to something reasonable.
• Definition of “reasonable” for Base functional form:
• C=0
• F= 1 / (“No effect” Input)
• P = 1 (0<P<1 will damp the relationship; P>1 will increase it.)
• Definition of “reasonable” for Power functional form:
• If this effect only *hurts*, B=0.99. If it only *=helps*, B=1.01.
• C=1
• F = 1/ (No effect input)
© ThinkVine. All Rights Reserved.
148
149. Autocalibration
In the Software:• Calibrate / Choose scenario
• “Work on Scenario”
• Autocalibration / Setting Parameter Boundaries
Your plan shows in the middle.
Max and Min Parameters on
the outside. Autocalibrate will
work to find the right answers
for the white cells. Gray cells
can be set and will not change.
© ThinkVine. All Rights Reserved.
149
150. Autocalibration / Impacts and Results
• Awareness goals: don’t need these, but can tell algorithm to minimize slope ofad-based awareness.
• Impacts goals are also not necessary. They give ranges (or single bounds) on
the % of sales (volume) due to marketing groups or “base volume” of a brand.
If you want no
bound, fill in a one
for the maximum or
a zero for the
minimum!
© ThinkVine. All Rights Reserved.
150
151. Autocalibration / Impacts and Results
• Sales Goals:• You must enter at least one of these
• If you have N brands, it only makes sense to have N-1 of these.
• Autocalibration Settings give your output scenario a name, and give the
algorithm a stopping place.
© ThinkVine. All Rights Reserved.
151
152. Autocalibration
Outputs:• A scenario, with the name you specified, seen on the “Scenarios”
tab of “Calibrate.”
• You cannot delete the original “initial” scenario.
• Instead, copy & paste the values from this scenario into your initial or any
other scenario you wish to use.
• Each table of goals will show a value in the “actual” column for
any goal you entered.
• Actual MAPEs
• Actual slopes of (ad-based) awareness of a brand
• Actual impacts of marketing groups.
© ThinkVine. All Rights Reserved.
152
153. Autocalibration watch-out: noise in weekly sales
• Because of the low number of agents (necessary for repeated runs)• Noise is larger in autocal runs
• May or may not be a problem, depending on your category frequency
• Noise can be easily seen in a graph of category volume
• Download results
• On the “Sales” tab, scroll to “All Consumers All Channels Category” and find the
Volume column.
• If that graph looks smooth or very like your “seasonality” inputs, not a problem
• If not, you are probably seeing noise.
• If noise is significant from week to week
• AutoCalibrate may be less effective
• You may want to bound the parameters of small marketing groups above and below
with the same number.
• Does not optimize these
• Avoids trying to estimate effects smaller than noise.
© ThinkVine. All Rights Reserved.
154. Set up MAPE Workbook
© ThinkVine. All Rights Reserved.155. Set up MAPE Workbook
Purpose:• The purpose of setting up a MAPE Workbook is to allow the analyst to assess
how well their modeled calibration simulations compare versus actual
volume. This is a necessary step in the calibration process as it allows the
analyst to assess their model’s accuracy throughout calibration.
Specifics:
• Setting up a MAPE workbook should not take more than 15-30 minutes of
analyst time. Most analysts already have templates that can be used to create
this workbook (one will be embedded here), so don’t re-invent the wheel if you
don’t need to.
• While the workbook only takes a short time to set up, it should continue to be
used throughout the entire calibration process. The results from every relevant
simulation should be pasted into the MAPE workbook in order to review its
accuracy versus actuals.
© ThinkVine. All Rights Reserved.
156. Set up MAPE Workbook
Step by Step (1/2):• To create your MAPE Workbook, you can either start from scratch or alter an existing template. An
example is attached at the top of this page.
• Create columns to enter in the Week #, Date, Actual Volume and Modeled Volume for each week of your
calibration period. These are columns B-E in the attached example.
• Paste the actual weekly volume inputs from the customer in the Actual Volume column. Once you have
the results from your first calibration, those will be pasted in the Modeled Volume column.
• Create a column to calculate the absolute error between Actual Volume and Modeled Volume for each
week. This is column N in the attached example. The formula used to calculate these values is
ABS[(Modeled Volume – Actual Volume)/Actual Volume] and is also contained in the example.
• Create a set of cells to sum the weekly Actual and Modeled Volume for each of the years (or partial years)
within the calibration. For each year, enter a calculation to determine the yearly difference between
Modeled Volume and Actual Volume. This set of cells and corresponding calculations are shaded blue in
the example.
As you’re calibrating, these yearly errors will be a helpful measure to check to see how closely your model matches
actual volume at a very high level. A benchmark goal for yearly error is +/- 3% for each year.
• Create a set of cells to calculate the weekly MAPE (Mean Absolute Percentage Error) for each year and for
the total calibration. This is done by entering a calculation to average the weekly errors that you created
(located in column N in the example) earlier. This set of cells and corresponding calculations are shaded
orange in the example.
As you’re calibrating, these measures will provide you with insight into how well your model tends to fit on a weekly
level. A model should achieve weekly MAPE no worse than 15% in order to be considered well-calibrated. Most models
should be able to achieve a weekly MAPE of 10% or lower.
© ThinkVine. All Rights Reserved.
157. Set up MAPE Workbook
Step by Step (2/2):• In addition to the Weekly MAPE that you already calculated, you may also want to calculate a Monthly
MAPE. To do this, start by creating columns to calculate monthly Actual Volume, monthly Modeled
Volume and the absolute error between Actual Volume and Modeled Volume for each month. For
simplicity, you can assume that months are groups of 4, 4, and 5-week periods (this will allow you to create
12 months from 52 weeks of data). This section and corresponding calculations are shaded red in the
example.
• To calculate the Monthly MAPE for each year, enter a calculation to average the monthly errors that you
created in the prior step. This set of cells is shaded yellow in the example.
In addition to weekly MAPE, this is indicates how well your model fits versus actual volume. A benchmark goal for
monthly MAPE is less than 10%.
• Create a set of cells to calculate the actual and modeled volume trend from year to year. This is done by
simply dividing the yearly volume for Year 2 by the volume for Year 1. This set of cells is shaded green in
the example.
Comparing the actual trend to the modeled trend is helpful during calibration in order to confirm that your model is
directionally trending in the right direction. This may not be evident by just looking at the weekly/monthly/yearly error
measures. If you find that your model is trending downward while actuals are trending upward (or vice versa), that is a
red flag for your calibration, regardless of how well your model fits from a MAPE perspective.
• Repeat these steps in a separate section of the workbook if you are calibrating multiple brands
© ThinkVine. All Rights Reserved.
158. Set up MAPE Workbook
Watch-outs:• Most analysts already have templates, including the one attached in this
document. Don’t re-invent the wheel if you don’t have to.
• Consider augmenting your MAPE workbook with other sections that you may
want to consider during your calibration. These often contain other pieces of
data that you’ll be delivering during the Technical Review, along with the model
fit. Examples could include:
• Table to review the model’s volume attribution
• Table to review the model’s ROI output by tactic by year
• Graph of awareness throughout the calibration period
© ThinkVine. All Rights Reserved.
159. Set up the MAPE Calculator
© ThinkVine. All Rights Reserved.160. Set up MAPE Calculator
Purpose:• The MAPE calculator is a tool that allows the analyst to assess the fit of the
model and which media tactics may be throwing off fit
Specifics:
• Setting up a MAPE workbook should not take more than 15-30 minutes of
analyst time.
• While the workbook only takes a short time to set up, it should continue to be
used throughout the entire calibration process. The results from every relevant
simulation should be run through the MAPE calculator in order to review its
accuracy versus actuals.
© ThinkVine. All Rights Reserved.
161. Set up MAPE Calculator
Step by Step: (1/4)• Obtain a copy of the MAPE Calculator template (embedded in the slide)
• Fill out the worksheet according to your project, filling in the Modeled Item Name,
Brand Name, and Channel name
• Note, an analyst can analyze multiple modeled items and multiple channels at the same time.
Simply copy and paste columns to create additional analyses
• Copy in actuals for the appropriate modeled item, brand, and channel combination
• Download results of a simulation from the software. This can be found on the Calibrate screen
• Highlight a scenario set that has been simulated, and use the drop-down menu in the top
right to download the results
• Click “Run Report…” on the MAPE Calculator which will reveal this box:
© ThinkVine. All Rights Reserved.
162. Set up MAPE Calculator
Step by Step: (2/4)• Click “Locate File…” and select the downloaded results to be analyzed
• Click “Choose Location to Save File…” and select where you want the MAPE
calculator output to be saved
• Leave Select Time as Week, and choose to show residual results
• Choosing Media Measure:
• Reach/ACV—I would like to see model error correlated with each media tactic’s
Reach (media) or ACV (trade)
• Persuasion/Savings—I would like to see model error correlated with each media
tactic’s Persuasion column (media) or Savings (trade)
• Combined—I would like to see model error correlated with a combined measure of
Reach/Persuasion (media) and ACV/Savings (trade)
• Click “OK” to run calculator
© ThinkVine. All Rights Reserved.
163. Set up MAPE Calculator
Step by Step: (3/4)• The calculator will output a chart
for each modeled item, brand,
and channel combination that
shows current model fit:
• The model will also output a
graph that shows how each
media tactic lines up with model
error:
© ThinkVine. All Rights Reserved.
164. Set up MAPE Calculator
Step by Step: (4/4)• If there is a negative correlation, it suggests that media is driving the model
to be too high, and that marketing activity's persuasion parameter should be
decreased; the opposite is true for a strong positive correlation, and that
tactic’s persuasion should be increased
• As a general rule of thumb, any correlation that is greater in magnitude than 0.2
should be evaluated for updating
• However, pay attention to reach/ACV or persuasion/savings. A strong correlation to a
tactic that has maximum reach of less than 5% of agents will probably not drastically
effect model fit
• For further thoughts on how to improve fit, see the Improve Fit section of the Analyst
Documentation
© ThinkVine. All Rights Reserved.
165. Flatten Awareness
© ThinkVine. All Rights Reserved.166. Flatten Awareness (1/4)
Purpose:• The probability that an agent purchases an item is related to its preference
for that item and its awareness of that brand. It is important to have an
understanding of awareness trends.
• Since awareness is bounded on (0,1) in the model, having awareness values
that trend up (or down) over simulated time has an inverse effect on the
contribution of marketing in future time periods.
• Most of the time, ThinkVine analyzes existing brands whose awareness
flattens over time. NOTE: Sometimes positive trends in awareness can be
expected, especially in the case of a new (young) brand.
Specifics:
• Make a plot of media based awareness for the brand being modeled as well as
the competition.
• This requires the analyst to download the results from the simulation in Excel.
© ThinkVine. All Rights Reserved.
167. Flatten Awareness (2/4)
Step by Step:• Open the relevant marketplace
• On the Calibrate tab, select Scenario Sets
• Once inside this section of the software, select the plan
• Then chose Download Results from the Scenario Set drop down menu.
© ThinkVine. All Rights Reserved.
168. Flatten Awareness (3/4)
Step by Step:• An Excel file with weekly awareness is downloaded.
• On the Awareness spreadsheet is media based awareness by week.
• Make a line plot of these values and assess the slope of this variable.
© ThinkVine. All Rights Reserved.
169. Flatten awareness (4/4)
How to adjust awareness• If awareness is trending up or down beyond what the modeler expects or feels
comfortable with, there are 3 major levers to adjust
• Forgetting—this will effect all media tactics and total media awareness for all modeled items in
the model (i.e. both the modeled item and competition). Increasing forgetting will help offset
awareness increase, decreasing will offset an awareness decrease. Note, increasing forgetting
will increase total media impacts and visa versa.
• Media Awareness Increase Factor—this will affect all media tactics for just one modeled item.
This is useful to use if you do not want to affect both modeled items or are comfortable with
relative impacts (e.g. TV is 1.5x the contribution of radio, and I want to maintain that
relationship). Note, increasing MAIF will increase total media impacts and visa versa.
• Persuasion parameters—if awareness increases/decreases too much as a particular tactic is
started/going dark, changing just that media tactic’s persuasion parameter may be sufficient to
flatten awareness.
• Flattening awareness is an iterative process, and the modeler must pay attention to the
impact flattening has on other model diagnostics like fit, impacts, ROIs, etc.
© ThinkVine. All Rights Reserved.
170. Improve Impacts
© ThinkVine. All Rights Reserved.171. Improve Impacts
Purpose:• Highlight some common adjustments to improve the impacts of the marketing
activities.
Specifics:
• Some marketing activities, such as trade, have data to support their impact on
sales. Therefore, as part of the calibration process, you should try to match that
impact in the marketplace.
• Impacts can be adjusted at an individual marketing object level or at a total
marketing level
• Impacts are measured by percentage of total sales and ROI, which are output in
the marketing performance table
• The impacts of each marketing object can be adjusted by altering the calibration
parameters, base on the marketing type of that marketing object. Those
parameters are Persuasion, Temporary lift, Reach, ACV, or Elasticity
• To change the impact of all marketing activities, you can adjust the
characteristics of the modeled item
© ThinkVine. All Rights Reserved.
172. Improve Impacts
Step by Step:What to think about when adjusting impacts:
• Are tactics that have a lower spend contributing more to volume than higher
spend tactics? Should they be?
• What are the ROIs of each of the tactics? Are any too high or below $1.00?
• Are tactics that should have stronger effectiveness contributing less than lower
impact ones (e.g. 15s TV is contributing more than 30s TV despite having the same
number of GRPs)?
• Do impacts continually get larger (or smaller) over time?
© ThinkVine. All Rights Reserved.
173. Improve Impacts
Step by Step:Adjust the impact of individual marketing objects:
• This process is the same as adjusting for the fit, where the parameters of
individual marketing objects can increase/decrease to affect sales
• From the dashboard, click on CALIBRATE on the top menu line to expand.
Then select SCENARIO SETS in the sub-menu [Pic 1]
• Once on the Scenario Sets screen, select the appropriate plan, most likely
the initial plan as this is part of the original calibration process.
• Click on the green Work on Scenarios button [Pic 2]
• In the Scenarios screen, scroll down to the marketing object you want to
adjust and change the parameter according to how the impact should be
adjusted [Pic 3]. Normally, if you need to increase impact, then you should
increase the parameter. (In this example, TV persuasion is adjusted)
• This is not a linear relationship, so some fine tuning is required
© ThinkVine. All Rights Reserved.
174. Improve Impacts
Step by Step:Adjust the impact of all marketing objects:
• This macro level adjustment process is accomplished by changing the
purchasing behavior of the agents or the characteristics of the modeled
item.
• From the dashboard, click on AGENTS on the top menu line to expand. Then
select AGENTS in the sub-menu [Pic 4]
• Some of the most common variables that can be adjusted are:
Purchasing frequency [Pic 5]
Trial and Repeat probability [Pic 6]
Units per purchase [Pic 7]
• To assist with changing these distribution settings, use a graphing tool such as
Parameter Solver to translate the parameters to statistical variables, like mean,
variance, etc.
• Adjust these parameters according to how you would like the impact to change
© ThinkVine. All Rights Reserved.
175. Improve Impacts
Step by Step:Adjust the impact of all marketing objects (cont.):
• The modeler can also adjust impacts using forgetting or the media
awareness increase factor (MAIF) for any modeled item
• Increasing either of these will increase all impacts, visa versa for decreasing
• These parameters will effect awareness, so the analyst should ensure awareness
does not have too great of an increase or decrease after affecting impacts
© ThinkVine. All Rights Reserved.
176. Improve Impacts
Pic1
Pic
2
© ThinkVine. All Rights Reserved.
177. Improve Impacts
Pic3
© ThinkVine. All Rights Reserved.
178.
Pic4
Pic
5
Pic
6
Pic
7
© ThinkVine. All Rights Reserved.
179. Improve Impacts
Noteworthy• A tool such as Parameter Solver, image below, can translate the parameters
into more meaning metrics, which should help determine the values that
should be adjusted for the distribution
• Most of the time, impacts are organically
derived through the fit calibration
process.
• Here is the link to download Parameter
Solver
• The purchase behavior and characteristics
should normally be established when
setting up the marketplace. Therefore, only
slight adjustments should be required.
© ThinkVine. All Rights Reserved.
180. Improve Fit
© ThinkVine. All Rights Reserved.181. Improve Fit
Purpose:• Illustrate some common ways to improve your model fit.
Methods:
• 1. Increase Number of Agents
• 2. Measure number of over/underpredictions and adjust accordingly
• 3. Target specific weeks with largest over- or underpredictions
• 4. Diagnose common problems with the fit chart
© ThinkVine. All Rights Reserved.
182. Improve Fit: Increase Number of Agents
Increasing the number of agents is one of the easiest ways to tighten up yourmodel fit and reduce your MAPE.
Most people run with a small number of agents (~5,000) during calibration to
get the model to run faster. This makes sense when you are doing a large
number of runs and need to get results back quickly in order to make
adjustments. However, in many cases, using a smaller number of agents can
cause the model to be “noisy” between runs due to a smaller sample size,
causing results to wiggle. You can fix this by cranking up the number of agents
(up to the max of 50,000).
Keep in mind this doesn’t work for all models; some will show very little or no
improvement at all by increasing the number of agents. Still, it’s pretty simple
to do and can decrease your MAPE by several percentage points when it works.
© ThinkVine. All Rights Reserved.
183. Improve Fit: Increase Number of Agents
Navigate to the correct marketplace, and on the Home screen, look at ‘ProjectInstances’. Click on the correct project instance and then click on the Edit
button.
© ThinkVine. All Rights Reserved.
184. Improve Fit: Increase Number of Agents
Next, change the number of Agents to your desired value, then click Save.Then go ahead and run your simulations. Simple as that.
© ThinkVine. All Rights Reserved.
185. Improve Fit: Increase Number of Agents
Some things to watch out for:- Increasing the number of agents makes the model run slower. In some cases
MUCH slower (like 8+ hours to finish). To avoid this, instead of going from 5,000
to 50,000 agents all at once, first try increasing the number of agents by a
smaller factor (say, 2x or 3x). If this shows some improvement, you can continue
increasing agents up to the maximum. I personally wouldn’t go much beyond
25,000 agents, though- the reason being is that any benefit you get beyond this
point in terms of better fit will be outweighed by unexpected software issues like
causing servers to crash out of memory, runs taking 48 hours to complete, etc.
Most of your fit improvement occurs in the increase from 5,000 to 20,000.
20,000 to 50,000 you run into diminishing returns anyway.
- Also keep in mind that you will eventually have to allow the customer access to
the software, and the runs will have to complete in some reasonable amount of
time (45 minutes or less). So keep the number of agents reasonable.
- Finally, be aware that you will have to re-run and/or reset parent checkpoints
when you change the number of agents, and occasionally the software will have
strange errors; the more often you do this, the more likely you are to run into
one of them.
© ThinkVine. All Rights Reserved.
186. Improve Fit: Adjust based on number of over/under predictions.
Check your MAPE workbook. In any given week, a negative error means anunderprediction; positive means an overprediction.
If you have about the same number and magnitude of over- and underpredictions this trick won’t work; your model is missing consistently in both
directions. But if you have more of one or the other you can adjust either your
frequency variable, units per purchase, or number of consumers to get your
over- and under-predictions closer to even. HINT: this will decrease your MAPE
and improve your fit.
If your model is missing consistently high (overpredicting), think about
decreasing the number of consumers, decreasing the UPP, or decreasing the
frequency with which agents purchase; do the opposite if it’s underpredicting.
© ThinkVine. All Rights Reserved.
187. Improve Fit: Adjust based on number of over/under predictions.
First, let’s adjust the number of consumers. That’s probably the easiest tostart.
Navigate to the correct marketplace, and on the Home screen, look at ‘Project
Instances’. Click on the correct project instance and then click on the Edit
button.
© ThinkVine. All Rights Reserved.
188. Improve Fit: Adjust based on number of over/under predictions.
The number of consumers is usually in millions. If you are overpredicting,decrease the number of consumers; if you are underpredicting, increase the
number of consumers. To get an idea of how much to tweak, take the sum of
your predictions for the year and look at it versus the sum of your actuals. If
you are about 5% too high, decrease the number of consumers by about 5%.
© ThinkVine. All Rights Reserved.
189. Improve Fit: Adjust based on number of over/under predictions.
You can also do this with Units per Purchase or Frequency. These are agentvalues and you will need a stats program like Parameter Solver to calculate the
parameters.
© ThinkVine. All Rights Reserved.
190. Improve Fit: Adjust based on number of over/under predictions.
Frequency can be found under Agents->Definitions->Needs. Units perPurchase is under Agents->Definitions->Channel Behaviors.
© ThinkVine. All Rights Reserved.
191. Improve Fit: Adjust based on number of over/under predictions.
Frequency is a Gamma distribution with parameters [66, 0.5].The mean of this is 33. If we’re about 5% too high, let’s decrease the mean by about 5%
to 31.4. Take the new parameter values and put them into the software, then rerun the
simulation.
© ThinkVine. All Rights Reserved.
192. Target Your “Problem” Weeks
Some weeks will have more errors than others. Focus on the weeks with the biggesterrors and you will (hopefully) get the best improvement in fit.
Figure out what weeks you are interested in investigating (probably by looking at a line
graph time series of actual v. predicted with an error bar chart overlaid across the
bottom), then go ahead and export your marketing plan.
© ThinkVine. All Rights Reserved.
193. Target Your “Problem” Weeks
Open the plan once you’ve downloaded it and click on the Plan Data tab. Next, highlight the weeks you areinterested in investigating, then scroll to the right. Write down which marketing objects have activity in or very
near the week(s) you are interested in. Next, review output of your marketing results (in the software,
Forecasts->Marketing Performance) and focus on those objects. Which ones are driving the greatest percent of
total volume or too much? (if looking for an overprediction) Which ones are driving the least percent of total
volume or not enough? (if looking for an underprediction) Next, adjust your calibration parameters to
compensate and re-run the simulation. Rinse and repeat as necessary.
© ThinkVine. All Rights Reserved.
194. Diagnose common problems with the fit chart
(green bar is actuals, red is predicted)What this probably is: Awareness increasing too much.
How to fix it:
- Increase your forgetting if your awareness is going up too quickly.
- If your awareness is somewhat flat, make sure competition isn’t losing awareness too quickly (causing your
relative awareness to go up); jack up competition effectiveness to get competition awareness back on track.
- If neither of these apply, it could be a distribution issue. Make sure your distribution isn’t increasing while
competition distribution is staying flat.
© ThinkVine. All Rights Reserved.
195. Diagnose common problems with the fit chart
(green bar is actuals, red is predicted)What this probably is: Awareness decreasing too much.
How to fix it:
- Decrease your forgetting if your awareness is dropping too quickly.
- If your awareness is somewhat flat, make sure competition isn’t gaining awareness too quickly (causing your
relative awareness to go down); drop competition effectiveness to get competition awareness back on track.
- If neither of these apply, it could be a distribution issue. Make sure your distribution isn’t decreasing or
staying flat while competition distribution is going up.
© ThinkVine. All Rights Reserved.
196. Fine Tuning
© ThinkVine. All Rights Reserved.197. Fine Tuning
• Purpose of this step: This step is designed to simultaneously improve the fit ofthe model and to guarantee its continued forecasting accuracy. Fine tuning
tends to be an iterative process, as the modeler is typically making small
changes that might improve the model in one area but adversely affect it in
others. If you have any persistent difficulties with model fit around specific
weeks, it’s best to communicate with the customer to be sure that you have
incorporated all the relevant causal data.
• Prerequisites: By this point, the model should be calibrated. Any changes that
you make at this point will be with an eye towards reconciling any anomalies
found during the calibration period, and forecasting ability.
© ThinkVine. All Rights Reserved.
198. Fine Tuning
• Step-by-step instructions:1. Increase the number of agents in the simulation to at least 20,000, and
preferably more – scenarios will run more slowly, but with greater precision
2. Apply any heuristics to your calibration parameters based on other models or
experience
a. For example, you may have data to suggest that 15 second
advertisements are ~70% as effective as 30 seconds, or that primetime TV
is 120% as effective as daytime.
b. Be sure to apply any of these changes consistently across all marketing
activities!
3. Plot model residuals and identify any trends or outliers, as you did with your
MAPE calculation. If they don’t correlate well with any marketing activities,
work with the customer to identify any potential sources of discrepancy; if
found, marketing activities or external factors can be added to the project to
capture these impacts and improve fit
© ThinkVine. All Rights Reserved.
199. Fine Tuning
4.Seasonality may be worth revisiting – once you’ve teased out some of the
marketing effects more explicitly, you may be able to update some of your
seasonality calculations to account for effects that are media driven as
opposed to those that are strictly seasonal
5. Check your price sensitivities – if sales are responding too much or too little
to base price changes, resample your agents with a different price sensitivity
6. After making changes, re-run the simulation to ensure that impacts and fit
remain strong – repeat this step as many times as necessary to feel
comfortable with the model as a whole (time permitting of course
a.
If marketing impacts or MAPE change substantially, you may be able to
recoup any losses relatively quickly by adjusting the Media Awareness
Increase Factor, Trial Probability Power, and Repeat Probability Power.
© ThinkVine. All Rights Reserved.
200. Fine Tuning
• Watch-outs:• Because the scenarios will take longer to run, it’s usually advisable to run a few (24) simultaneously so that, as one finishes, you can use the results to create a new
scenario – this workflow will allow you to work on a rolling basis, rather than
waiting for one scenario to run from start to finish before you can begin work on a
new one
• If you need to run more than 2-4 scenarios at a time, and individual scenarios are
taking over an hour to run, consider simulating a large batch overnight. Only 9
scenarios can be run at the same time across all modelers (this number will increase
in the future)
• Outside of the actual calibration parameters, there are other parts of the model
that can be adjusted to fine-tune results and ensure continued accuracy:
• Price – if you’re expecting prices (for the primary modeled item and/or competitive
modeled items) to trend either up or down long-term, consider adding a trend to the
pricing time series.
• Distribution – if you’re expecting store counts or online traffic for the modeled brand
or competition to change over time, consider adding a trend to the distribution time
series
• How long should this step take: This should take approximately a day.
© ThinkVine. All Rights Reserved.
201. Future Prediction Awareness Impacts
© ThinkVine. All Rights Reserved.202. Future Prediction Awareness Impacts
Purpose:• To ensure that the model behaves as expected in future simulations. While your marketplace
is calibrated on historical data, future simulations are the primary use of the software.
During calibration, carefully constructed future simulations should be run to
• Ensure the model is not over-fit and
• Prevent extreme behaviors in out-years.
Specifics:
• In the later stages of calibration, simulations of future periods with realistic as well as
extreme assumptions about marketing should be conducted to verify the stability of modeled
awareness. Unstable awareness can:
• Create a trend to sales volume
• Throw off future marketing impacts
• To avoid these issues, in most cases, the modeler in the calibration period tries to keep
weekly awareness relatively “flat.” In certain cases (e.g. customer went dark for half a year,
customer started TV for the first time ever in the last year of calibration) declines or growths
in awareness may be appropriate.
• These must be run for a calibration to be considered “final”
• 20 minutes of set up time, 6 model runs of run time for each check of the future simulations
© ThinkVine. All Rights Reserved.
203. Future Prediction Awareness Impacts
Step by Step:• The goal of this step of the calibration is to see what happens to awareness in
out-years beyond the calibration period.
• Create and run 6 plans (three identical runs for both the modeled brand and
competition) to test this:
• Business as usual. What if we carry the most recent year forward and run
it for another year?
• Completely dark. What happens if the customer went completely dark for
a year?
• Double spend. What if spend is literally doubled in the future simulation?
• These 3 outcomes capture the most likely scenario (i.e. spending similar to last
year) and the extremes. If the modeler is comfortable with these outcomes,
then all other possibilities will occur somewhere within these bounds.
© ThinkVine. All Rights Reserved.
204. Future Prediction Awareness Impacts
Step by Step:• Business as usual is the most important test run you will do, since it is the most
likely future scenario. To create the plan, do a simple copying of the last year of the
calibration with a starting date as the end of the calibration period.
• Note: By copying that plan another 2 times, the modeler can use the sliders on
the Work On Plans screen to make the Completely Dark and Double Spend runs.
• If awareness is flat in the calibration period, it should remain flat in the Business as
Usual scenario. If it does not, further investigation needs to be done.
• Was the awareness not as “flat” in the calibration as the modeler originally
thought (i.e. it is “curving” up or down towards the end of the simulation)? If so,
then forgetting or the media awareness increase factor may need to be adjusted.
• Is one particular tactic driving the awareness growth (i.e. a new tactic was
introduced in the end of the calibration period which is driving up awareness the
following year)? If so, then that individual tactic’s persuasion parameter may
need to be updated.
• Now look at the effect on impacts. Are impacts of the future year similar to the
previous year? As they are identical plans, the impacts should be similar, and
definitely directionally consistent. For example, it’s okay if TV goes from 16.6% of
volume to 17.0% of total volume, but TV should not go from 30% of the
incremental volume to 75% of the incremental volume.
© ThinkVine. All Rights Reserved.
205. Future Prediction Awareness Impacts
Step by Step:• In the dark scenario, awareness will decline. How far does it drop? The dark year
will give the modeler an idea of how fast their forgetting is and whether or not it’s
appropriate. In most cases, the modeler will want to avoid extreme cases where
one dark year will result in zero awareness (though category and brand may call for
such cases).
• Similarly, the 2x spend scenario is testing an extreme. If the customer has a
dramatic increase in spend, what happens to awareness and impacts? If the
previous finding was media contributes 10% of volume, but then doubling spend
results in 23% incremental, media may not be saturating in the model. Is the 23%
incremental realistic even in an extreme case where the marketing budget is twice
as high as typical for that brand? The customers will be able to simulate these
extremes, so the modeler should be comfortable and understand the results.
• While these checks do not need to happen until later in the calibration process,
they should also not be the last simulation or an “afterthought.” They are valuable
runs to highlight how the model’s predictive capability will hold up in the out-years
and whether modeling decisions are leading to over-fitting in the calibration
period. As the software’s primary use is forecasting, the modeler must devote
ample time to ensure accurate and logical answers are being shown in the future
scenarios. The results of the future awareness prediction tests may require more
calibration, and the process should be repeated a few times.
© ThinkVine. All Rights Reserved.
206. SmartMix Suite
© ThinkVine. All Rights Reserved.207. SmartMix Suite
• Purpose:• The purpose of using the SmartMix Suite is to quickly find key information such as:
• What is the budget needed to reach a sales target?
• Which is the best plan to achieve the greatest ROI?
• How can we decide on the best marketing mix to maximize sales?
• Specifics:
• Before getting started, you have to determine what question you want to answer with the
SmartMix Suite. Each of the three above questions correspond to a different component of
SmartMix.
• SmartSpend:
• Use SmartSpend when your yearly sales target is set and you want to know how much
marketing is needed to hit that sales target. SmartSpend can quickly and accurately find
the budget level and marketing plan needed to reach your sales target.
• SmartROI:
• SmartROI is effective when you have a range of budget you are considering and you want
to know how much to spend to maximize your profit over the plan. It returns the plan that
gives you the highest profit (return) based on the entered margin, sales and additional
marketing spend in the plan.
• SmartPlan®:
• Use SmartPlan when you know how much you want to spend on marketing, but you want
a plan generated with the highest sales possible.
© ThinkVine. All Rights Reserved.
208. SmartMix Suite
• Step-By-Step:• There are two areas of the SmartMix user interface: the top and bottom portions. Most of the user
fields and functions are the same no matter which component of SmartMix you use.
• Top Portion Functionality:
• The Name, Item of Focus, Target, Existing Plan, Date, Duration, and Margin are present in all three
SmartMix components:
• Name –Choose a unique name for your new plan. You will probably want to name the plan so
that it is easy to identify which parameters were tested
• Item of Focus – This is the brand or modeled item that you want to optimize
• Target – The group of interest to the plan (this will mostly be “All Consumers”)
• Existing Plan – This plan fills in all the marketing objects that are not being optimized, trade and
the marketing of other brands
• Date – This is the date when the new plan will start. The drop-down box contains all of the
options for the new plan’s start date. The options for start dates are controlled by the scenarios
that are checked as “Client Available” in the Calibrate > Scenarios screen.
• Duration – This determines how long the new plan will be
• Margin – Margin is the contribution from each unit of sales volume and is used in the ROI
calculation. This will be automatically populated with the margin that is in the modeled item(s)
you have selected. You may change this to a different number, but then the forecasts and ROI
measures cannot be directly compared to previous plans. Please note: Models are usually built in
millions; however if your model is set up in thousands, you will need to enter the margin in
thousands. Also, for the margin to actually default a value, you have to phyiscally select it in the
item of focus dropdown. if you just leave it ask the default, there will be nothing in the box, but if
you go up to the field and select it then a margin will appear
© ThinkVine. All Rights Reserved.
209. SmartMix Suite
• Differences in Top Portion Functionality within the SmartMix Suite:• In SmartSpend you will want to enter in a maximum spend and sales target – the budget only
among items being optimized and sales target are in actual units.
• For SmartROI you also enter a minimum and maximum spend – the budget minimum and
maximum only among items being optimized.
• With SmartPlan® you need to enter how much to spend – the budget for the additional
spend only among items that are being optimized.
© ThinkVine. All Rights Reserved.
210. SmartMix Suite – Top Portion Functionality
• Top Portion Functionality© ThinkVine. All Rights Reserved.
211. SmartMix Suite
• Bottom Portion Functionality:• The bottom portion of the user interface controls a number of tasks. These tasks are the same
for each component of SmartMix
• Included in Plan – Selected by default, un-checking the item completely removes it from
the new plan created
• Media Item – This is the name of the item
• Current Spend – This displays any spend that is already present from the initial values in
the base plan selected in the top portion
• Use Existing – Un-checked by default, selecting this will use the initial base plan values and
copy those into the final SmartMix plan and removes the item from the optimization
process. If checked, the spend amount for the activity is not included in the maximum
amount for optimization that you specified.
• New Spend Min – The minimum is zero by default. Entering in a value requires that
SmartMix spend at least that amount on the item
• New Spend Max – This is equal to the max entered in the top portion by default. It is the
most money that SmartMix can possibly spend on an item
© ThinkVine. All Rights Reserved.
212. SmartMix Suite – Bottom Portion Functionality
© ThinkVine. All Rights Reserved.213. SmartMix Suite
• General Notes:• When SmartSpend, SmartROI or SmartPlan® completes, a new plan is generated in the Work on
Plans section of the software. This plan now acts like any other plan, with the ability to copy or
simulate. You can also modify the plan, honing in on specific areas of the plan to make minor
adjustments to spend levels across categories such as Digital Media and TV, tactics like Social
Media and Prime TV and activities (such as Facebook and 30-second TV spots).
• Typically there are a 100 or more marketing options that could be flighted in any manner over
52 weeks. All these options unfortunately result in an N-P (nondeterministic polynomial time)
Complete problem. In other words, you can verify the solution easily but the only way to find
the true optimal plan is to try every combination – which would take an impossibly long time.
This is true of most of these types of problems and any similar software program has this issue.
• SmartMix finds an acceptable plan of a simpler problem using a greedy heuristic algorithm. The
greedy algorithm means that at each step you choose the optimal solution – ignoring any future
steps (local solution). SmartMix’s method is heuristic (a strategy for finding a solution) because it
solves a smaller problem – looking at seasonal flighting and fixed spend increments and
comparing agent model results.
• SmartMix performs a maximum of 30 steps, so it divides the spend range into at most 30
increments. Please note that SmartMix does not truly produce “the” optimal plan. This is not
possible with due to N-P Complete nature of problem. What it does instead is find the optimal
solution given fixed spend increments and the algorithm above.
© ThinkVine. All Rights Reserved.
214. SmartMix Tips and Tricks
• SmartMix is now more accurate and provides better recommendations buttakes longer to run. SmartMix will typically take an hour to run.
• To shorten the run time, only select activities that should be considered for
your plan.
• Remember to subtract trade and coupons spend when entering in budget,
minimum and maximum spend. SmartMix optimizes media only.
• Before you run, total the amount for activities that “use existing” spend and
subtract that “holdout” from your budget. The maximum spends will
automatically adjust to the lower amount.
• For comparable results, replace the default profit margin value of $0 with a
specific margin for the focus item.
• Get an email notifying you that your SmartMix plan is ready by checking the
box in the “Create SmartMix” dialog.
© ThinkVine. All Rights Reserved.
214
215. Customer Specific Simulations
© ThinkVine. All Rights Reserved.216. Customer Specific Simulations
Purpose:• Each customer will have a certain number of unique business questions that
they would like answered. This is the part of the process during which the
analyst will set up the simulations needed to answer these customer-specific
questions.
Specifics:
• In nearly every case, the marketplace’s historical calibration should be locked
and signed off on by a Technical Director prior to moving on to running
simulations for the customer.
• Depending on the number and complexity of business questions, this step may
take several hours or several days of simulation and analysis.
© ThinkVine. All Rights Reserved.
217. Customer Specific Simulations
Step by Step:• The steps for these simulations will be different for each customer, depending
on their specific business questions. However, each simulation will likely
require the analyst to create a new plan (or set of plans) within the software
and analyze the results.
• Some examples include:
• Simulating a future base marketing plan
• Simulating multiple alternate options to compare versus the base plan
• Simulating the impact of marketing tactics at several levels of higher or lower
spend
• Simulating the impact of moving marketing dollars from one tactic to
another
• Optimizing the marketing budget (with possible spending constraints) for a
period of time (year, quarter) in the future
© ThinkVine. All Rights Reserved.
218. Customer Specific Simulations
Watch-outs:• Be sure to review the results of the customer-specific simulations once they
have finished running. Make sure that you are comfortable with the results
and that they can be logically explained to the customer. Some good questions
to consider are:
• Do the results of these simulations make sense relative to the information we have
already delivered?
• Do any of the marketing tactics perform significantly better/worse than in the past?
• Is the overall volume and volume attribution very different than expected?
• How will the customer react to these results? Is this good news or bad news for
them?
• Are there any aspects of the results that the customer is likely to question? If so,
what datapoints can be prepared to support our results?
• What recommendations can we provide based on the results of these simulations?
© ThinkVine. All Rights Reserved.
219. Saturation volume input runs
© ThinkVine. All Rights Reserved.220. Saturation volume input runs
Purpose:• Testing extremes of the model tactic-by-tactic to ensure saturation dynamics
are accurate and appropriate for the brand/category
• While the model is calibrated on historical data, future simulations are the
primary use of the software. During calibration, future simulations should
be run to ensure saturation dynamics of each modeled tactic are appropriate
and realistic.
Specifics:
• The calibration process should be nearly complete
• Initial analysis on future simulations should have been conducted
• ½ day to set up and analyze, plus run time for simulations
© ThinkVine. All Rights Reserved.
221. Saturation volume input runs
Step by Step:• The modeler needs to set up several runs of increased budget for a given tactic (e.g.
+10%, +20%, +50%, +100%, +200%) to see how volume and ROI for that tactic saturate.
Due to the nature of our reach curves, the runs should result in volume curves that
follow an exponential pattern:
© ThinkVine. All Rights Reserved.
222. Saturation volume input runs
ROIStep by Step:
• And ROI should follow:
2
ROI ($)
1,5
1
0,5
0,1
2,2
4,3
6,4
8,5
10,6
12,7
14,8
16,9
19
21,1
23,2
25,3
27,4
29,5
31,6
33,7
35,8
37,9
40
42,1
44,2
46,3
48,4
0
Spend ($MM)
• Set up of the runs is fairly straightforward. Copy a given plan, and use the sliders on the
Work on Plan screen to increase activity in a marketing activity. Only chose one tactic at a
time—the goal is to see the effect of scaling that media in isolation to all else being held
constant.
• As previously stated, chose percent increases to test for each media tactic such as: +10%,
+20%, +50%, +100%, +200%. The modeler will want to make enough “posts in the ground”
to derive a curve, but must balance that with the volume of runs that will be required to
complete the exercise. Choosing 5 increase percentages for 10 different tactics will result in
50 simulations. Depending on the timeline, more selective options (+50%, +100%, +200%)
may be needed.
© ThinkVine. All Rights Reserved.
223. Saturation volume input runs
Step by Step:• As a tip, create a new folder for on the Work on Plans screen for the exercise, and explicitly name each
simulation (e.g. TV +20%). This will keep the modeling folder neat and organized for future use as well as
making the interpretation of results easier for the model to understand.
• Once the runs are finished, download the marketing performance results for each simulation. Create
scatterplots for each tactic for the spend and the volume, as well as a scatterplot for spend and the ROI.
Using Excel, fit a trendline through the data to determine a curve.
• A quick word on the trendline options. The modeler will want to choose an option that has a high R2
when fitting the data. That said, a few things to keep in mind:
• Exponential—should be the preferred option as the ThinkVine model’s saturation should follow our reach
curves, which are exponential in form.
• Linear—Linear will show no diminishing returns, and should not be used
• Logarithmic—While the shape is similar to the exponential, there are more extremes closer to zero, often
having negative numbers. As volume and ROI cannot be negative, the modeler will have to do some
“hand adjusting” around zero spend when using this option.
• Polynomial—Excel defaults to a 2nd degree polynomial, which will result in the curve being parabolic in
nature, which is contrary to what the model “believes” based off reach curves. While the shape can often
help fit the data very well at lower spend levels, at the extremes it will give illogical results based on our
model.
• Power—Similar to logarithmic, this option is close to exponential with some extremes around 0, and the
modeler should show caution at lower spends
© ThinkVine. All Rights Reserved.
224. Saturation volume input runs
Step by Step:• After deriving these curves, the modeler must analyze the results.
• Are tactics showing appropriate signs of saturation?
• If not, is there a logical reason (e.g. they are on a low part of the spend curve and saturation should not have
set in yet)?
• Is the model saturating too fast? That is, is the model suggesting the brand is already at the extreme of their
spending limits? If so, the curves may need to be adjusted.
• A good starting point for analysis is determining at what point will the tactic fall below a $1.00 ROI, and assessing
how that compares to the customers’ current spend level. How close is the customer to these break even
points? Does the modeler or anyone else on the Customer Success team have familiarity with these media
tactics and category? How does the breakeven point compare to similar brands? Where is competition spending
in relation to the modeled brand? If the competition is spending far more than the breakeven point for the
modeled brand, is there a reason why the customers’ brand has such a lower ceiling than the competitive brand
(e.g. they are a much smaller, or less established brand)?
• A final comment, for tactics with very small execution (under $1MM), the modeler should test more extreme
spend levels than +200%. What if the customer spends $5MM-$10MM? Often, when spend levels are so small,
even extreme % differences still mean the overall spend is very small, and inconsistencies in saturation may be
masked by those small amounts. The modeler may want to avoid a situation where a small execution continues
to have a very strong ROI at high spend levels (unless justified by experience or the data).
• SmartMix, for instance, may over prioritize small executions if their saturation has not been properly capped.
• If the results of the saturation exercises require any adjustment to the curves, most likely the entire calibration
period’s fit will be slightly altered. Therefore, these saturation exercises should be viewed as part of the
calibration period, and not an afterthought once calibration is “complete.” While a lot of work to incorporate
into the calibration process, the saturation curves are standard outputs in Guidance Delivery decks, so the work
invested here will be a time saver later in the process.
© ThinkVine. All Rights Reserved.
225. Segment Performance Runs
© ThinkVine. All Rights Reserved.226. Segment Performance Runs
• Purpose of this step: These runs will help identify which marketing activitiesare most effective with desirable agent segments. For example, a brand may
assign greater value to higher income consumers, or to consumers who are
more likely to have long-term brand loyalty. For example, a technology brand
may want to increase its adoption among millennials in order to build cachet.
• Prerequisites: Any segments to be targeted in these runs must have been
defined during agent creation (see step Agent Generation – Targets, Influences,
Needs, Weights). Further, baseline calibrated runs are necessary to extract
insights before segment-optimal runs can be constructed. Note: in this section,
the terms “segment” and “target” are used interchangeably.
© ThinkVine. All Rights Reserved.
227. Segment Performance Runs
1. SmartMix can be used to optimize sales for a specific target group orcustomer segment.
a. Select which SmartMix tool (SmartPlan, SmartROI or SmartSpend) you’d
like to use, and navigate to that screen.
b. Set up SmartMix according to the instructions in the SmartMix section,
but instead of targeting “All Consumers,” select the consumer segment
you’d like the SmartMix plan to optimize against
c. Configure SmartMix as you otherwise would, and run it
d. Once the plan is available in the “Work on Plans” screen, run it as you
would any other marketing plan
© ThinkVine. All Rights Reserved.
228. Segment Performance Runs
2.Measure marketing performance by segment
a. Navigate to Forecasts Marketing Performance
b. Select the plan created by SmartMix, as well as any plans you’d like to
compare in terms of segment performance
c. Select the target you’d like to analyze under the “Set Chart Details”
header
d. Scroll to the bottom of the screen and click “Draw chart”
e. Review the results to identify which marketing tactics are most effective
(generally speaking, which have the highest Normalized ROIs) with your
target population, and make note of them
© ThinkVine. All Rights Reserved.
229. Segment Performance Runs
3.Copy the SmartMix plan, and any others you’d like to modify in order to
better target your desired segment
a. Adjust the copied plans by placing additional money into the in-segment
highest performing tactics, and removing money from lower-performing
tactics
i. Make adjustments using the same procedures outlined in “Saturation
Volume inputs” to add and subtract money from individual tactics or
tactic groups as desired
b. Examine the relationships between total volume and segment volume:
i. Return to the Marketing Performance table as described in step 2a
ii. Chart both the target-specific performance as described in 2d, and the
overall performance by selecting “All Consumers” as the target before
clicking “Draw Chart” again
c. Determine which plans are best-suited to the needs of the customer,
based on the simulation outputs
© ThinkVine. All Rights Reserved.
230. Segment Performance Runs
• Watch-outs:• As with any other SmartMix run, be sure to set maximums appropriately
given any constraints you’re aware of. Doing so will help it to arrive at an
accurate result
• Also, do not do this step until after you have done your media saturation
tests.
• The simulation software uses the same margins for all segments, which may
cause the output of a scenario in which you target a particular segment to
appear suboptimal
• How long should this step take:
• This step should take 4-8 hours, depending on the number of segments
desired to be analyzed, and average simulation run time
© ThinkVine. All Rights Reserved.
231. Change in Sales Chart
© ThinkVine. All Rights Reserved.232. Change in Sales Chart
Purpose:• Utilizing this chart will help determine that amount level in which different
factors impact volume across different forecasts.
• This chart is also known as a “due-to” chart
Methods:
• This step is completed after at least two plans are created and simulated.
• This process should only take a couple of minutes.
© ThinkVine. All Rights Reserved.
233. Change in Sales Chart
Step by Step:• To view the Change in Sales Chart, first:
• On the Project Instance screen, set price and distribution to be visible.
• Simulate at least two plans with the same length (in weeks). After the
simulation is completed, navigate to the Change in Sales tab in the Forecast
section.
• Step One: Select a Reference Forecast
Only one Forecast can be selected
• Step Two: Select a Forecast to Compare
Only one Forecast can be selected
• Each Forecast must have the same
• Marketing Output Groups in order to show up in the chart.
• Start and end date in order to display price and distribution impacts.
© ThinkVine. All Rights Reserved.
234. Change in Sales Chart
Step Three: Set Chart DetailsOnly one modeled item can be selected.
Step Four: Click the Draw Chart button
© ThinkVine. All Rights Reserved.
235. Change in Sales Chart
• After the chart is completed, the Change in Sales bar chart along with the table of theresults will be visible. The left axis of the chart will show the marketing output groups
while the bottom axis will show the percentages.
• Each of the bars will originate at “0%” and will be shaded in red and positioned to the
left if the change is negative and green and positioned to the right if the change is
positive.
In this example, Total Sales is
~0.95% less in the Compared
Forecast relative to the
Referenced Forecast.
© ThinkVine. All Rights Reserved.
236. Change in Sales Chart
Watch Outs:• Though the software will allow to compare simulations of different years if you
do not include distribution or price, it can be misleading.
• If you have no change to marketing or other inputs and only the year
changes, it is very likely that sales will change anyway. Examples:
• Brands with a trend
• Categories with a trend
• Brands with marketing that is not sustaining the brand
• As a consequence, sales can decrease “due to” an increase in marketing, or
vice versa.
• If you do compare multiple years, you should not assume that the only
change is due to the causal variables included in the chart
• First run the later year with the plan from the earlier one
• Bear in mind that you should have expected the “identical plan” change.
© ThinkVine. All Rights Reserved.
237. How are impacts calculated?
MultipleSimulations are
Run
Volume
Therefore,
Contribution Tactic alone
is worth:
All Marketing
On
100
All On, TV Off
95
The parts make up more than the
whole. That probably doesn't
make sense.
Marketing
26
Base
79
Base 79 + Marketing 26 = 105
5
All On, Trade Off 82
18
All On, Digital
Off
97
3
All Marketing
Off (BASE)
79
While some may see this and claim synergy – this has more to do
with the starting levels of awareness. (the closer you are to perfect
awareness, the less impactful an impression becomes)
So, the model automatically repercentages tactics so the total
volume contribution = 100
TV
[5* (21/26)] = 4
Trade
[18 * (21/26)] = 15
Digital
[3 * (21/26)] = 2
Base 79 + Marketing 21 = 100
© ThinkVine. All Rights Reserved.
238. Optimal Mix Runs
© ThinkVine. All Rights Reserved.239. Optimal Mix Runs
• Purpose:• The purpose of this part in the process is to arrive at an Optimal Plan for your customer that
achieves their goals (maximize sales, maximize return on investment, etc.)
• Specifics:
• Optimal Mix Runs isn’t necessarily a stand alone step in the Analyst process. In order to
successfully reach a truly optimal plan for your customer, you will have to gather information
from many other steps in the process, such as:
• Saturation Runs
• SmartMix Suite
• SmartSpend
• SmartROI
• SmartPlan®
• Previous Customer Knowledge
• Duration of this step is entirely dependent on the project and the methods you take to arrive at
an optimal plan. If you have previously run multiple SmartMix components on this account, you
may be closer to as optimal plan than a project who hasn’t.
© ThinkVine. All Rights Reserved.
240. Optimal Mix Runs
• Step-By-Step:• First step is to reach back into previous work on this account and gather information
• Check the results of your SmartMix runs
• Did you run SmartPlan? If not, it may be the first step you want to take to arrive at an
optimal mix
• If you have run SmartPlan, but want to improve on it or possibly apply some constraints
that SmartPlan can’t handle (i.e. quarterly budgets), this is really where the saturation
runs and other customer knowledge comes in
• Check you results of the saturation runs
• Is TV saturating slower than Search? Make note of any information you can glean from
these results – they will help you decide where to put that extra $1MM
• Previous market learnings
• Does TVC have a marketplace similar to this where we can apply some of the learnings?
• Talk to your client
• Be sure to communicate with the client – see if their business has any known
constraints (i.e. they know they won’t spend more than X, or could never get approval
on spending Y)
• It’s crucial that what TVC suggests as optimal is actually something that is actionable for
their business
© ThinkVine. All Rights Reserved.
241. Optimal Mix Runs
• Step-By-Step:• Putting all of these together, the next step is to set up runs
• You will more than likely want to set up multiple runs and experiment with different levels
of different tactics - the only way to really learn what is optimal is by trying different mixes
• If you haven’t previously, you may also want to experiment with flighting the media
differently
© ThinkVine. All Rights Reserved.
242. Marginal ROI
© ThinkVine. All Rights Reserved.243. Marginal ROI Analysis
Purpose:• How to set up plans and calculate the marginal return on incremental spend
for media activities.
Specifics:
• Knowing to which marketing tactics the next available dollar should be
allocated is a valuable insight for most customers.
• Marginal ROI analysis helps them plan for changes in budget.
• Like most marginal calculations, the marginal ROI is the incremental sales
unit derived from an additional unit of spend.
© ThinkVine. All Rights Reserved.
244. Create Patterns for Marketing Objects
Step by Step:• Open the relevant marketplace
• From the dashboard, click on PLAN on the top menu line to expand. Then
select WORK ON PLANS in the sub-menu [Pic 1]
• Once on the Work on Plans screen, select the plan on which you want to
analyze the marginal ROI, most likely the latest available plan. This plan will
serve as the base plan.
• Copy that plan into a new plan. Ensure that all the parameters and settings,
such as checkpoint, starting date, etc., are exactly the same.
You must copy a plan for each media tactic in the plan. For instance, if a plan has
twenty marketing objects that you want to know the marginal ROI, then you will
have to make twenty copies of the base plan.
Name this new plan something relevant and identifiable, e.g. “2014 Marginal ROI
TV”
© ThinkVine. All Rights Reserved.
245. Create Patterns for Marketing Objects
Step by Step:• After the copied plan is created, select that plan and then click on Work on
Plan [Pic 2] to get to the adjust spending screen
• In the Adjust Spending screen, find the appropriate marketing object. In this
example, it is TV
• Add $1 million to the existing budget by entering the number in the Adjusted
box [Pic 3]
• Finally, simulate that plan. Repeat with the other copied plans
• Once the plans are simulated, go to the MARKETING PERFORMANCE tables
under the FORECASTS option
• Compare the output of the original base plan and the copied marginal plan
with the additional $1 million
• Calculate the difference between the sales volume for the marketing object
(TV). The marginal ROI is that difference/$1 million.
© ThinkVine. All Rights Reserved.
246. Create Patterns for Marketing Objects
Pic1
Pic
2
© ThinkVine. All Rights Reserved.
247. Create Patterns for Marketing Objects
Pic3
© ThinkVine. All Rights Reserved.
248. Create Patterns for Marketing Objects
Noteworthy• The most common incremental spend is $1 million. However, that amount
could be $500K or $5 million.
• The basic formula to calculate marginal ROI is:
[New Sales Volume – Base Sales Volume]
[New Spend – Base Spend]
• SmartMix performs essentially the same calculations, therefore, the ranking
of the marginal ROI should be closely tied to the SmartMix allocation
© ThinkVine. All Rights Reserved.
249. Training Software Prep
© ThinkVine. All Rights Reserved.250. Training Software Prep (1/5)
Purpose:• Before customers are given access to a marketplace, it needs to be cleaned
and organized. This will take less than an hour.
Specific Tasks:
• Add a chart to the Home Screen
• Make sure the Base Plan is 'Shared, Read-Only' and easily found
• Hide all old/irrelevant plans
• Create back-up plans of all Base plans, mark private, put in separate folder
• Check drop-downs in SmartMix - Base Plans available? Start dates relevant?
• Populate Data Lists - updated sales, updated media plans
• Populate Reference Docs - calculators, Guidance Decks, etc.
© ThinkVine. All Rights Reserved.
251. Training Software Prep (2/5)
Add a chart to the Home Screen1. Login as a customer to see the Home Screen
2. Click Select Chart (Pic 1)
3. Select a Chart (Pic 2)
4. Click Save.
Pic
1
Pic
2
© ThinkVine. All Rights Reserved.
252. Training Software Prep (3/5)
• Make sure the Base Plan is 'Shared, Read-Only' and easily found• Hide all old/irrelevant plans that don’t need to be accessed by Customer
1.
2.
3.
Click the Plan tab, Work on plans
Click on the Plan you want to share or hide
Using the Plan drop-down above the Plan Details box (Pic 3), select Private, Shared (Pic 4)
• As the owner, you can change how you would like the plan to be shared. If you choose Fully Shared or
Shared and Read only, you will need to select the groups you want to share it with. (If you select Private,
no one sees it but the owner.)
• As the owner, you can also Change Ownership of the plan to anyone that has access to the marketplace. If
you want to use the Share Options to facilitate editing plans, you can change your plan to Shared and
Read Only and transfer ownership to your team member. Now, only your team member can edit the plan
while others with access to the plan can only view it. However, this means that you will lose ownership.
Select how you want
the plan shared.
Pic
3
Share Plan
Pic
4
© ThinkVine. All Rights Reserved.
253. Training Software Prep (4/5)
• Check drop-downs in all 3 SmartMix modules – Are your Base Plans available? Are theStart dates relevant?
1. Access SmartMix via the Plan tab, SmartMix.
2. Check plans and dates for SmartPlan, SmartROI, and SmartSpend.
Pic
5
Are the correct Base
Plans available?
Are the start dates
relevant?
© ThinkVine. All Rights Reserved.
254. Training Software Prep (5/5)
• Populate Data ListsIn order to utilize the data collection capabilities of the software, the Admin needs to set up categorical Lists. These
lists can only be set up by the Admin, but the customer has the ability to Upload data into the Lists, once created.
1. From the Data tab, Click on Create New List (Pic 6), give it a name, click Save. Being specific about the data
you’re looking to receive within a List helps the customer keep the uploaded data organized for you.
2. With the List selected on the left, Click Create New Data Item. Here there are drop-down boxes for you to
define the data type, subtype, measure, and timeframe of the data for the customer to upload (Pic 6).
3. Repeat Step 2 for as many Data Items as you need.
Pic
6
Pic
6
Create New Data List
© ThinkVine. All Rights Reserved.












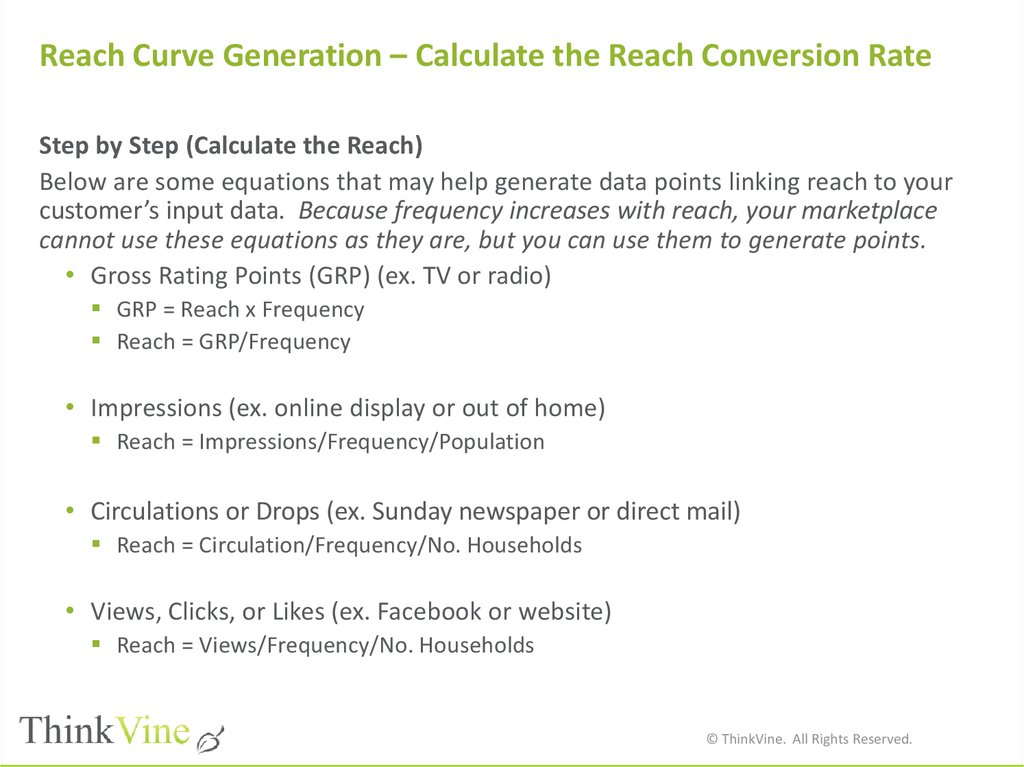


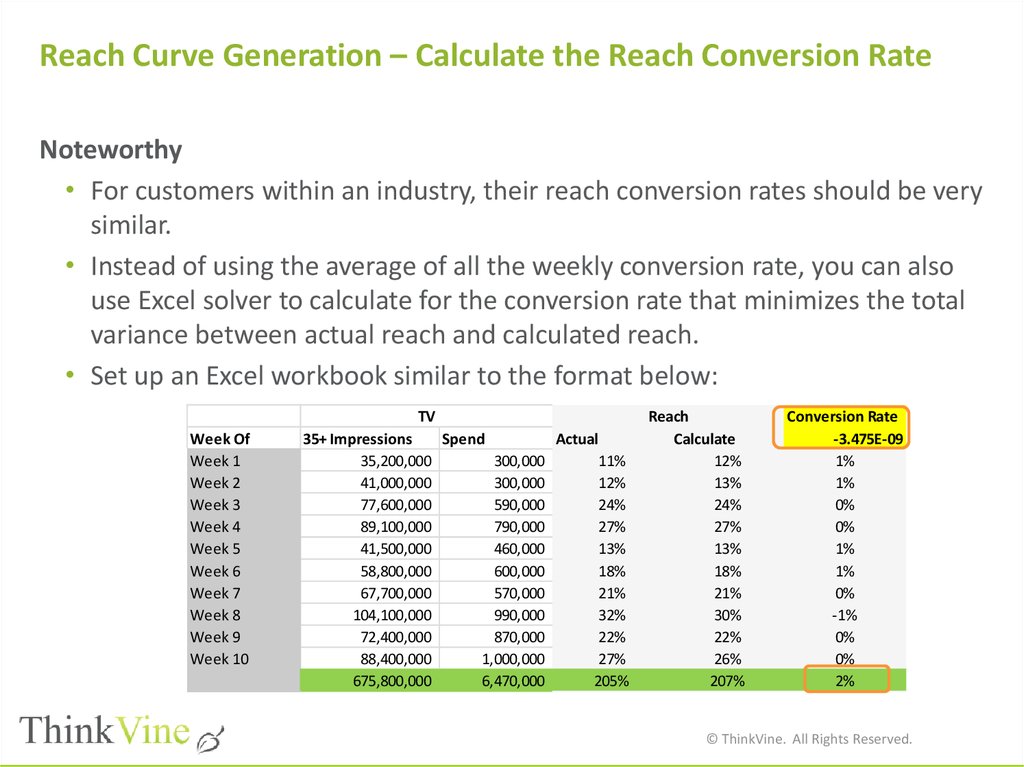


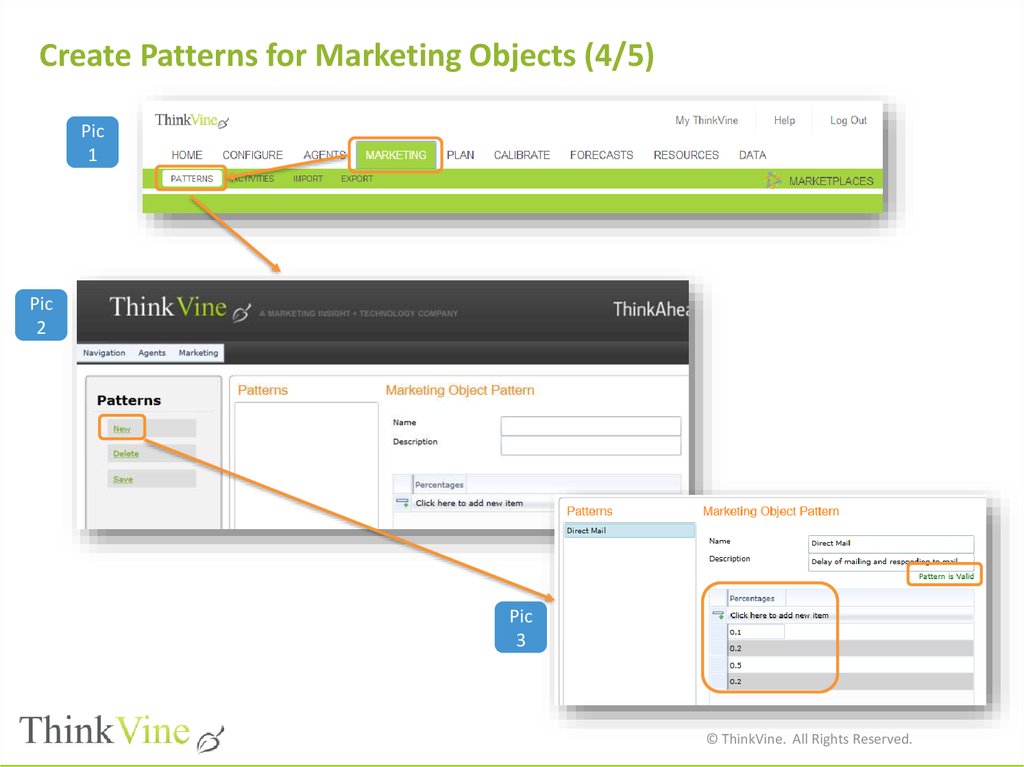








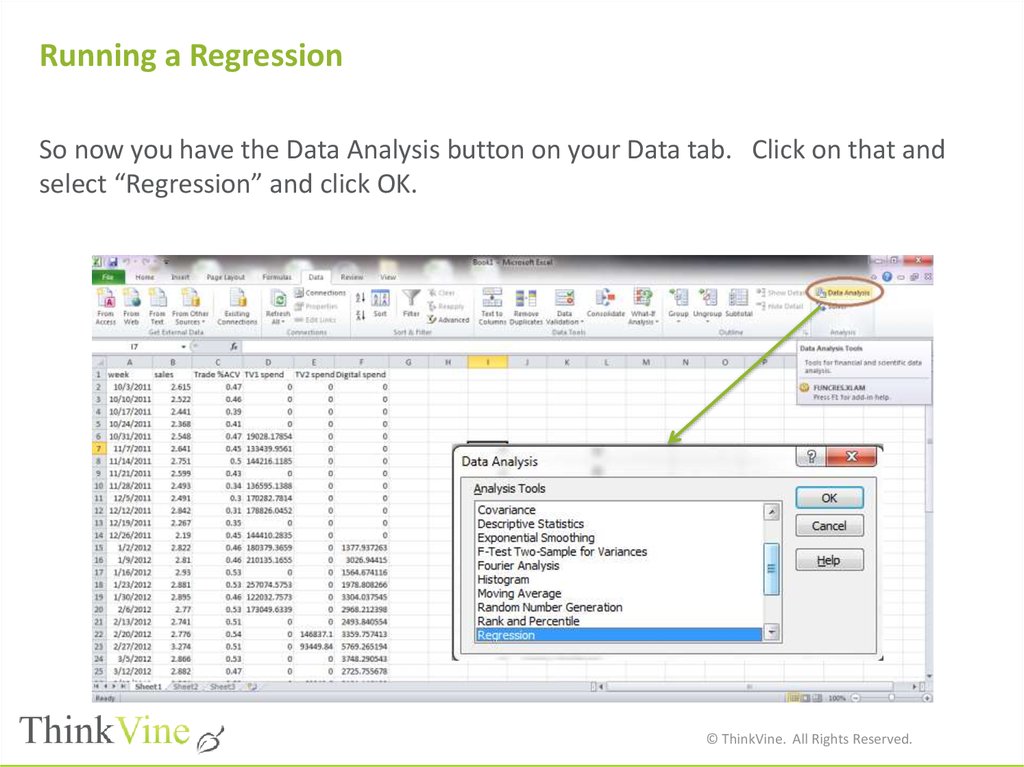









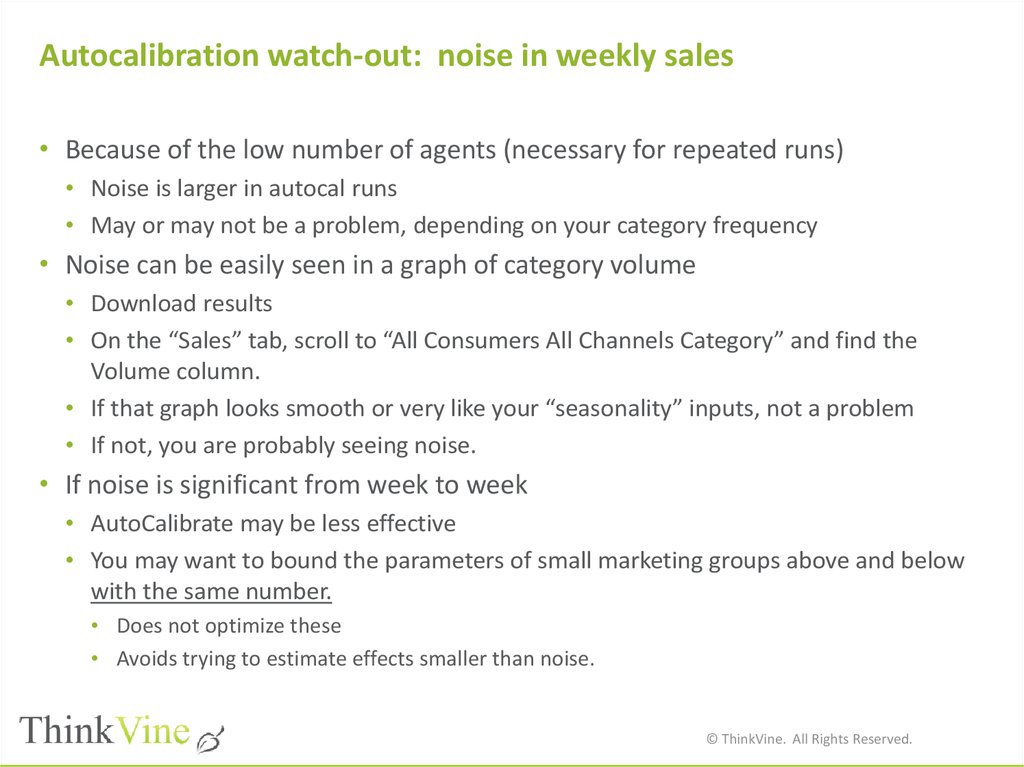




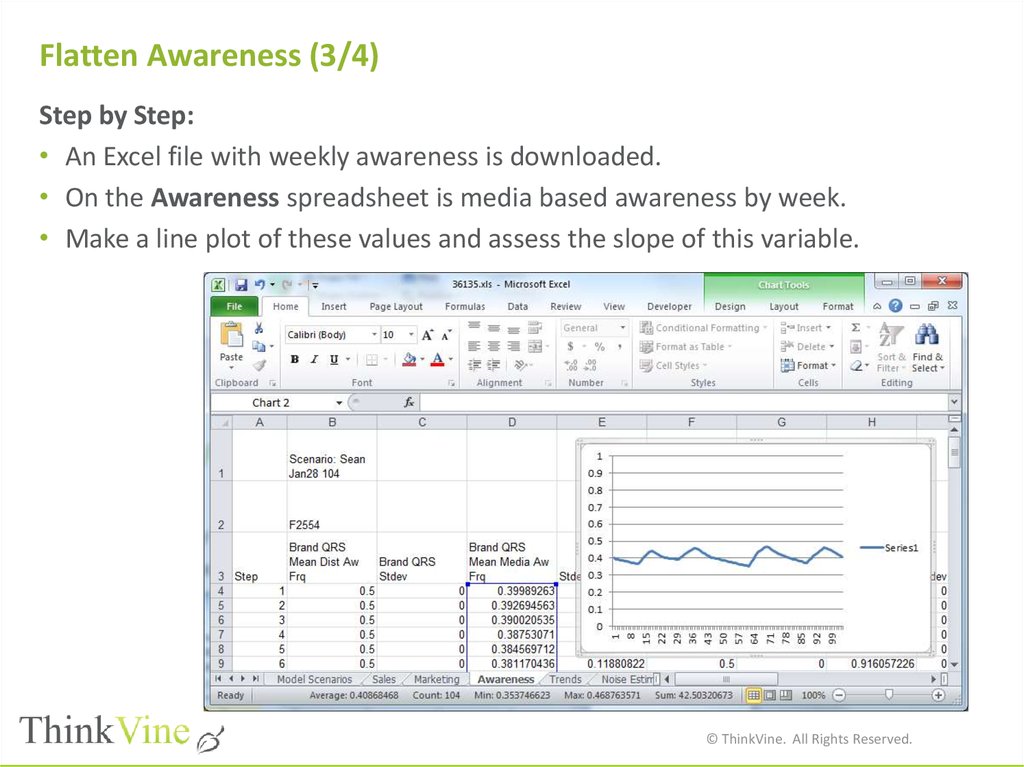





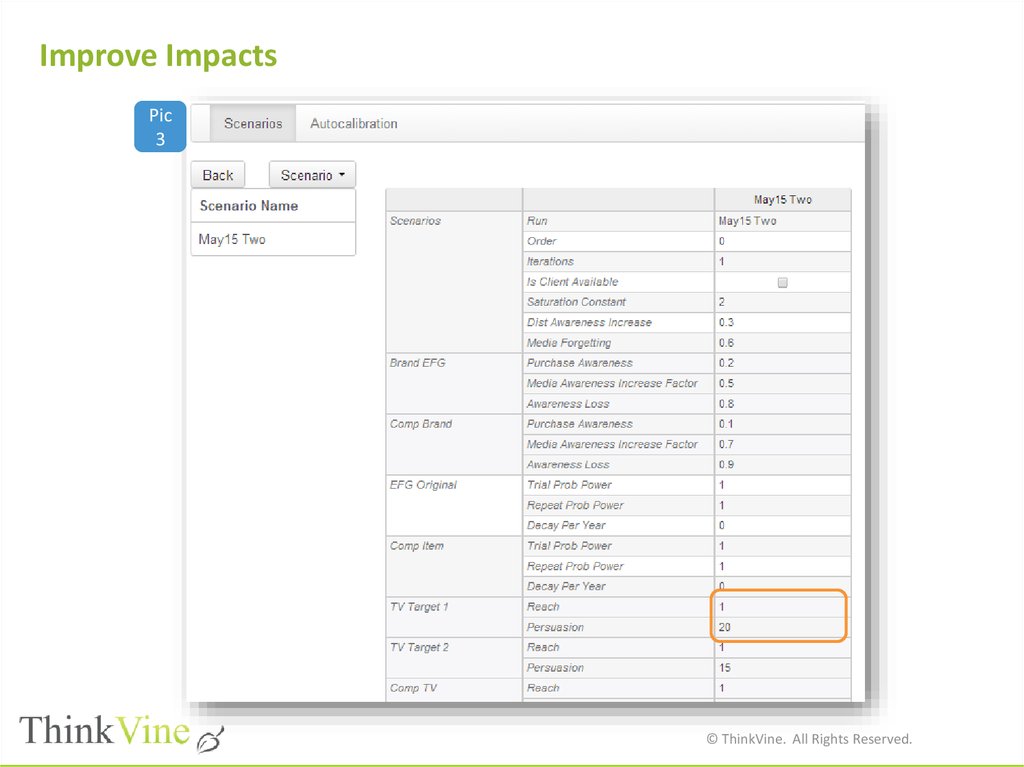

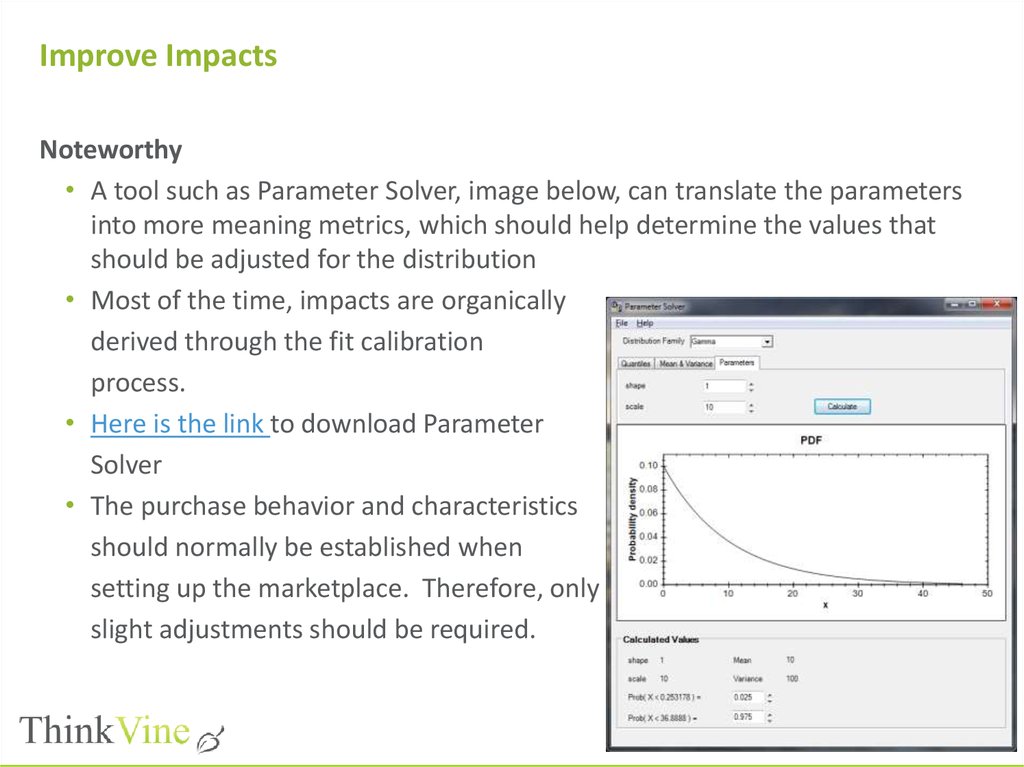


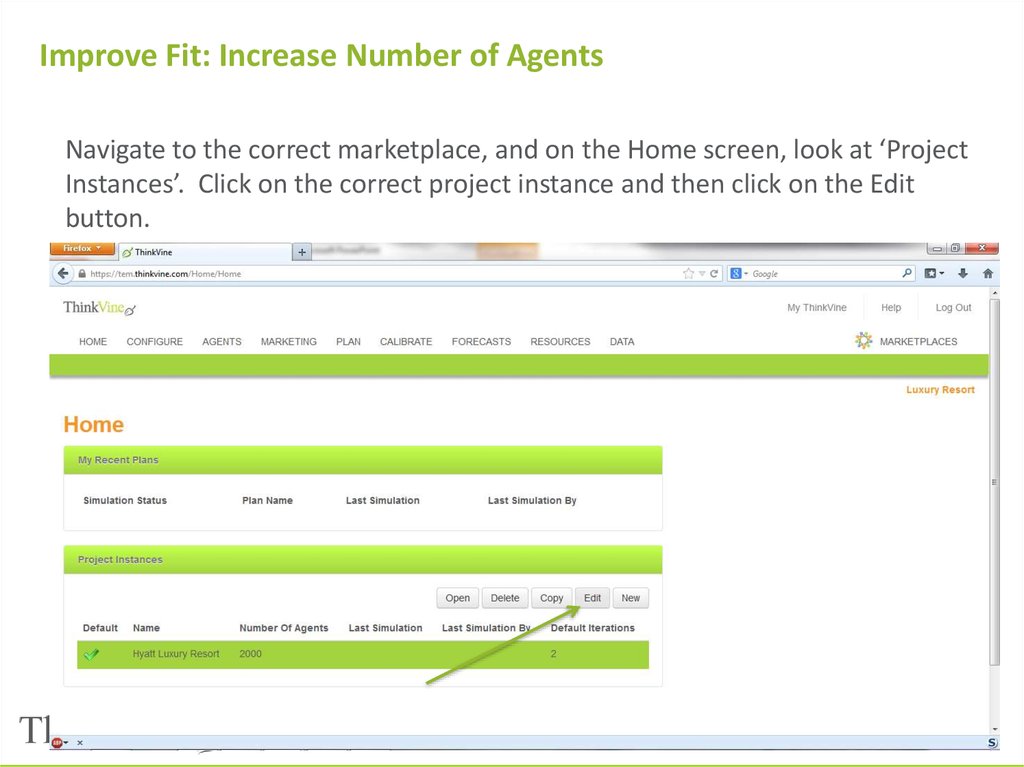




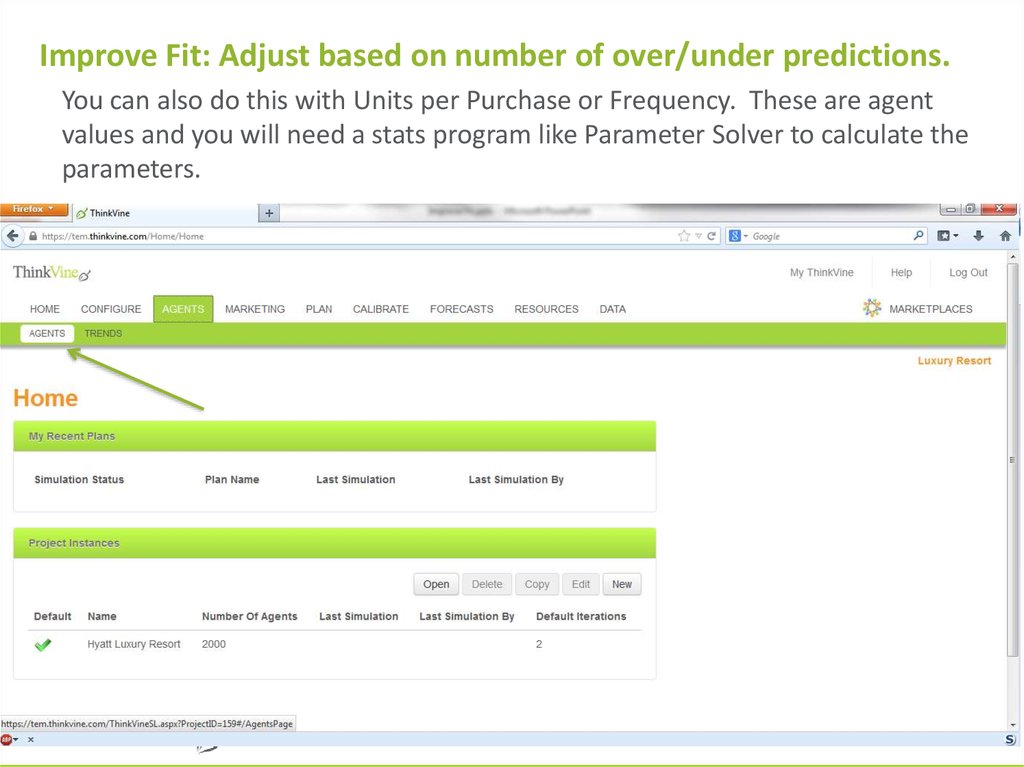

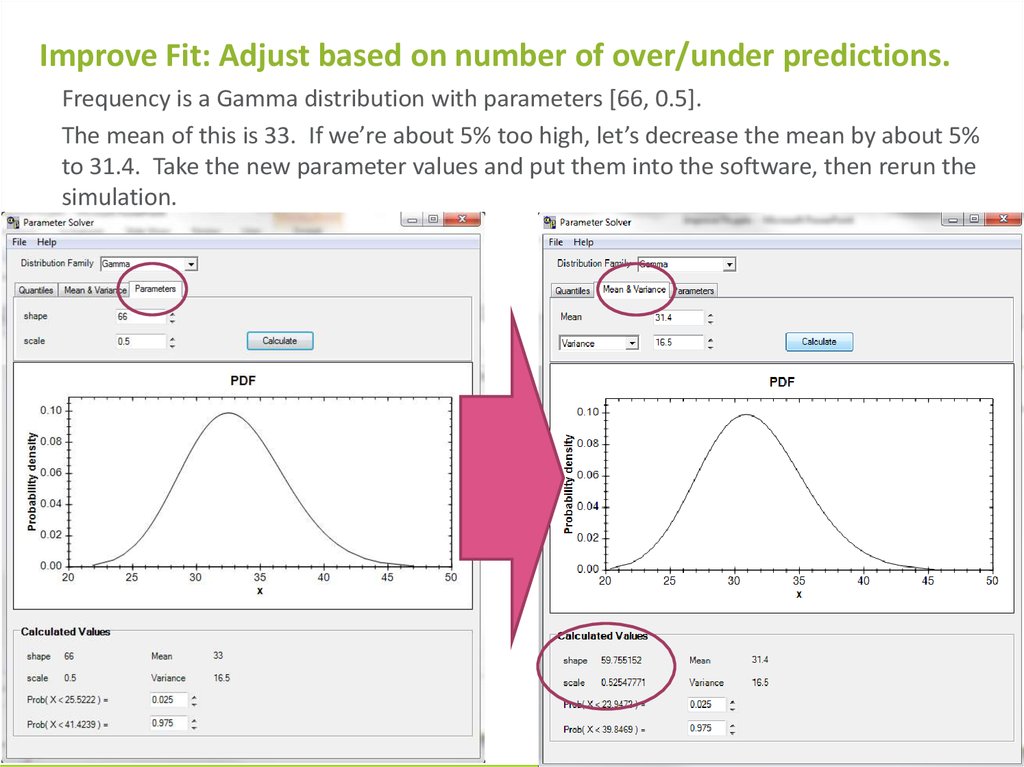
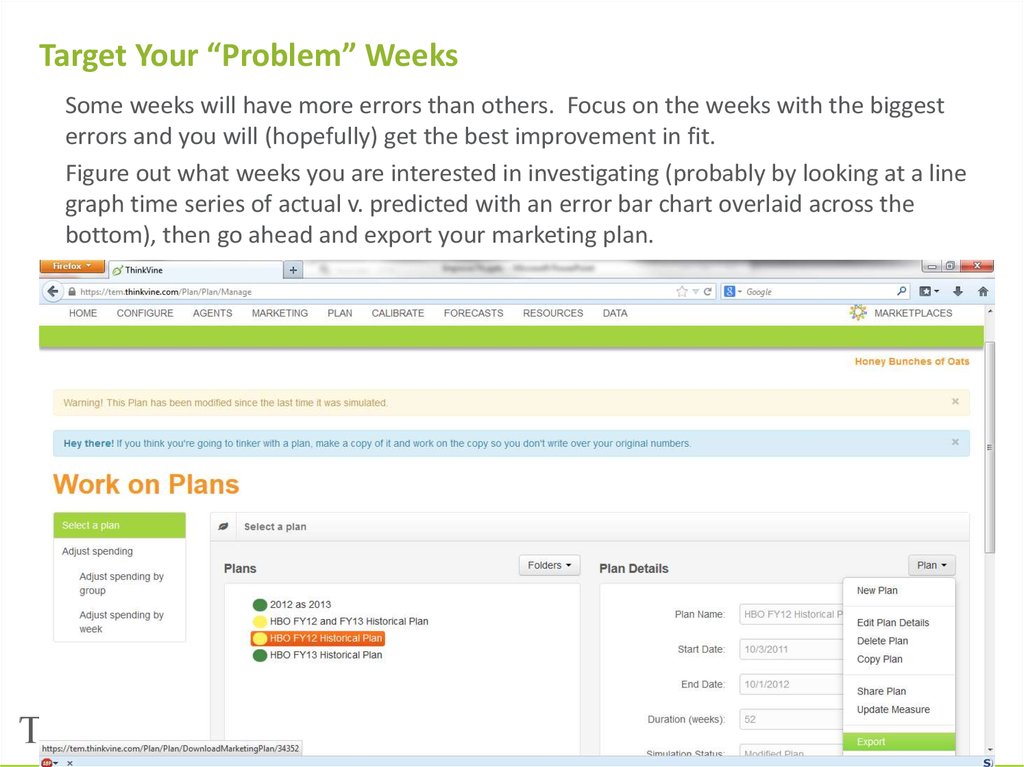


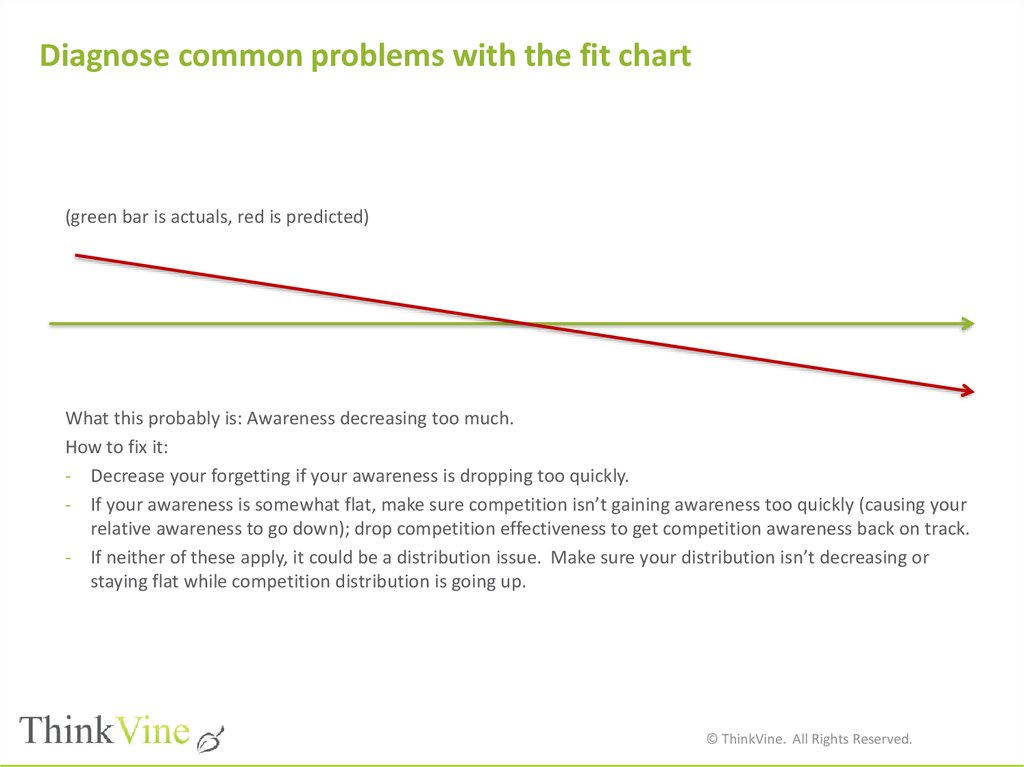









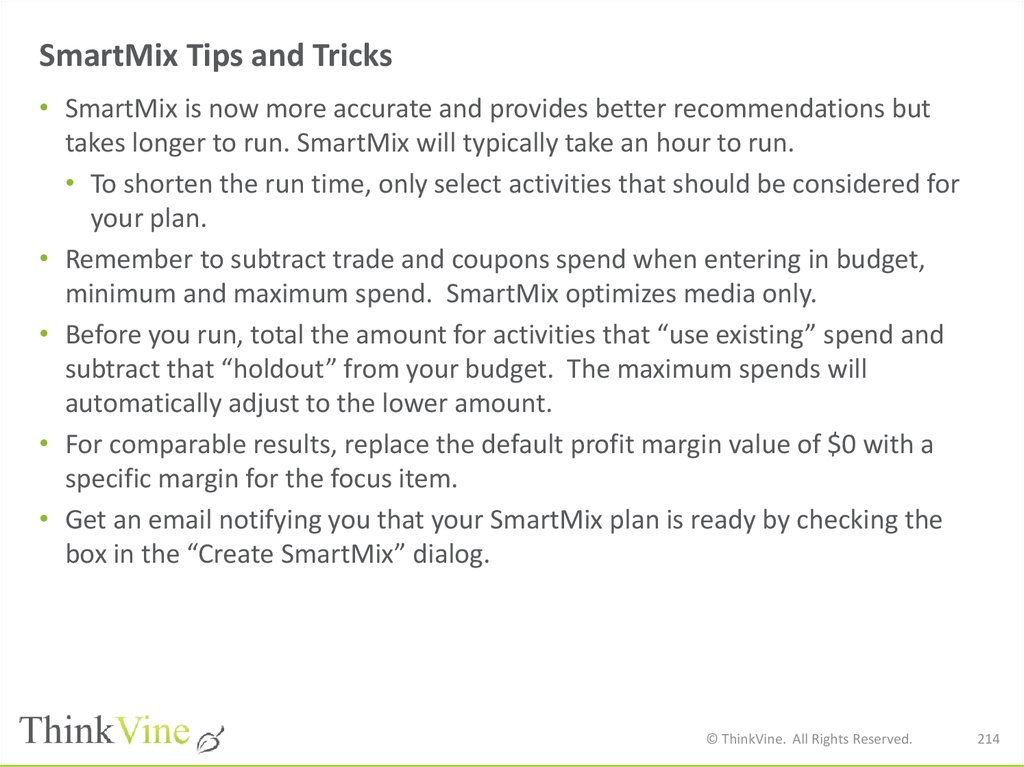



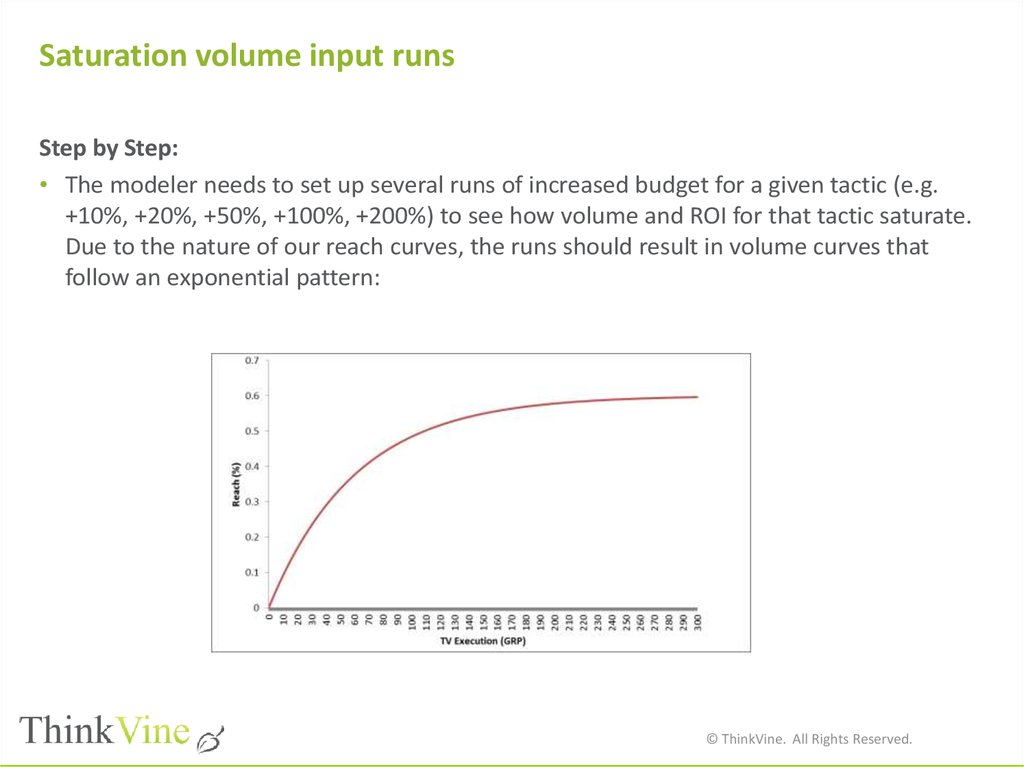




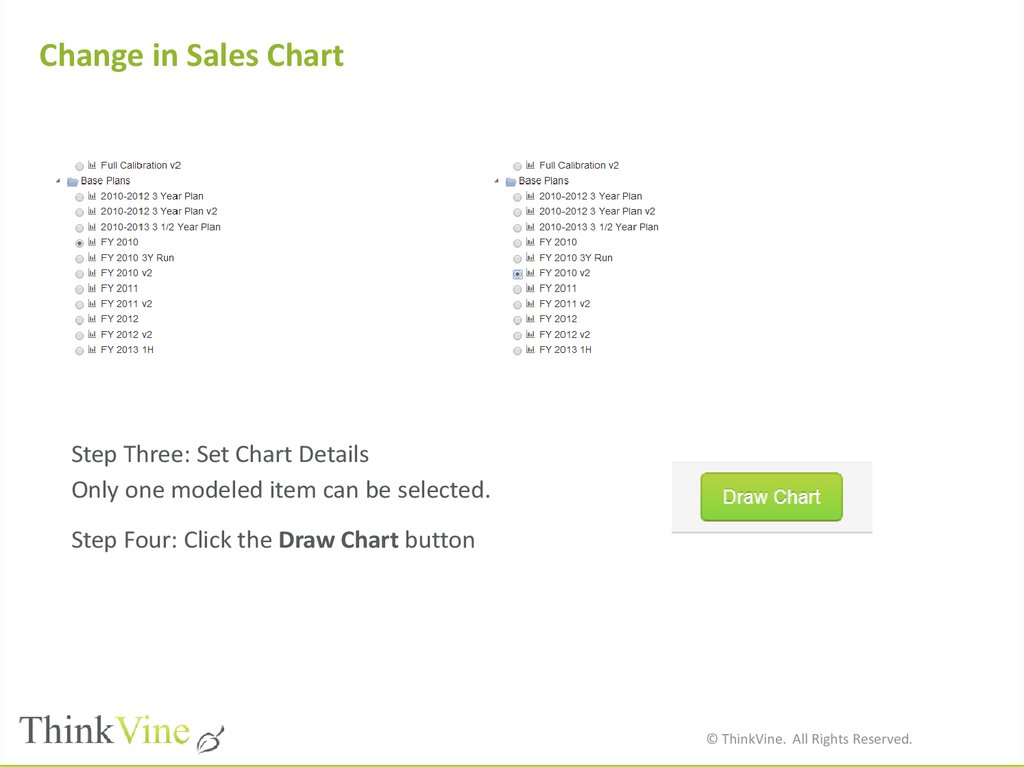
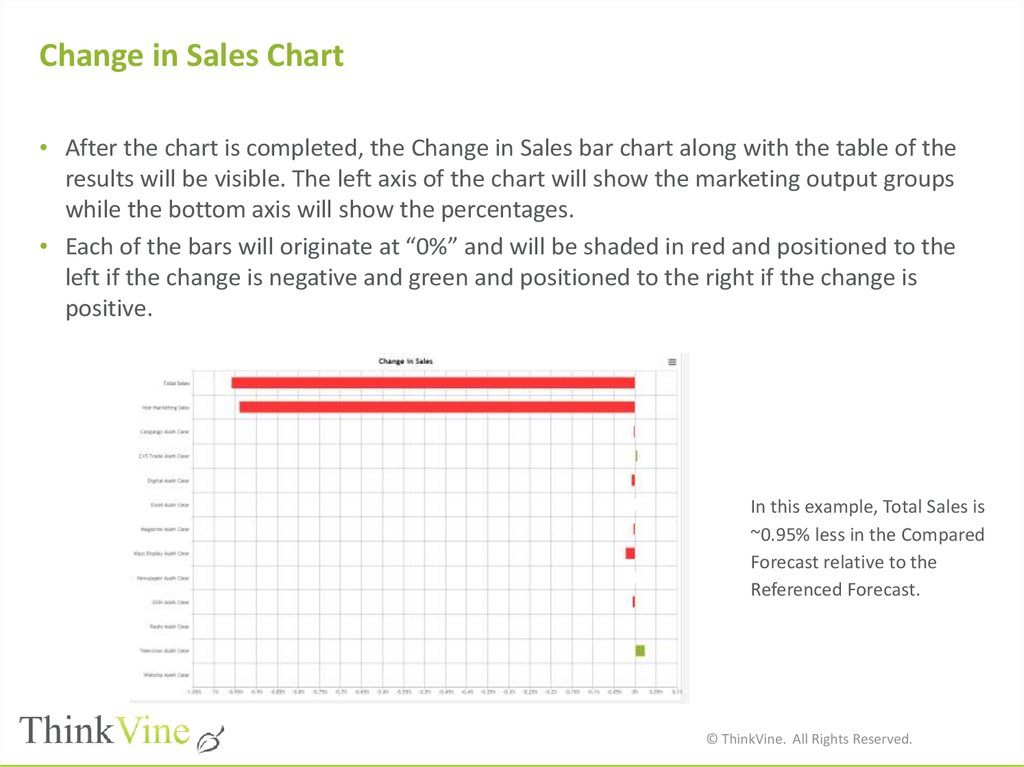

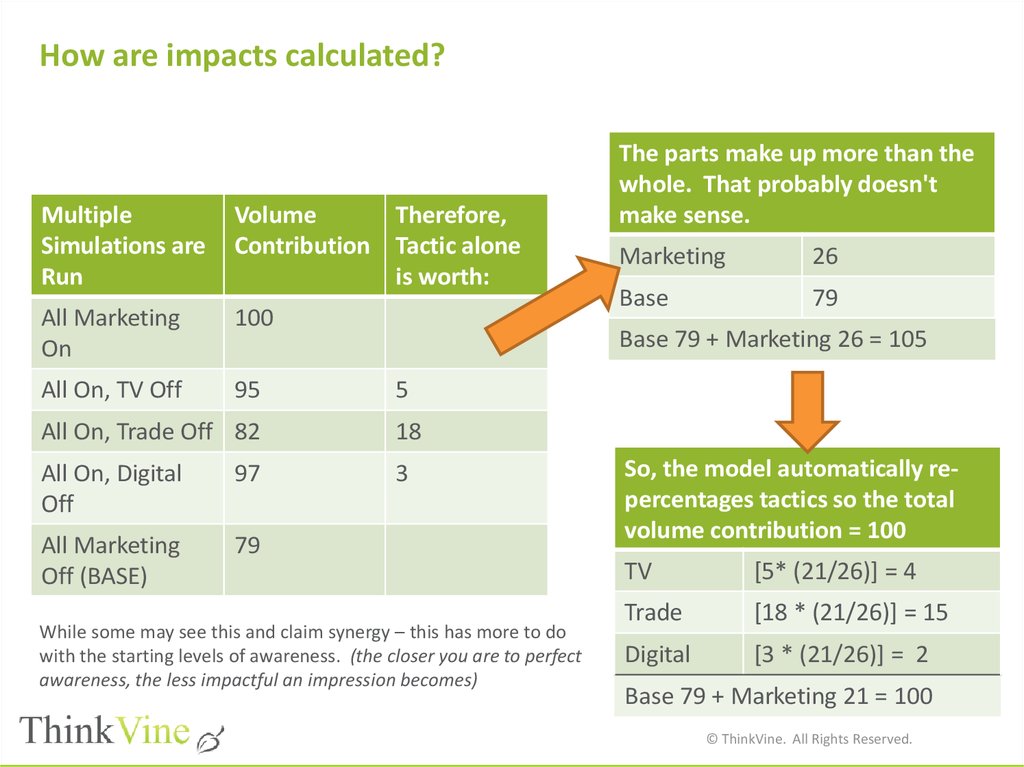




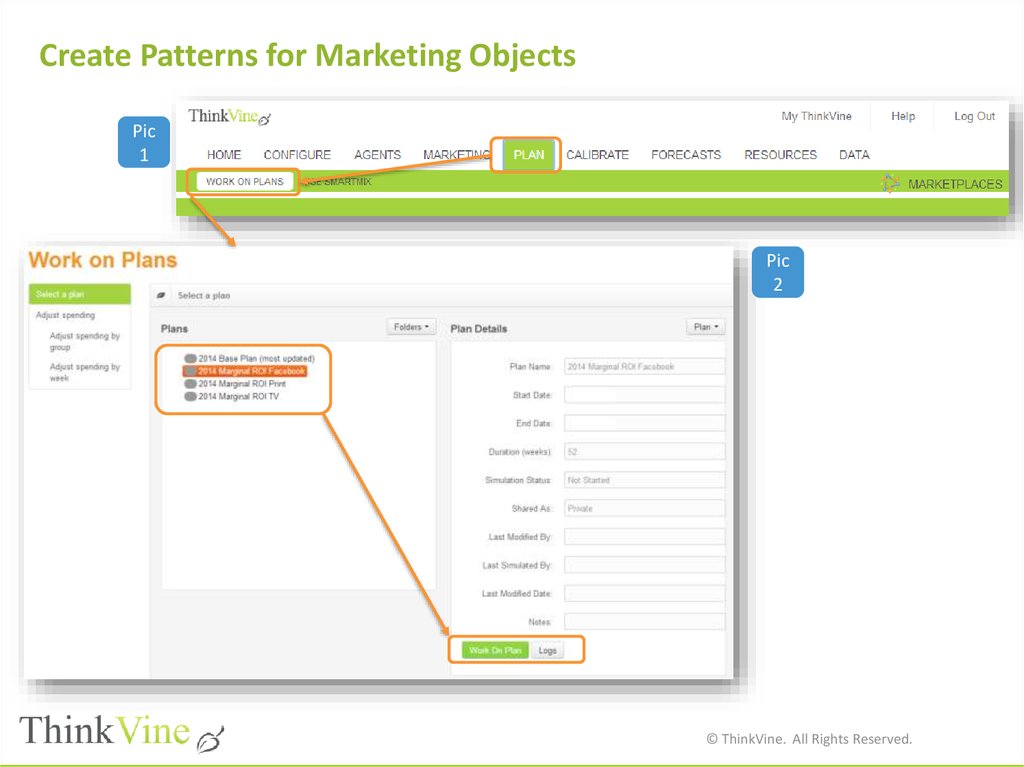
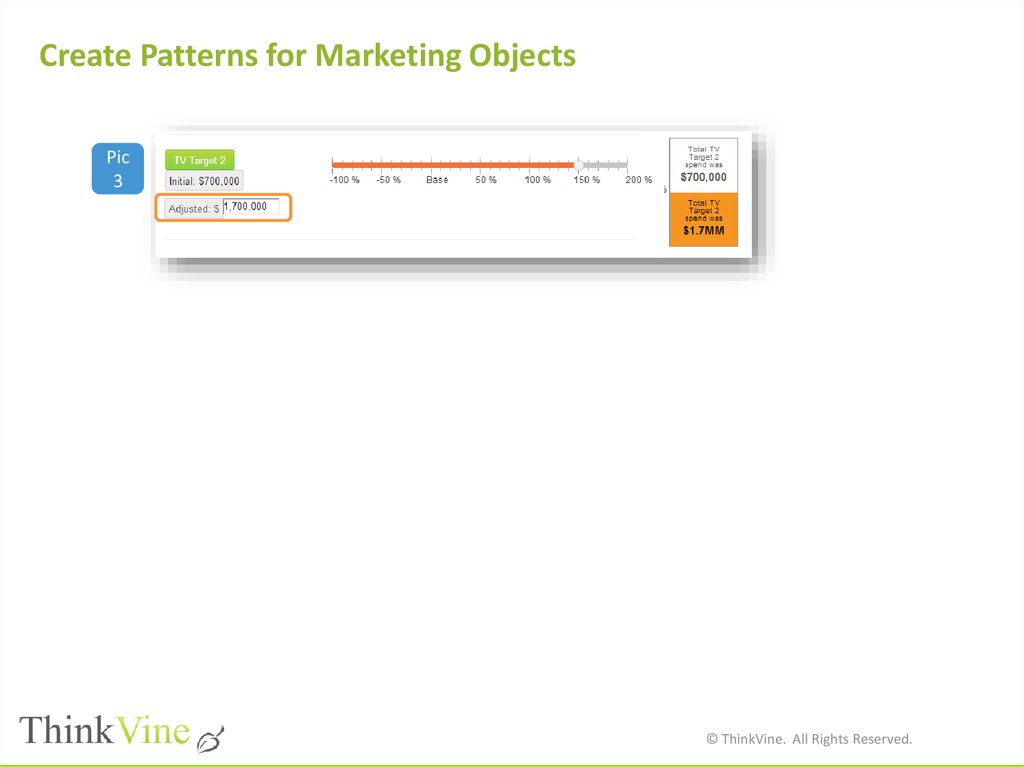


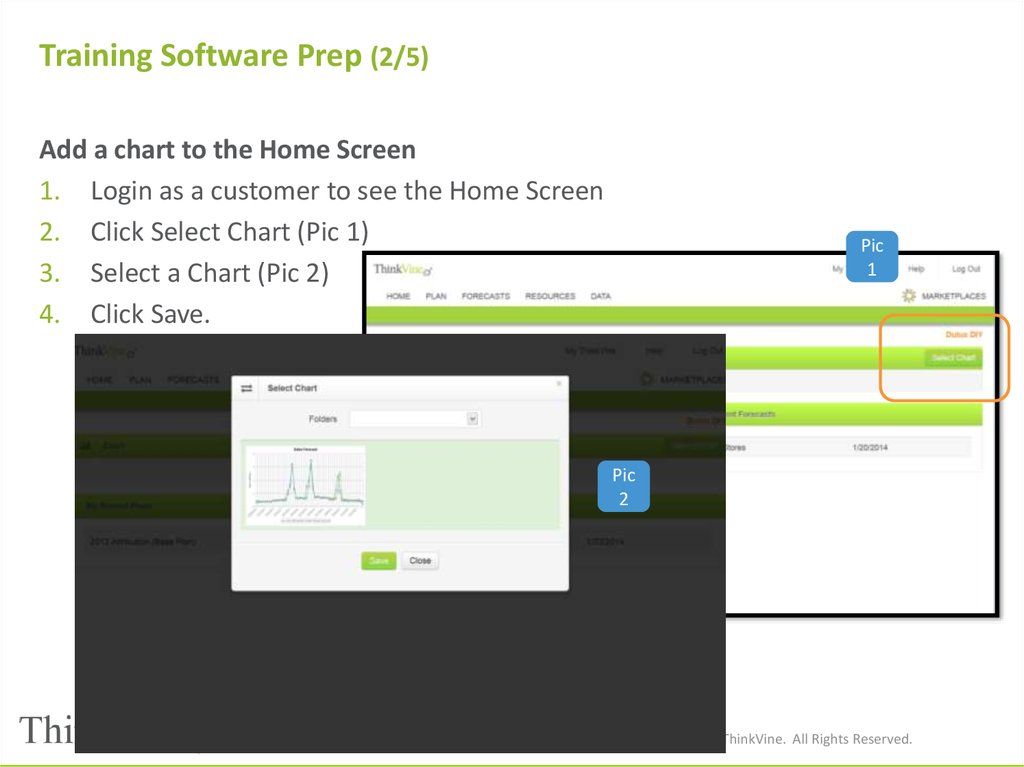

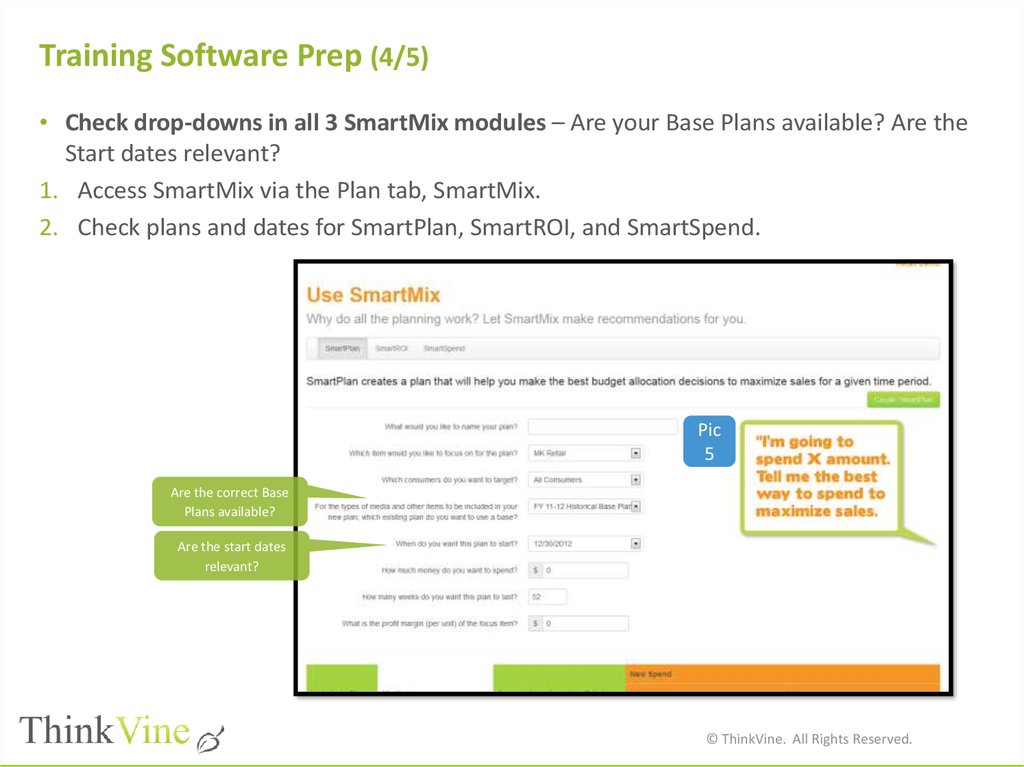

 Базы данных