


 Реклама
Похожие презентации:


Buoyage Odessa
1. Buoyage
Odessa 20092. Buoyage
• How many different systems?– Lateral Marks – system A
• Red to Port
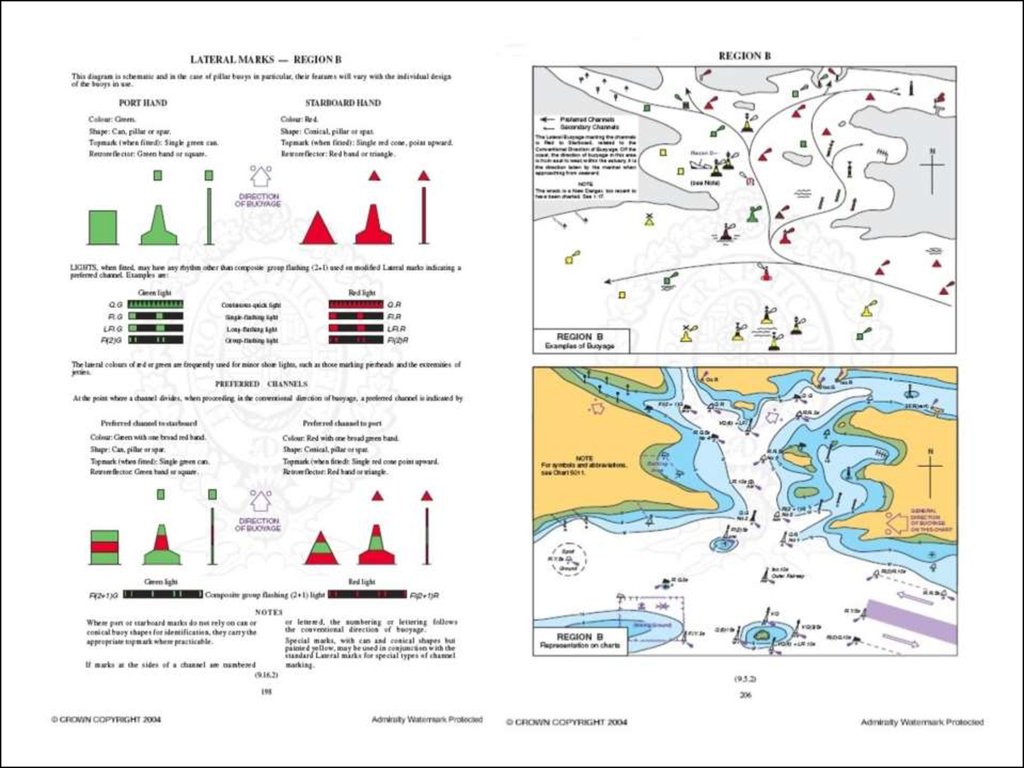
– Lateral Marks – system B
• Green to port
– Cardinal Marks
• Black and yellow marks defined by location to the danger
– Special Marks
• Isolated danger, safe water, special marks
3. North Cardinal Marks
• North cardinal marks arepositioned at the most
northerly point of a
navigational hazard.
• They are pillar or spar
shaped, with the upper part
being black and the lower
part coloured yellow.
• The black top mark is
formed by two cones both
pointing upwards as shown.
• Light: White very quick
flash, or quick flash.
4. East Cardinal Marks
• East cardinal marks arepositioned at the most
easterly point of a navigational
hazard.
• They are pillar or spar shaped,
black with a wide yellow waist
band.
• The black top mark is formed
by two cones one pointing up
and the other down as shown.
• Light: White very quick flash, 3
every 5 seconds, or quick
flash, 3 every 10 seconds.
5. South Cardinal Marks
South cardinal marks are positioned
at the most southerly point of a
navigational hazard.
They are pillar or spar shaped, with
the upper part being coloured yellow
and the lower part black.
The black top mark is formed by two
cones pointing down as shown.
Light: White very quick flash, 6
followed by a long flash every 10
seconds, or quick flash, 6 followed by
a long flash every 15 seconds.
6. West Cardinal Marks
• West cardinal marks arepositioned at the most westerly
point of a navigational hazard.
• They are pillar or spar shaped,
coloured yellow with a wide black
waist band.
• The black top mark is formed by
two cones one pointing up and
the other down as shown.
• Light: White very quick flash, 9
every 10 seconds, or quick flash,
9 every 15 seconds.
7. Isolated danger mark
• Isolated danger marks arepositioned above any isolated
navigational hazard, which is
surrounded by safe water.
• They may be pillar or spar
shaped, black in colour with
horizontal red stripes.
• The black top mark is formed by
two spheres placed one above
the other.
• Light: (if fitted) White flashing in
groups of two.
8. Safe water marks
• Safe water marks indicatesafe deep water.
• They may be of different
shapes, but always have red
and white vertical stripes
and a red spherical top
mark.
• Light: (if fitted) White
isophase occulting, or a long
flash every ten seconds.
9. Special marks
• Special marks indicate theposition of any special
feature.
• They may be of different
shapes, but are always
yellow with a yellow cross
top mark.
• However, a conical shaped
buoy would normally be
placed in a starboard hand
position.
10. Starboard hand marks – System A
• Starboard hand lateralmarks are positioned to
mark the starboard hand
edge of a navigable channel.
• They may be conical or spar
shaped, but are always
coloured green.
• The green top mark is also
conical.
• Light (if fitted): Green, of
any rhythm that does not
conflict with other local
lights.
11. Port Hand Marks – System A
• Port hand lateral marks arepositioned to mark the port
hand edge of a navigable
channel.
• They may be either can or
spar shaped, but are always
coloured red.
• The red top mark is also can
shaped.
• Light: (if fitted) Red, of any
rhythm that does not
conflict with other local
lights.