


 Строительство
Похожие презентации:


«URTA» - traditional buryatskoe housing
1. ЮРТА - ТРАДИЦИОННОЕ БУРЯТСКОЕ ЖИЛИЩЕ
«URTA» - TRADITIONALBURYATSKOE HOUSING
2. The Buryat yurt
is a historically formed sample of a dwelling ideally suited for anomadic way of life. In the yurt lived all year round - quite resistant against winds due
to hemispherical shape and low altitude, seismic safety - due to mobile wall
construction, the possibility to vary the area, availability of the material, always clean
air - these and many other properties developed over 2500-3000 years.
Yurta organically fits into the environment, in a form repeating the sky dome over it,
semicircular hills and hills. In the summer heat and heat in it the saving coolness, in
the cold live fire in the hearth creates uniform heating and a special microclimate,
eliminating harmful to human health energy, characteristic for buildings with straight
angles.
The internal space of the yurt is divided into five parts: the center is the gulam ghalam,
the location of the main sacral object of the yurt; The northern side is the Khaimor
Tala, an honorary "high" part of the yurt; Western, right (baroon) side - guest or male;
East, left (jawn) side - economic or female, south - exit from the yurt.
The nomadic house consists of nine basic elements:
3. Уняа «Unyaaa»
plough-stone poles, from which the arch of the yurtaof the Buryats is built. Only extremely flexible tree
species are used: this increases the service life of the
elements. Their number reaches sixty
4. Тооно «Toono»
a special circle on the top of the yurt. It forms a hole, which serves to removesmoke and house lighting during the day. The diameter of the "window" is about
a meter. The rim is made of birch. On perimeter in it holes are drilled, into which
the poles of the arch are installed
5. Тээнги «Thaengi»
supporting poles of the structure. There are only twoof them, and with their upper edge they abut the
tone
6. Дааган «Daagan»
struts of the upper rim, serving togive it rigidity. From the Buryat
language this word is translated as
"carry on yourself"
7. Туургэ «Turege»
felt, covering the side parts of the dwelling. Each roll inlength reaches three meters. Its surface is necessarily treated
with a special antiseptic solution from tobacco, sour milk and
salt
8. Зээг «Zeeg»
hair ropes attached to the top edge of the coating. Felt first closethe south-western part of the yurt, then - the south-east and only
after that close the rest of the dwelling. This order is dictated by
the need for maximum protection against cold northwesterly
winds
9. Дээбэри «Deebari»
throw themselves after the turk. They are twohuge pieces of felt covering, narrow at the top
and wide at the bottom. The thickest and dense
felt is always located on the north-western part
of the yurt
10. Холшон «Khoshlon»
belts of horsehair, with which the yurt is pulledover the felt cover. They keep the upper and
middle parts of the insulation. Below, the
covering was stretched by felt belts, and, if
necessary, covered with dry manure.
11. Instruction on assembling-installation of a felt burial yurt of the Buryat-Mongol type
12.
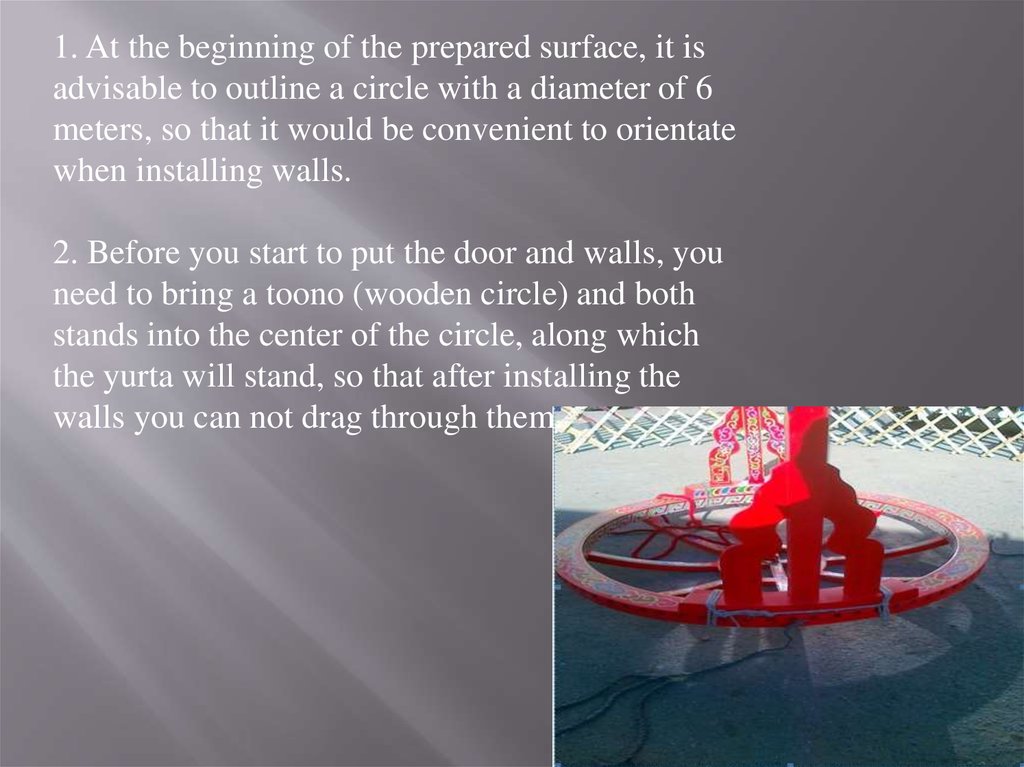
1. At the beginning of the prepared surface, it isadvisable to outline a circle with a diameter of 6
meters, so that it would be convenient to orientate
when installing walls.
2. Before you start to put the door and walls, you
need to bring a toono (wooden circle) and both
stands into the center of the circle, along which
the yurta will stand, so that after installing the
walls you can not drag through them.
13.
3. Install the door. Traditionally, the Mongolian people put their house(yurt) in a door to the south or to the south-east.
4. Next, we begin to set the walls in such a way that the walls come up
with walls with exactly vertically sawn rails from one edge. One wall
should go to the left of the door, the other on the right.
The walls are connected to each other in a "lock" and tightly tied with
ropes.
14.
Walls that approach the door must be tied to thedoor with ropes. To one of these ropes we tie a
rope around which the walls encircle round and
tighten it so that the crosshairs of the walls are
level with the upper edge of the door block. In
the future, when installing Units (ceiling poles)
with this rope, you can adjust - loosen or
tighten, thereby increasing or decreasing the
diameter of the yurt to strengthen the union
more rigidly.
Toono is turned "upside down" and
we tie struts stronger. We raise and
put the tone on the stands in the
center of the circle, orienting it
from north to south, centering on
the door.
15.
Toono is turned "upside down" and we tie strutsstronger. We raise and put the tone on the stands in the
center of the circle, orienting it from north to south,
centering on the door.
16.
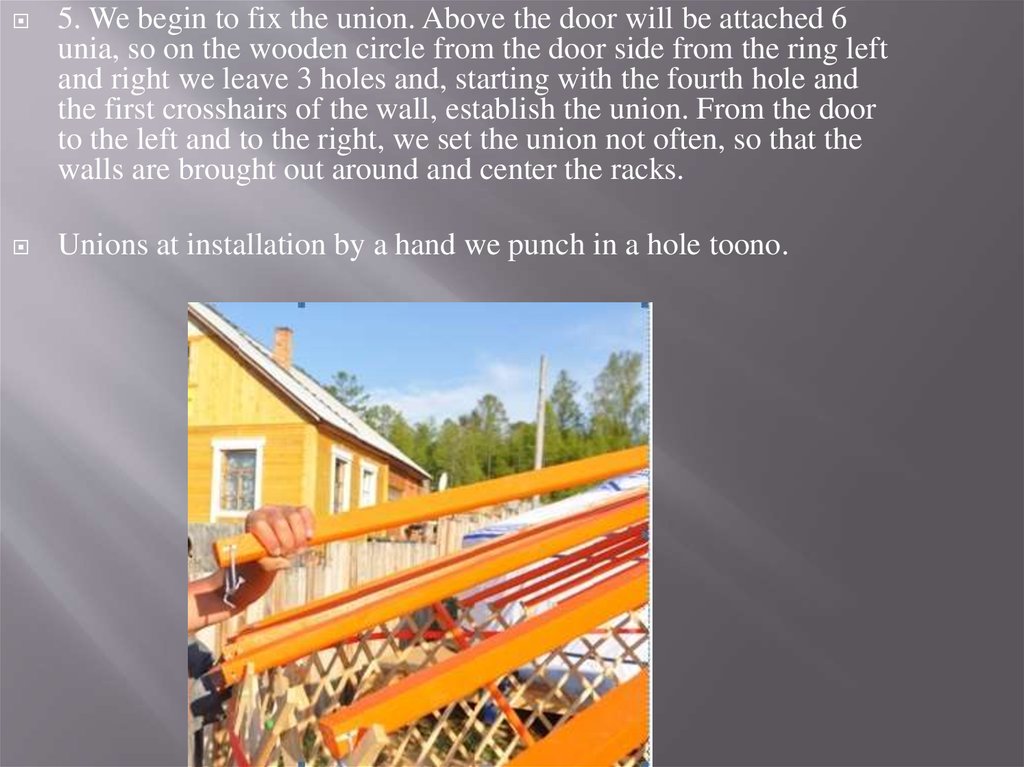
5. We begin to fix the union. Above the door will be attached 6unia, so on the wooden circle from the door side from the ring left
and right we leave 3 holes and, starting with the fourth hole and
the first crosshairs of the wall, establish the union. From the door
to the left and to the right, we set the union not often, so that the
walls are brought out around and center the racks.
Unions at installation by a hand we punch in a hole toono.
17.
To the wall, the union is fastened with ropes so thatit is not possible for it to "move" down and fall out
of the hole into the tono and fall to the floor
(striking the hard floor of the end of the union can
break down
Unions are more convenient to insert outside the yurt. Fully install
the union. Where necessary, there it is necessary to cut the ends of
the union with an ax or chisel, so that the end of the union deep
and densely enters the hole of the tono.
18.
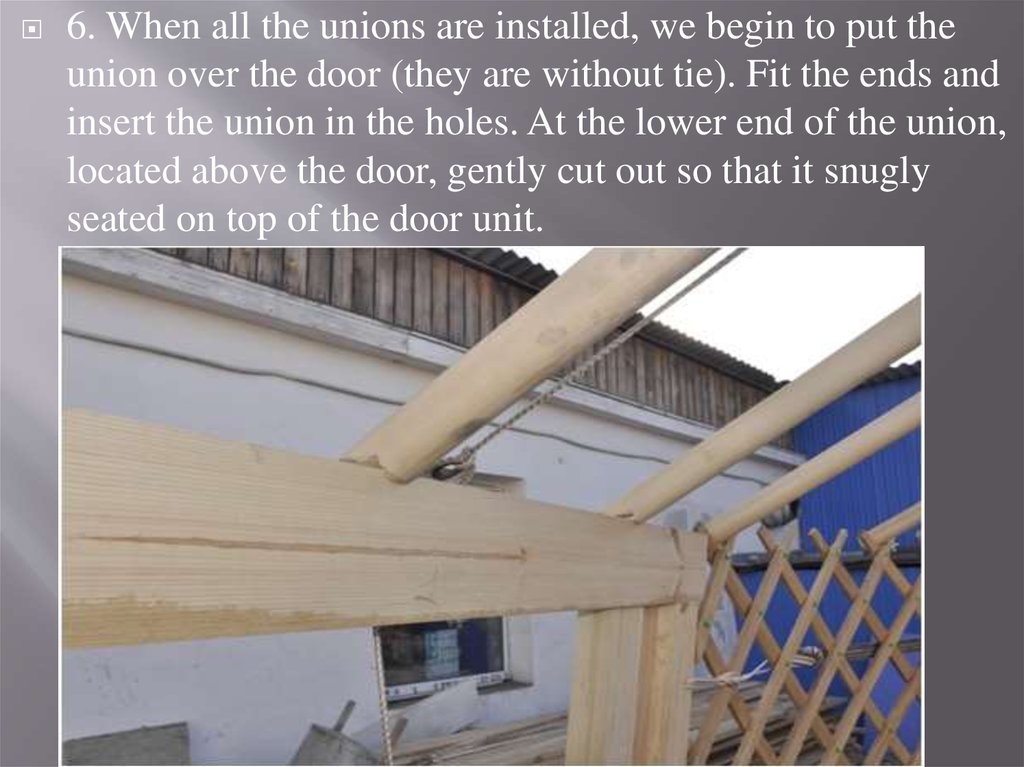
6. When all the unions are installed, we begin to put theunion over the door (they are without tie). Fit the ends and
insert the union in the holes. At the lower end of the union,
located above the door, gently cut out so that it snugly
seated on top of the door unit.
19.
7. If the inner case of calico is included in the package ofyour yurt, then the next step is to put it on the frame. It can
be fastened in places with a stapler, so that it does not blow
off the wind.
8. Fix the felt walls with a rope, pulled through the loops
around. You need to start from the door and finish on the
other side - firmly tie both ends of the rope so that the walls
can not slide down.
20.
9. Felt semicircles - the devoir fit on the roof in such a sequence:- first on the front part of the roof (on the door side) with the cutout under the tono
(under the circle)
- Then on the back of the roof so that the tono is half closed.
21.
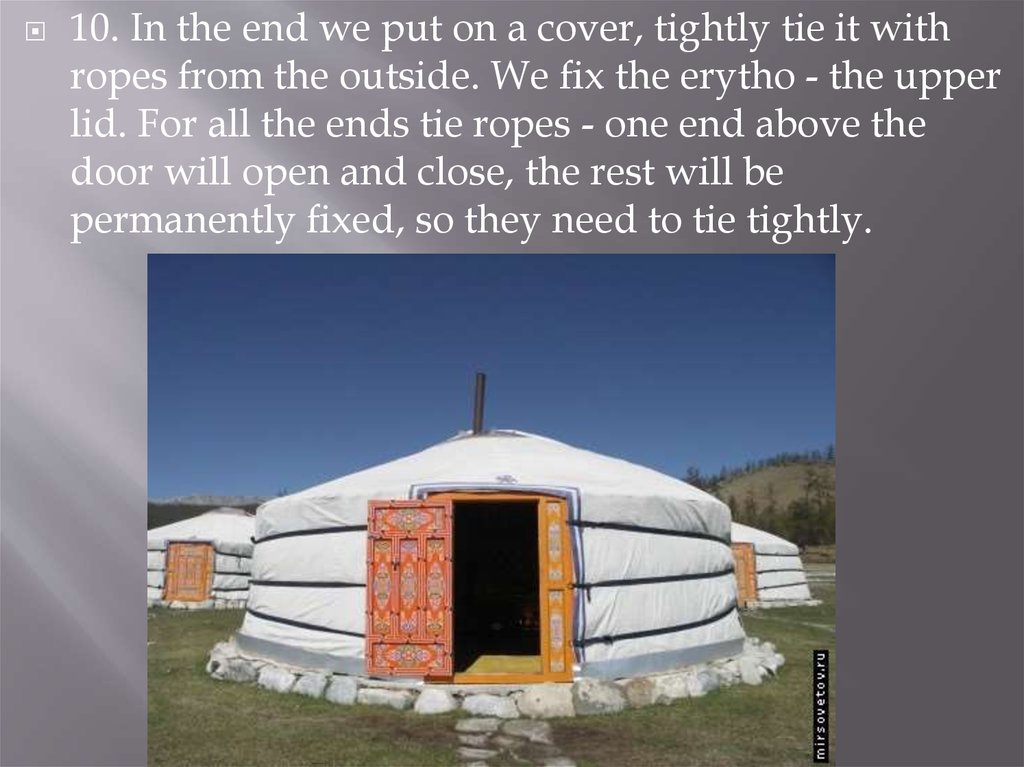
10. In the end we put on a cover, tightly tie it withropes from the outside. We fix the erytho - the upper
lid. For all the ends tie ropes - one end above the
door will open and close, the rest will be
permanently fixed, so they need to tie tightly.