


 Программное обеспечение
Похожие презентации:


")

Java Unit
1.
Java UnitTesting
Java Marathon
2.
AgendaTerminology
What is Junit
Annotations
How to work with Junit
Junit Test
What is Maven
Java Marathon
3.
• A test fixture sets up the data (both objects and primitives) that are needed to run testsExample: If you are testing code that updates an employee record, you need an
employee record to test it on
• A unit test is a test of a single class
• A test case tests the response of a single method to a particular set of inputs
• A test suite is a collection of test cases
• A test runner is software that runs tests and reports results
• An integration test is a test of how well classes work together
JUnit provides some limited support for integration tests
4.
Software testing is imperative to identify bugs and errors during software developmentand increase the quality of the product. Additionally, software testing is necessary to
ensure that the software fulfills the client specifications, responds correctly to inputs (input
validation), runs in a reasonable time (performance testing), is easy to install and run
(deployment testing), and meets the stakeholder’s goals.
Test-Driven Development (TDD) is a key practice for extreme programming, it suggests that
the code is developed or changed exclusively on the basis of the Unit Testing. TDD helps
the programmer improve the code, side by side, increasing the programmer’s productivity.
5.
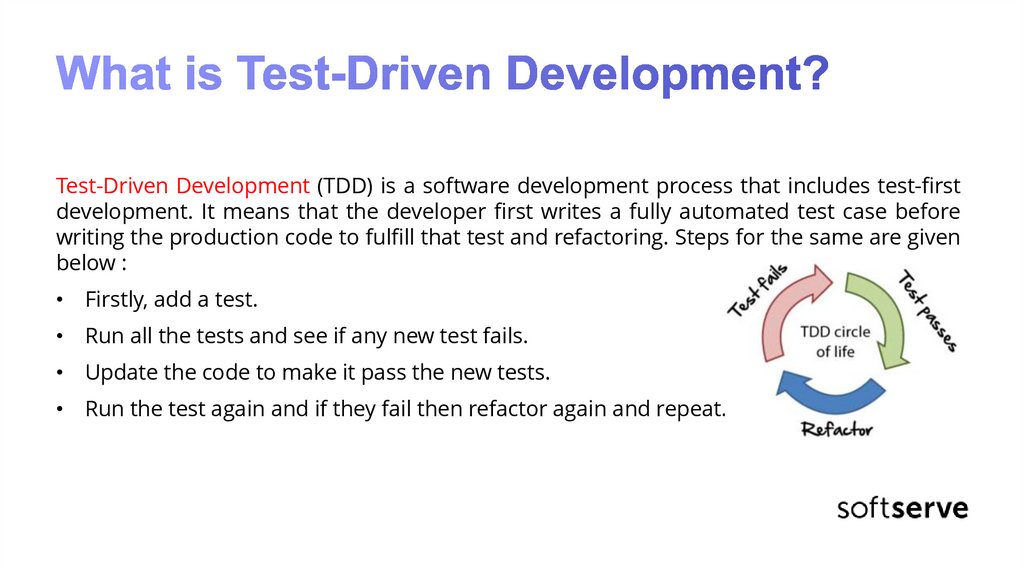
Test-Driven Development (TDD) is a software development process that includes test-firstdevelopment. It means that the developer first writes a fully automated test case before
writing the production code to fulfill that test and refactoring. Steps for the same are given
below :
• Firstly, add a test.
• Run all the tests and see if any new test fails.
• Update the code to make it pass the new tests.
• Run the test again and if they fail then refactor again and repeat.
6.
JUnit is a Regression Testing Framework used by developers to implement unit testing inJava and accelerate programming speed and increase the quality of code. JUnit Framework
can be easily integrated with either of the following:
Eclipse
Ant
Maven
JUnit 5 is composed of several different modules from three different sub-projects:
JUnit 5 = JUnit Platform + JUnit Jupiter + JUnit Vintage
7.
JUnit also defines the TestEngine API for developing a testing framework that runs on theplatform. First-class support for the JUnit Platform also exists in popular IDEs:
IntelliJ IDEA,
Eclipse,
Visual Studio Code
JUnit Jupiter is the combination of the new programming model and extension model for
writing tests and extensions in JUnit 5. The Jupiter sub-project provides a TestEngine for
running Jupiter based tests on the platform.
JUnit Vintage provides a TestEngine for running JUnit 3 and JUnit 4 based tests on the
platform. It requires JUnit 4.12 or later to be present on the class path or module path.
8.
JUnit 5 requires Java 8 (or higher) at runtime. However, you can still test code that has beencompiled with previous versions of the JDK.
JUnit test framework provides the following important features:
Fixtures
Test suites
Test runners
JUnit classes
9.
Fixtures is a fixed state of a set of objectsused as a baseline for running tests. The
purpose of a test fixture is to ensure that
there is a well-known and fixed environment
in which tests are run so that results are
repeatable. It includes −
• setUp() method, which runs before every
test invocation.
• tearDown() method, which runs after
every test method.
10.
A test suite bundles a few unit test casesand runs them together. In JUnit, both
@RunWith and @Suite annotation are
used to run the suite test.
A test runner is used for executing the
test cases. Here is an example that
assumes the test class TestJunit already
exists.
11.
JUnit classes are important classes, used in writing and testing JUnits. Some of theimportant classes are :
• Assert − Contains a set of assert methods.
• TestCase − Contains a test case that defines the fixture to run multiple tests.
• TestResult − Contains methods to collect the results of executing a test case.
• TestSuite is a composite of tests.
12.
JUnit Jupiter supports the following annotations for configuring tests and extending theframework. Unless otherwise stated, all core annotations are located in the
org.junit.jupiter.api package in the junit-jupiter-api module.
Annotation
Description
@Test
Denotes that a method is a test method. Unlike JUnit 4’s @Test annotation,
this annotation does not declare any attributes, since test extensions in JUnit
Jupiter operate based on their own dedicated annotations. Such methods
are inherited unless they are overridden.
@ParameterizedTest
Denotes that a method is a parameterized test. Such methods are inherited
unless they are overridden.
@RepeatedTest
Denotes that a method is a test template for a repeated test. Such methods
are inherited unless they are overridden.
@TestFactory
Denotes that a method is a test factory for dynamic tests. Such methods
are inherited unless they are overridden.
13.
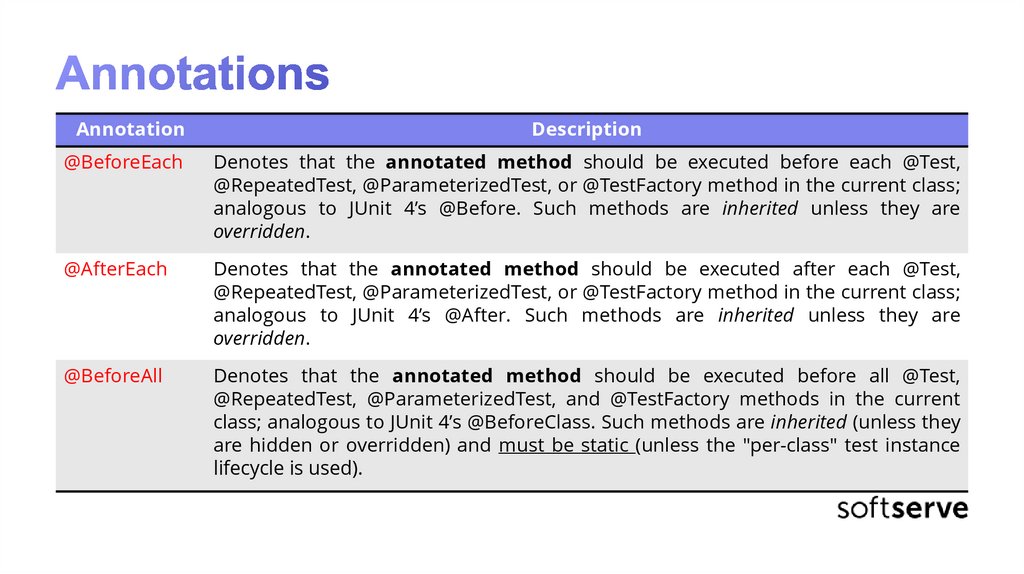
AnnotationDescription
@BeforeEach
Denotes that the annotated method should be executed before each @Test,
@RepeatedTest, @ParameterizedTest, or @TestFactory method in the current class;
analogous to JUnit 4’s @Before. Such methods are inherited unless they are
overridden.
@AfterEach
Denotes that the annotated method should be executed after each @Test,
@RepeatedTest, @ParameterizedTest, or @TestFactory method in the current class;
analogous to JUnit 4’s @After. Such methods are inherited unless they are
overridden.
@BeforeAll
Denotes that the annotated method should be executed before all @Test,
@RepeatedTest, @ParameterizedTest, and @TestFactory methods in the current
class; analogous to JUnit 4’s @BeforeClass. Such methods are inherited (unless they
are hidden or overridden) and must be static (unless the "per-class" test instance
lifecycle is used).
14.
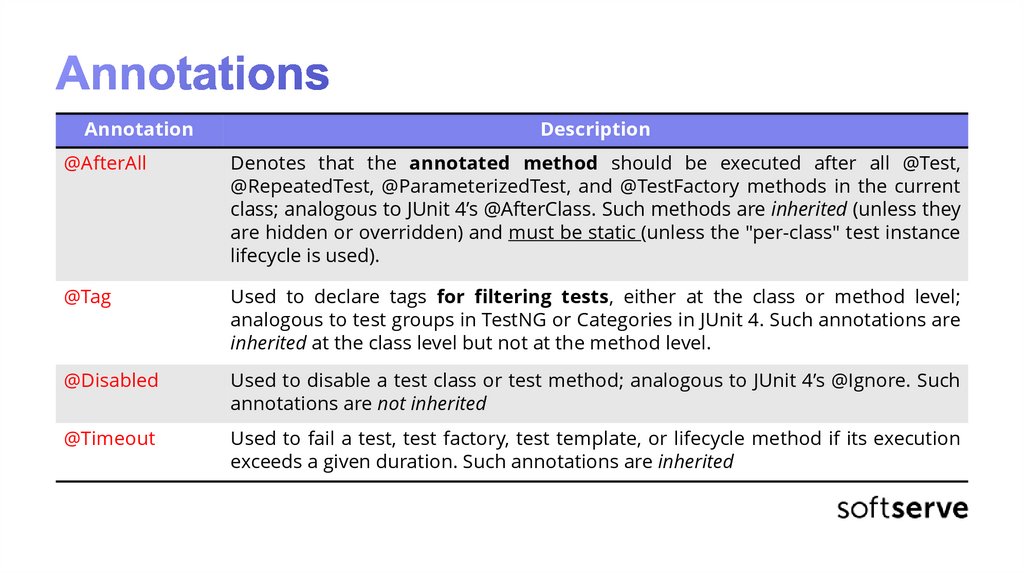
AnnotationDescription
@AfterAll
Denotes that the annotated method should be executed after all @Test,
@RepeatedTest, @ParameterizedTest, and @TestFactory methods in the current
class; analogous to JUnit 4’s @AfterClass. Such methods are inherited (unless they
are hidden or overridden) and must be static (unless the "per-class" test instance
lifecycle is used).
@Tag
Used to declare tags for filtering tests, either at the class or method level;
analogous to test groups in TestNG or Categories in JUnit 4. Such annotations are
inherited at the class level but not at the method level.
@Disabled
Used to disable a test class or test method; analogous to JUnit 4’s @Ignore. Such
annotations are not inherited
@Timeout
Used to fail a test, test factory, test template, or lifecycle method if its execution
exceeds a given duration. Such annotations are inherited
15.
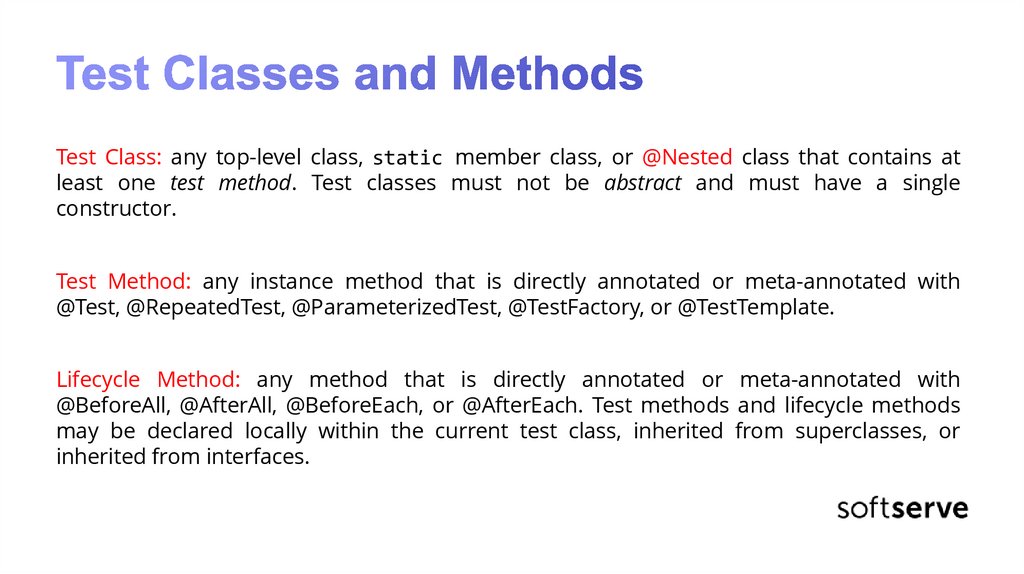
Test Class: any top-level class, static member class, or @Nested class that contains atleast one test method. Test classes must not be abstract and must have a single
constructor.
Test Method: any instance method that is directly annotated or meta-annotated with
@Test, @RepeatedTest, @ParameterizedTest, @TestFactory, or @TestTemplate.
Lifecycle Method: any method that is directly annotated or meta-annotated with
@BeforeAll, @AfterAll, @BeforeEach, or @AfterEach. Test methods and lifecycle methods
may be declared locally within the current test class, inherited from superclasses, or
inherited from interfaces.
16.
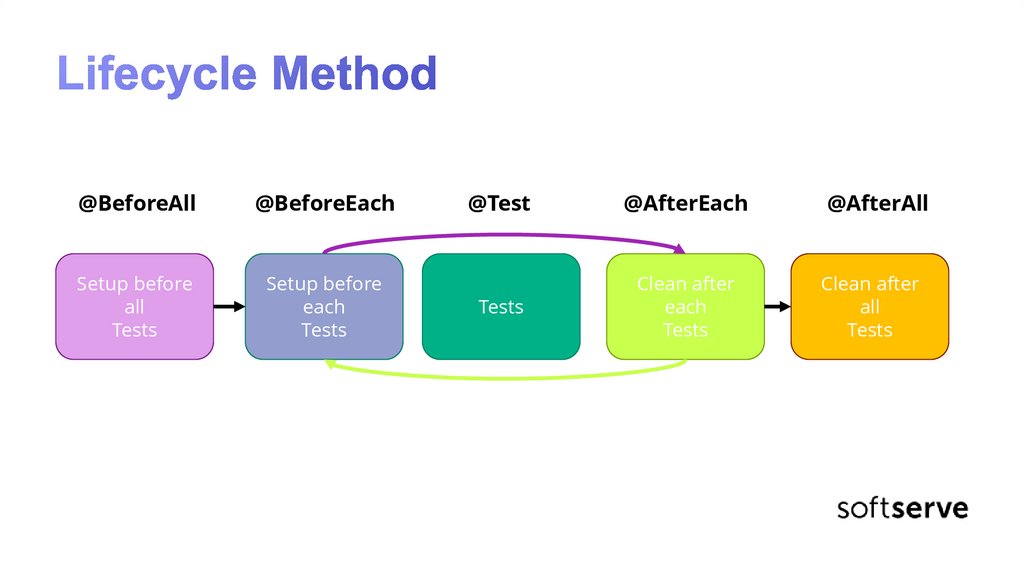
@BeforeAll@BeforeEach
Setup before
all
Tests
Setup before
each
Tests
@Test
@AfterEach
@AfterAll
Tests
Clean after
each
Tests
Clean after
all
Tests
17.
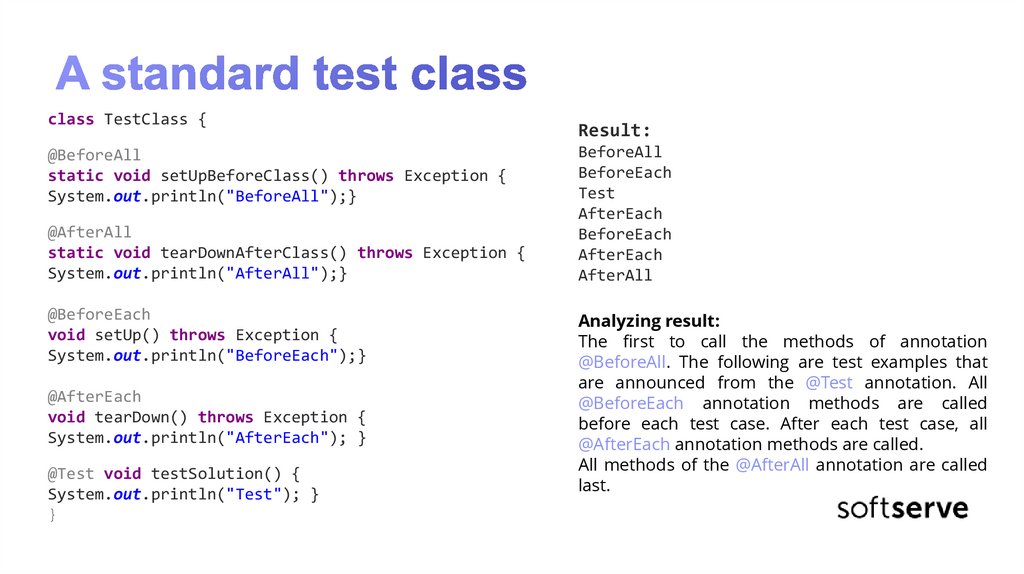
class TestClass {@BeforeAll
static void setUpBeforeClass() throws Exception {
System.out.println("BeforeAll");}
@AfterAll
static void tearDownAfterClass() throws Exception {
System.out.println("AfterAll");}
@BeforeEach
void setUp() throws Exception {
System.out.println("BeforeEach");}
@AfterEach
void tearDown() throws Exception {
System.out.println("AfterEach"); }
@Test void testSolution() {
System.out.println("Test"); }
}
Result:
BeforeAll
BeforeEach
Test
AfterEach
BeforeEach
AfterEach
AfterAll
Analyzing result:
The first to call the methods of annotation
@BeforeAll. The following are test examples that
are announced from the @Test annotation. All
@BeforeEach annotation methods are called
before each test case. After each test case, all
@AfterEach annotation methods are called.
All methods of the @AfterAll annotation are called
last.
18.
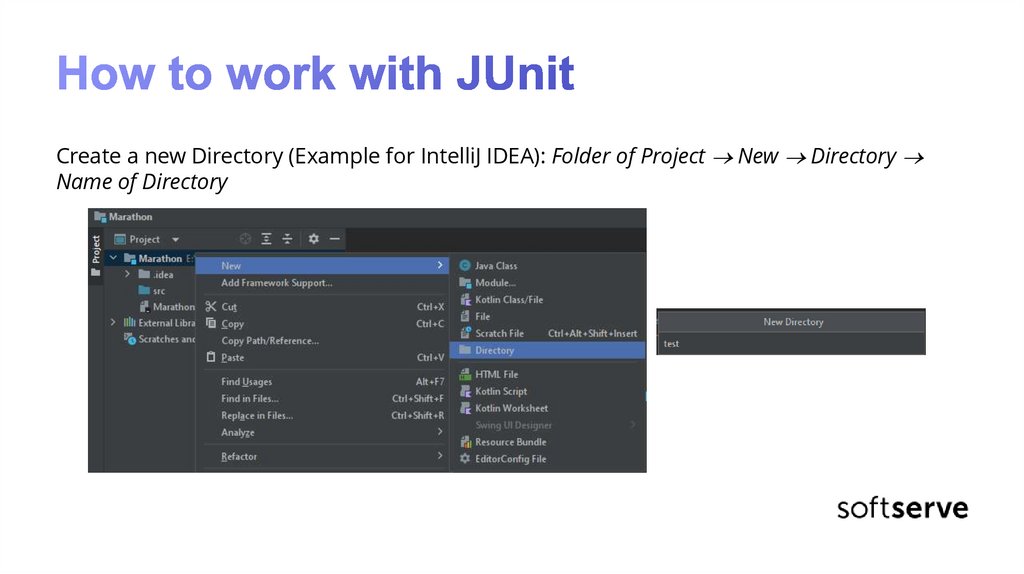
Create a new Directory (Example for IntelliJ IDEA): Folder of Project New DirectoryName of Directory
19.
Mark Directory “test” as Test Sources Root: Right Click on folder “tests” Mark Directory asTest Sources Root
20.
21.
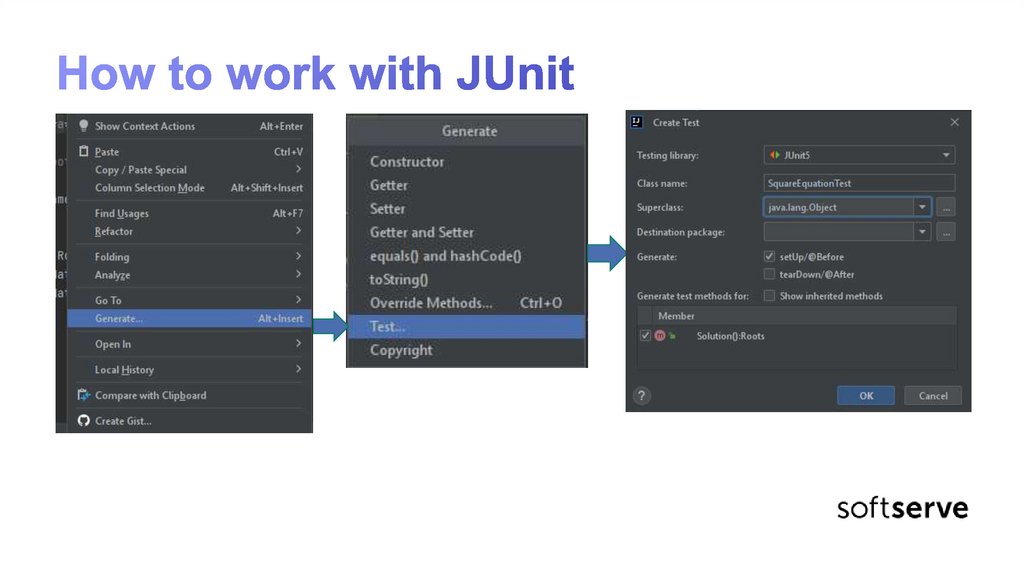
There are two methods in this code:• setUp () method with @BeforeEach
annotation. This method will be used
first in testing;
• testSolution () method with @Test
annotation. This method will be an
important test of the Solution ()
function of the SquareEquation class.
22.
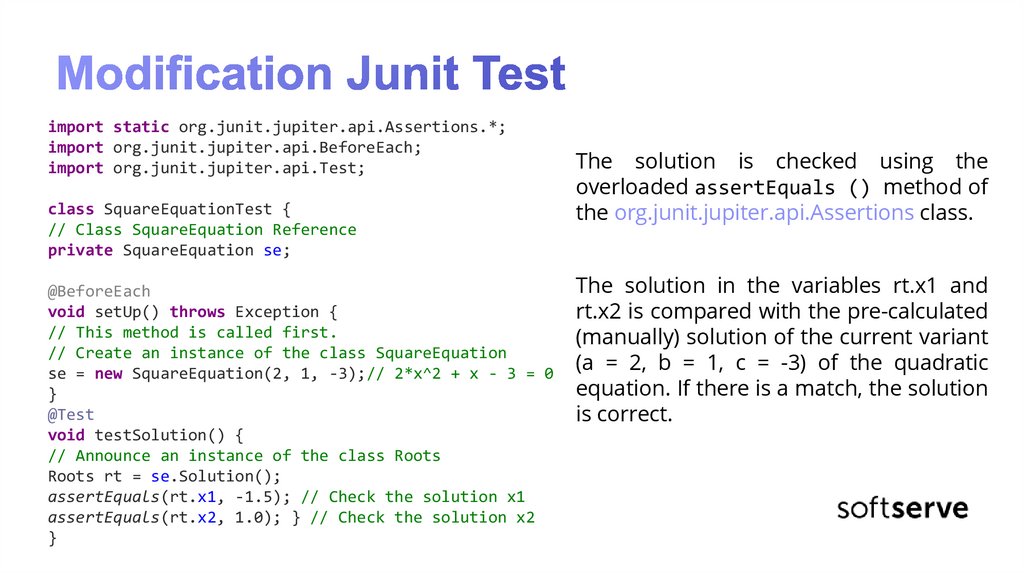
import static org.junit.jupiter.api.Assertions.*;import org.junit.jupiter.api.BeforeEach;
import org.junit.jupiter.api.Test;
class SquareEquationTest {
// Class SquareEquation Reference
private SquareEquation se;
@BeforeEach
void setUp() throws Exception {
// This method is called first.
// Create an instance of the class SquareEquation
se = new SquareEquation(2, 1, -3);// 2*x^2 + x - 3 = 0
}
@Test
void testSolution() {
// Announce an instance of the class Roots
Roots rt = se.Solution();
assertEquals(rt.x1, -1.5); // Check the solution x1
assertEquals(rt.x2, 1.0); } // Check the solution x2
}
The solution is checked using the
overloaded assertEquals () method of
the org.junit.jupiter.api.Assertions class.
The solution in the variables rt.x1 and
rt.x2 is compared with the pre-calculated
(manually) solution of the current variant
(a = 2, b = 1, c = -3) of the quadratic
equation. If there is a match, the solution
is correct.
23.
Once the code EquationTest class code has been generated, the developed test can berun. This is done by command “Run”. After starting, the test result will be displayed in the
JUnit window. Result:
24.
As you can see from the result, the correct solution is confirmed, and the test is passed.Therefore, the Solution () method of the SquareEquation class gives the correct result
for the case when a = 2, b = 1, c = -3.
If you intentionally specify an incorrect answer in the TestSolution () method when
calling assertEquals (), for example
25.
Apache Maven is a framework for building and managing dependencies.Build in .war or .jar
The difference between the Maven project and
the Java project is in the Intellij IDEA that the
Maven project has a certain structure.
26.
The most common default lifecycle phases are executed:•Validate: validate the project is correct and all necessary information is available
•Compile: compile the source code of the project
•Test: test the compiled source code using a suitable unit testing framework. These tests
should not require the code to be packaged or deployed
•package: take the compiled code and package it in its distributable format, such as a JAR.
•integration-test: process and deploy the package if necessary into an environment
where integration tests can be run
27.
The most common default lifecycle phases are executed:•verify: run any checks to verify the package is valid and meets quality criteria
•install: install the package into the local repository, for use as a dependency in other
projects locally
•deploy: done in an integration or release environment, copies the final package to the
remote repository for sharing with other developers and projects.
There are two other Maven lifecycles of note beyond the default list above. They are:
•clean: cleans up artifacts created by prior builds
•site: generates site documentation for this project
28.
In the Maven project, you can create and run tests the same way you do in any otherproject using the default IntelliJ IDEA test runner.
Run tests
1.Open the Maven tool window.
2.Under the Lifecycle node select test.
29.
Run a single testTo run just a single test instead of all the tests declared in a project, create a Maven run
configuration for a single test with the Maven -Dtest=TestName test command. The run
configuration will be saved under the Run Configurations node.
1.In the Maven tool window, under the Lifecycle node, right-click the test goal.
2.From the context menu, select Create 'name of the module/project and name of a goal'.
3.In the dialog that opens, specify a working directory that contains the test you want
to run and in the Command line field, specify a phase (specified automatically) and the
-Dtest=TestName test command.
4.Open the Run Configurations node and double-click your configuration to run.
5.Maven runs the test and displays the result in the Run tool window.
30.
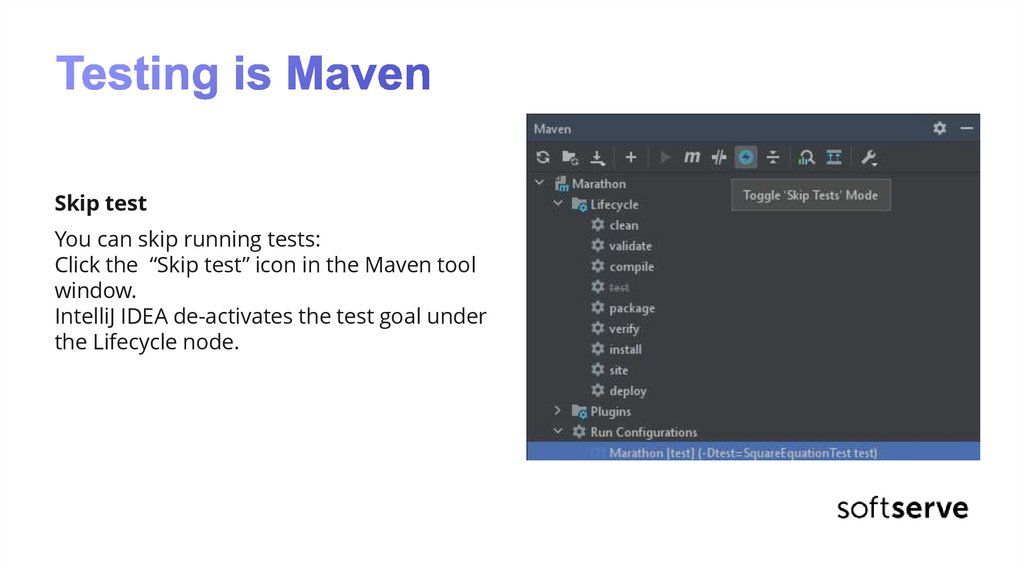
Skip testYou can skip running tests:
Click the “Skip test” icon in the Maven tool
window.
IntelliJ IDEA de-activates the test goal under
the Lifecycle node.