


 Программное обеспечение
Похожие презентации:


")

Mobile Development
1.
LECTURE 12.
MOBILEDEVELOPMENT
Nowadays, many companies are facing the challenge of needing to build mobile
apps for multiple platforms, specifically for both Android and iOS. This is why
cross-platform mobile development solutions have emerged as one of the most
popular software development trends.
According to Statista, there were 3.48 million mobile apps available on the
Google Play Store and 2.22 million apps on the App Store in the first quarter of
2021, with Android and iOS now accounting for 99% of the worldwide mobile
operating system market.
ASTANA IT UNIVERSITY
2
3.
DIFFERENT APPROACHES TO MOBILE APPDEVELOPMENT
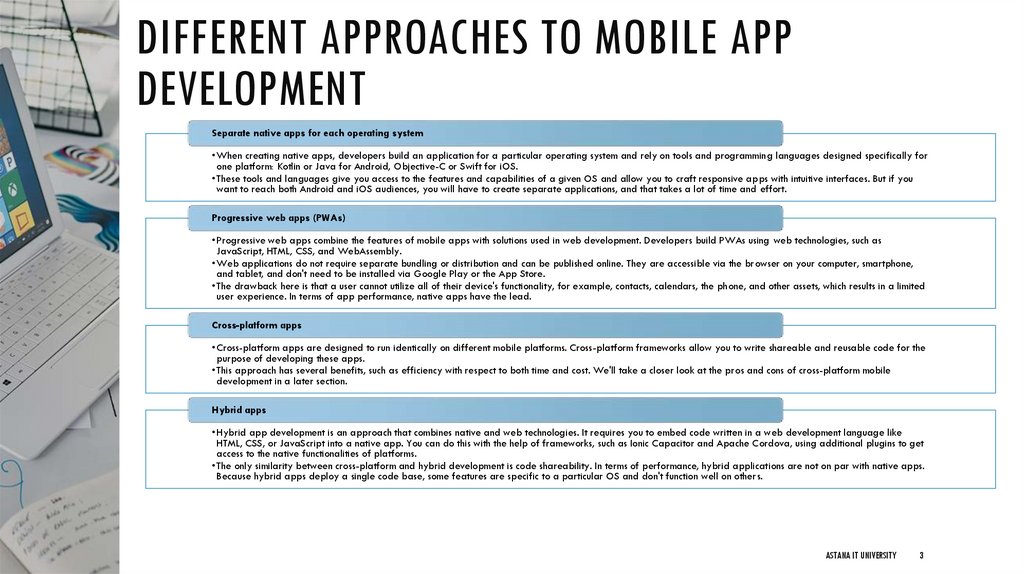
Separate native apps for each operating system
• When creating native apps, developers build an application for a particular operating system and rely on tools and programming languages designed specifically for
one platform: Kotlin or Java for Android, Objective-C or Swift for iOS.
• These tools and languages give you access to the features and capabilities of a given OS and allow you to craft responsive apps with intuitive interfaces. But if you
want to reach both Android and iOS audiences, you will have to create separate applications, and that takes a lot of time and effort.
Progressive web apps (PWAs)
• Progressive web apps combine the features of mobile apps with solutions used in web development. Developers build PWAs using web technologies, such as
JavaScript, HTML, CSS, and WebAssembly.
• Web applications do not require separate bundling or distribution and can be published online. They are accessible via the browser on your computer, smartphone,
and tablet, and don't need to be installed via Google Play or the App Store.
• The drawback here is that a user cannot utilize all of their device's functionality, for example, contacts, calendars, the phone, and other assets, which results in a limited
user experience. In terms of app performance, native apps have the lead.
Cross-platform apps
• Cross-platform apps are designed to run identically on different mobile platforms. Cross-platform frameworks allow you to write shareable and reusable code for the
purpose of developing these apps.
• This approach has several benefits, such as efficiency with respect to both time and cost. We'll take a closer look at the pros and cons of cross-platform mobile
development in a later section.
Hybrid apps
• Hybrid app development is an approach that combines native and web technologies. It requires you to embed code written in a web development language like
HTML, CSS, or JavaScript into a native app. You can do this with the help of frameworks, such as Ionic Capacitor and Apache Cordova, using additional plugins to get
access to the native functionalities of platforms.
• The only similarity between cross-platform and hybrid development is code shareability. In terms of performance, hybrid applications are not on par with native apps.
Because hybrid apps deploy a single code base, some features are specific to a particular OS and don't function well on others.
ASTANA IT UNIVERSITY
3
4.
CROSS-PLATFORMDEVELOPMENT
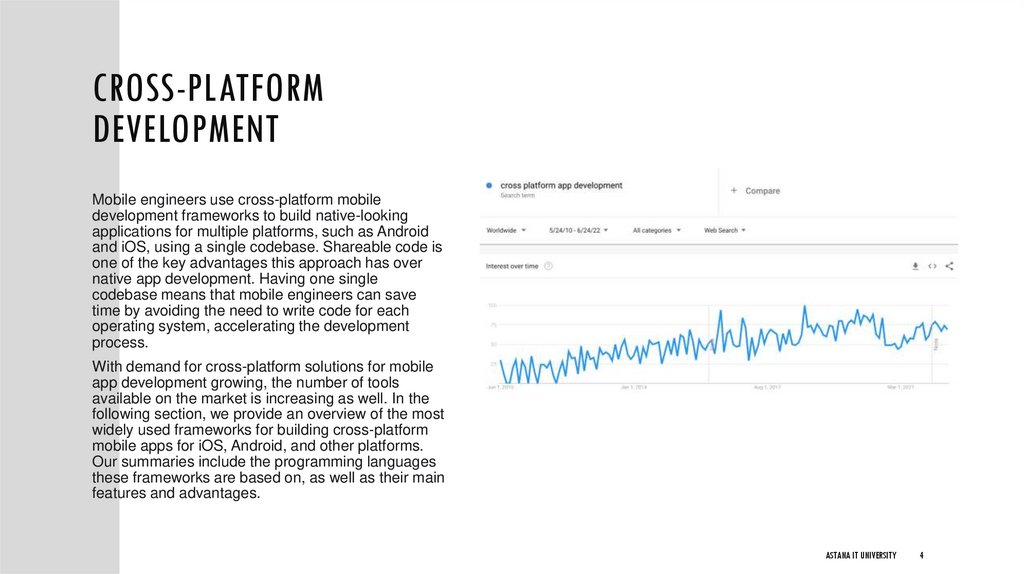
Mobile engineers use cross-platform mobile
development frameworks to build native-looking
applications for multiple platforms, such as Android
and iOS, using a single codebase. Shareable code is
one of the key advantages this approach has over
native app development. Having one single
codebase means that mobile engineers can save
time by avoiding the need to write code for each
operating system, accelerating the development
process.
With demand for cross-platform solutions for mobile
app development growing, the number of tools
available on the market is increasing as well. In the
following section, we provide an overview of the most
widely used frameworks for building cross-platform
mobile apps for iOS, Android, and other platforms.
Our summaries include the programming languages
these frameworks are based on, as well as their main
features and advantages.
ASTANA IT UNIVERSITY
4
5.
IS CROSS-PLATFORM MOBILE DEVELOPMENTRIGHT FOR YOU?
Benefits
Reusable code
• With cross-platform programming, mobile engineers don't need to write new code for every operating system. Using a single
codebase allows developers to cut down on time spent doing repetitive tasks, such as API calls, data storage, data serialization,
and analytics implementation.
Time savings
• Due to code reusability, cross-platform applications require less code, and when it comes to coding, less code is more. Time saved
is because you do not have to write as much code. Additionally, with fewer lines of code, there are fewer places for bugs to
emerge, resulting in less time spent testing and maintaining your code.
Drawbacks
•Performance.
•The more complicated code of cross-platform solutions combines native
and non-native components, which may affect the performance.
•Limited Functionality and poorer app design
Effective resource management
• Building separate applications is expensive. Having a single codebase helps you effectively manage your resources. Both your
Android and your iOS development teams can learn how to write and use shared code.
Attractive opportunities for developers
• Many mobile engineers view modern cross-platform technologies as desirable elements in a product's tech stack. Developers may
get bored at work due to repetitive and routine tasks, such as JSON parsing. However, new technologies and tasks can bring back
their excitement, motivation, and joy for work tasks. This means that having a modern tech stack can actually simplify the hiring
process for your mobile team.
Opportunity to reach wider audiences
• You don't have to choose between different platforms. Since your app is compatible with multiple operating systems, you can
satisfy the needs of both Android and iOS audiences and maximize your reach.
Quicker time to market and customization
• Since you don't need to build different apps for different platforms, you can develop and launch your product much faster. What's
more, if your application needs to be customized or transformed, it will be easier for programmers to make small changes to
specific parts of your codebase. This will also allow you to be more responsive to user feedback.
•Cross-platform apps can’t support all native-only functions and
features of mobile devices, such as advanced graphics and animation
or 3D effects. This results in limited functionality and poorer app
design.
•Updating delay
•When Google and Apple add new features to Android and iOS
platforms, native solutions can immediately start using them. But hybrid
apps have to wait until these updates are adjusted to the chosen crossplatform framework. Thus, there always will be an updating delay.
ASTANA IT UNIVERSITY
5
6.
FRAMEWORKSReact Native
Kotlin Multiplatform Mobile
Flutter
Ionic
Xamarin
• An open-source UI software framework,
React Native was developed in 2015 (a
bit earlier than Flutter) by Meta
Platforms, formerly Facebook.
• Mobile apps: Skype, Bloomberg, Shopify,
various small modules in Facebook and
Instagram.
• Kotlin Multiplatform Mobile is an SDK
developed by JetBrains for creating
Android and iOS applications. It allows
you to share common code between the
two platforms and write platform-specific
code only when it's necessary, for
example, when you need to build native
UI components or when you are working
with platform-specific APIs.
• Mobile apps: Philips, Baidu, Netflix, Leroy
Merlin.
• Released by Google in 2017, Flutter is a
popular framework for building mobile,
web, and desktop apps from a single
codebase. To build applications with
Flutter, you will need to use Google's
programming language called Dart.
• Mobile apps: eBay, Alibaba, Google
Pay, ByteDance apps.
• Ionic is an open-source UI toolkit that was
released in 2013. It helps developers
build hybrid mobile and desktop
applications using a combination of native
and web technologies, like HTML, CSS,
and JavaScript, with integrations for the
Angular, React, and Vue frameworks.
• Mobile apps: T-Mobile, BBC (Children's &
Education apps), EA Games.
• Xamarin was launched in 2011 and is
now owned by Microsoft. It's an opensource cross-platform app development
framework that uses the C# language
and the .Net framework to develop apps
for Android, iOS, and Windows.
• Mobile apps: UPS, Alaska Airlines,
Academy Members (Academy of Motion
Picture Arts and Sciences).
ASTANA IT UNIVERSITY
6
7.
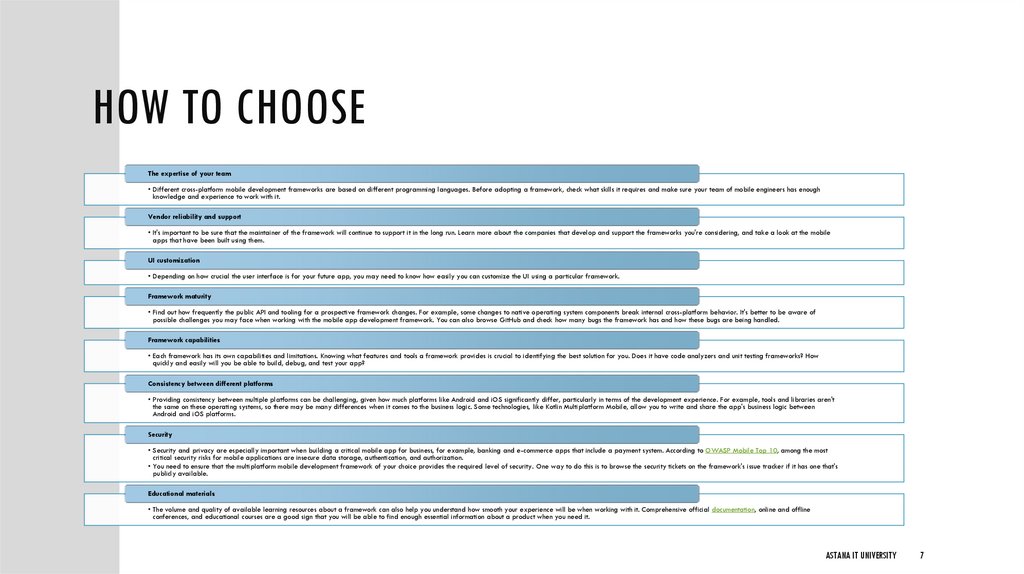
HOW TO CHOOSEThe expertise of your team
• Different cross-platform mobile development frameworks are based on different programming languages. Before adopting a framework, check what skills it requires and make sure your team of mobile engineers has enough
knowledge and experience to work with it.
Vendor reliability and support
• It's important to be sure that the maintainer of the framework will continue to support it in the long run. Learn more about the companies that develop and support the frameworks you're considering, and take a look at the mobile
apps that have been built using them.
UI customization
• Depending on how crucial the user interface is for your future app, you may need to know how easily you can customize the UI using a particular framework.
Framework maturity
• Find out how frequently the public API and tooling for a prospective framework changes. For example, some changes to native operating system components break internal cross-platform behavior. It's better to be aware of
possible challenges you may face when working with the mobile app development framework. You can also browse GitHub and check how many bugs the framework has and how these bugs are being handled.
Framework capabilities
• Each framework has its own capabilities and limitations. Knowing what features and tools a framework provides is crucial to identifying the best solution for you. Does it have code analyzers and unit testing frameworks? How
quickly and easily will you be able to build, debug, and test your app?
Consistency between different platforms
• Providing consistency between multiple platforms can be challenging, given how much platforms like Android and iOS significantly differ, particularly in terms of the development experience. For example, tools and libraries aren't
the same on these operating systems, so there may be many differences when it comes to the business logic. Some technologies, like Kotlin Multiplatform Mobile, allow you to write and share the app's business logic between
Android and iOS platforms.
Security
• Security and privacy are especially important when building a critical mobile app for business, for example, banking and e-commerce apps that include a payment system. According to OWASP Mobile Top 10, among the most
critical security risks for mobile applications are insecure data storage, authentication, and authorization.
• You need to ensure that the multiplatform mobile development framework of your choice provides the required level of security. One way to do this is to browse the security tickets on the framework's issue tracker if it has one that's
publicly available.
Educational materials
• The volume and quality of available learning resources about a framework can also help you understand how smooth your experience will be when working with it. Comprehensive official documentation, online and offline
conferences, and educational courses are a good sign that you will be able to find enough essential information about a product when you need it.
ASTANA IT UNIVERSITY
7
8.
FLUTTERInitial release date: May 2017
Developer: Google
License: New BSD License
Platforms:
Android,
iOS,
Web platform,
macOS,
Microsoft Windows,
Linux
Programming languages: Dart
Website: flutter.dev
9.
HISTORY• The first version of Flutter was
announced in the year 2015 at
the Dart Developer Summit. It was
initially known as codename "Sky"
and can run on the Android OS.
1
2
• After the announcement of Flutter,
the first Flutter Alpha version (v0.06) was released in May 2017.
• Later, during the keynote of
Google Developer days in
Shanghai, Google launched the
second preview of Flutter in
September 2018 that was the last
big release before Flutter 1.0
version.
3
4
• On December 4, 2018, the first
stable version of the Flutter
framework was released at the
Flutter Live event, denoting Flutter
1.0. The current stable release of
the framework is Flutter
v1.9.1+hotfix.6 on October 24,
2019.
ASTANA IT UNIVERSITY
9
10.
APPS BUILT USING FLUTTERDream 11
11.
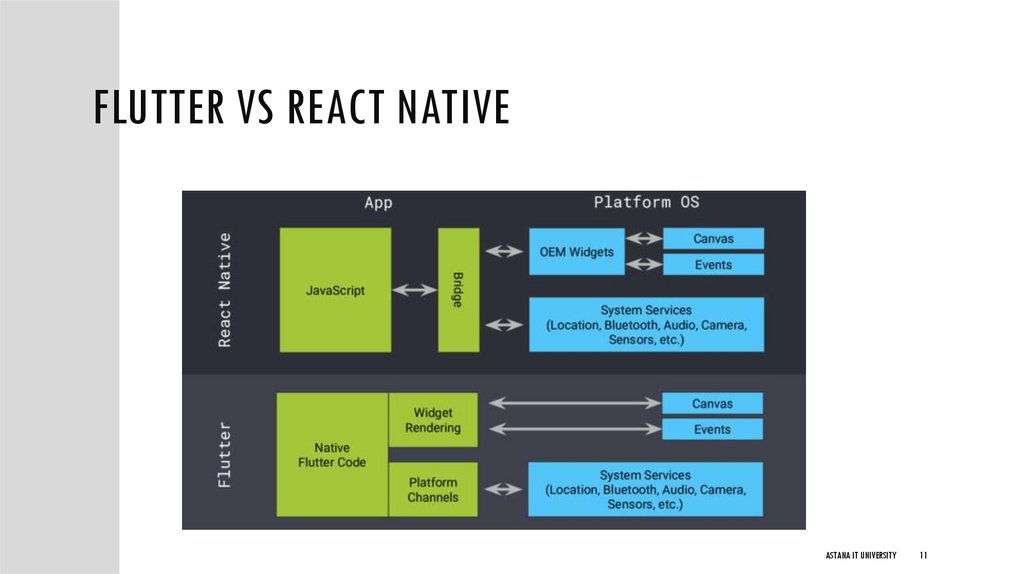
FLUTTER VS REACT NATIVEASTANA IT UNIVERSITY
11
12.
HOW FLUTTER RENDERSUIS
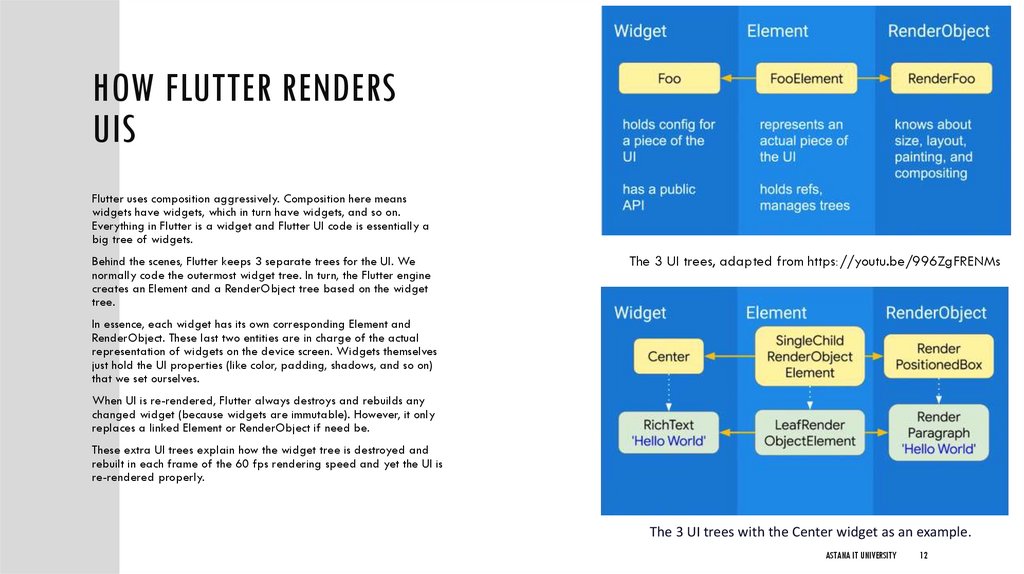
Flutter uses composition aggressively. Composition here means
widgets have widgets, which in turn have widgets, and so on.
Everything in Flutter is a widget and Flutter UI code is essentially a
big tree of widgets.
Behind the scenes, Flutter keeps 3 separate trees for the UI. We
normally code the outermost widget tree. In turn, the Flutter engine
creates an Element and a RenderObject tree based on the widget
tree.
The 3 UI trees, adapted from https://youtu.be/996ZgFRENMs
In essence, each widget has its own corresponding Element and
RenderObject. These last two entities are in charge of the actual
representation of widgets on the device screen. Widgets themselves
just hold the UI properties (like color, padding, shadows, and so on)
that we set ourselves.
When UI is re-rendered, Flutter always destroys and rebuilds any
changed widget (because widgets are immutable). However, it only
replaces a linked Element or RenderObject if need be.
These extra UI trees explain how the widget tree is destroyed and
rebuilt in each frame of the 60 fps rendering speed and yet the UI is
re-rendered properly.
The 3 UI trees with the Center widget as an example.
ASTANA IT UNIVERSITY
12
13.
ADVANTAGES AND DRAWBACKSAdvantages
•Dart has a large repository of software packages which lets you to extend the capabilities of your
application.
Drawbacks
•Since it is coded in Dart language, a developer needs to learn new
language (though it is easy to learn).
•Developers need to write just a single code base for both applications (both Android and iOS
platforms). Flutter may to be extended to other platform as well in the future.
•Flutter needs lesser testing. Because of its single code base, it is sufficient if we write automated tests
once for both the platforms.
•Flutter’s simplicity makes it a good candidate for fast development. Its customization capability and
extendibility makes it even more powerful.
•Modern framework tries to separate logic and UI as much as possible but,
in Flutter, user interface and logic is intermixed. We can overcome this using
smart coding and using high level module to separate user interface and
logic.
•With Flutter, developers has full control over the widgets and its layout.
•Developers are having a hard time in choosing the right development tools
in hugely populated segment.
•Flutter offers great developer tools, with amazing hot reload.
ASTANA IT UNIVERSITY
13
14.
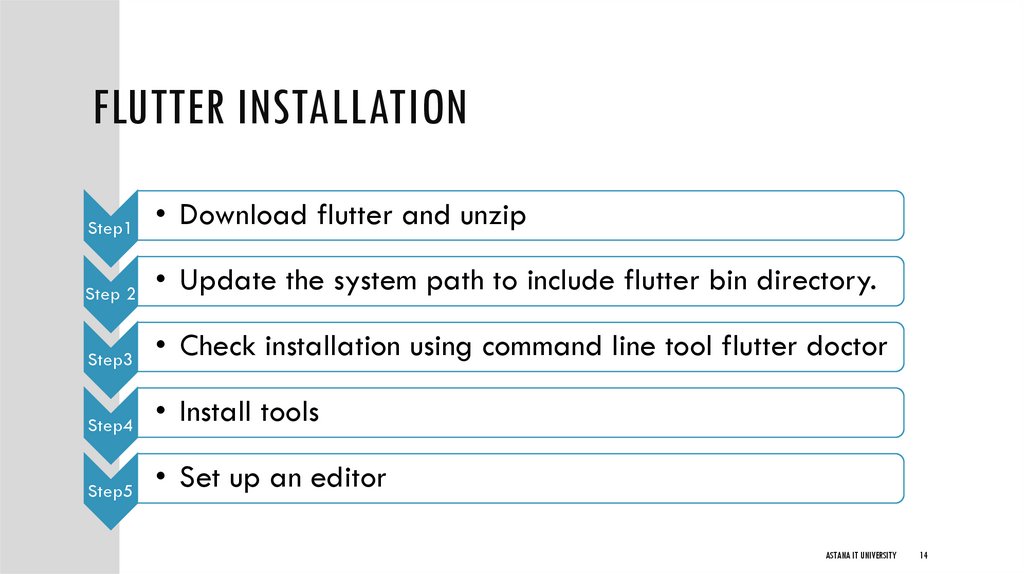
FLUTTER INSTALLATIONStep1
• Download flutter and unzip
Step 2
• Update the system path to include flutter bin directory.
Step3
• Check installation using command line tool flutter doctor
Step4
• Install tools
Step5
• Set up an editor
ASTANA IT UNIVERSITY
14
15.
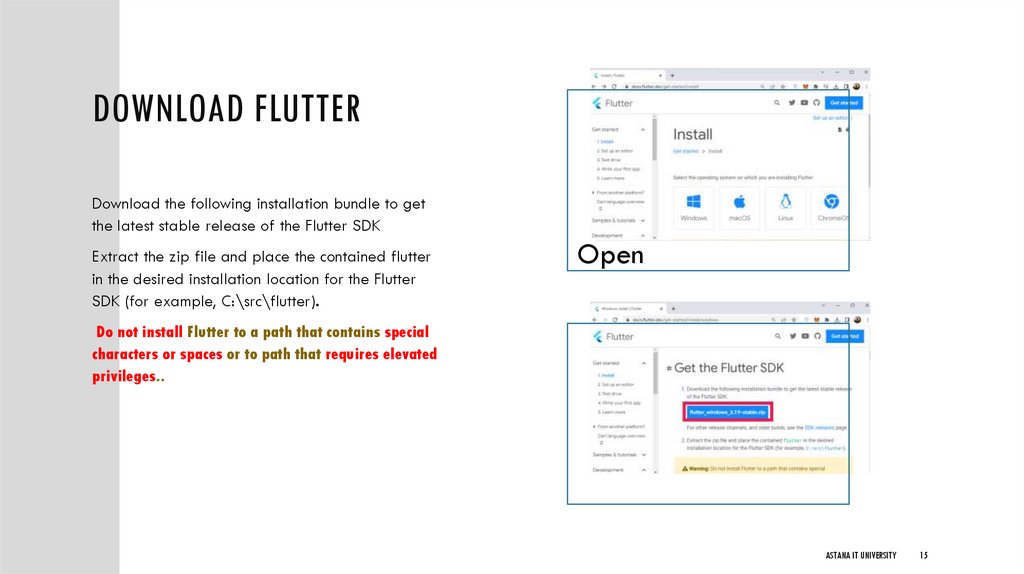
DOWNLOAD FLUTTERDownload the following installation bundle to get
the latest stable release of the Flutter SDK
Extract the zip file and place the contained flutter
in the desired installation location for the Flutter
SDK (for example, C:\src\flutter).
Open
Do not install Flutter to a path that contains special
characters or spaces or to path that requires elevated
privileges..
ASTANA IT UNIVERSITY
15
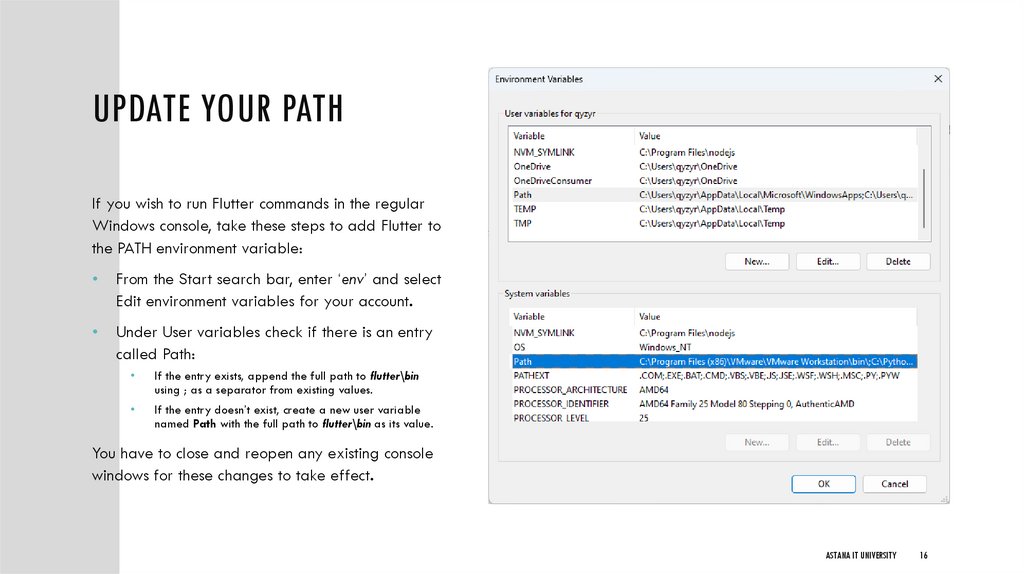
16.
UPDATE YOUR PATHIf you wish to run Flutter commands in the regular
Windows console, take these steps to add Flutter to
the PATH environment variable:
From the Start search bar, enter ‘env’ and select
Edit environment variables for your account.
Under User variables check if there is an entry
called Path:
If the entry exists, append the full path to flutter\bin
using ; as a separator from existing values.
If the entry doesn’t exist, create a new user variable
named Path with the full path to flutter\bin as its value.
You have to close and reopen any existing console
windows for these changes to take effect.
ASTANA IT UNIVERSITY
16
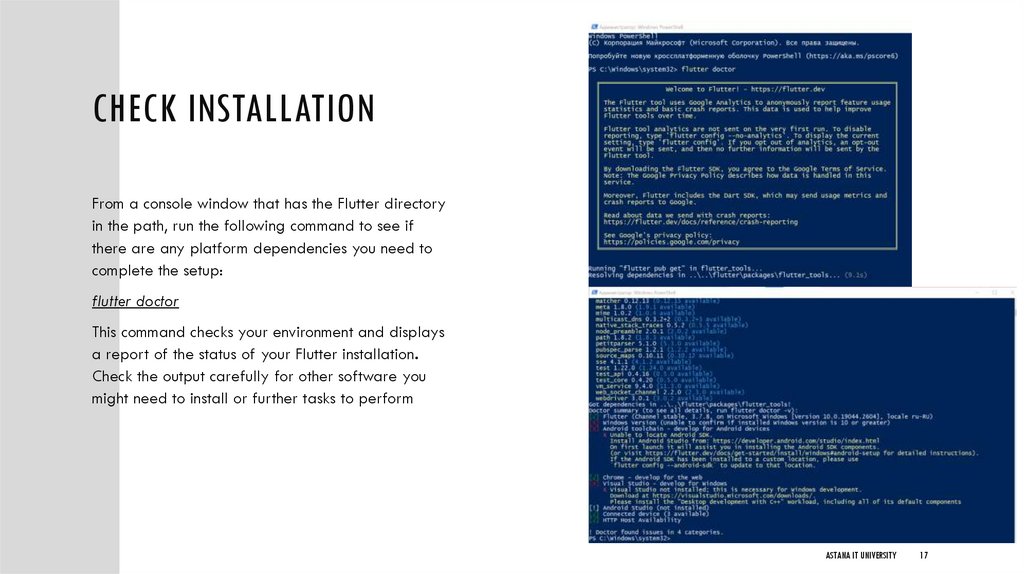
17.
CHECK INSTALLATIONFrom a console window that has the Flutter directory
in the path, run the following command to see if
there are any platform dependencies you need to
complete the setup:
flutter doctor
This command checks your environment and displays
a report of the status of your Flutter installation.
Check the output carefully for other software you
might need to install or further tasks to perform
ASTANA IT UNIVERSITY
17
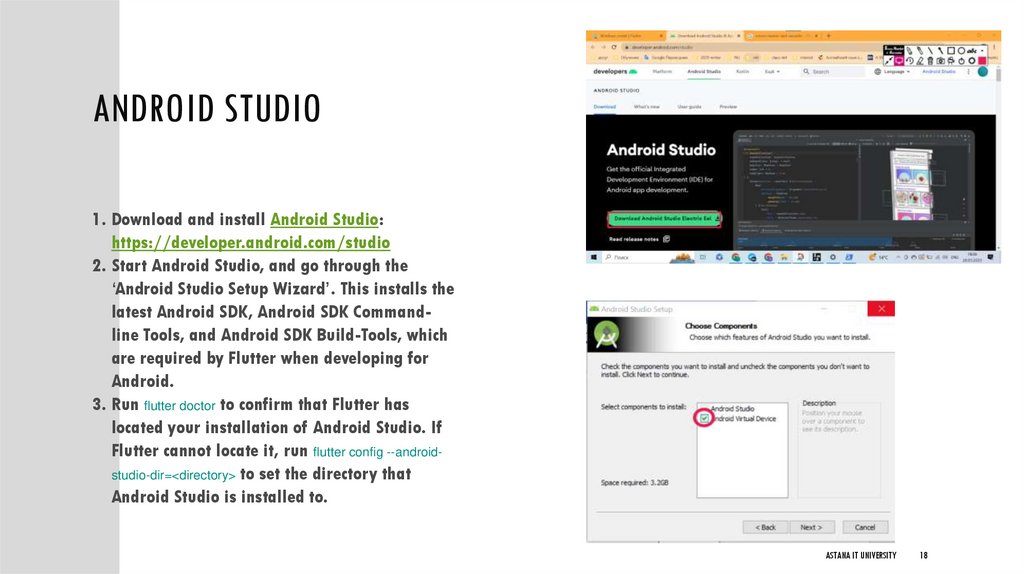
18.
ANDROID STUDIO1. Download and install Android Studio:
https://developer.android.com/studio
2. Start Android Studio, and go through the
‘Android Studio Setup Wizard’. This installs the
latest Android SDK, Android SDK Commandline Tools, and Android SDK Build-Tools, which
are required by Flutter when developing for
Android.
3. Run flutter doctor to confirm that Flutter has
located your installation of Android Studio. If
Flutter cannot locate it, run flutter config --androidstudio-dir=<directory> to set the directory that
Android Studio is installed to.
ASTANA IT UNIVERSITY
18
19.
SET UP THE ANDROID SDKAndroid SDK Build Tools
• Includes tools to build Android apps.
Android SDK Platform Tools
• Includes various tools required by the Android platform, including the adb tool.
Android SDK Command-Line Tools
• Includes essential tools such as ProGuard.
Google USB Driver
• Required for Windows. Includes tools to help you perform adb debugging with Google
devices.
Android Emulator
• A QEMU-based device-emulation tool that you can use to debug and test your
applications in an actual Android runtime environment.
Intel ARM System Images
• The system image is required to run the Android Emulator. Each platform version
contains the supported system images. You can also download system images later when
creating Android Virtual Devices (AVDs) in the AVD Manager. Select either Intel or ARM
based on your development computer's processor.
ASTANA IT UNIVERSITY
19
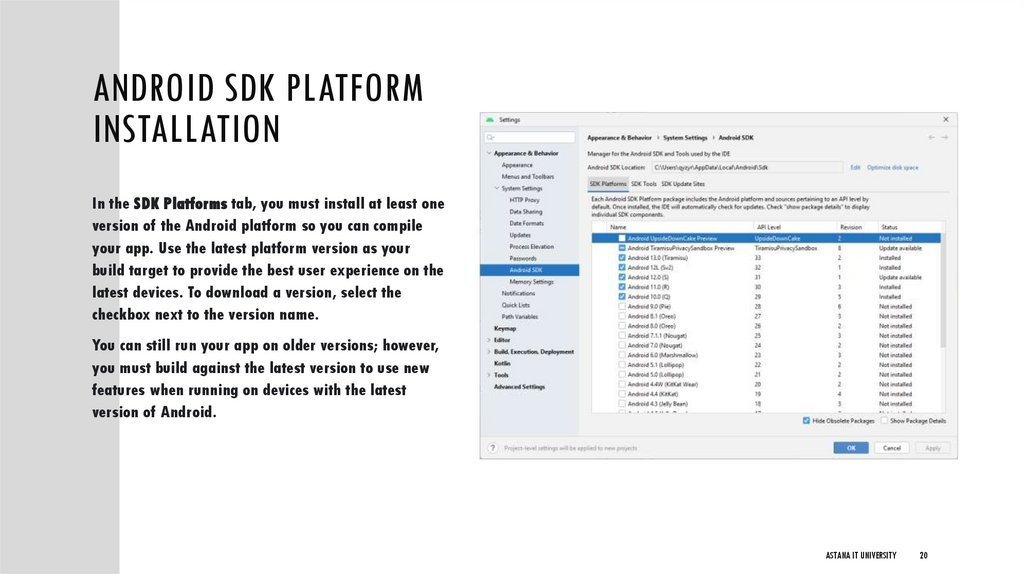
20.
ANDROID SDK PLATFORMINSTALLATION
In the SDK Platforms tab, you must install at least one
version of the Android platform so you can compile
your app. Use the latest platform version as your
build target to provide the best user experience on the
latest devices. To download a version, select the
checkbox next to the version name.
You can still run your app on older versions; however,
you must build against the latest version to use new
features when running on devices with the latest
version of Android.
ASTANA IT UNIVERSITY
20
21.
CREATING VIRTUAL DEVICE1.Launch Android Studio, click the AVD
Manager icon, and select Create Virtual
Device…
1.Choose a device definition and
select Next.
1.Select one or more system images for the
Android versions you want to emulate, and
select Next. An x86 or x86_64 image is
recommended.
ASTANA IT UNIVERSITY
21
22.
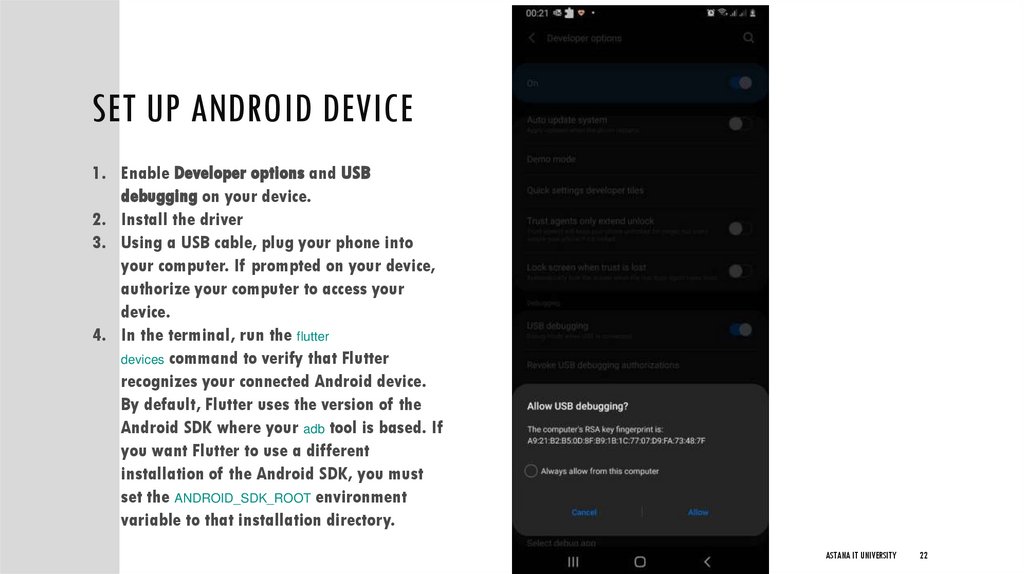
SET UP ANDROID DEVICE1. Enable Developer options and USB
debugging on your device.
2. Install the driver
3. Using a USB cable, plug your phone into
your computer. If prompted on your device,
authorize your computer to access your
device.
4. In the terminal, run the flutter
devices command to verify that Flutter
recognizes your connected Android device.
By default, Flutter uses the version of the
Android SDK where your adb tool is based. If
you want Flutter to use a different
installation of the Android SDK, you must
set the ANDROID_SDK_ROOT environment
variable to that installation directory.
ASTANA IT UNIVERSITY
22
23.
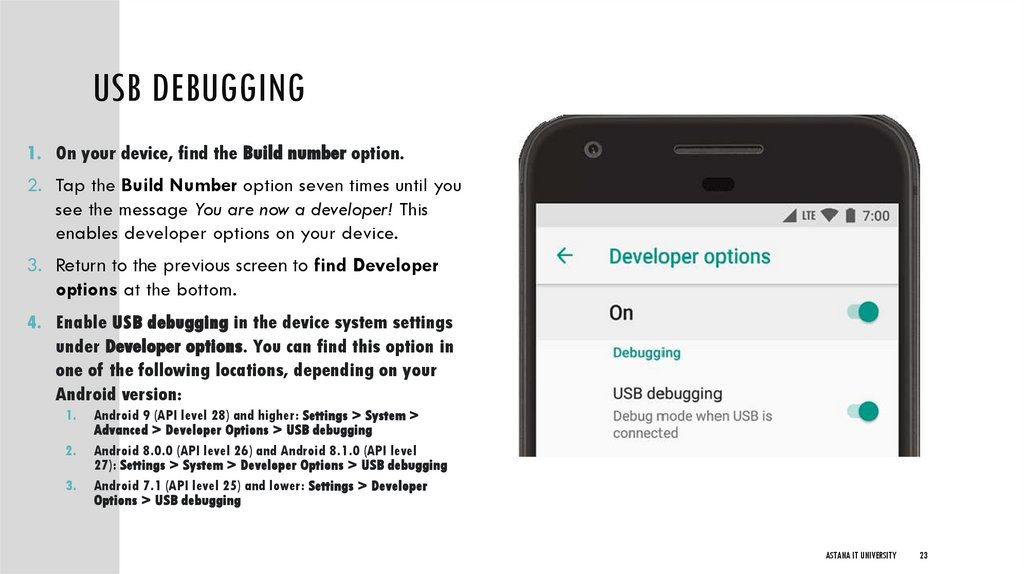
USB DEBUGGING1. On your device, find the Build number option.
2. Tap the Build Number option seven times until you
see the message You are now a developer! This
enables developer options on your device.
3. Return to the previous screen to find Developer
options at the bottom.
4. Enable USB debugging in the device system settings
under Developer options. You can find this option in
one of the following locations, depending on your
Android version:
1.
2.
3.
Android 9 (API level 28) and higher: Settings > System >
Advanced > Developer Options > USB debugging
Android 8.0.0 (API level 26) and Android 8.1.0 (API level
27): Settings > System > Developer Options > USB debugging
Android 7.1 (API level 25) and lower: Settings > Developer
Options > USB debugging
ASTANA IT UNIVERSITY
23
24.
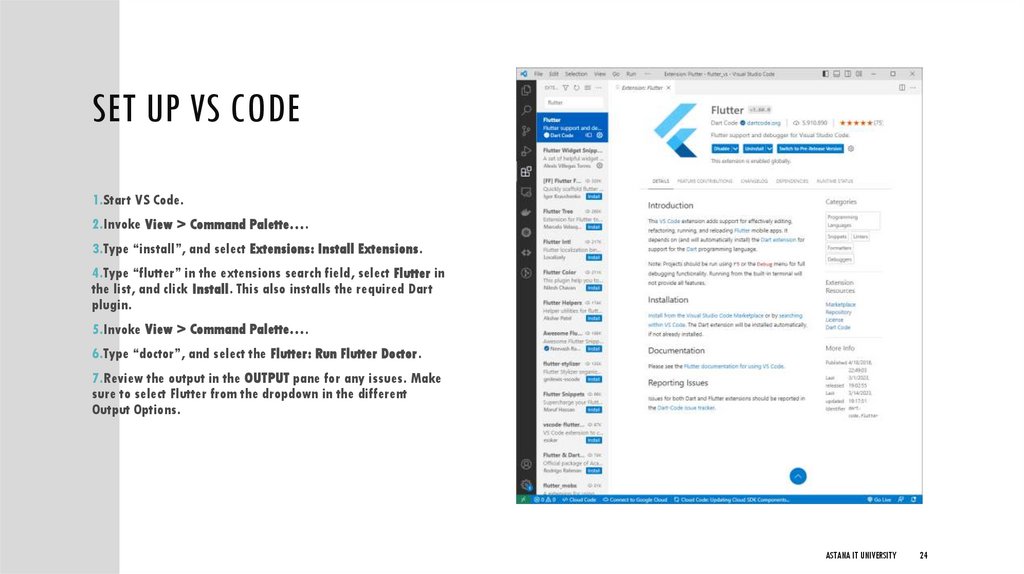
SET UP VS CODE1.Start VS Code.
2.Invoke View > Command Palette….
3.Type “install”, and select Extensions: Install Extensions.
4.Type “flutter” in the extensions search field, select Flutter in
the list, and click Install. This also installs the required Dart
plugin.
5.Invoke View > Command Palette….
6.Type “doctor”, and select the Flutter: Run Flutter Doctor.
7.Review the output in the OUTPUT pane for any issues. Make
sure to select Flutter from the dropdown in the different
Output Options.
ASTANA IT UNIVERSITY
24
25.
CREATE NEW PROJECTTo create a new Flutter project from the
Flutter starter app template:
1. Open the Command Palette
(Ctrl+Shift+P (Cmd+Shift+P on macOS)).
2. Select the Flutter: New
Project command and press Enter.
3. Select Application and press Enter.
4. Select a Project location.
5. Enter your desired Project name.
ASTANA IT UNIVERSITY
25
26.
RUN ANDROID EMULATORFROM VSCODE AND
CONNECT
1. Locate the VS Code status bar (the blue bar at the bottom
of the window):
2. Select a device from the Device Selector area.
1. If no device is available, and you want to use a
device simulator, click No Devices and click “Start
…..” to launch a simulator.
2. If no device is created you can create device by
pressing “ Create android emulator”
3. Invoke Run > Start Debugging or press F5.
4. Wait for the app to launch—progress is printed in
the Debug Console view.
ASTANA IT UNIVERSITY
26
27.
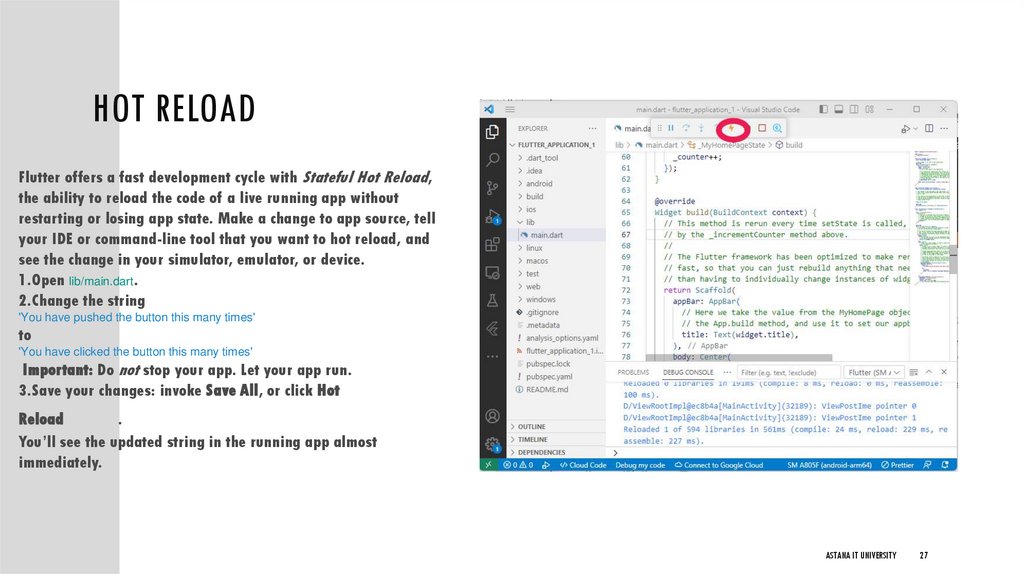
HOT RELOADFlutter offers a fast development cycle with Stateful Hot Reload,
the ability to reload the code of a live running app without
restarting or losing app state. Make a change to app source, tell
your IDE or command-line tool that you want to hot reload, and
see the change in your simulator, emulator, or device.
1.Open lib/main.dart.
2.Change the string
'You have pushed the button this many times'
to
'You have clicked the button this many times'
Important: Do not stop your app. Let your app run.
3.Save your changes: invoke Save All, or click Hot
Reload
.
You’ll see the updated string in the running app almost
immediately.
ASTANA IT UNIVERSITY
27
28.
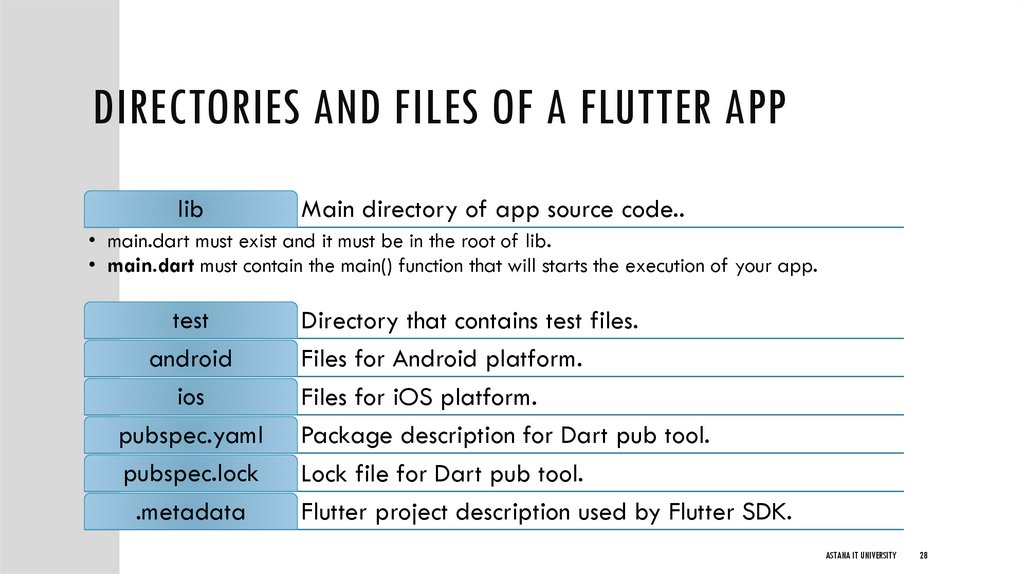
DIRECTORIES AND FILES OF A FLUTTER APPlib
Main directory of app source code..
• main.dart must exist and it must be in the root of lib.
• main.dart must contain the main() function that will starts the execution of your app.
test
android
ios
pubspec.yaml
pubspec.lock
.metadata
Directory that contains test files.
Files for Android platform.
Files for iOS platform.
Package description for Dart pub tool.
Lock file for Dart pub tool.
Flutter project description used by Flutter SDK.
ASTANA IT UNIVERSITY
28
29.
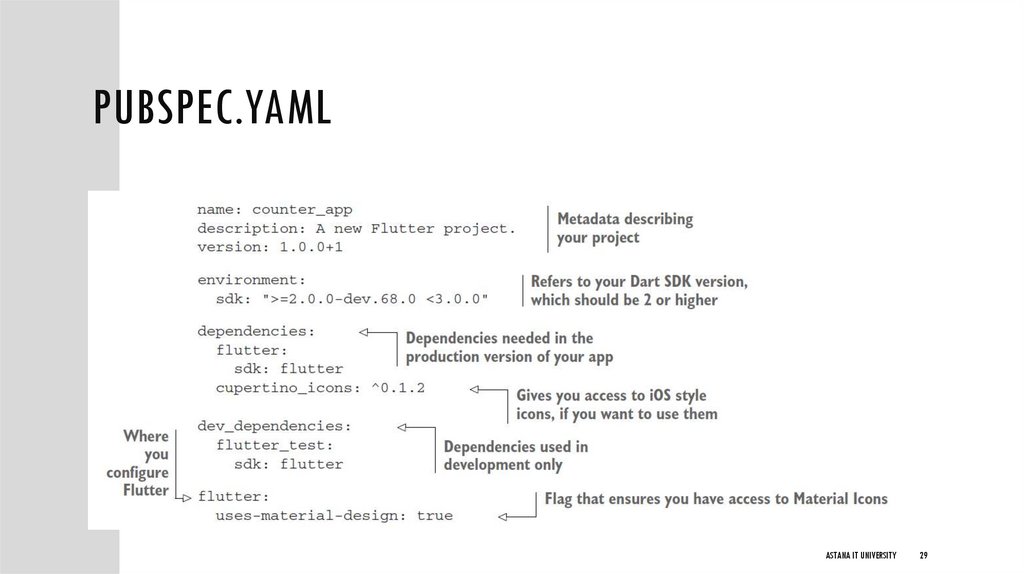
PUBSPEC.YAMLASTANA IT UNIVERSITY
29
30.
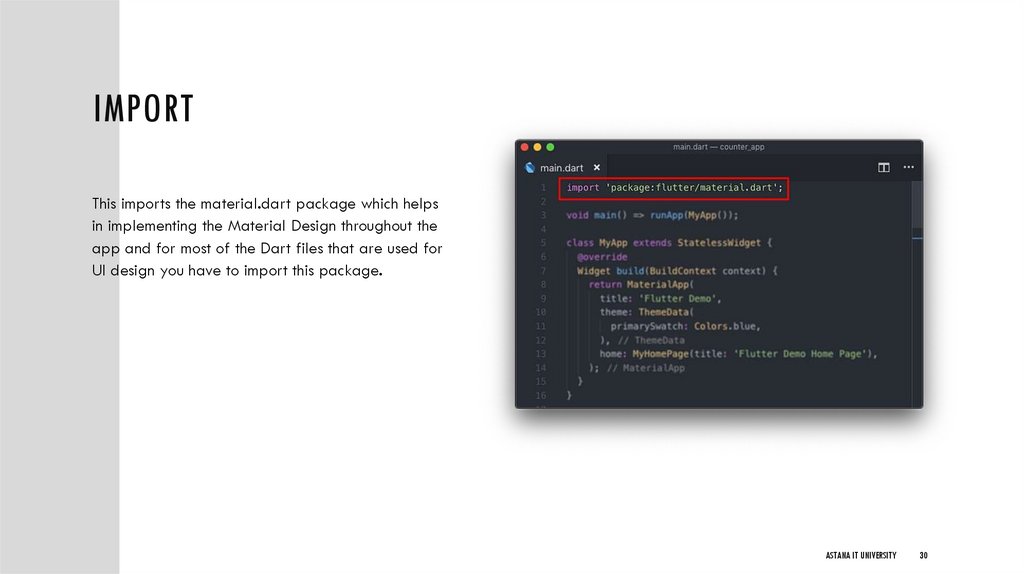
IMPORTThis imports the material.dart package which helps
in implementing the Material Design throughout the
app and for most of the Dart files that are used for
UI design you have to import this package.
ASTANA IT UNIVERSITY
30
31.
MAINThen you have the main function which has the
runApp method containing the first Widget as its
argument, in this case, it is called MyApp.
ASTANA IT UNIVERSITY
31
32.
STATELESS WIDGET(MYAPP)
This widget is the root of the app. Here, inside the
build method, it returns a Material App widget
containing the three properties: title, theme & home.
title
• A one-line description used by the device to identify the app for
the user.
• On Android, the titles appear above the task manager’s app
snapshots which are displayed when the user presses the “recent
apps” button. On iOS, this value cannot be used.
theme
• This property defines the ThemeData widget containing
information about different colors, fonts and other theme data
that would be used throughout the app. Here, only one property is
defined, primarySwatch which stores the color blue. But, in your
app, you can define any number of theme properties you want.
home
• This property contains a Stateful Widget, MyHomePage to which
the title is passed on. When you start this app for the first time this
is the widget that will be displayed as the first screen on your
device.
ASTANA IT UNIVERSITY
32
33.
STATEFUL WIDGET(MYHOMEPAGE)
This Stateful Widget MyHomePagetakes a
constructor containing a key and a title. Here,
the title is passed on from the previous class. You
can see that the String title is marked final, this is
done because the fields in a Widget subclass are
always marked final if you do not mark this as
a final you will get a warning.
Now, we have the overridden createState method
which returns the instance of the
class_MyHomePageState.
ASTANA IT UNIVERSITY
33
34.
STATE CLASS(_MYHOMEPAGESTATE)
In this class at first, a private integer variable _counter is
initialized to zero. After that, we have a private void
method defined called _incrementCounter.
_incrementCounter
• This method calls the setState method, this setState is used to
rebuild the widget tree. In this counter app, we have
incremented the _counter variable within this setState. If we just
increment the _counter variable without defining
any setState method, then this variable would get updated
behind the scene but we will not see any UI changes as the
widget tree would not be rebuilt.
build method
• This method is rerun every time setState is called, for instance
as done by the _incrementCounter method above.
• The Flutter framework has been optimized to make rerunning
build methods fast, so that you can just rebuild anything that
needs updating rather than having to individually change
instances of widgets.
• In this app, the build method returns a Scaffold widget
containing three properties:
ASTANA IT UNIVERSITY
34
35.
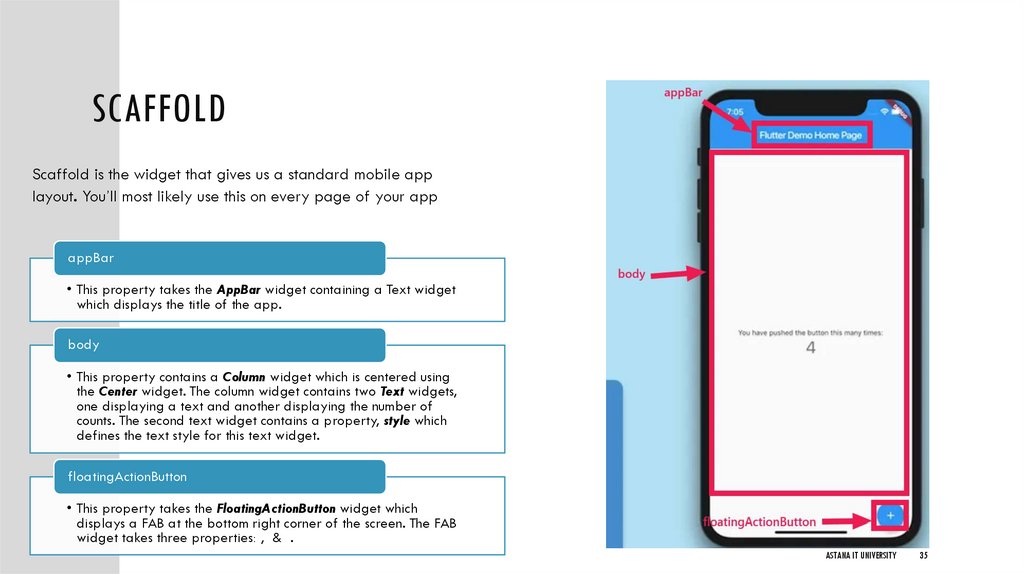
SCAFFOLDScaffold is the widget that gives us a standard mobile app
layout. You’ll most likely use this on every page of your app
appBar
• This property takes the AppBar widget containing a Text widget
which displays the title of the app.
body
• This property contains a Column widget which is centered using
the Center widget. The column widget contains two Text widgets,
one displaying a text and another displaying the number of
counts. The second text widget contains a property, style which
defines the text style for this text widget.
floatingActionButton
• This property takes the FloatingActionButton widget which
displays a FAB at the bottom right corner of the screen. The FAB
widget takes three properties: , & .
ASTANA IT UNIVERSITY
35
36.
COLUMNColumn is also layout widget. It takes a List of
children and arranges them vertically. By default,
it sizes itself to fit its children horizontally, and
tries to be as tall as its parent.
Column has various properties to control how it
sizes itself and how it positions its children. Here
we use mainAxisAlignment to center the children
vertically; the main axis here is the vertical axis
because Columns are vertical (the cross axis
would be horizontal).
mainAxisAlignment and crossAxisAlignment sh
ould feel very familiar if you’re used to using
CSS’s Flexbox or Grid.
Text takes a String as it’s first argument. We’re
passing in the value of the counter as an
interpolated String.
ASTANA IT UNIVERSITY
36
37.
FLOATINGACTIONBUTTONFloating action buttons are special button
It takes the FloatingActionButton widget which displays a FAB at the
bottom right corner of the screen. The FAB widget takes three
properties: onPressed, tooltip & child .
onPressed
• The onPressed property is used to call
the _incrementCounter method which increments the counter
by 1 and rebuilds the widget tree
tooltip
• This property can take a String. The text is displayed when
the user long-presses on the button and is used
for accessibility, which means that it won’t be displayed in
normal circumstances.
child
• The child widget is used to show anything inside the parent
widget. Here, it is used to show a add icon.
ASTANA IT UNIVERSITY
37
38.
ADDING ELEMENTS TO THE SCREENASTANA IT UNIVERSITY
38
39.
THANK YOU FOR YOUR ATTENTIONhttps://habr.com/ru/post/527112/
https://docs.flutter.dev/
https://dart.dev/guides
ASTANA IT UNIVERSITY
39