

 Маркетинг
Похожие презентации:


Softener drawer. Detergent drawer
1.
ENContent
1-Safety information ............................................................................................................
2-Product description..........................................................................................................
3-Control panel ...................................................................................................................
4-Programmes ....................................................................................................................
5-Consumption ...................................................................................................................
6-Daily use .........................................................................................................................
7-Eco-friendly washing .......................................................................................................
8-Care and cleaning ...........................................................................................................
9-Troubleshooting ...............................................................................................................
10-Installation .....................................................................................................................
11-Technical data ................................................................................................................
12-Customer service ...........................................................................................................
3
2.
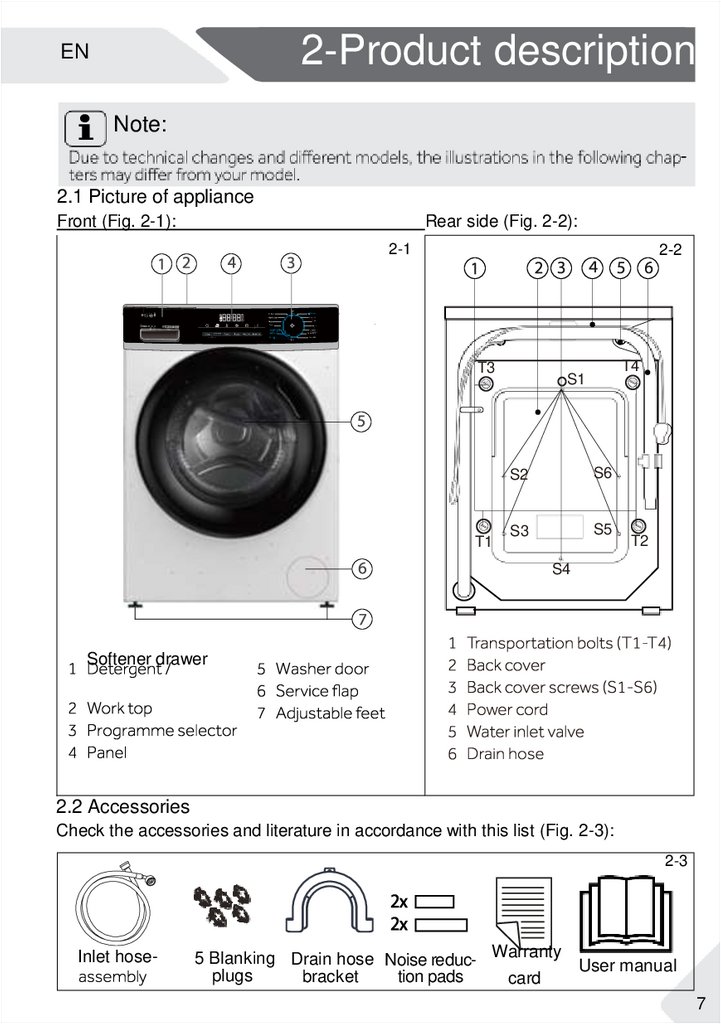
2-Product descriptionEN
Note:
2.1 Picture of appliance
Front (Fig. 2-1):
Rear side (Fig. 2-2):
2-1
2-2
Refresh
Quick 15’
Fast
Duvet
Anti-crease
Baby Care
Shirt
Cotton 20°C
Eco 40-60
T3
T1
T4
S1
S2
S6
S3
S5
T2
S4
Softener drawer
2.2 Accessories
Check the accessories and literature in accordance with this list (Fig. 2-3):
2-3
Inlet hose-
5 Blanking Drain hose Noise reduc- Warranty User manual
plugs
bracket
tion pads
card
7
3.
3-1Refresh
Quick 15’
Fast
Duvet
Anti-crease
Baby Care
Shirt
Cotton 20°C
Eco 40-60
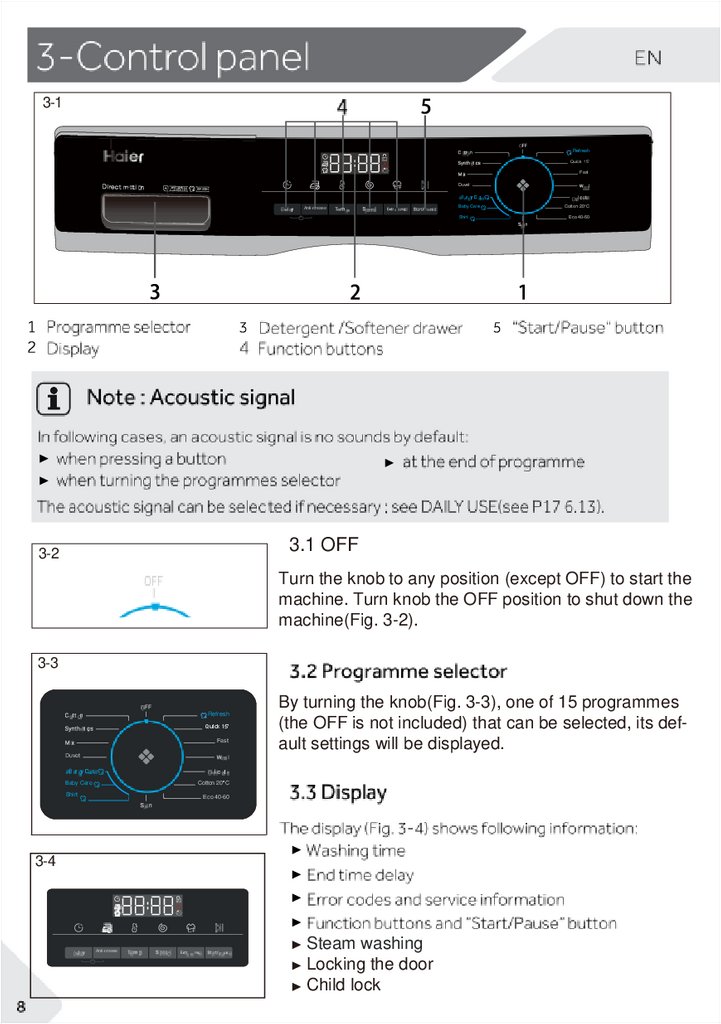
3.1 OFF
3-2
Turn the knob to any position (except OFF) to start the
machine. Turn knob the OFF position to shut down the
machine(Fig. 3-2).
3-3
Refresh
Quick 15’
Fast
By turning the knob(Fig. 3-3), one of 15 programmes
(the OFF is not included) that can be selected, its default settings will be displayed.
Duvet
Baby Care
Cotton 20°C
Shirt
Eco 40-60
3-4
Anti-crease
Steam washing
Locking the door
Child lock
4.
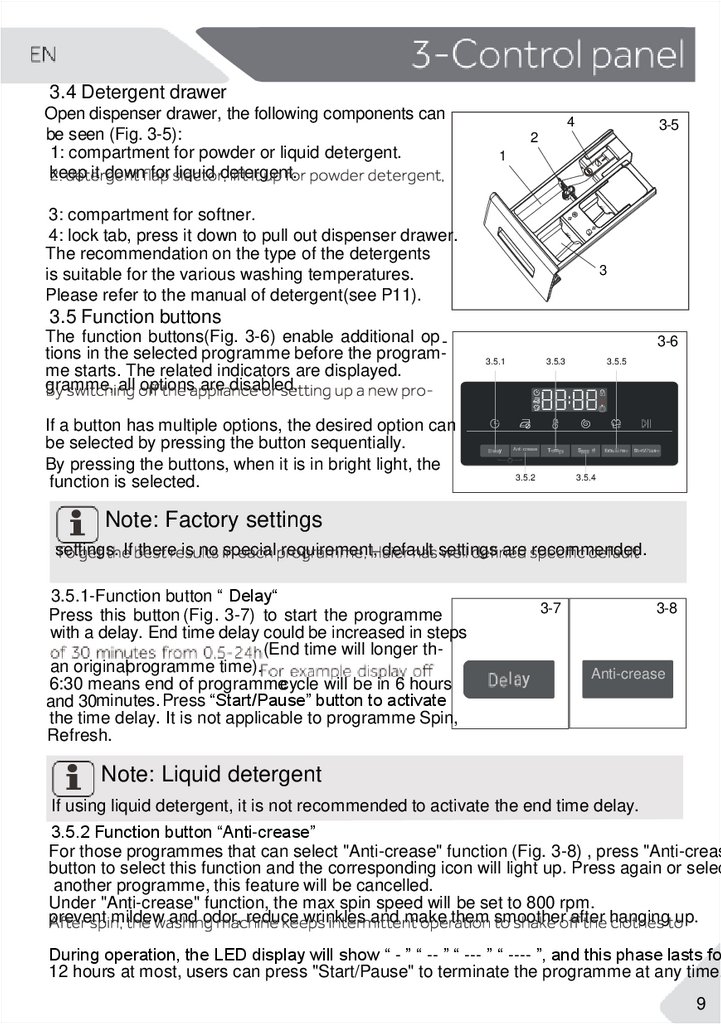
3.4 Detergent drawerOpen dispenser drawer, the following components can
be seen (Fig. 3-5):
1: compartment for powder or liquid detergent.
keep it down for liquid detergent.
4
3-5
2
1
3: compartment for softner.
4: lock tab, press it down to pull out dispenser drawer.
The recommendation on the type of the detergents
is suitable for the various washing temperatures.
Please refer to the manual of detergent(see P11).
3
3.5 Function buttons
The function buttons(Fig. 3-6) enable additional op tions in the selected programme before the programme starts. The related indicators are displayed.
gramme, all options are disabled.
If a button has multiple options, the desired option can
be selected by pressing the button sequentially.
By pressing the buttons, when it is in bright light, the
function is selected.
3-6
3.5.1
3.5.3
3.5.5
Anti-crease
3.5.2
3.5.4
Note: Factory settings
settings. If there is no special requirement, default settings are recommended.
3.5.1-Function button “ Delay“
Press this button (Fig. 3-7) to start the programme
with a delay. End time delay could be increased in steps
(End time will longer than originalprogramme time).
6:30 means end of programmecycle will be in 6 hours
and 30minutes. Press “Start/Pause” button to activate
the time delay. It is not applicable to programme Spin,
Refresh.
3-7
3-8
Anti-crease
Note: Liquid detergent
If using liquid detergent, it is not recommended to activate the end time delay.
3.5.2 Function button “Anti-crease”
For those programmes that can select "Anti-crease" function (Fig. 3-8) , press "Anti-creas
button to select this function and the corresponding icon will light up. Press again or selec
another programme, this feature will be cancelled.
Under "Anti-crease" function, the max spin speed will be set to 800 rpm.
prevent mildew and odor, reduce wrinkles and make them smoother after hanging up.
During operation, the LED display will show “ - ” “ -- ” “ --- ” “ ---- ”, and this phase lasts for
12 hours at most, users can press "Start/Pause" to terminate the programme at any time.
9
5.
3-Cont rol panelEN
3.5.3 Function button “Temp.“
Press this button (Fig. 3-9) to change the washing temperature of the programme. If no value is illuminated
(the display“--°C”) the water will not be heated.
3-9
3.5.4 Function button“Speed“
Press this button (Fig. 3-10) to change or deselect the
spin of the programme. If no value is illuminated the dis-
3-10
3.5.5 “Extra Rinse ” button
Press this button (Fig. 3-11) to rinse the laundry more
intense with fresh water. This is recommended for people
with sensitive skin.
By Pressing the button several times z ero to three additional cycles can be selected. They appear in the display
with P--0/P--1/P--2/P--3.
3-11
3-12
3.6 “Start/Pause“ button
Press this button (Fig. 3-12) gently to start or interrupt the currently displayed programme. During programme setting and during programme run the LED
above the button is shining, or if interrupted blinking.
3-13
3.7 Child lock
Anti-crease
3-14
Choosing a programme and then start, touch button“ Delay”and ”Anti-crease”( Fig .3-13) for 3 seconds simultaneously to block all panel elements against activation,
panel display
. For unlocking please touch again the
two buttons.The child lock indicator lights up when the
child lock works. Feature is optional when the machine
is running.
pressed, when the child lock is activated. The change
is not running.
Note: The procedure to check the number of cycles that the
machine has run.
and "speed" at the same time, it will display the number of running cycles for 2 seconds,
and then back to standby interface. The cumulativer running cycles will add 1 after the
programme ends. The running cycles will be displayed in hexadecimal if it is over 9999.
10
6.
4-ProgrammesEN
Detergent compartment for:
1
1
Detergent
2
Softener or care product
2
Programme HW80/HW90 selectable
/HW100
range
Duvet
4/4.5/5
Allergy Care
8/9/10
1
2
Delay
in °C 1)
º
º
º
º
º
º
º
/
/
1000
º
º
º
/
/
/
/
Fabrics type
Synthetic or mixed
Machine-washable
fabric made of wool
or with wool content
1000
silk
Spin
Quick 15’
Refresh
8/9/10
/
/
/
/
/
/ Non-fragile fabric
Lightly soiled mixedlaundry of cotton and
synthetic
2)
1
/
/
/
/ Cotton / Synthetic
Function
Extra Rinse
in kg
Preset
spin
speed
in rpm
Anti-crease
Temperature
Preset
Max. load
1000
* Water is not heated up.
1) Choose 90°C wash temperature only for special hygienic requirements.
2) Reduce detergent amount because programme duration is short.
improvement purposes.
11
7.
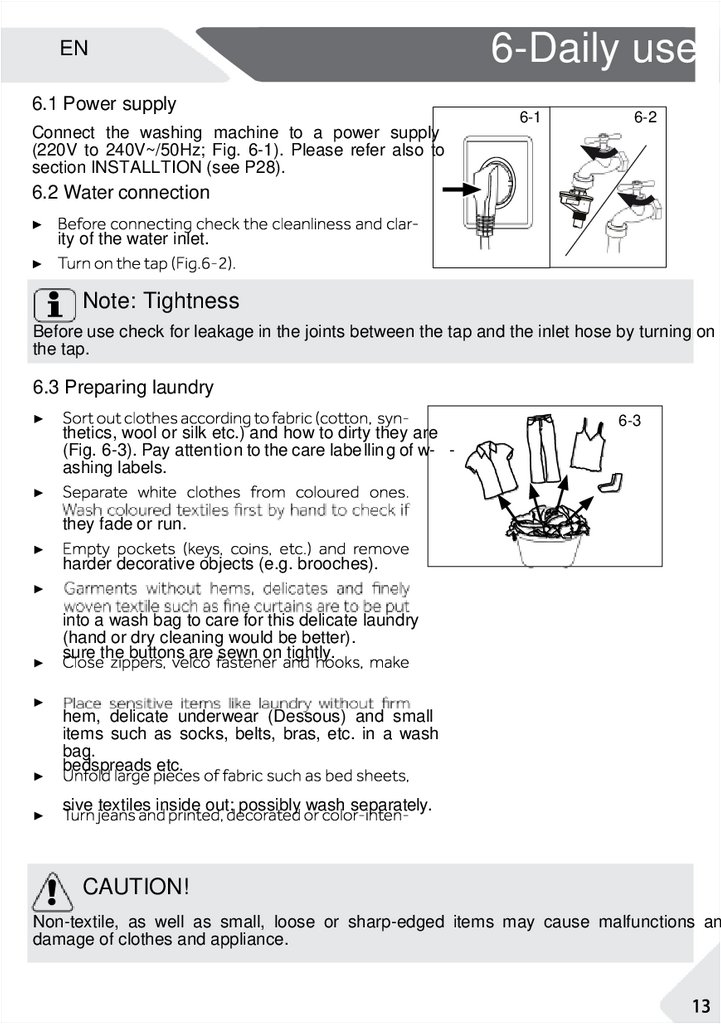
EN6.1 Power supply
6-Daily use
6-1
6-2
Connect the washing machine to a power supply
(220V to 240V~/50Hz; Fig. 6-1). Please refer also to
section INSTALLTION (see P28).
6.2 Water connection
ity of the water inlet.
Note: Tightness
Before use check for leakage in the joints between the tap and the inlet hose by turning on
the tap.
6.3 Preparing laundry
thetics, wool or silk etc.) and how to dirty they are
(Fig. 6-3). Pay attentio n to the care labellin g of w- ashing labels.
6-3
they fade or run.
harder decorative objects (e.g. brooches).
into a wash bag to care for this delicate laundry
(hand or dry cleaning would be better).
sure the buttons are sewn on tightly.
hem, delicate underwear (Dessous) and small
items such as socks, belts, bras, etc. in a wash
bag.
bedspreads etc.
sive textiles inside out; possibly wash separately.
CAUTION!
Non-textile, as well as small, loose or sharp-edged items may cause malfunctions and
damage of clothes and appliance.
8.
6-Daily useEN
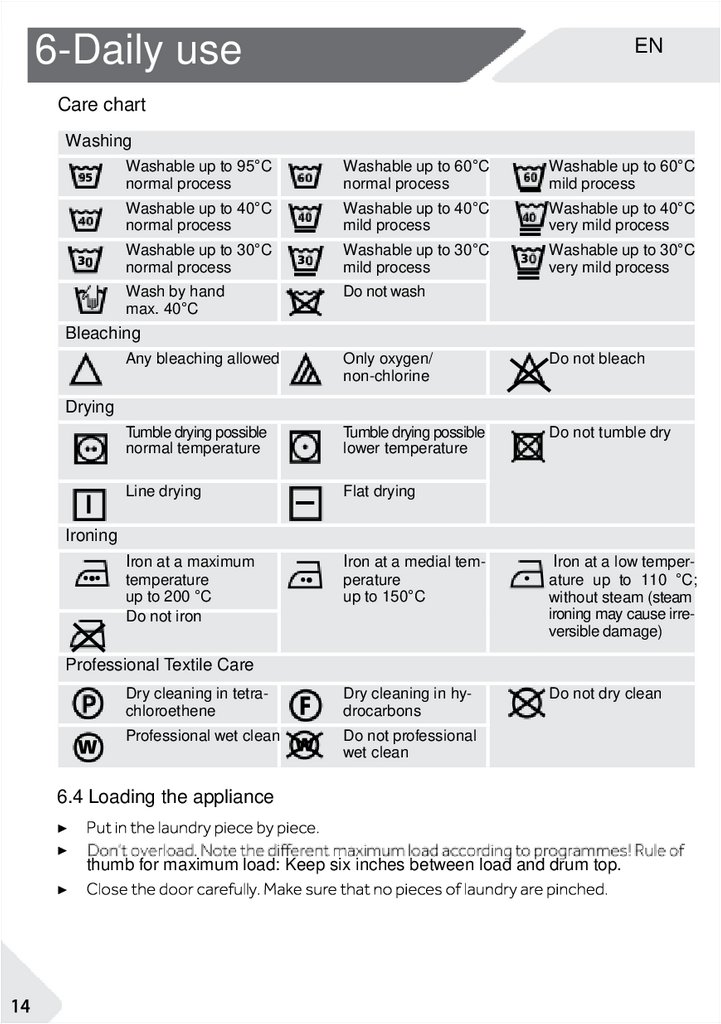
Care chart
Washing
Washable up to 95°C
normal process
Washable up to 60°C
normal process
Washable up to 60°C
mild process
Washable up to 40°C
normal process
Washable up to 40°C
mild process
Washable up to 40°C
very mild process
Washable up to 30°C
normal process
Washable up to 30°C
mild process
Washable up to 30°C
very mild process
Wash by hand
max. 40°C
Do not wash
Bleaching
Any bleaching allowed
Only oxygen/
non-chlorine
Do not bleach
Tumble drying possible
normal temperature
Tumble drying possible
lower temperature
Do not tumble dry
Line drying
Flat drying
Iron at a maximum
Iron at a medial tem-
temperature
up to 200 °C
Do not iron
perature
up to 150°C
Drying
Ironing
Iron at a low temperature up to 110 °C;
without steam (steam
ironing may cause irreversible damage)
Professional Textile Care
Dry cleaning in tetrachloroethene
Dry cleaning in hydrocarbons
Professional wet clean
Do not professional
wet clean
Do not dry clean
6.4 Loading the appliance
thumb for maximum load: Keep six inches between load and drum top.
9.
6-Daily useEN
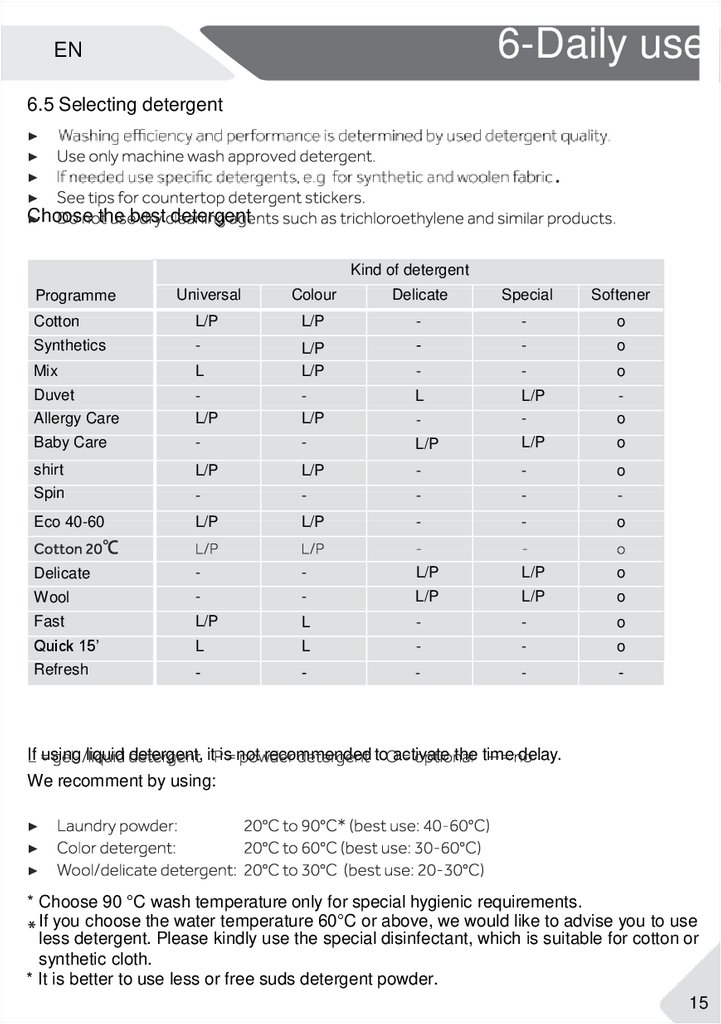
6.5 Selecting detergent
Choose the best detergent
Kind of detergent
Universal
Colour
Delicate
Special
Softener
Cotton
L/P
L/P
-
-
o
Synthetics
-
-
o
Mix
L
L/P
L/P
-
-
-
o
Duvet
Allergy Care
L/P
L/P
L
-
L/P
-
o
Baby Care
-
-
L/P
L/P
o
shirt
Spin
L/P
L/P
-
-
o
-
-
-
-
-
Eco 40-60
L/P
L/P
-
-
o
Delicate
-
-
L/P
L/P
o
Wool
-
-
L/P
L/P
o
Fast
L/P
L
-
-
o
Quick 15’
Refresh
L
L
-
-
o
-
-
-
-
-
Programme
If using liquid detergent, it is not recommended to activate the time delay.
We recomment by using:
* Choose 90 °C wash temperature only for special hygienic requirements.
If you choose the water temperature 60°C or above, we would like to advise you to use
less detergent. Please kindly use the special disinfectant, which is suitable for cotton or
synthetic cloth.
* It is better to use less or free suds detergent powder.
15
10.
6-Daily useEN
6-4
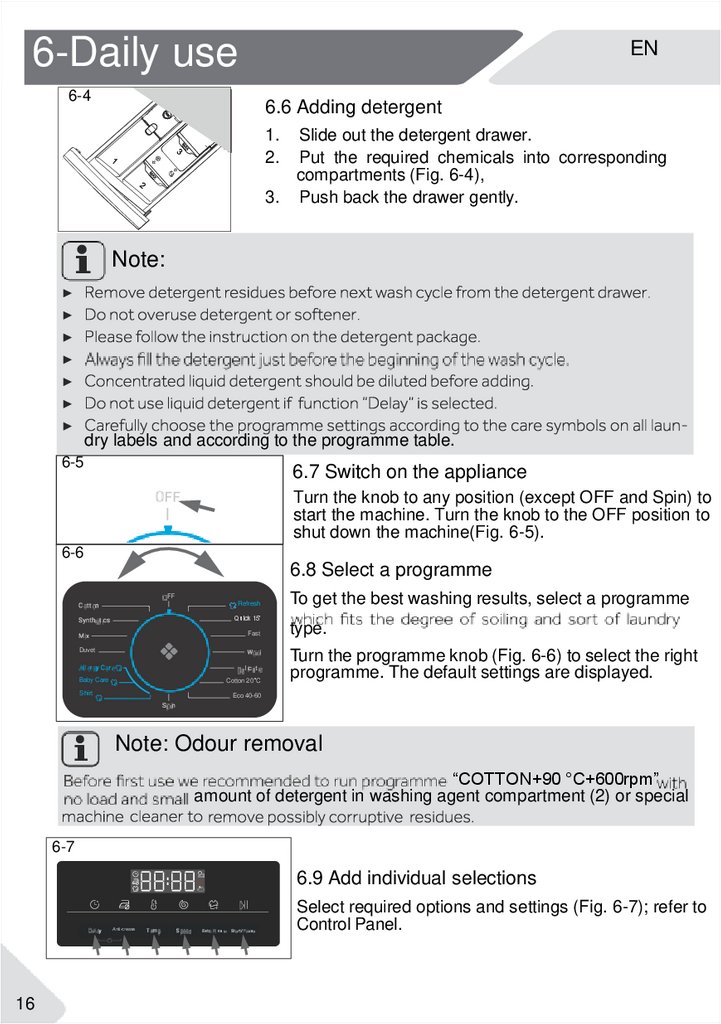
6.6 Adding detergent
1.
2.
Slide out the detergent drawer.
Put the required chemicals into corresponding
compartments (Fig. 6-4),
3. Push back the drawer gently.
Note:
dry labels and according to the programme table.
6-5
6.7 Switch on the appliance
Turn the knob to any position (except OFF and Spin) to
start the machine. Turn the knob to the OFF position to
shut down the machine(Fig. 6-5).
6-6
6.8 Select a programme
Refresh
Quick 15’
Fast
Duvet
Baby Care
Cotton 20°C
Shirt
To get the best washing results, select a programme
type.
Turn the programme knob (Fig. 6-6) to select the right
programme. The default settings are displayed.
Eco 40-60
Note: Odour removal
“COTTON+90 °C+600rpm”
amount of detergent in washing agent compartment (2) or special
6-7
6.9 Add individual selections
Anti-crease
16
Select required options and settings (Fig. 6-7); refer to
Control Panel.
11.
6-Daily useEN
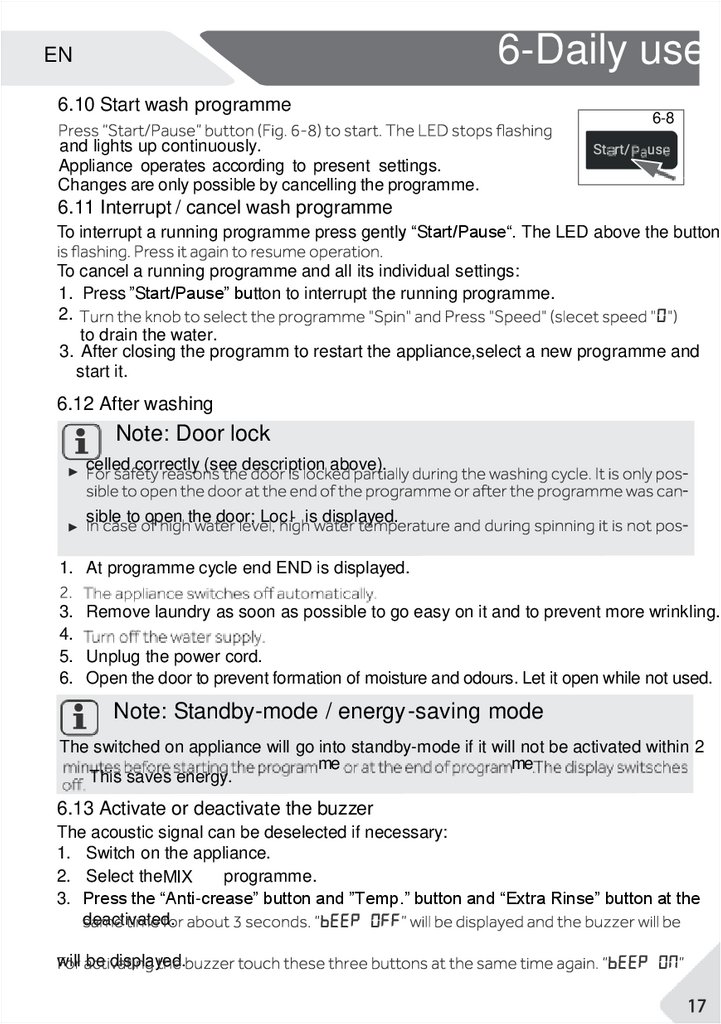
6.10 Start wash programme
6-8
and lights up continuously.
Appliance operates according to present settings.
Changes are only possible by cancelling the programme.
6.11 Interrupt / cancel wash programme
To interrupt a running programme press gently “Start/Pause“. The LED above the button
To cancel a running programme and all its individual settings:
1. Press ”Start/Pause” button to interrupt the running programme.
2.
to drain the water.
3. After closing the programm to restart the appliance,select a new programme and
start it.
6.12 After washing
Note: Door lock
celled correctly (see description above).
sible to open the door; Loc l- is displayed.
1. At programme cycle end END is displayed.
3. Remove laundry as soon as possible to go easy on it and to prevent more wrinkling.
4.
5. Unplug the power cord.
6. Open the door to prevent formation of moisture and odours. Let it open while not used.
Note: Standby-mode / energy -saving mode
The switched on appliance will go into standby-mode if it will not be activated within 2
me
me
This saves energy.
6.13 Activate or deactivate the buzzer
The acoustic signal can be deselected if necessary:
1. Switch on the appliance.
2. Select the MIX
programme.
3. Press the “Anti-crease” button and ”Temp.” button and “Extra Rinse” button at the
deactivated.
will be displayed.
12.
7-Eco-friendly washingEnvironmentally responsible use
mended maximum load size.
ciently cleaning below 60°C.
EN
13.
EN8-Care and cleaning
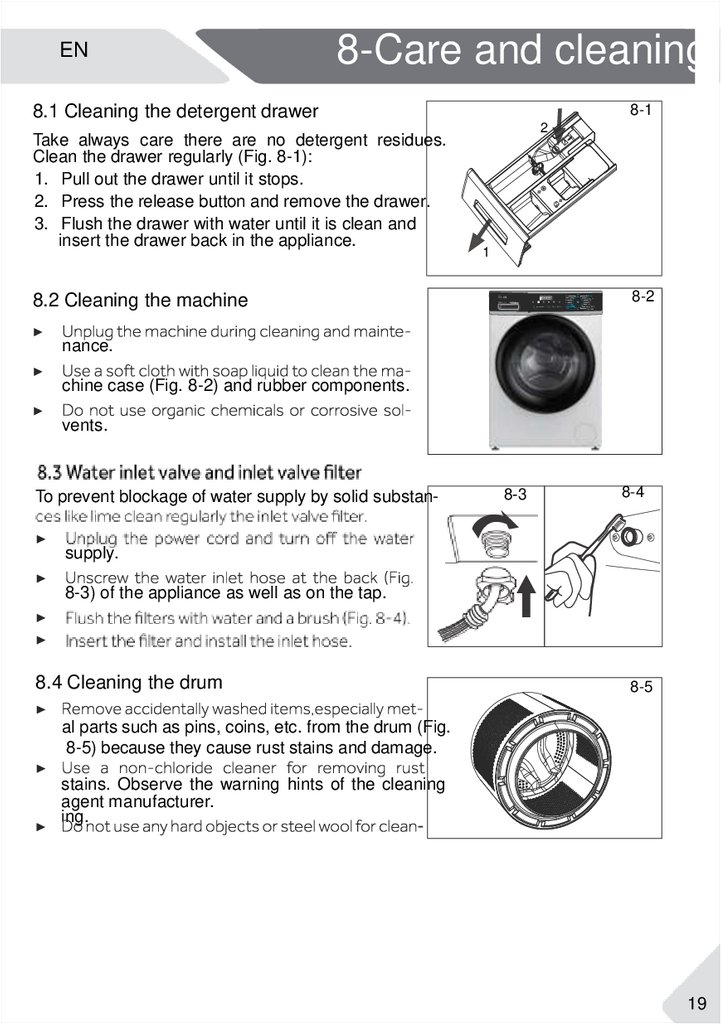
8.1 Cleaning the detergent drawer
Take always care there are no detergent residues.
Clean the drawer regularly (Fig. 8-1):
1. Pull out the drawer until it stops.
2. Press the release button and remove the drawer.
3. Flush the drawer with water until it is clean and
insert the drawer back in the appliance.
8-1
2
1
8.2 Cleaning the machine
Refresh
Quick 15’
Fast
Duvet
Anti-crease
Baby Care
Shirt
8-2
Cotton 20°C
Eco 40-60
nance.
chine case (Fig. 8-2) and rubber components.
vents.
To prevent blockage of water supply by solid substan-
8-3
8-4
supply.
8-3) of the appliance as well as on the tap.
8.4 Cleaning the drum
8-5
al parts such as pins, coins, etc. from the drum (Fig.
8-5) because they cause rust stains and damage.
stains. Observe the warning hints of the cleaning
agent manufacturer.
ing.
19
14.
8-Care and cleaning8-6
8-7
EN
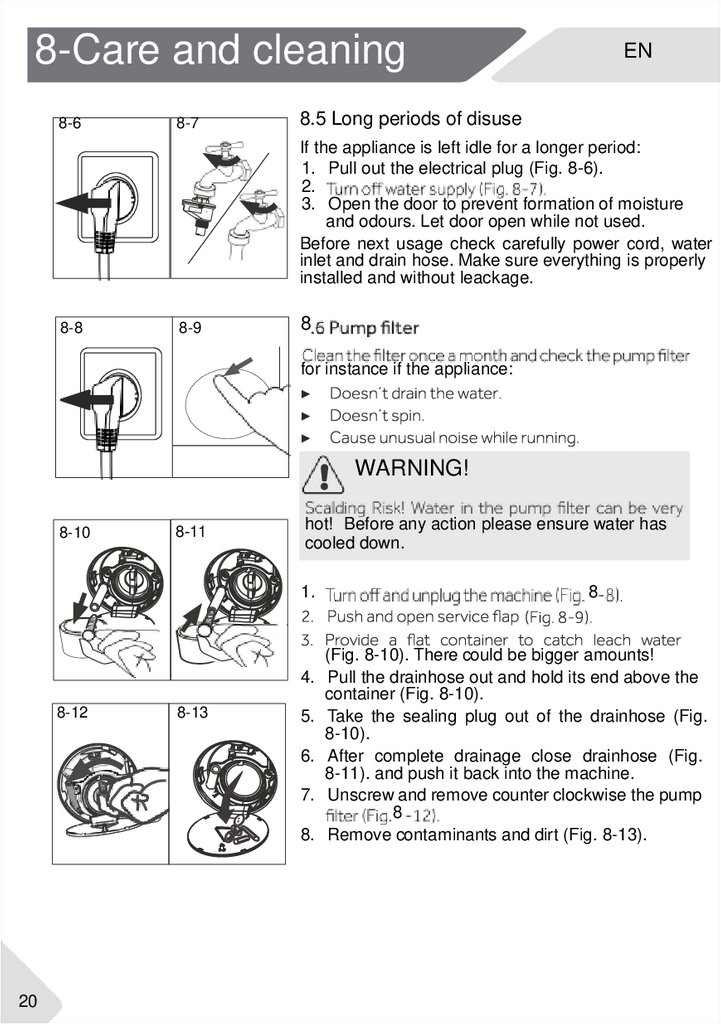
8.5 Long periods of disuse
If the appliance is left idle for a longer period:
1. Pull out the electrical plug (Fig. 8-6).
2.
3. Open the door to prevent formation of moisture
and odours. Let door open while not used.
Before next usage check carefully power cord, water
inlet and drain hose. Make sure everything is properly
installed and without leackage.
8-8
8-9
8
for instance if the appliance:
WARNING!
8-10
8-11
hot! Before any action please ensure water has
cooled down.
1.
8-12
20
8-13
8
(Fig. 8-10). There could be bigger amounts!
4. Pull the drainhose out and hold its end above the
container (Fig. 8-10).
5. Take the sealing plug out of the drainhose (Fig.
8-10).
6. After complete drainage close drainhose (Fig.
8-11). and push it back into the machine.
7. Unscrew and remove counter clockwise the pump
8
8. Remove contaminants and dirt (Fig. 8-13).
15.
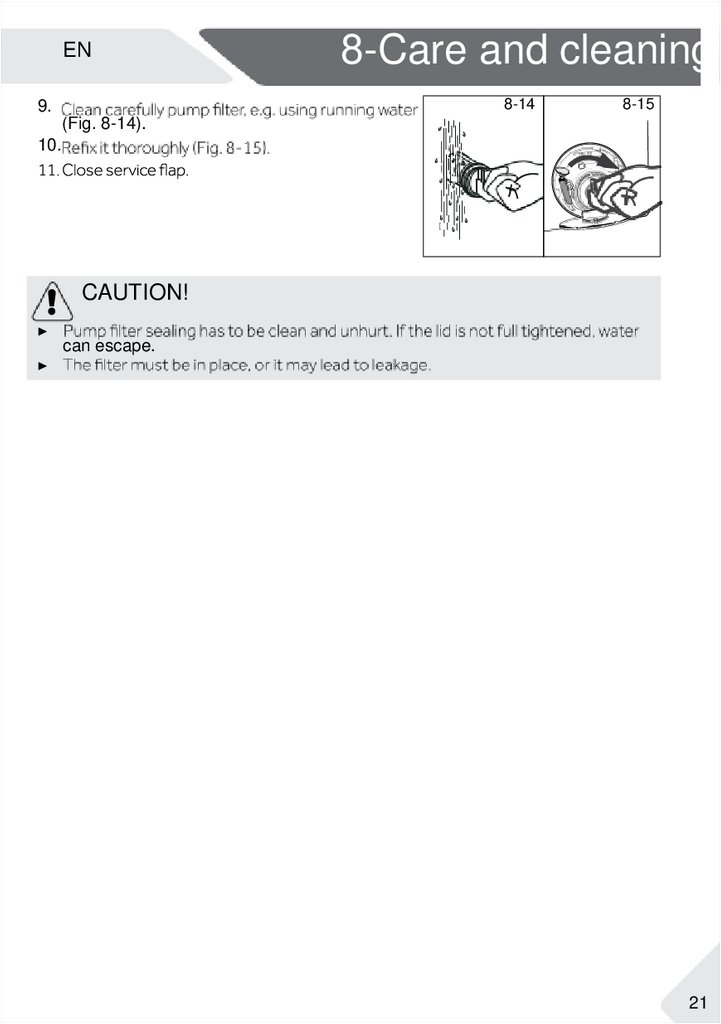
EN8-Care and cleaning
8-14
9.
8-15
(Fig. 8-14).
10.
CAUTION!
can escape.
21
16.
9-TroubleshootingEN
of a problem please check all shown possibilities and follow below instructions before you
WARNING!
the mains socket.
improper repairs can cause considerable consequential damages.
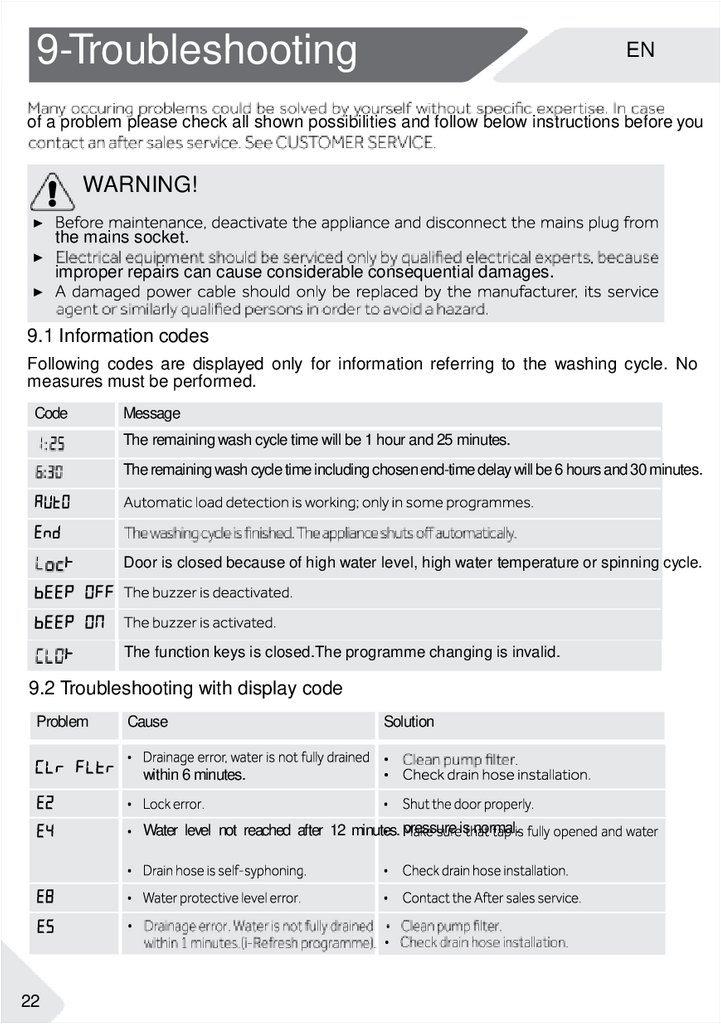
9.1 Information codes
Following codes are displayed only for information referring to the washing cycle. No
measures must be performed.
Code
Message
The remaining wash cycle time will be 1 hour and 25 minutes.
The remaining wash cycle time including chosen end-time delay will be 6 hours and 30 minutes.
Door is closed because of high water level, high water temperature or spinning cycle.
The function keys is closed.The programme changing is invalid.
9.2 Troubleshooting with display code
Problem
Cause
Solution
within 6 minutes.
Water level not reached after 12 minutes. pressure is normal.
22
17.
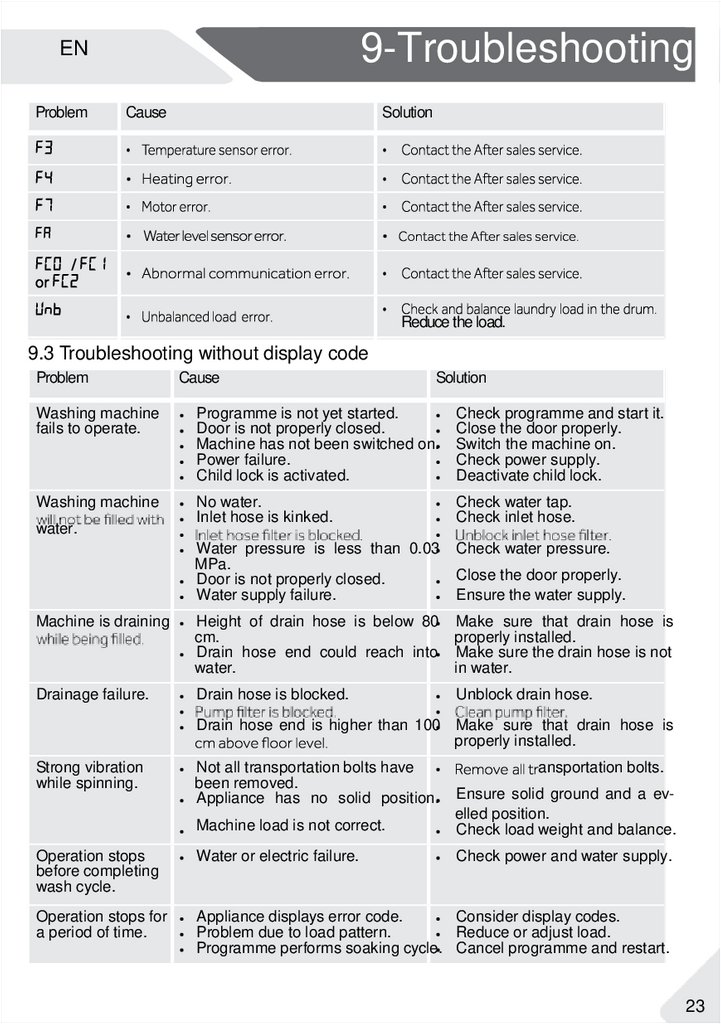
9-TroubleshootingEN
Problem
Cause
Solution
Reduce the load.
9.3 Troubleshooting without display code
Problem
Cause
Solution
Washing machine
fails to operate.
Programme is not yet started.
Door is not properly closed.
Machine has not been switched on.
Power failure.
Child lock is activated.
Check programme and start it.
Close the door properly.
Switch the machine on.
Check power supply.
Deactivate child lock.
Washing machine
No water.
Inlet hose is kinked.
Check water tap.
Check inlet hose.
Water pressure is less than 0.03
MPa.
Door is not properly closed.
Water supply failure.
Check water pressure.
Machine is draining
Height of drain hose is below 80
cm.
Drain hose end could reach into
water.
Make sure that drain hose is
properly installed.
Make sure the drain hose is not
in water.
Drainage failure.
Drain hose is blocked.
Unblock drain hose.
water.
Close the door properly.
Ensure the water supply.
Drain hose end is higher than 100 Make sure that drain hose is
properly installed.
Strong vibration
while spinning.
Not all transportation bolts have
been removed.
Appliance has no solid position.
ansportation bolts.
Machine load is not correct.
Ensure solid ground and a evelled position.
Check load weight and balance.
Operation stops
before completing
wash cycle.
Water or electric failure.
Check power and water supply.
Operation stops for
a period of time.
Appliance displays error code.
Consider display codes.
Problem due to load pattern.
Reduce or adjust load.
Programme performs soaking cycle. Cancel programme and restart.
23
18.
9-TroubleshootingProblem
Cause
EN
Solution
Excessive foam
dations.
detergent drawer.
Automatic adjustment of washing
time.
be adjusted.
fect functionality.
dry and run a spinning programme again.
with selected programme
washing result.
to the degree of pollution
and according to manufacded.
Washing powder
laundry.
ted in the drum.
remain as white spots on the laundry.
dry laundry.
Laundry has grey
patches.
or ointments.
cial cleaner.
Note: Foam formation
If too much foam is inspected during spin cycle, motor stops and drain pump will be activated for 90 seconds. If that elimination of foam fails up to 3 times, programme ends
without spinning.
ance, disconnect the power supply and contact the customer service.
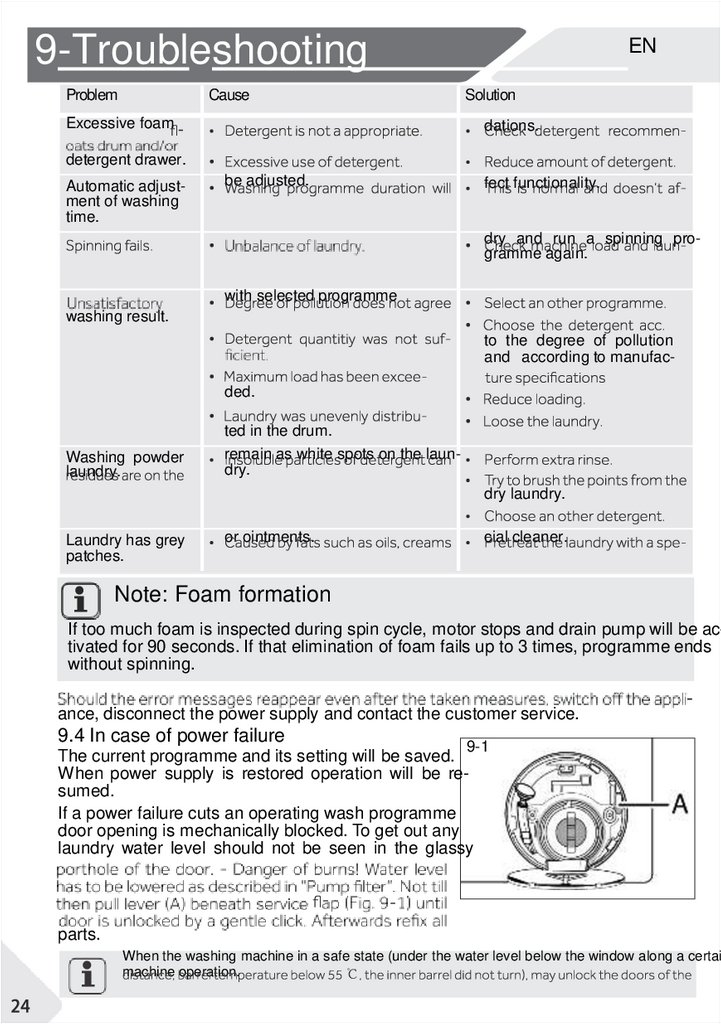
9.4 In case of power failure
9-1
The current programme and its setting will be saved.
When power supply is restored operation will be resumed.
If a power failure cuts an operating wash programme
door opening is mechanically blocked. To get out any
laundry water level should not be seen in the glassy
parts.
When the washing machine in a safe state (under the water level below the window along a certain
machine operation.
19.
10-InstallationEN
10.1 Preparation
keep them out of childrens reach. While opening the package, water drops may be
seen on plastic bag and porthole. This normal phenomenon results from water tests
in the factory.
Note: Packaging disposal
Keep all packaging materials out of children´s reach and dispose them in an environmentally friendly manner.
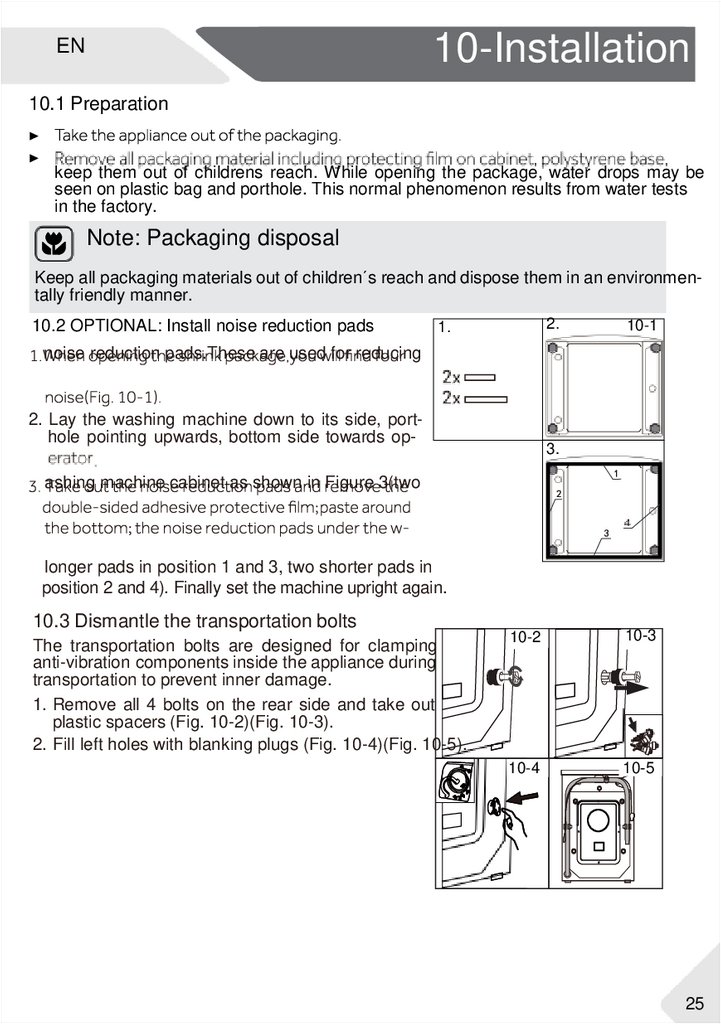
10.2 OPTIONAL: Install noise reduction pads
2.
1.
10-1
noise reduction pads.These are used for reducing
2. Lay the washing machine down to its side, porthole pointing upwards, bottom side towards op-
3.
ashing machine cabinet as shown in Figure 3(two
longer pads in position 1 and 3, two shorter pads in
position 2 and 4). Finally set the machine upright again.
10.3 Dismantle the transportation bolts
The transportation bolts are designed for clamping
anti-vibration components inside the appliance during
transportation to prevent inner damage.
1. Remove all 4 bolts on the rear side and take out
plastic spacers (Fig. 10-2)(Fig. 10-3).
2. Fill left holes with blanking plugs (Fig. 10-4)(Fig. 10-5).
10-2
10-3
10-4
10-5
25
20.
10-InstallationEN
Note: Keep in safe place
10.4 Moving the appliance
before installation to prevent damage: The assembly takes place in reverse order.
10-6
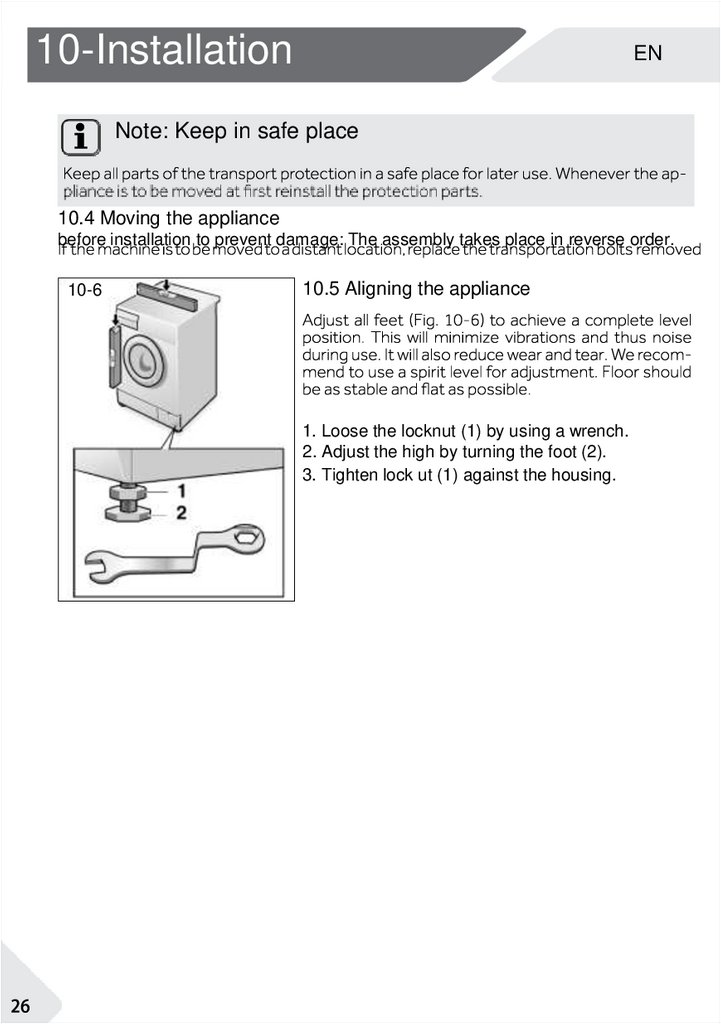
10.5 Aligning the appliance
1. Loose the locknut (1) by using a wrench.
2. Adjust the high by turning the foot (2).
3. Tighten lock ut (1) against the housing.
21.
10-InstallationEN
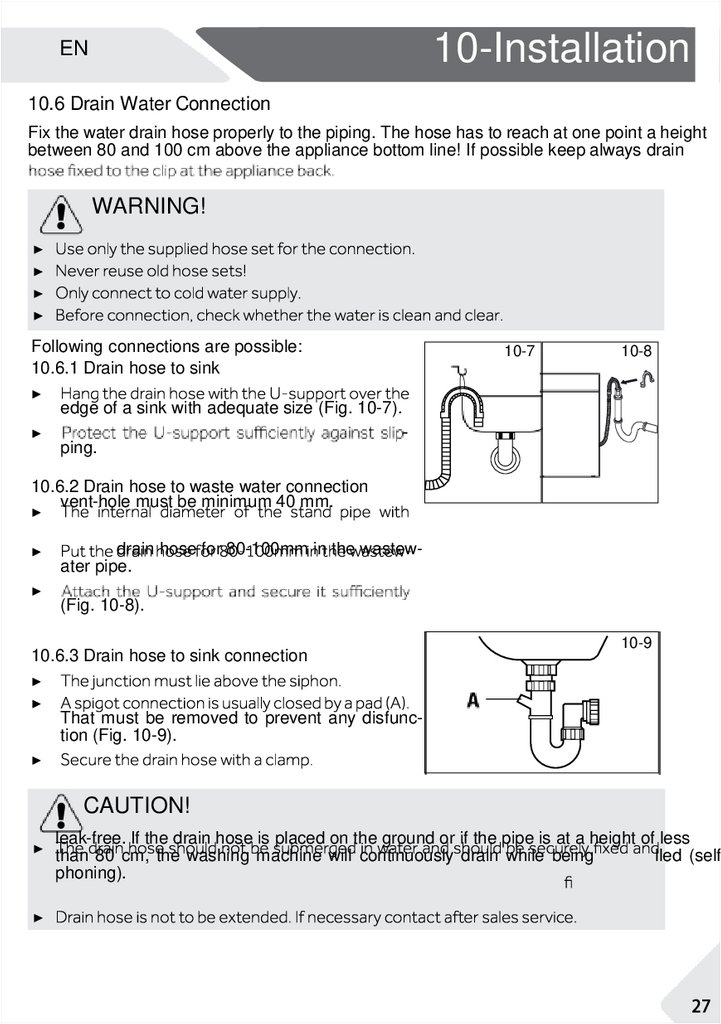
10.6 Drain Water Connection
Fix the water drain hose properly to the piping. The hose has to reach at one point a height
between 80 and 100 cm above the appliance bottom line! If possible keep always drain
WARNING!
Following connections are possible:
10.6.1 Drain hose to sink
10-7
10-8
edge of a sink with adequate size (Fig. 10-7).
ping.
10.6.2 Drain hose to waste water connection
vent-hole must be minimum 40 mm.
drain hose for 80-100mm in the wastewater pipe.
(Fig. 10-8).
10.6.3 Drain hose to sink connection
10-9
That must be removed to prevent any disfunction (Fig. 10-9).
CAUTION!
leak-free. If the drain hose is placed on the ground or if the pipe is at a height of less
than 80 cm, the washing machine will continuously drain while being
lled (selfphoning).
22.
11-Technical dataEN
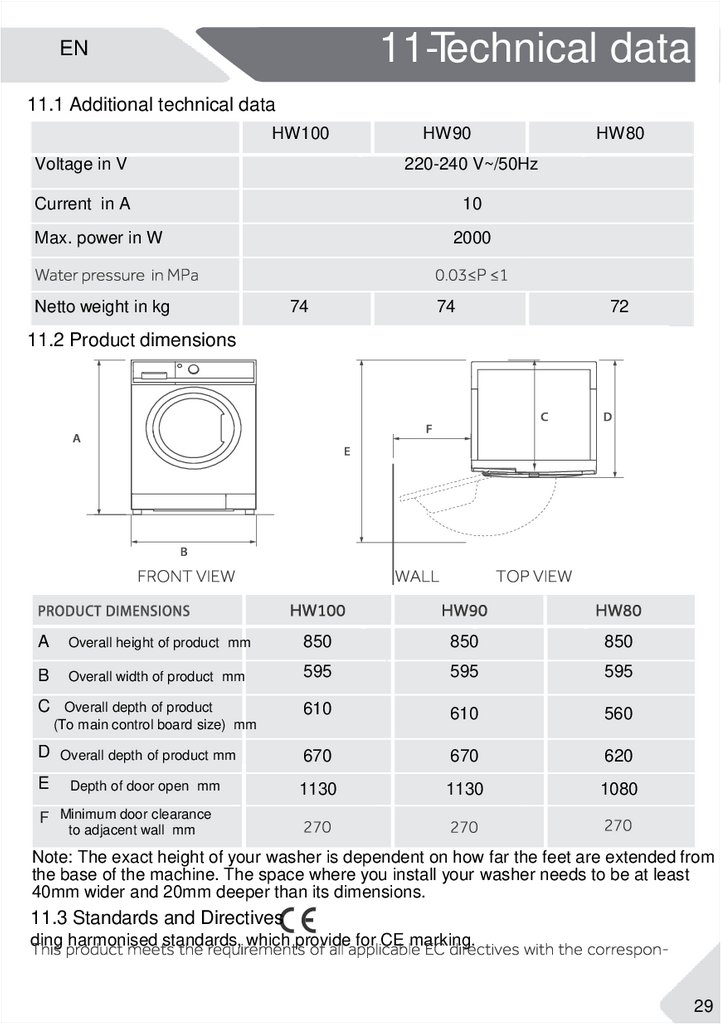
11.1 Additional technical data
HW100
HW90
Voltage in V
220-240 V~/50Hz
Current in A
10
Max. power in W
2000
Netto weight in kg
74
74
HW80
72
11.2 Product dimensions
A
Overall height of product mm
850
850
850
B
Overall width of product mm
595
595
595
610
610
560
D Overall depth of product mm
670
670
620
E
1130
1130
1080
C Overall depth of product
(To main control board size) mm
Depth of door open mm
F Minimum door clearance
to adjacent wall mm
Note: The exact height of your washer is dependent on how far the feet are extended from
the base of the machine. The space where you install your washer needs to be at least
40mm wider and 20mm deeper than its dimensions.
11.3 Standards and Directives
ding harmonised standards, which provide for CE marking.
29