


 Английский язык
Похожие презентации:
 Part 1")


")


")

Повязки. Dressings and bandaging
1.
ПовязкиDressings and bandaging
2.
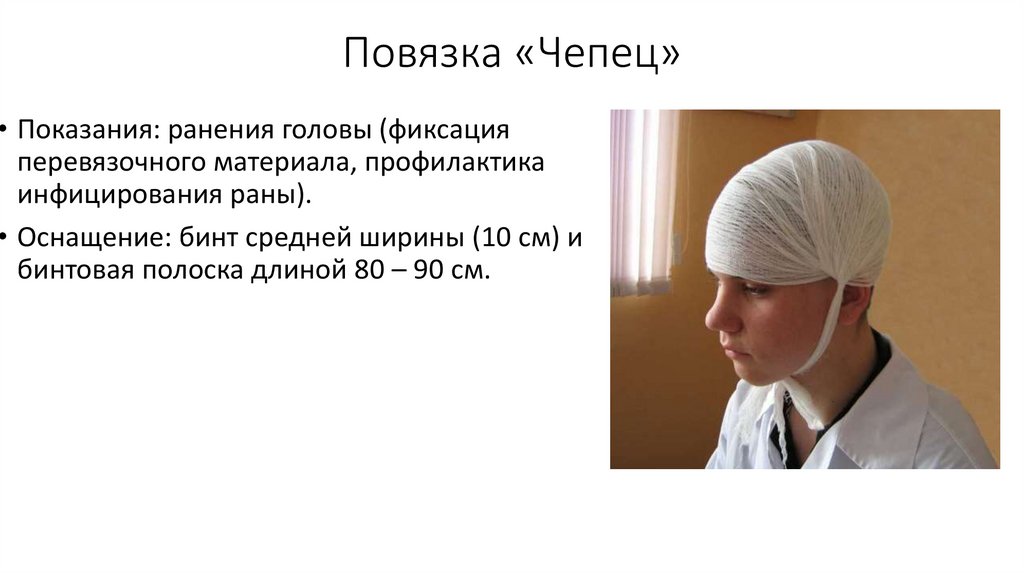
Повязка «Чепец»• Показания: ранения головы (фиксация
перевязочного материала, профилактика
инфицирования раны).
• Оснащение: бинт средней ширины (10 см) и
бинтовая полоска длиной 80 – 90 см.
3.
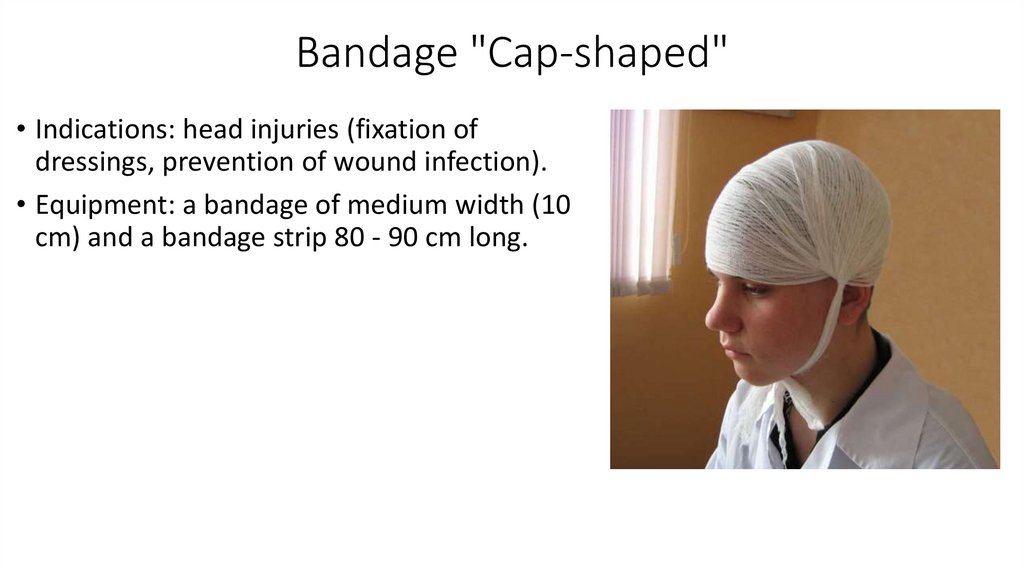
Bandage "Cap-shaped"• Indications: head injuries (fixation of
dressings, prevention of wound infection).
• Equipment: a bandage of medium width (10
cm) and a bandage strip 80 - 90 cm long.
4.
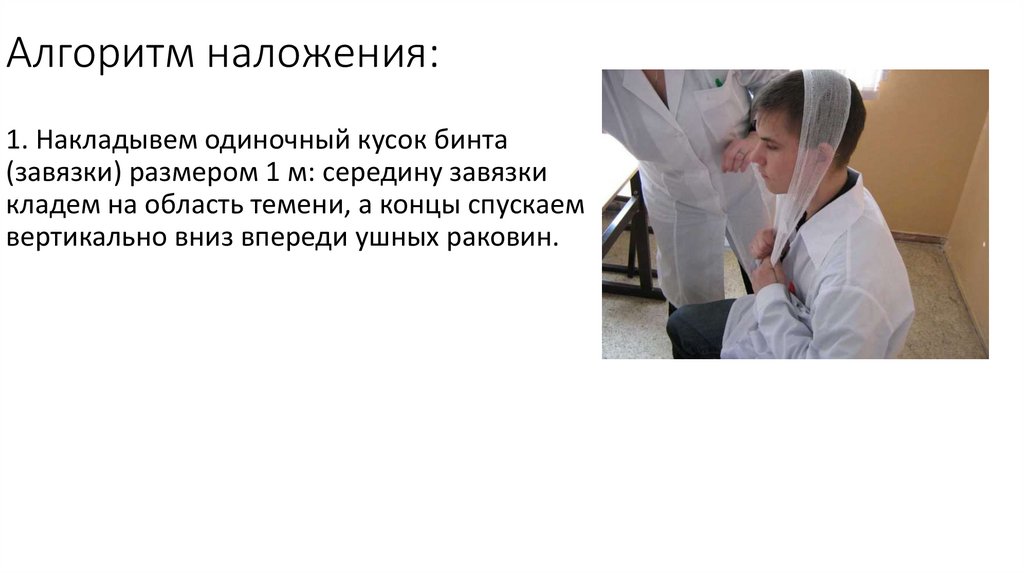
Алгоритм наложения:1. Накладывем одиночный кусок бинта
(завязки) размером 1 м: середину завязки
кладем на область темени, а концы спускаем
вертикально вниз впереди ушных раковин.
5.
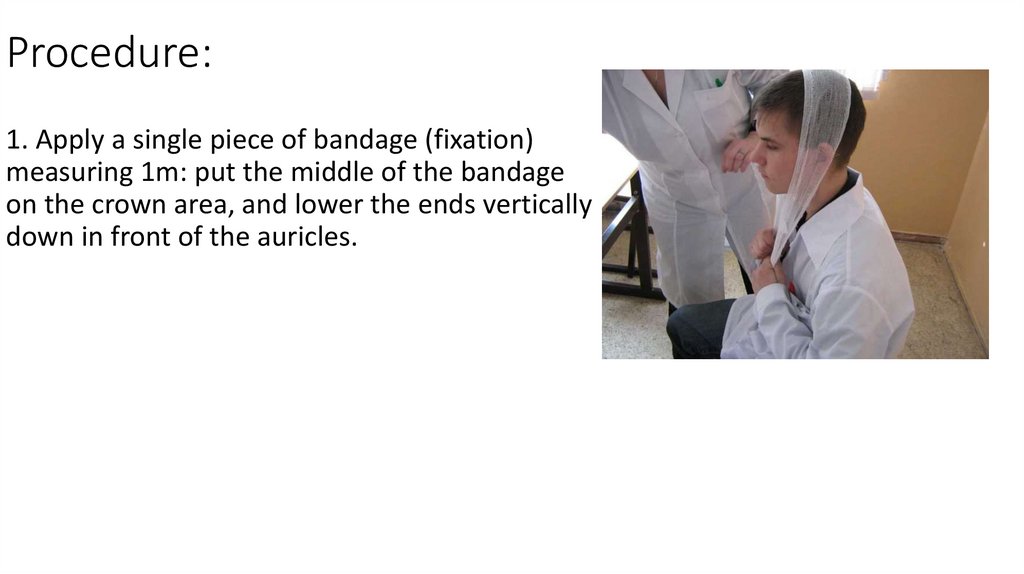
Procedure:1. Apply a single piece of bandage (fixation)
measuring 1m: put the middle of the bandage
on the crown area, and lower the ends vertically
down in front of the auricles.
6.
2. Делаем первый циркулярный ходвокруг головы.
7.
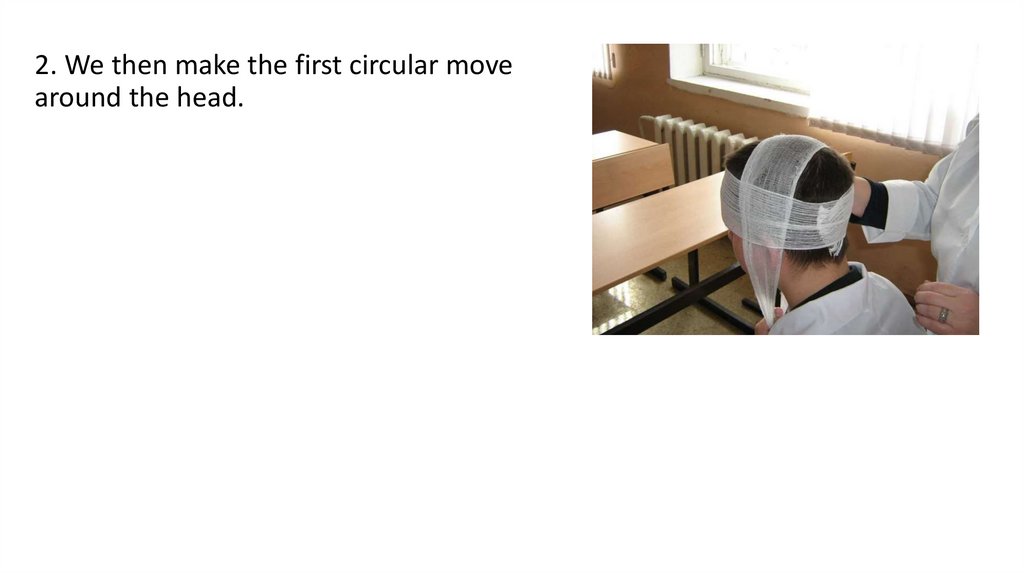
2. We then make the first circular movearound the head.
8.
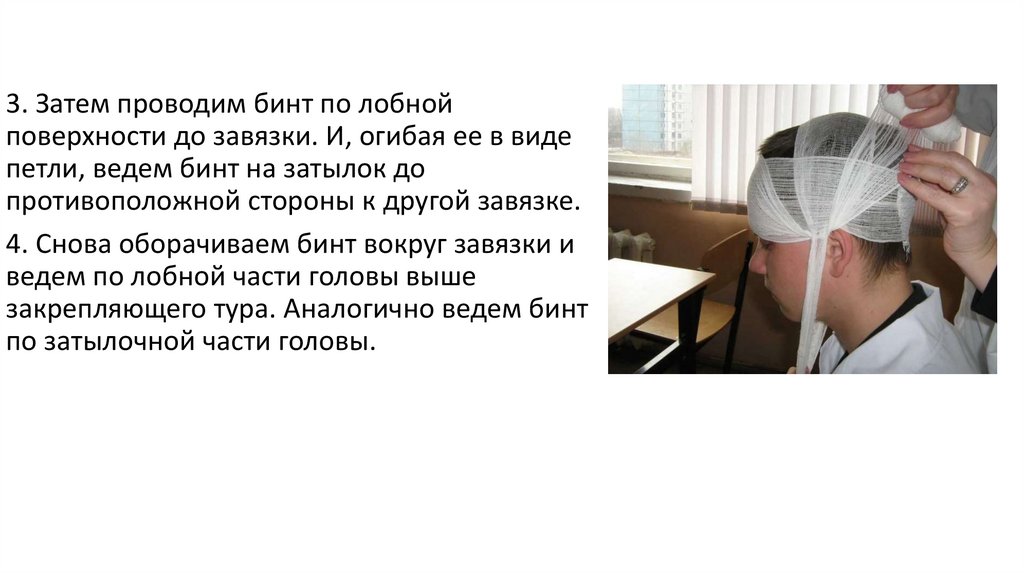
3. Затем проводим бинт по лобнойповерхности до завязки. И, огибая ее в виде
петли, ведем бинт на затылок до
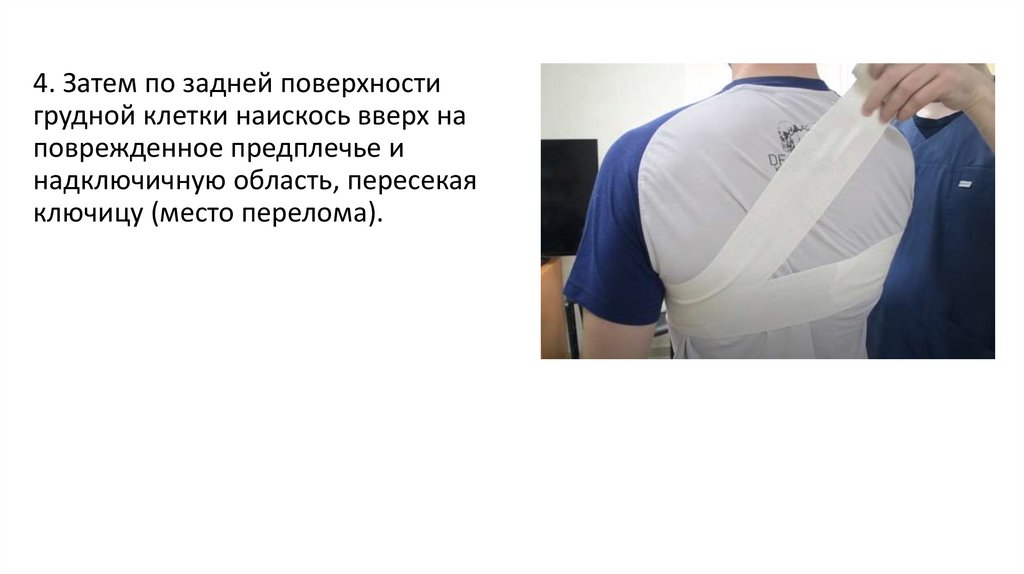
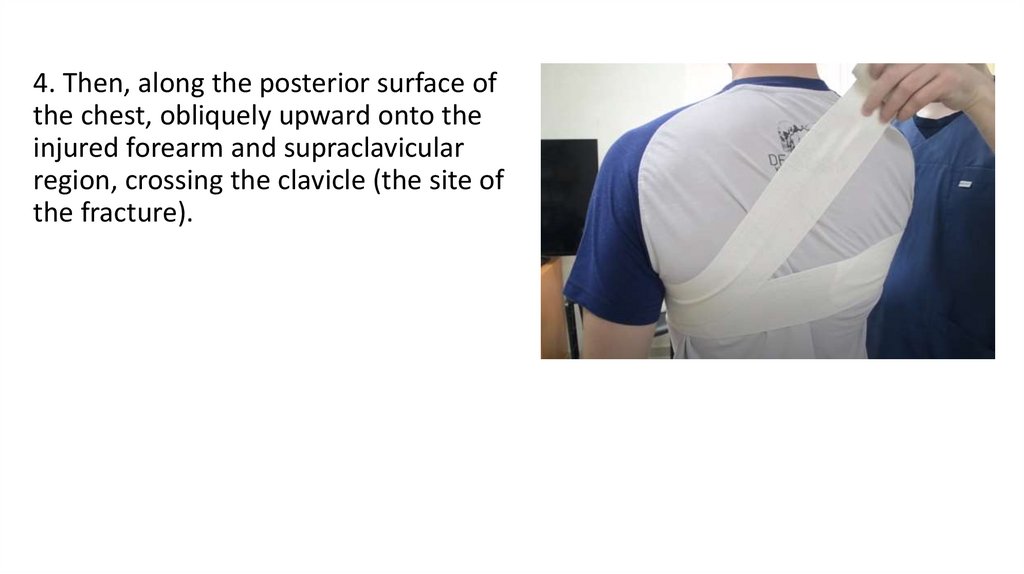
противоположной стороны к другой завязке.
4. Снова оборачиваем бинт вокруг завязки и
ведем по лобной части головы выше
закрепляющего тура. Аналогично ведем бинт
по затылочной части головы.
9.
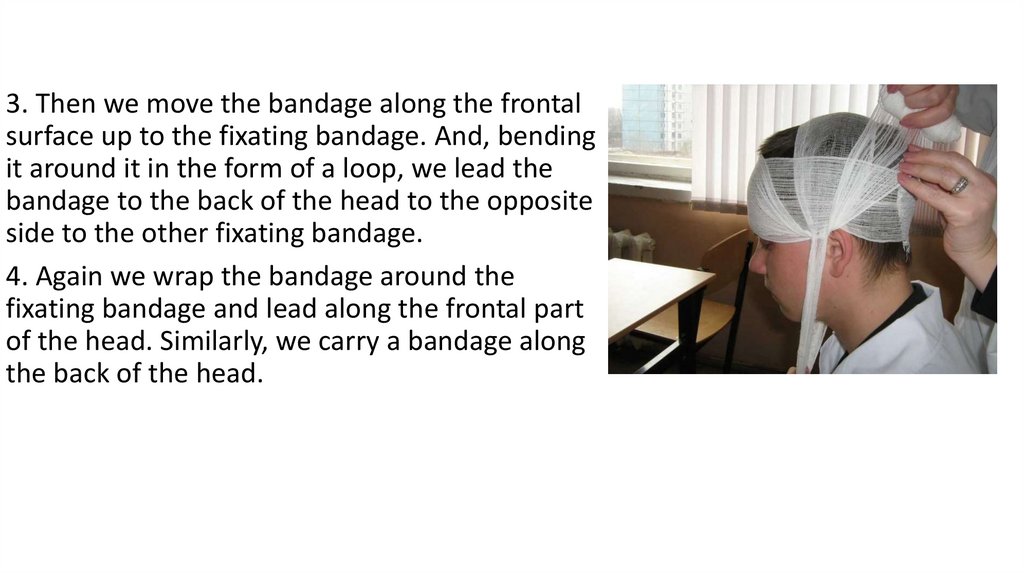
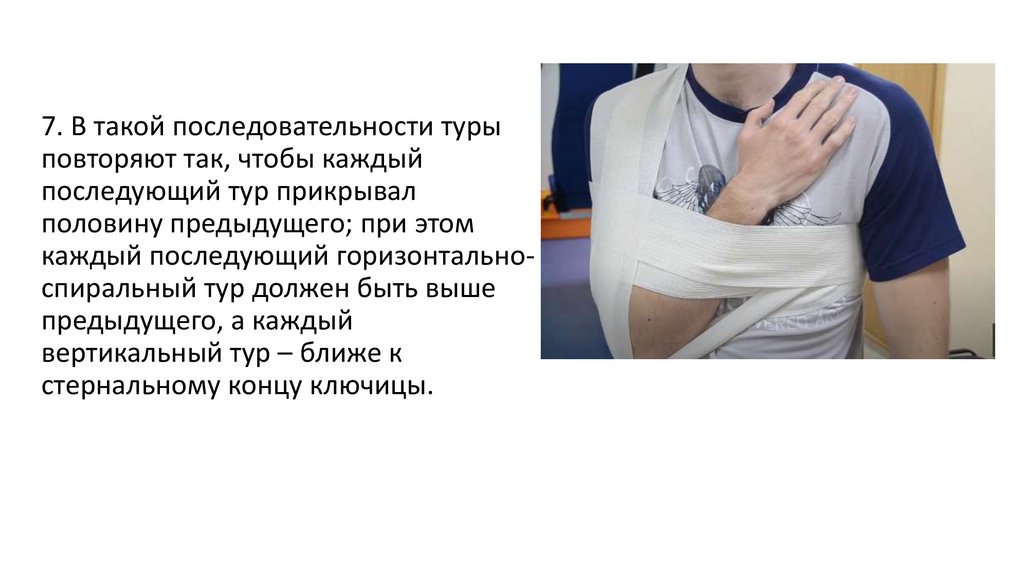
3. Then we move the bandage along the frontalsurface up to the fixating bandage. And, bending
it around it in the form of a loop, we lead the
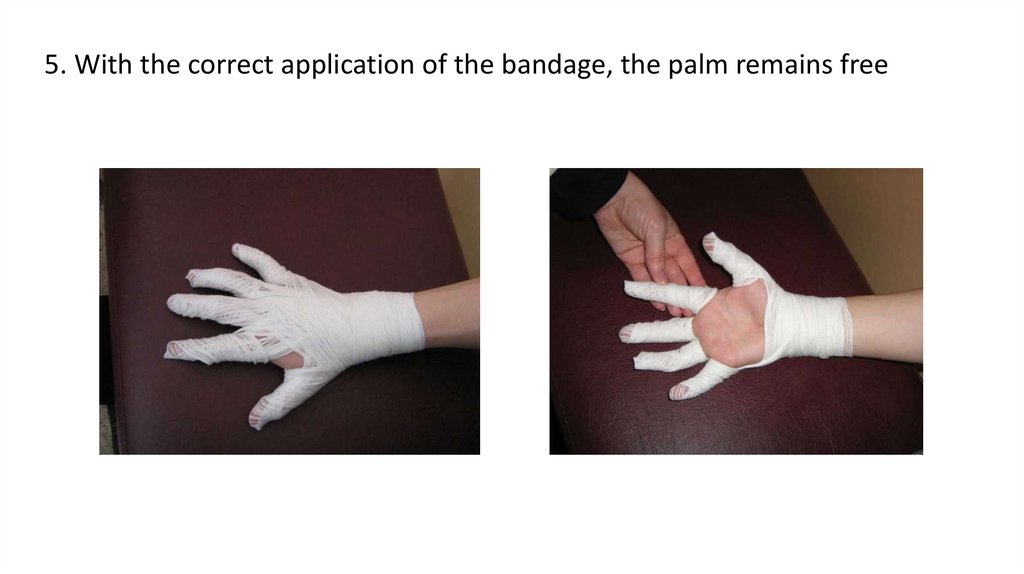
bandage to the back of the head to the opposite
side to the other fixating bandage.
4. Again we wrap the bandage around the
fixating bandage and lead along the frontal part
of the head. Similarly, we carry a bandage along
the back of the head.
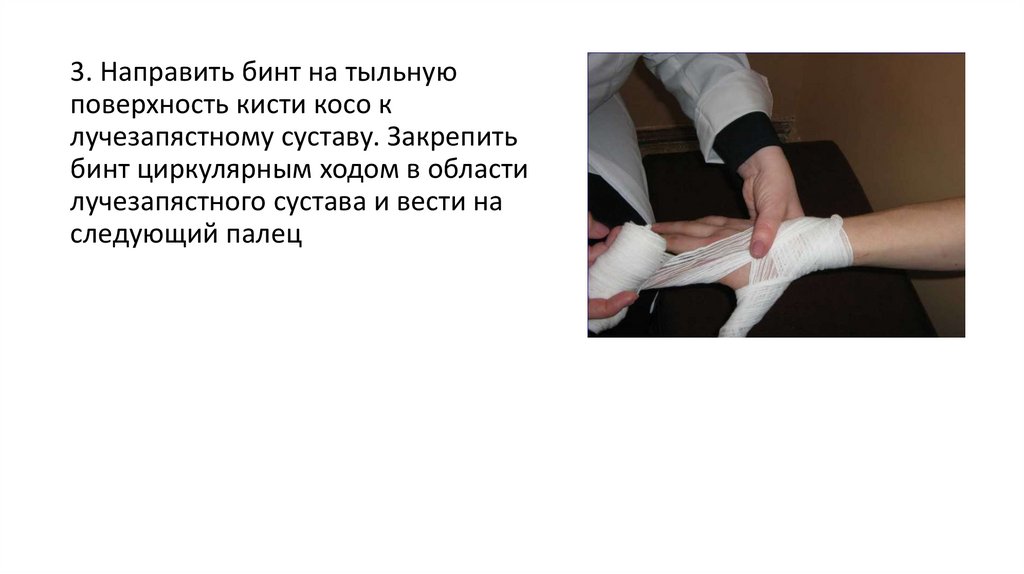
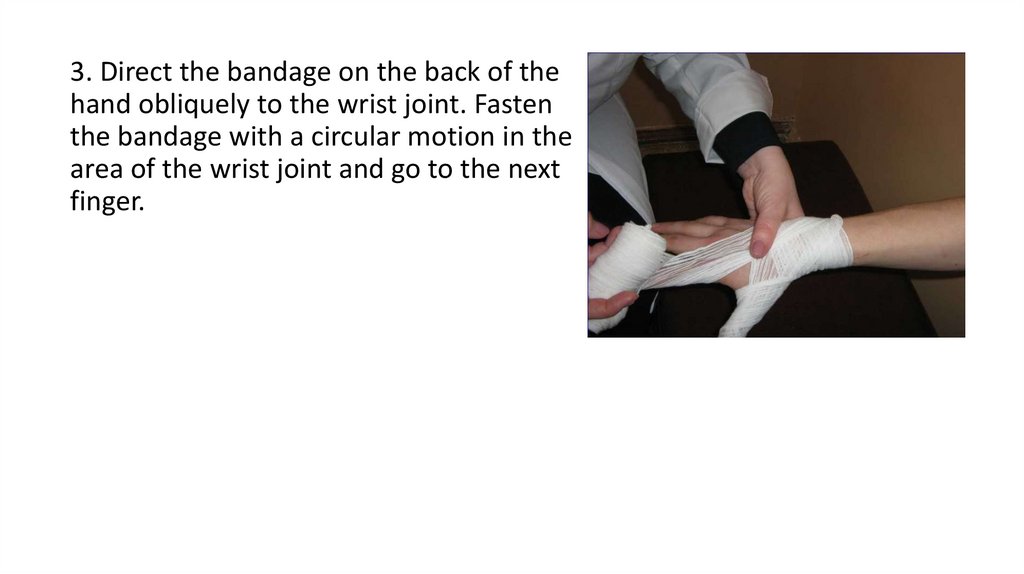
10.
5. Повторяем циркулярные ходывокруг головы, прикрывая
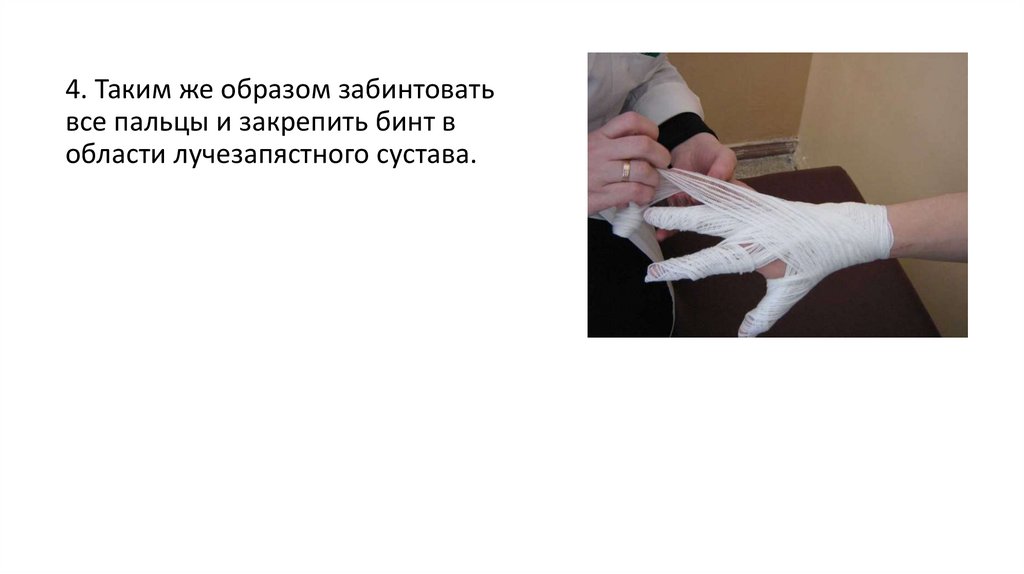
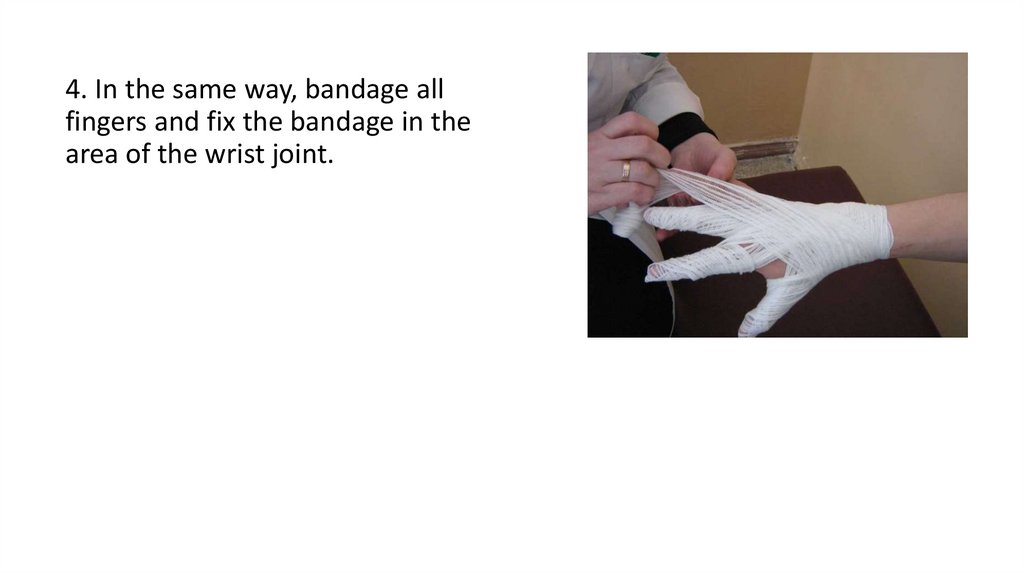
предыдущий ход на 1/2 или 2/3 до
полного покрытия волосистой части
головы.
6. Оборачиваем бинт вокруг одного из
концов завязки и закрепляем узлом.
11.
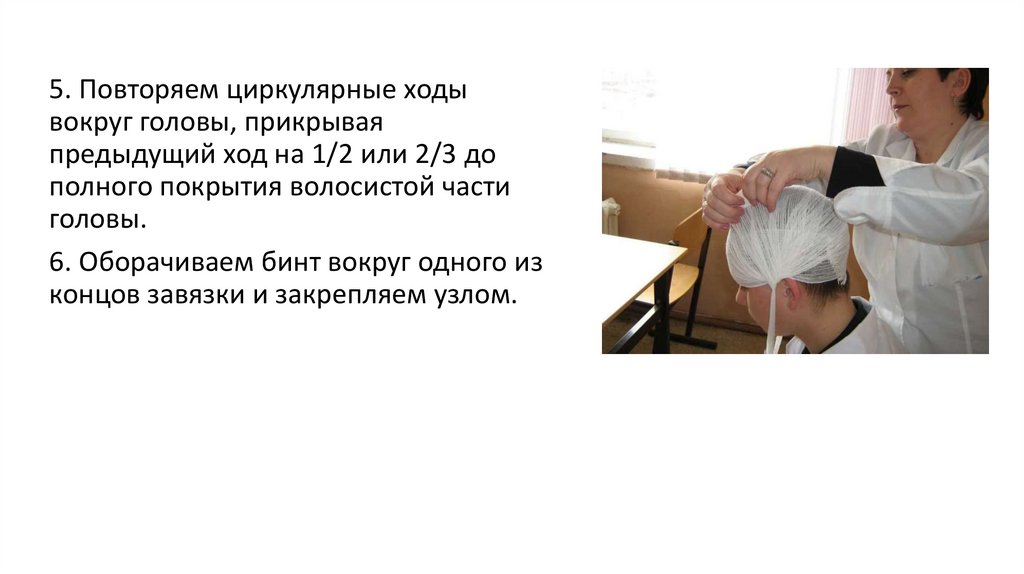
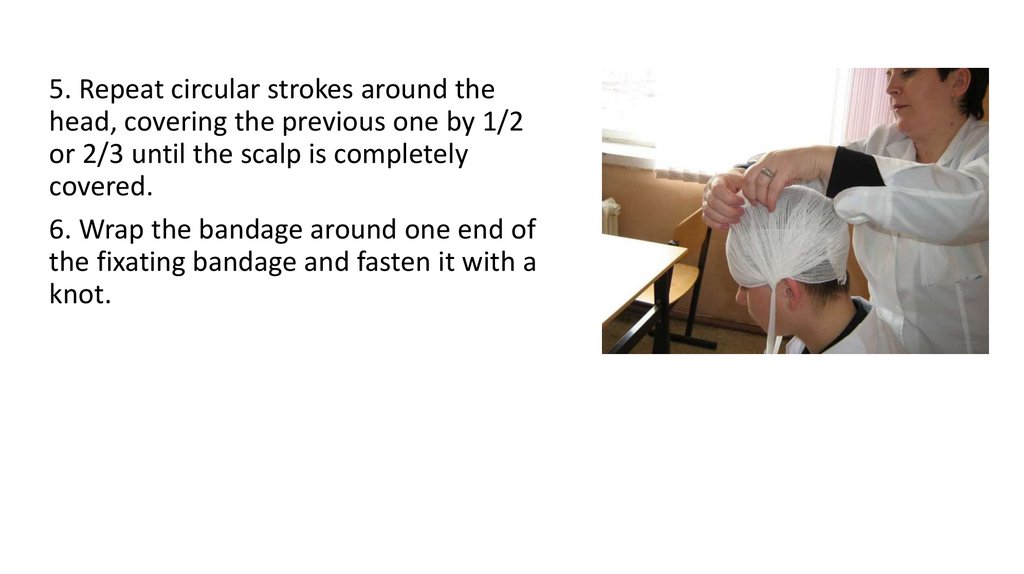
5. Repeat circular strokes around thehead, covering the previous one by 1/2
or 2/3 until the scalp is completely
covered.
6. Wrap the bandage around one end of
the fixating bandage and fasten it with a
knot.
12.
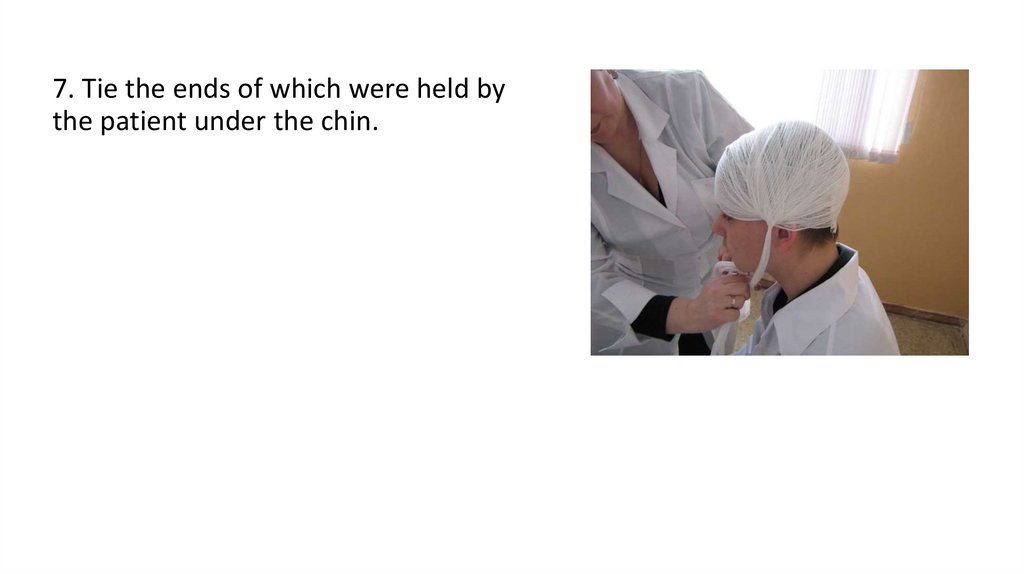
7. Завязываем под подбородкомотрезок бинта, концы которого
удерживал пациент.
13.
7. Tie the ends of which were held bythe patient under the chin.
14.
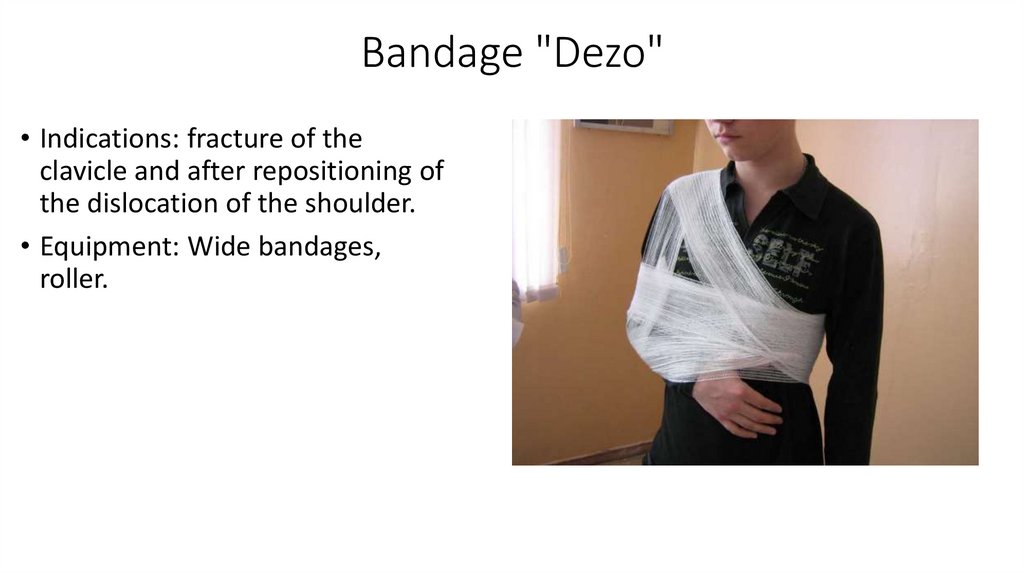
Повязка «Дезо»• Показания: перелом ключицы
и после вправления вывиха
плеча.
• Оснащения: Широкие бинты,
валик.
15.
Bandage "Dezo"• Indications: fracture of the
clavicle and after repositioning of
the dislocation of the shoulder.
• Equipment: Wide bandages,
roller.
16.
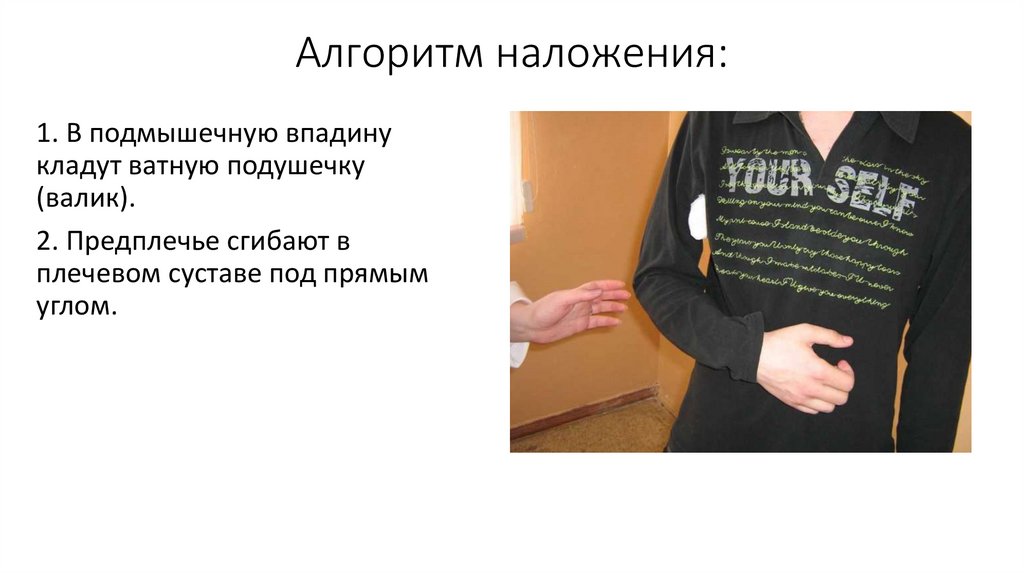
Алгоритм наложения:1. В подмышечную впадину
кладут ватную подушечку
(валик).
2. Предплечье сгибают в
плечевом суставе под прямым
углом.
17.
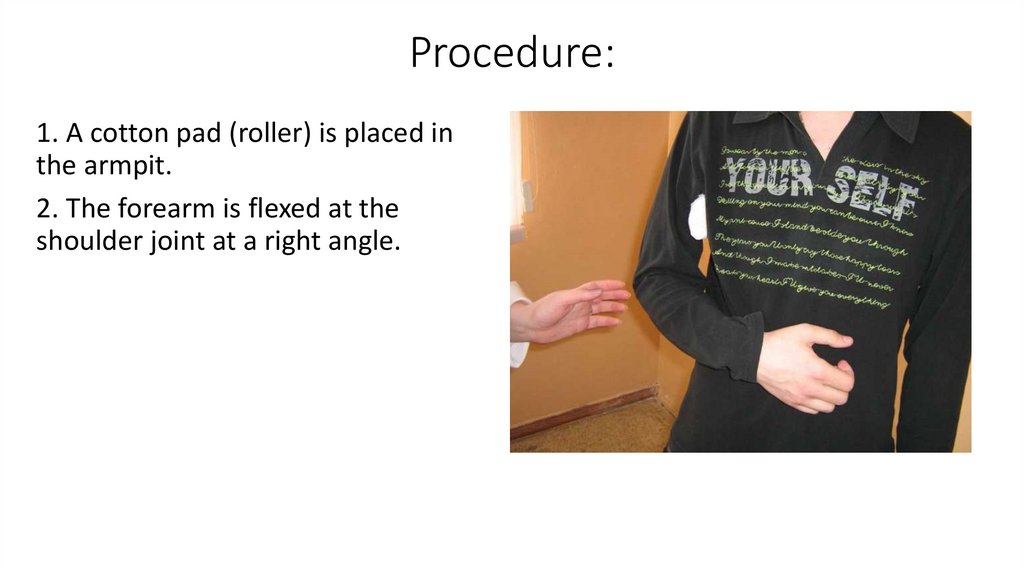
Procedure:1. A cotton pad (roller) is placed in
the armpit.
2. The forearm is flexed at the
shoulder joint at a right angle.
18.
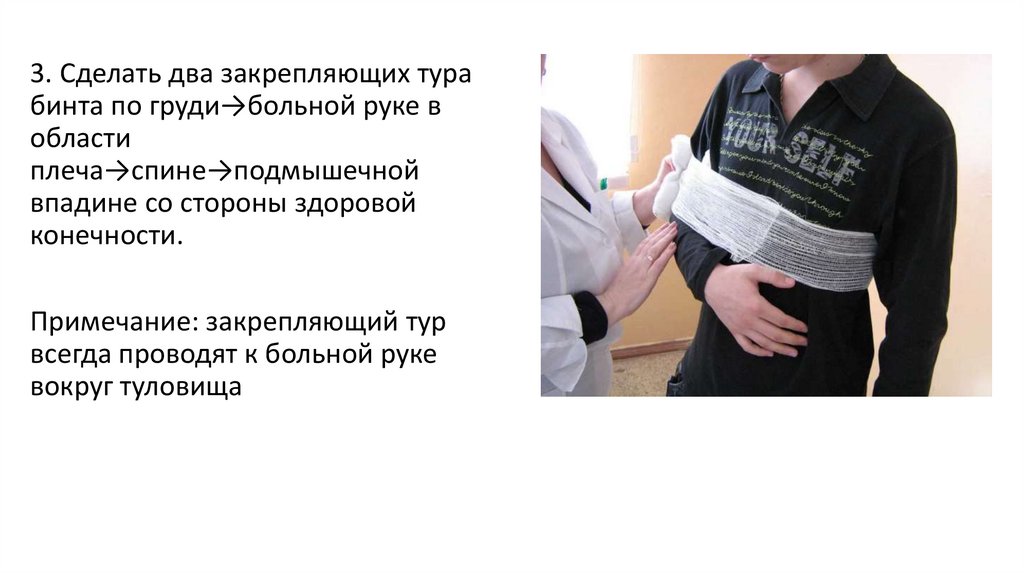
3. Сделать два закрепляющих турабинта по груди→больной руке в
области
плеча→спине→подмышечной
впадине со стороны здоровой
конечности.
Примечание: закрепляющий тур
всегда проводят к больной руке
вокруг туловища
19.
3. Make two fixing rounds of bandagealong the chest → sore arm → back →
armpit from the side of the healthy
limb.
Note: the fixing round is always
carried out to the sore arm around the
torso.
20.
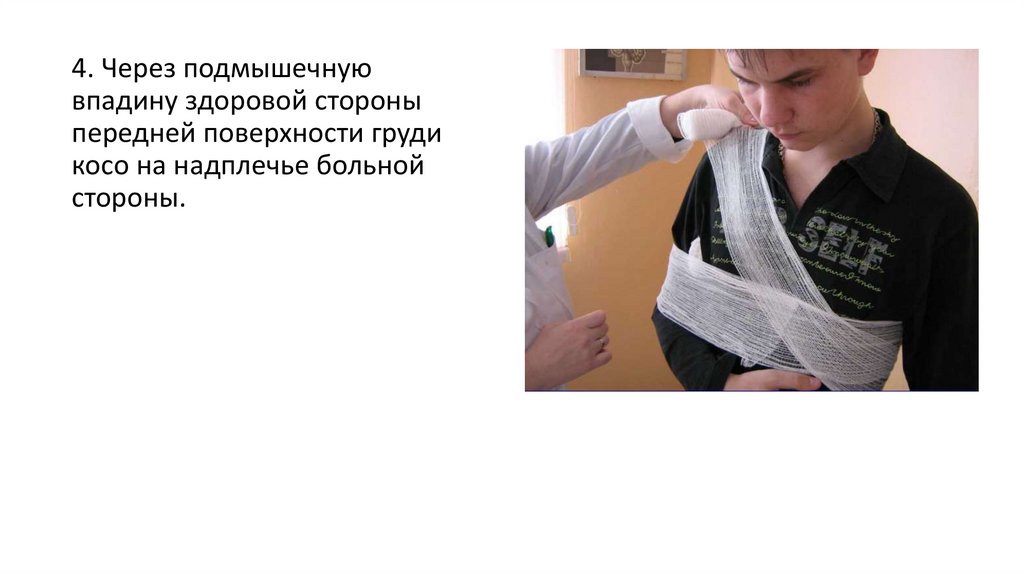
4. Через подмышечнуювпадину здоровой стороны
передней поверхности груди
косо на надплечье больной
стороны.
21.
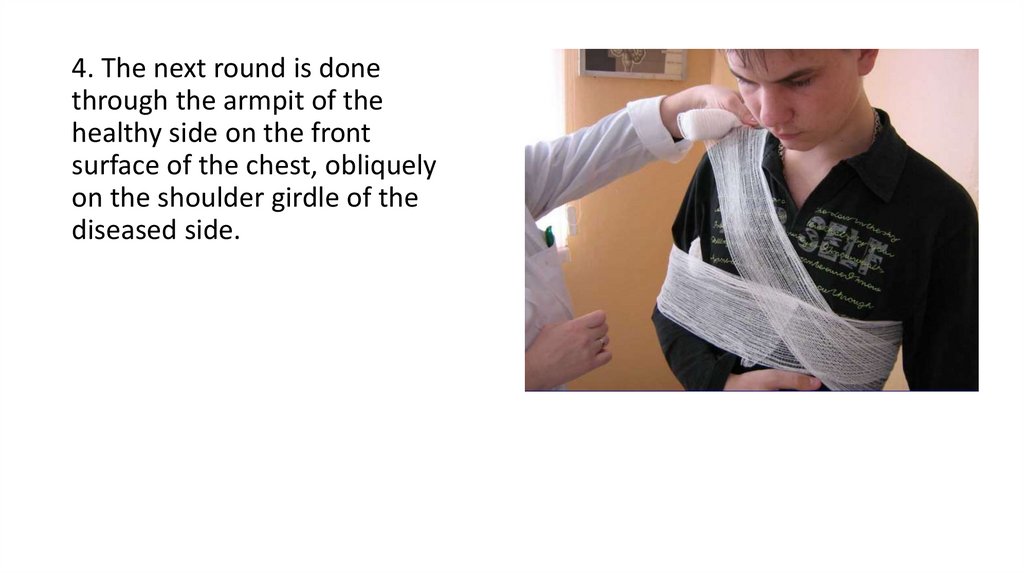
4. The next round is donethrough the armpit of the
healthy side on the front
surface of the chest, obliquely
on the shoulder girdle of the
diseased side.
22.
5. Оттуда спускается вниз по заднейповерхности больного плеча под
локоть
23.
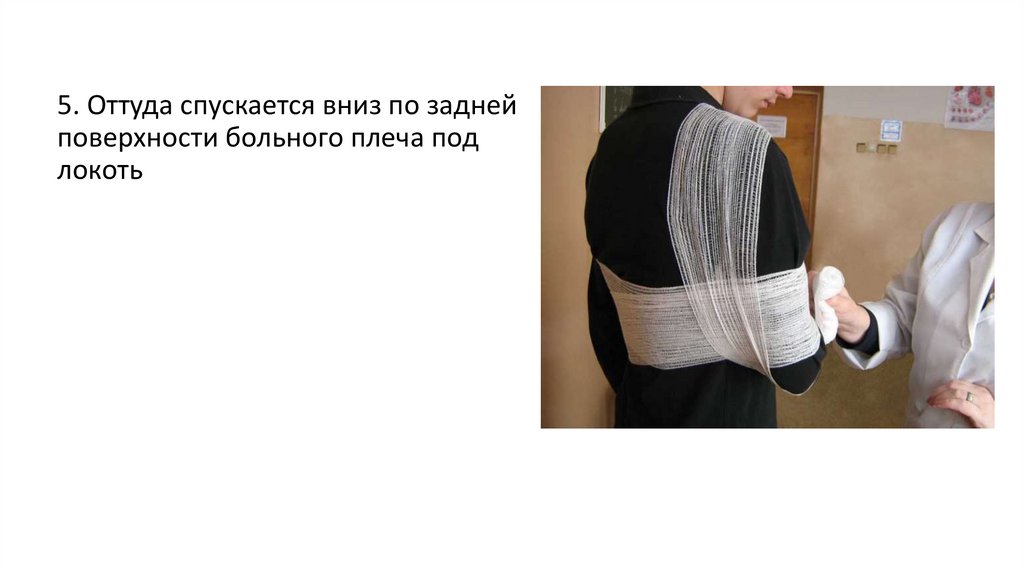
5. From there it goes down along theback surface of the sore shoulder
under the elbow
24.
5. Огибает локтевой сустав, и,поддерживая предплечье,
направляем бинт косо вверх в
подмышечную впадину здоровой
стороны.
25.
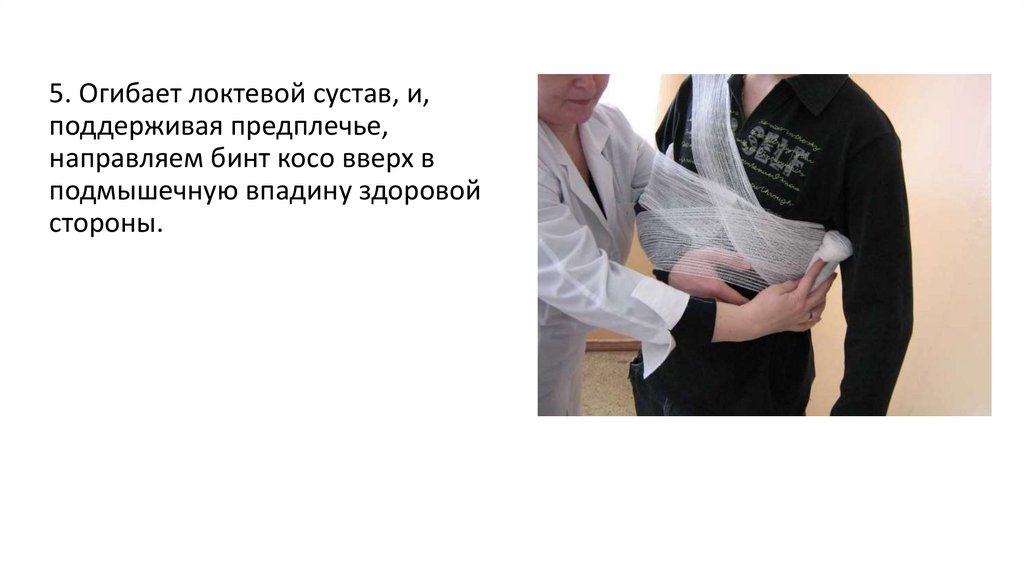
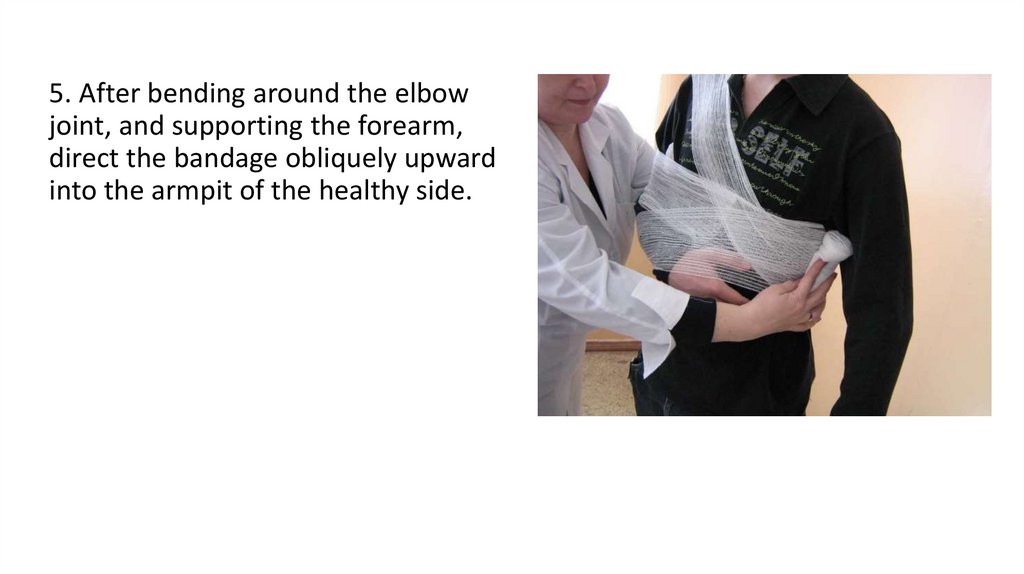
5. After bending around the elbowjoint, and supporting the forearm,
direct the bandage obliquely upward
into the armpit of the healthy side.
26.
6. По передней поверхности больногоплеча на локоть и, огибаем
предплечье.
7. Направляем бинт по спине в
подмышечную впадину здоровой
стороны.
Алгоритм повторяется вплоть до
полной фиксации плеча(3-4 раза).
8. Закрепляют повязку на здоровом
надплечье или на груди – булавкой(
если повязка наложена на длительное
время, туры бинта следует прошить).
27.
6. The next round is then on the frontsurface of the sore shoulder on the elbow
and, bend it around the forearm.
7. We direct the bandage along the back
into the armpit of the healthy side.
The procedure is repeated until the
shoulder is fully fixed (3-4 times).
8. Fix the bandage on the healthy
shoulder girdle or on the chest - with a
pin (if the bandage is applied for a long
time, the bandage rounds should be
stitched).
28.
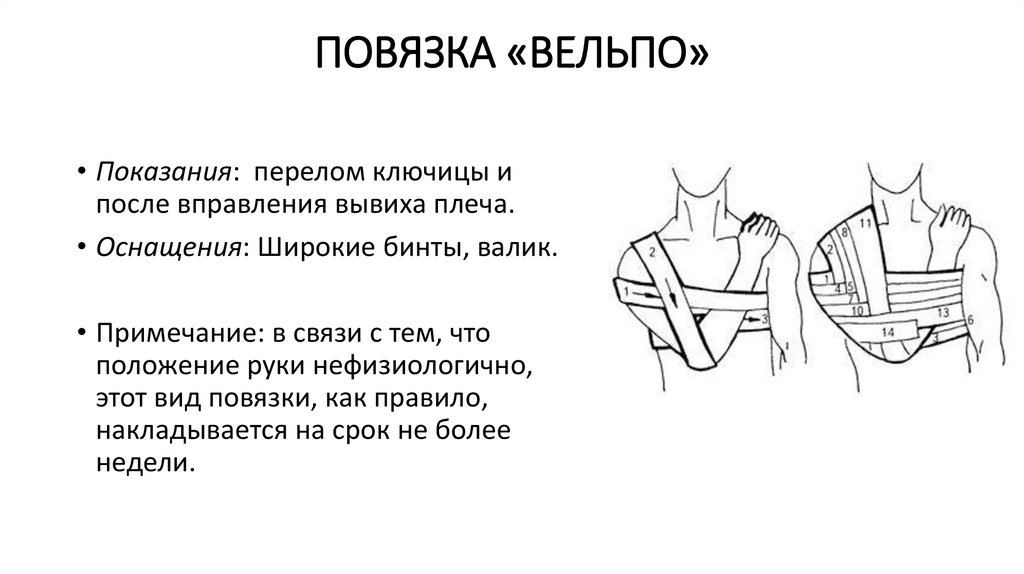
ПОВЯЗКА «ВЕЛЬПО»• Показания: перелом ключицы и
после вправления вывиха плеча.
• Оснащения: Широкие бинты, валик.
• Примечание: в связи с тем, что
положение руки нефизиологично,
этот вид повязки, как правило,
накладывается на срок не более
недели.
29.
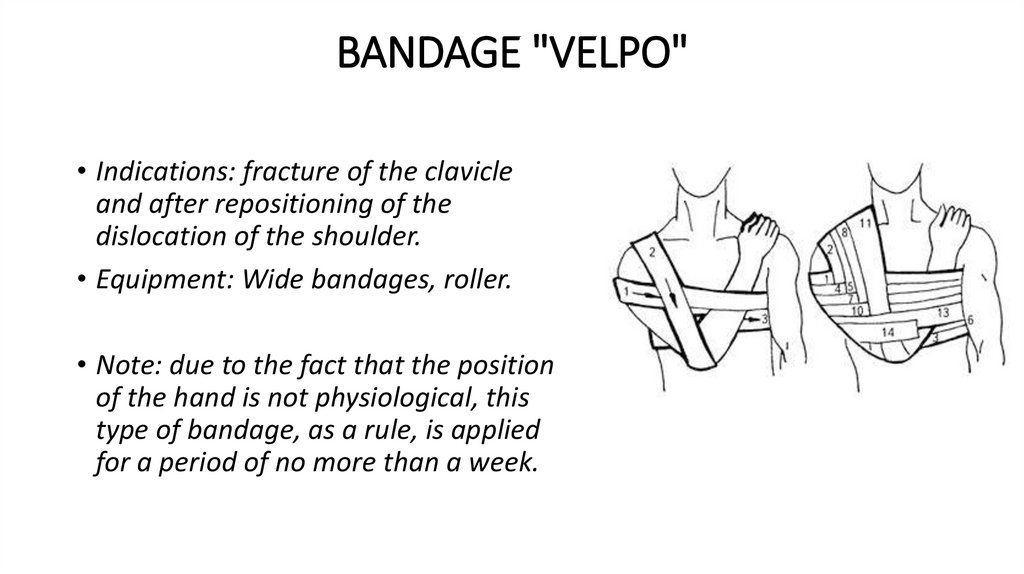
BANDAGE "VELPO"• Indications: fracture of the clavicle
and after repositioning of the
dislocation of the shoulder.
• Equipment: Wide bandages, roller.
• Note: due to the fact that the position
of the hand is not physiological, this
type of bandage, as a rule, is applied
for a period of no more than a week.
30.
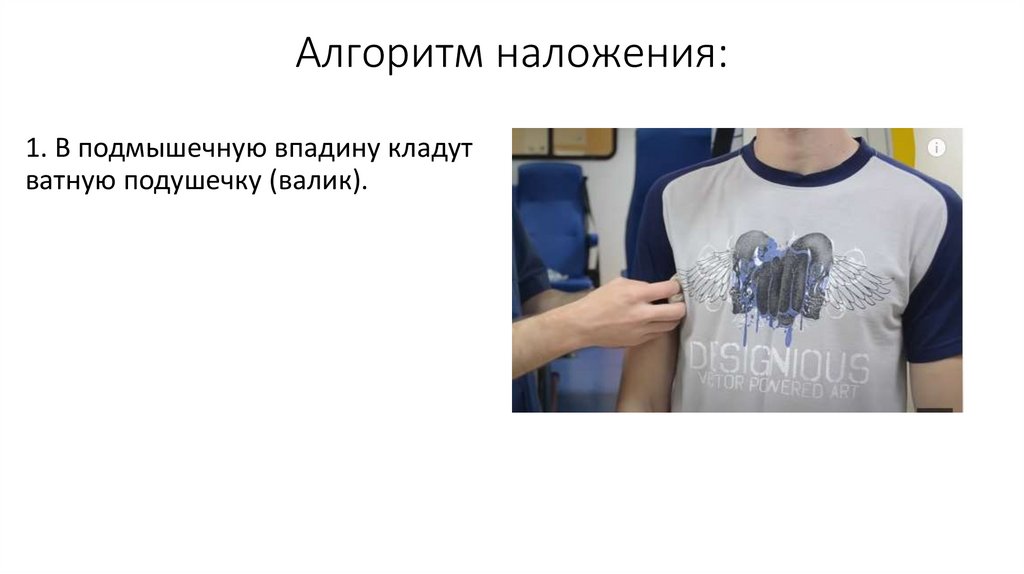
Алгоритм наложения:1. В подмышечную впадину кладут
ватную подушечку (валик).
31.
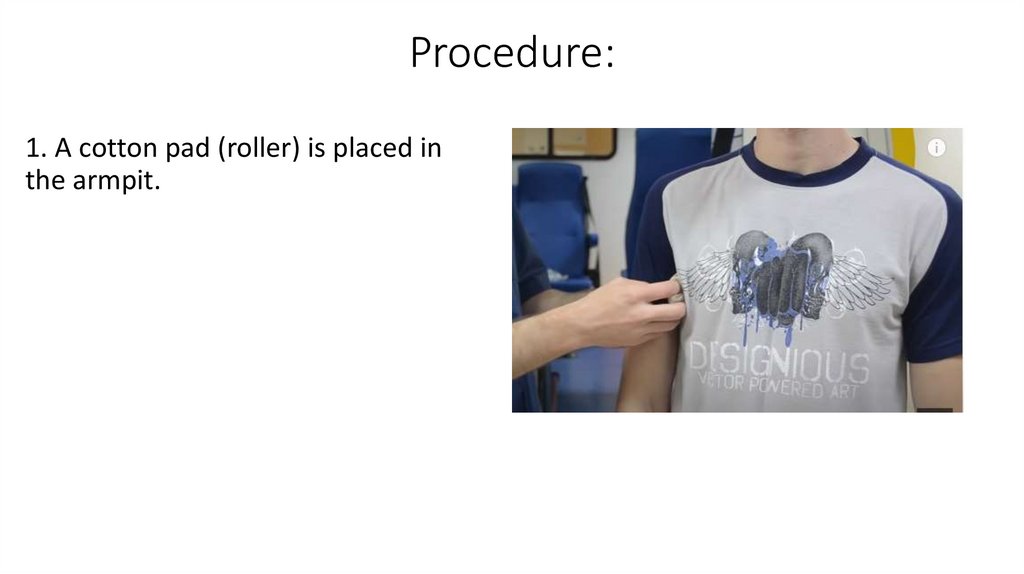
Procedure:1. A cotton pad (roller) is placed in
the armpit.
32.
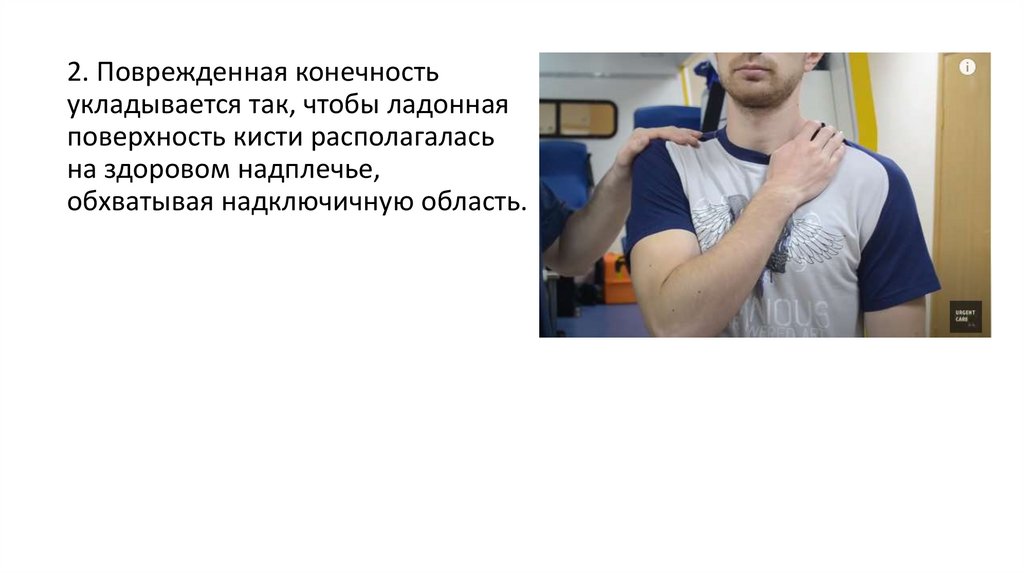
2. Поврежденная конечностьукладывается так, чтобы ладонная
поверхность кисти располагалась
на здоровом надплечье,
обхватывая надключичную область.
33.
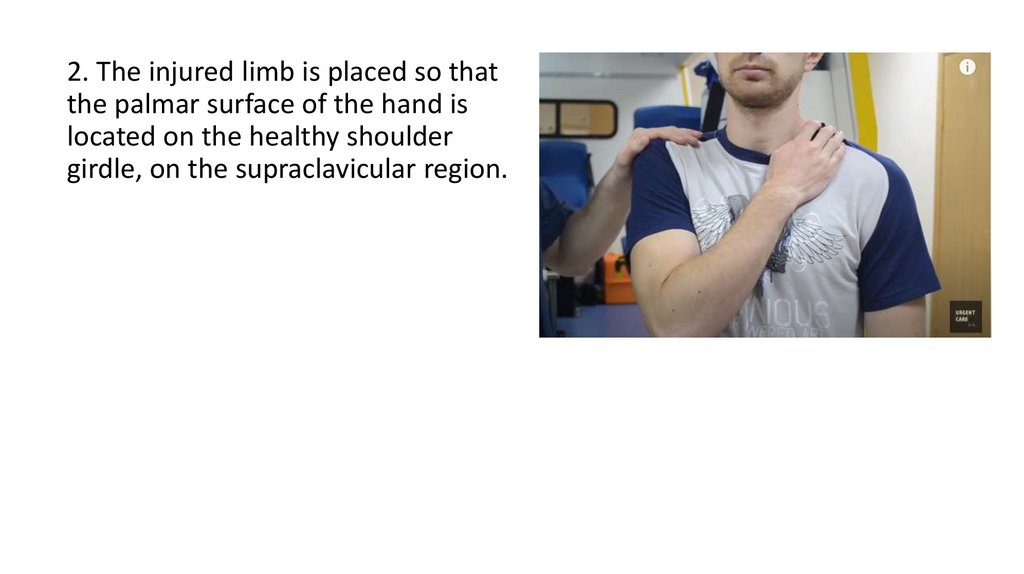
2. The injured limb is placed so thatthe palmar surface of the hand is
located on the healthy shoulder
girdle, on the supraclavicular region.
34.
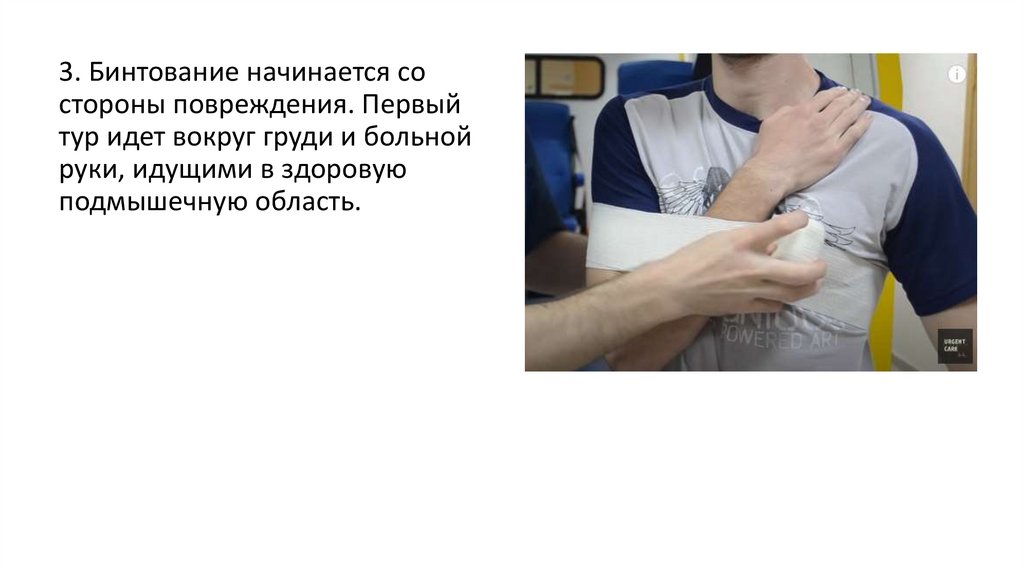
3. Бинтование начинается состороны повреждения. Первый
тур идет вокруг груди и больной
руки, идущими в здоровую
подмышечную область.
35.
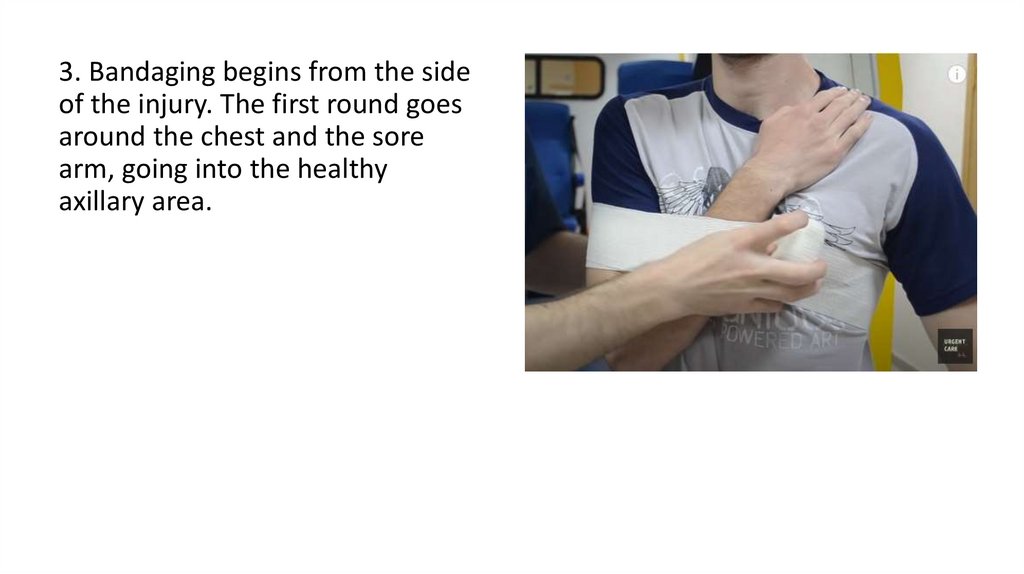
3. Bandaging begins from the sideof the injury. The first round goes
around the chest and the sore
arm, going into the healthy
axillary area.
36.
4. Затем по задней поверхностигрудной клетки наискось вверх на
поврежденное предплечье и
надключичную область, пересекая
ключицу (место перелома).
37.
4. Then, along the posterior surface ofthe chest, obliquely upward onto the
injured forearm and supraclavicular
region, crossing the clavicle (the site of
the fracture).
38.
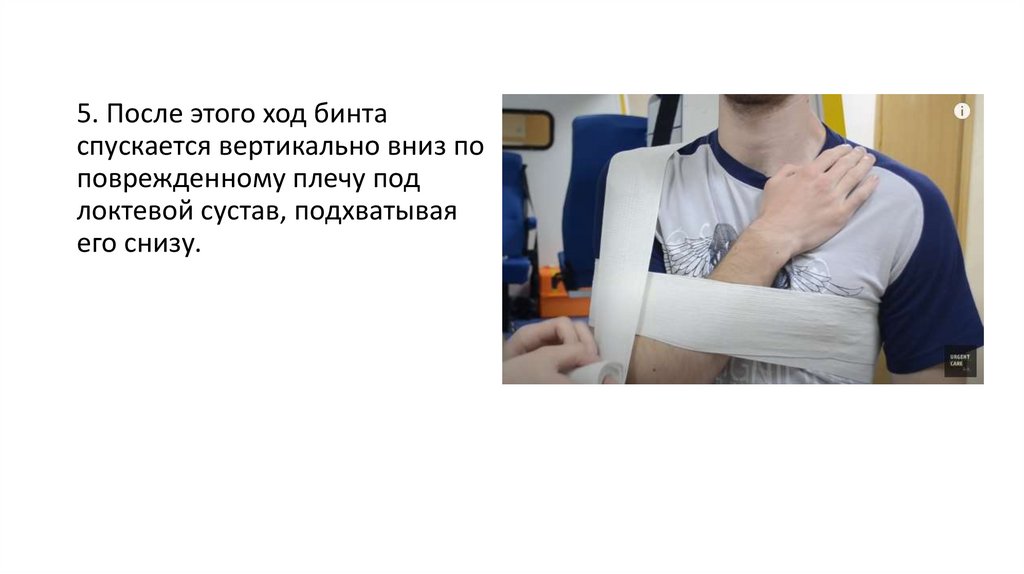
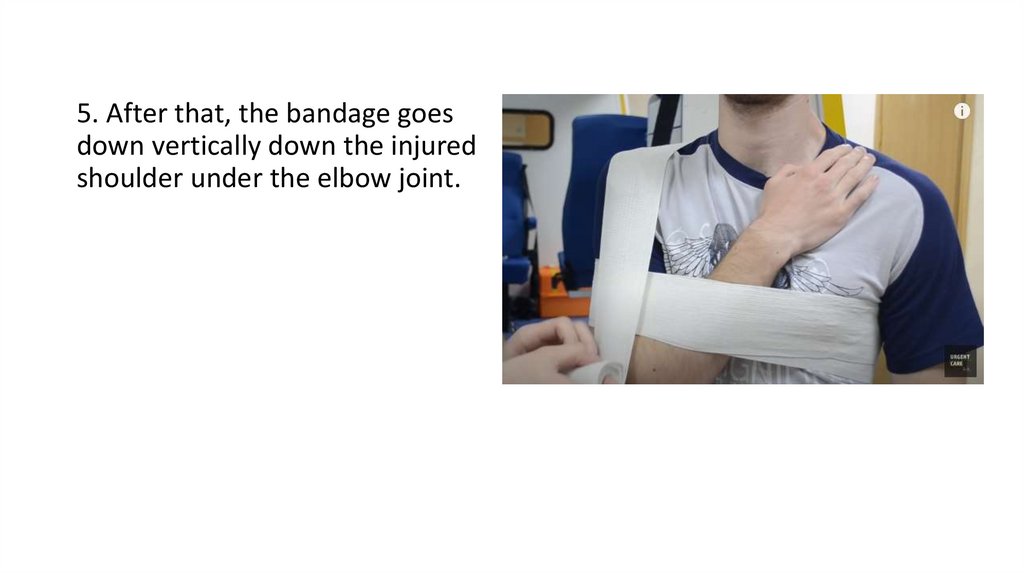
5. После этого ход бинтаспускается вертикально вниз по
поврежденному плечу под
локтевой сустав, подхватывая
его снизу.
39.
5. After that, the bandage goesdown vertically down the injured
shoulder under the elbow joint.
40.
6. Далее поднимается кподмышечной области здоровой
стороны, проходит через спину и
переходит в горизонтальный тур
вокруг груди.
41.
6. Further ascends to the axillaryregion of the healthy side, passes
through the back and goes into a
horizontal round around the chest.
42.
7. В такой последовательности турыповторяют так, чтобы каждый
последующий тур прикрывал
половину предыдущего; при этом
каждый последующий горизонтальноспиральный тур должен быть выше
предыдущего, а каждый
вертикальный тур – ближе к
стернальному концу ключицы.
43.
7. In this sequence, the rounds arerepeated so that each subsequent round
covers half of the previous one; in this
case, each subsequent horizontal-spiral
round should be higher than the
previous one, and each vertical round
should be closer to the sternal end of
the clavicle.
44.
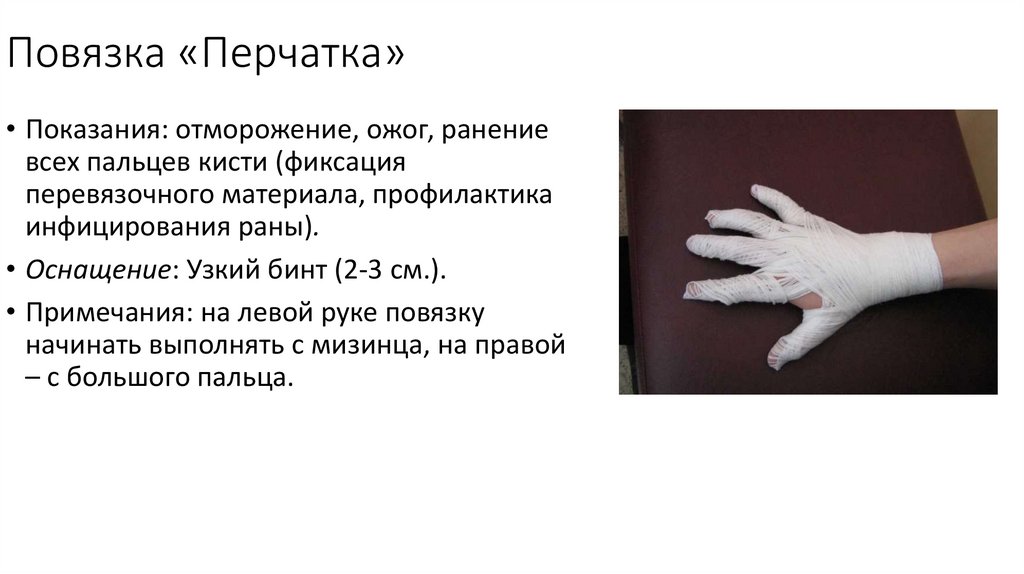
Повязка «Перчатка»• Показания: отморожение, ожог, ранение
всех пальцев кисти (фиксация
перевязочного материала, профилактика
инфицирования раны).
• Оснащение: Узкий бинт (2-3 см.).
• Примечания: на левой руке повязку
начинать выполнять с мизинца, на правой
– с большого пальца.
45.
Bandage "Glove"• Indications: frostbite, burns, injury to all
fingers of the hand (fixation of dressings,
prevention of wound infection).
• Equipment: Narrow bandage (2-3 cm).
• Notes: on the left hand, start the bandage
from the little finger, on the right - from the
thumb.
46.
Алгоритм наложения:1. Наложить 2 – 3 циркулярных тура
вокруг кисти и направить бинт косо по
тыльной поверхности кисти к ногтевой
фаланге первого пальца (в данном
случае большого).
47.
Procedure:1. Apply 2 - 3 circular rounds around the
hand and direct the bandage obliquely
along the back surface of the hand to the
nail phalanx of the first finger (the
thumb).
48.
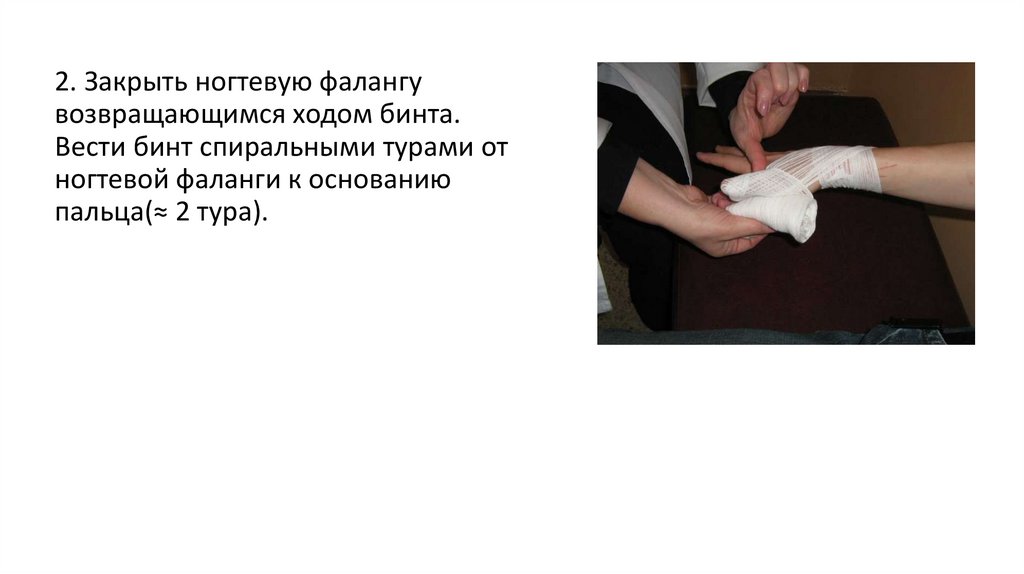
2. Закрыть ногтевую фалангувозвращающимся ходом бинта.
Вести бинт спиральными турами от
ногтевой фаланги к основанию
пальца(≈ 2 тура).
49.
2. Close the nail phalanx with thebandage. Guide the bandage in spiral
rounds from the nail phalanx to the
base of the finger (≈ 2 rounds).
50.
3. Направить бинт на тыльнуюповерхность кисти косо к
лучезапястному суставу. Закрепить
бинт циркулярным ходом в области
лучезапястного сустава и вести на
следующий палец
51.
3. Direct the bandage on the back of thehand obliquely to the wrist joint. Fasten
the bandage with a circular motion in the
area of the wrist joint and go to the next
finger.
52.
4. Таким же образом забинтоватьвсе пальцы и закрепить бинт в
области лучезапястного сустава.
53.
4. In the same way, bandage allfingers and fix the bandage in the
area of the wrist joint.