


 Маркетинг
 Программное обеспечение
 Электроника
Похожие презентации:


C3510 and C3100 introduction and software operation. Mindray
1.
C3510 and C3100 introduction andsoftware operation
Aaron Yuan
2.
CatalogueInstruments introduction
C3510&C3100 Auto Coagulation Analyzer operation
Software introduction
2
© 2020Mindray Confidential
3.
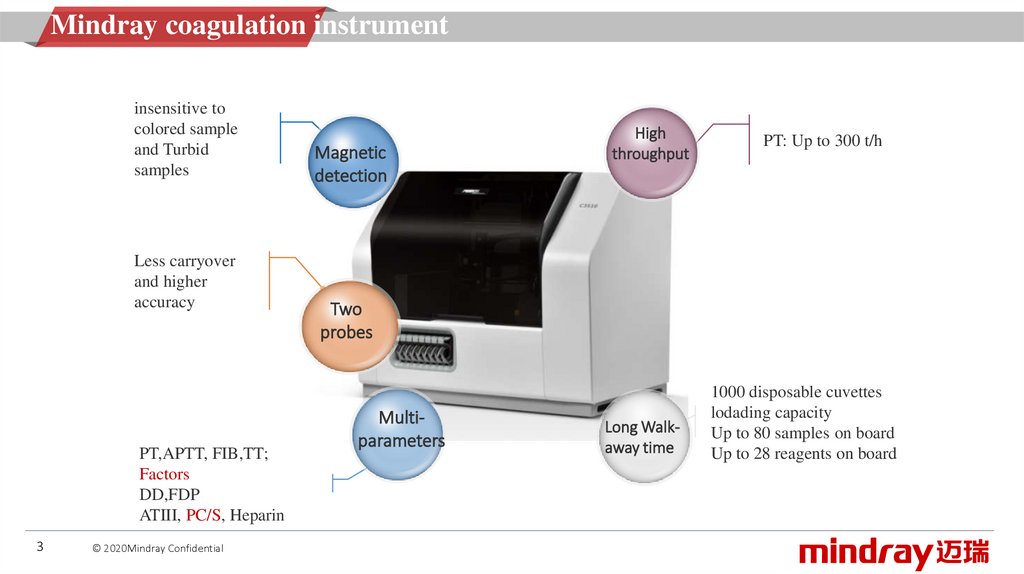
Mindray coagulation instrumentinsensitive to
colored sample
and Turbid
samples
Less carryover
and higher
accuracy
PT,APTT, FIB,TT;
Factors
DD,FDP
ATIII, PC/S, Heparin
3
© 2020Mindray Confidential
Magnetic
detection
High
throughput
PT: Up to 300 t/h
Two
probes
Multiparameters
Long Walkaway time
1000 disposable cuvettes
lodading capacity
Up to 80 samples on board
Up to 28 reagents on board
4.
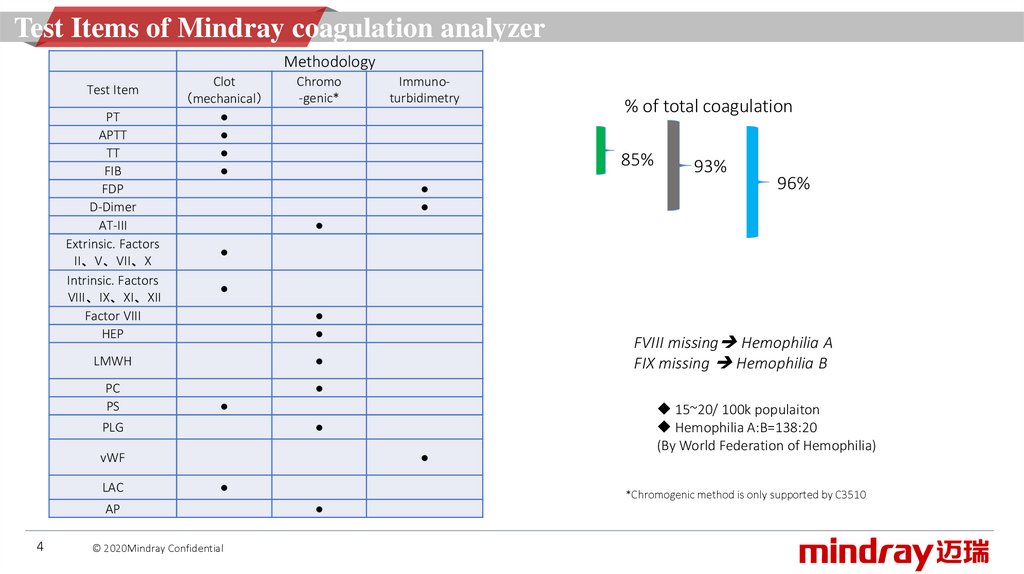
Test Items of Mindray coagulation analyzerMethodology
Test Item
PT
APTT
TT
FIB
FDP
D-Dimer
AT-III
Extrinsic. Factors
II、V、VII、X
Intrinsic. Factors
VIII、IX、XI、XII
Factor VIII
HEP
Clot
mechanical
Chromo
-genic*
93%
96%
PC
PS
FVIII missing Hemophilia A
FIX missing Hemophilia B
PLG
vWF
AP
4
% of total coagulation
85%
LMWH
LAC
Immunoturbidimetry
© 2020Mindray Confidential
15~20/ 100k populaiton
Hemophilia A:B=138:20
(By World Federation of Hemophilia)
*Chromogenic method is only supported by C3510
5.
Fully auto coagulation analyzerC3510
Item
C3510
C3100
Mechanical method
√
√
Immunoturbidimetric method
√
√
Chromogenic method
√
×
Test channel
10(4+5+1)
7(4+3)
Sample position
83
61
Reagent position
28
11
Number of Needles
2
2
Cuvette loading capacity
1000
1000
PT(T/H)
300
200
DD(T/H)
100
60
PT/APTT(T/H)
PT/APTT/TT/FIB
(SAMPLE/H)
PT/APTT/TT/FIB/DD
(SAMPLE/H)
70
50
60
34
40
20
40~120
20~70
Top
throughput
General
throughput
C3100
5
© 2020Mindray Confidential
Applicable to Sample volume per day
6.
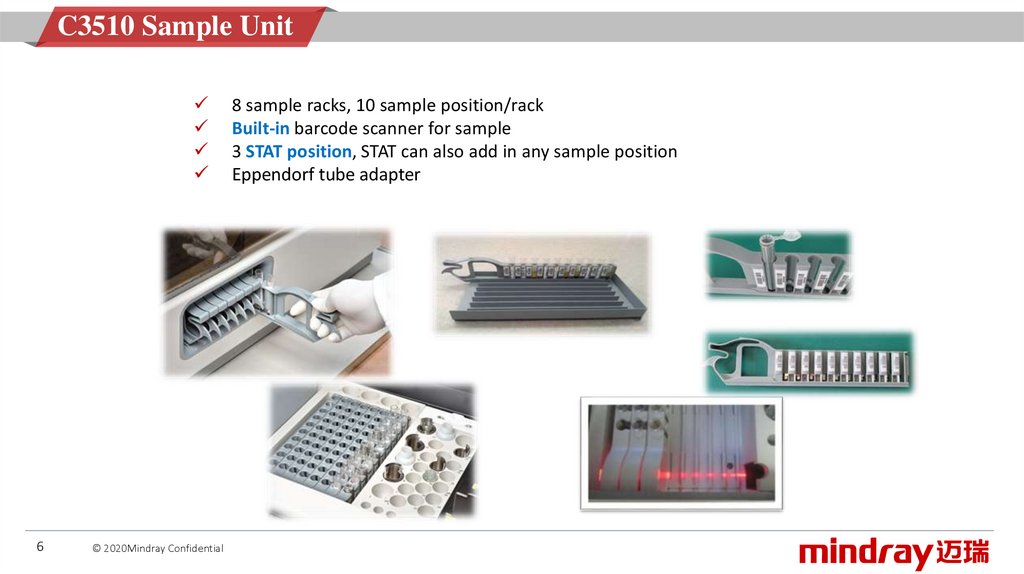
C3510 Sample Unit6
© 2020Mindray Confidential
8 sample racks, 10 sample position/rack
Built-in barcode scanner for sample
3 STAT position, STAT can also add in any sample position
Eppendorf tube adapter
7.
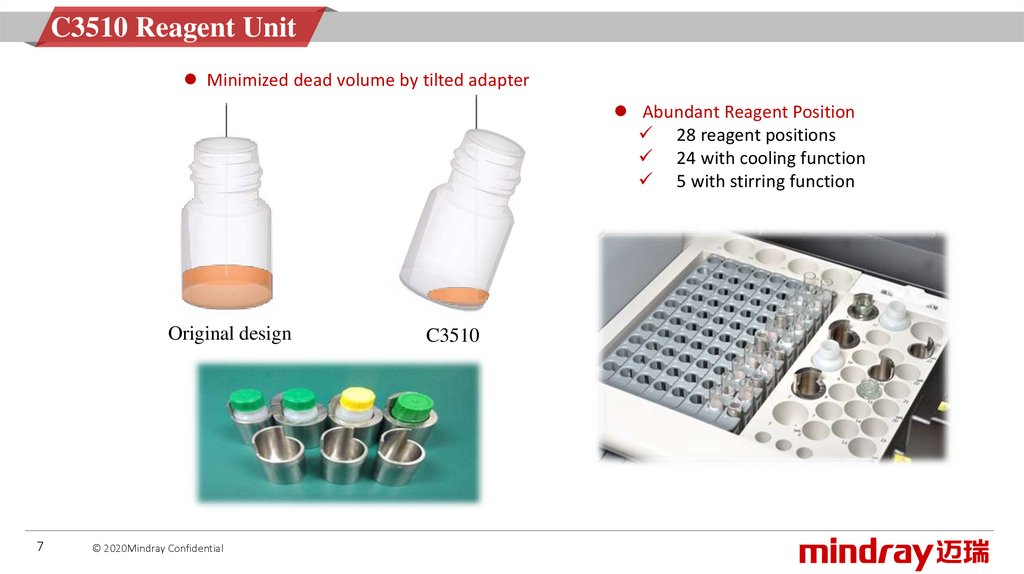
C3510 Reagent UnitMinimized dead volume by tilted adapter
Abundant Reagent Position
28 reagent positions
24 with cooling function
5 with stirring function
Original design
7
© 2020Mindray Confidential
C3510
8.
C3510 SamplingUnit
8
Separate sample/reagent probe, less carry over
Both probe equipped with liquid level detection function
Both probe equipped with collision protection in vertical direction
Reagent probe with heating function ensure accurate result
High sampling precision: 2-500μl, 0.25μl increment
© 2020Mindray Confidential
9.
C3510 Measuring UnitIncubation channel: 16
Testing channel
Mechanical testing channel: 4
575nm optical channel*: 5
405nm optical channel*: 1
*shared with incubation channel
575nm
channel
Incubation
channel
Minimal reaction volume:150ul
405nm
channel
575nm is commonly used for Immunoturbidimetry
405nm is commonly used for Chromogenic assays
9
© 2020Mindray Confidential
Mechanical
channel
10.
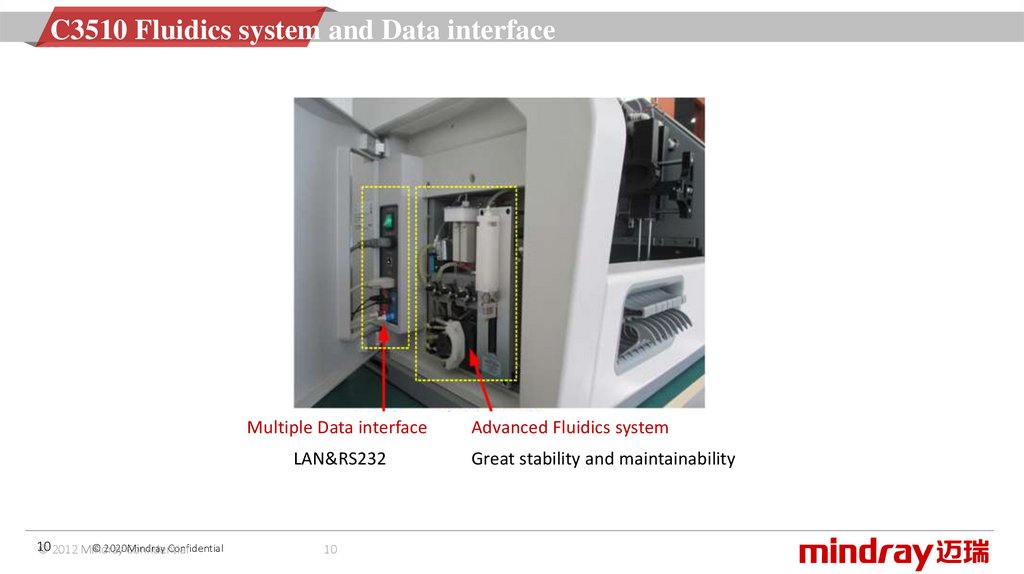
C3510 Fluidics system and Data interfaceMultiple Data interface
LAN&RS232
10
© 2020Mindray
Confidential
© 2012 Mindray
Confidential
10
Advanced Fluidics system
Great stability and maintainability
11.
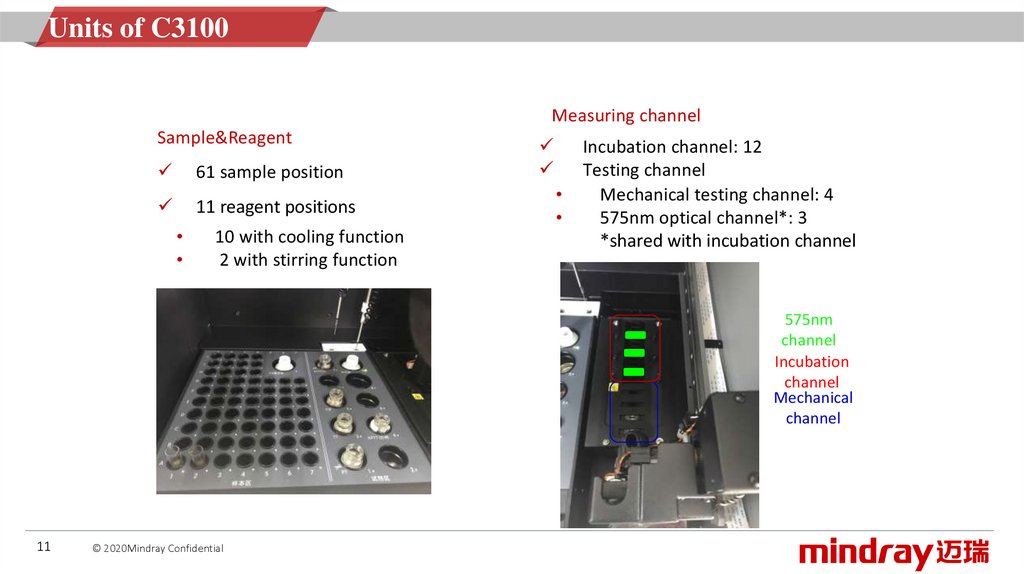
Units of C3100Measuring channel
Sample&Reagent
61 sample position
11 reagent positions
10 with cooling function
2 with stirring function
Incubation channel: 12
Testing channel
Mechanical testing channel: 4
575nm optical channel*: 3
*shared with incubation channel
575nm
channel
Incubation
channel
Mechanical
channel
11
© 2020Mindray Confidential
12.
Cuvettes Loading Unit12
Patented cuvette catch technology
1000 cuvettes auto loading
Disposable cuvettes and steel balls
Management of cuvette by software and IC card
© 2020Mindray Confidential
13.
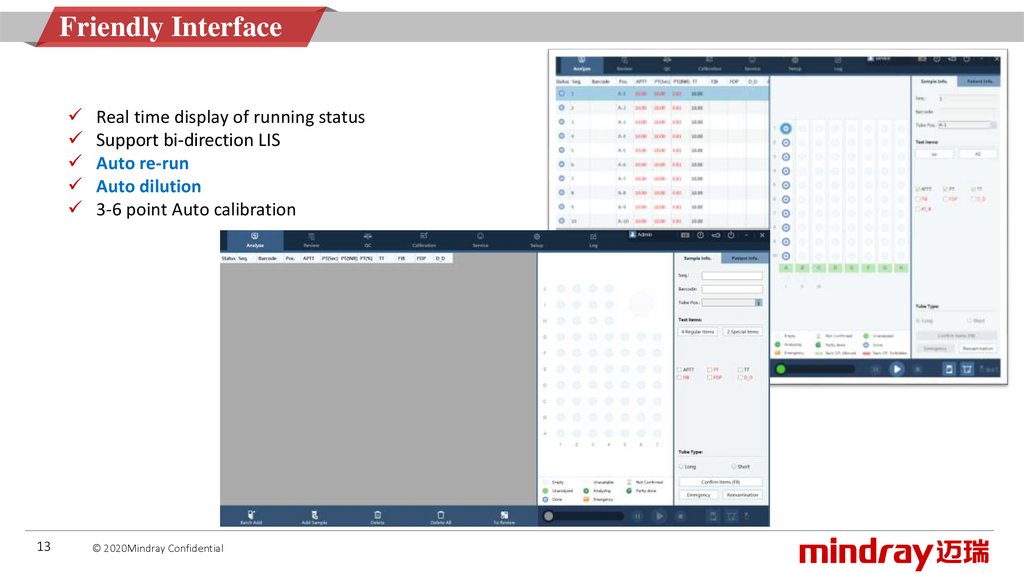
Friendly Interface13
Real time display of running status
Support bi-direction LIS
Auto re-run
Auto dilution
3-6 point Auto calibration
© 2020Mindray Confidential
14.
nvenient and efficient Reagent managementDisplay of accurate remaining test
Alarm strategy with orange/red color
One-click after reagent replacement
14
© 2020Mindray Confidential
15.
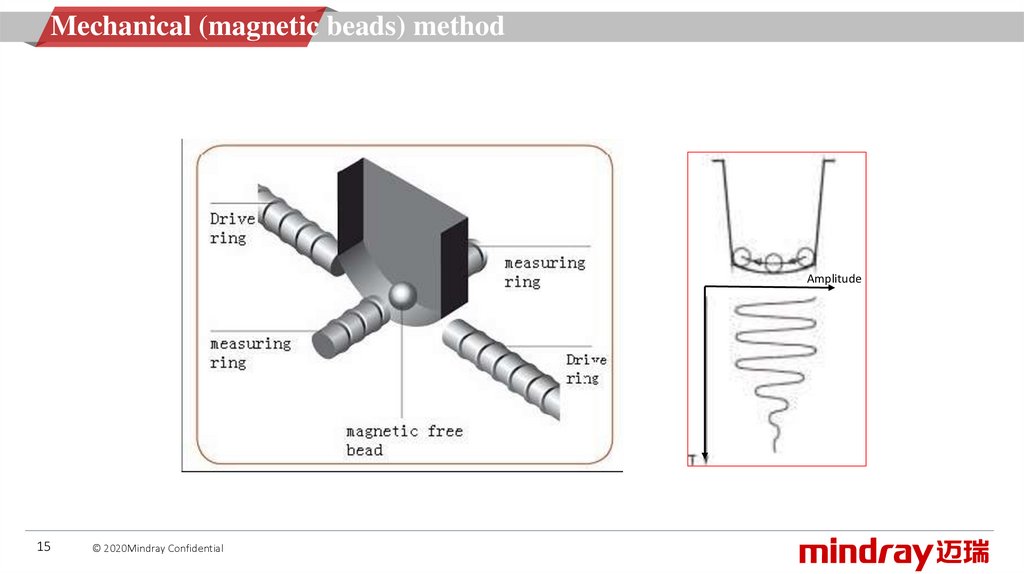
Mechanical (magnetic beads) methodAmplitude
15
© 2020Mindray Confidential
16.
Reliable mechanical detection method16
Advantages of mechanical method, insensitive to:
• Coloured plasmas
• Haemolysed plasmas
• Lipemic plasmas
• Bilirubin
• Turbid reagents [eg: PT (rabbit brain origin)/APTT (kaolin)]
© 2020Mindray Confidential
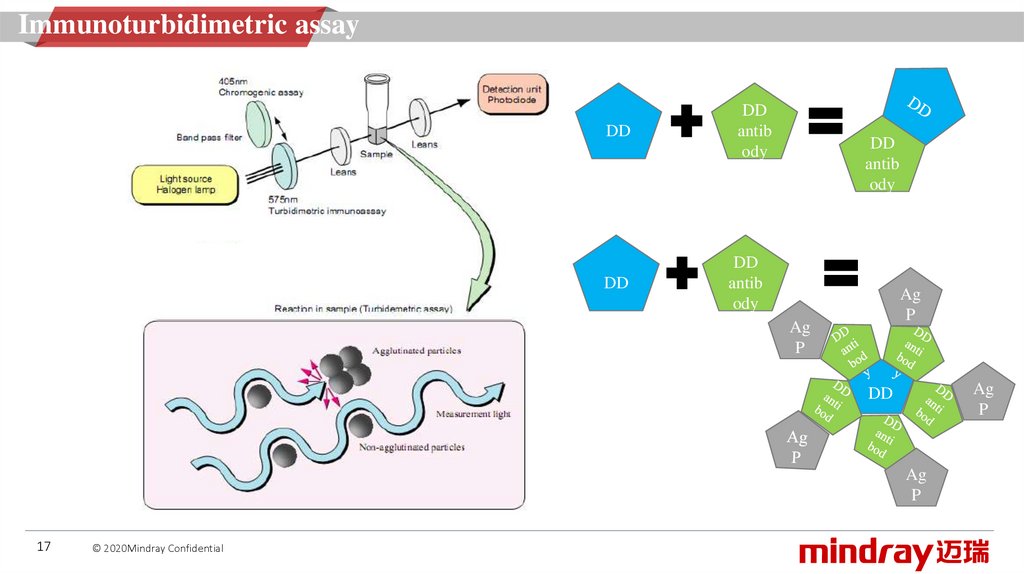
17.
Immunoturbidimetric assayDD
DD
antib
ody
DD
DD
antib
ody
DD
antib
ody
Ag
P
Ag
P
Ag
P
DD
Ag
P
17
© 2020Mindray Confidential
18.
Chromogenic substrate methodStep 1
CHROMOGENIC
Development
Thrombin
ATⅢ
Thrombin
405nm
The absorbance measured at
405nm is inversely proportional to
the AT activity concentration in the
plasma sample
18
© 2020Mindray Confidential
ATⅢ
Step 2
Thrombin
PNA
19.
CatalogueInstruments introduction
C3510&C3100 Auto Coagulation Analyzer operation
Software introduction
19
© 2020Mindray Confidential
20.
OverviewPreparations before
operation
Check circuit
Check fluid path
Check waste cup box
Start up
Turn on device
switch
Turn on PC and start
the software
The entire daily operation process of the
analyzer from startup to shutdown are as
Prepare analysis reagent
follows:
Determine
calibration curve
Daily QC
Prepare samples
Analyze
Shutdown
20
© 2020Mindray Confidential
Turn off device terminal
switch
Turn off PC terminal
software
21.
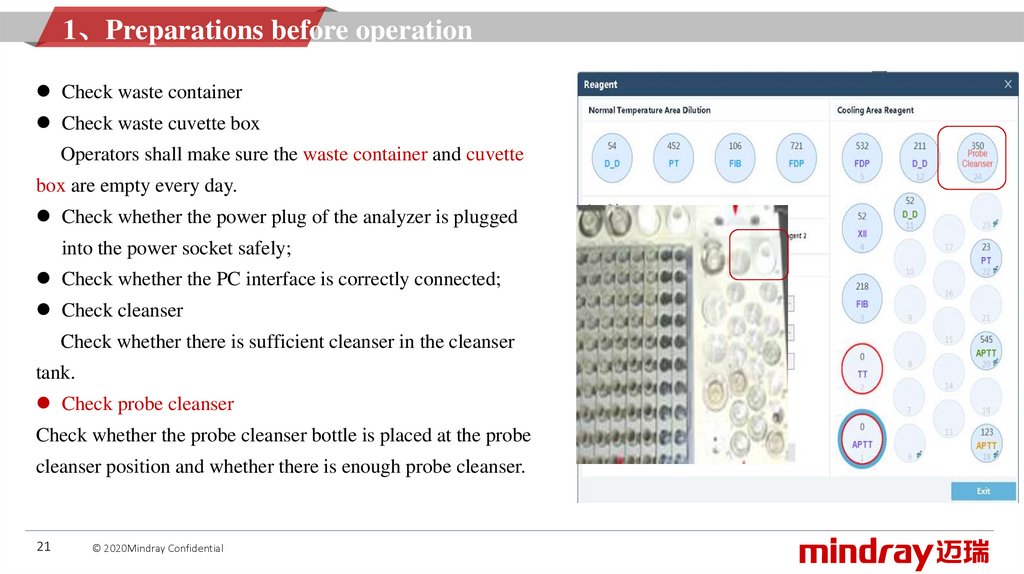
1、Preparations before operationCheck waste container
Check waste cuvette box
Operators shall make sure the waste container and cuvette
box are empty every day.
Check whether the power plug of the analyzer is plugged
into the power socket safely;
Check whether the PC interface is correctly connected;
Check cleanser
Check whether there is sufficient cleanser in the cleanser
tank.
Check probe cleanser
Check whether the probe cleanser bottle is placed at the probe
cleanser position and whether there is enough probe cleanser.
21
© 2020Mindray Confidential
22.
2、StartupTurn on the analyzer power;
Turn on the PC;
Click the software shortcut icon;
22
© 2020Mindray Confidential
23.
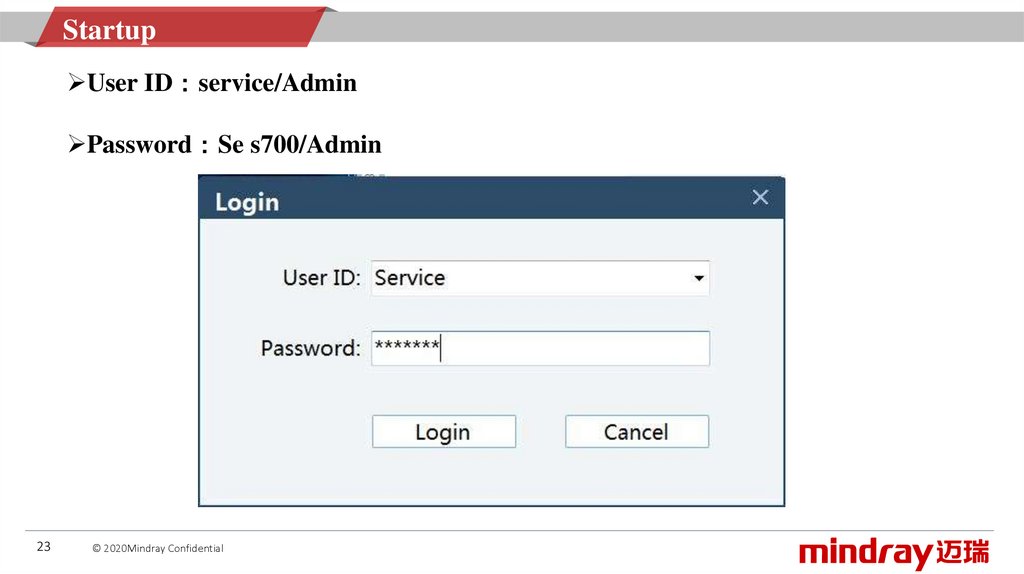
StartupUser ID service/Admin
Password Se s700/Admin
23
© 2020Mindray Confidential
24.
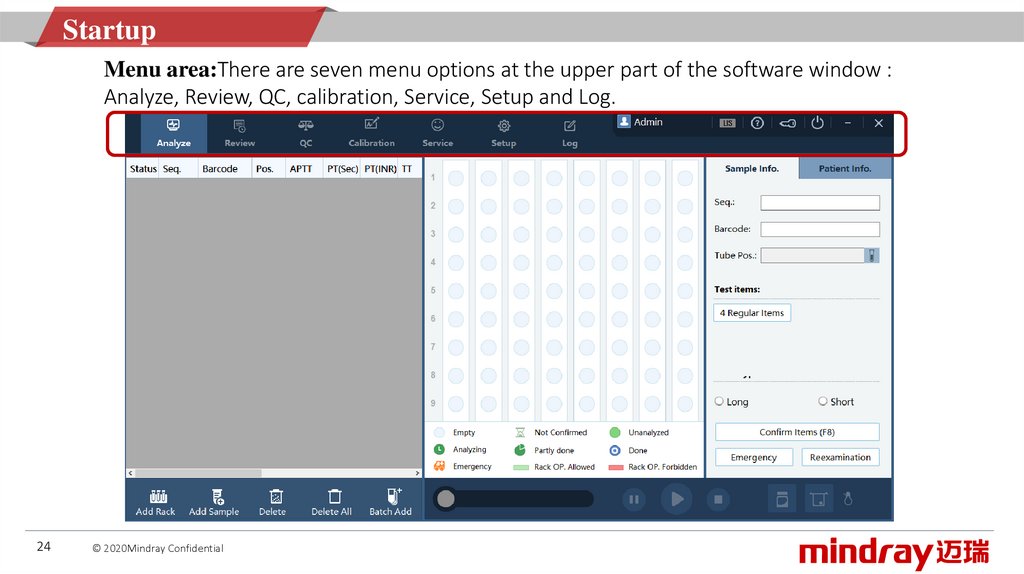
StartupMenu area:There are seven menu options at the upper part of the software window :
Analyze, Review, QC, calibration, Service, Setup and Log.
24
© 2020Mindray Confidential
25.
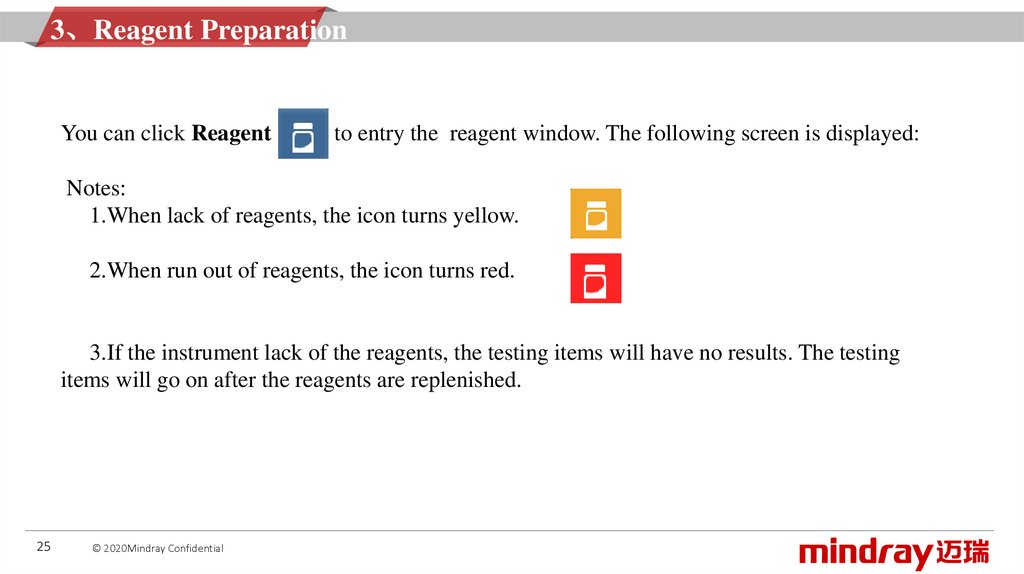
3、Reagent PreparationYou can click Reagent
to entry the reagent window. The following screen is displayed:
Notes:
1.When lack of reagents, the icon turns yellow.
2.When run out of reagents, the icon turns red.
3.If the instrument lack of the reagents, the testing items will have no results. The testing
items will go on after the reagents are replenished.
25
© 2020Mindray Confidential
26.
Reagent Preparation?
26
© 2020Mindray Confidential
27.
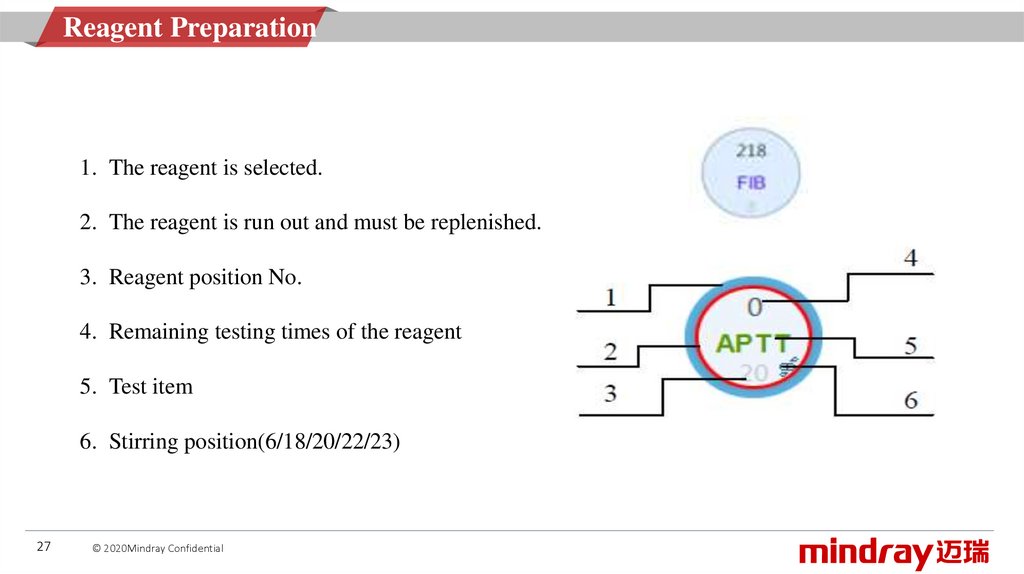
Reagent Preparation1. The reagent is selected.
2. The reagent is run out and must be replenished.
3. Reagent position No.
4. Remaining testing times of the reagent
5. Test item
6. Stirring position(6/18/20/22/23)
27
© 2020Mindray Confidential
28.
Reagent PreparationYou can set up the reagents as follows:
1.To set up diluents and buffer, you need to place the
corresponding diluent or buffer bottle in Normal
Temperature Area.
2.To set up reagents, you need to place them in the
Cooling Area .
28
© 2020Mindray Confidential
29.
Reagent Preparation3.Select a target reagent position, for example, position 23,
and set the reagent information about the position.
4.Selecting testing items
5.Reagent type: You can select the reagent type based on the
instructions of the reagent.
6.Reagent batch No.: Fill in the batch number of the reagent
based on the reagent instructions or labels.
7.After the above information is filled in, click Save.
29
© 2020Mindray Confidential
30.
Reagent PreparationUpdate
To replenish the reagent, you need to:
1.Replace the empty reagent bottle with a new one.
2.Select the reagent position on the software.
3.Click Update. The instrument reads the available remaining number of tests
for the new reagent bottle, and clears the warning about the reagent bottle.
Clear
To clear the information about a selected reagent position, do as follows:
1.Select a target reagent position on the software.
2.Click Clear
3.After the reagent position setup is complete, click Quit.
30
© 2020Mindray Confidential
31.
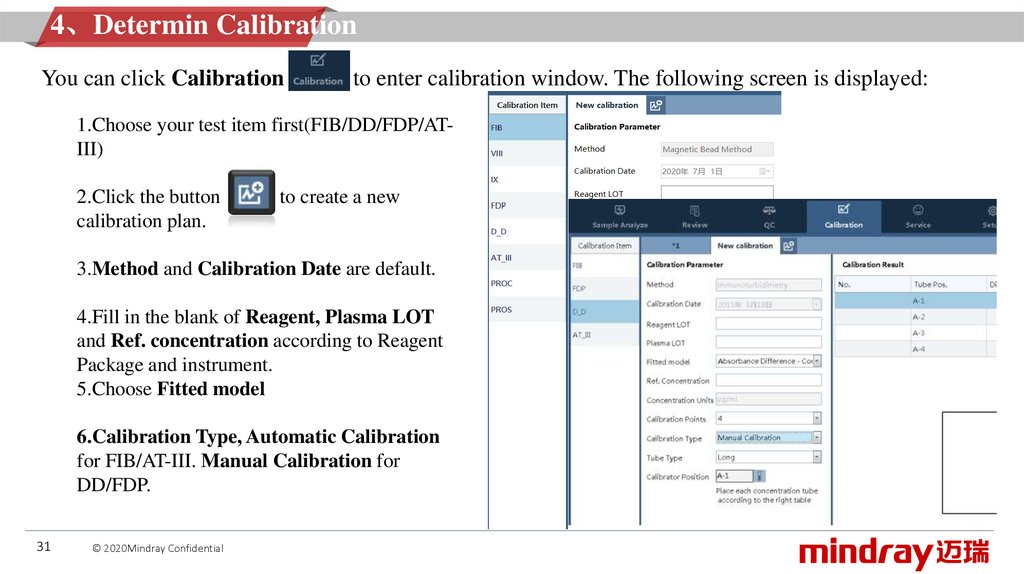
4、Determin CalibrationCurve
You can click Calibration
to enter calibration window. The following screen is displayed:
1.Choose your test item first(FIB/DD/FDP/ATIII)
2.Click the button
calibration plan.
to create a new
3.Method and Calibration Date are default.
4.Fill in the blank of Reagent, Plasma LOT
and Ref. concentration according to Reagent
Package and instrument.
5.Choose Fitted model
6.Calibration Type, Automatic Calibration
for FIB/AT-III. Manual Calibration for
DD/FDP.
31
© 2020Mindray Confidential
32.
Determin Calibration Curve7.Choose Calibration unit,points, tube
type(default as short) as your need.
8.Set calibrator position:Click calibrator
setup button
Enter rack No. and tube No. ;
In the case of “Manual Calibration”, when
the initial tube position of the calibrator and
the calibration points are selected, the
number of the tube position will be
displayed in the right calibration result area
32
© 2020Mindray Confidential
33.
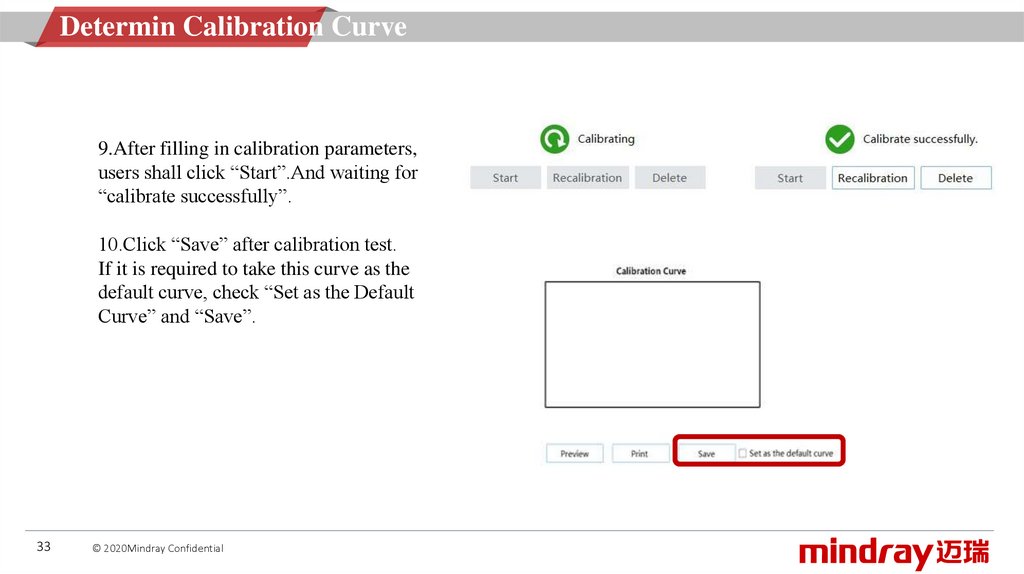
Determin Calibration Curve9.After filling in calibration parameters,
users shall click “Start”.And waiting for
“calibrate successfully”.
10.Click “Save” after calibration test.
If it is required to take this curve as the
default curve, check “Set as the Default
Curve” and “Save”.
33
© 2020Mindray Confidential
34.
5、Quality controlThe analyzer may have certain error during long-term use. Error may lead to incorrect or
unreliable analysis results.
The equipment status shall be monitored daily to guarantee correct and valid data.
34
© 2020Mindray Confidential
35.
QC settingYou can set the parameter of the item you choose according to the
instrument of corresponding QC reagent.
There are five default QC
Groups on the left of the
interface, you can get
them modified as you like,
but can’t delete any group.
35
© 2020Mindray Confidential
When parameter has been modified, dialog box below appears if the
modification keeps unsaved, you can’t go on next step.
36.
QC settingVarious laboratories are recommended to establish their own targets and deviation limits based on QC test data.
36
© 2020Mindray Confidential
37.
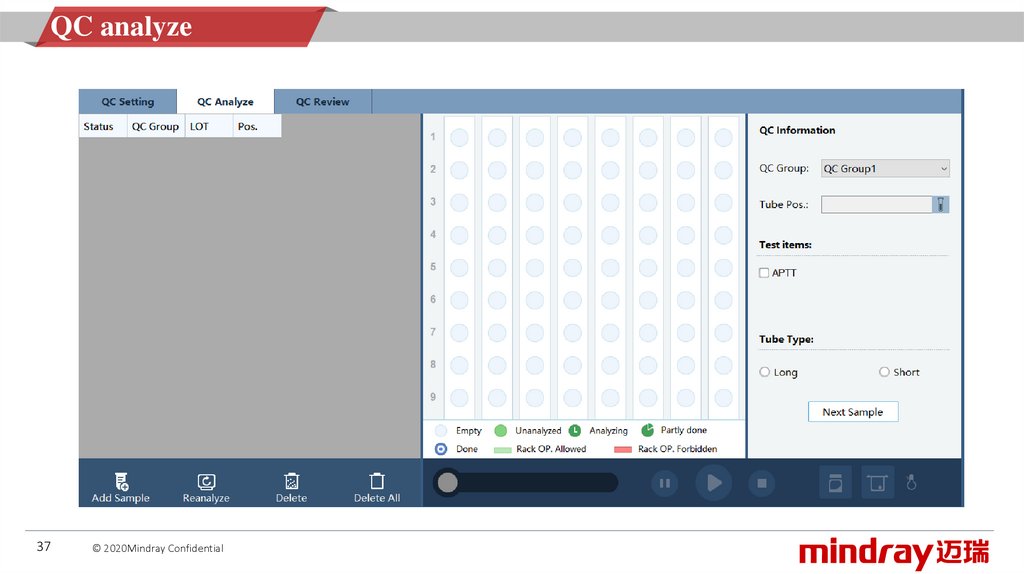
QC analyze37
© 2020Mindray Confidential
38.
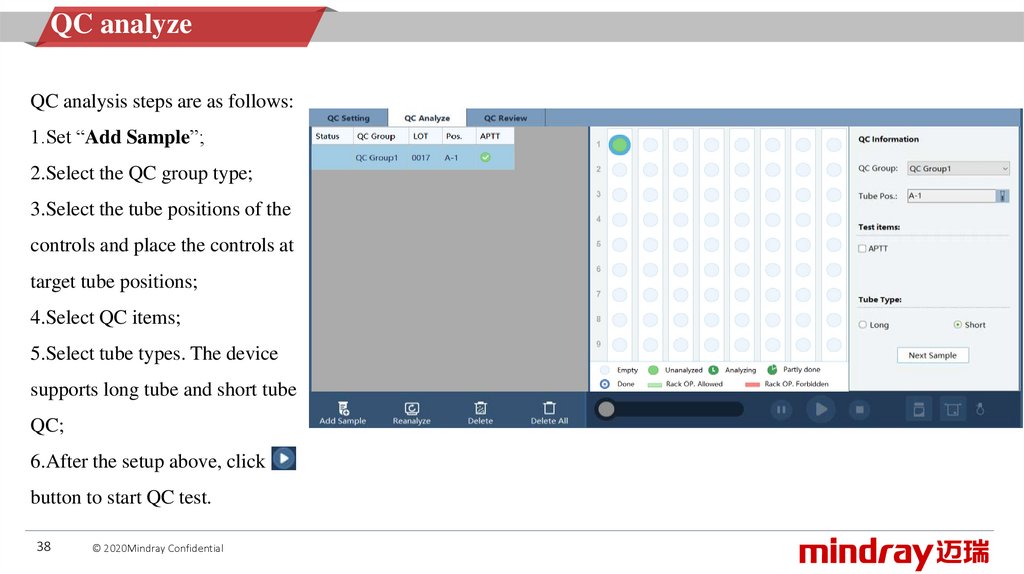
QC analyzeQC analysis steps are as follows:
1.Set “Add Sample”;
2.Select the QC group type;
3.Select the tube positions of the
controls and place the controls at
target tube positions;
4.Select QC items;
5.Select tube types. The device
supports long tube and short tube
QC;
6.After the setup above, click
button to start QC test.
38
© 2020Mindray Confidential
39.
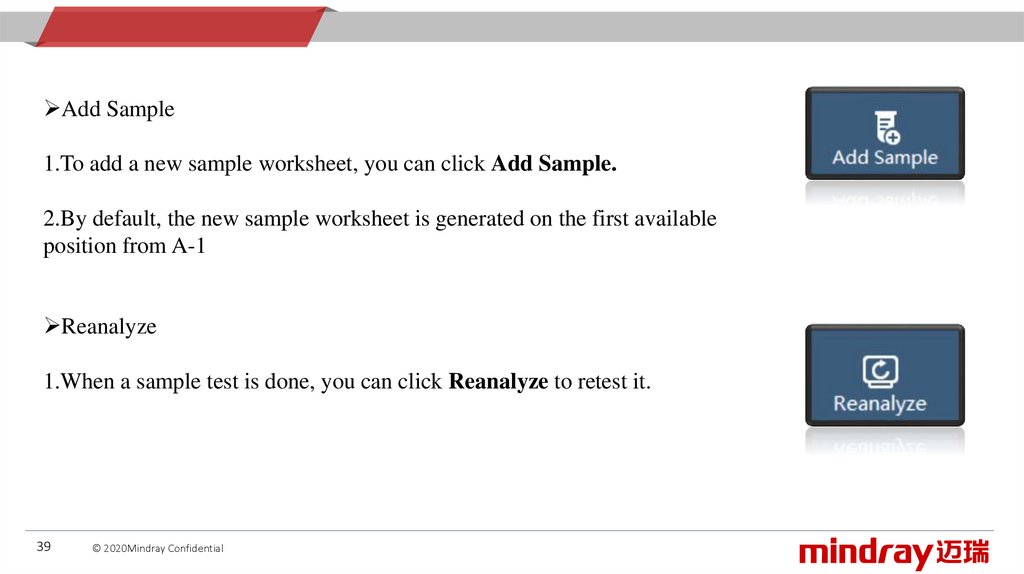
Add Sample1.To add a new sample worksheet, you can click Add Sample.
2.By default, the new sample worksheet is generated on the first available
position from A-1
Reanalyze
1.When a sample test is done, you can click Reanalyze to retest it.
39
© 2020Mindray Confidential
40.
DeleteYou can delete the sample in the worksheet area.
1.If you delete a delivered sample whose testing does not start, the sample
information is not saved in QC Review.
2.Samples in testing state cannot be deleted.
Delete All
1.You can clear all the worksheets by click Delete All.
2.After a samples testing ends, you can click Delete. The testing information
can also be queried in QC Review.
40
© 2020Mindray Confidential
41.
QC reviewYou shall choose
your QC Group
first.
Then you can
classify test
results by date .
41
© 2020Mindray Confidential
42.
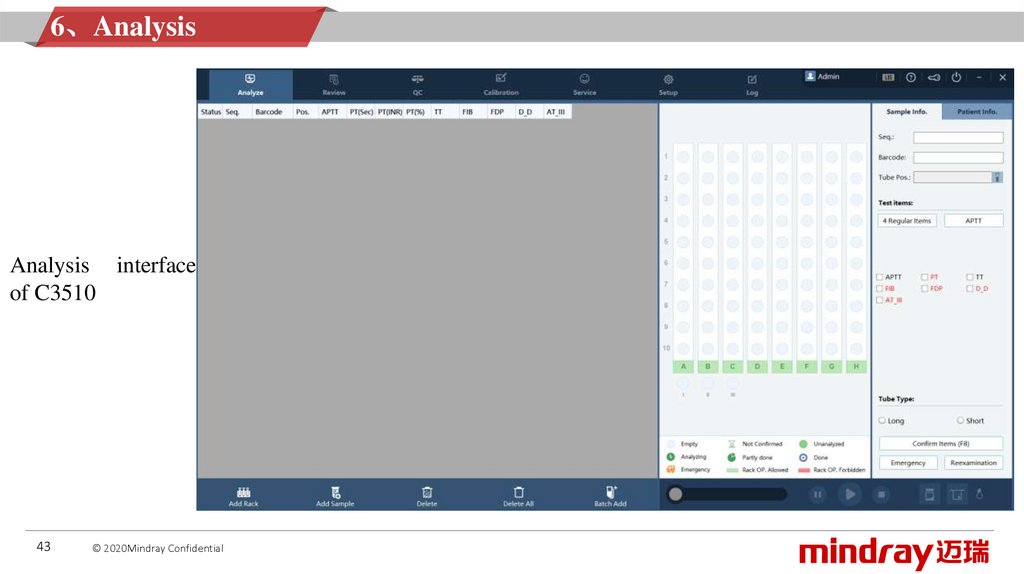
6、AnalysisAnalysis interface
of C3510
42
© 2020Mindray Confidential
43.
6、AnalysisAnalysis interface
of C3510
43
© 2020Mindray Confidential
44.
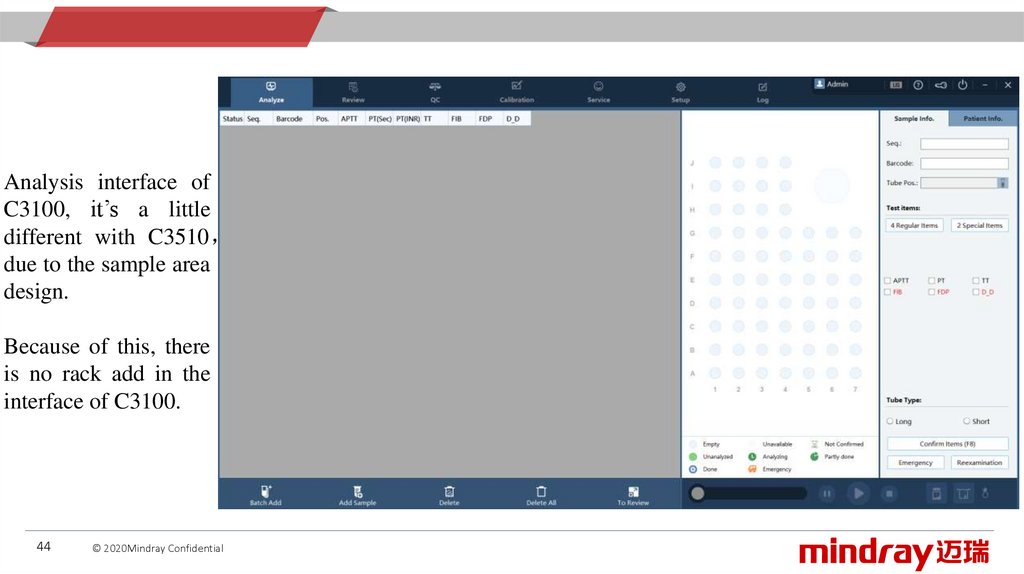
Analysis interface ofC3100, it’s a little
different with C3510
due to the sample area
design.
Because of this, there
is no rack add in the
interface of C3100.
44
© 2020Mindray Confidential
45.
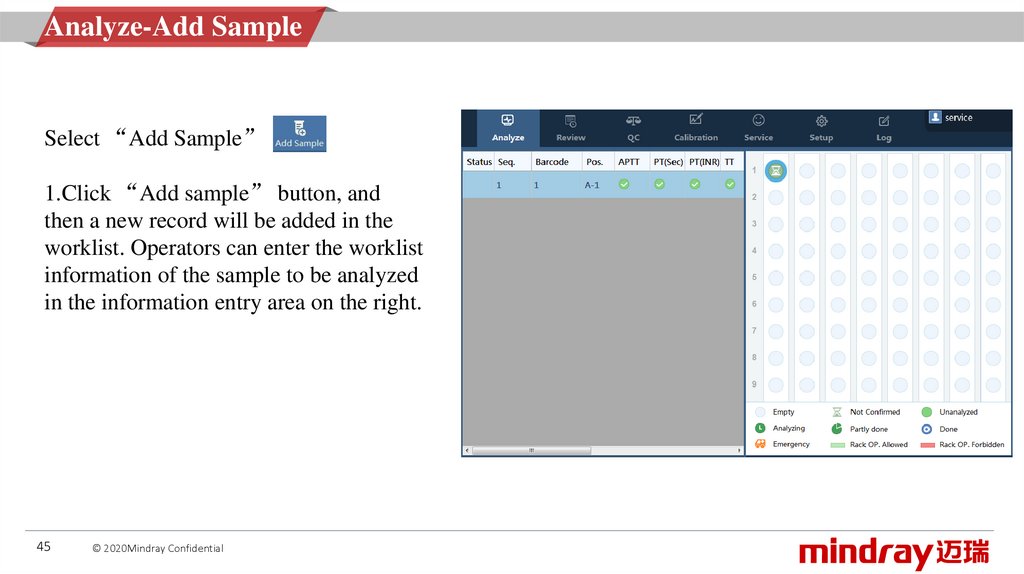
Analyze-Add SampleSelect “Add Sample”
1.Click “Add sample” button, and
then a new record will be added in the
worklist. Operators can enter the worklist
information of the sample to be analyzed
in the information entry area on the right.
45
© 2020Mindray Confidential
46.
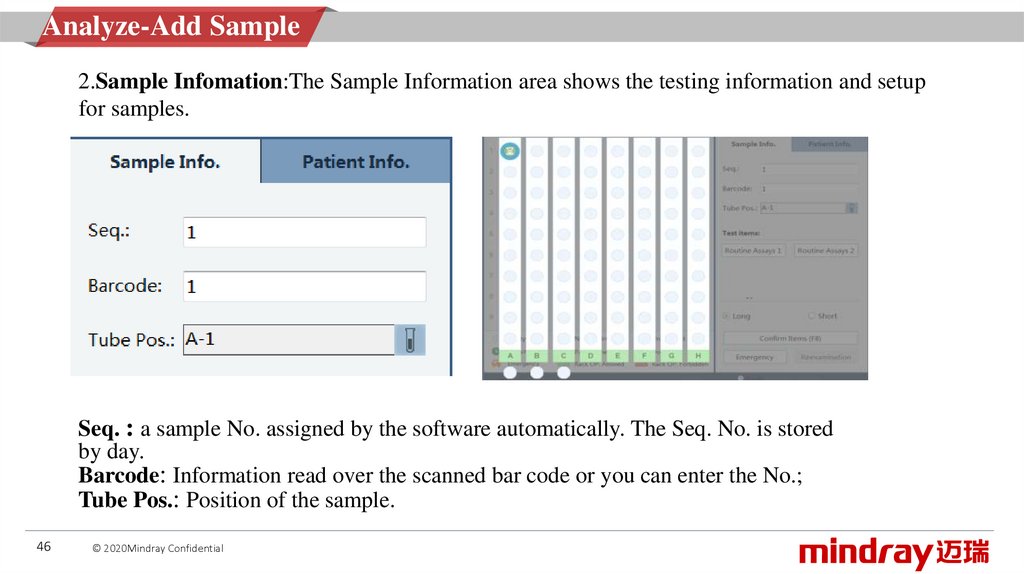
Analyze-Add Sample2.Sample Infomation:The Sample Information area shows the testing information and setup
for samples.
Seq. : a sample No. assigned by the software automatically. The Seq. No. is stored
by day.
Barcode: Information read over the scanned bar code or you can enter the No.;
Tube Pos.: Position of the sample.
46
© 2020Mindray Confidential
47.
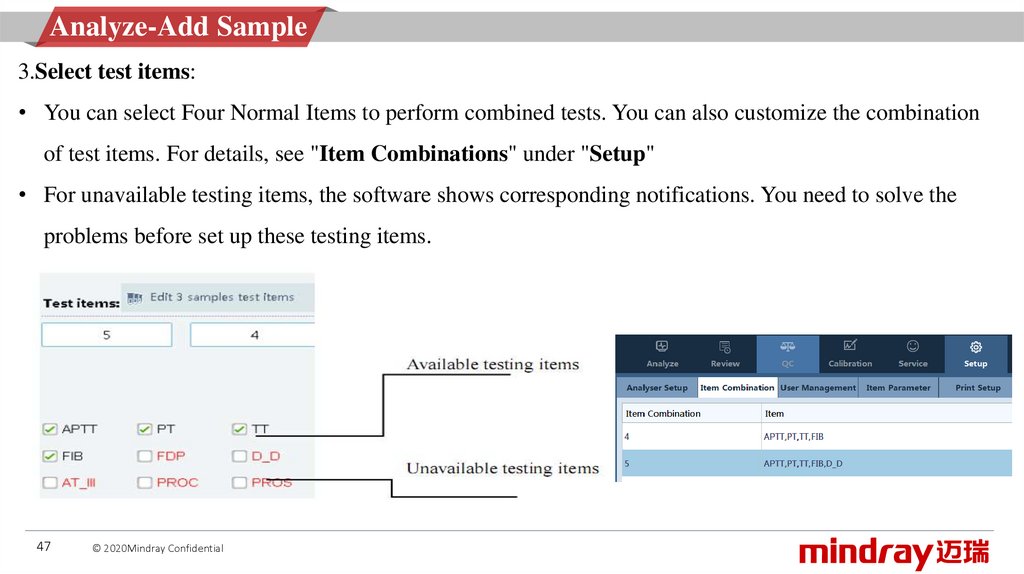
Analyze-Add Sample3.Select test items:
• You can select Four Normal Items to perform combined tests. You can also customize the combination
of test items. For details, see "Item Combinations" under "Setup"
• For unavailable testing items, the software shows corresponding notifications. You need to solve the
problems before set up these testing items.
47
© 2020Mindray Confidential
48.
Analyze-Add Sample4.Tube Type
The software default setting of sample tube is long tube, if you want to do the test with short tube,
you have to click "Short Tube" after you select the sample.
5.Confirm Items
The status of the sample is Not Comfirmed.Then you should click the button and it turns
Unanalyzed.
6.Start
The operators need to place the sample in the position A-1,then Start.
48
© 2020Mindray Confidential
49.
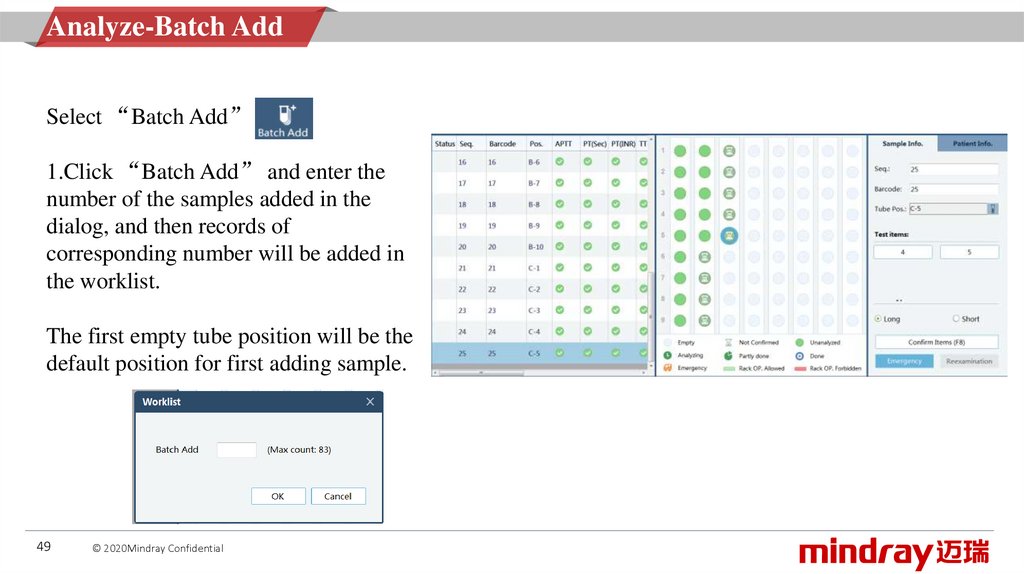
Analyze-Batch AddSelect “Batch Add”
1.Click “Batch Add” and enter the
number of the samples added in the
dialog, and then records of
corresponding number will be added in
the worklist.
The first empty tube position will be the
default position for first adding sample.
49
© 2020Mindray Confidential
50.
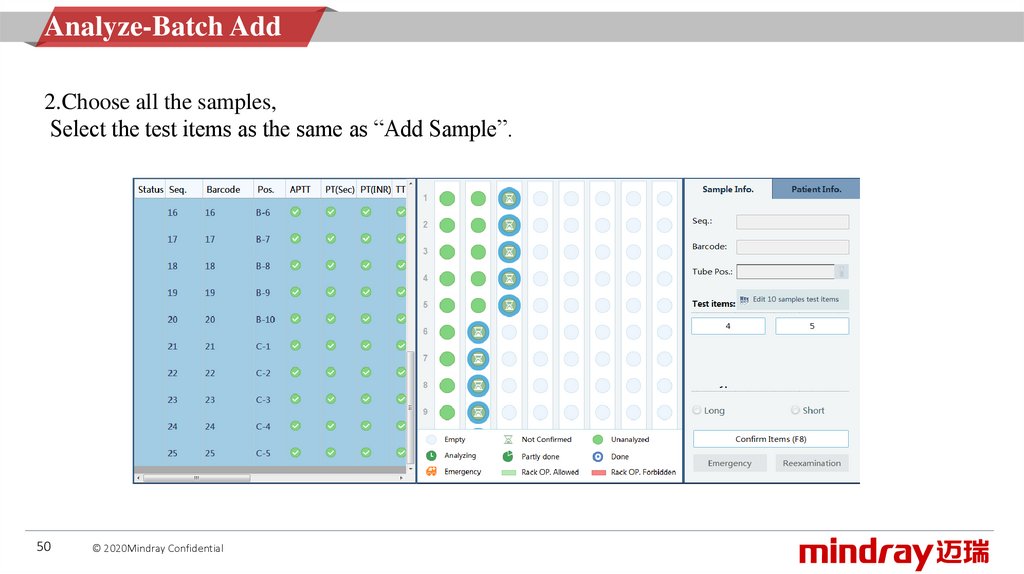
Analyze-Batch Add2.Choose all the samples,
Select the test items as the same as “Add Sample”.
50
© 2020Mindray Confidential
51.
Analyze-Batch Add3.Tube Type
The software default setting of sample tube is long tube, if you want to do the test with short tube,
you have to click "Short Tube" after you select the sample.
4.Confirm Items
The status of the sample is Not Comfirmed.Then you should click the button and the samples
turn Unanalyzed.
5.Start
The operators need to place the samples in the right position,then Start.
51
© 2020Mindray Confidential
52.
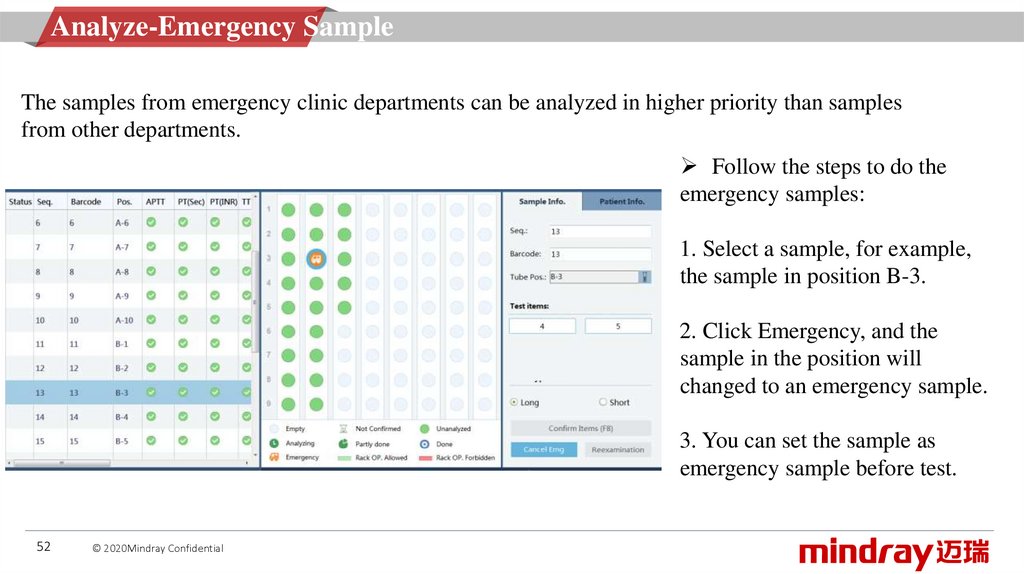
Analyze-Emergency SampleThe samples from emergency clinic departments can be analyzed in higher priority than samples
from other departments.
Follow the steps to do the
emergency samples:
1. Select a sample, for example,
the sample in position B-3.
2. Click Emergency, and the
sample in the position will
changed to an emergency sample.
3. You can set the sample as
emergency sample before test.
52
© 2020Mindray Confidential
53.
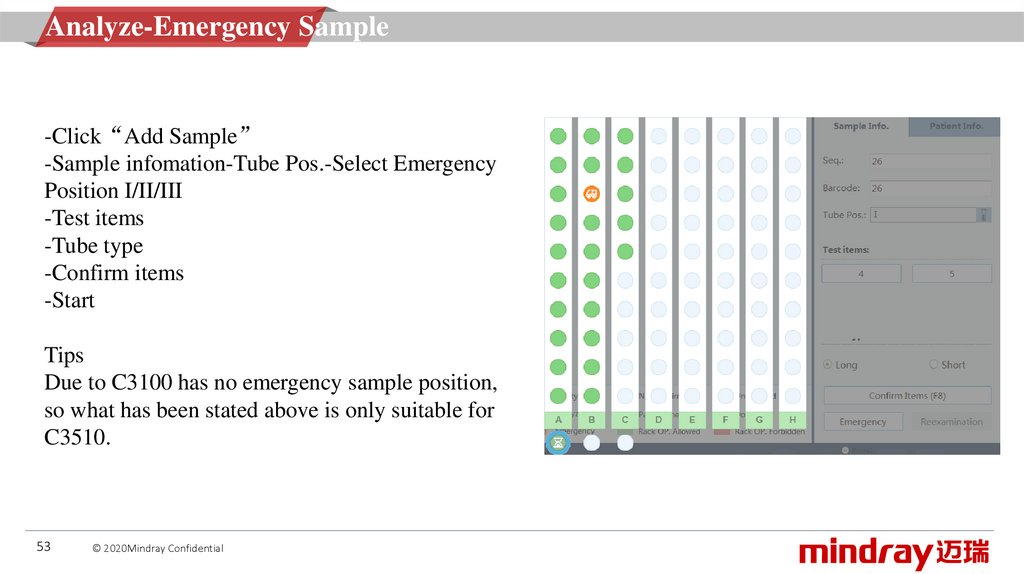
Analyze-Emergency Sample-Click“Add Sample”
-Sample infomation-Tube Pos.-Select Emergency
Position I/II/III
-Test items
-Tube type
-Confirm items
-Start
Tips
Due to C3100 has no emergency sample position,
so what has been stated above is only suitable for
C3510.
53
© 2020Mindray Confidential
54.
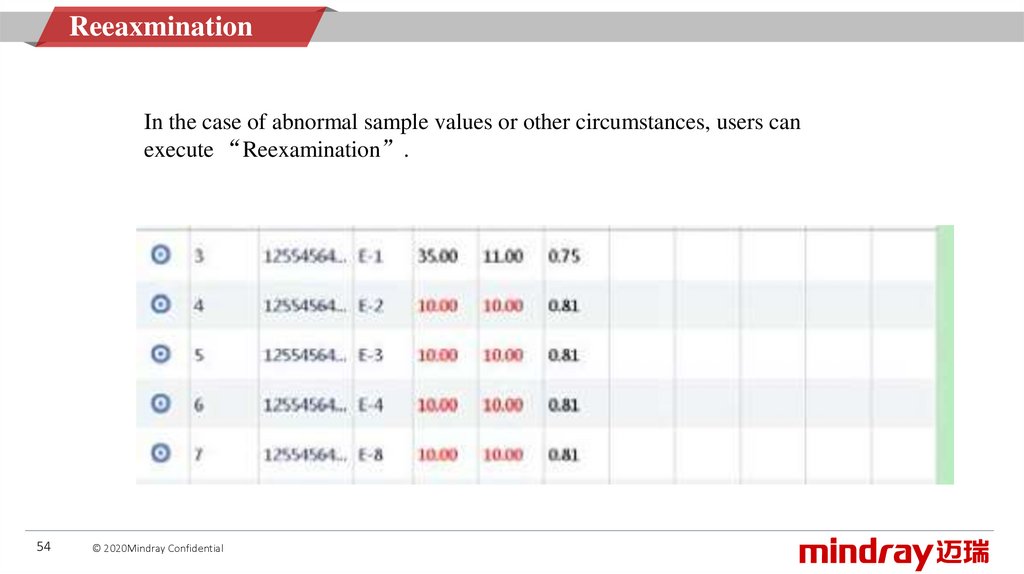
ReeaxminationIn the case of abnormal sample values or other circumstances, users can
execute “Reexamination”.
54
© 2020Mindray Confidential
55.
ReeaxminationRetesting
You can retest the sample which is still
in the sample rack, showed as below:
choose the tested sample - press
"reexamination" - choose the test item press "start"
55
© 2020Mindray Confidential
56.
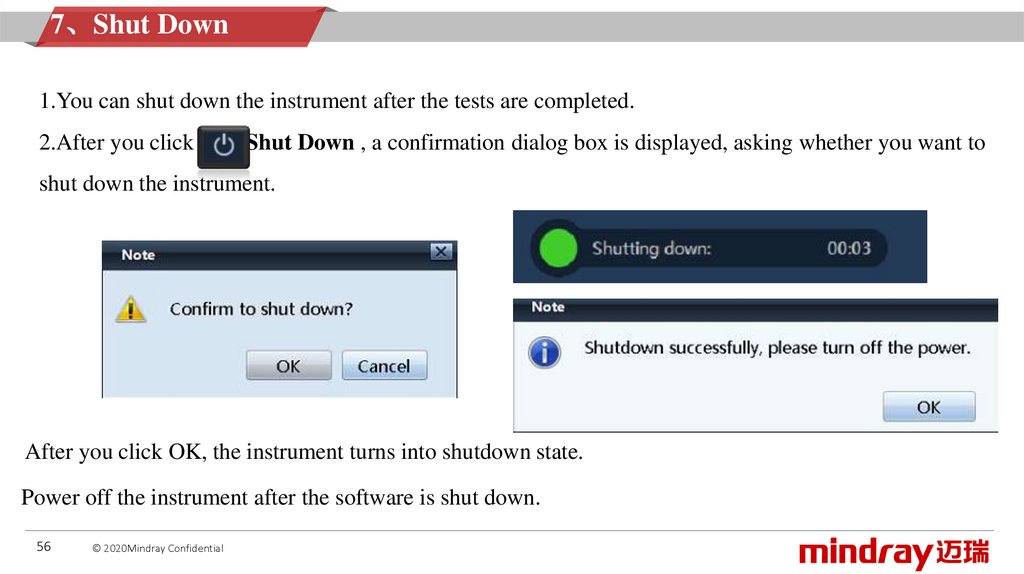
7、Shut Down1.You can shut down the instrument after the tests are completed.
2.After you click
Shut Down , a confirmation dialog box is displayed, asking whether you want to
shut down the instrument.
After you click OK, the instrument turns into shutdown state.
Power off the instrument after the software is shut down.
56
© 2020Mindray Confidential
57.
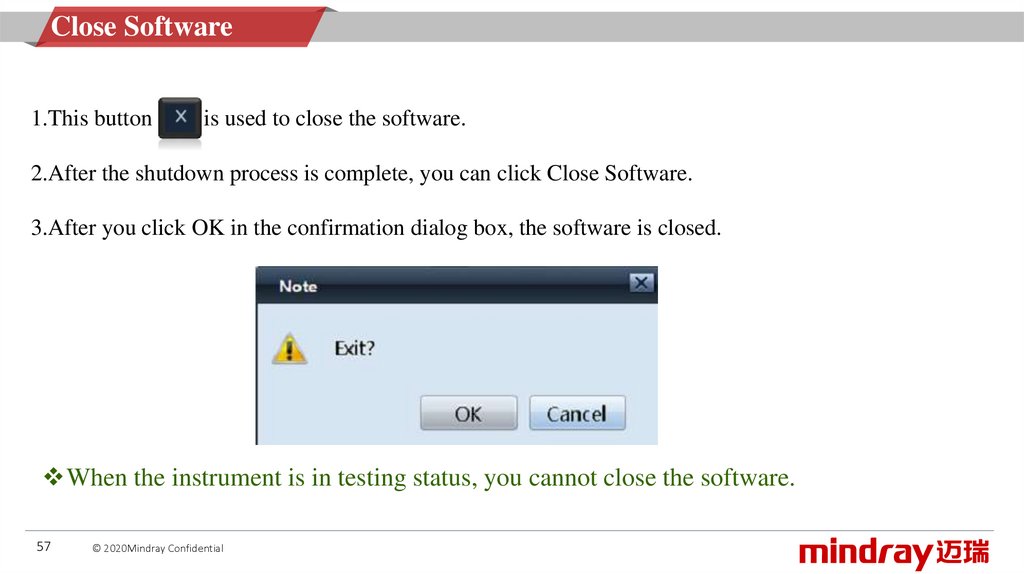
Close Software1.This button
is used to close the software.
2.After the shutdown process is complete, you can click Close Software.
3.After you click OK in the confirmation dialog box, the software is closed.
When the instrument is in testing status, you cannot close the software.
57
© 2020Mindray Confidential
58.
CatalogueInstruments introduction
C3510&C3100 Auto Coagulation Analyzer operation
Software introduction
58
© 2020Mindray Confidential
59.
Software system59
© 2020Mindray Confidential
60.
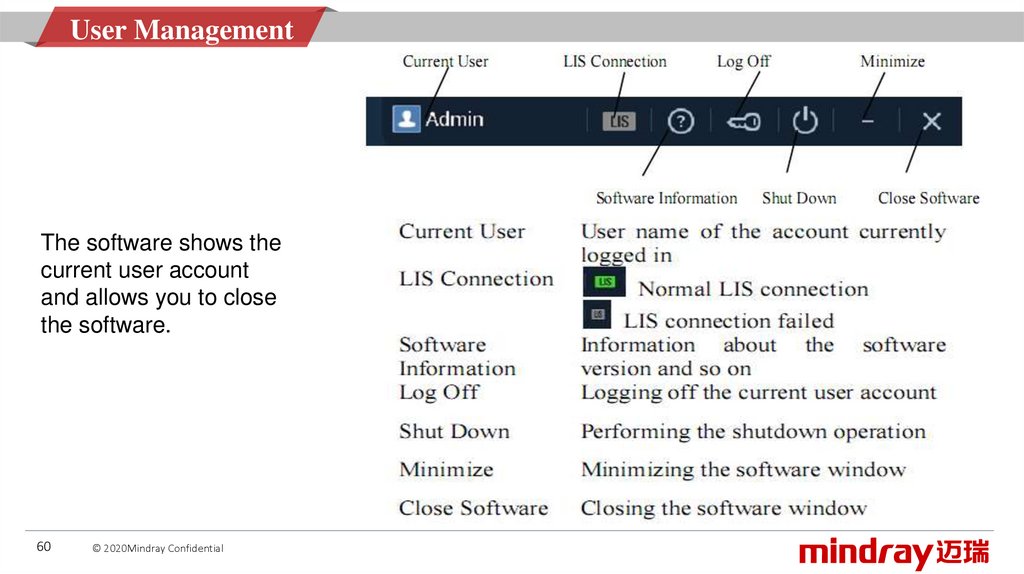
User ManagementThe software shows the
current user account
and allows you to close
the software.
60
© 2020Mindray Confidential
61.
Log outIf you need to change the user account, you need to log out the current user account first. Do as follows:
1.Click the Log out
button.
2.In the dialog box as shown bellow, click OK.
Select another user account, enter the correct password, and click Login.
61
© 2020Mindray Confidential
62.
Log outWhen all the tests are complete and there are no ongoing tests, the following prompt message is
displayed after you change the user (or close the software and restart it):
If you want to save the previous worksheets, click Yes.
62
© 2020Mindray Confidential
63.
Sample Information• No samples are added to the specified position
in the test tube rack.
• The testing worksheet of the corresponding position
is set up, but no testing worksheet is carried out.
• The sample is testing.
• The partly completed icon appears when one of the
following situations occurs.
1. The instrument is disconnected with the software.
2. The sample is to wait for re-test or re-dilut.
3. The result is abnormal.
4. The test has been stopped.
• All of the test is completed.
63
© 2020Mindray Confidential
64.
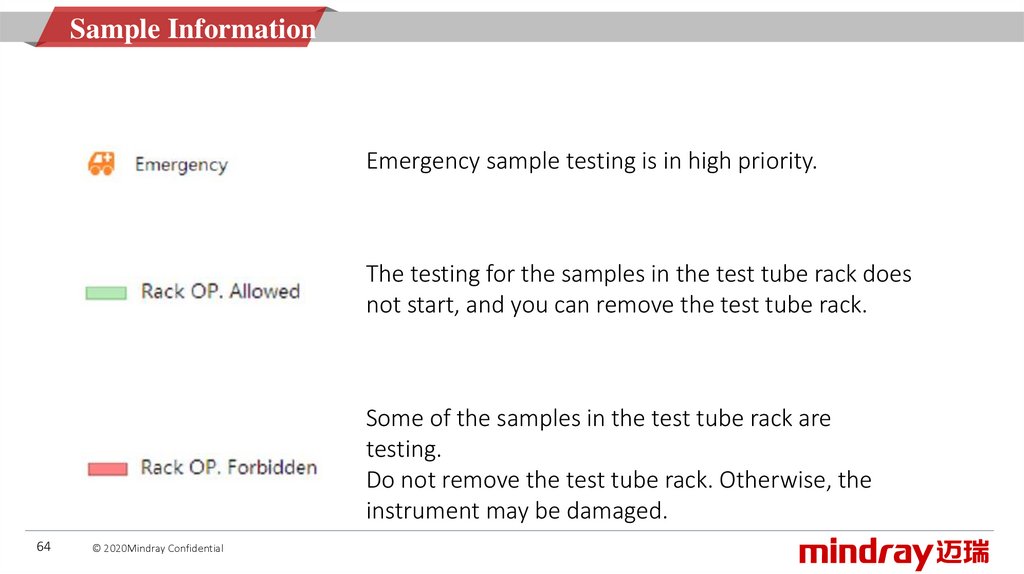
Sample InformationEmergency sample testing is in high priority.
The testing for the samples in the test tube rack does
not start, and you can remove the test tube rack.
Some of the samples in the test tube rack are
testing.
Do not remove the test tube rack. Otherwise, the
instrument may be damaged.
64
© 2020Mindray Confidential
65.
Functional ButtonsAdd Rack: You can click Add Rack to add a new tube rack without barcodes, and a worksheet will
be generated automatically in the sample status area and sample area.
You can insert the rack to the corresponding position based on the position notification in the
sample area.
To add a new tube rack to a specified position, do as follows: Right-click the target position, for
example, position F in the following figure, and choose Add Rack.
As shows above, it’s different between C3510 and C3100.
65
© 2020Mindray Confidential
66.
If you have already inserted a new tube rack before adding a new tube rack on the software, thegenerated rack position may not be the desired position. In this case, you need to change the rack
position on the software.
By default, the new tube racks are added from left to right (A-H).
Similarly, to remove the tube racks, the following message appears:
If you click OK or do not operate, the software takes by default that the tube rack is removed.
The corresponding worksheet is removed from the sample status area, and you can check it in
Review.
66
© 2020Mindray Confidential
67.
Functional ButtonsTesting Buttons
Start
You can click Start to start the test, after you have confirm the test information.
Pause
You can click Pause if you need to change reagents or perform other operations.
When it is ready, click “Start” again, and the device will start test analysis.
Stop
You can click stop to cancels not started tests and the machine will stop when finished current
testing.
Status indicator:
1.The status indicator shows the working status of the instrument. The number in the indicator
shows the number of alarms.
2.The software indicator shows the content of the alarms in rolling.
67
© 2020Mindray Confidential
68.
Status indicator:1.The status indicator shows the working status of the instrument. The number in the indicator
shows the number of alarms.
2.The software indicator shows the content of the alarms in rolling.
68
© 2020Mindray Confidential
69.
ConsumablesYou can click
Consumables to check the
usage of the corresponding consumable.
Reagent Limit: The software shows the
remaining amounts of reagents for the test
item.
Cuvette Limit: The software shows the
updated remaining amount in the cuvette.
Actual Cuvette Quantity: The software counts
the number of cuvettes. You can check how
many cuvettes left on the cuvette tray.
69
© 2020Mindray Confidential
70.
Swing CardWhen the reagent or cuvette amount is low, you need to swipe the card.
Click Swipe Card, and follow the instructions:
After the instruction message appears, place the card on the card reading area on the instrument.
70
© 2020Mindray Confidential
71.
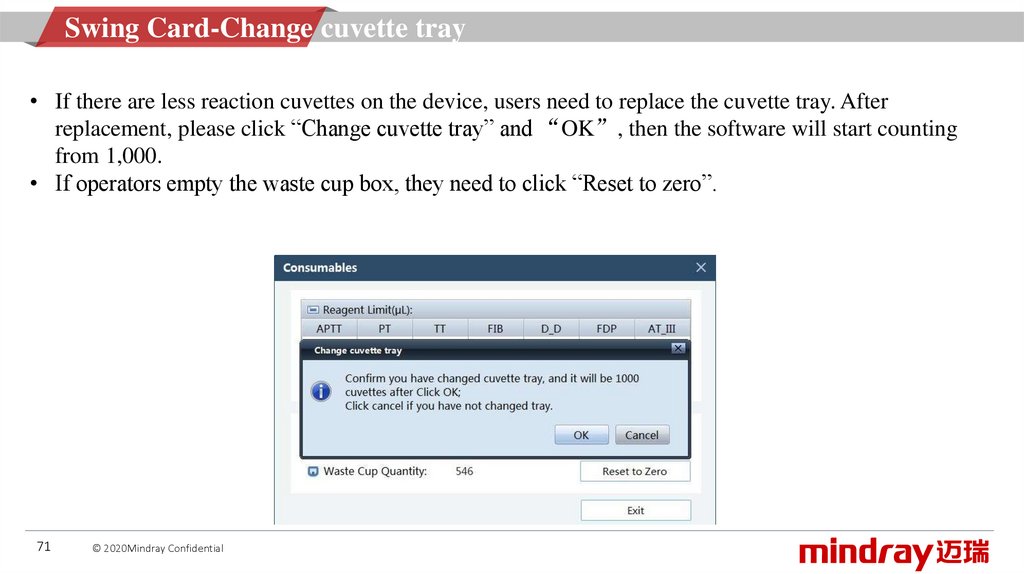
Swing Card-Change cuvette tray• If there are less reaction cuvettes on the device, users need to replace the cuvette tray. After
replacement, please click “Change cuvette tray” and “OK”, then the software will start counting
from 1,000.
• If operators empty the waste cup box, they need to click “Reset to zero”.
71
© 2020Mindray Confidential
72.
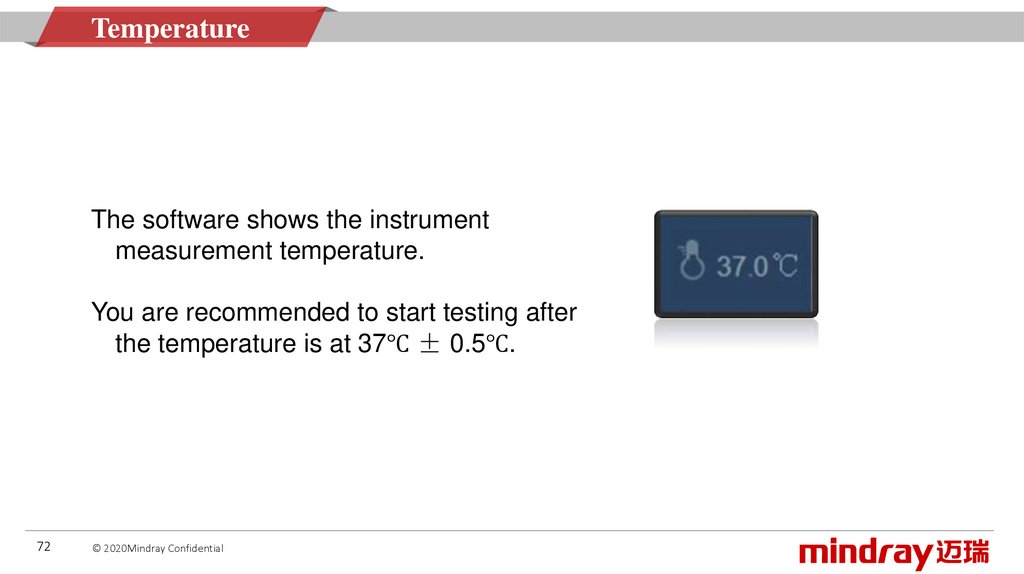
TemperatureThe software shows the instrument
measurement temperature.
You are recommended to start testing after
the temperature is at 37℃ ± 0.5℃.
72
© 2020Mindray Confidential
73.
ReviewDouble-click the sample information, it will turn to the Review window.
73
© 2020Mindray Confidential
74.
ReviewYo u c a n c h e c k ,
review, and print the
testing results in the
Review window.
74
© 2020Mindray Confidential
75.
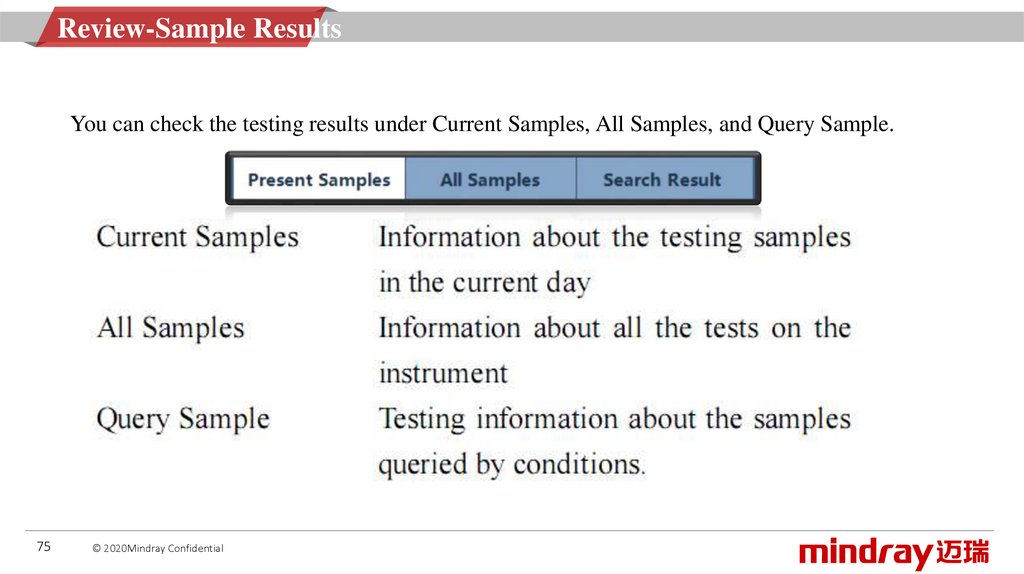
Review-Sample ResultsYou can check the testing results under Current Samples, All Samples, and Query Sample.
75
© 2020Mindray Confidential
76.
Review-Search SampleYou can filter the samples with querying conditions. Do as follows:
1.In the Review window, click Search.
2.Enter the query condition in the Search window.
3.To query samples by time, select a time point from Testing Time.
4.To query samples by other conditions, click Advanced.
5.You can select the query type as required.
6.After you select the query type and enter the query conditions correctly, click OK to
query samples.
76
© 2020Mindray Confidential
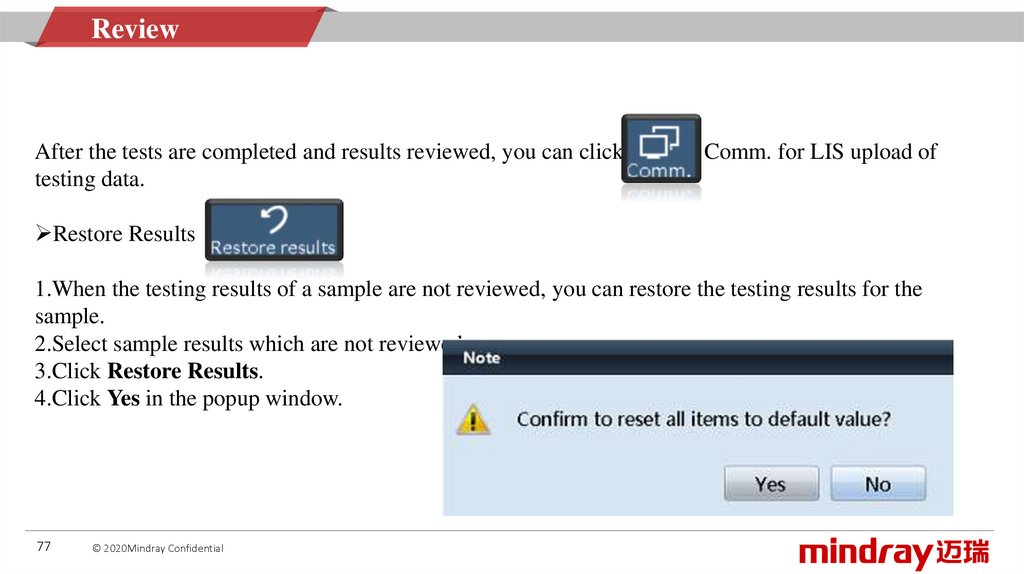
77.
ReviewAfter the tests are completed and results reviewed, you can click
testing data.
Comm. for LIS upload of
Restore Results
1.When the testing results of a sample are not reviewed, you can restore the testing results for the
sample.
2.Select sample results which are not reviewed.
3.Click Restore Results.
4.Click Yes in the popup window.
77
© 2020Mindray Confidential
78.
ServiceTo help the analyzer operation effectively, you are recommended to take daily
maintenance
78
© 2020Mindray Confidential
79.
ServicePipe refill
To ensure the accuracy of the testing results
and the cleanness of the tube, click the Pipe
refill periodically.
Soak probes
Click Soak probes when the two needles have been used for a while.
Examine liquid flow
Observe the water outlet from the sample needle and reagent needle is normal or not. If not,
clean the needle.
79
© 2020Mindray Confidential
80.
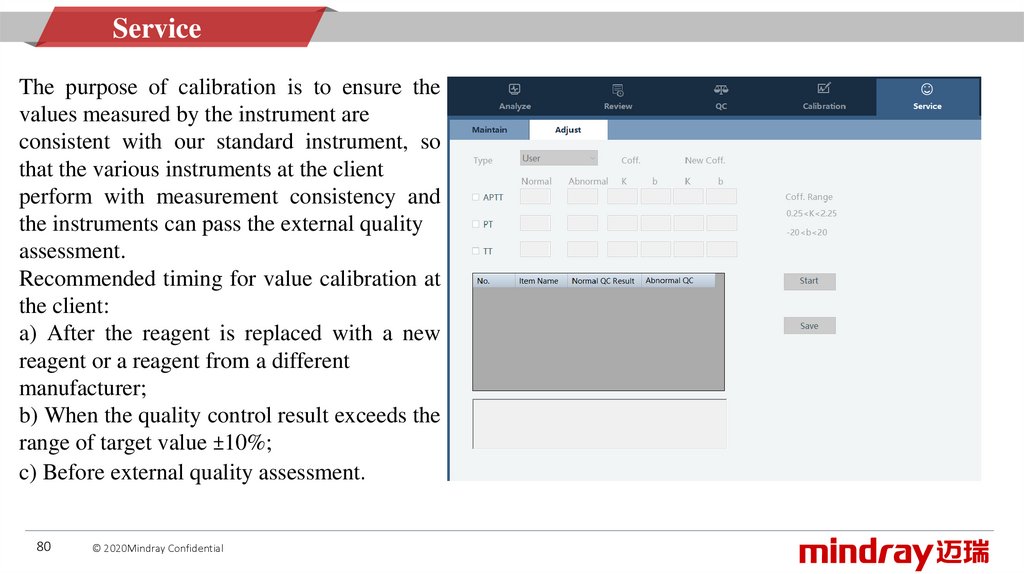
ServiceThe purpose of calibration is to ensure the
values measured by the instrument are
consistent with our standard instrument, so
that the various instruments at the client
perform with measurement consistency and
the instruments can pass the external quality
assessment.
Recommended timing for value calibration at
the client:
a) After the reagent is replaced with a new
reagent or a reagent from a different
manufacturer;
b) When the quality control result exceeds the
range of target value ±10%;
c) Before external quality assessment.
80
© 2020Mindray Confidential
81.
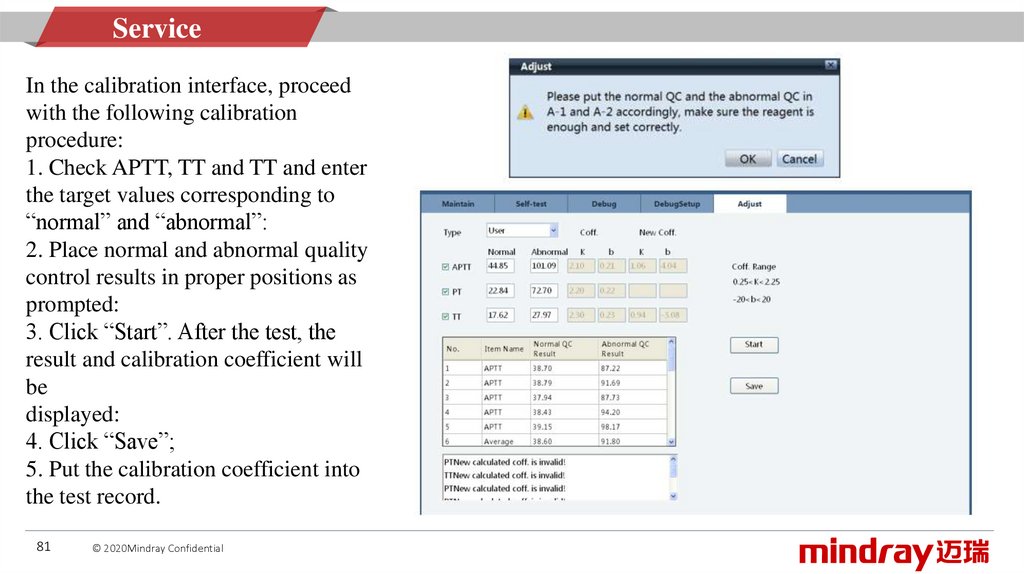
ServiceIn the calibration interface, proceed
with the following calibration
procedure:
1. Check APTT, TT and TT and enter
the target values corresponding to
“normal” and “abnormal”:
2. Place normal and abnormal quality
control results in proper positions as
prompted:
3. Click “Start”. After the test, the
result and calibration coefficient will
be
displayed:
4. Click “Save”;
5. Put the calibration coefficient into
the test record.
81
© 2020Mindray Confidential
82.
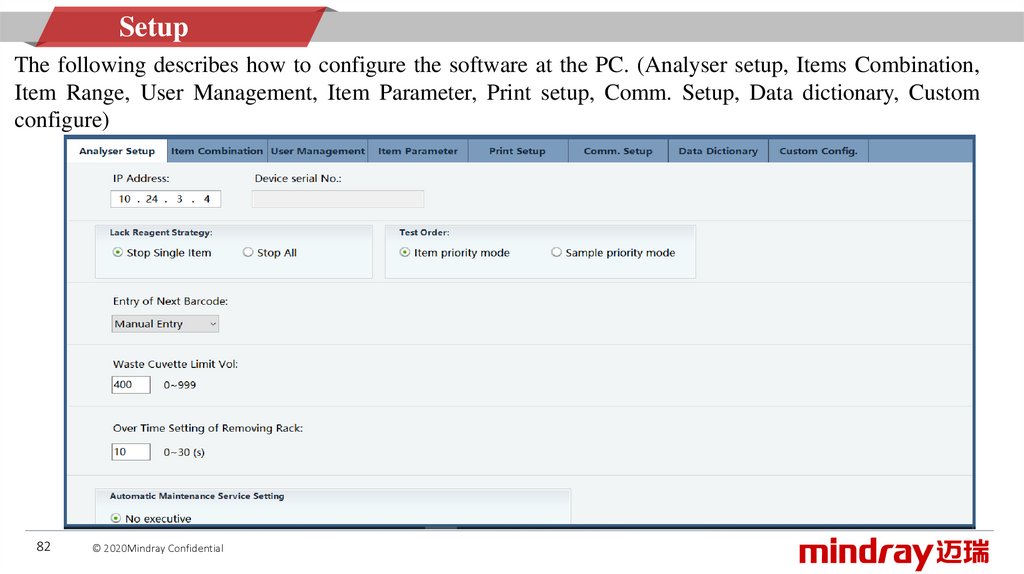
SetupThe following describes how to configure the software at the PC. (Analyser setup, Items Combination,
Item Range, User Management, Item Parameter, Print setup, Comm. Setup, Data dictionary, Custom
configure)
82
© 2020Mindray Confidential
83.
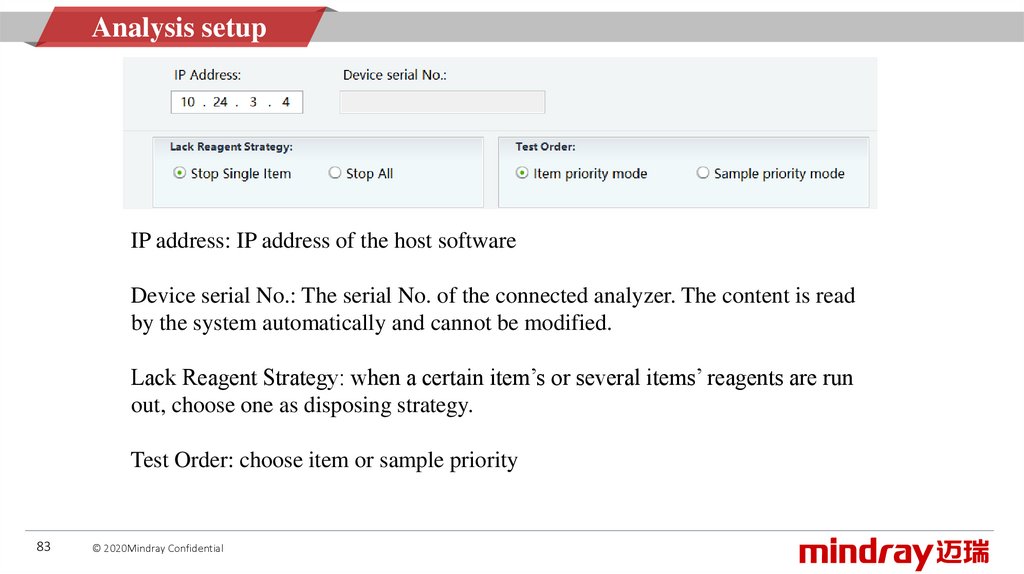
Analysis setupIP address: IP address of the host software
Device serial No.: The serial No. of the connected analyzer. The content is read
by the system automatically and cannot be modified.
Lack Reagent Strategy: when a certain item’s or several items’ reagents are run
out, choose one as disposing strategy.
Test Order: choose item or sample priority
83
© 2020Mindray Confidential
84.
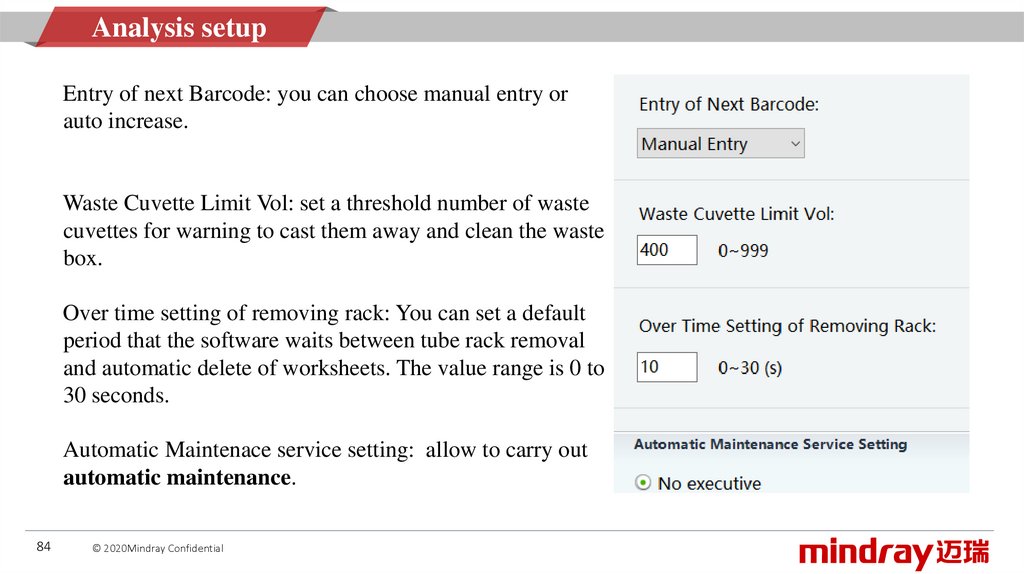
Analysis setupEntry of next Barcode: you can choose manual entry or
auto increase.
Waste Cuvette Limit Vol: set a threshold number of waste
cuvettes for warning to cast them away and clean the waste
box.
Over time setting of removing rack: You can set a default
period that the software waits between tube rack removal
and automatic delete of worksheets. The value range is 0 to
30 seconds.
Automatic Maintenace service setting: allow to carry out
automatic maintenance.
84
© 2020Mindray Confidential
85.
Items combinationFor your convenience in implementing a group of tests, you can set combined test item under Setup >
Items combination
85
© 2020Mindray Confidential
86.
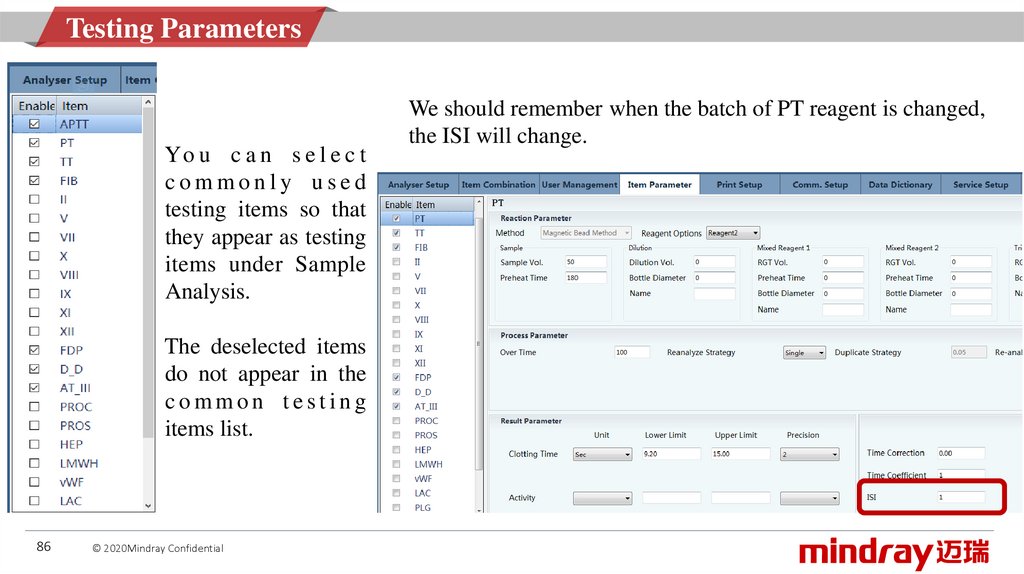
Testing ParametersYo u c a n s e l e c t
commonly used
testing items so that
they appear as testing
items under Sample
Analysis.
The deselected items
do not appear in the
common testing
items list.
86
© 2020Mindray Confidential
We should remember when the batch of PT reagent is changed,
the ISI will change.
87.
Testing ParametersIf you want to make PT%
shows
as
a
reportable
parameter, please set relevant
parameter of PT% and save
it, then PT% shows in analysis
and calibration interface.
87
© 2020Mindray Confidential
88.
User ManagementThe user registration form can hold information about up to
20 administrators and 100 common users(operators).
If you want to add a new user, click the
button ADD, then the dialog box above
will appear, fill in the blank and finish
adding.
88
© 2020Mindray Confidential
89.
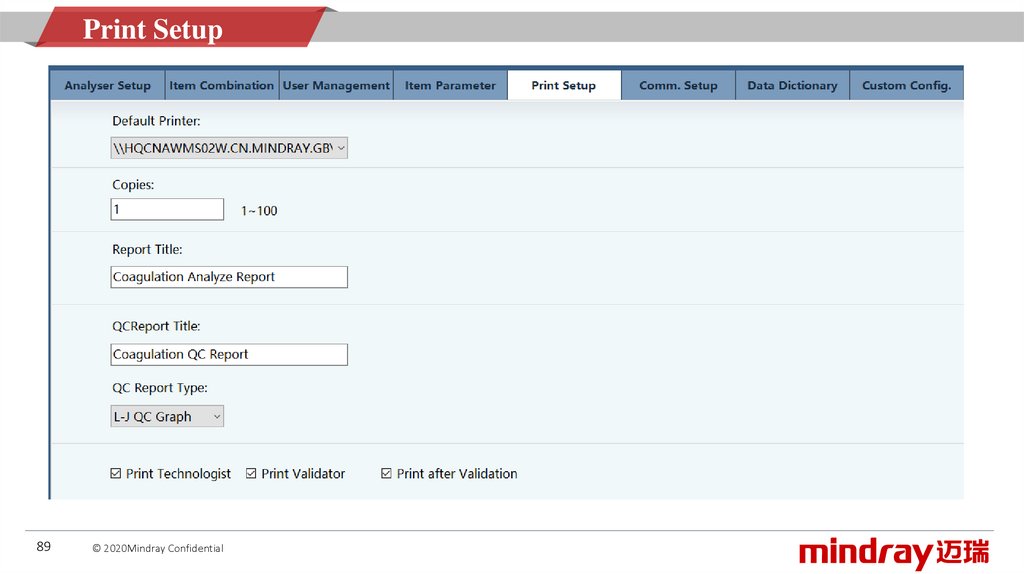
Print Setup89
© 2020Mindray Confidential
90.
Comm. Setup90
© 2020Mindray Confidential
91.
LogsOperation can be record by the software and generate logs, you can select logs you need to export.
91
© 2020Mindray Confidential