


 Электроника
Похожие презентации:

")
")
")


Telephone repair
1.
Parts LayoutReceiver
REAR (Back glass
TOF TX
type)
SIM + microSD Socket
Sub ANT
Ultra Wide Camera
Wide Camera
ToF Camera (RX)
Flash LED
Tele Camera
NFC / MST ANT
Wireless Changing
Volume key
Power/Bixby key
Battery
Main ANT
Speaker
- This document cannot be used without Samsung’s Authorization -
Confidential
2.
Parts LayoutPBA ( MAIN )
MIC3000
SUB MIC
U13000
Barometer sensor
SOC13001
Battery Connector
U3009
Proximeter/
Ambient Light Sensor
SIM2000
T-FLASH/SIM
F3000
WIFI CHIP
U3002
Bluetooth CHIP
U7002
Camera PMIC
U13001
6 AXIS SENSOR
U7007
2ND Camera PMIC
SOC14000
WIRELESS CHARGER IC
U19001
Display Connector
U17000
TRANSCEIVER
UCP4000
AP
UME2000
MEMORY
U9002
CP
- This document cannot be used without Samsung’s Authorization -
Confidential
3.
Parts LayoutSUB PBA
U201
HALL SENSOR
USB100
USB TYPE C Connector
AU201
MAIN MIC
U209
GRIP SENSOR
U102
MAIN ANT2
U100
MAIN ANT1
- This document cannot be used without Samsung’s Authorization -
Confidential
4.
TroubleshootingNo Power
Step
Check point
1
Confirm the defect symptom.
(Do not confuse the screen problem.)
2
Check the Power button working physically
3
4
Check the vibration is working when system
power is on
Check the Battery voltage ( C13016 , C13017 )
Is it more than 3.5V ?
Result value
Defect point
-
-
Normal
Go to the step 3
Get Stuck / Sticky
Cleaning, Reassembly
Vibration working
&
Screen off
Screen problem
Vibrationless
Go to the step 4
Normal
Replace PBA
Abnormal
Try charging the battery by using TA
or change the battery
- This document cannot be used without Samsung’s Authorization -
Confidential
5.
TroubleshootingNo Power (step4 – battery voltage)
- This document cannot be used without Samsung’s Authorization -
Confidential
6.
TroubleshootingPower on but no operation (freezing)
Step
Check point
Result value
Defect point
1
Confirm the defect symptom.
Press the volume down + PWR key during 7s.
-
-
Solved
3rd party Apps
Not solved
Go to the step 3
Yes
Go to the step 3.1
No
Go to the step 4
Rooted
OOW
Normal
Go to the step 4
Solved
S/W or 3rd party Apps
Not solved
Go to the step 5
-
-
2
Enter the safe mode and check if powers up.
3
Is it possible to enter the download mode?
3.1
Check if it’s rooted.
4
Perform full reset.
5
Upgrade software to the latest version.
- This document cannot be used without Samsung’s Authorization -
Confidential
7.
TroubleshootingNo Charging
Step
Check point
1
Confirm the defect symptom
Change customer’s charger & cable
2
Charge the battery for at least 5 minutes..
3
Replace the battery
4
5
Check USB connector visually and Disassemble
Replace MAIN PBA
Result value
Defect point
-
-
Solved
Totally discharged battery
Not solved
Go to the step 3
Solved
Battery
Not solved
Go to the step 4
Dust
Cleaning
Damage
Replace SUB PBA
Normal
Go to the step 5
-
-
- This document cannot be used without Samsung’s Authorization -
Confidential
8.
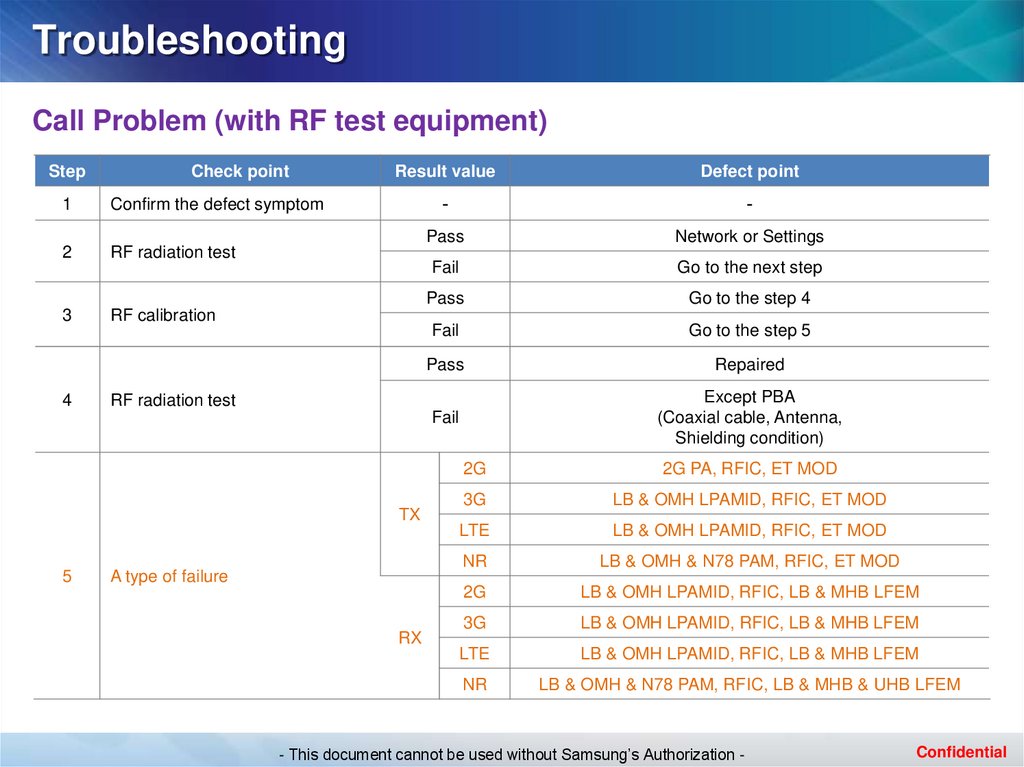
TroubleshootingCall Problem (with RF test equipment)
Step
Check point
1
Confirm the defect symptom
2
RF radiation test
3
RF calibration
4
Result value
Defect point
-
-
Pass
Network or Settings
Fail
Go to the next step
Pass
Go to the step 4
Fail
Go to the step 5
Pass
Repaired
Fail
Except PBA
(Coaxial cable, Antenna,
Shielding condition)
RF radiation test
TX
5
A type of failure
RX
2G
2G PA, RFIC, ET MOD
3G
LB & OMH LPAMID, RFIC, ET MOD
LTE
LB & OMH LPAMID, RFIC, ET MOD
NR
LB & OMH & N78 PAM, RFIC, ET MOD
2G
LB & OMH LPAMID, RFIC, LB & MHB LFEM
3G
LB & OMH LPAMID, RFIC, LB & MHB LFEM
LTE
LB & OMH LPAMID, RFIC, LB & MHB LFEM
NR
LB & OMH & N78 PAM, RFIC, LB & MHB & UHB LFEM
- This document cannot be used without Samsung’s Authorization -
Confidential
9.
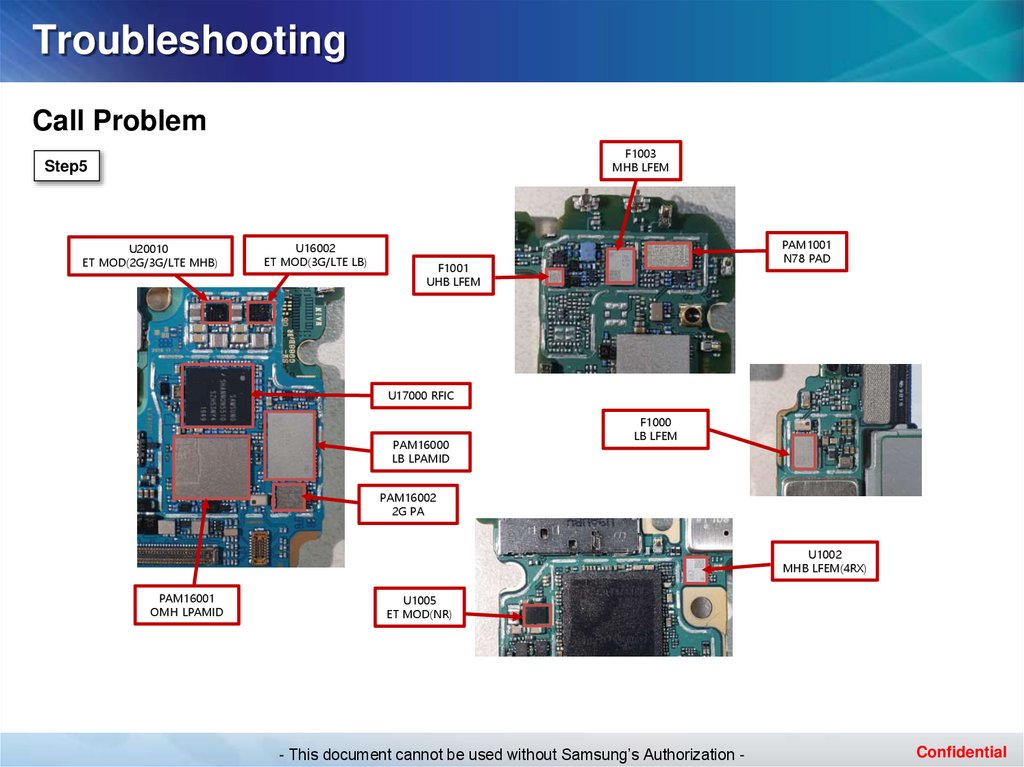
TroubleshootingCall Problem
F1003
MHB LFEM
Step5
U20010
ET MOD(2G/3G/LTE MHB)
U16002
ET MOD(3G/LTE LB)
PAM1001
N78 PAD
F1001
UHB LFEM
U17000 RFIC
PAM16000
LB LPAMID
F1000
LB LFEM
PAM16002
2G PA
U1002
MHB LFEM(4RX)
PAM16001
OMH LPAMID
U1005
ET MOD(NR)
- This document cannot be used without Samsung’s Authorization -
Confidential
10.
TroubleshootingCall Problem (without RF test equipment)
Step
Check point
1
Confirm the defect symptom
2
Check the settings
(airplane mode, Mobile networks)
3
4
Check the debug screen *#0011#
(Compare to normal device)
Check the RF parts except PBA.
(Coaxial cable, Antenna, Shielding condition, etc..)
Check the status visually(crack, missing, Corrosion..etc)
of RF components.
(compare to normal PBA)
5
U17000 RFIC(Transceiver)
PAM16000 (LB LPAMID)
PAM16001 (OMH LPAMID)
PAM16002 (2G PA)
PAM1001 (N78 PAD)
U20010 (ET MOD for 2G/3G/LTE MHB)
U16002 (ET MOD for 3G/LTE LB)
U1005 (ET MOD for NR)
F1000 (LB LFEM)
F1003 (MHB LFEM)
F1001 (UHB LFEM)
U1002 (MHB LFEM for 4RX)
Result value
Defect point
-
-
Abnormal
Settings
Normal
Go to the next step
Abnormal
Go to the next step
Normal
Network
Broken, dust, corrosion
RF parts
Loose fitting
Connection
Normal
Go to the next step
Abnormal
RF components.
Normal
CP(Call Processor)
(U9002)
CP PMIC(U9001)
- This document cannot be used without Samsung’s Authorization -
Confidential
11.
TroubleshootingCall Problem
Step2,3
Step4
CHECK SETTINGS
Main ANTENNA Metal contact
ANT. Contact (for main RF)
Main ANTENNA Metal contact
DEBUG SCREEN STATUS
Same value compare to
normal device.
Step5
Step4
Diversity ANTENNA contact
Diversity ANTENNA Metal contact
- This document cannot be used without Samsung’s Authorization -
Confidential
12.
TroubleshootingSound Problem
Step.
Check point
1
Confirm the defect symptom.
2
*#0*# → dual speaker
3
Result value
Defect point
-
-
No sound(RCV or SPK)
Go to the next step
Normal
S/W or Settings
Solved
RCV or Speaker
Not solved
Go to the next step
-
-
Same signal compared with a
good PBA
RCV or Speaker
No signal
RCV AMP (U3007)
SPK AMP (U20004)
Replace the RCV or SPK module
4
Activate the dual speaker path.
(*#0*# → Dual Speaker)
5
Check the signal at two of speaker contacts.
(Using oscilloscope)
Notice : It should be measured when the
speaker path is activated on.
- This document cannot be used without Samsung’s Authorization -
Confidential
13.
TroubleshootingSound Problem
Step3
RCV
Speaker
RCV contacts
Step5
U3007
RCV AMP
(Inside of
Shield Can)
U20004
SPK AMP
(Inside of
Interposer)
Speaker
contacts
- This document cannot be used without Samsung’s Authorization -
Confidential
14.
TroubleshootingDisplay Problem
Step
1
2
Check point
Confirm the defect symptom
Check the AMOLED connector (SOC14000)
3
Replace the AMOLED
4
Connect a AMOLED, and display on with a
power supply
(power supply voltage : 4.0V)
Check the voltage of C14030 = 3.0V
5
6
7
Result value
Defect point
-
-
Broken, dust, corrosion
AMOLED connector
(SOC14000)
Loose fitting
Connection
Normal
Go to the next step
Solved
AMOLED
Not solved
Go to the next step
-
-
If not the correct value
PMIC(U14000)
Notice. It should be measured when the display is
activated on
C14030=3.0V
Go to the next step
Check the voltage of C14041 = 1.8V, C14029 = 1.8V
If not the correct value
PMIC(U14000)
Notice. It should be measured when the display is
activated on
C14041 = 1.8V
C14029 = 1.8V
Go to the next step
Check the voltage of following chips
(C14040,C14031,C14032)
Notice. It should be measured when the display
is activated on
If not the correct value
PMIC(U14000)
C14040 = 7.8V
C14031 = -1.4 ~ -6.6V
C14032 = 4.6V
MAIN CHIP
- This document cannot be used without Samsung’s Authorization -
Confidential
15.
TroubleshootingDisplay Problem
Step2
Step5, 6
UB CONNECTOR
C14041
C14030
C14029
SOC14000
Step7
C14032
C14031 C14040
- This document cannot be used without Samsung’s Authorization -
Confidential