


 Промышленность
Похожие презентации:


Introduction to Marine Seismic Processing - ProMAX
1. Introduction to Marine Seismic Processing - ProMAX
Andrew GoodliffeUniversity of Alabama
Socorro, NM, Wednesday May 28
2. ProMAX Exercise
•What is ProMAX?•A software package for processing reflection seismic
data
•Commonly used in the energy industry
•Not free!
•There are many other programs that will do the same
sort of thing – they differ mainly in their user interface
(or lack thereof)
•Runs on many flavors of UNIX
3. Where did the data come from?
• A short seismic reflection survey inPapua New Guinea
• September 1999
• R/V Maurice Ewing
–
–
–
–
–
–
1.2 km streamer
48 channels
25 m group interval
1395 inch3 tuned six airgun array
25 m shot interval
24-fold CMPs 12.5 m apart
4. Woodlark Basin
•A rift basin in Papua NewGuinea
•A classic place to study the
orogenic rifting to seafloor
spreading transition
•The line that we will look at
crosses a large rift basin
close to the transition to
seafloor spreading
•The survey was carried out
as part of an Ocean Drilling
Program site survey
5. High Pressure Air Sources: The Air Gun
From: http://www.ldeo.columbia.edu/res/fac/oma/sssHigh Pressure Air
Sources: The Air Gun
Ready
Fire!
Fired
Lower chamber has a top diameter
that's smaller the bottom diameter air pressure forces the piston down
and sealing the upper, firing
chamber. High pressure air is filling
the firing chamber through the Tshaped passage, and the firing, or
actuating air passage is blocked
(solid black) by a solenoid valve.
Full pressure has built up in the
upper chamber. The Solenoid has
been triggered, releasing highpressure air into the active air
passage, which is now yellow.
The air fills the area directly
below the piston, overcoming the
sealing effect of the air in the
lower, control chamber. The
piston moves upwards, releasing
the air in the upper chamber into
the water.
A large bubble of compressed air is
expanding into the surrounding water.
The air in the lower control chamber
has been compressed. The triggered
air, released into the space below the
piston, is fully expanded, and can now
exhaust at a controlled rate through
the vent ports. As this takes place, the
piston rapidly but gently moves
downward, re-sealing the chamber, and
readying the sound source for refilling.
6. Air Guns
•Airguns suspended fromstowed booms
Other source?
•Single Air gun – note air
ports
7.
8. Tuning An Air Gun Array
•Summing the signal of multiple guns creates a more desirablesignal
•Note the relative scales of the left and right plots
From http://www.ldeo.columbia.edu/res/fac/oma/sss/tuning.html
Tuning An Air Gun Array
9. Listening
From Kearey, Brooks, and Hill, 2002• Hydrophone
– Piezoelectric material
– Pressure changes in the water generate small currents which
are amplified
• Geophone
– Mechanical
– Motion of coil relative to magnet generates a small current
which is then amplified
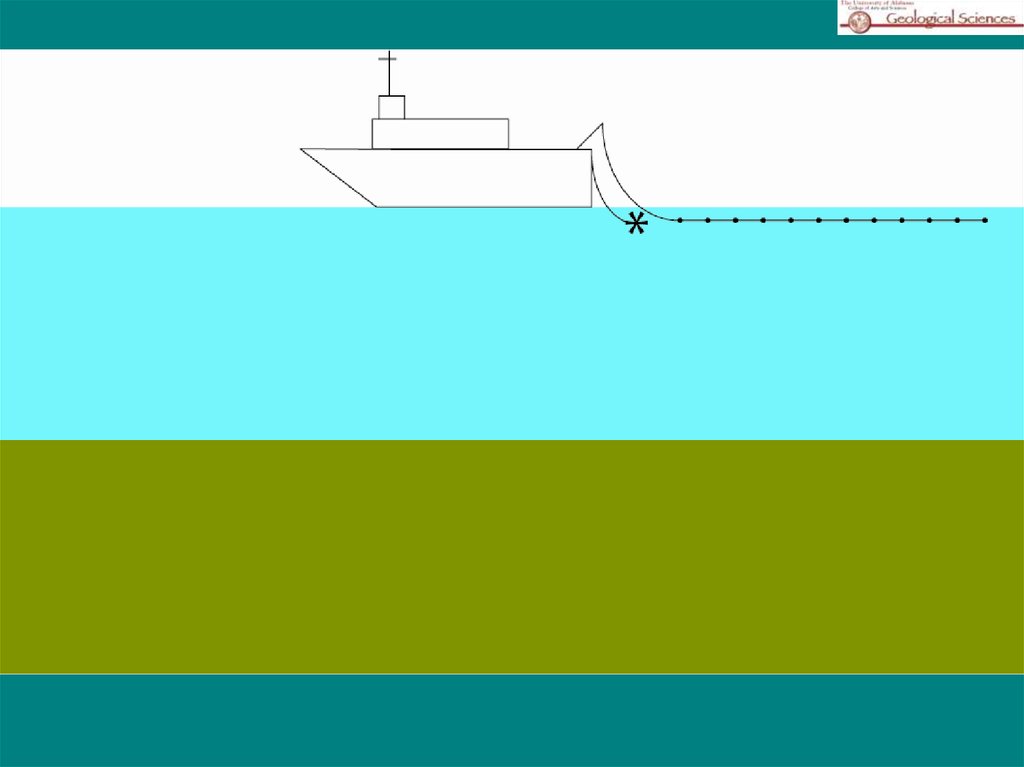
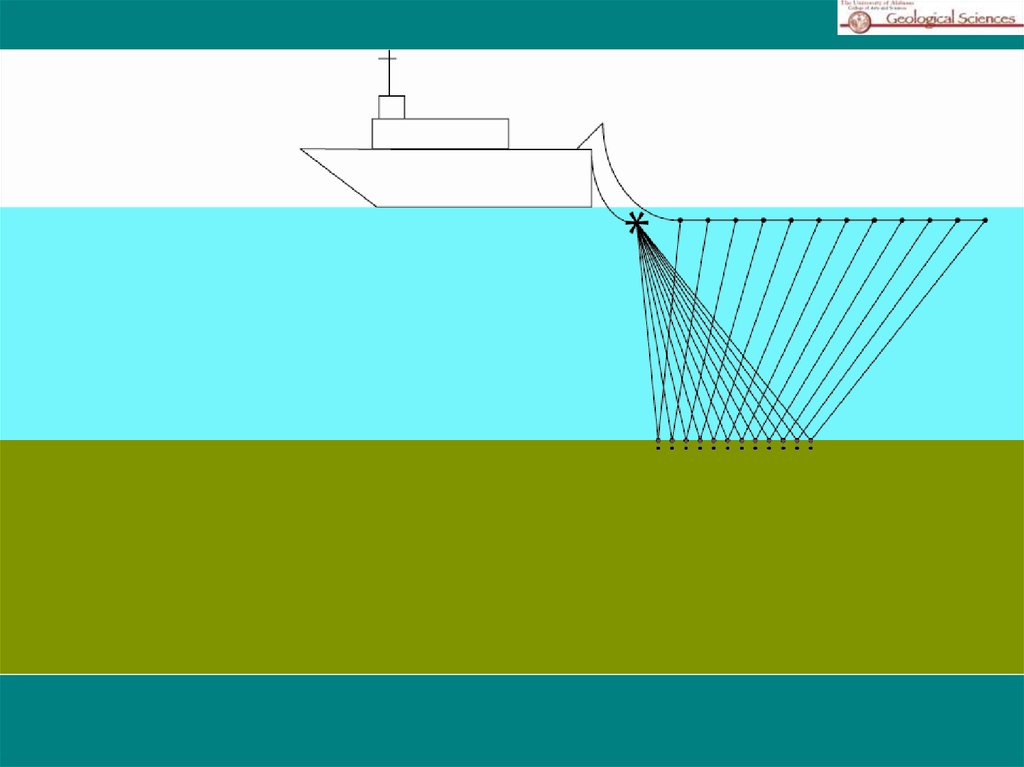
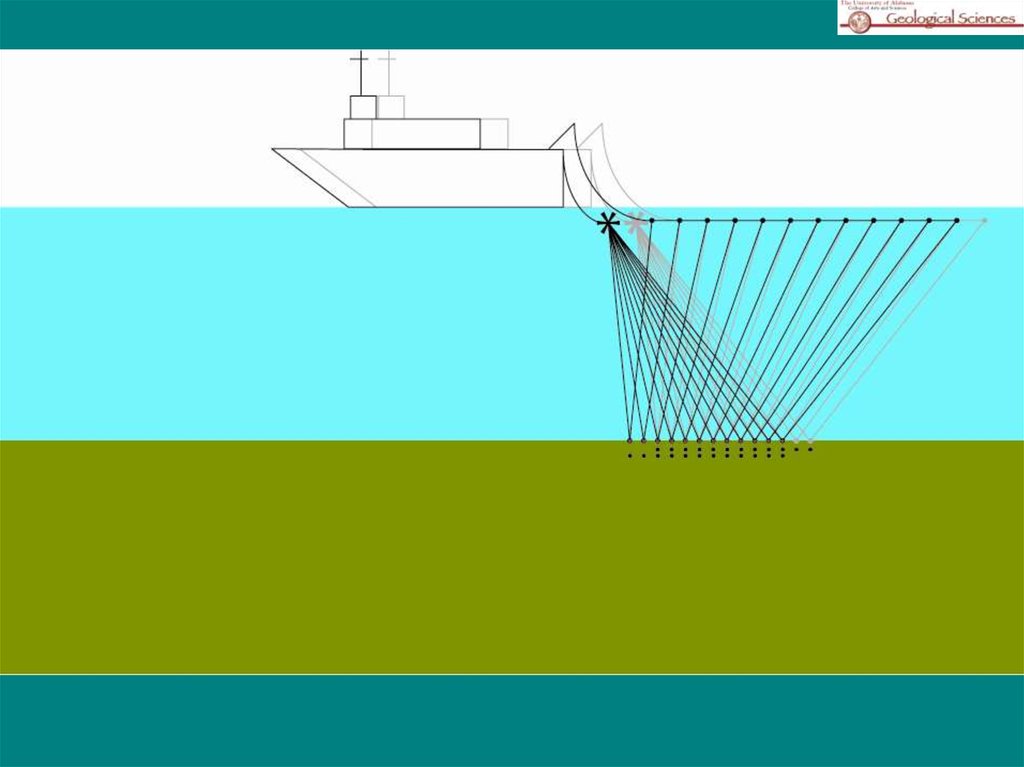
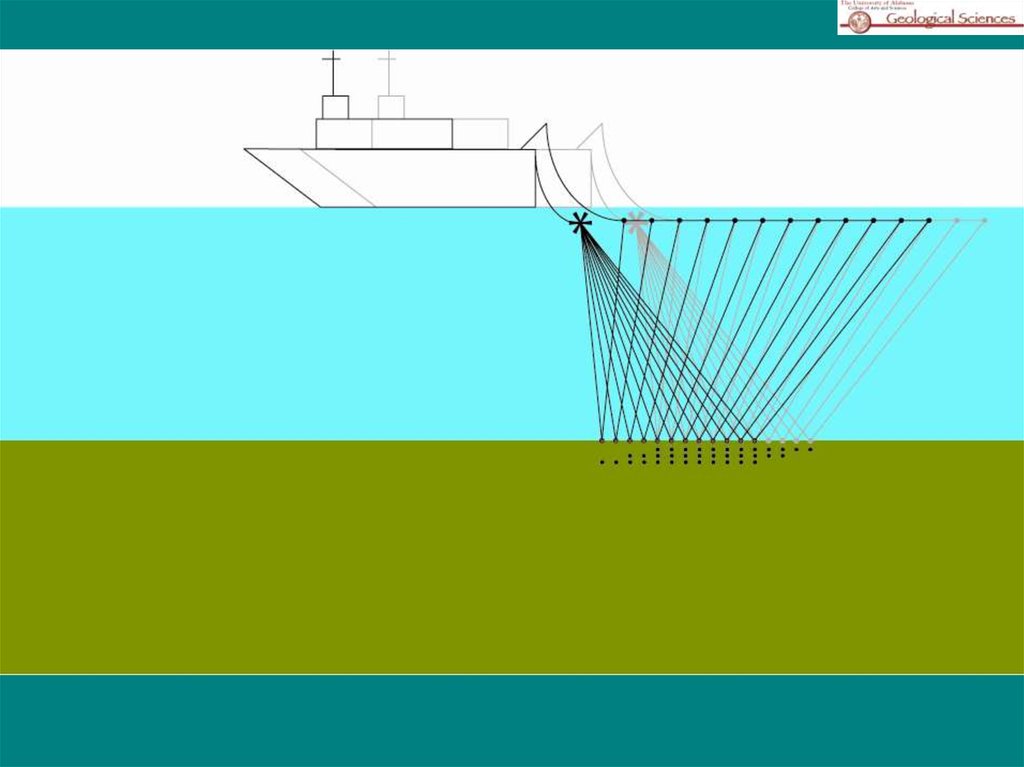
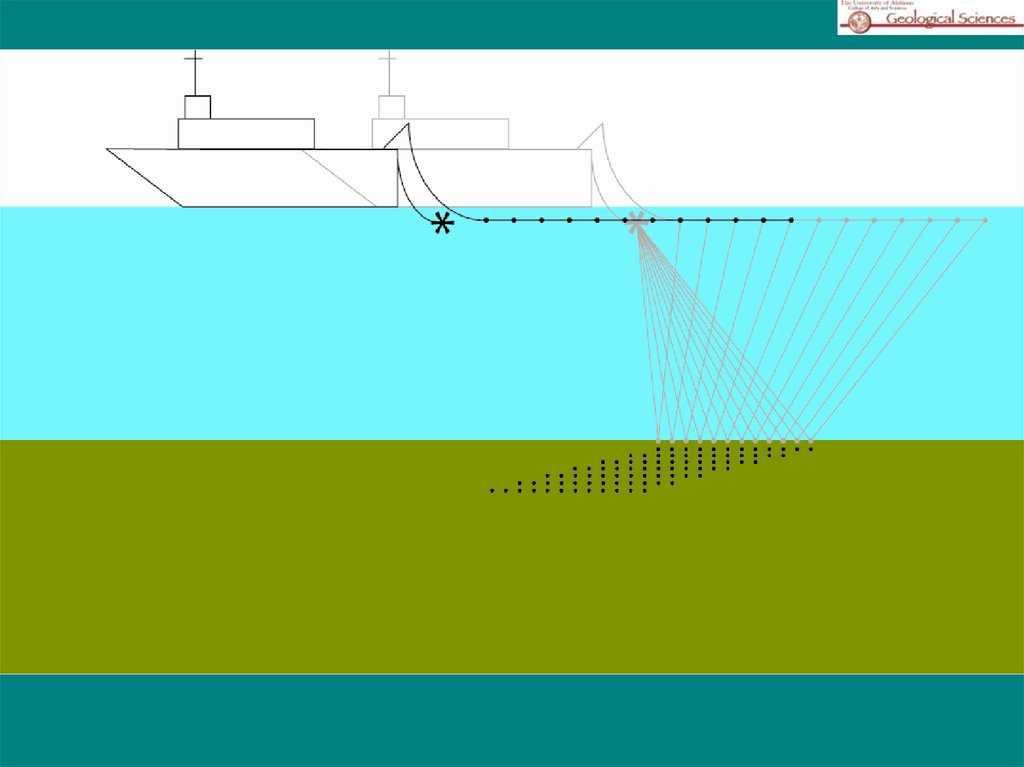
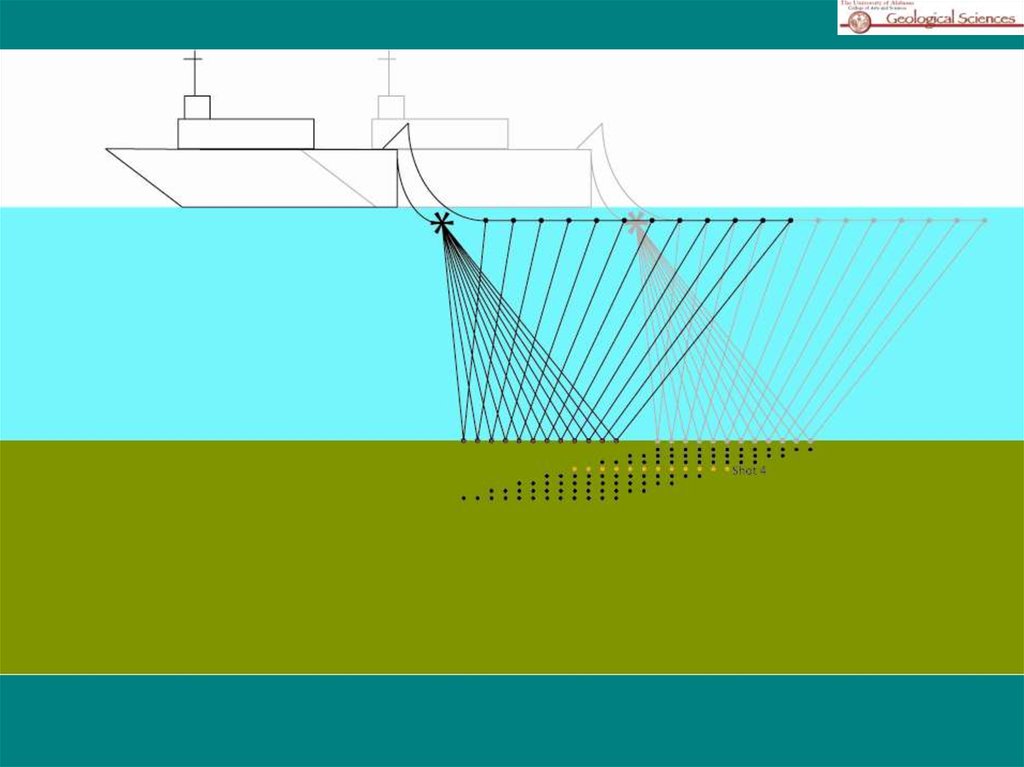
10. How is a Marine Seismic Reflection Survey Shot?
Definition of shot and common mid-point (CMP) gathersShot gather: All the data
recorded on all the channels
by a single shot
CMP gather: A collection of
traces that have been
recorded at the same
location.
Shot and CMP gathers are simply different ways of sorting the
data.
What is the natural CMP spacing relative to the group interval?
11.
12.
13.
14.
15.
16.
17.
18.
19.
20.
21.
22.
23.
24.
25.
26.
27.
28.
29.
30. Starting ProMAX
• Type Promax on the command line• Select the survey
• Select the line that includes your name
31. Anatomy of ProMAX
Click on the EW9910 area, then EW9910 Line ODP11List of
flows –
operations
that we will
apply to the
data
Status of
any jobs
that are
running
This area tells you what each of your mouse buttons will
do – ProMAX uses three mouse buttons
32. Anatomy of ProMAX
Click on 01 – Display ShotsThis flow reads in the seismic
data and displays it
List of
individual
processes –
things we can
do to the data.
Flows are built
up of a
sequence of
processes. Click
on one and it
will appear in
the left-hand
window. Delete
and processes
accidentally
added by
clicking on
delete in the
left-hand
window
33. Anatomy of ProMAX
Click on Disk Data Input with the middle mouse button. This willparameterize the process. Here we see that we are reading in 11 Shots
w/geom (raw shot file with navigation added to the headers), sorting the
data by Source index number (shot number), reading in every 10th shot from
shot 300 to the end of the file
34. Anatomy of ProMAX
Clicking on the data file 11 Shots w/geom with the left-hand mouse button(LHMB) will take you to a list of data files. Click on 11 Shots w/geom with
the middle mouse. The details of the data file are now displayed
We can now see how many traces there are in the file, the sample rate (in
milliseconds), how many samples there are per-trace, the minimum and
maximum CDP, and the minimum and maximum shot (SIN). Moving your
cursor to the top of the screen will take you back to the flow
35. Anatomy of ProMAX
Clicking on the data file 11 Shots w/geom with the left-hand mouse button(LHMB) will take you to a list of data files. Click on 11 Shots w/geom with
the middle mouse. The details of the data file are now displayed
We can now see how many traces there are in the file, the sample rate (in
milliseconds), how many samples there are per-trace, the minimum and
maximum CDP, and the minimum and maximum shot (SIN). Moving your
cursor to the top of the screen will take you back to the flow
36. Displaying a Shot
Clicking on Execute with the LHMBDirect ray path
– sound travels
directly from
the airgun array
to the
hydrophones –
forms a straight
line
Reflected ray
path – sound
bounces of the
seafloor and
underlying
layers – forms a
hyperbola
Water column noise
37. Water Velocity
Clicking on the zoom icon. By holding down the LHMB and dragging a box,zoon into the area where we see the direct wave. The gradient of the direct
wave gives us the water velocity. Click on the gradient icon. By holding down
the LHMB, drag a line that follows the first arrival of the direct wave. The
corresponding velocity will be displayed at the bottom of the screen
Which channel is
nearest to the ship?
Zoom icon
Gradient
icon
38. Near-Trace Plot
When we are collecting data we want to see it as quickly as possible – oneway of doing this is by displaying a near-trace plot. This is simply a display of
the channel nearest to the ship for each shot. This will give us the first
glimpse of what we are looking at in terms of geology. Go back to the list of
processes and click on 02 – Near Trace Plot. Execute the flow.
Seafloor
Graben
bounding faults
Basement
Multiple
39. Near-Trace Plot
Go back to the flow 02 – Near Trace Plot and uncomment Automatic GainControl by clicking on it with the right-hand mouse button (RHMB). This will
add gain to the section, enhancing the deeper reflectors
40. Power Spectrum
Go back the list of flows. Click on the flow 03 – Power Spectrum andexecute it. This flow is setup to show the frequency content of every 10th
shot. We use a plot like this to determine characterize the range of
frequencies in data, and possibly identify noise
Click on
the arrow
to go to
the next
shot
Shot gather
Frequency range
Frequency content by
channel
Phase
41. Filtering
We can use a bandpass filter to remove frequencies below and above acertain range. We are now going to test some filter parameters using the
process 04 - Filter
The filter defined in
Parameter Test will remove all
frequencies below 6 Hz and
above 80 Hz. All frequencies
between 10 and 70 Hz will be
kept. A ramp is applied to
intermediate values
The number 99999 next to
filter values indicates that the
actual filter value comes from
the Parameter Test process
Execute the flow
42. Filtering
For each shot a filtered and unfiltered (Control copy) version of the data isdisplayed. Advance to the next shot by clicking on the arrow.
•Zoom in to look at the data in detail
•Try some different filters
43. Removing NMO
x2T t x t0
2V 2t0
x
V
2t0 T
From Kearey, Brooks, and Hill, 2002
From Yilmaz, 1989
The reason for having so many (24 in this case) traces in a CMP is so that we
can stack (sum) the traces for a given CMP.
•Noise cancels out
•Real signal (geology) is amplified
•Signal to noise ratio increase
•First we must remove Normal Moveout (NMO) – the difference in travel
time that is the result of varying ray path lengths
44. Removing NMO in Practice – Velocity Analysis
Semblanceplot
From Yilmaz, 1989
CMP
NMO has been
removed
correctly and
the reflector is
now coherent
Nowadays velocity analysis is
carried out using semblance
plots – these show how well
the data stacks (i.e. a
reflector is coherent across
a stack after NMO is
applied) for a given two-way
travel time and velocity
Go back to the flows list in ProMAX
and select 05 – Velocity Analysis –
click on Execute
45. Velocity Analysis
Click on the zoom iconand zoom into this
area
Dynamic stack
Semblance plot
CMP
46. Velocity Analysis
Click onthe pick
icon to
pick
velocity/ti
me point
on the
semblance
plot
Click on
Gather –
Apply
NMO to
see NMO
applied as
you pick
Velocity Analysis
NMO
Add
velocity/time
points to the
semblance plot
such that the
NMO is removed
for the major
reflectors.
•Zoom in and out
as necessary
•Do not pick the
multiple
•Save your picks
47. Stacking
Go back to the list of flows.•Click on 06 – Stack
•This flow uses your velocity picks and other that were picked earlier to
stack the data
•The traces in each CMP are summed to form one trace
Removes some
residual noise
and spikes
Applies a
bandpass filter
to the data
Traces in each
CMP are stacked
Execute the flow – this will take some time…..
Applies the NMO
correction using
the picked
velocities
Trace mutes to
remove stretched
traces and attenuate
multiple
48. View Stack
Go back to the list of flows.•Click on 07 – View Stack
•Execute the flow
•You will see that the image is now much better than our original near
trace plot
•You can start to see stratigraphy
•However, the are lots of diffractions and reflectors are not in their
correct subsurface location – we need to migrate
49. Migration
In an un-migrated time section reflectors do not represent the truesubsurface geometry.
•See examples below…
(C)
(A)
From Kearey et al., 2002
Seafloor
Dipping
reflectors
Time section
(A) a syncline on the seafloor is
imaged as a “bow-time section
Bow-tie effect
(B)
Time section
Geological
Crosssection
(B) The addition of diffractions from
the end of reflectors results in a very
complex time section
(B) A dipping reflector is shallower in
a time section
50. Migration
Go back to the list of flows.•Click on 08 – Migration
Migration
Using a velocity model that was
made earlier we will migrate the
data
There are a number of ways of
migrating the data – all are
mathematically very complex….
Execute the flow. This will take some time
When it has finished running, Click on 09 – View Migration and execute the
flow
51. View Migration
•Most diffractions have gone•Geology is now gar more evident
•Remaining problems: smiles; frowns
•Solution: improve velocity model; more advance processing
•Why is this still not equivalent to a geological cross-section?