


 Информатика
Похожие презентации:


Your image here
1.
Your image hereThe image must have only scales of our colors.
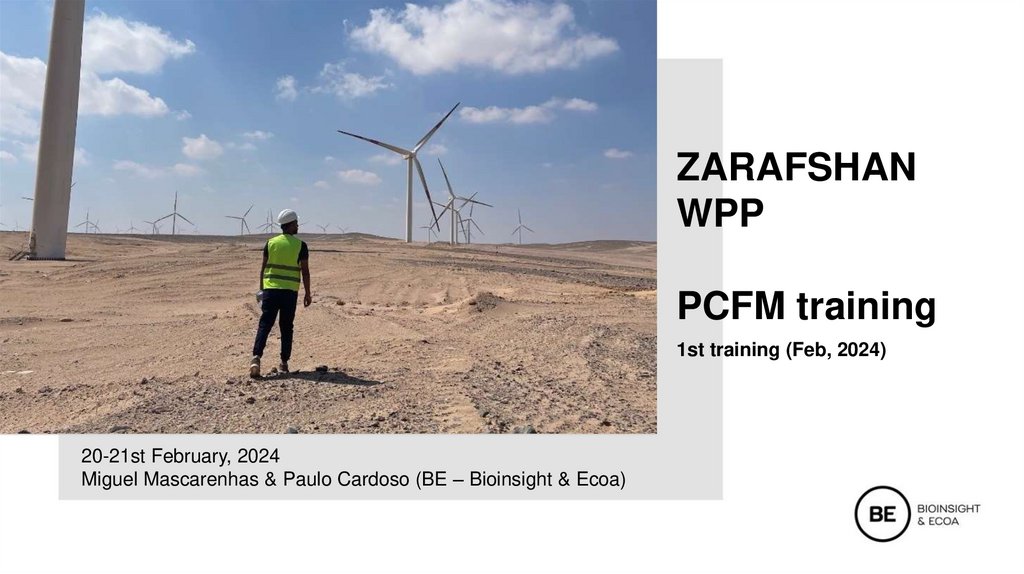
ZARAFSHAN
WPP
PCFM training
1st training (Feb, 2024)
20-21st February, 2024
Miguel Mascarenhas & Paulo Cardoso (BE – Bioinsight & Ecoa)
2.
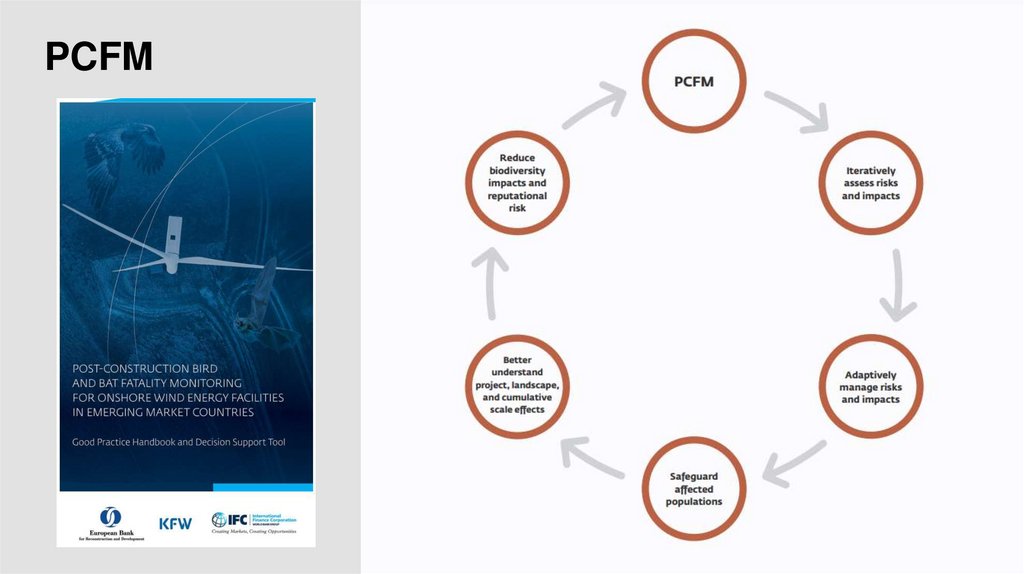
PCFM• Good Practice Handbook and Decision Support Tool
• Designed for industry, governments, and conservation groups and provides practical
guidance on the design and implementation of PCFM methodology at WEFs that aligns with
Good International Industry Practice
• Promote the global standardization in methodologies for monitoring bird and bat fatalities
so that fatality rates can be better compared across sites, landscapes, countries, and
regions
IFC site: https://www.ifc.org/en/insights-reports/2023/bird-bat-fatality-monitoring-onshore-wind-energy-facilities
3.
PCFM4.
Training GoalPrepare Juru Team to start the
carcass search.
5.
Training programe20 Feb
0800 – 1200
• Fast-track PCFM overview. Quick review of all actions that will be performed related to PCFM training
1) Setting up search plots
2) Protocol to map unsearchable areas of each plot and areas of different visibility classes
3) Conduct carcass search
4) Carcass processing protocol
5) H&S protocol
1200 – 1230: Lunch
1230 – 1730
On site PCFM training. Setting up the search plots and conduct carcass search. On site data recording
21 Feb
0800 – 0900
• Last day briefing, questions, and guidance
• Day briefing, tasks and goals of the day
0900 – 17h30
Full day of plot setting and carcass search (including the protocol for data recording and carcass processing)
6.
SETTING UP SEARCH PLOTS7.
Search plotconfiguration
Examples of search plot type
Circular plot
Square plot
Roads and pads
plot
Partial plot
GPH p.23
Source: IFC, 2023. Post-construction bird and bat fatality monitoring for onshore wind energy facilities in
emerging market countries. Good Practice Handbook and Decision Support Tool
8.
Recommended1st year PCFM
design
QUESTION
Project Setup
USER INPUT
Units
1. How many turbines are at the facility (1 - 999)?
111 turbines
2. What is the hub height of the turbines (m)?
95 meters
3. What is the blade length of the turbines (m)?
77 meters
User interface – First Year
Recommended First Year PCFM design
PCFM design component
Recommendation
Number of turbines to search with full plots
75
turbines
Full plot search radius
86
meters
Search transect width
6*
meters
Additionally, search RAP** at all turbines to a distance of
Search interval
Number of searcher efficiency trials (per carcass size)
172
7
12
meters
days
count
Number of carcass persistence trials (per carcass size)
12
count
* If visibility is high at the WEF site and its surroundings, and if there is existing
knowledge of the bat species at risk, transect spacing of 10m is considered a
reasonable alternative to 6m transect spacing
** RAP = Road and Pad Plot. For more information, discussed in Section 3.3.3.2
GPH Decision Support Tool
9.
Plot setup –spatial
arrangement
RAP searches:
Turbine and crane pad area plus any
access roads to a distance of 171m
from the turbine base (equivalent
to the maximum blade tip height).
171m
RAP search
distance
Full Plot
85,5m
1
There are specific aspects of landscape characteristics, notably
relief/topography, terrain, and vegetation height and density, which can
influence PCFM study design. These aspects can sometimes reduce or preclude
systematic carcass searches outside of WTG road and pad (R&P) areas or
under/near OHTL areas. For the majority of WTGs expected to be energized
(and consequently included in the systematic PCFM) in Year 1, and for the OHTL,
these aspects are not anticipated to substantially limit the areas which may be
searched during systematic PCFM. However, it should be noted that ongoing
construction-related activities – including reclamation and reinstatement
activities – may also limit systematic or chance finds/incidental search areas
due to HSE considerations. The determination of which areas may be included
in systematic PCFM, or chance finds/incidental monitoring areas, will be made
by the LE, the IOE and the HSE Manager, and these determinations will be
reviewed by the Biodiversity Manager.
Full plot searches:
square shape to simplify the setup
of search plots whenever possible1.
The size will be 85,5m radius
(equivalent to half the maximum
turbine blade tip height).
10.
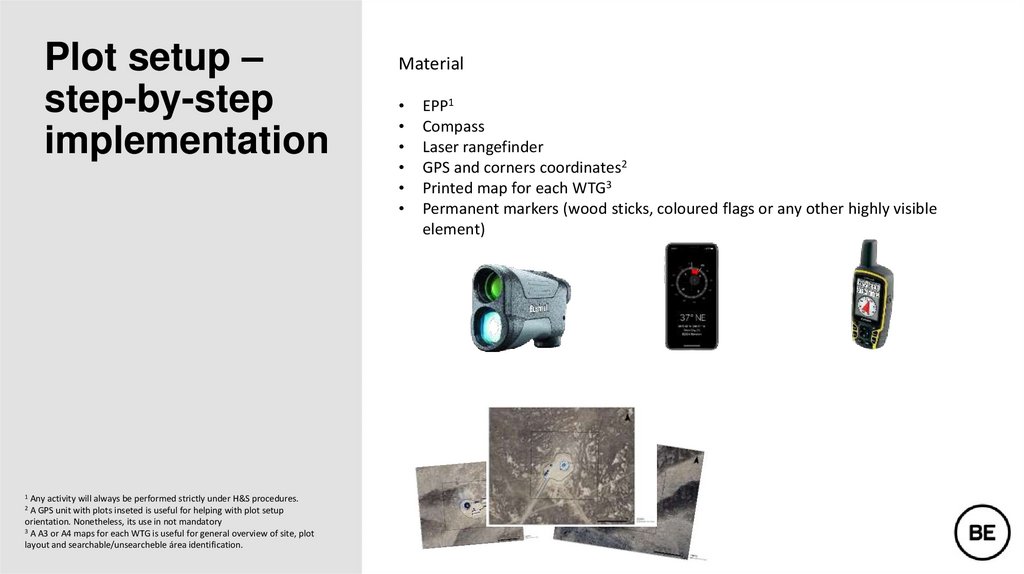
Plot setup –step-by-step
implementation
1 Any activity will always be performed strictly under H&S procedures.
2 A GPS unit with plots inseted is useful for helping with plot setup
orientation. Nonetheless, its use in not mandatory
3 A A3 or A4 maps for each WTG is useful for general overview of site, plot
layout and searchable/unsearcheble área identification.
Material
EPP1
Compass
Laser rangefinder
GPS and corners coordinates2
Printed map for each WTG3
Permanent markers (wood sticks, coloured flags or any other highly visible
element)
11.
Plot setupGeneral rules
Plot setup requires at least two
field workers1
Plot Orientation: N-S
Reference: Turbine base
key measurements: Full plot
radius, plot vertex, RAP radius
RAP radius
Plot
vertex
171m
120,9m
85,5m
1 Any activity will always be performed strictly under H&S procedures.
2 A GPS unit with plots inseted is useful for helping with plot setup
orientation. Nonetheless, its use in not mandatory
3 A A3 or A4 maps for each WTG is useful for general overview of site, plot
layout and searchable/unsearcheble área identification.
Full plot
radius
12.
Plot setup –step-by-step
implementation
Key coordinates
1: 41.553262, 64.425859
2: 41.551734, 64.425820
3: 41.551760,64.423780
4: 41.553293, 64.423816
5: 41.553334, 64.423089
6: 41.551888, 64.426679
Before any activity, check with HSE the H&S
procedures, including all EPP.
1. From the turbine position walk NE
using the compass.
2. Check the distance to the WTG with
the rangefinder until reach 120,9m,
check the position with GPS elements
(see uploading data to GPS below) and
mark corner 1.
3. Walk 171m to the South using the
compass.
4. Check the 120,9m distance to the WTG
with the rangefinder, check the
position with GPS elements and mark
corner 2.
5. Walk 171m to the West using the
compass.
6. Check the 120,9m distance to the WTG
with the rangefinder, check the
position with GPS elements and mark
corner 3.
7. Walk 171m to the North using the
compass.
8. Check the 120,9m distance to the WTG
with the rangefinder, check position
with GPS elements and mark corner 4.
9. Walk to all roads limiting the RAP
search area up to 171m from the WTG.
Mark corners 5, 6, etc.
171m
5
4
1
120,9m
85,5m
3
171m
2
6
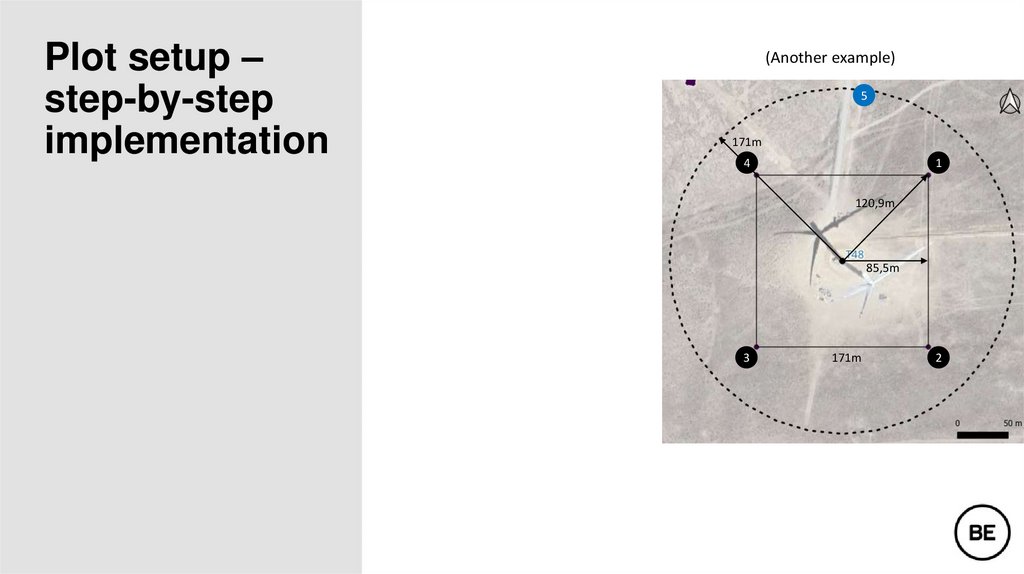
13.
Plot setup –step-by-step
implementation
(Another example)
5
171m
4
1
120,9m
85,5m
3
171m
2
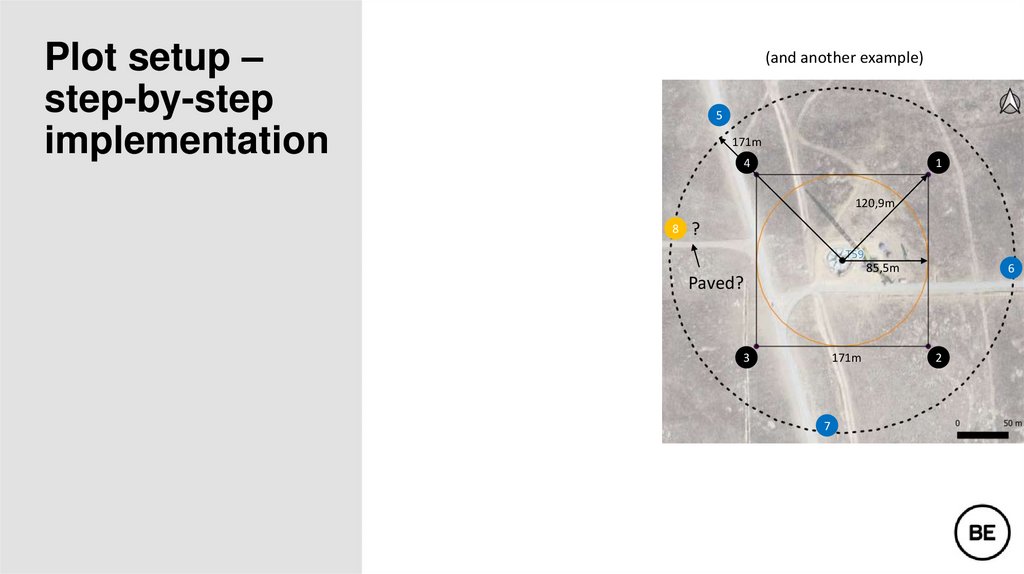
14.
Plot setup –step-by-step
implementation
(and another example)
5
171m
4
1
120,9m
8
?
85,5m
Paved?
171m
3
7
6
2
15.
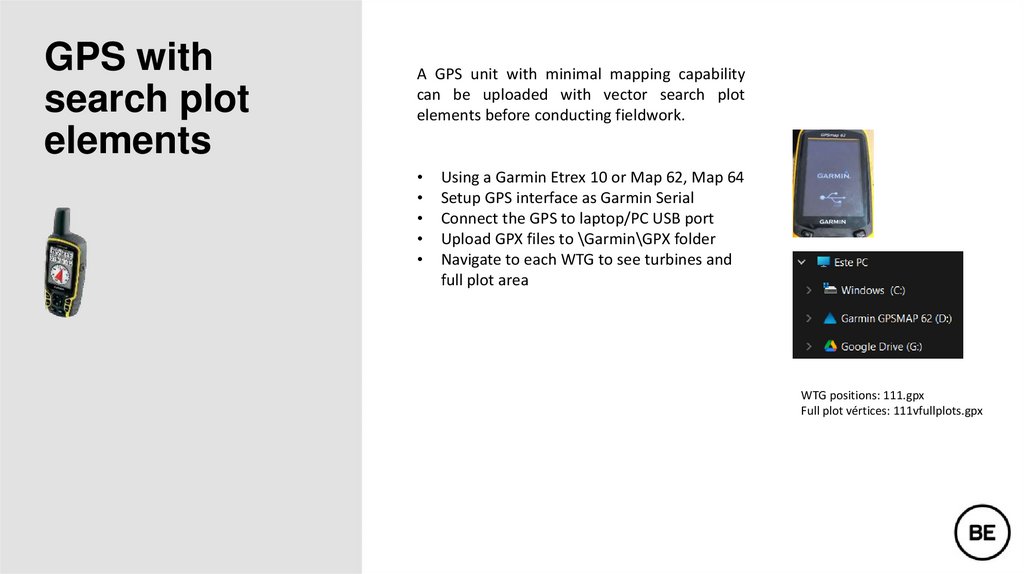
GPS withsearch plot
elements
A GPS unit with minimal mapping capability
can be uploaded with vector search plot
elements before conducting fieldwork.
Using a Garmin Etrex 10 or Map 62, Map 64
Setup GPS interface as Garmin Serial
Connect the GPS to laptop/PC USB port
Upload GPX files to \Garmin\GPX folder
Navigate to each WTG to see turbines and
full plot area
WTG positions: 111.gpx
Full plot vértices: 111vfullplots.gpx
16.
MAP & VALIDATEUNSEARCHABLE AREAS
PROTOCOL
17.
Unsearchable areas mapping/validationUnsearchable areas must be identified for each plot, prior to performing carcass searches for the first time at a given plot
Unsearchable areas are (for example):
• Areas within the search plot that are unsafe to search (e.g. steep terrain, loose soil piles)
• Inaccessible areas (e.g. unauthorized entry, water bodies)
• Complex habitat where search would be difficult (e.g. areas with high bush density)
• Complex habitat where detection is difficult (e.g. densely forested areas)
Example of unsearchable areas due to
loose soil piles present at site
Example of steep terrain present at site
18.
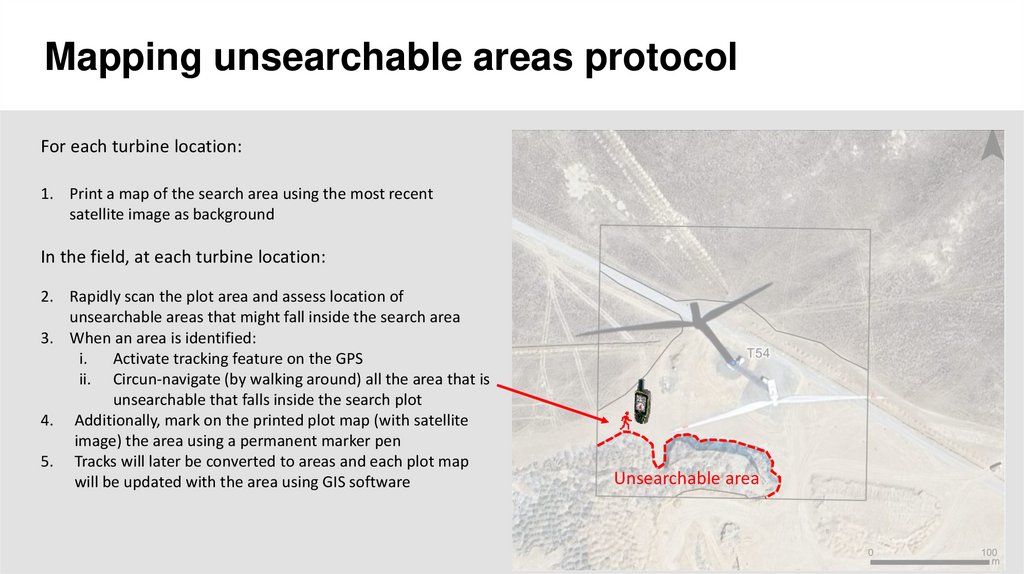
Mapping unsearchable areas protocolFor each turbine location:
1. Print a map of the search area using the most recent
satellite image as background
In the field, at each turbine location:
2. Rapidly scan the plot area and assess location of
unsearchable areas that might fall inside the search area
3. When an area is identified:
i. Activate tracking feature on the GPS
ii. Circun-navigate (by walking around) all the area that is
unsearchable that falls inside the search plot
4. Additionally, mark on the printed plot map (with satellite
image) the area using a permanent marker pen
5. Tracks will later be converted to areas and each plot map
will be updated with the area using GIS software
Unsearchable area
19.
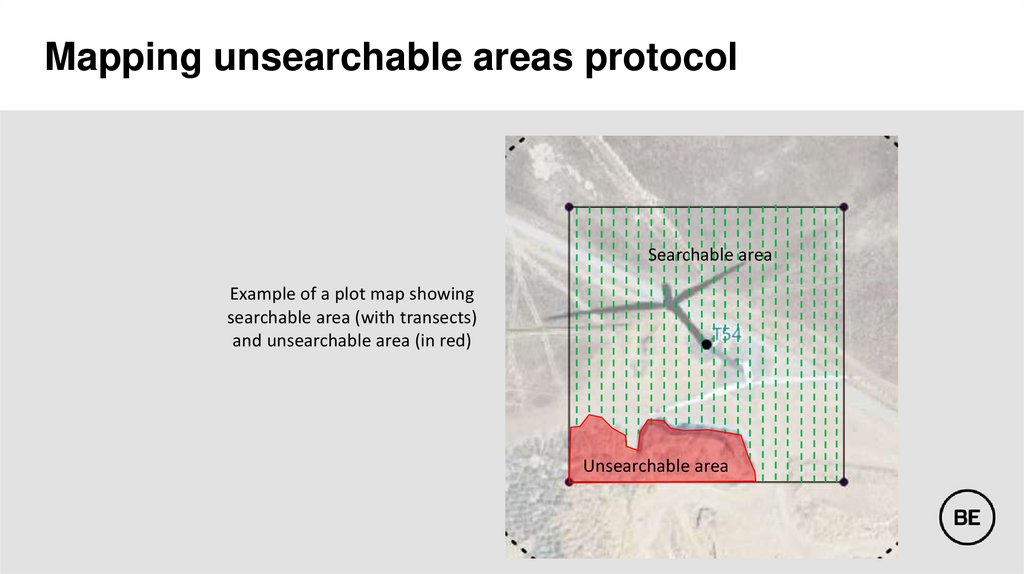
Mapping unsearchable areas protocolSearchable area
Example of a plot map showing
searchable area (with transects)
and unsearchable area (in red)
Unsearchable area
20.
MAP & VALIDATE VISIBILITYCLASSES PROTOCOL
21.
Visibility classesVisibility greatly influences the detectability of the carcasses
3 classes of visibility are expected:
Not expected on
site
Easy
Moderate
Difficult
Very Difficult
≥90% bare ground
20-90% bare ground
1-20% bare ground
<1% bare ground
Vegetation ≤15cm
Vegetation ≤15cm
Vegetation 15-30 cm
Vegetation >30 cm
22.
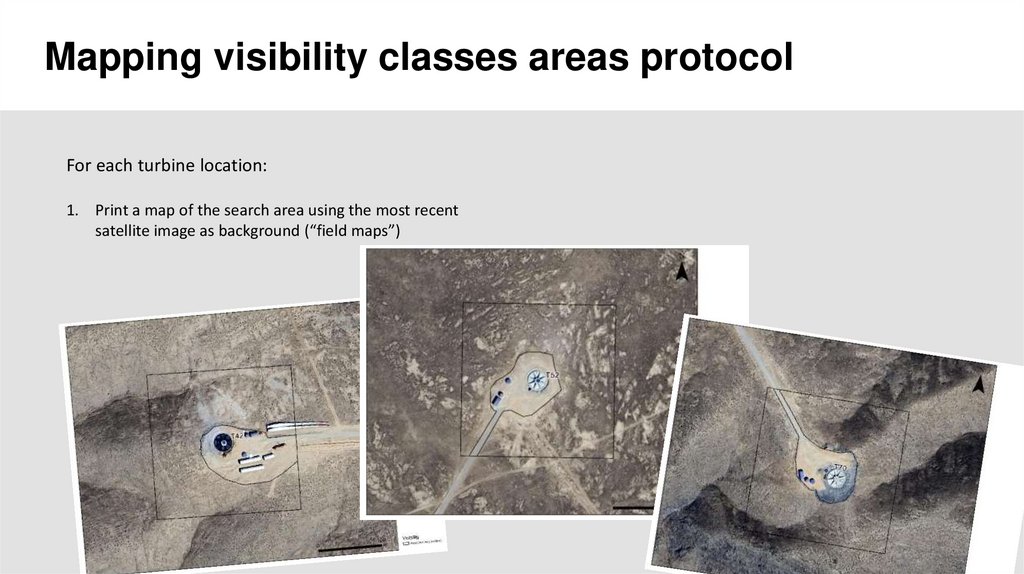
Mapping visibility classes areas protocolFor each turbine location:
1. Print a map of the search area using the most recent
satellite image as background (“field maps”)
23.
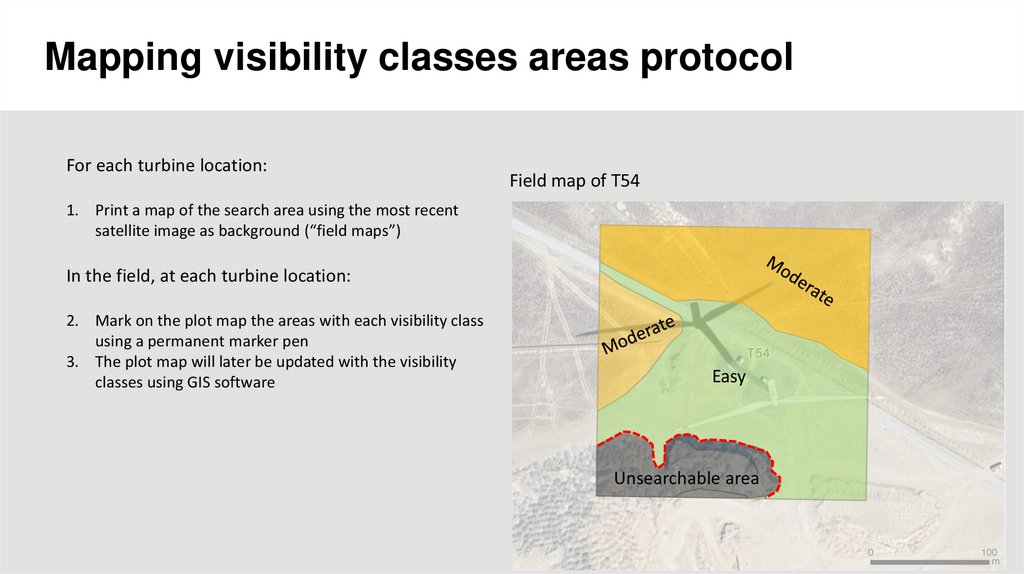
Mapping visibility classes areas protocolFor each turbine location:
Field map of T54
1. Print a map of the search area using the most recent
satellite image as background (“field maps”)
In the field, at each turbine location:
2. Mark on the plot map the areas with each visibility class
using a permanent marker pen
3. The plot map will later be updated with the visibility
classes using GIS software
Unsearchable area
24.
Mapping visibility classes areas protocolFor each turbine location:
Field map of T54
1. Print a map of the search area using the most recent
satellite image as background (“field maps”)
In the field, at each turbine location:
2. Mark on the plot map the areas with each visibility class
using a permanent marker pen
3. The plot map will later be updated with the visibility
classes using GIS software
Easy
Unsearchable area
25.
CARCASS SEARCH PROTOCOL26.
Transectsetup
Before any activity check with HSE
the H&S procedures, including all EPP.
171m
1
From plot edge 1, move 3m from
either side of the plot edge.
Setup regularly spaced, parallel
transects (N-S oriented) covering
the entire 171x171m square full
plot
Full plot
1
3m
6m
6m
3m
Road
171m
2
27.
Conductingcarcass
searches
Before any activity check with HSE
the H&S procedures, including all EPP.
171m
1
1. Starting at position 1 (3m from
either side of the plot edge) walk
the 1st transect along the plot
edge heading South.
2. Walk at a regular pace covering
approx. 1,5m/s.
3. Scan for carcasses or any signals
of carcasses on both sides of the
transect.
4. Keep the focus on scanning the
ground while maintaining the
transect alignment and 6m
distance.
5. Using a GPS with active track can
help but should not distract
searches.
Full plot
6m
Road
171m
2
28.
Conductingcarcass
searches
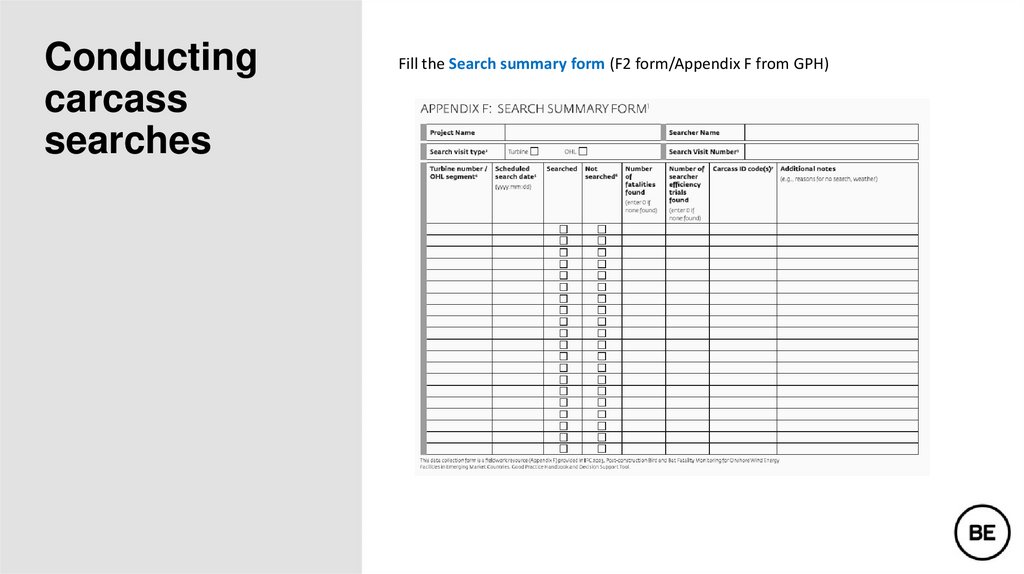
Fill the Search summary form (F2 form/Appendix F from GPH)
29.
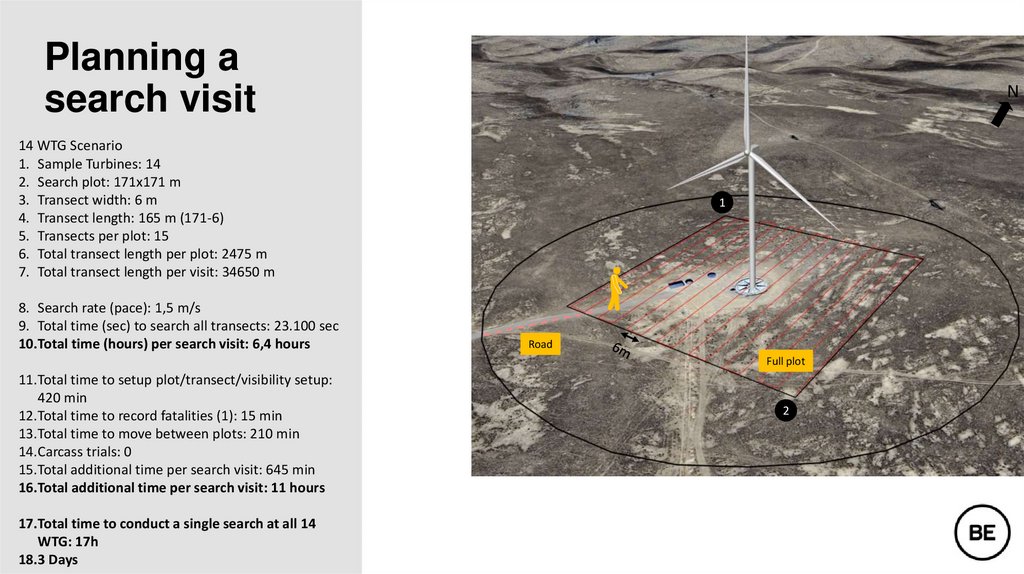
Planning asearch visit
N
14 WTG Scenario
1. Sample Turbines: 14
2. Search plot: 171x171 m
3. Transect width: 6 m
4. Transect length: 165 m (171-6)
5. Transects per plot: 15
6. Total transect length per plot: 2475 m
7. Total transect length per visit: 34650 m
8. Search rate (pace): 1,5 m/s
9. Total time (sec) to search all transects: 23.100 sec
10.Total time (hours) per search visit: 6,4 hours
1
Road
Full plot
11.Total time to setup plot/transect/visibility setup:
420 min
12.Total time to record fatalities (1): 15 min
13.Total time to move between plots: 210 min
14.Carcass trials: 0
15.Total additional time per search visit: 645 min
16.Total additional time per search visit: 11 hours
17.Total time to conduct a single search at all 14
WTG: 17h
18.3 Days
2
30.
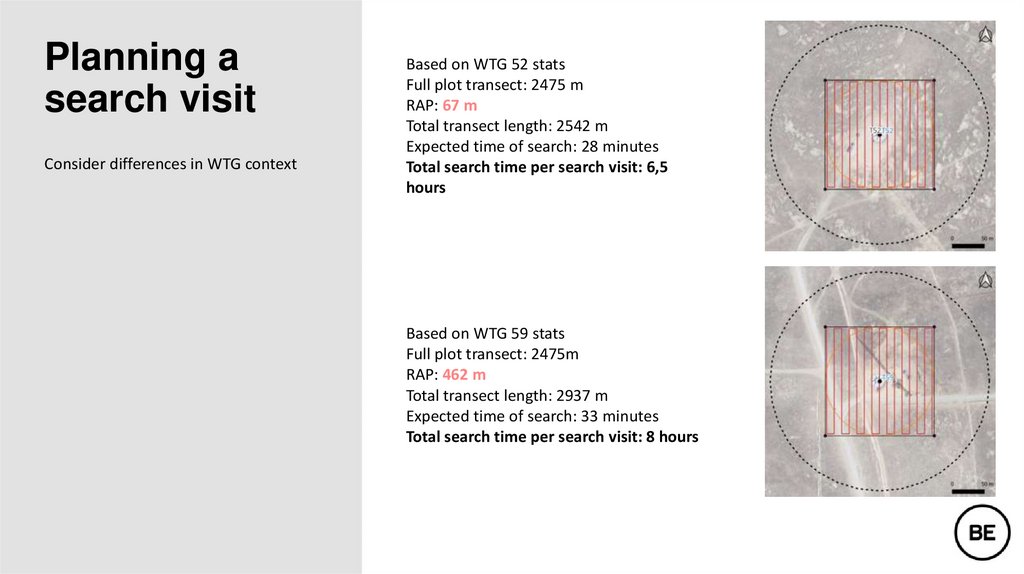
Planning asearch visit
Consider differences in WTG context
Based on WTG 52 stats
Full plot transect: 2475 m
RAP: 67 m
Total transect length: 2542 m
Expected time of search: 28 minutes
Total search time per search visit: 6,5
hours
Based on WTG 59 stats
Full plot transect: 2475m
RAP: 462 m
Total transect length: 2937 m
Expected time of search: 33 minutes
Total search time per search visit: 8 hours
31.
CARCASS PROCESSINGPROTOCOL
32.
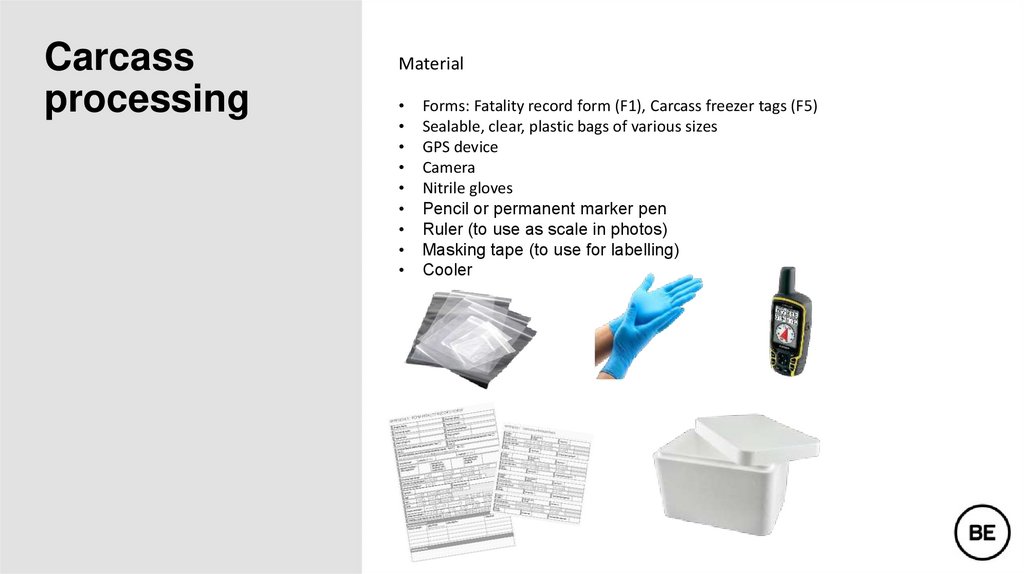
Carcassprocessing
Material
Forms: Fatality record form (F1), Carcass freezer tags (F5)
Sealable, clear, plastic bags of various sizes
GPS device
Camera
Nitrile gloves
Pencil or permanent marker pen
Ruler (to use as scale in photos)
Masking tape (to use for labelling)
Cooler
33.
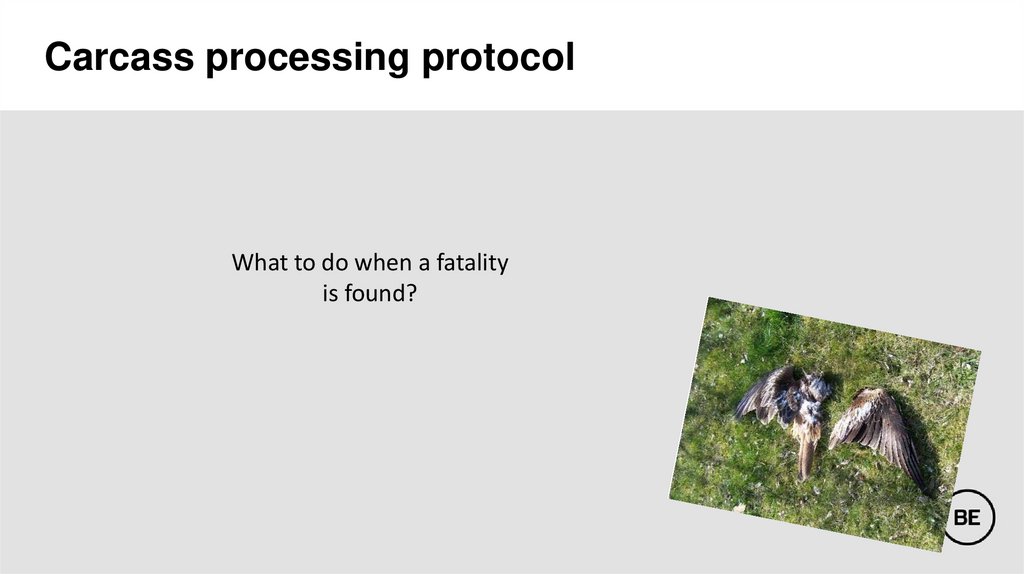
Carcass processing protocolWhat to do when a fatality
is found?
34.
Carcass processing protocolFor each found fatality:
1. Mark fatality location using GPS device
Carcass ID label!
What is missing?
Size reference!
Size reference!
2. Take photographs (with ruler or scale unit)
• All photographs should have:
• a size reference in view (e.g., ruler, coin)
• Label with carcass ID (e.g. the same label used for
the plastic bag)
• Make sure photographs are not blurred
35.
Carcass processing protocolHow to take photos?
1. As found (taken from directly above)
5
photos rule
2. Turned over (to show the ground-facing side)
3. From different angles
• to show any features that may help with identification
• head, wings, tail, feet, and additionally for bats, tragus (ear)
4. Showing any injuries
5. Showing the area immediately surrounding the fatality (e.g. relative to the nearest turbine, RAP,
OHL)
36.
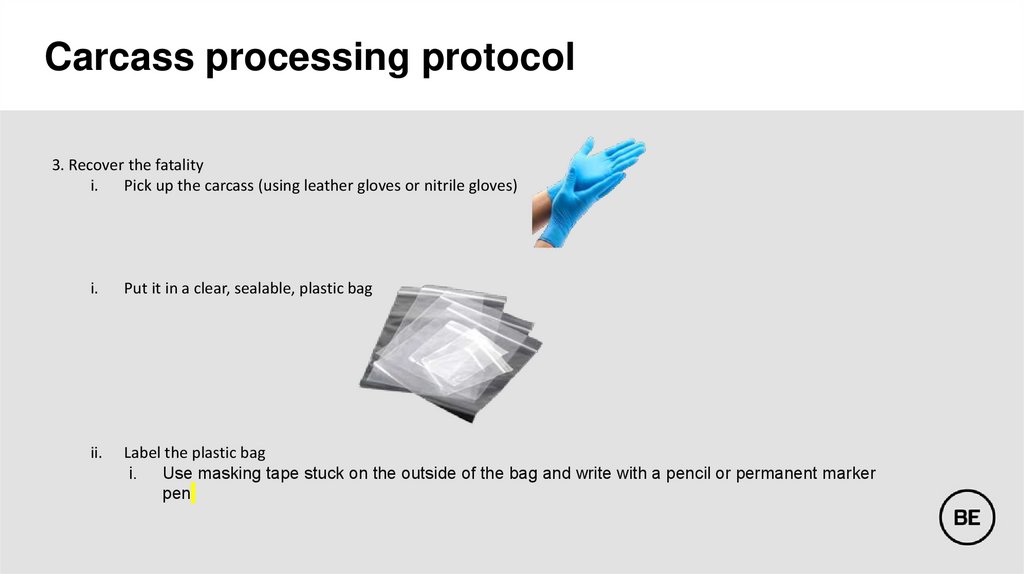
Carcass processing protocol3. Recover the fatality
i. Pick up the carcass (using leather gloves or nitrile gloves)
i.
Put it in a clear, sealable, plastic bag
ii.
Label the plastic bag
i. Use masking tape stuck on the outside of the bag and write with a pencil or permanent marker
pen
37.
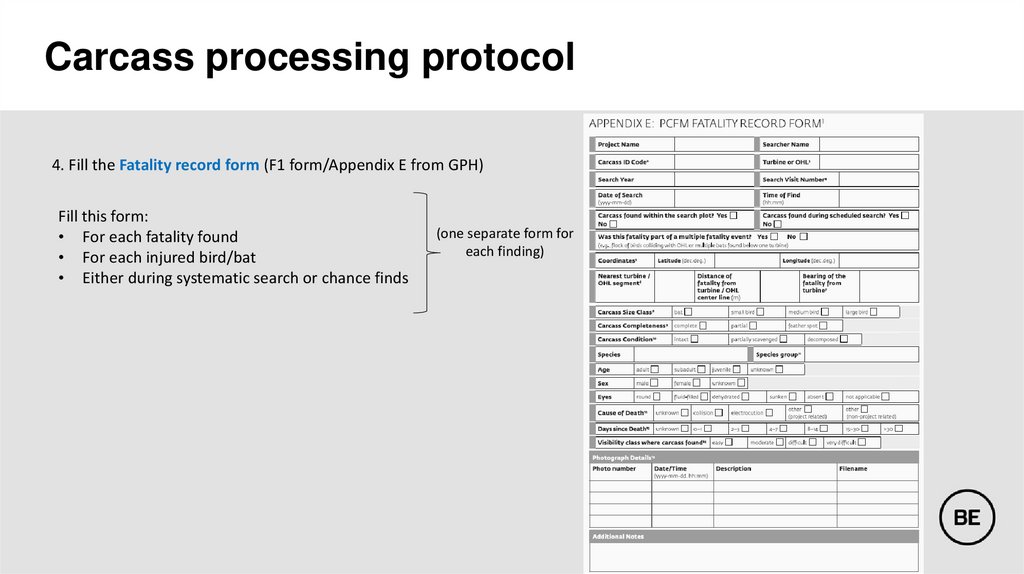
Carcass processing protocol4. Fill the Fatality record form (F1 form/Appendix E from GPH)
Fill this form:
• For each fatality found
• For each injured bird/bat
• Either during systematic search or chance finds
(one separate form for
each finding)
38.
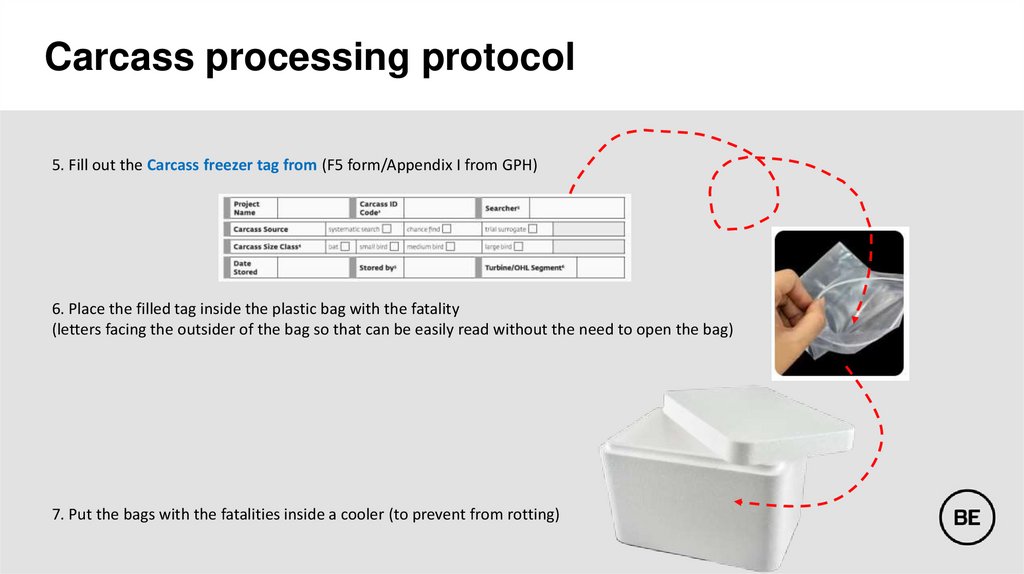
Carcass processing protocol5. Fill out the Carcass freezer tag from (F5 form/Appendix I from GPH)
6. Place the filled tag inside the plastic bag with the fatality
(letters facing the outsider of the bag so that can be easily read without the need to open the bag)
7. Put the bags with the fatalities inside a cooler (to prevent from rotting)
39.
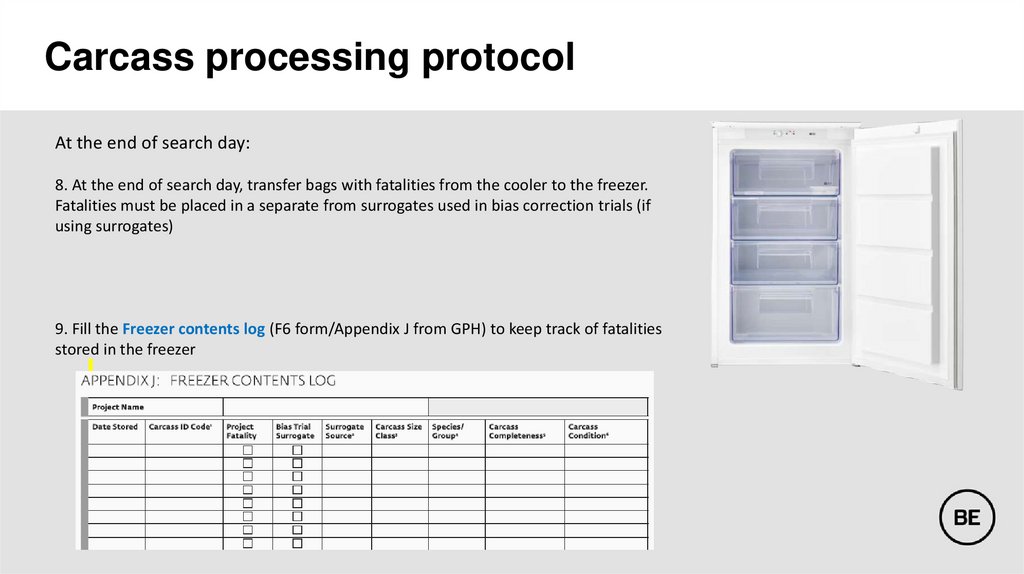
Carcass processing protocolAt the end of search day:
8. At the end of search day, transfer bags with fatalities from the cooler to the freezer.
Fatalities must be placed in a separate from surrogates used in bias correction trials (if
using surrogates)
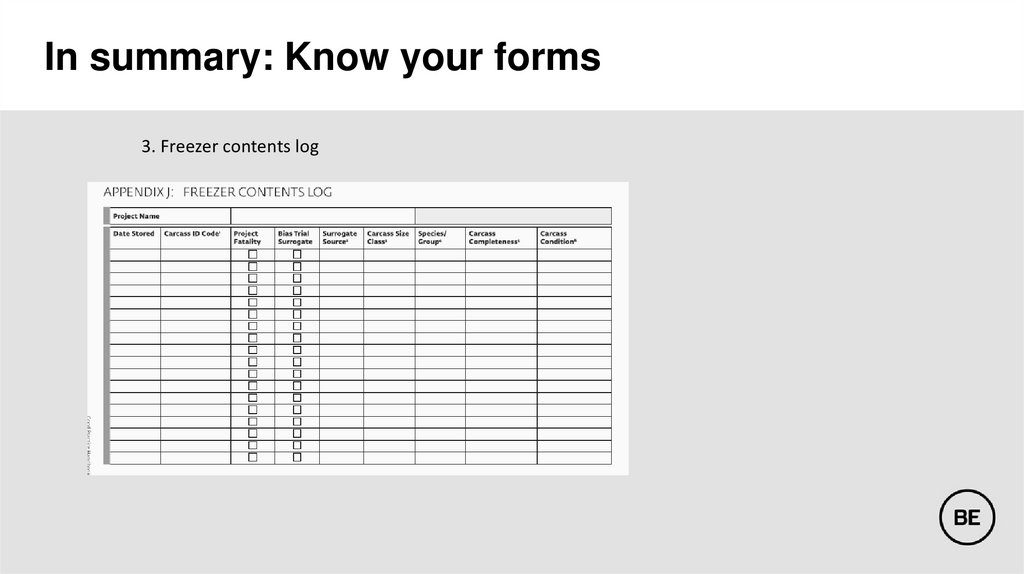
9. Fill the Freezer contents log (F6 form/Appendix J from GPH) to keep track of fatalities
stored in the freezer
40.
In summary: Know your forms1. Record searches
2. When a fatality/injured bat
or bird is found
Fatality form
(1 per each fatality/injured bat or bird)
41.
In summary: Know your forms3. Freezer contents log
42.
PCFM RELATED HEALTH &SAFETY PROTOCOL
43.
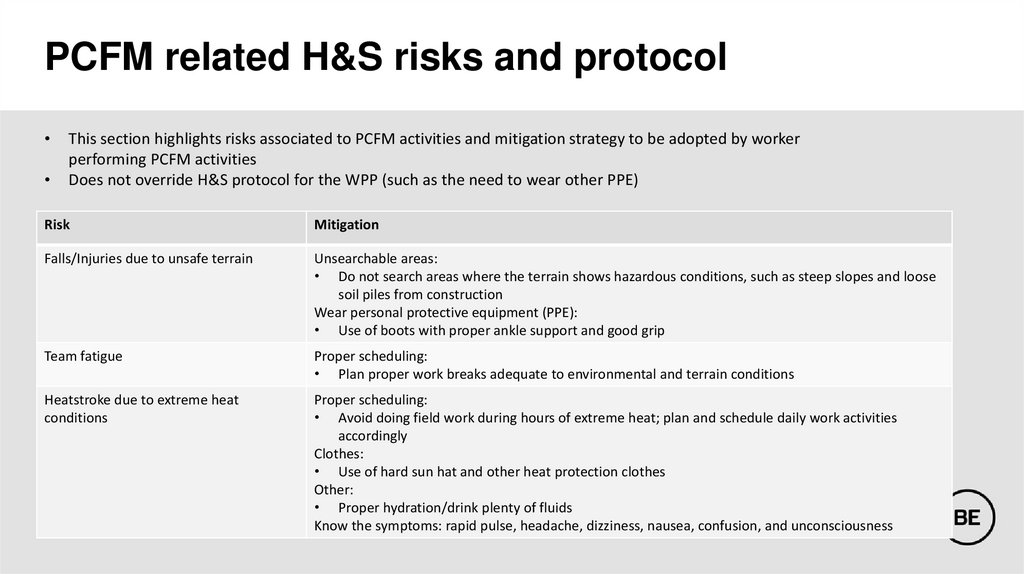
PCFM related H&S risks and protocolThis section highlights risks associated to PCFM activities and mitigation strategy to be adopted by worker
performing PCFM activities
Does not override H&S protocol for the WPP (such as the need to wear other PPE)
Risk
Mitigation
Falls/Injuries due to unsafe terrain
Unsearchable areas:
• Do not search areas where the terrain shows hazardous conditions, such as steep slopes and loose
soil piles from construction
Wear personal protective equipment (PPE):
• Use of boots with proper ankle support and good grip
Team fatigue
Proper scheduling:
• Plan proper work breaks adequate to environmental and terrain conditions
Heatstroke due to extreme heat
conditions
Proper scheduling:
• Avoid doing field work during hours of extreme heat; plan and schedule daily work activities
accordingly
Clothes:
• Use of hard sun hat and other heat protection clothes
Other:
• Proper hydration/drink plenty of fluids
Know the symptoms: rapid pulse, headache, dizziness, nausea, confusion, and unconsciousness
44.
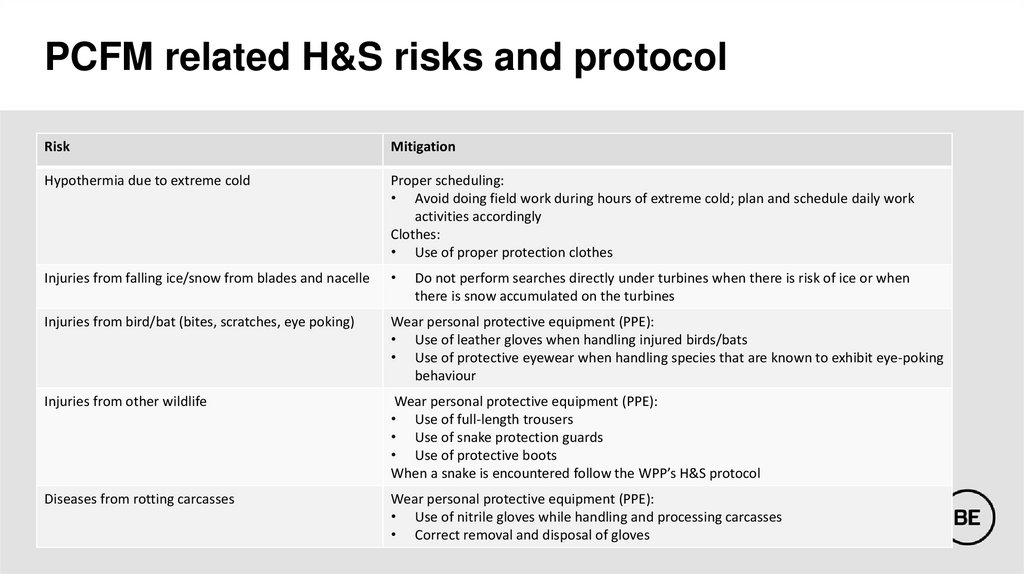
PCFM related H&S risks and protocolRisk
Mitigation
Hypothermia due to extreme cold
Proper scheduling:
• Avoid doing field work during hours of extreme cold; plan and schedule daily work
activities accordingly
Clothes:
• Use of proper protection clothes
Injuries from falling ice/snow from blades and nacelle
Injuries from bird/bat (bites, scratches, eye poking)
Wear personal protective equipment (PPE):
• Use of leather gloves when handling injured birds/bats
• Use of protective eyewear when handling species that are known to exhibit eye-poking
behaviour
Injuries from other wildlife
Wear personal protective equipment (PPE):
• Use of full-length trousers
• Use of snake protection guards
• Use of protective boots
When a snake is encountered follow the WPP’s H&S protocol
Diseases from rotting carcasses
Wear personal protective equipment (PPE):
• Use of nitrile gloves while handling and processing carcasses
• Correct removal and disposal of gloves
Do not perform searches directly under turbines when there is risk of ice or when
there is snow accumulated on the turbines