


 Информатика
 Программное обеспечение
Похожие презентации:
 and the fundamental tree algorithm")


")
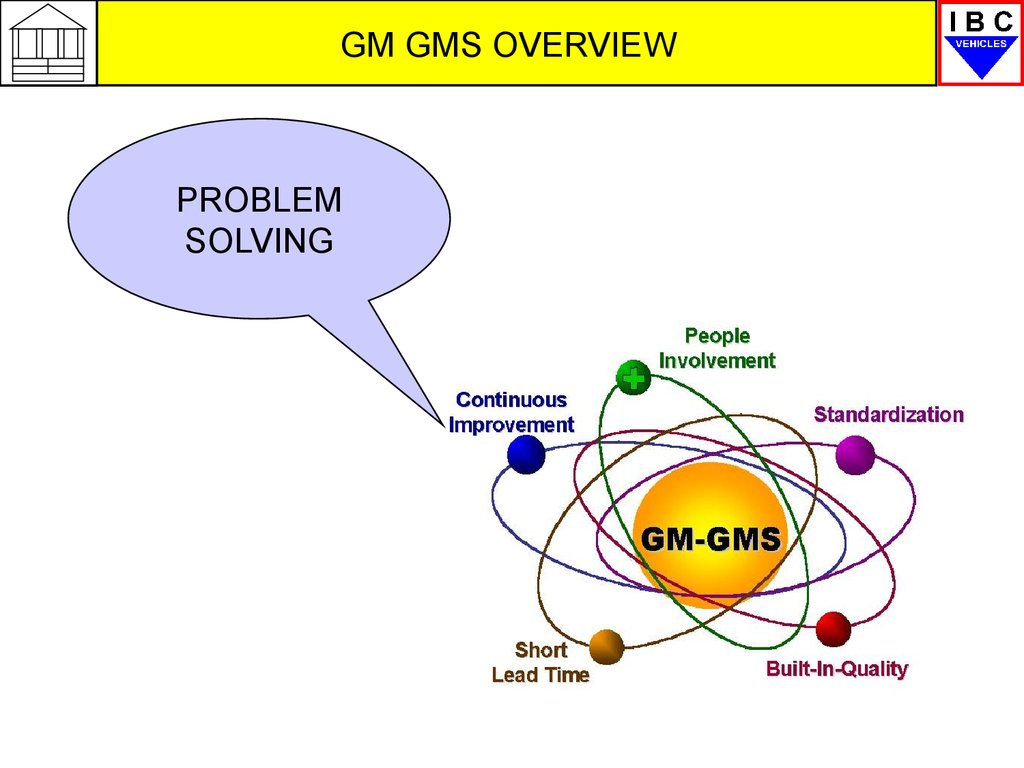
GM GMS overview problem solving
1.
GM GMS OVERVIEWPROBLEM
SOLVING
2.
PROBLEM SOLVINGIBC VEHICLES – STANDARD PROBLEM
SOLVING PROCESS
‘7 Diamonds’
3.
PROBLEM SOLVINGWhat is 7 Diamonds?
• Seven Diamonds is a standard 7 step problem solving
process. It demands that the manufacturing areas verify
that all processes are being followed correctly and all
tooling is working (and being used) correctly with the
right parts being used.
• Confirmation of these items MUST be made by
Manufacturing before Engineering can be involved in
any further, more detailed investigations.
70% of all Quality and Build problems are caused
by non-standard operating or tooling not working or
not being used correctly!
4.
PROBLEM SOLVINGWhy do we need the 7 Diamonds process?
We need to apply a standardised approach for every problem we have so that;
We fully UNDERSTAND all of the issues
We determine the RIGHTFUL OWNER/S of the problem
We ensure that corrective actions are EFFECTIVE
We actually SOLVE the problem.
Currently
We don’t always follow the same steps or directions.
Too often we attempt to solve problems without really understanding
them and all of the contributary factors.
By not identifying the real owner we do not arrive at the real root
cause and are left with permanent containments (extra work).
We often think we have cured a problem only for it to resurface at
a later date.
5.
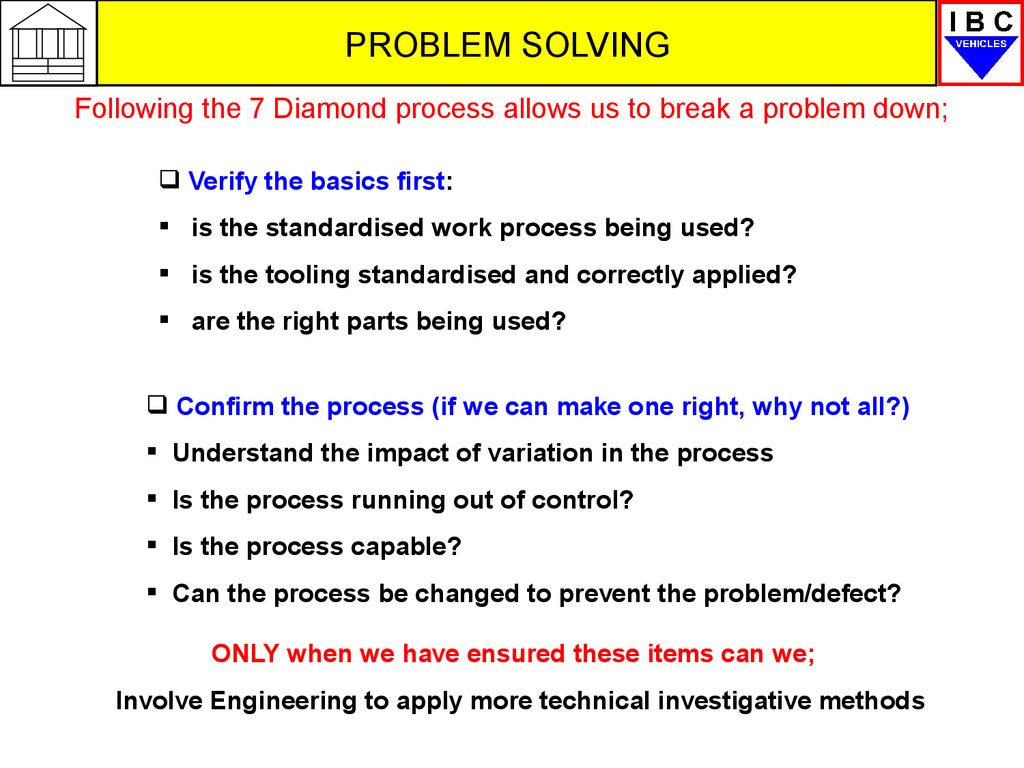
PROBLEM SOLVINGFollowing the 7 Diamond process allows us to break a problem down;
Verify the basics first:
is the standardised work process being used?
is the tooling standardised and correctly applied?
are the right parts being used?
Confirm the process (if we can make one right, why not all?)
Understand the impact of variation in the process
Is the process running out of control?
Is the process capable?
Can the process be changed to prevent the problem/defect?
ONLY when we have ensured these items can we;
Involve Engineering to apply more technical investigative methods
6. 7 Diamonds Standardised Problem Solving
PROBLEM SOLVING7 Diamonds
Standardised Problem Solving
Responsibility
Problem Identified
Begin Investigation
Will process
change resolve?
Responsibility
Manufacturing
1
Correct
Process?
Red-X study
Red X Engineer
(QE Co-ord)
5b
Responsibility
Manufacturing Engineer
5a
Manufacturing
2
Manufacturing
3
PRT Teams
4a
SQA
4b
Correct
Tool?
Tolerance stack-up,
CAD study
VEC, HPT, QE
(QE co-ord)
6
Correct
Part?
Parts swap,
Parts
Quality?
More Complex
Problem
Level 2 Analysis
(Engin’g)
7
7. Review of Responsibilities
PROBLEM SOLVINGReview of Responsibilities
• Diamonds 1-3
Production/Maintenance Supervisor &
Team Leader/Team Members
• Diamond 4a
Production Unit Problem Resolution Team
• Diamond 4b
SQA
• Diamond 5a
Manufacturing Engineer
• Diamond 5b-6
QE (Red-X, CAD, Tolerance Stack-up
• Diamond 7
Product Engineering. Level 2 analysis
(QE co-ordination)
8. Diamonds 1 - 3
PROBLEM SOLVINGDiamonds 1 - 3
Diamonds 1 to 3 of the process are used to determine if the
Production organisation is running the manufacturing process to
design intent.
If the manufacturing process is NOT being managed to design intent,
then it must be corrected and validated, before we can consider
asking for Engineering assistance.
Engineering referral only occurs when the manufacturing process
does meet design intent and the problem still exists.
9.
PROBLEM SOLVINGManufacturing
Corrects
Correct
Process?
Manufacturing
Corrects
Correct
Tool?
Manufacturing
Corrects
Correct
Part?
PRT Team
and SQA
Parts swap,
Parts Quality?
1 – Verify/Correct Process
2 – Verify/Correct Tooling
3 – Verify/Correct Parts
4a/b – Investigate Parts
10.
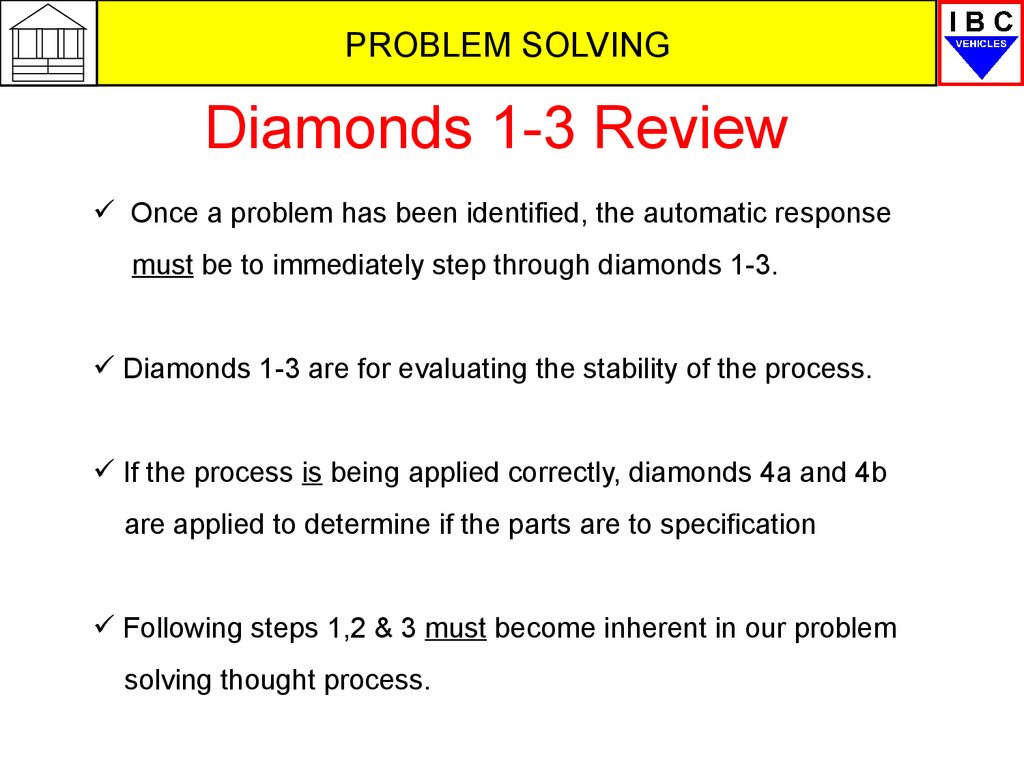
PROBLEM SOLVINGDiamonds 1-3 Review
Once a problem has been identified, the automatic response
must be to immediately step through diamonds 1-3.
Diamonds 1-3 are for evaluating the stability of the process.
If the process is being applied correctly, diamonds 4a and 4b
are applied to determine if the parts are to specification
Following steps 1,2 & 3 must become inherent in our problem
solving thought process.
11.
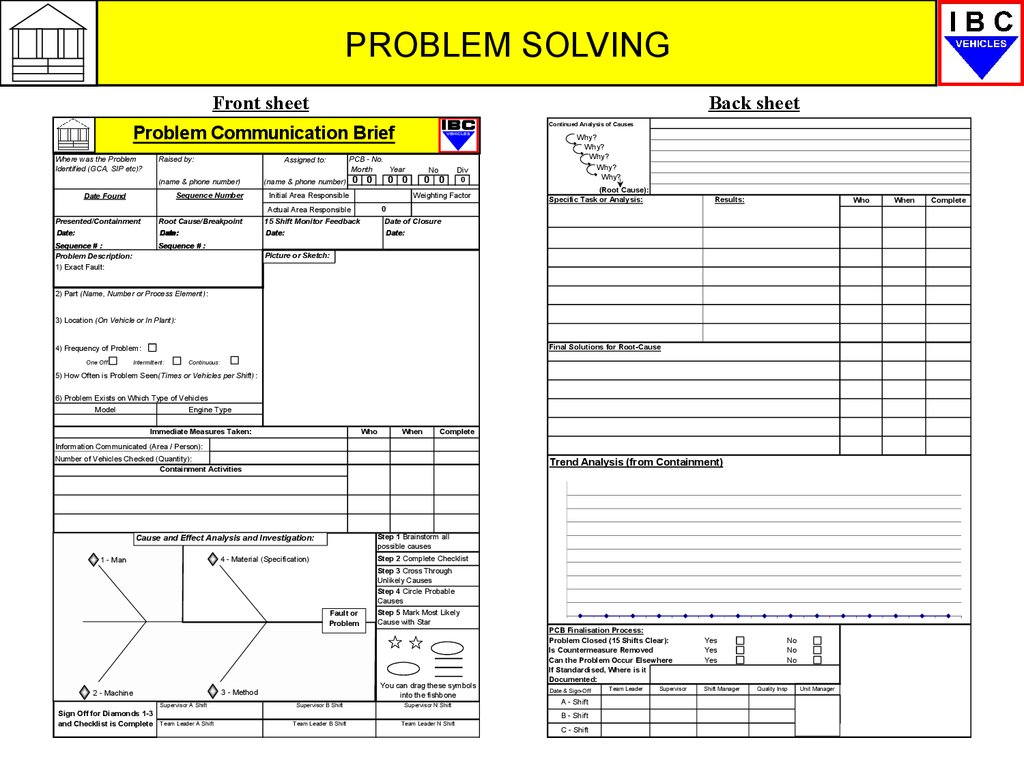
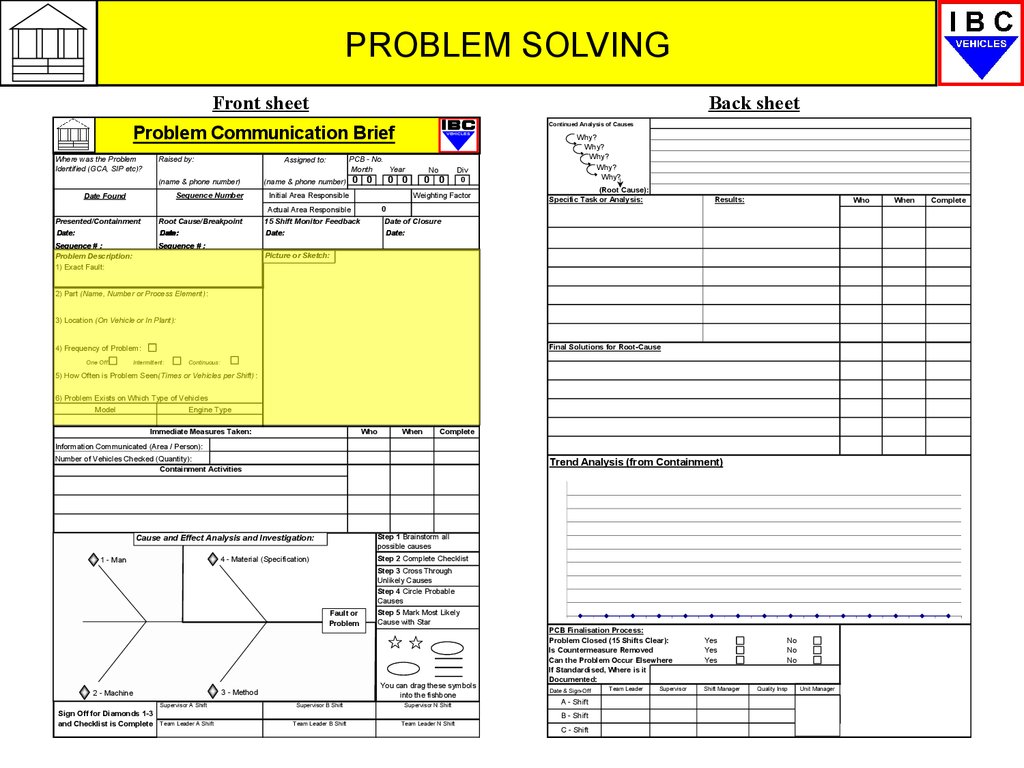
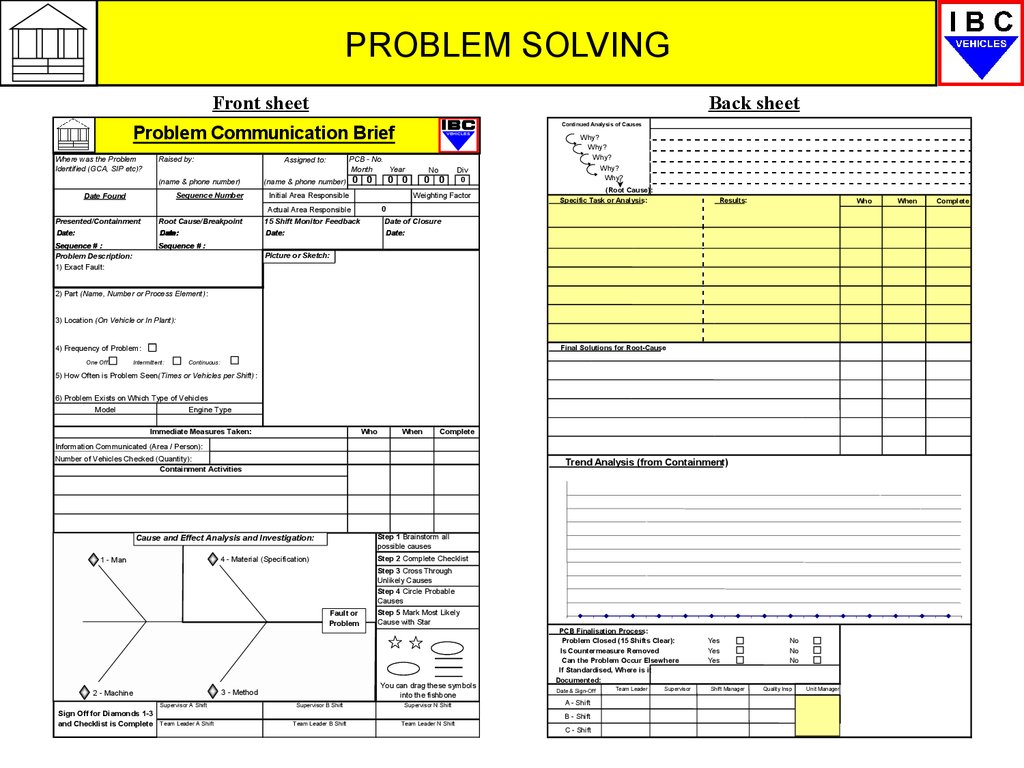
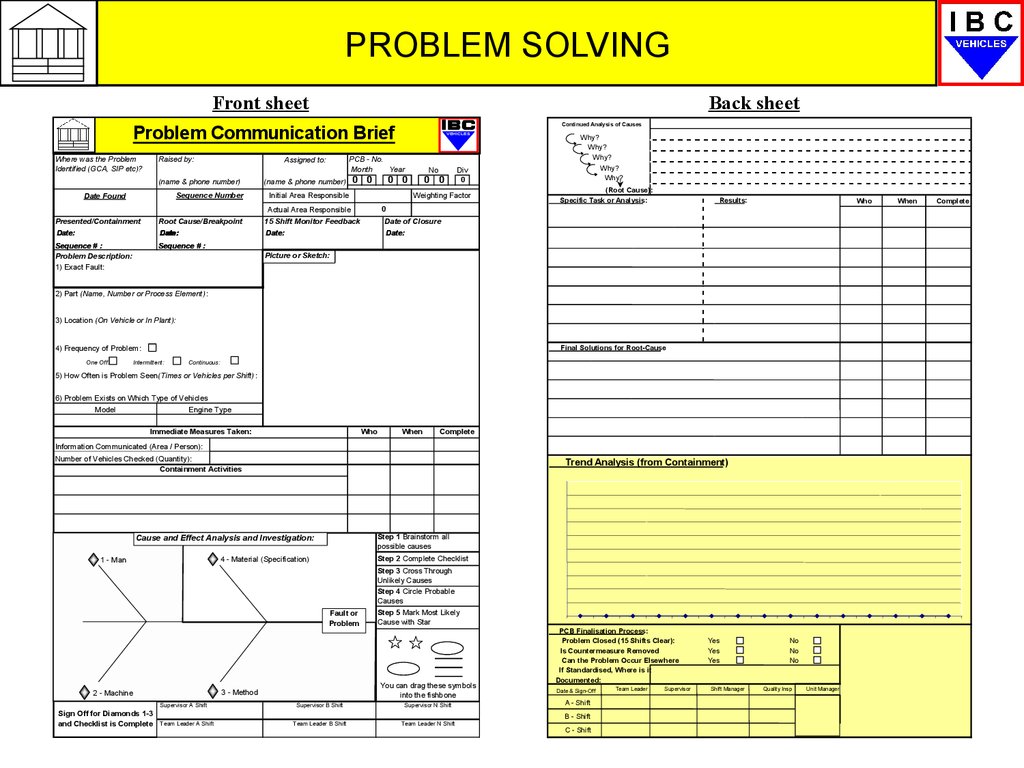
PROBLEM SOLVINGPCB – Problem Communication Brief
The PCB is a standard document used for problem solving Quality
concerns at IBC.
It ensures that everyone applies the same thought process towards
understanding and resolving these problems.
As you will see the PCB is aligned to the 7 Diamonds process.
We will now look briefly at how the PCB works, remembering that
the first 3 Diamonds are those you will be involved in.
12.
PROBLEM SOLVINGFront sheet
Back sheet
Continued Analysis of Causes
Problem Communication Brief
Raised by:
Where was the Problem
Identified (GCA, SIP etc)?
Sequence Number
Date Found
PCB - No..:
Month
Year
Assigned to:
(name & phone number)
VEHICLES
(name & phone number)
0 0
No
0 0
Initial Area Responsible
0 0
Div
0
Weighting Factor
Why?
Why?
Why?
Why?
Why?
(Root Cause):
Specific Task or Analysis:
Results:
Who
0
Actual Area Responsible
Presented/Containment
Root Cause/Breakpoint
15 Shift Monitor Feedback
Date of Closure
Date:
Date:
Date:
Date:
Sequence # :
Problem Description:
1) Exact Fault:
Sequence # :
Picture or Sketch:
2) Part (Name, Number or Process Element) :
3) Location (On Vehicle or In Plant):
Final Solutions for Root-Cause
4) Frequency of Problem:
One Off:
Intermittent:
Continuous:
5) How Often is Problem Seen(Times or Vehicles per Shift) :
6) Problem Exists on Which Type of Vehicles
Model
Engine Type
Immediate Measures Taken:
Who
When
Complete
Information Communicated (Area / Person):
Number of Vehicles Checked (Quantity):
Containment Activities
Trend Analysis (from Containment)
Step 1 Brainstorm all
possible causes
Cause and Effect Analysis and Investigation:
Step 2 Complete Checklist
4 - Material (Specification)
1 - Man
Fault or
Problem
Supervisor A Shift
Sign Off for Diamonds 1-3
and Checklist is Complete
You can drag these symbols
into the fishbone
3 - Method
2 - Machine
Step 3 Cross Through
Unlikely Causes
Step 4 Circle Probable
Causes
Step 5 Mark Most Likely
Cause with Star
Supervisor B Shift
Supervisor N Shift
Team Leader B Shift
Team Leader N Shift
PCB Finalisation Process:
Problem Closed (15 Shifts Clear):
Is Countermeasure Removed
Can the Problem Occur Elsewhere
If Standardised, Where is it
Documented:
Date & Sign-Off
A - Shift
B - Shift
Team Leader A Shift
C - Shift
Team Leader
Supervisor
Yes
Yes
Yes
Shift Manager
No
No
No
Quality Insp
Unit Manager
When
Complete
13.
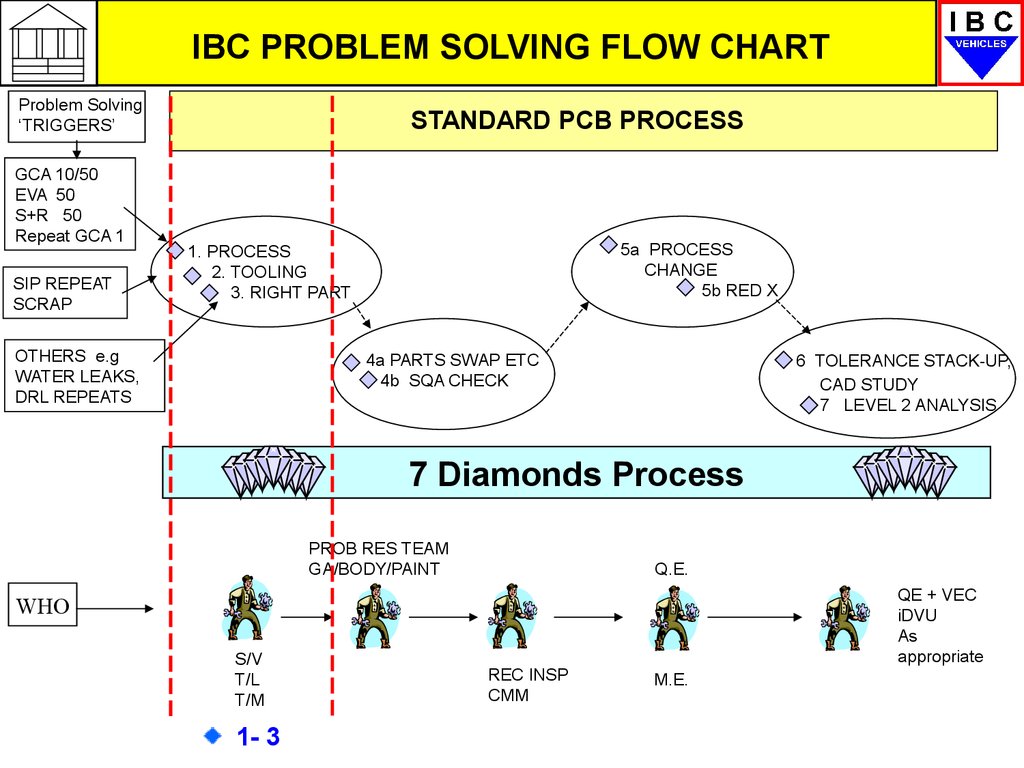
IBC PROBLEM SOLVING FLOW CHARTProblem Solving
‘TRIGGERS’
GCA 10/50
EVA 50
S+R 50
Repeat GCA 1
SIP REPEAT
SCRAP
STANDARD PCB PROCESS
5a PROCESS
CHANGE
5b RED X
1. PROCESS
2. TOOLING
3. RIGHT PART
OTHERS e.g
WATER LEAKS,
DRL REPEATS
4a PARTS SWAP ETC
4b SQA CHECK
6 TOLERANCE STACK-UP,
CAD STUDY
7 LEVEL 2 ANALYSIS
7 Diamonds Process
PROB RES TEAM
GA/BODY/PAINT
Q.E.
QE + VEC
iDVU
As
appropriate
WHO
S/V
T/L
T/M
1- 3
REC INSP
CMM
M.E.
14. PROBLEM SOLVING
Generating PCBsThere are a number of ‘trigger’ points which generate the need for a PCB to be
issued and completed. These largely determine who and what generates a PCB.
(1) ‘Central’ PCBs
Issued by Plant QA for GCA Audit Factor 50, 10 and repetitive Factor 1.0 defects
found on Audit vehicles. Repetitive defects found at the ‘Squeak and Rattle’ test,
Water Test, C.A.T audit and Electrical Systems audit also generate PCBs.
(2)
Local/Internal PCBs
These are issued by the Unit Manager through the Unit PRT Team for repetitive
Quality defects, DRL repeats, BIW Audit defects and high cost or repeat Scrap
parts and assemblies.
15. PROBLEM SOLVING
All PCBs are processed through the relevant Unit PRT Team who log theminto the Unit PCB tracking system and determine who in the Unit is the right
person/s to complete the PCB.
PCB – Escalation to Diamond 4a
If after completing each stage of Diamond 1-3 on the PCB form the cause is
not apparent or it is clear the problem belongs to another department the PCB
is returned to the Unit PRT Team who will decide whether to refer the PCB
elsewhere or progress the PCB to Diamonds 4a and/or 4b.
On completion all PCBs are returned to the PRT Team to update the tracking
system and forward completed ‘central’ PCBs back to Plant QA.
16. PROBLEM SOLVING
All PCBs pertaining to any particular area are tracked on a Section ‘Live’ PCBTracking board.
Here all OPEN PCBs are displayed and tracked for 15 shifts after the final counter
measures have been implemented.
Supervisors and Team Leaders will discuss these issues and the current status
with their Team members on a regular basis.
17. PROBLEM SOLVING
So how does the PCB work?We will now look briefly at each stage of the PCB
process using simple examples which illustrate how
to complete each section.
18.
PROBLEM SOLVINGFront sheet
Back sheet
Continued Analysis of Causes
Problem Communication Brief
Raised by:
Where was the Problem
Identified (GCA, SIP etc)?
Sequence Number
Date Found
PCB - No..:
Month
Year
Assigned to:
(name & phone number)
VEHICLES
(name & phone number)
0 0
No
0 0
Initial Area Responsible
0 0
Div
0
Weighting Factor
Why?
Why?
Why?
Why?
Why?
(Root Cause):
Specific Task or Analysis:
Results:
Who
0
Actual Area Responsible
Presented/Containment
Root Cause/Breakpoint
15 Shift Monitor Feedback
Date of Closure
Date:
Date:
Date:
Date:
Sequence # :
Problem Description:
1) Exact Fault:
Sequence # :
Picture or Sketch:
2) Part (Name, Number or Process Element) :
3) Location (On Vehicle or In Plant):
Final Solutions for Root-Cause
4) Frequency of Problem:
One Off:
Intermittent:
Continuous:
5) How Often is Problem Seen(Times or Vehicles per Shift) :
6) Problem Exists on Which Type of Vehicles
Model
Engine Type
Immediate Measures Taken:
Who
When
Complete
Information Communicated (Area / Person):
Number of Vehicles Checked (Quantity):
Containment Activities
Trend Analysis (from Containment)
Step 1 Brainstorm all
possible causes
Cause and Effect Analysis and Investigation:
Step 2 Complete Checklist
4 - Material (Specification)
1 - Man
Fault or
Problem
Supervisor A Shift
Sign Off for Diamonds 1-3
and Checklist is Complete
You can drag these symbols
into the fishbone
3 - Method
2 - Machine
Step 3 Cross Through
Unlikely Causes
Step 4 Circle Probable
Causes
Step 5 Mark Most Likely
Cause with Star
Supervisor B Shift
Supervisor N Shift
Team Leader B Shift
Team Leader N Shift
PCB Finalisation Process:
Problem Closed (15 Shifts Clear):
Is Countermeasure Removed
Can the Problem Occur Elsewhere
If Standardised, Where is it
Documented:
Date & Sign-Off
A - Shift
B - Shift
Team Leader A Shift
C - Shift
Team Leader
Supervisor
Yes
Yes
Yes
Shift Manager
No
No
No
Quality Insp
Unit Manager
When
Complete
19.
PROBLEM SOLVINGUnit Reference Number
provided by the Quality Dept
OR Unit PRT team
PCB ADMIN DATA
Problem Communication Brief
Where was the Problem
Identified (GCA, SIP etc)?
GCA AUDIT
Date Found
01/01/99
Raised by:
Assigned to:
P GASSOR (PRT)
(name & phone number)
A N OTHER
PCB - No..:
Month
Year
(name & phone number)
0 0
0 0
V EHICLES
No
0 0
Sequence Number
Initial Area Responsible
BODY
Weighting Factor
323323 (or Body Tag No)
Actual Area Responsible
0
1/10/50
Presented/Containment
Root Cause/Breakpoint
15 Shift Monitor Feedback
Date of Closure
Date:
Date:
Date:
Date:
Sequence # :
02/01/99
323493
Div
0
09/01/99
Sequence # :
325493
16/01/99
16/01/99
20.
PROBLEM SOLVINGFront sheet
Back sheet
Continued Analysis of Causes
Problem Communication Brief
Raised by:
Where was the Problem
Identified (GCA, SIP etc)?
Sequence Number
Date Found
PCB - No..:
Month
Year
Assigned to:
(name & phone number)
VEHICLES
(name & phone number)
0 0
No
0 0
Initial Area Responsible
0 0
Div
0
Weighting Factor
Why?
Why?
Why?
Why?
Why?
(Root Cause):
Specific Task or Analysis:
Results:
Who
0
Actual Area Responsible
Presented/Containment
Root Cause/Breakpoint
15 Shift Monitor Feedback
Date of Closure
Date:
Date:
Date:
Date:
Sequence # :
Problem Description:
1) Exact Fault:
Sequence # :
Picture or Sketch:
2) Part (Name, Number or Process Element) :
3) Location (On Vehicle or In Plant):
Final Solutions for Root-Cause
4) Frequency of Problem:
One Off:
Intermittent:
Continuous:
5) How Often is Problem Seen(Times or Vehicles per Shift) :
6) Problem Exists on Which Type of Vehicles
Model
Engine Type
Immediate Measures Taken:
Who
When
Complete
Information Communicated (Area / Person):
Number of Vehicles Checked (Quantity):
Containment Activities
Trend Analysis (from Containment)
Step 1 Brainstorm all
possible causes
Cause and Effect Analysis and Investigation:
Step 2 Complete Checklist
4 - Material (Specification)
1 - Man
Fault or
Problem
Supervisor A Shift
Sign Off for Diamonds 1-3
and Checklist is Complete
You can drag these symbols
into the fishbone
3 - Method
2 - Machine
Step 3 Cross Through
Unlikely Causes
Step 4 Circle Probable
Causes
Step 5 Mark Most Likely
Cause with Star
Supervisor B Shift
Supervisor N Shift
Team Leader B Shift
Team Leader N Shift
PCB Finalisation Process:
Problem Closed (15 Shifts Clear):
Is Countermeasure Removed
Can the Problem Occur Elsewhere
If Standardised, Where is it
Documented:
Date & Sign-Off
A - Shift
B - Shift
Team Leader A Shift
C - Shift
Team Leader
Supervisor
Yes
Yes
Yes
Shift Manager
No
No
No
Quality Insp
Unit Manager
When
Complete
21.
PROBLEM SOLVINGPROBLEM DESCRIPTION/DATA
Sequence # :
Problem Description:
1) Exact Fault:
Sequence # :
Picture or Sketch:
WELD NUT MISSING FROM LH
SIDE LOAD DOOR
2) Part (Name, Number or Process Element) :
LH SIDE LOAD DOOR ASSEMBLY COMPLETE
3) Location (On Vehicle or In Plant):
LH SIDE LOAD DOOR LOCK LOCATION
4) Frequency of Problem:
One Off:
Intermittent:
Continuous:
5) How Often is Problem Seen(Times or Vehicles per Shift) :
AVE 2 PER WEEK (FROM STABS DATA)
6) Problem Exists on Which Type of Vehicles
Model
ALL + LH S/L DOOR
Engine Type
N/A
22.
PROBLEM SOLVINGFront sheet
Back sheet
Continued Analysis of Causes
Problem Communication Brief
Raised by:
Where was the Problem
Identified (GCA, SIP etc)?
Sequence Number
Date Found
PCB - No..:
Month
Year
Assigned to:
(name & phone number)
VEHICLES
(name & phone number)
0 0
No
0 0
Initial Area Responsible
0 0
Div
0
Weighting Factor
Why?
Why?
Why?
Why?
Why?
(Root Cause):
Specific Task or Analysis:
Results:
Who
0
Actual Area Responsible
Presented/Containment
Root Cause/Breakpoint
15 Shift Monitor Feedback
Date of Closure
Date:
Date:
Date:
Date:
Sequence # :
Problem Description:
1) Exact Fault:
Sequence # :
Picture or Sketch:
2) Part (Name, Number or Process Element) :
3) Location (On Vehicle or In Plant):
Final Solutions for Root-Cause
4) Frequency of Problem:
One Off:
Intermittent:
Continuous:
5) How Often is Problem Seen(Times or Vehicles per Shift) :
6) Problem Exists on Which Type of Vehicles
Model
Engine Type
Immediate Measures Taken:
Who
When
Complete
Information Communicated (Area / Person):
Number of Vehicles Checked (Quantity):
Containment Activities
Trend Analysis (from Containment)
Step 1 Brainstorm all
possible causes
Cause and Effect Analysis and Investigation:
Step 2 Complete Checklist
4 - Material (Specification)
1 - Man
Fault or
Problem
Supervisor A Shift
Sign Off for Diamonds 1-3
and Checklist is Complete
You can drag these symbols
into the fishbone
3 - Method
2 - Machine
Step 3 Cross Through
Unlikely Causes
Step 4 Circle Probable
Causes
Step 5 Mark Most Likely
Cause with Star
Supervisor B Shift
Supervisor N Shift
Team Leader B Shift
Team Leader N Shift
PCB Finalisation Process:
Problem Closed (15 Shifts Clear):
Is Countermeasure Removed
Can the Problem Occur Elsewhere
If Standardised, Where is it
Documented:
Date & Sign-Off
A - Shift
B - Shift
Team Leader A Shift
C - Shift
Team Leader
Supervisor
Yes
Yes
Yes
Shift Manager
No
No
No
Quality Insp
Unit Manager
When
Complete
23.
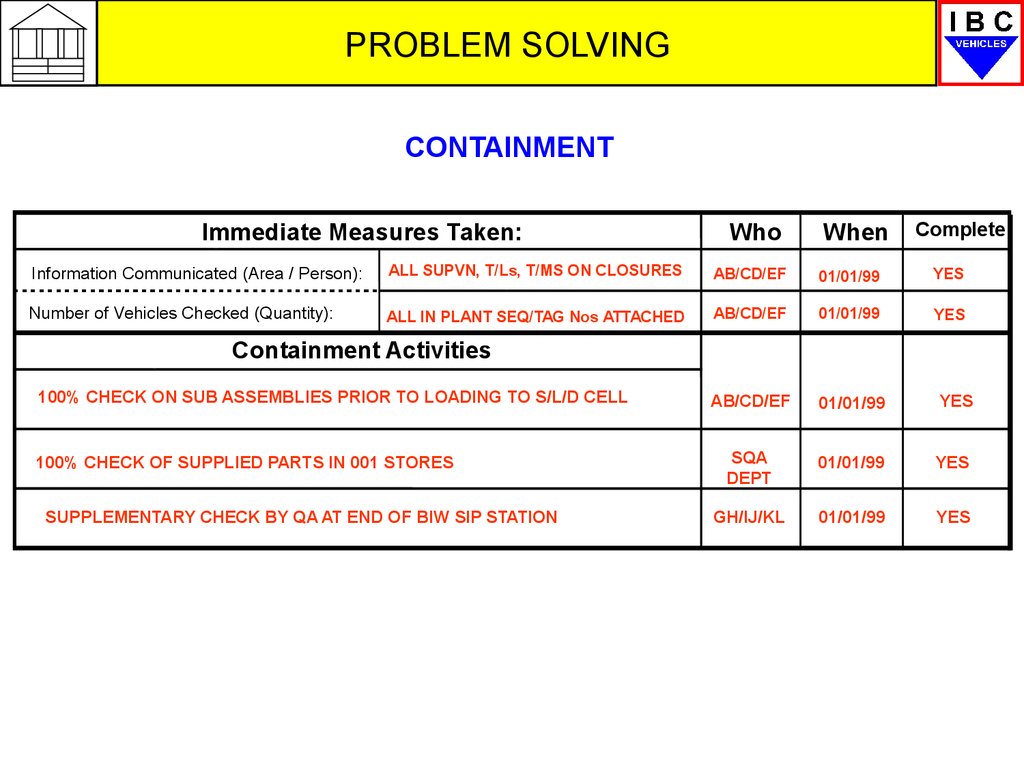
PROBLEM SOLVINGCONTAINMENT
Immediate Measures Taken:
Who
When
Complete
Information Communicated (Area / Person):
ALL SUPVN, T/Ls, T/MS ON CLOSURES
AB/CD/EF
01/01/99
YES
Number of Vehicles Checked (Quantity):
ALL IN PLANT SEQ/TAG Nos ATTACHED
AB/CD/EF
01/01/99
YES
AB/CD/EF
01/01/99
YES
SQA
DEPT
01/01/99
YES
GH/IJ/KL
01/01/99
YES
Containment Activities
100% CHECK ON SUB ASSEMBLIES PRIOR TO LOADING TO S/L/D CELL
100% CHECK OF SUPPLIED PARTS IN 001 STORES
SUPPLEMENTARY CHECK BY QA AT END OF BIW SIP STATION
24.
PROBLEM SOLVINGFront sheet
Back sheet
Continued Analysis of Causes
Problem Communication Brief
Raised by:
Where was the Problem
Identified (GCA, SIP etc)?
Sequence Number
Date Found
PCB - No..:
Month
Year
Assigned to:
(name & phone number)
VEHICLES
(name & phone number)
0 0
No
0 0
Initial Area Responsible
0 0
Div
0
Weighting Factor
Why?
Why?
Why?
Why?
Why?
(Root Cause):
Specific Task or Analysis:
Results:
Who
0
Actual Area Responsible
Presented/Containment
Root Cause/Breakpoint
15 Shift Monitor Feedback
Date of Closure
Date:
Date:
Date:
Date:
Sequence # :
Problem Description:
1) Exact Fault:
Sequence # :
Picture or Sketch:
2) Part (Name, Number or Process Element) :
3) Location (On Vehicle or In Plant):
Final Solutions for Root-Cause
4) Frequency of Problem:
One Off:
Intermittent:
Continuous:
5) How Often is Problem Seen(Times or Vehicles per Shift) :
6) Problem Exists on Which Type of Vehicles
Model
Engine Type
Immediate Measures Taken:
Who
When
Complete
Information Communicated (Area / Person):
Number of Vehicles Checked (Quantity):
Containment Activities
Trend Analysis (from Containment)
Step 1 Brainstorm all
possible causes
Cause and Effect Analysis and Investigation:
Step 2 Complete Checklist
4 - Material (Specification)
1 - Man
Fault or
Problem
Supervisor A Shift
Sign Off for Diamonds 1-3
and Checklist is Complete
You can drag these symbols
into the fishbone
3 - Method
2 - Machine
Step 3 Cross Through
Unlikely Causes
Step 4 Circle Probable
Causes
Step 5 Mark Most Likely
Cause with Star
Supervisor B Shift
Supervisor N Shift
Team Leader B Shift
Team Leader N Shift
PCB Finalisation Process:
Problem Closed (15 Shifts Clear):
Is Countermeasure Removed
Can the Problem Occur Elsewhere
If Standardised, Where is it
Documented:
Date & Sign-Off
A - Shift
B - Shift
Team Leader A Shift
C - Shift
Team Leader
Supervisor
Yes
Yes
Yes
Shift Manager
No
No
No
Quality Insp
Unit Manager
When
Complete
25.
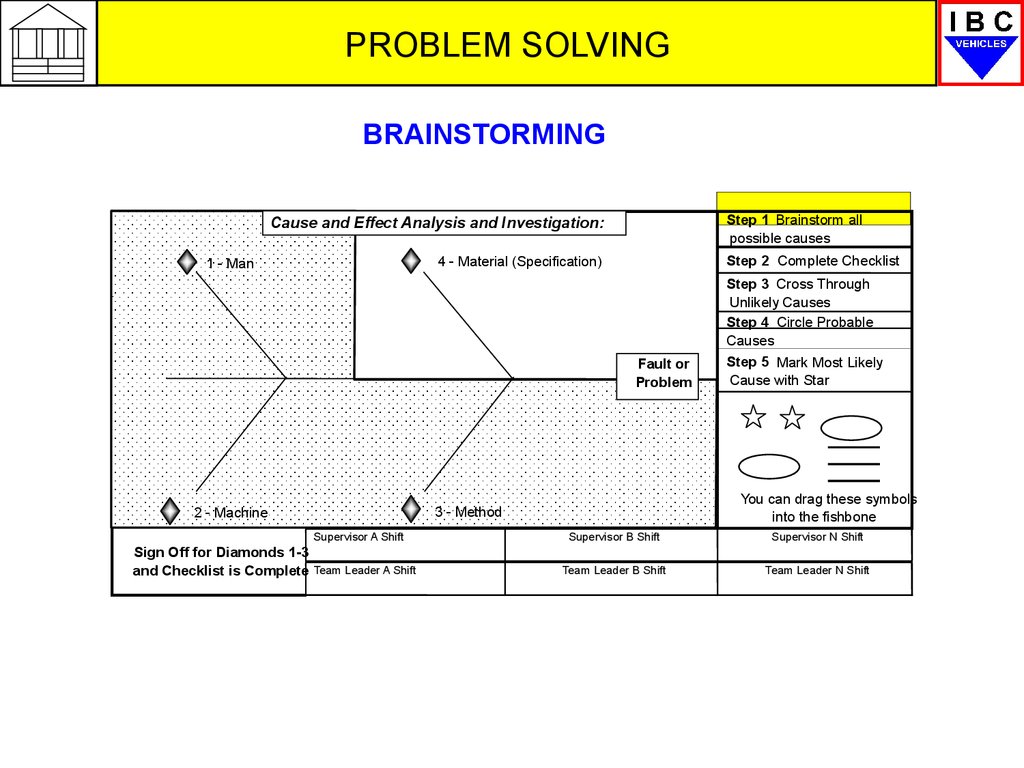
PROBLEM SOLVINGBRAINSTORMING
Step 1 Brainstorm all
possible causes
Cause and Effect Analysis and Investigation:
Step 2 Complete Checklist
4 - Material (Specification)
1 - Man
Step 3 Cross Through
Unlikely Causes
Step 4 Circle Probable
Causes
Fault or
Problem
Supervisor A Shift
Sign Off for Diamonds 1-3
and Checklist is Complete
You can drag these symbols
into the fishbone
3 - Method
2 - Machine
Team Leader A Shift
Step 5 Mark Most Likely
Cause with Star
Supervisor B Shift
Supervisor N Shift
Team Leader B Shift
Team Leader N Shift
26.
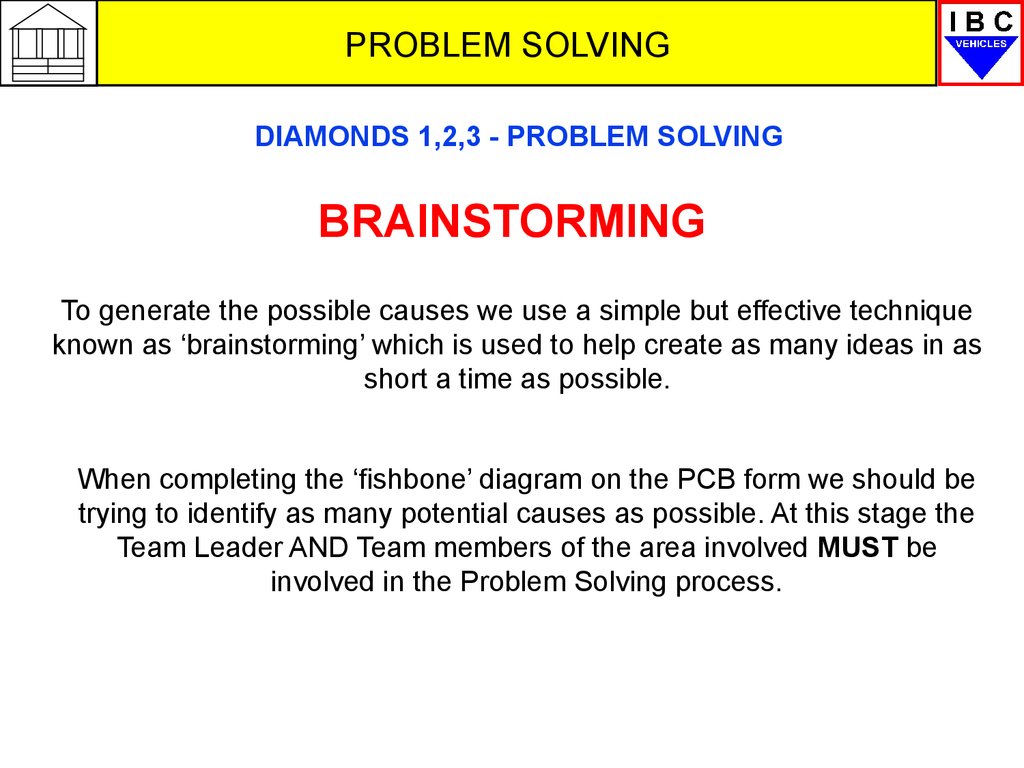
PROBLEM SOLVINGDIAMONDS 1,2,3 - PROBLEM SOLVING
BRAINSTORMING
To generate the possible causes we use a simple but effective technique
known as ‘brainstorming’ which is used to help create as many ideas in as
short a time as possible.
When completing the ‘fishbone’ diagram on the PCB form we should be
trying to identify as many potential causes as possible. At this stage the
Team Leader AND Team members of the area involved MUST be
involved in the Problem Solving process.
27.
PROBLEM SOLVINGDIAMONDS 1-3 PROBLEM SOLVING TOOLS
HOW TO BRAINSTORM?
It is best performed in small groups. For example; a Supervisor, Team
Leader and some or all of the team members.
Ensure all group members are aware of the nature of the problem/defect e.g.
missing part, damage, wrong part etc.
Next, ask each person to think of as many possible causes for the defect
(however likely or unlikely they may seem).
Get each person to briefly explain their ideas and note down EVERY idea
clearly on a flipchart/paper.
As a group discuss each idea and agree on the most likely causes.
Where possible ask group members to verify/investigate the most likely causes
and suggest suitable countermeasures
28.
PROBLEM SOLVINGDIAMONDS 1-3 PROBLEM SOLVING TOOLS
BRAINSTORMING – DO’s and DON’Ts
DO – record and discuss every idea – however extreme they may appear (quite
often even the strangest ideas prove to contain some benefits)
DON’T – never dismiss or ridicule any ideas. This is likely to switch that person
off and refrain from any further positive input.
DO – try to ensure that all ideas are fully understood – ask individuals to
explain them and ask questions to ensure there are no misunderstandings.
DON’T – be influenced by any previous history of a particular problem or defect
– always start with a blank sheet of paper!
DO – ensure whenever an idea is discarded, that the individual who came up
with it fully understands why it will not be pursued.
29.
PROBLEM SOLVINGBRAINSTORMING - CHECK LIST
Step 1 Brainstorm all
possible causes
Cause and Effect Analysis and Investigation:
Step 2 Complete Checklist
4 - Material (Specification)
1 - Man
Missed operation?
Operator not trained?
Operator not working to
SOS/JES?
Fault or
Problem
Welds missed? Operator unable to see if part is present?
Welds failed?
Operator checking for part present?
Poke –Yoke not working?
Following SOS/JES correctly?
Faulty part location pins/clamps?
3 - Method
2 - Machine
Supervisor A Shift
Sign Off for Diamonds 1-3
and Checklist Complete
Team Leader A Shift
Step 3 Cross Through
Unlikely Causes
Step 4 Circle Probable
Causes
Step 5 Mark Most Likely
Cause with Star
You can drag these symbols
into the fishbone
Supervisor B Shift
Supervisor N Shift
Team Leader B Shift
Team Leader N Shift
30.
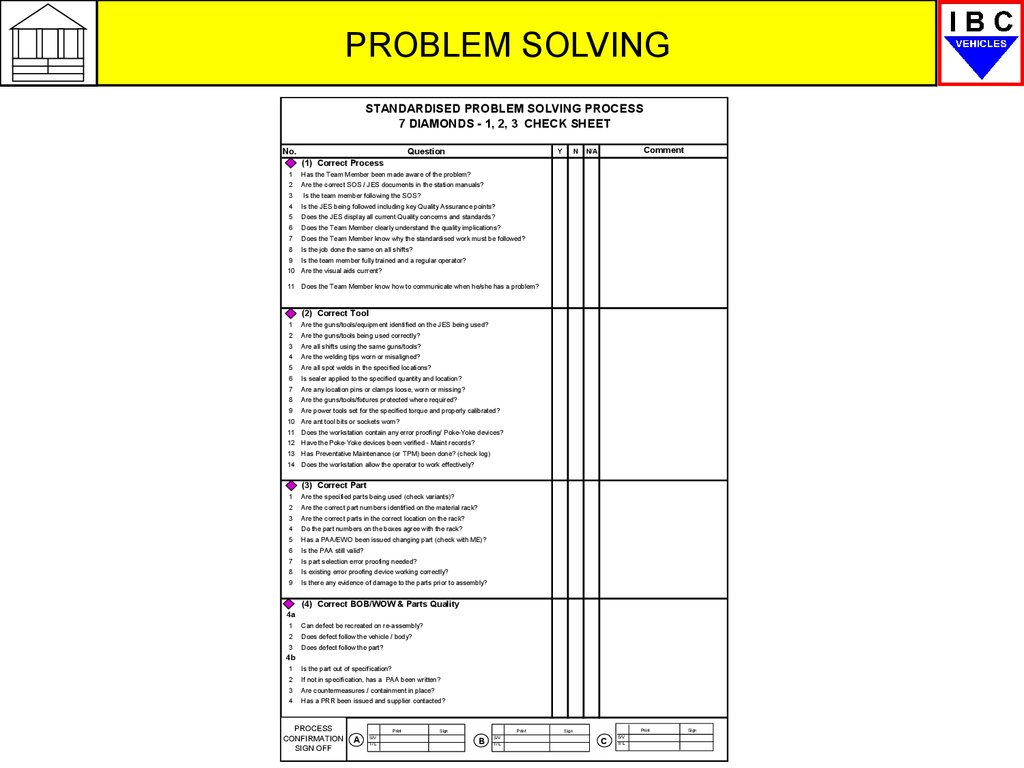
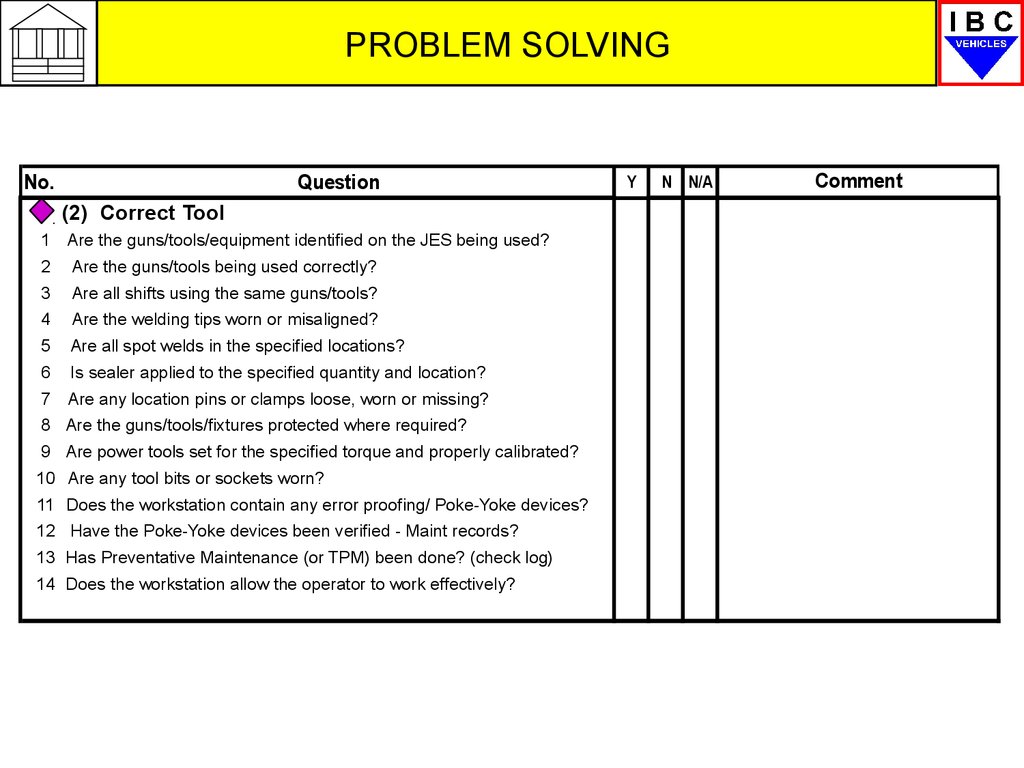
PROBLEM SOLVINGSTANDARDISED PROBLEM SOLVING PROCESS
7 DIAMONDS - 1, 2, 3 CHECK SHEET
No.
Question
Y
N
Comment
N/A
(1) Correct Process
1
Has the Team Member been made aware of the problem?
2
Are the correct SOS / JES documents in the station manuals?
3
Is the team member following the SOS?
4
Is the JES being followed including key Quality Assurance points?
5
Does the JES display all current Quality concerns and standards?
6
Does the Team Member clearly understand the quality implications?
7
Does the Team Member know why the standardised work must be followed?
8
Is the job done the same on all shifts?
9
Is the team member fully trained and a regular operator?
10 Are the visual aids current?
11 Does the Team Member know how to communicate when he/she has a problem?
(2) Correct Tool
1
Are the guns/tools/equipment identified on the JES being used?
2
Are the guns/tools being used correctly?
3
Are all shifts using the same guns/tools?
4
Are the welding tips worn or misaligned?
5
Are all spot welds in the specified locations?
6
Is sealer applied to the specified quantity and location?
7
Are any location pins or clamps loose, worn or missing?
8
Are the guns/tools/fixtures protected where required?
9
Are power tools set for the specified torque and properly calibrated?
10 Are ant tool bits or sockets worn?
11 Does the workstation contain any error proofing/ Poke-Yoke devices?
12 Have the Poke-Yoke devices been verified - Maint records?
13 Has Preventative Maintenance (or TPM) been done? (check log)
14 Does the workstation allow the operator to work effectively?
(3) Correct Part
1
Are the specified parts being used (check variants)?
2
Are the correct part numbers identified on the material rack?
3
Are the correct parts in the correct location on the rack?
4
Do the part numbers on the boxes agree with the rack?
5
Has a PAA/EWO been issued changing part (check with ME)?
6
Is the PAA still valid?
7
Is part selection error proofing needed?
8
Is existing error proofing device working correctly?
9
Is there any evidence of damage to the parts prior to assembly?
(4) Correct BOB/WOW & Parts Quality
4a
1
Can defect be recreated on re-assembly?
2
Does defect follow the vehicle / body?
3
Does defect follow the part?
4b
1
Is the part out of specification?
2
If not in specification, has a PAA been written?
3
Are countermeasures / containment in place?
4
Has a PRR been issued and supplier contacted?
PROCESS
CONFIRMATION
SIGN OFF
A
S/V
T/ L
Sign
B
S/V
T/ L
Sign
C
S/V
T/ L
Sign
31.
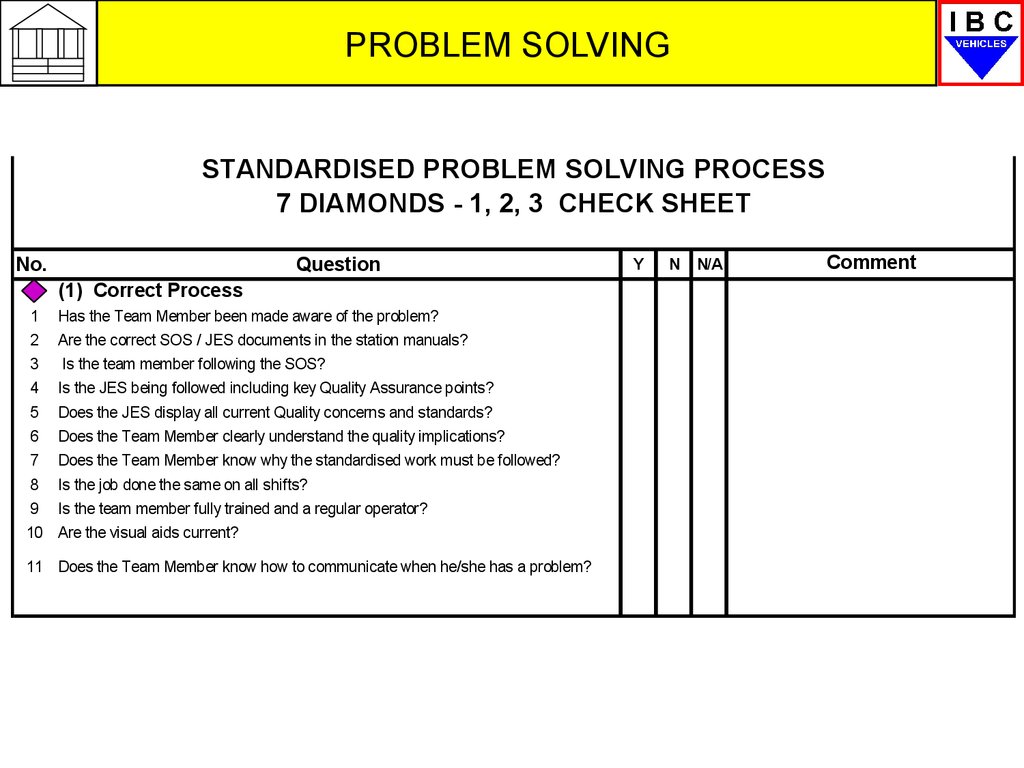
PROBLEM SOLVINGSTANDARDISED PROBLEM SOLVING PROCESS
7 DIAMONDS - 1, 2, 3 CHECK SHEET
No.
Question
(1) Correct Process
1
Has the Team Member been made aware of the problem?
2
Are the correct SOS / JES documents in the station manuals?
3
Is the team member following the SOS?
4
Is the JES being followed including key Quality Assurance points?
5
Does the JES display all current Quality concerns and standards?
6
Does the Team Member clearly understand the quality implications?
7
Does the Team Member know why the standardised work must be followed?
8
Is the job done the same on all shifts?
9
Is the team member fully trained and a regular operator?
10 Are the visual aids current?
11 Does the Team Member know how to communicate when he/she has a problem?
Y
N
N/A
Comment
32.
PROBLEM SOLVINGNo.
Question
(2) Correct Tool
1 Are the guns/tools/equipment identified on the JES being used?
2
Are the guns/tools being used correctly?
3
Are all shifts using the same guns/tools?
4
Are the welding tips worn or misaligned?
5
Are all spot welds in the specified locations?
6
Is sealer applied to the specified quantity and location?
7
Are any location pins or clamps loose, worn or missing?
8 Are the guns/tools/fixtures protected where required?
9 Are power tools set for the specified torque and properly calibrated?
10 Are any tool bits or sockets worn?
11 Does the workstation contain any error proofing/ Poke-Yoke devices?
12 Have the Poke-Yoke devices been verified - Maint records?
13 Has Preventative Maintenance (or TPM) been done? (check log)
14 Does the workstation allow the operator to work effectively?
Y
N N/A
Comment
33.
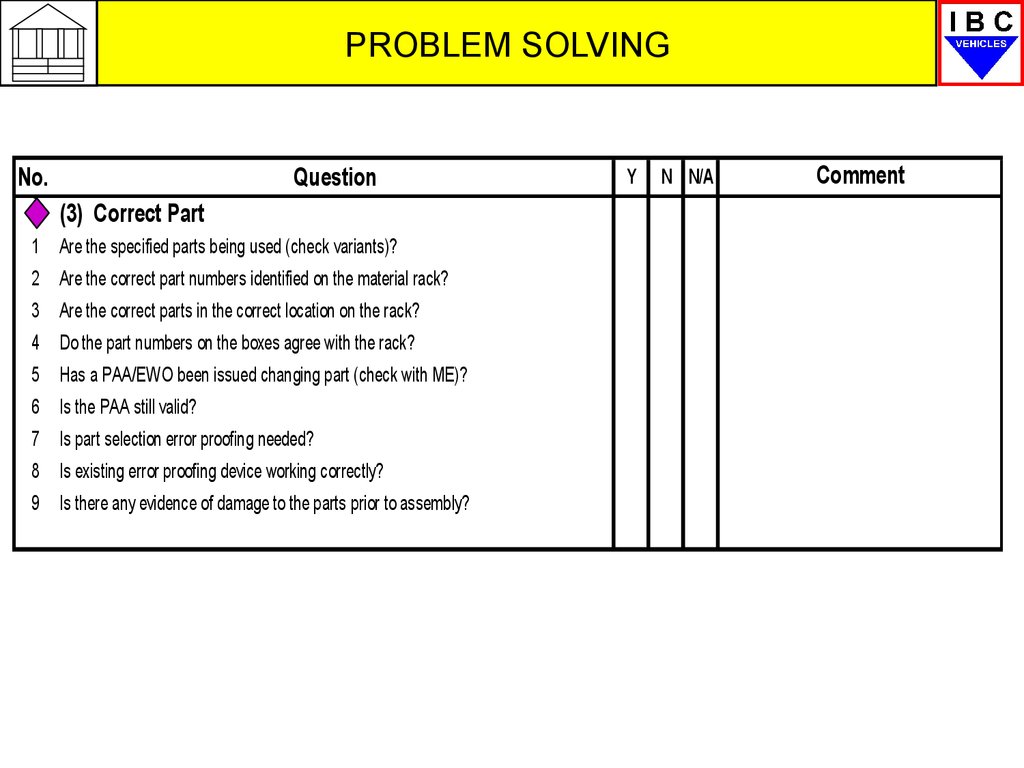
PROBLEM SOLVINGNo.
Question
(3) Correct Part
1 Are the specified parts being used (check variants)?
2 Are the correct part numbers identified on the material rack?
3 Are the correct parts in the correct location on the rack?
4 Do the part numbers on the boxes agree with the rack?
5 Has a PAA/EWO been issued changing part (check with ME)?
6 Is the PAA still valid?
7 Is part selection error proofing needed?
8 Is existing error proofing device working correctly?
9 Is there any evidence of damage to the parts prior to assembly?
Y
N N/A
Comment
34.
PROBLEM SOLVINGThis section of the check list is completed by PRT Team or SQA following
agreed escalation of the PCB
No.
Question
(4) Correct BOB/WOW & Parts Quality
Y
Comment
N N/A
4a
1Can defect be recreated on re-assembly?
2 Does defect follow the vehicle / body?
3 Does defect follow the part?
4b
1 Is the part out of specification?
2If not in specification, has a PAA been written?
3Are countermeasures / containment in place?
4Has a PRR been issued and supplier contacted?
PROCESS
CONFIRMATION A
SIGN OFF
S/V
T/ L
Sign
B
S/V
T/ L
Sign
C
S/V
T/ L
Sign
35.
PROBLEM SOLVINGCOMPLETING THE FISHBONE (1)
Step 1 Brainstorm all
possible causes
Cause and Effect Analysis and Investigation:
Step 2 Complete Checklist
4 - Material (Specification)
1 - Man
Missed operation?
Operator not trained?
Operator not working to
SOS/JES?
Fault or
Problem
Welds missed? Operator unable to see if part is present?
Welds failed?
Operator checking for part present?
Poke –Yoke not working?
Following SOS/JES correctly?
Faulty part location pins/clamps?
3 - Method
2 - Machine
Supervisor A Shift
Sign Off for Diamonds 1-3
and Checklist Complete
Team Leader A Shift
Step 3 Cross Through
Unlikely Causes
Step 4 Circle Probable
Causes
Step 5 Mark Most Likely
Cause with Star
You can drag these symbols
into the fishbone
Supervisor B Shift
Supervisor N Shift
Team Leader B Shift
Team Leader N Shift
36.
PROBLEM SOLVINGCOMPLETING THE FISHBONE (2)
Step 1 Brainstorm all
possible causes
Cause and Effect Analysis and Investigation:
Step 2 Complete Checklist
4 - Material (Specification)
1 - Man
Supplier part?
Missed operation?
Operator not trained?
Operator not working to
SOS/JES?
Fault or
Problem
Welds missed? Operator unable to see if part is present?
Welds failed?
Operator checking for part present?
Poke –Yoke not working?
Following SOS/JES correctly?
Faulty part location pins/clamps?
3 - Method
2 - Machine
Supervisor A Shift
Sign Off for Diamonds 1-3
and Checklist Complete
xxxxxxxxx
Team Leader A Shift
xxxxxxxxx
Supervisor B Shift
xxxxxxxxx
Step 3 Cross Through
Unlikely Causes
Step 4 Circle Probable
Causes
Step 5 Mark Most Likely
Cause with Star
You can drag these symbols
into the fishbone
Supervisor N Shift
xxxxxxxxx
All boxes must be
Team Leader B Shift
Team Leader N Shift
xxxxxxxxx SIGNED before xxxxxxxxx
PCB can be
closed with PRT
37.
PROBLEM SOLVINGFront sheet
Back sheet
Continued Analysis of Causes
Problem Communication Brief
Raised by:
Where was the Problem
Identified (GCA, SIP etc)?
Sequence Number
Date Found
PCB - No..:
Month
Year
Assigned to:
(name & phone number)
VEHICLES
(name & phone number)
0 0
No
0 0
Initial Area Responsible
0 0
Why?
Why?
Why?
Why?
Why?
Div
0
Weighting Factor
(Root Cause):
Specific Task or Analysis:
Results:
Who
0
Actual Area Responsible
Presented/Containment
Root Cause/Breakpoint
15 Shift Monitor Feedback
Date of Closure
Date:
Date:
Date:
Date:
Sequence # :
Problem Description:
1) Exact Fault:
Sequence # :
Picture or Sketch:
2) Part (Name, Number or Process Element) :
3) Location (On Vehicle or In Plant):
Final Solutions for Root-Cause
4) Frequency of Problem:
One Off:
Intermittent:
Continuous:
5) How Often is Problem Seen(Times or Vehicles per Shift) :
6) Problem Exists on Which Type of Vehicles
Model
Engine Type
Immediate Measures Taken:
Who
When
Complete
Information Communicated (Area / Person):
Number of Vehicles Checked (Quantity):
Containment Activities
Trend Analysis (from Containment)
Step 1 Brainstorm all
possible causes
Cause and Effect Analysis and Investigation:
Step 2 Complete Checklist
4 - Material (Specification)
1 - Man
Fault or
Problem
Supervisor A Shift
Sign Off for Diamonds 1-3
and Checklist is Complete
You can drag these symbols
into the fishbone
3 - Method
2 - Machine
Step 3 Cross Through
Unlikely Causes
Step 4 Circle Probable
Causes
Step 5 Mark Most Likely
Cause with Star
Supervisor B Shift
Supervisor N Shift
Team Leader B Shift
Team Leader N Shift
PCB Finalisation Process:
Problem Closed (15 Shifts Clear):
Is Countermeasure Removed
Can the Problem Occur Elsewhere
If Standardised, Where is it
Documented:
Date & Sign-Off
A - Shift
B - Shift
Team Leader A Shift
C - Shift
Team Leader
Supervisor
Yes
Yes
Yes
Shift Manager
No
No
No
Quality Insp
Unit Manager
When
Complete
38.
PROBLEM SOLVINGContinued Analysis of
Causes
Why?
Why?
Why?
Why?
Why?
(Root Cause):
The ‘5 Whys’
39.
PROBLEM SOLVINGContinued Analysis of Causes
UNABLE TO FIT S/L DOOR STRIKER IN GENERAL
ASSEMBLY
Why?
NO THREADED BOSS IN LH S/L DOOR TO FIT BOLT
Why?
WELD NUT MISSING FROM LH S/L DOOR
Why?
WELD NUT MISSED FROM LH S/L DOOR REINFORCEMENT
SUB ASSEMBLY
Why?
MISSED OPERATION FROM OUTSIDE SUPPLIER OF
ASSEMBLY
Why?
(Root Cause):
SUPPLIER PART – SQA & QE TO INVESTIGATE
SUPPLIER PROCESS AND TAKE NECESSARY ACTIONS
MISSED OPERATION FROM OUTSIDE SUPPLIER OF
ASSEMBLY – SUPPLIER QUALITY PROCESS NOK
40.
PROBLEM SOLVINGFront sheet
Back sheet
Continued Analysis of Causes
Problem Communication Brief
Raised by:
Where was the Problem
Identified (GCA, SIP etc)?
Sequence Number
Date Found
PCB - No..:
Month
Year
Assigned to:
(name & phone number)
VEHICLES
(name & phone number)
0 0
No
0 0
Initial Area Responsible
0 0
Why?
Why?
Why?
Why?
Why?
Div
0
Weighting Factor
(Root Cause):
Specific Task or Analysis:
Results:
Who
0
Actual Area Responsible
Presented/Containment
Root Cause/Breakpoint
15 Shift Monitor Feedback
Date of Closure
Date:
Date:
Date:
Date:
Sequence # :
Problem Description:
1) Exact Fault:
Sequence # :
Picture or Sketch:
2) Part (Name, Number or Process Element) :
3) Location (On Vehicle or In Plant):
Final Solutions for Root-Cause
4) Frequency of Problem:
One Off:
Intermittent:
Continuous:
5) How Often is Problem Seen(Times or Vehicles per Shift) :
6) Problem Exists on Which Type of Vehicles
Model
Engine Type
Immediate Measures Taken:
Who
When
Complete
Information Communicated (Area / Person):
Number of Vehicles Checked (Quantity):
Containment Activities
Trend Analysis (from Containment)
Step 1 Brainstorm all
possible causes
Cause and Effect Analysis and Investigation:
Step 2 Complete Checklist
4 - Material (Specification)
1 - Man
Fault or
Problem
Supervisor A Shift
Sign Off for Diamonds 1-3
and Checklist is Complete
You can drag these symbols
into the fishbone
3 - Method
2 - Machine
Step 3 Cross Through
Unlikely Causes
Step 4 Circle Probable
Causes
Step 5 Mark Most Likely
Cause with Star
Supervisor B Shift
Supervisor N Shift
Team Leader B Shift
Team Leader N Shift
PCB Finalisation Process:
Problem Closed (15 Shifts Clear):
Is Countermeasure Removed
Can the Problem Occur Elsewhere
If Standardised, Where is it
Documented:
Date & Sign-Off
A - Shift
B - Shift
Team Leader A Shift
C - Shift
Team Leader
Supervisor
Yes
Yes
Yes
Shift Manager
No
No
No
Quality Insp
Unit Manager
When
Complete
41.
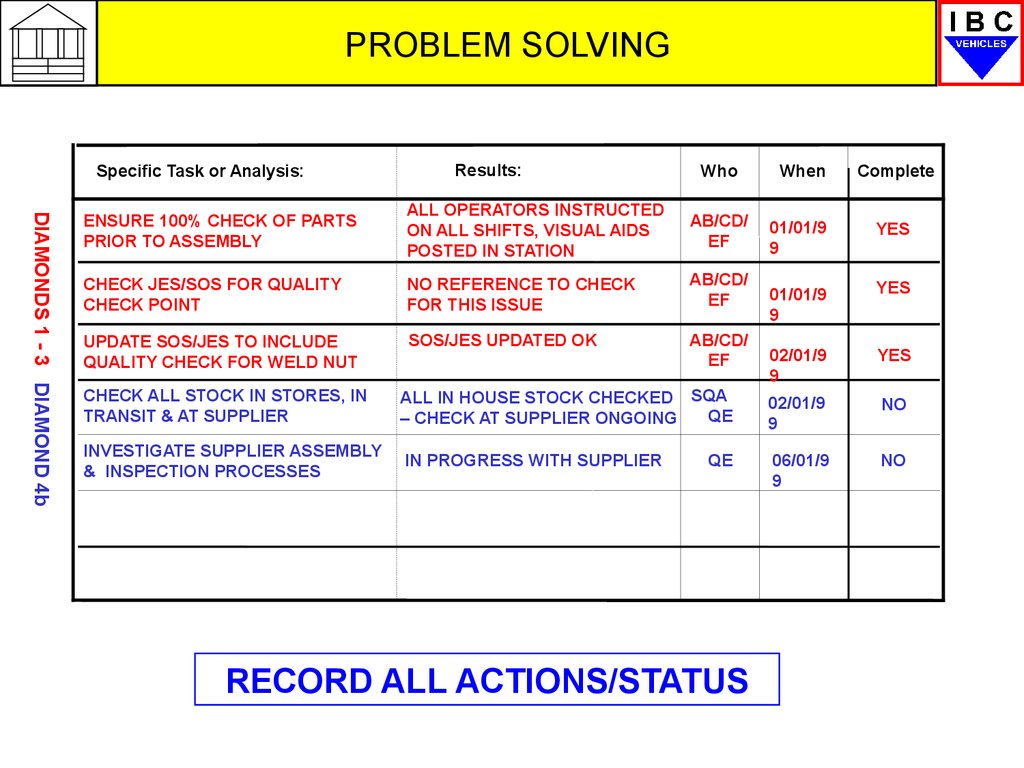
PROBLEM SOLVINGSpecific Task or Analysis:
Results:
DIAMONDS 1 - 3 DIAMOND 4b
Who
When
Complete
01/01/9
9
YES
01/01/9
9
YES
02/01/9
9
YES
ENSURE 100% CHECK OF PARTS
PRIOR TO ASSEMBLY
ALL OPERATORS INSTRUCTED
ON ALL SHIFTS, VISUAL AIDS
POSTED IN STATION
AB/CD/
EF
CHECK JES/SOS FOR QUALITY
CHECK POINT
NO REFERENCE TO CHECK
FOR THIS ISSUE
AB/CD/
EF
UPDATE SOS/JES TO INCLUDE
QUALITY CHECK FOR WELD NUT
SOS/JES UPDATED OK
AB/CD/
EF
CHECK ALL STOCK IN STORES, IN
TRANSIT & AT SUPPLIER
ALL IN HOUSE STOCK CHECKED SQA
QE
– CHECK AT SUPPLIER ONGOING
02/01/9
9
NO
INVESTIGATE SUPPLIER ASSEMBLY
& INSPECTION PROCESSES
IN PROGRESS WITH SUPPLIER
06/01/9
9
NO
QE
RECORD ALL ACTIONS/STATUS
42.
PROBLEM SOLVINGFront sheet
Back sheet
Continued Analysis of Causes
Problem Communication Brief
Raised by:
Where was the Problem
Identified (GCA, SIP etc)?
Sequence Number
Date Found
PCB - No..:
Month
Year
Assigned to:
(name & phone number)
VEHICLES
(name & phone number)
0 0
No
0 0
Initial Area Responsible
0 0
Why?
Why?
Why?
Why?
Why?
Div
0
Weighting Factor
(Root Cause):
Specific Task or Analysis:
Results:
Who
0
Actual Area Responsible
Presented/Containment
Root Cause/Breakpoint
15 Shift Monitor Feedback
Date of Closure
Date:
Date:
Date:
Date:
Sequence # :
Problem Description:
1) Exact Fault:
Sequence # :
Picture or Sketch:
2) Part (Name, Number or Process Element) :
3) Location (On Vehicle or In Plant):
Final Solutions for Root-Cause
4) Frequency of Problem:
One Off:
Intermittent:
Continuous:
5) How Often is Problem Seen(Times or Vehicles per Shift) :
6) Problem Exists on Which Type of Vehicles
Model
Engine Type
Immediate Measures Taken:
Who
When
Complete
Information Communicated (Area / Person):
Number of Vehicles Checked (Quantity):
Containment Activities
Trend Analysis (from Containment)
Step 1 Brainstorm all
possible causes
Cause and Effect Analysis and Investigation:
Step 2 Complete Checklist
4 - Material (Specification)
1 - Man
Fault or
Problem
Supervisor A Shift
Sign Off for Diamonds 1-3
and Checklist is Complete
You can drag these symbols
into the fishbone
3 - Method
2 - Machine
Step 3 Cross Through
Unlikely Causes
Step 4 Circle Probable
Causes
Step 5 Mark Most Likely
Cause with Star
Supervisor B Shift
Supervisor N Shift
Team Leader B Shift
Team Leader N Shift
PCB Finalisation Process:
Problem Closed (15 Shifts Clear):
Is Countermeasure Removed
Can the Problem Occur Elsewhere
If Standardised, Where is it
Documented:
Date & Sign-Off
A - Shift
B - Shift
Team Leader A Shift
C - Shift
Team Leader
Supervisor
Yes
Yes
Yes
Shift Manager
No
No
No
Quality Insp
Unit Manager
When
Complete
43.
PROBLEM SOLVINGFinal Solutions for Root-Cause
Who
100% CHECK FOR WELD NUT AT SIDE LOAD DOOR ASSEMBLY
ADDED TO JES/SOS SHEETS
SUPPLIER TO 100% CHECK FOR WELD NUT PRIOR TO
SHIPPING TO IBC
When
Complete
AB/CD/ 02/01/99
EF
YES
QE/
SUPPLIER 05/01/99
YES
QE/
SUPPLIER TO INVESTIGATE AND IMPROVE QUALITY SYSTEMS
SUPPLIER
TO ASSURE OK PARTS TO IBC
T.B.D
NO
BODY MAINTENANCE & ME TO INVESTIGATE POSSIBILITY OF
POKE-YOKE DEVICE IN SIDE LOAD DOOR TOOLING
T.B.D
NO
WHEREVER
POSSIBLE PUT
THE NAME OR
INITIALS OF THOSE
RESPONSIBLE
ME/
MAINT
44.
PROBLEM SOLVINGFront sheet
Back sheet
Continued Analysis of Causes
Problem Communication Brief
Raised by:
Where was the Problem
Identified (GCA, SIP etc)?
Sequence Number
Date Found
PCB - No..:
Month
Year
Assigned to:
(name & phone number)
VEHICLES
(name & phone number)
0 0
No
0 0
Initial Area Responsible
0 0
Why?
Why?
Why?
Why?
Why?
Div
0
Weighting Factor
(Root Cause):
Specific Task or Analysis:
Results:
Who
0
Actual Area Responsible
Presented/Containment
Root Cause/Breakpoint
15 Shift Monitor Feedback
Date of Closure
Date:
Date:
Date:
Date:
Sequence # :
Problem Description:
1) Exact Fault:
Sequence # :
Picture or Sketch:
2) Part (Name, Number or Process Element) :
3) Location (On Vehicle or In Plant):
Final Solutions for Root-Cause
4) Frequency of Problem:
One Off:
Intermittent:
Continuous:
5) How Often is Problem Seen(Times or Vehicles per Shift) :
6) Problem Exists on Which Type of Vehicles
Model
Engine Type
Immediate Measures Taken:
Who
When
Complete
Information Communicated (Area / Person):
Number of Vehicles Checked (Quantity):
Containment Activities
Trend Analysis (from Containment)
Step 1 Brainstorm all
possible causes
Cause and Effect Analysis and Investigation:
Step 2 Complete Checklist
4 - Material (Specification)
1 - Man
Fault or
Problem
Supervisor A Shift
Sign Off for Diamonds 1-3
and Checklist is Complete
You can drag these symbols
into the fishbone
3 - Method
2 - Machine
Step 3 Cross Through
Unlikely Causes
Step 4 Circle Probable
Causes
Step 5 Mark Most Likely
Cause with Star
Supervisor B Shift
Supervisor N Shift
Team Leader B Shift
Team Leader N Shift
PCB Finalisation Process:
Problem Closed (15 Shifts Clear):
Is Countermeasure Removed
Can the Problem Occur Elsewhere
If Standardised, Where is it
Documented:
Date & Sign-Off
A - Shift
B - Shift
Team Leader A Shift
C - Shift
Team Leader
Supervisor
Yes
Yes
Yes
Shift Manager
No
No
No
Quality Insp
Unit Manager
When
Complete
45.
PROBLEM SOLVINGTrend Analysis (from Containment)
Any further occurrences
must be investigated
Use appropriate scale
8
7
6
This part of the PCB MUST be filled in by hand.
Shift 1) Track from date
when root cause found
5
4
Shift 15) If no
further defects
agree to close
with PRT
3
2
1
1
2
3
4
5
6
7
PCB Finalisation Process:
Problem Closed (15 Shifts Clear):
Yes
Is Countermeasure Removed
Yes
Can the Problem Occur Elsewhere
Yes
If Standardised, Where is it
JES/SOS SHEETS
Documented:
Date & Sign-Off
A - Shift
B - Shift
C - Shift
Team Leader
Supervisor
Shift Manager
8
9
10
No
No
No
Quality Insp
Unit Manager
11
12
13
14
15
All boxes must be SIGNED
(Not computer generated) and
it is the shift managers
responsibility to ensure the
PCB is done correctly and
then pass the completed PCB
to the PRT
46. PROBLEM SOLVING
PCB – CompletionONLY after the PCB has been signed off by all those required on
ALL 3 shifts, can the PCB be submitted for closure.
If the issuing body (e.g. Plant QA, Unit PRT Team etc.) agree that a
problem has been clear for 15 shifts following the introduction of
suitable counter-measures, then the PCB can be closed.
On completion and closure all PCBs will be archived by the PRT
Team and the tracking system updated. External PCBs will be
forwarded to the relevant locations by the PRT Team.
47.
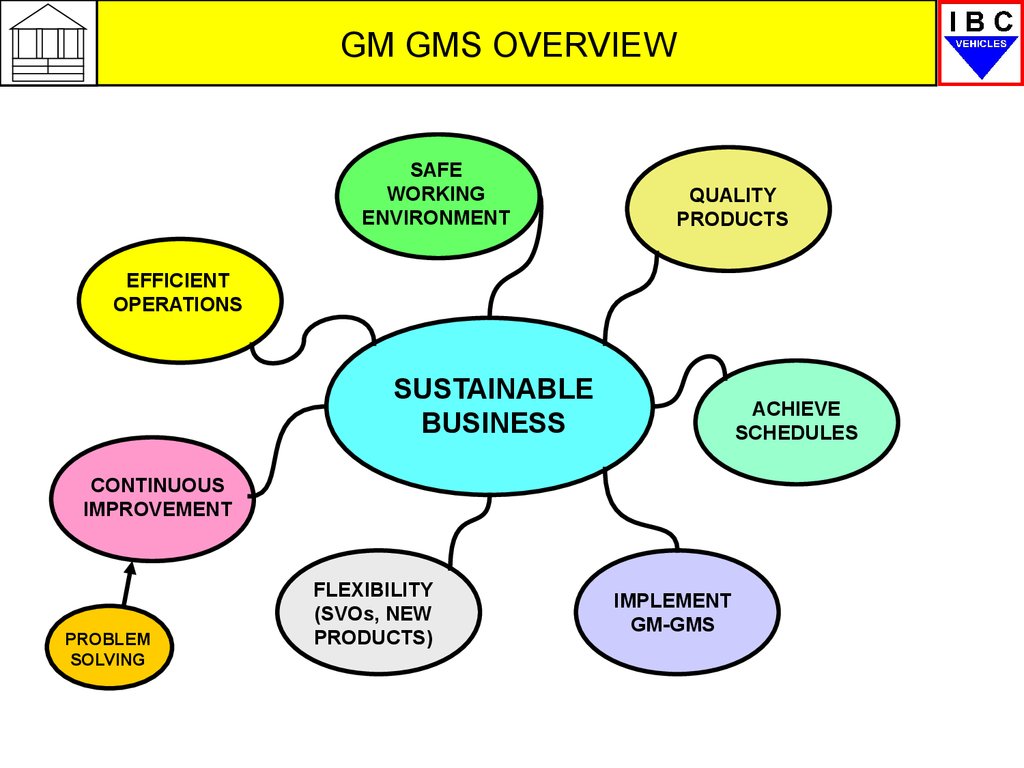
GM GMS OVERVIEWSAFE
WORKING
ENVIRONMENT
QUALITY
PRODUCTS
EFFICIENT
OPERATIONS
SUSTAINABLE
BUSINESS
ACHIEVE
SCHEDULES
CONTINUOUS
IMPROVEMENT
PROBLEM
SOLVING
FLEXIBILITY
(SVOs, NEW
PRODUCTS)
IMPLEMENT
GM-GMS