


 Программирование
Похожие презентации:


")


Protecting Management Access
1.
ATP. Lecture 2Protecting
Management
Access
1
2.
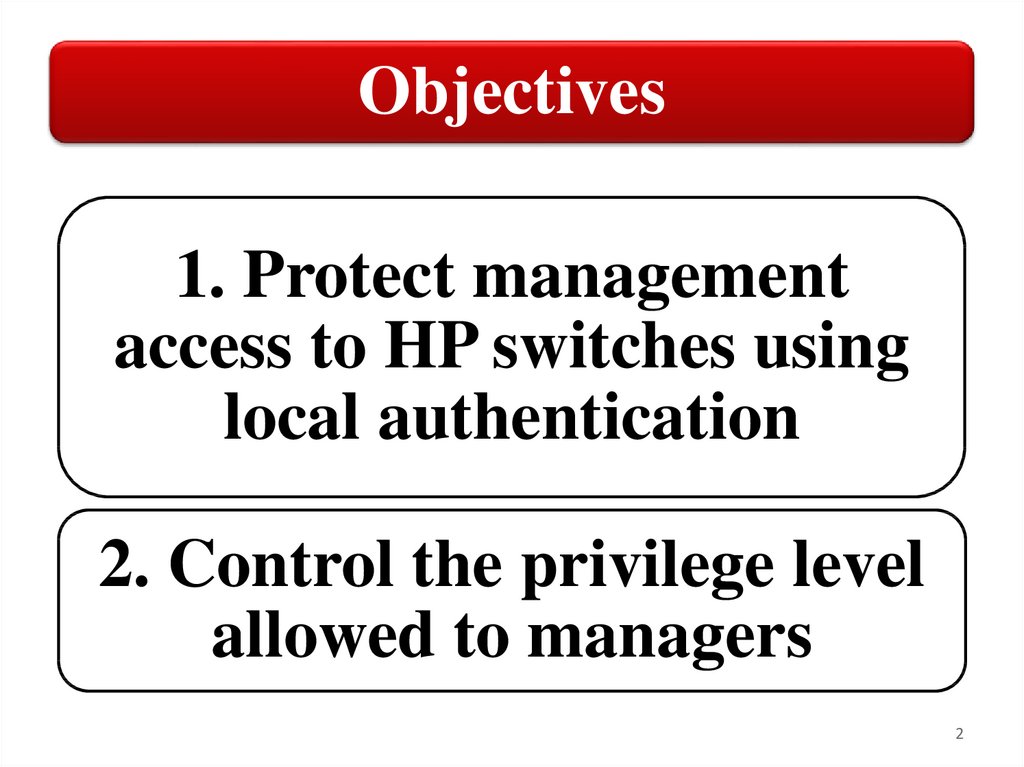
Objectives1. Protect management
access to HP switches using
local authentication
2. Control the privilege level
allowed to managers
2
3.
ProtectingManagement
Access
1. Protect management access to
HP switches using local
authentication
3
4.
Out-of-band managementWhen you initially configure a switch, you will
typically use out-of-band management.
For out-of-band management, you must have
physical access to the switch. You connect your
management station to the switch’s console port
using the serial cable that ships with the switch.
This connection is dedicated to the management
session. Out-of-band management does not
require the switch to have network connectivity.
4
5.
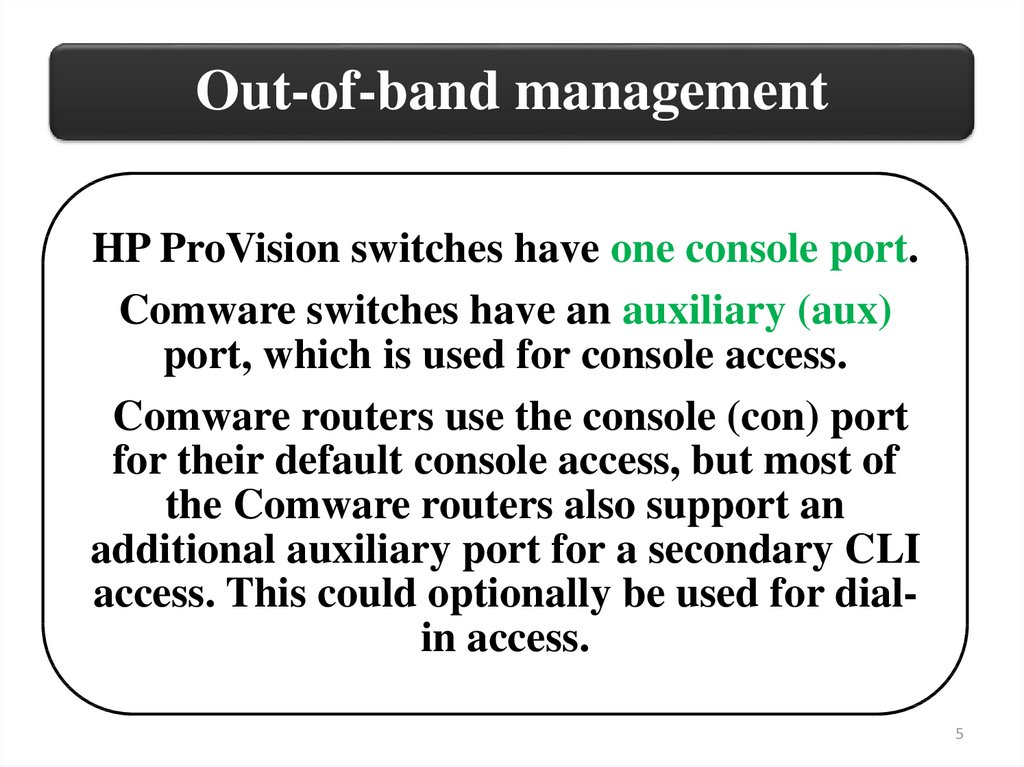
Out-of-band managementHP ProVision switches have one console port.
Comware switches have an auxiliary (aux)
port, which is used for console access.
Comware routers use the console (con) port
for their default console access, but most of
the Comware routers also support an
additional auxiliary port for a secondary CLI
access. This could optionally be used for dialin access.
5
6.
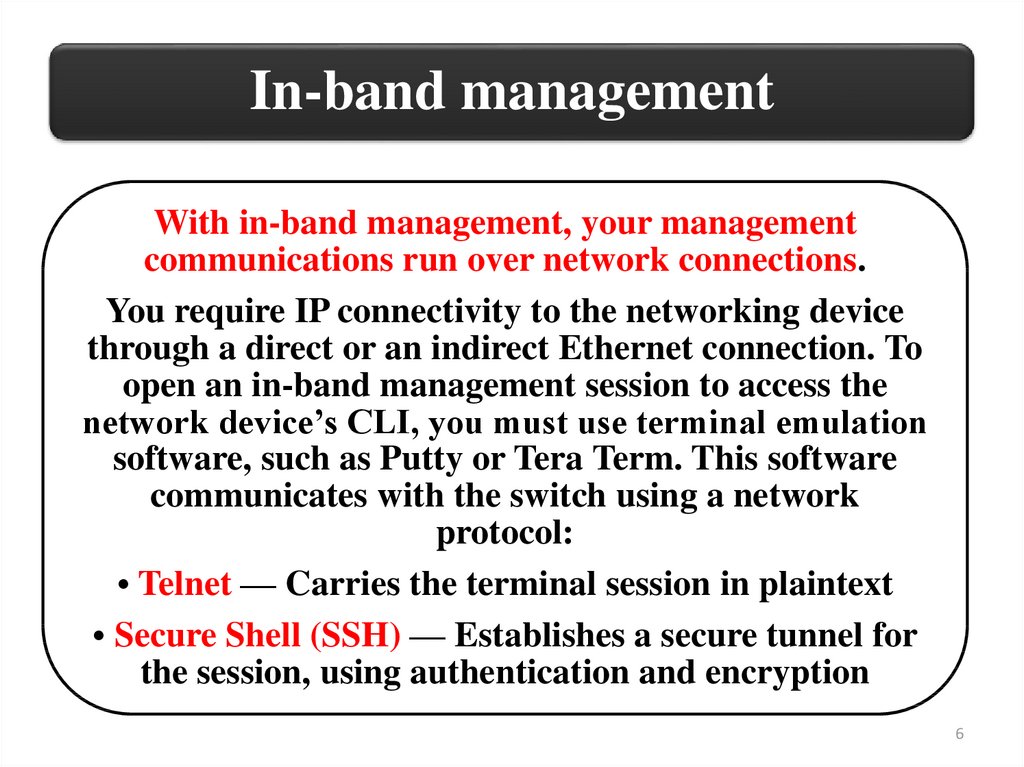
In-band managementWith in-band management, your management
communications run over network connections.
You require IP connectivity to the networking device
through a direct or an indirect Ethernet connection. To
open an in-band management session to access the
network device’s CLI, you must use terminal emulation
software, such as Putty or Tera Term. This software
communicates with the switch using a network
protocol:
• Telnet — Carries the terminal session in plaintext
• Secure Shell (SSH) — Establishes a secure tunnel for
the session, using authentication and encryption
6
7.
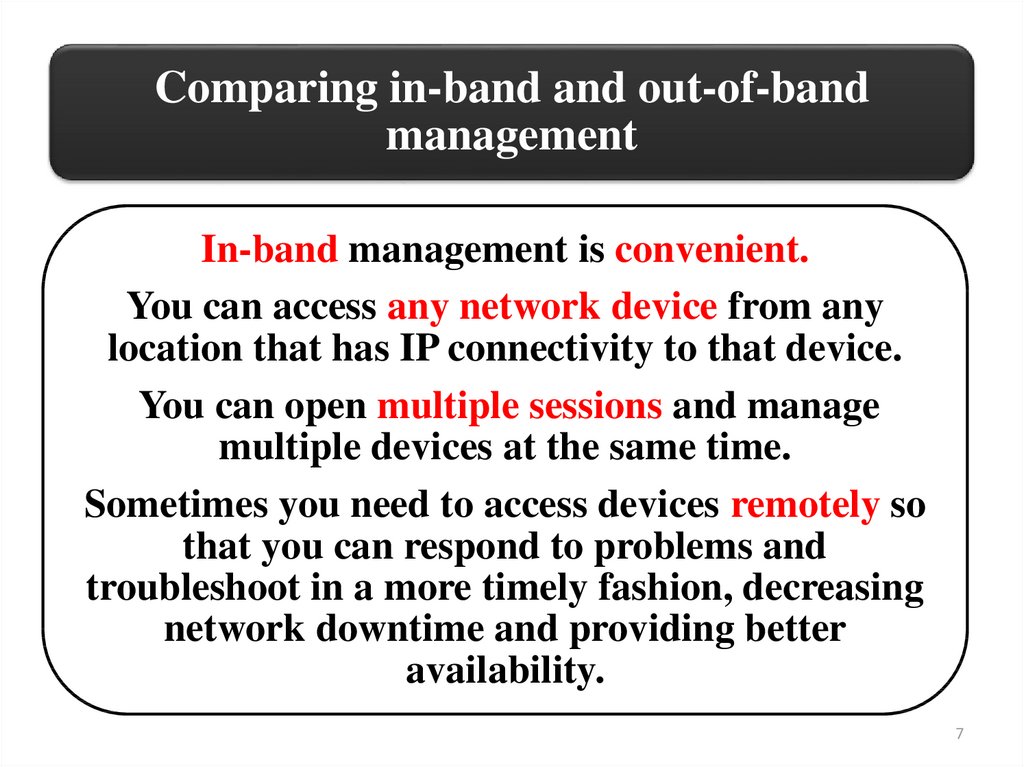
Comparing in-band and out-of-bandmanagement
In-band management is convenient.
You can access any network device from any
location that has IP connectivity to that device.
You can open multiple sessions and manage
multiple devices at the same time.
Sometimes you need to access devices remotely so
that you can respond to problems and
troubleshoot in a more timely fashion, decreasing
network downtime and providing better
availability.
7
8.
Comparing in-band and out-of-bandmanagement
Out-of-band management is inherently more
secure because you have to have physical access
to the device to establish a connection.
As a result, you can control in-band management
access by physically securing the device.
In addition, the connection is dedicated to the
management session so that other users cannot
eavesdrop on the traffic exchanged between the
device and the management station.
8
9.
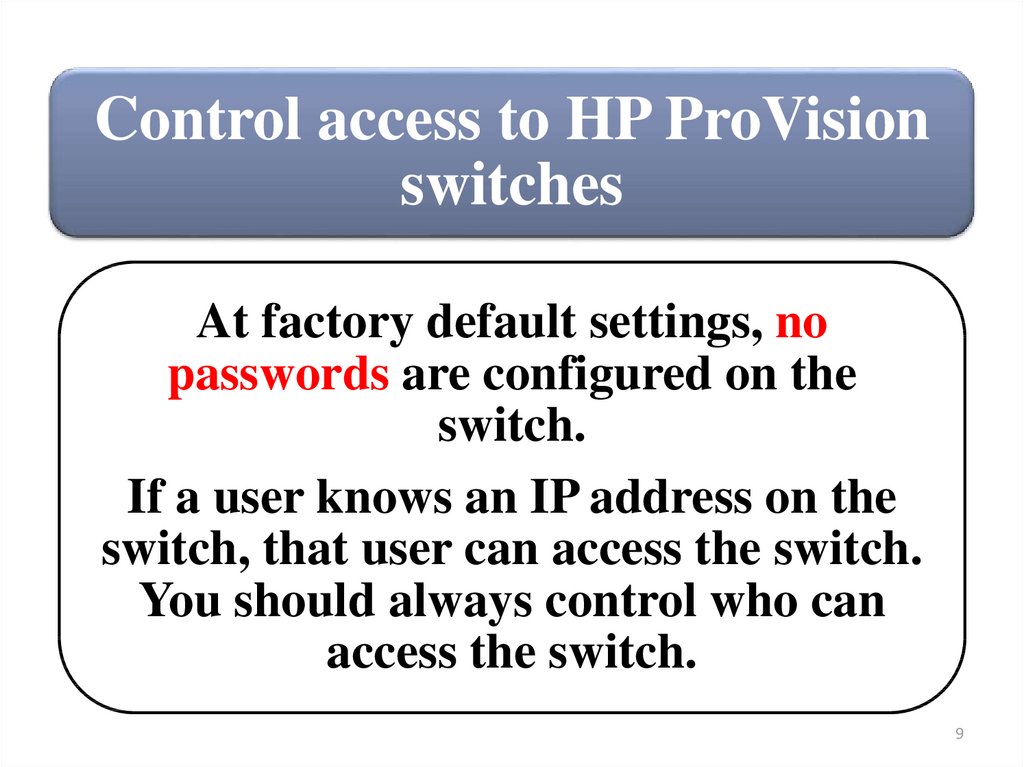
Control access to HP ProVisionswitches
At factory default settings, no
passwords are configured on the
switch.
If a user knows an IP address on the
switch, that user can access the switch.
You should always control who can
access the switch.
9
10.
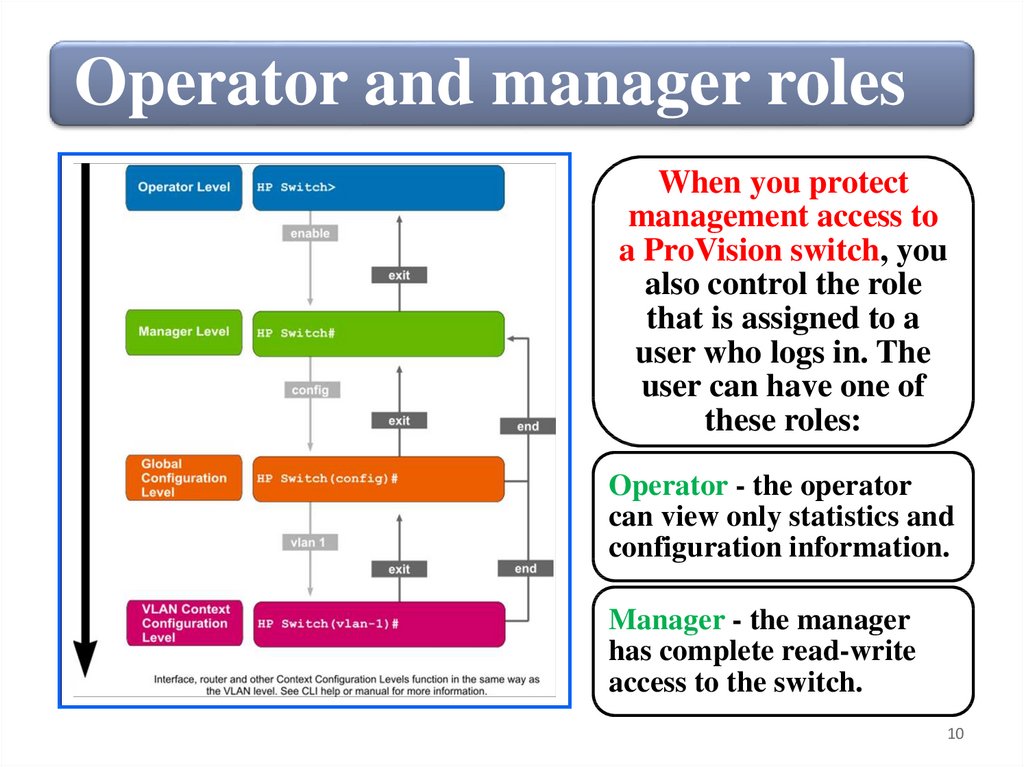
Operator and manager rolesWhen you protect
management access to
a ProVision switch, you
also control the role
that is assigned to a
user who logs in. The
user can have one of
these roles:
Operator - the operator
can view only statistics and
configuration information.
Manager - the manager
has complete read-write
access to the switch.
10
11.
Access an HP ProVision switch through aTelnet session
You can protect management access to the
switch’s CLI by configuring a manager
username and password, an operator username
and password, or both.
When you enter the commands for setting the
password, you are not required to specify a
username. If you do not, the switch keeps the
default user names, which are manager for
manager and operator for operator. If you prefer,
you can configure your own usernames.
11
12.
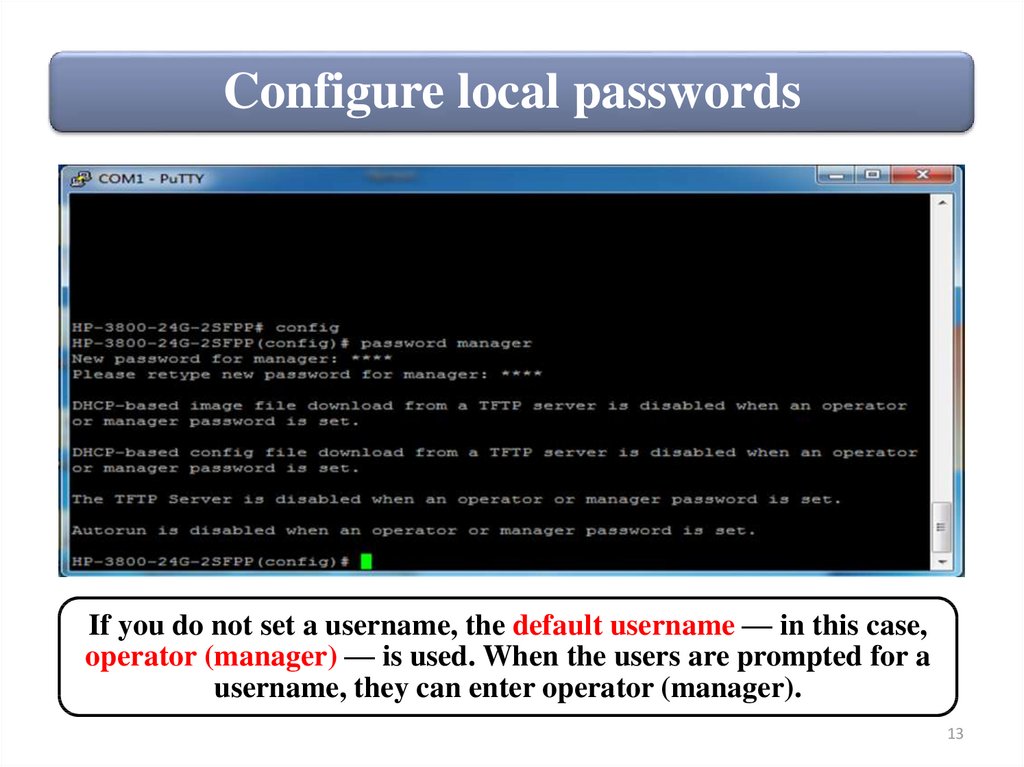
Configure local passwordsTo configure an operator or manager password, access the
ProVision switch CLI using either in-band or out-of-band
management and move to the global configuration mode.
ProVision-1# configure
To configure an operator or manager password, you use the
password operator or manager command. When you enter
this command, you will be prompted to type the password.
ProVision-1(config)# password operator
ProVision-1(config)# password manager
12
13.
Configure local passwordsIf you do not set a username, the default username — in this case,
operator (manager) — is used. When the users are prompted for a
username, they can enter operator (manager).
13
14.
Users access the switch CLIWhen you configure
an operator username
and password or a
manager username
and password, users
can no longer log
directly in to the
switch using a console
session or a Telnet
session.
Instead users are
prompted to enter a
username and
password.
• If they enter the correct
credentials for the operator
role, they enter the
operator context. From this
context, they can enter
limited show commands.
• If users enter the correct
credentials for the manager
role, they enter the enable
mode and receive complete
read-write access to the
ProVision switch.
14
15.
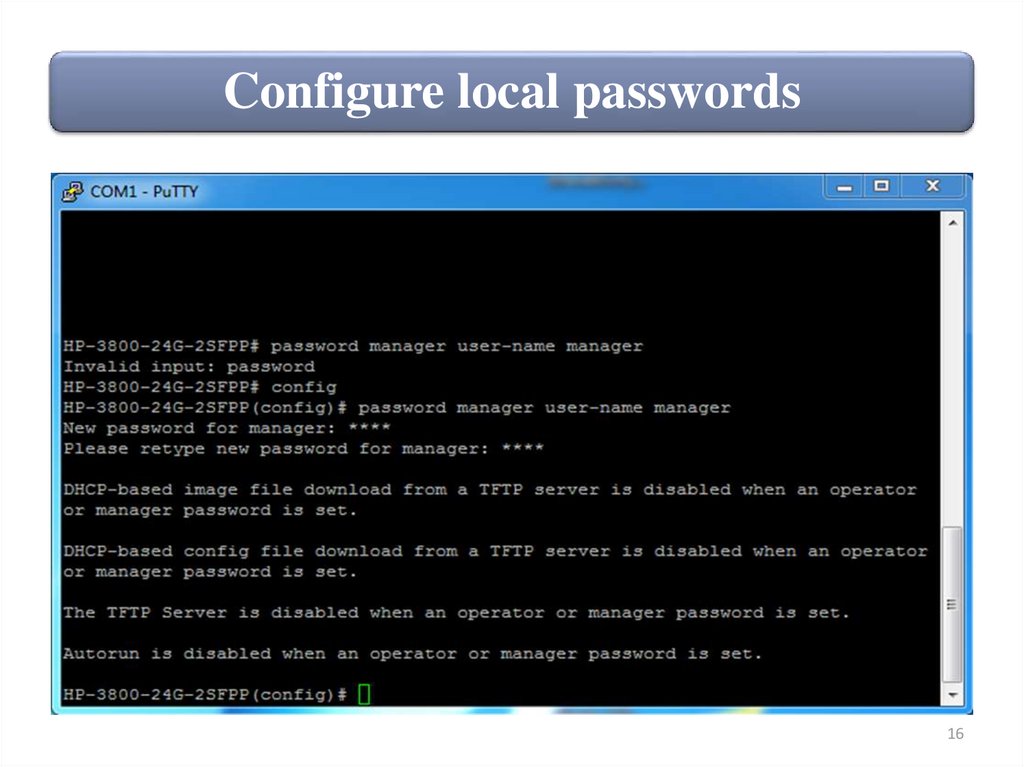
Configure local passwordsIf you want to change the manager (operator)
username, you can add the user-name option to the
password manager (operator) command and then
specify another username. The command below
changes the manager (operator) username.
ProVision-1(config)# password manager username manager
ProVision-1(config)# password operator username operator
15
16.
Configure local passwords16
17.
Configure local passwordsYou can configure a different username
for the operator, using the same username option:
ProVision-1(config)# password manager username admin
ProVision-1(config)# password operator username techsupport
If users try to enter manager for the username, the
login will fail because the new credentials have
replaced the old ones.
17
18.
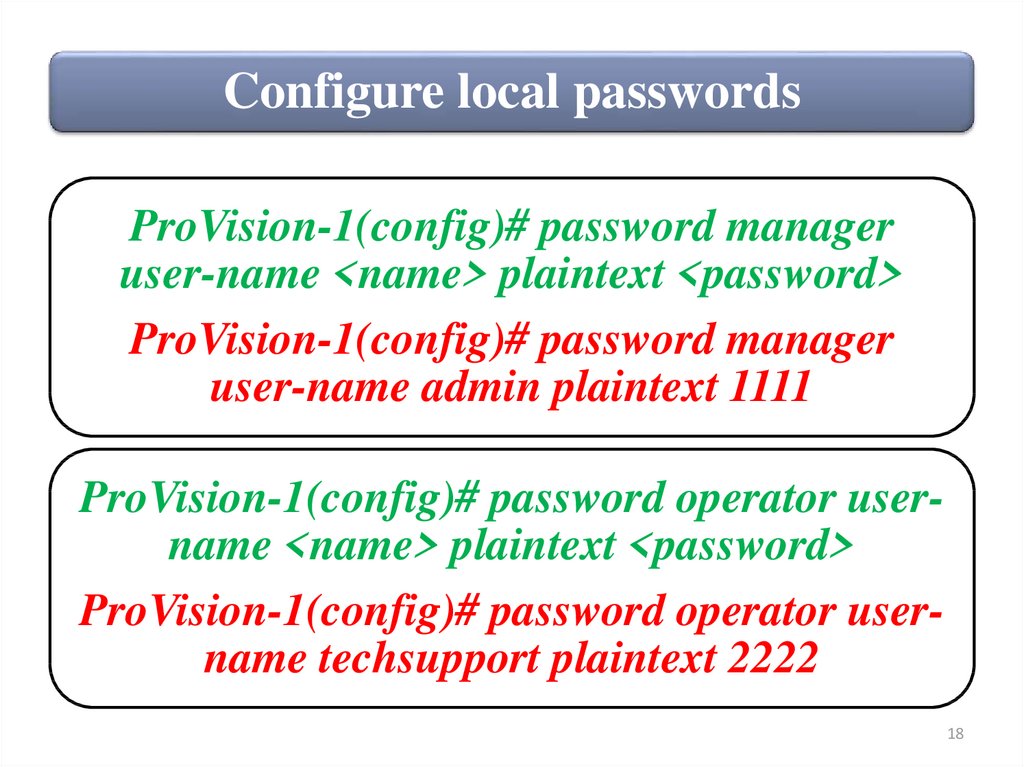
Configure local passwordsProVision-1(config)# password manager
user-name <name> plaintext <password>
ProVision-1(config)# password manager
user-name admin plaintext 1111
ProVision-1(config)# password operator username <name> plaintext <password>
ProVision-1(config)# password operator username techsupport plaintext 2222
18
19.
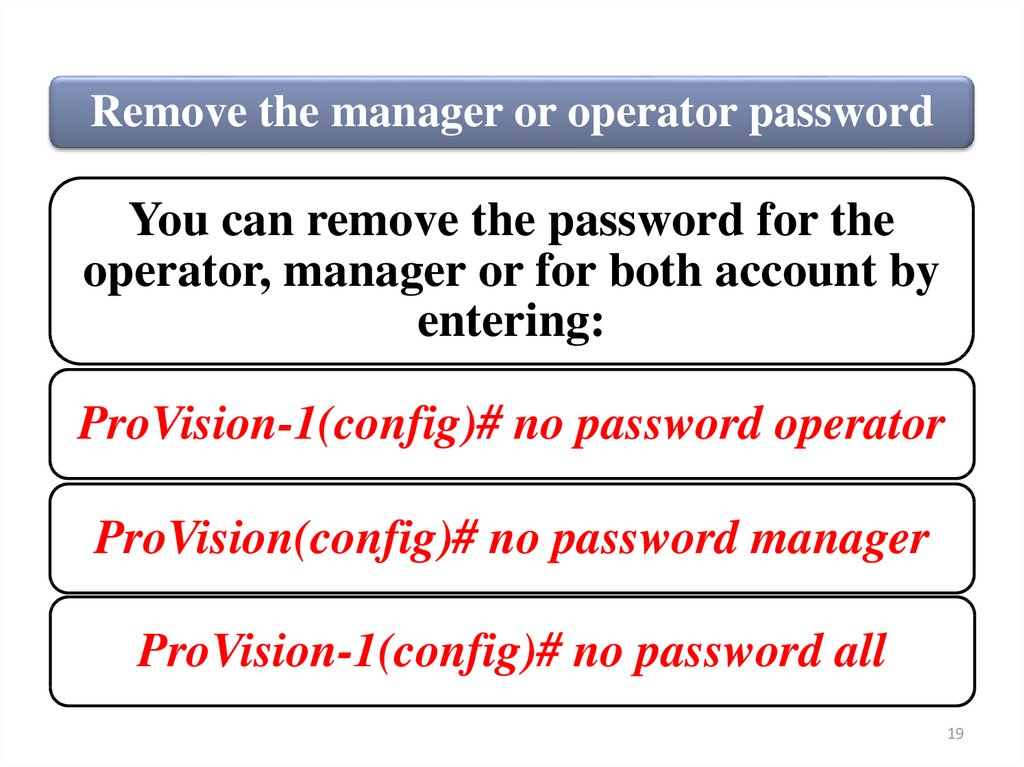
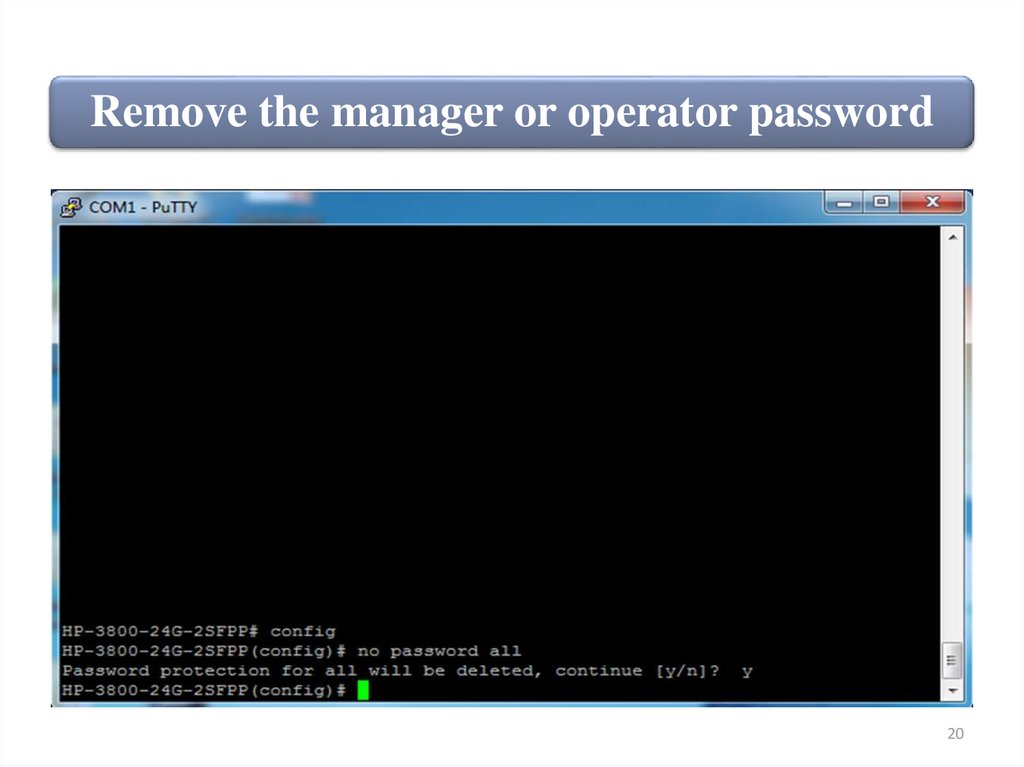
Remove the manager or operator passwordYou can remove the password for the
operator, manager or for both account by
entering:
ProVision-1(config)# no password operator
ProVision(config)# no password manager
ProVision-1(config)# no password all
19
20.
Remove the manager or operator password20
21.
Where local credentials are savedBy default, the credentials are not included in the ProVision
configuration. The same holds true for other credentials
listed in Table. Because the credentials are not stored in the
configuration, they are not included if you save the
configuration to a file and download that file from the switch.
In addition, if you reset the configuration to factory default
settings, the passwords are still applied. You must manually
remove the passwords by using the no form of the password
command.
21
22.
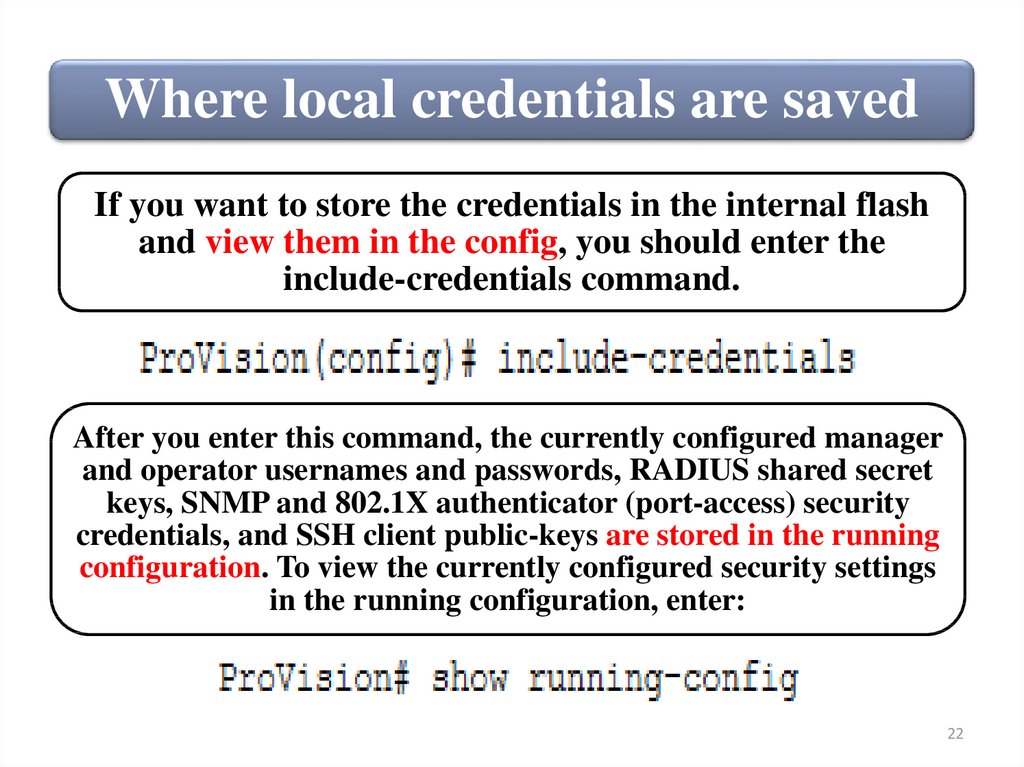
Where local credentials are savedIf you want to store the credentials in the internal flash
and view them in the config, you should enter the
include-credentials command.
After you enter this command, the currently configured manager
and operator usernames and passwords, RADIUS shared secret
keys, SNMP and 802.1X authenticator (port-access) security
credentials, and SSH client public-keys are stored in the running
configuration. To view the currently configured security settings
in the running configuration, enter:
22
23.
Controlling access to HPComware switches
You will now learn about controlling
management access to Comware
switches.
23
24.
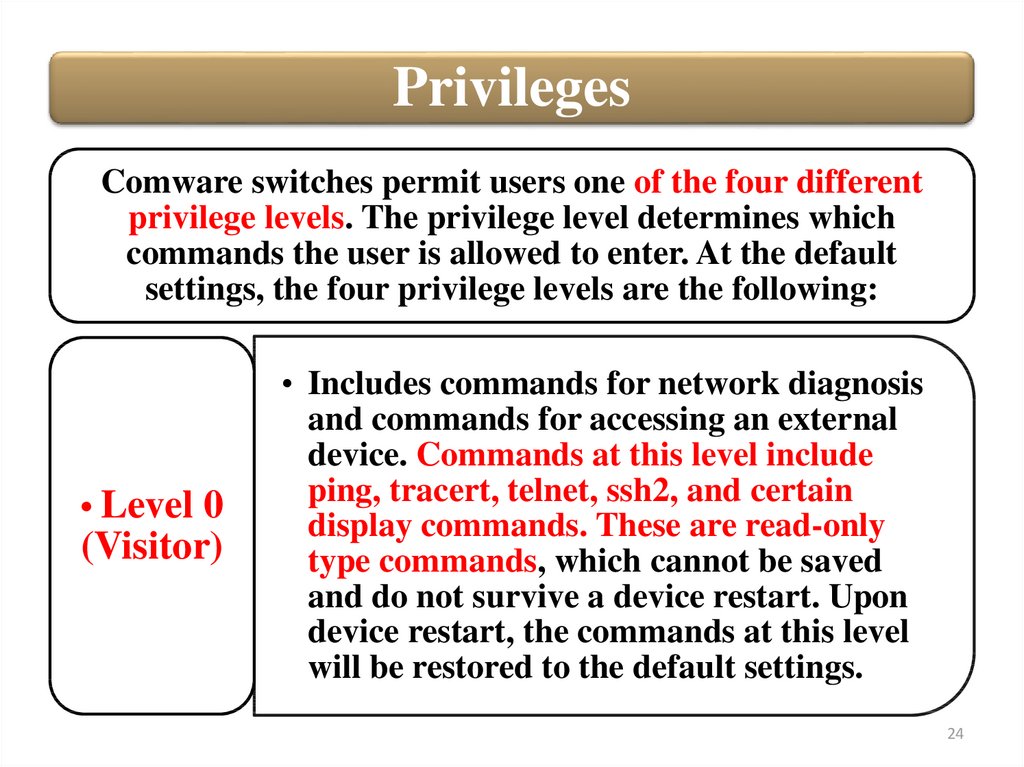
PrivilegesComware switches permit users one of the four different
privilege levels. The privilege level determines which
commands the user is allowed to enter. At the default
settings, the four privilege levels are the following:
• Level 0
(Visitor)
• Includes commands for network diagnosis
and commands for accessing an external
device. Commands at this level include
ping, tracert, telnet, ssh2, and certain
display commands. These are read-only
type commands, which cannot be saved
and do not survive a device restart. Upon
device restart, the commands at this level
will be restored to the default settings.
24
25.
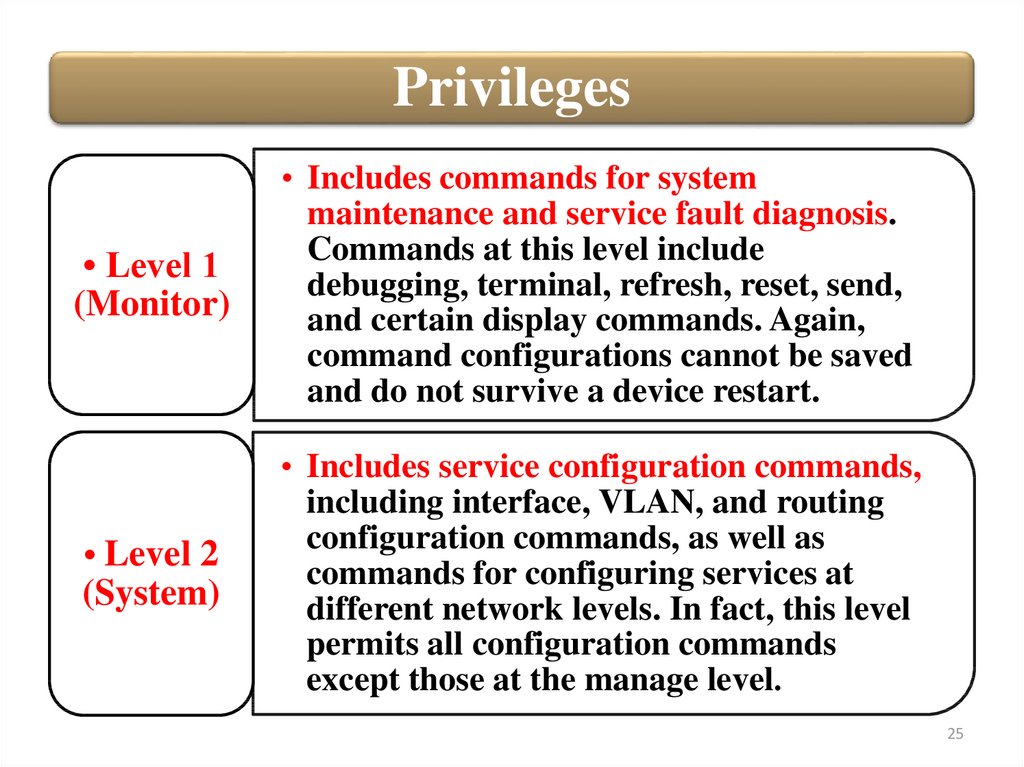
Privileges• Level 1
(Monitor)
• Level 2
(System)
• Includes commands for system
maintenance and service fault diagnosis.
Commands at this level include
debugging, terminal, refresh, reset, send,
and certain display commands. Again,
command configurations cannot be saved
and do not survive a device restart.
• Includes service configuration commands,
including interface, VLAN, and routing
configuration commands, as well as
commands for configuring services at
different network levels. In fact, this level
permits all configuration commands
except those at the manage level.
25
26.
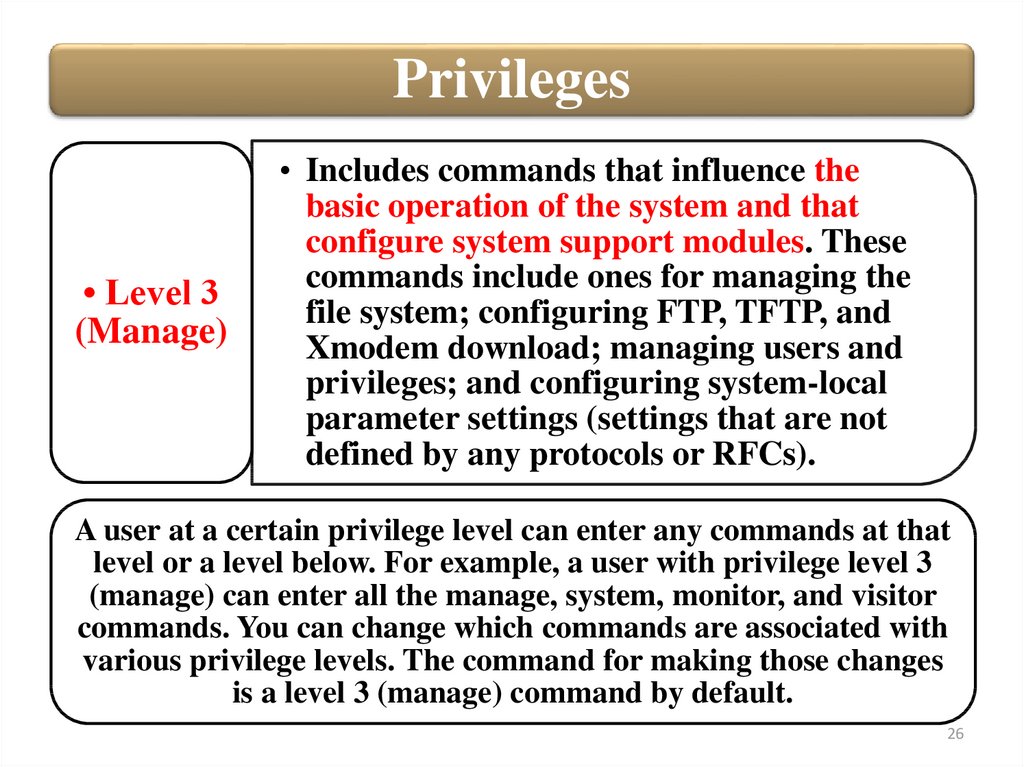
Privileges• Level 3
(Manage)
• Includes commands that influence the
basic operation of the system and that
configure system support modules. These
commands include ones for managing the
file system; configuring FTP, TFTP, and
Xmodem download; managing users and
privileges; and configuring system-local
parameter settings (settings that are not
defined by any protocols or RFCs).
A user at a certain privilege level can enter any commands at that
level or a level below. For example, a user with privilege level 3
(manage) can enter all the manage, system, monitor, and visitor
commands. You can change which commands are associated with
various privilege levels. The command for making those changes
is a level 3 (manage) command by default.
26
27.
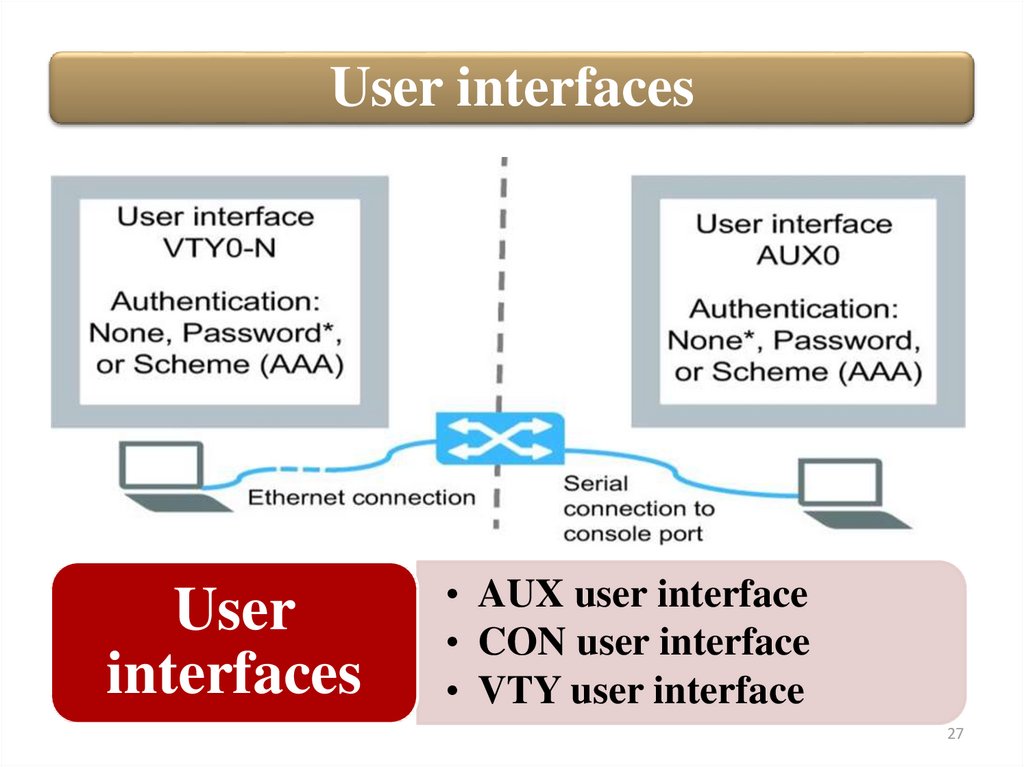
User interfacesUser
interfaces
• AUX user interface
• CON user interface
• VTY user interface
27
28.
User interfaces• AUX user interface
– Manages and monitors users who log in
through the console port (out-of-band
management) on Comware switches. The type
of the console port is EIA/TIA-232 DTE. The
interface ID is aux0.
• CON user interface
– Manages and monitors users who log in
through the console port (out-of-band
management) on Comware routers. The
interface ID is con0.
28
29.
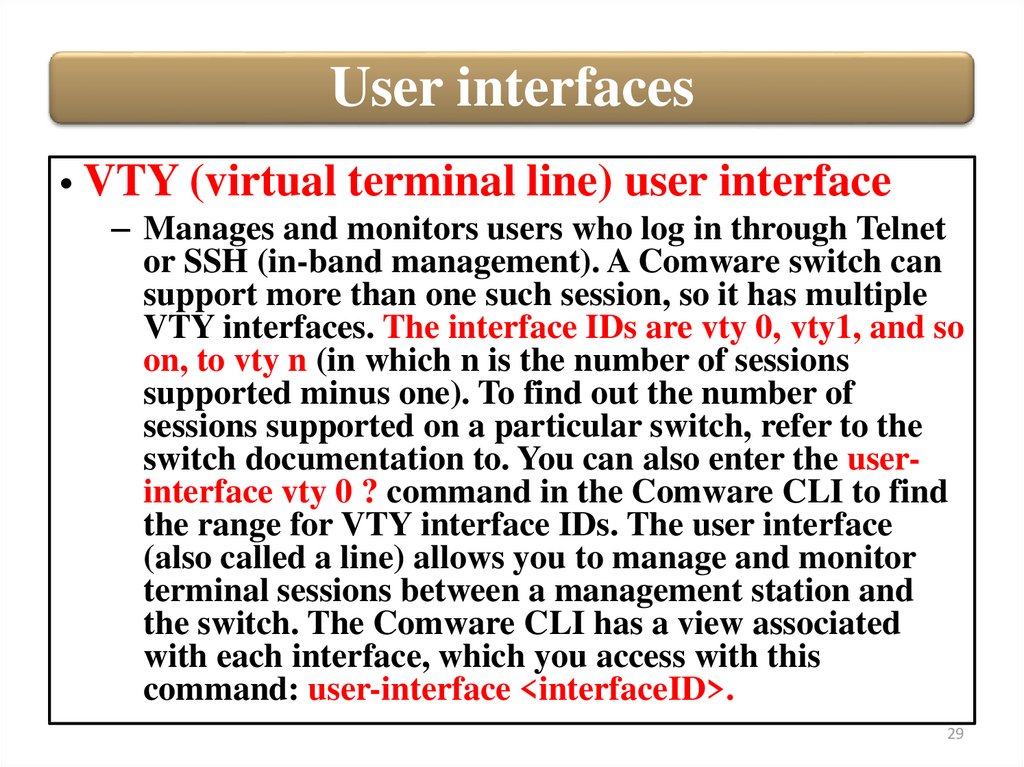
User interfaces• VTY (virtual terminal line) user interface
– Manages and monitors users who log in through Telnet
or SSH (in-band management). A Comware switch can
support more than one such session, so it has multiple
VTY interfaces. The interface IDs are vty 0, vty1, and so
on, to vty n (in which n is the number of sessions
supported minus one). To find out the number of
sessions supported on a particular switch, refer to the
switch documentation to. You can also enter the userinterface vty 0 ? command in the Comware CLI to find
the range for VTY interface IDs. The user interface
(also called a line) allows you to manage and monitor
terminal sessions between a management station and
the switch. The Comware CLI has a view associated
with each interface, which you access with this
command: user-interface <interfaceID>.
29
30.
Default privilege levelEach user
interface
has a
default
privilege
level:
• On the routers, con 0 has a
default privilege level of 3;
• On the switches, aux 0
has a default privilege
level of 3;
• All other user interfaces
have a default privilege
level of 0.
30
31.
Default privilege levelYou can configure multiple VTY (virtual terminal
line) interfaces at once by entering a range of
interface IDs for the user-interface command. In
this way, you can set up consistent settings for
managing Telnet (or SSH) access, regardless of
how many sessions are currently active.
Telnet access is disabled by default on Comware
switches. To allow Telnet access, you must first
enable the switch’s Telnet server.
31
32.
Authentication methodsAn important
setting for user
interfaces is the
authentication
method, which
controls whether
a user needs to
authenticate and,
if so, how.
Comware
switches support
three
authentication
methods:
• None — The user does not need
to log in. The CLI prompt
appears immediately after the
session connects. None is the
default setting for the AUX user
interface.
• Password — The user is
prompted for a password when
logging in. The switch checks
the password against the
password set on the interface.
Password is the default setting
for VTY interfaces.
32
33.
Authentication methodsScheme
• The user is prompted for a username
and a password when logging in. The
switch checks user credentials
according to global Authentication,
Authorization, and Accounting
(AAA) settings. These settings might
direct the switch to authenticate the
user locally or against a remote
RADIUS or TACACS+ server.
Because Comware switches have different settings
for each user interface, you can set up different
methods and credentials on different interfaces.
33
34.
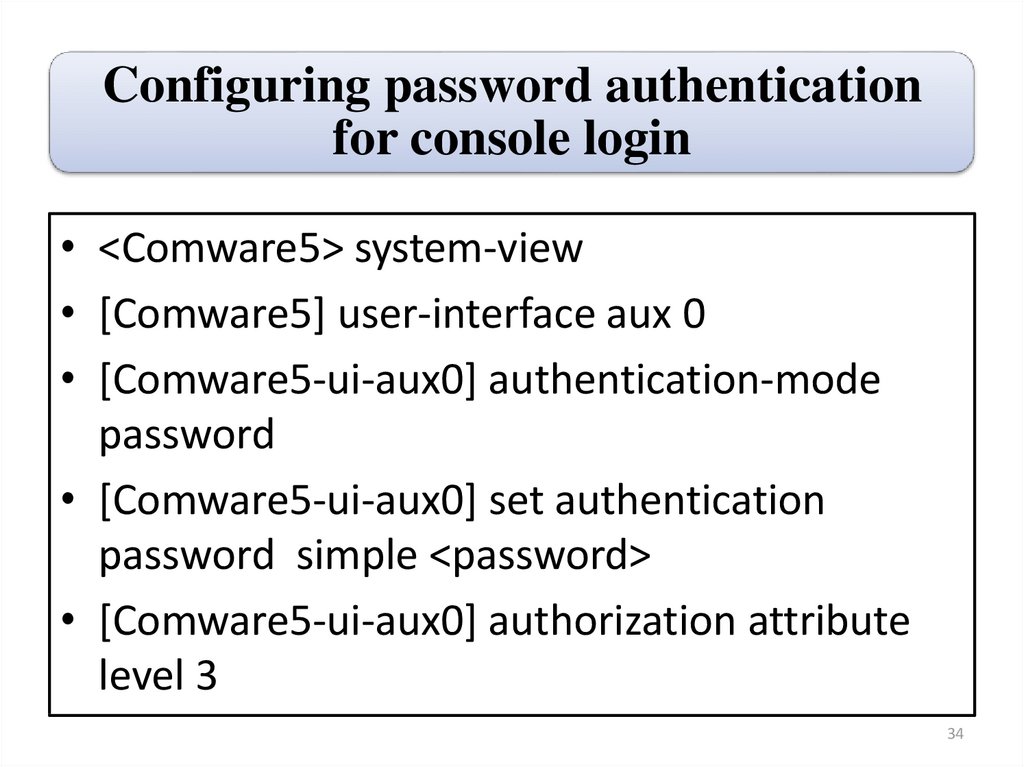
Configuring password authenticationfor console login
• <Comware5> system-view
• [Comware5] user-interface aux 0
• [Comware5-ui-aux0] authentication-mode
password
• [Comware5-ui-aux0] set authentication
password simple <password>
• [Comware5-ui-aux0] authorization attribute
level 3
34
35.
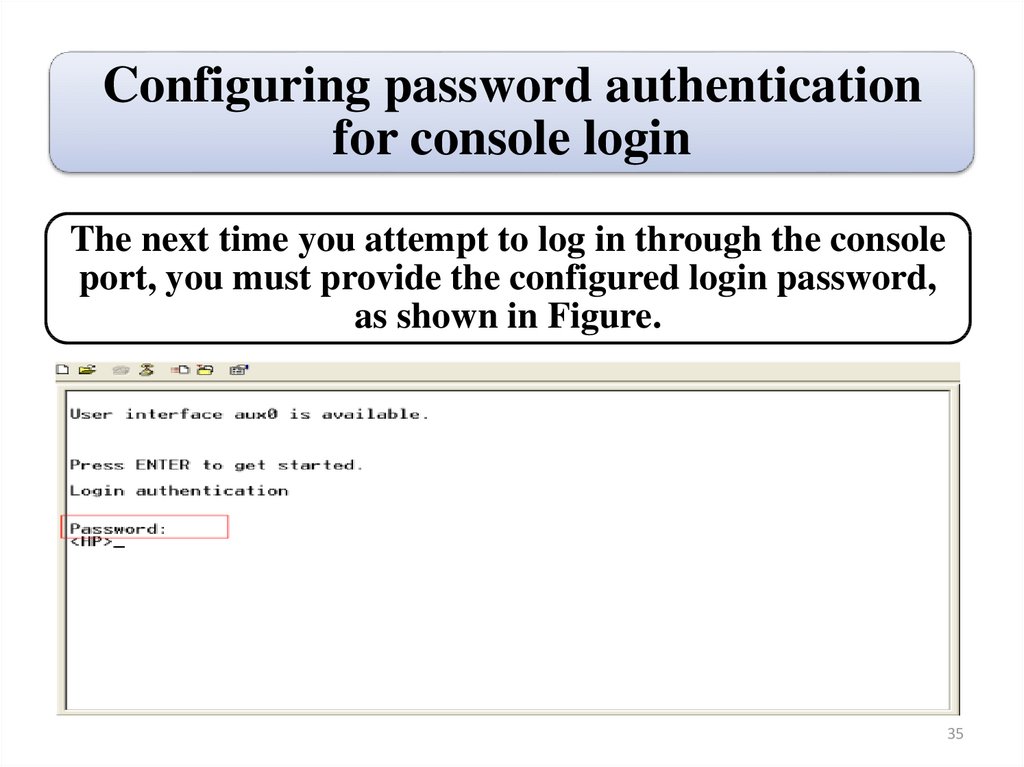
Configuring password authenticationfor console login
The next time you attempt to log in through the console
port, you must provide the configured login password,
as shown in Figure.
35
36.
Configuring scheme authentication forconsole login
• <Comware5> system-view
• [Comware5] user-interface aux 0
• [Comware5-uiaux0] authentication-mode
scheme
• [Comware5-uiaux0] command authorization
• [Comware5-uiaux0] command accounting
• [Comware5-uiaux0] quit
36
37.
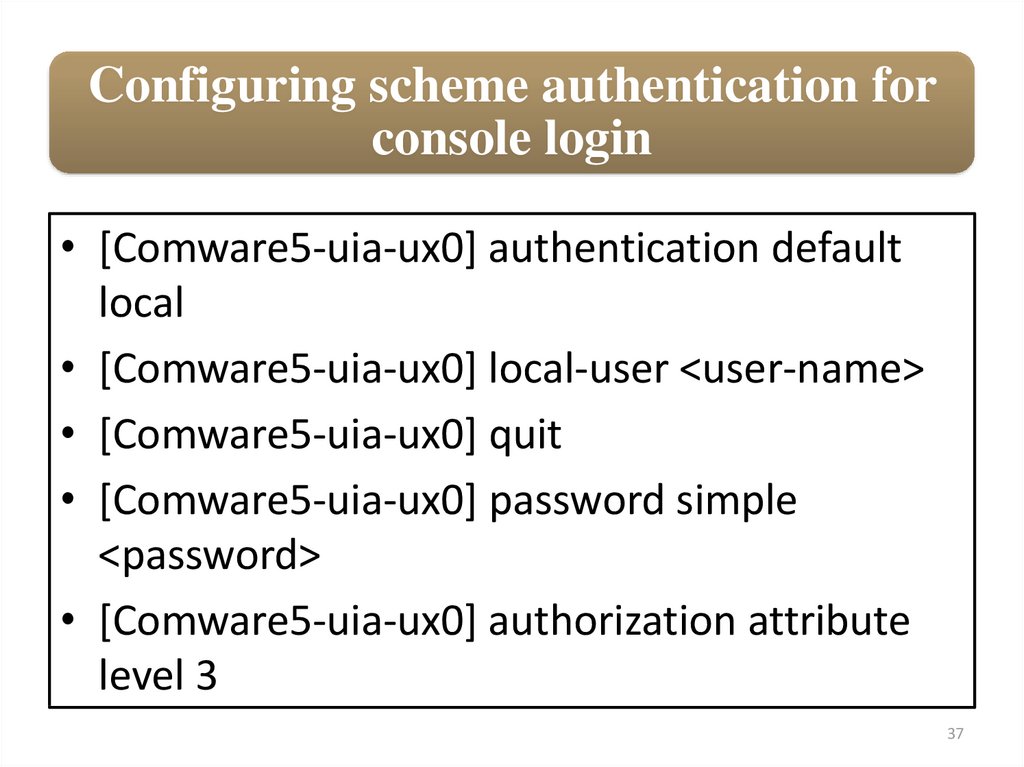
Configuring scheme authentication forconsole login
• [Comware5-uia-ux0] authentication default
local
• [Comware5-uia-ux0] local-user <user-name>
• [Comware5-uia-ux0] quit
• [Comware5-uia-ux0] password simple
<password>
• [Comware5-uia-ux0] authorization attribute
level 3
37
38.
Configuring password authenticationfor console login
The next time you attempt to log in through the console
port, you must provide the configured login username and
password, as shown in Figure.
38
39.
Password authentication on the VTYuser interface
Learn how to configure Comware switches to enforce password
authentication on the VTY (virtual terminal line) interfaces? When you
configure this form of authentication, a user is prompted for just a
password (no username). You set the password in the user interface. The
user interface also controls the user’s privilege level.
When you set the password for VTY interfaces, you can use the simple
keyword, which stores the password in the config in cleartext, or the
cipher keyword, which stores the password in an encrypted format.
For real-world environments, the cipher option is more secure.
39
40.
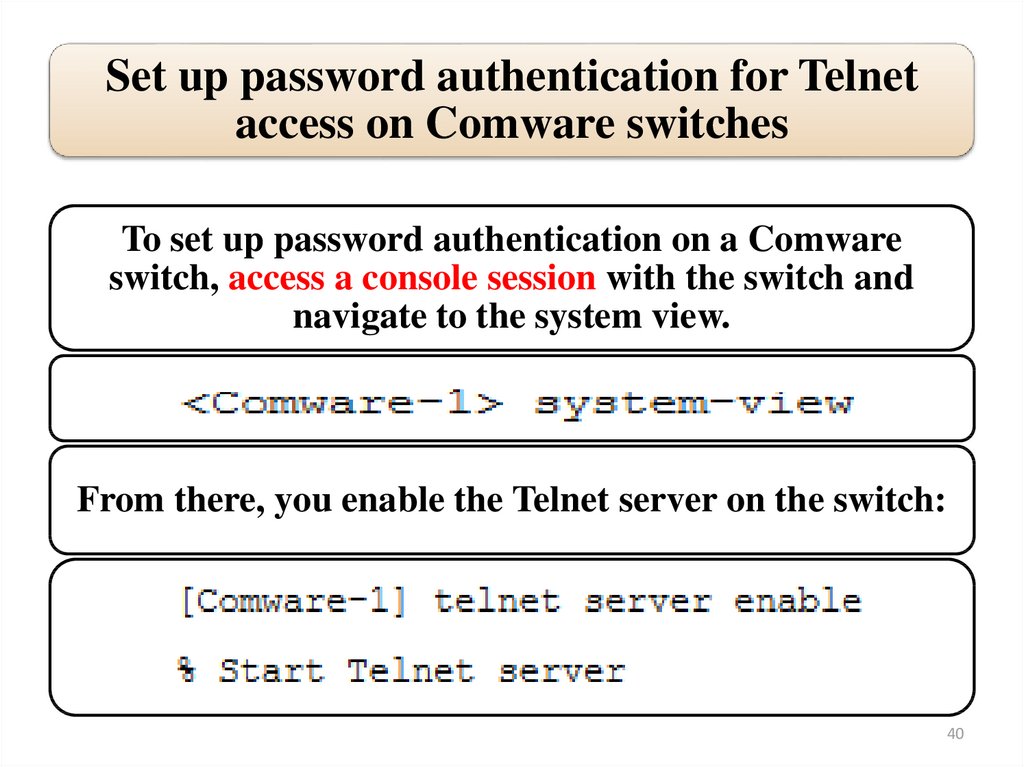
Set up password authentication for Telnetaccess on Comware switches
To set up password authentication on a Comware
switch, access a console session with the switch and
navigate to the system view.
From there, you enable the Telnet server on the switch:
40
41.
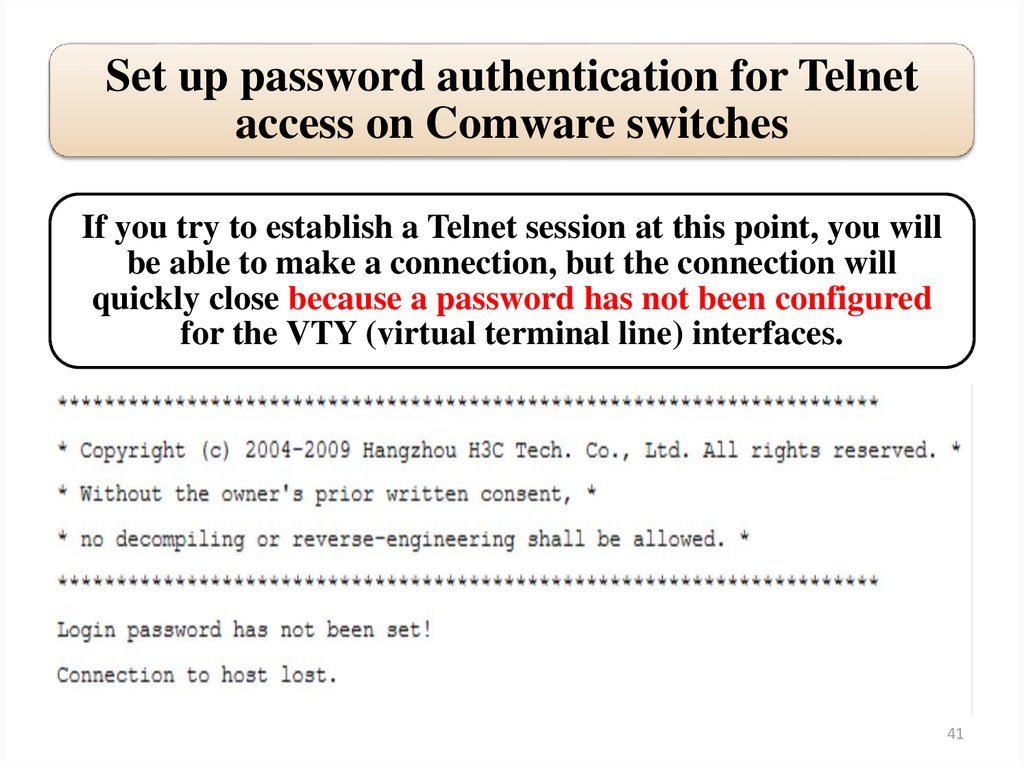
Set up password authentication for Telnetaccess on Comware switches
If you try to establish a Telnet session at this point, you will
be able to make a connection, but the connection will
quickly close because a password has not been configured
for the VTY (virtual terminal line) interfaces.
41
42.
Set up password authentication for Telnetaccess on Comware switches
You can configure a password for one VTY (virtual terminal
line) interface or a range of VTY interfaces at the same time.
To access the entire range of VTY interfaces, enter:
The interfaces already use password authentication, but the
command for setting that method is authentication-mode
password. The example below sets the password to “(hp.)”
42
43.
Set up password authentication for Telnetaccess on Comware switches
However, this configuration still does not give the user
complete privileges on the switch; that is, the user cannot
execute certain commands. To determine the rights that a
user who is currently logged in to the switch has, you can
enter the display users command. As you can see in the
output below, VTY interface (Telnet) users have privilege
level 0 after these commands are entered.
43
44.
Set up password authentication for Telnetaccess on Comware switches
You can change the privilege level for users who log in through Telnet
by configuring the privilege level for the VTY user interfaces. For
example, to set the privilege level to 2, enter:
This change will take affect when the user logs out of the switch and
then logs in again. You can verify the change by entering the display
users command when the user logs in to the switch again.
44
45.
ProtectingManagement
Access
2. Control the privilege level
allowed to managers
45
46.
HP Comware: Change the privilege levelWe learned how to change the privileges
Telnet users receive by configuring the
privilege level in the VTY (virtual
terminal line) interface settings. However,
this configuration changes the level for all
users. You might want to give Telnet users
level 0 privileges by default, but then allow
certain users higher privileges. One way to
do so is to use the super command and
super passwords to permit users to change
their privilege level.
46
47.
HP Comware: Change the privilege levelThe super <level> command permits a user to move to a
different privilege level. If the user attempts to move to a
higher privilege level, the switch prompts the user for a
password or denies the command if no password is set for
the specified level. By default, no super passwords are set.
To permit users to raise their privileges to a specific level,
simply set a super password for that level:
If you do not specify a level number in the command, you set
the super password for level 3.
47
48.
HP Comware: Change the privilege levelAfter you set the super password, users who
know the correct password can switch to that
level temporarily without logging out and
terminating the current connection. The users
can continue to configure the switch, but the
commands that they can execute have changed
to the new level.
After the user logs out and that user or a
different user logs in again, the user privilege is
restored to the original level, maintaining
security.
48
49.
HP Comware: Change the privilege levelNote that you can also use the super command
to move to a lower level than your current level.
You can always move to a lower level; you are
not prompted for a password.
While you are managing a switch, you do not
typically need to move to a lower level. (You can
always use commands at a lower privilege level
than your own without changing levels.) But you
might want to change to a lower level before
turning a session over to a different manager.
49
50.
Super passwords versus other credentialsBy default, the ability to raise the privilege level with a super
command is controlled by local passwords, as described
above. However, you can alternatively use the scheme
authentication to control access. (The super authentication
mode command configures this setting.) Scheme
authentication uses usernames and passwords, which might
be stored locally or on a centralized authentication server.
Setting up these credentials requires additional configuration
settings, which are beyond the scope of this study guide.
You can also use both scheme authentication and local
passwords. In this configuration, local passwords act as a
backup if the centralized authentication server is not available.
50
51.
Use super passwords to permit managersto raise their privilege level on the
Comware switches
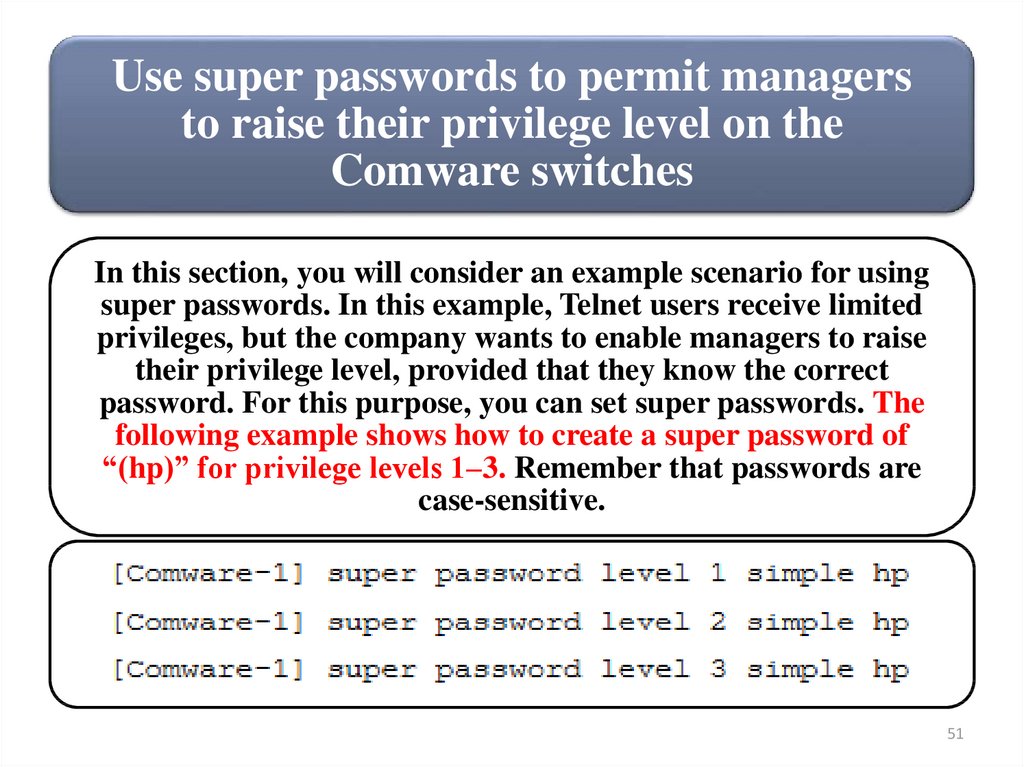
In this section, you will consider an example scenario for using
super passwords. In this example, Telnet users receive limited
privileges, but the company wants to enable managers to raise
their privilege level, provided that they know the correct
password. For this purpose, you can set super passwords. The
following example shows how to create a super password of
“(hp)” for privilege levels 1–3. Remember that passwords are
case-sensitive.
51
52.
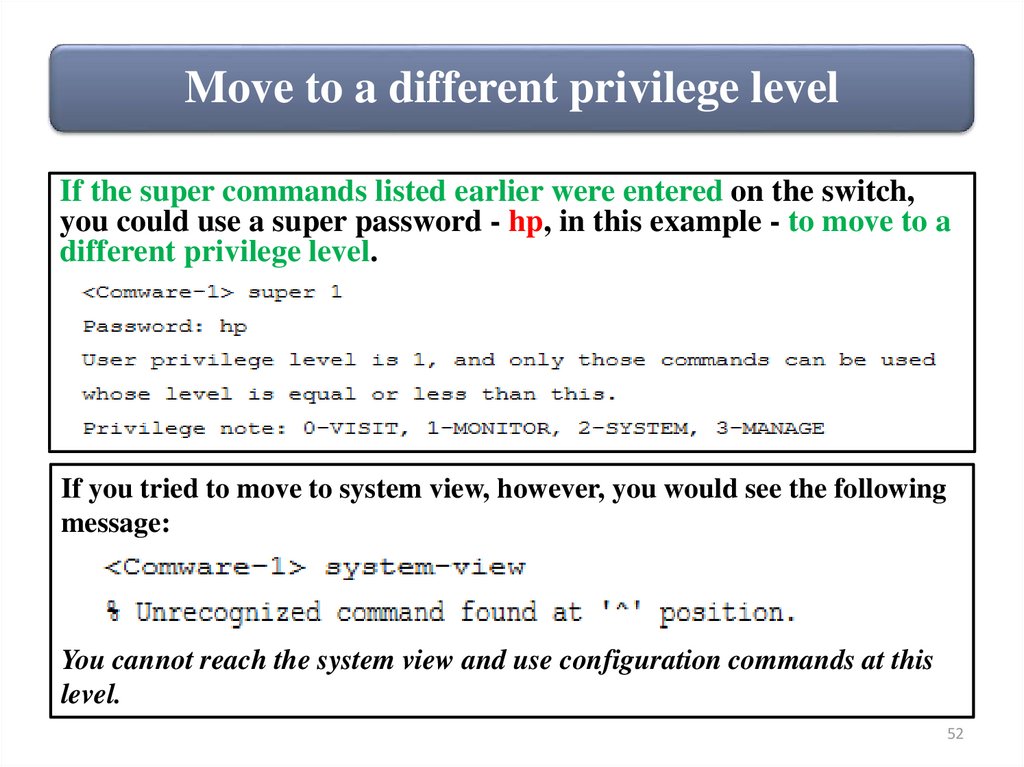
Move to a different privilege levelIf the super commands listed earlier were entered on the switch,
you could use a super password - hp, in this example - to move to a
different privilege level.
If you tried to move to system view, however, you would see the following
message:
You cannot reach the system view and use configuration commands at this
level.
52
53.
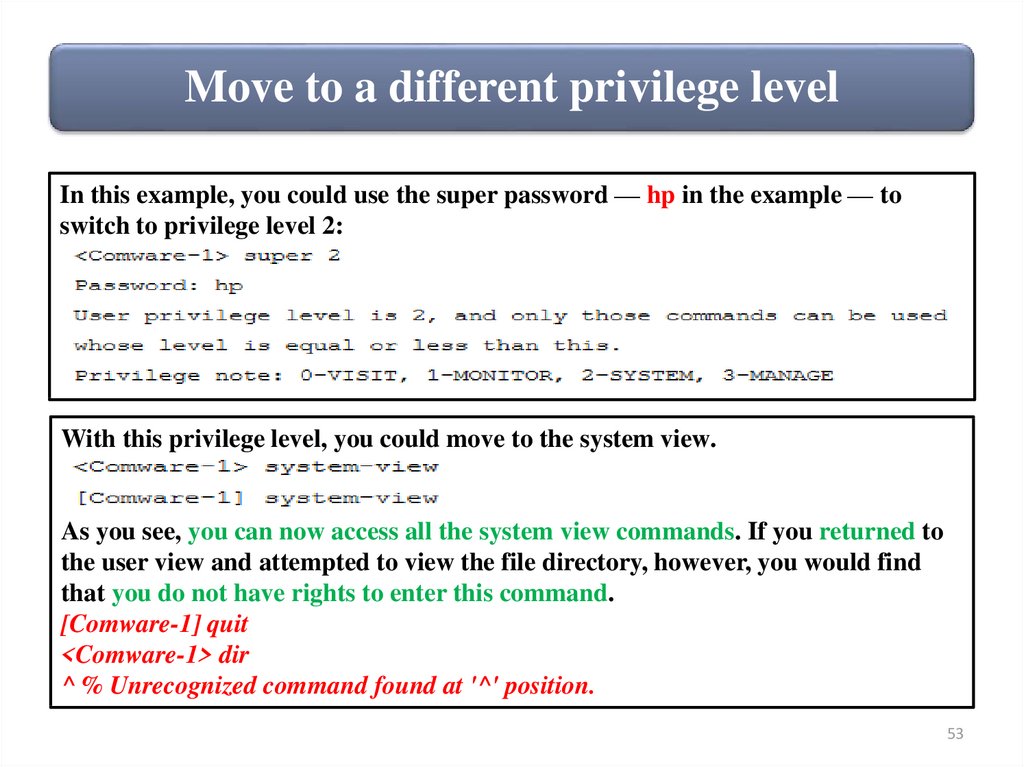
Move to a different privilege levelIn this example, you could use the super password — hp in the example — to
switch to privilege level 2:
With this privilege level, you could move to the system view.
As you see, you can now access all the system view commands. If you returned to
the user view and attempted to view the file directory, however, you would find
that you do not have rights to enter this command.
[Comware-1] quit
<Comware-1> dir
^ % Unrecognized command found at '^' position.
53
54.
Move to a different privilege levelIn this example, you could then switch to level 3,
using the super password, hp.
• .
If you moved to system view, you would see that you have
access to user view commands as well.
54
55.
Move to a different privilege levelThe next time you logged in using a Telnet session, you
would receive the privilege level 0. You could test this by
completing the steps outlined above and then logging out of
the switch.
In this example, you were at privilege level 3 when you
logged out. But what would your default Telnet privilege
be when you logged back in? You could check this by
initiating a new Telnet session and logging back in. At the
same time, you should launch a console session and, from
that session, view users.
55
56.
Move to a different privilege levelAs the above output shows, your Telnet privilege level
is 0. If you knew the super passwords, you could
change your privilege level as you did before.
56