


 Электроника
Похожие презентации:

")


Network applications of OMAP-based single-board computer
1.
NATIONAL TECHNICAL UNIVERSITYOF UKRAINE
“KYIV POLYTECHNIC INSTITUTE”
The Department of Design of Electronic
Digital Equipment
Digital Lab
T. Zakharchenko
Network applications of
OMAP-based single-board
computer
IEEE XXXIII International Scientific
Conference
ELECTRONICS AND
NANOTECHNOLOGY
2.
Workshop plan1.
2.
3.
4.
5.
6.
The OMAP platform
OMAP3 booting process
Bit torrent network
Creating boot media
OS configuration
Conclusions
2
3.
OMAP platform. Use and applicationOMAP (Open Multimedia Applications Platform) image/video
processors developed by Texas Instruments are a category
of proprietary system on chips (SoCs) for portable and
mobile multimedia applications. OMAP devices generally
include a general-purpose ARM architecture processor core
plus one or more specialized co-processors. Earlier OMAP
variants commonly featured a variant of the Texas
Instruments TMS320 series digital signal processor.
The OMAP family consists of three product groups classified
by performance and intended application::
• High-performance applications processors
• Basic multimedia applications processors
• Integrated modem and applications processors
3
4.
OMAP3The 3rd generation OMAP, the OMAP 3 is broken into 3 distinct
groups: the OMAP34x, the OMAP35x, and the OMAP36x. OMAP34x
and OMAP36x are distributed directly to large handset (such as cell
phone) manufacturers. OMAP35x is a variant of OMAP34x intended
for catalog distribution channels. The OMAP36x is a 45 nm version
of the 65 nm OMAP34x with higher clock speed.
The video technology in the higher end OMAP 3 parts is derived in
part from the DaVinci product line, which first packaged higher end
C64x+ DSPs and image processing controllers with ARM9
processors last seen in the older OMAP 1 generation or ARM
Cortex-A8.
Today we consider OMAP3530 chip with superscalar Cortex-A8
microprocessor, running at 720 MHz. On the chip DSP
TMS320C64x+ DSP core is placed too, and PowerVR SGX 530 (1,6
GFLOPS) graphical chip.
4
5.
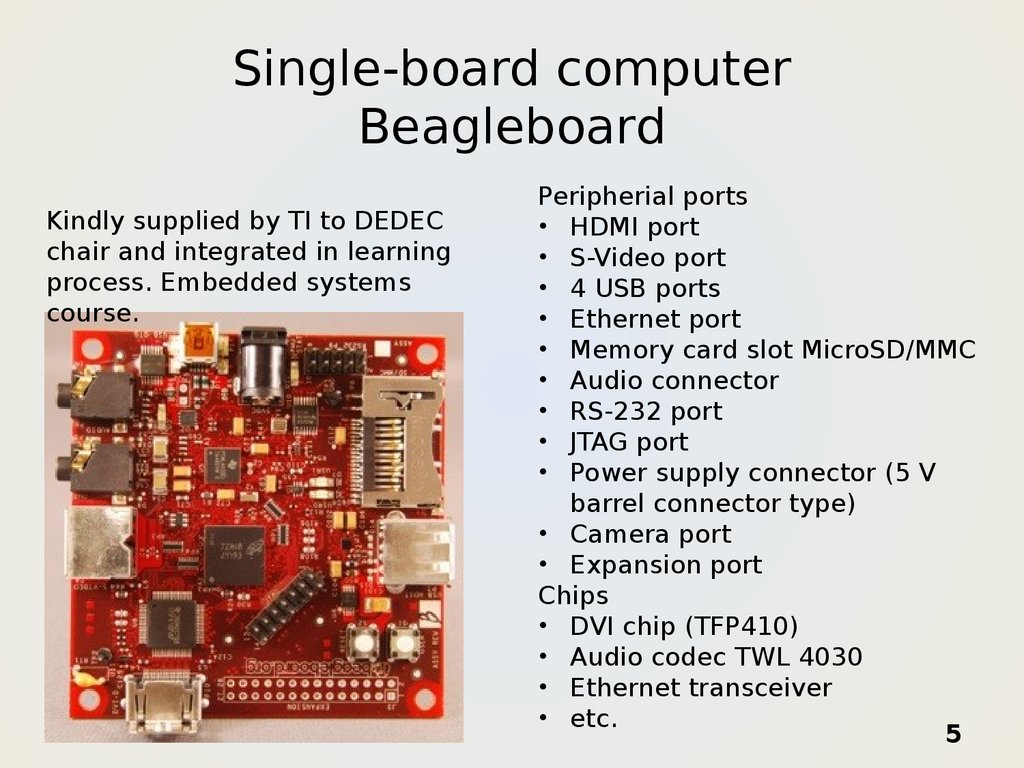
Single-board computerBeagleboard
Kindly supplied by TI to DEDEC
chair and integrated in learning
process. Embedded systems
course.
Peripherial ports
• HDMI port
• S-Video port
• 4 USB ports
• Ethernet port
• Memory card slot MicroSD/MMC
• Audio connector
• RS-232 port
• JTAG port
• Power supply connector (5 V
barrel connector type)
• Camera port
• Expansion port
Chips
• DVI chip (TFP410)
• Audio codec TWL 4030
• Ethernet transceiver
• etc.
5
6.
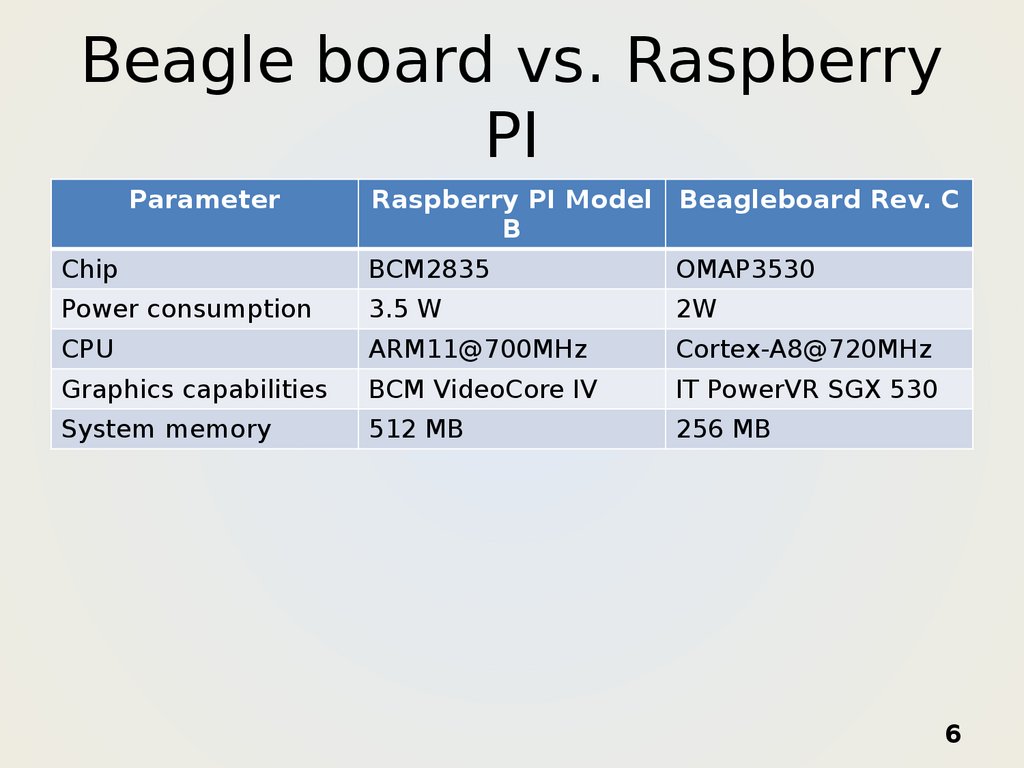
Beagle board vs. RaspberryPI
Parameter
Raspberry PI Model
B
Beagleboard Rev. C
Chip
BCM2835
OMAP3530
Power consumption
3.5 W
2W
CPU
ARM11@700MHz
Cortex-A8@720MHz
Graphics capabilities
BCM VideoCore IV
IT PowerVR SGX 530
System memory
512 MB
256 MB
6
7.
File exchange network BittorrentBitTorrent is a protocol that supports the practice of peer-to-peer file
sharing and is used for distributing large amounts of data over the
Internet.
A user who wants to upload a file first creates a small torrent
descriptor file that they distribute by conventional means (web,
email, etc.). They then make the file itself available through a
BitTorrent node acting as a seed. Those with the torrent descriptor file
can give it to their own BitTorrent nodes which, acting as peers or
leechers, download it by connecting to the seed and/or other peers.
The file being distributed is divided into segments called pieces. As
each peer receives a new piece of the file it becomes a source (of
that piece) for other peers, relieving the original seed from having to
send that piece to every computer or user wishing a copy. With
BitTorrent, the task of distributing the file is shared by those who
want it; it is entirely possible for the seed to send only a single copy
of the file itself and eventually distribute to an unlimited number of
peers.
7
Each piece is protected by a cryptographic hash contained in the
8.
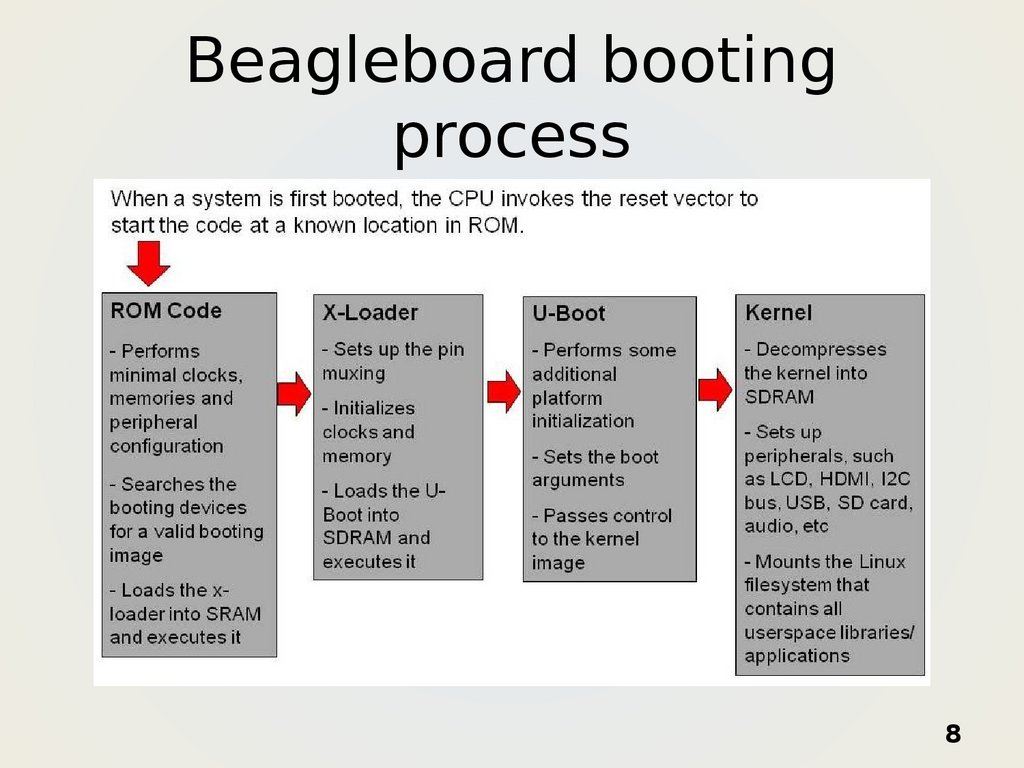
Beagleboard bootingprocess
8
9.
First boot stageThe internal ROM Code can attempt to boot from
several different peripheral and memory devices,
including, but not limited to:
• Serial (UART3)
• SD Card, eMMC,
• NAND
The order in which these devices are searched for a
valid first-stage booting image (x-loader) is determine
by a set of GPIO configuration pins referred to as
SYSBOOT. The TRM includes a table that shows the
booting device list that each combination of the
SYSBOOT pins refers to.
9
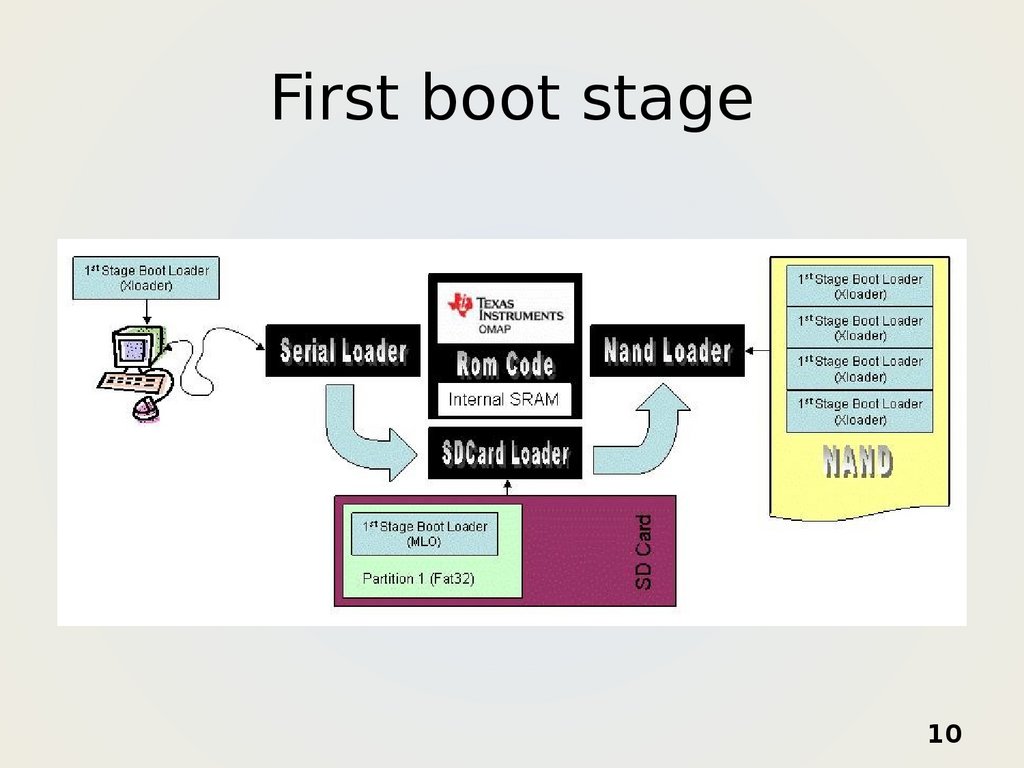
10.
First boot stage10
11.
First boot stageSerial Boot
For serial boot, a simple ID is written out of the serial port. If the host responds correctly within
a short window of time, the ROM will read from the serial port and transfer the data to the
internal SRAM. Control is passed to the start of SDRAM if no errors are detected. UART3 is the
only uart for which the ROM will attempt to load from.
SD Card Boot
If MMC is included in the booting device list, the ROM looks for an SD Card on the first MMC
controller. If a card is found, the ROM then looks for the first FAT32 partition within the partition
table. Once the partition is found, the root directory is scanned for a special signed file called
"MLO" (which is the x-loader binary with a header containing the memory location to load the
file to and the size of the file). Assuming all is well with the file, it is transfered into the internal
SRAM and control is passed to it. Both MMC1 and MMC2 can be used for booting.
NAND / eMMC Boot
If NAND is included in the booting device list, the ROM attempts to load the first sector of
NAND. If the sector is bad, corrupt, or blank, the ROM will try the next sector (up to 4) before
exiting. Once a good sector is found, the ROM transfers the contents to SRAM and transfers
control to it. (The same steps are performed for eMMC if eMMC is included in the booting device
list instead of NAND.)
11
12.
Second boot stageIt is the job of the x-loader to transfer the 2nd stage
loader into main memory, which we call the u-boot.
Typically both the x-loader and u-boot come from the
same storage medium. For example, typically if the
x-loader is transferred via USB, the u-boot will also be
transferred via USB, and if the x-loader is transferred
via SD card, the u-boot will also be transferred via SD
card. However, this is not required. For example, you
could flash the serial x-loader into the NAND. The
ROM code will load the x-loader from NAND and
transfer control to the x-loader, which will wait for the
u-boot to be downloaded from the serial port.
12
13.
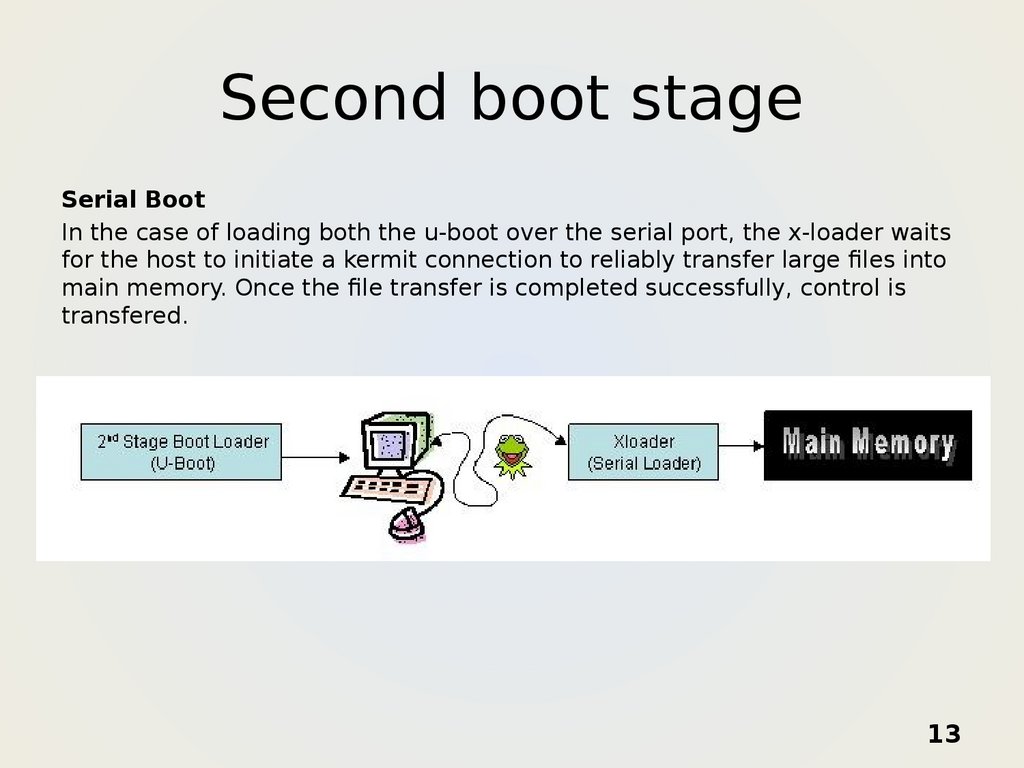
Second boot stageSerial Boot
In the case of loading both the u-boot over the serial port, the x-loader waits
for the host to initiate a kermit connection to reliably transfer large files into
main memory. Once the file transfer is completed successfully, control is
transfered.
13
14.
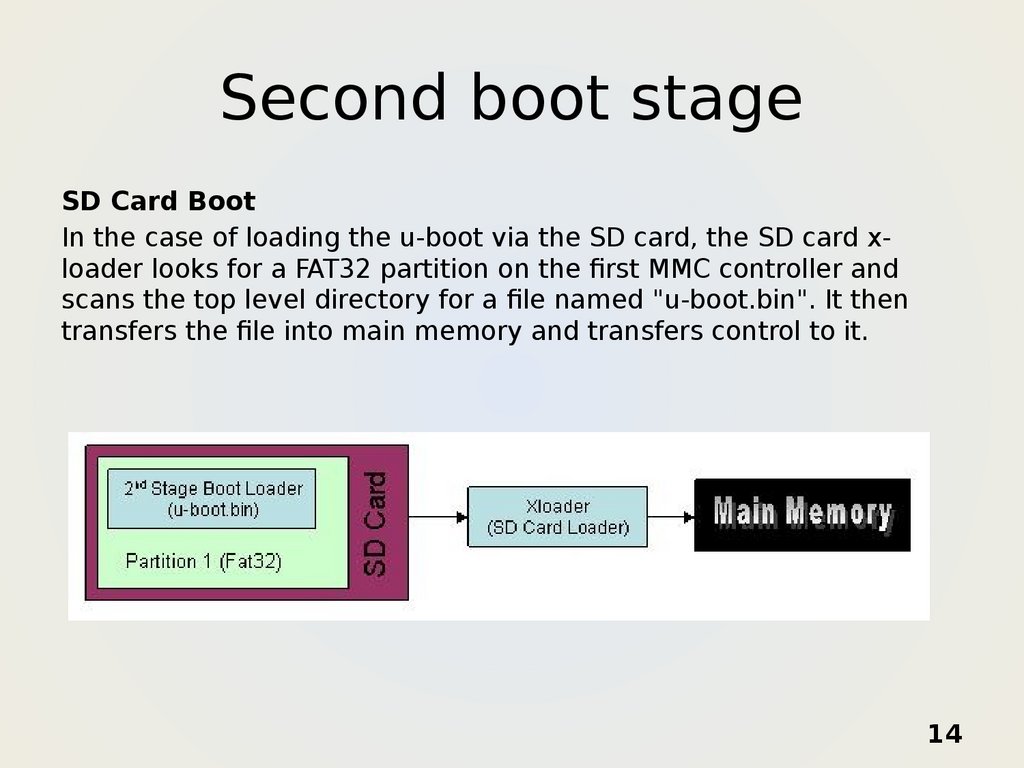
Second boot stageSD Card Boot
In the case of loading the u-boot via the SD card, the SD card xloader looks for a FAT32 partition on the first MMC controller and
scans the top level directory for a file named "u-boot.bin". It then
transfers the file into main memory and transfers control to it.
14
15.
Second boot stageNAND / eMMC Boot
In the case of a u-boot stored in NAND, the x-loader expects the u-boot to
be located at the 5th sector (offset 0x00800000). It transfers the image
from NAND into main memory and transfers control to it. In the case of a
u-boot stored in eMMC, the x-loader expects the u-boot to be located at
the offset 0x200.
15
16.
Kernel stageThe kernel in Linux handles all operating system processes,
such as memory management, task scheduling, I/O,
interprocess communication, and overall system control. This
is loaded in two stages - in the first stage the kernel (as a
compressed image file) is loaded into memory and
decompressed, and a few fundamental functions such as
basic memory management are set up. Control is then
switched one final time to the main kernel start process.
Once the kernel is fully operational – and as part of its
startup, upon being loaded and executing – the kernel looks
for an init process to run, which (separately) sets up a user
space and the processes needed for a user environment and
ultimate login. The kernel itself is then allowed to go idle,
subject to calls from other processes.
16
17.
Kernel stageThe kernel as loaded is typically an image file, compressed into either zImage or
bzImage formats with zlib or uncompressed uImage (our case). A routine at the
head of it does a minimal amount of hardware setup, decompresses the image fully
into high memory, and takes note of any RAM disk if configured.
The startup function for the kernel (also called the swapper or process 0)
establishes memory management (paging tables and memory paging), detects the
type of CPU and any additional functionality such as floating point capabilities, and
then switches to non-architecture specific Linux kernel functionality via a call to
start_kernel().
start_kernel executes a wide range of initialization functions. It sets up interrupt
handling (IRQs), further configures memory, starts the Init process (the first userspace process), and then starts the idle task via cpu_idle(). Notably, the kernel
startup process also mounts the initial RAM disk ("initrd") that was loaded
previously as the temporary root file system during the boot phase. The initrd
allows driver modules to be loaded directly from memory, without reliance upon
other devices and the drivers that are needed to access them. The root file system
is later switched via a call to pivot_root() which unmounts the temporary root file
system and replaces it with the use of the real one, once the latter is accessible.
The memory used by the temporary root file system is then reclaimed.
17
18.
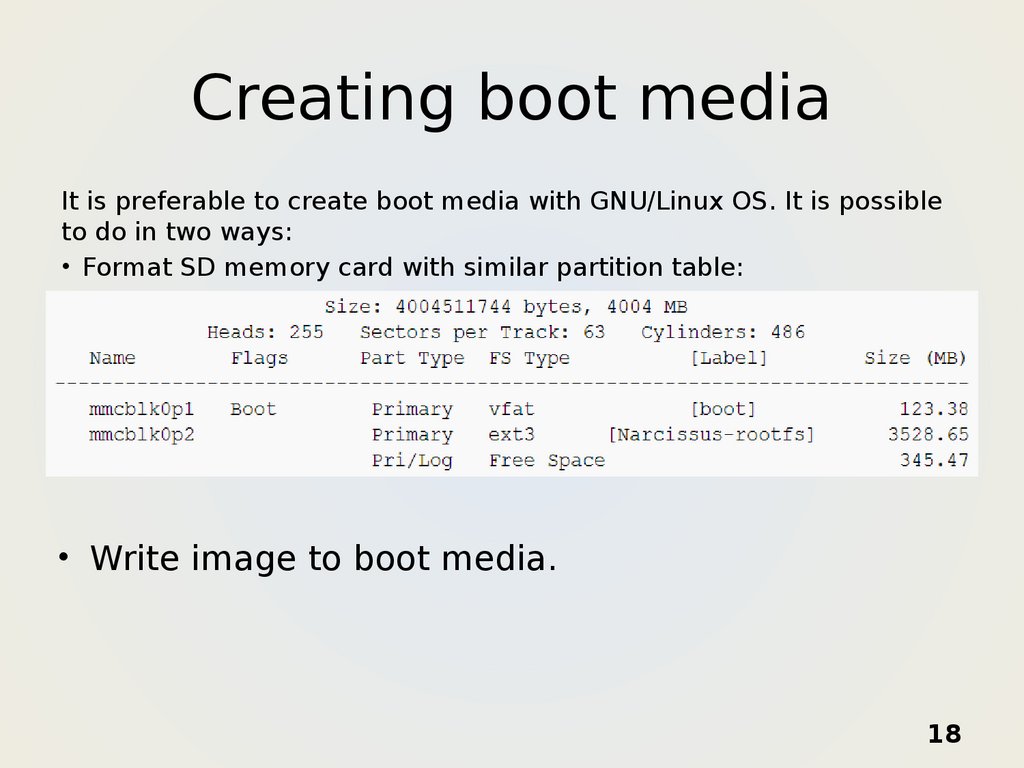
Creating boot mediaIt is preferable to create boot media with GNU/Linux OS. It is possible
to do in two ways:
• Format SD memory card with similar partition table:
• Write image to boot media.
18
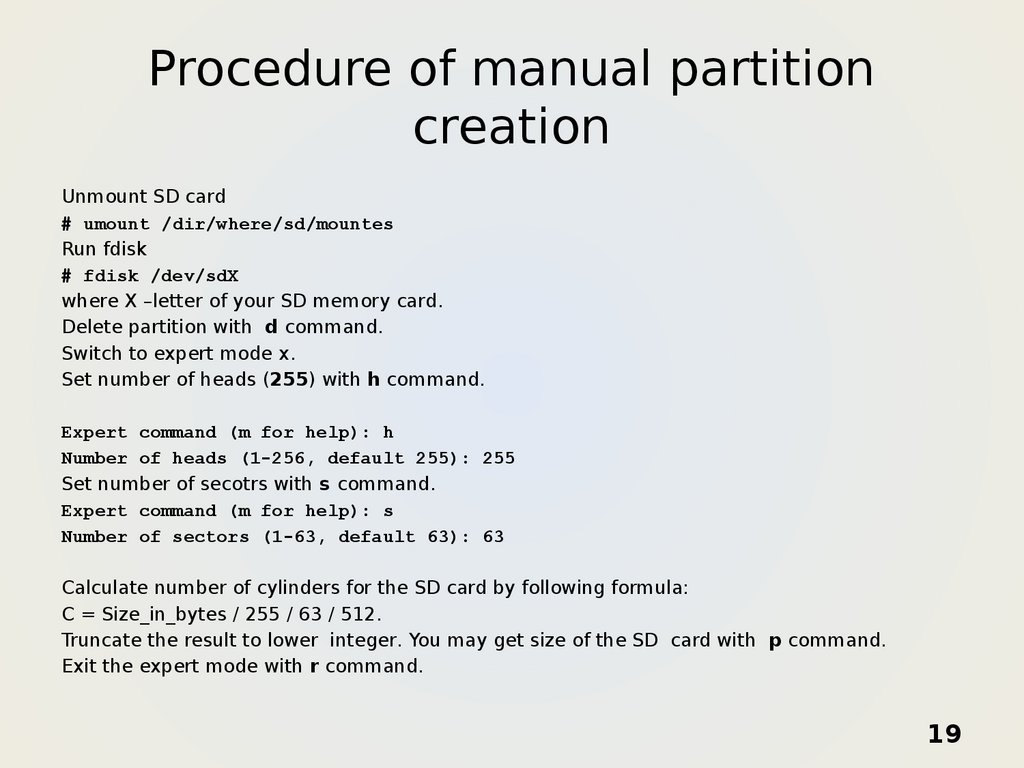
19.
Procedure of manual partitioncreation
Unmount SD card
# umount /dir/where/sd/mountes
Run fdisk
# fdisk /dev/sdX
where X –letter of your SD memory card.
Delete partition with d command.
Switch to expert mode x.
Set number of heads (255) with h command.
Expert command (m for help): h
Number of heads (1-256, default 255): 255
Set number of secotrs with s command.
Expert command (m for help): s
Number of sectors (1-63, default 63): 63
Calculate number of cylinders for the SD card by following formula:
C = Size_in_bytes / 255 / 63 / 512.
Truncate the result to lower integer. You may get size of the SD card with p command.
Exit the expert mode with r command.
19
20.
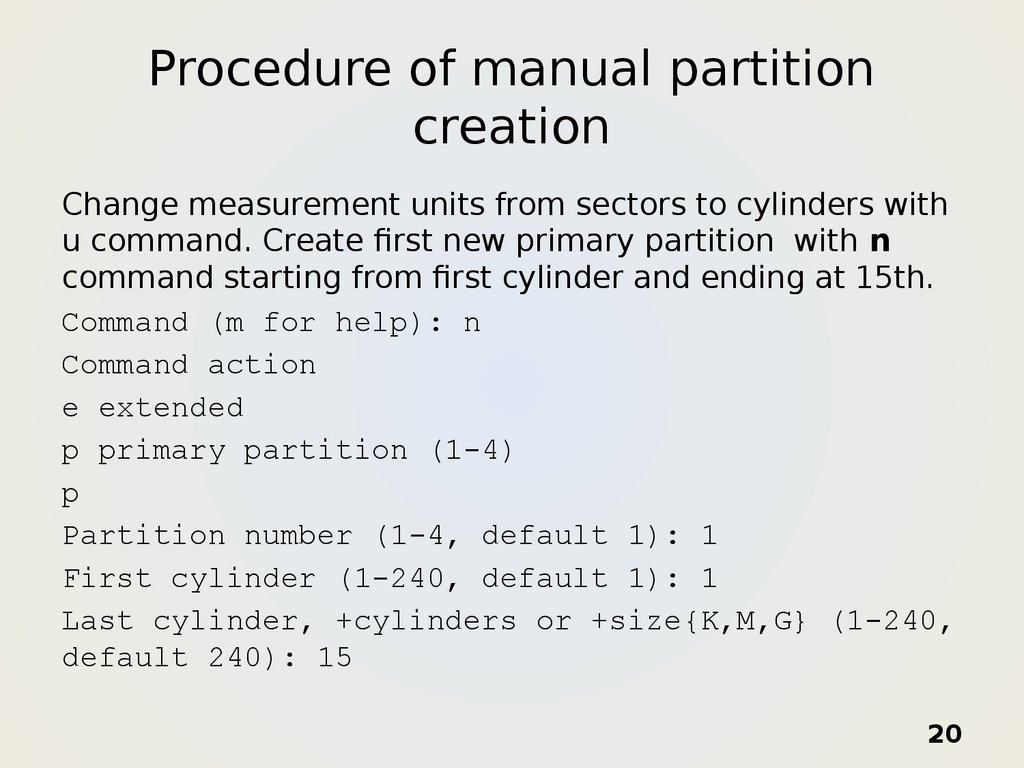
Procedure of manual partitioncreation
Change measurement units from sectors to cylinders with
u command. Create first new primary partition with n
command starting from first cylinder and ending at 15th.
Command (m for help): n
Command action
e extended
p primary partition (1-4)
p
Partition number (1-4, default 1): 1
First cylinder (1-240, default 1): 1
Last cylinder, +cylinders or +size{K,M,G} (1-240,
default 240): 15
20
21.
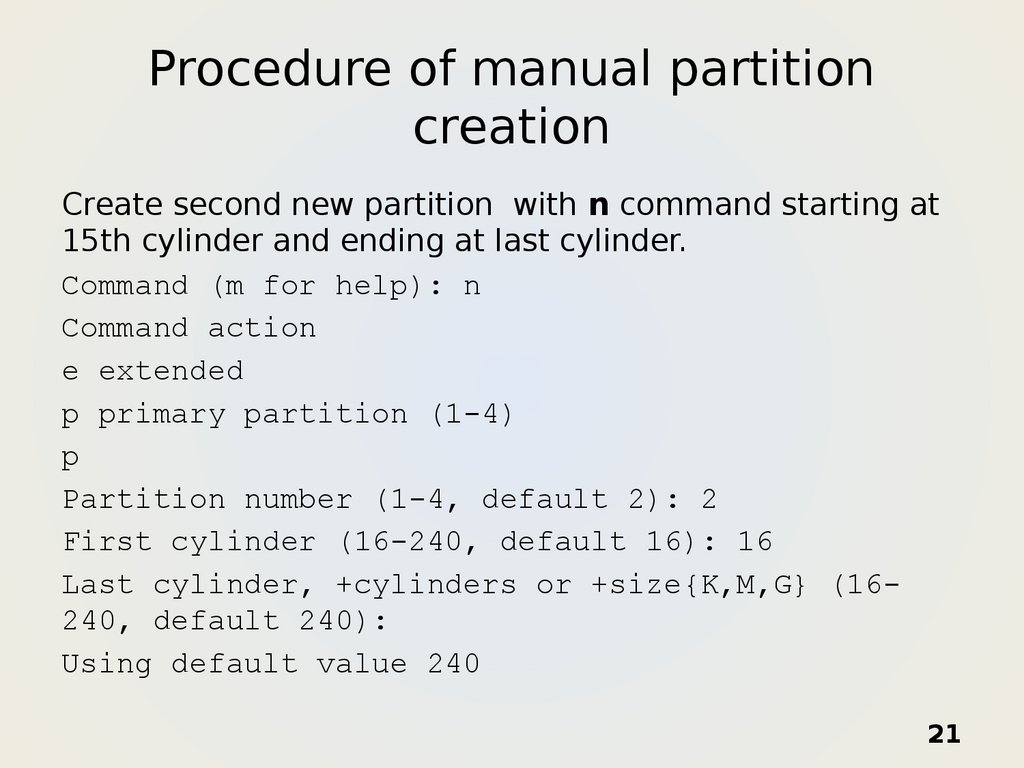
Procedure of manual partitioncreation
Create second new partition with n command starting at
15th cylinder and ending at last cylinder.
Command (m for help): n
Command action
e extended
p primary partition (1-4)
p
Partition number (1-4, default 2): 2
First cylinder (16-240, default 16): 16
Last cylinder, +cylinders or +size{K,M,G} (16240, default 240):
Using default value 240
21
22.
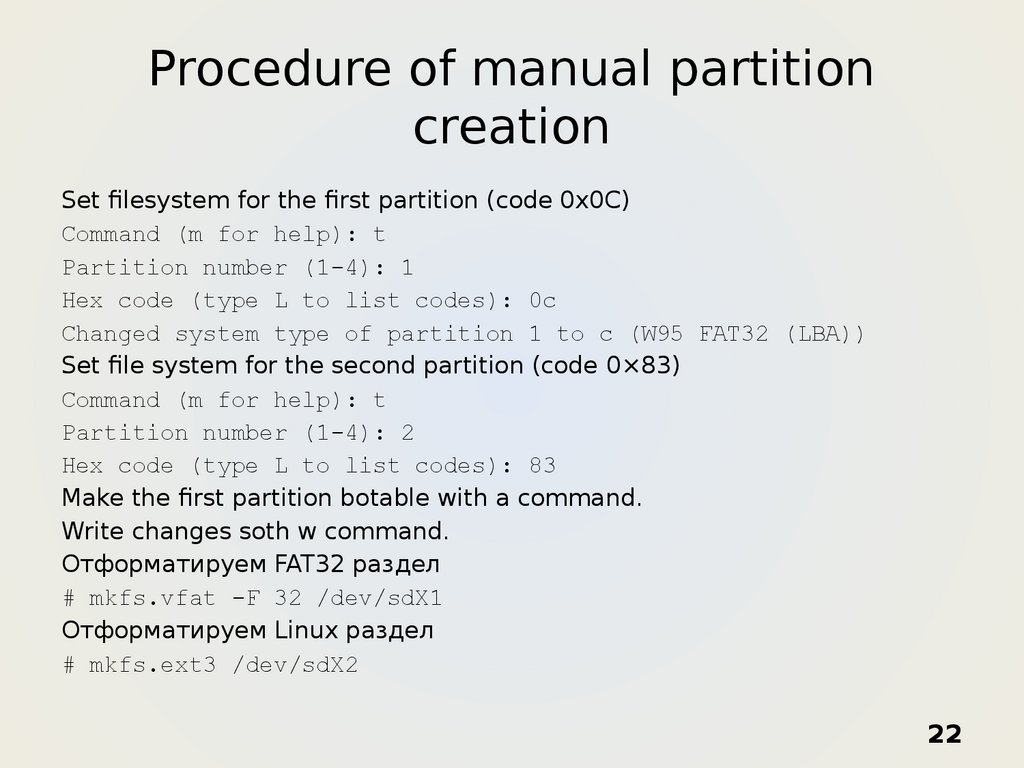
Procedure of manual partitioncreation
Set filesystem for the first partition (code 0x0C)
Command (m for help): t
Partition number (1-4): 1
Hex code (type L to list codes): 0c
Changed system type of partition 1 to c (W95 FAT32 (LBA))
Set file system for the second partition (code 0×83)
Command (m for help): t
Partition number (1-4): 2
Hex code (type L to list codes): 83
Make the first partition botable with a command.
Write changes soth w command.
Отформатируем FAT32 раздел
# mkfs.vfat -F 32 /dev/sdX1
Отформатируем Linux раздел
# mkfs.ext3 /dev/sdX2
22
23.
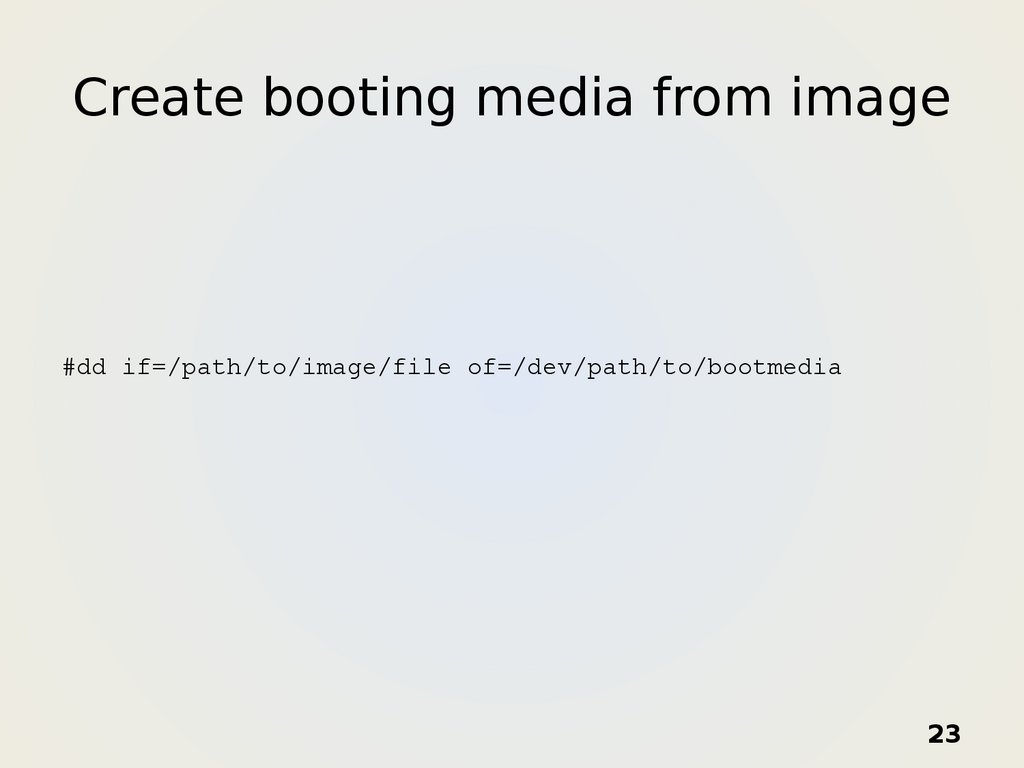
Create booting media from image#dd if=/path/to/image/file of=/dev/path/to/bootmedia
23
24.
The Ångström distributionThe Ångström distribution is a Linux distribution for a
variety of embedded devices.
You can configure your own edition of the distribution with
online builder at http://narcissus.angstrom-distribution.org/
. The distribution uses opkg package manager.
Features:
• Developed by developers from the OpenZaurus,
OpenEmbedded, and OpenSIMpad project
• ipkg-packages from Familiar.
• Huge number of supported devices.
• Automatical build system of test images.
24
25.
OS configurationOur goal is to create so called torrent-box on Beagleboard basis. Following
packages should be included in your edition of the Angstrom:
• transmission -- bittorrent client
• dropbear ssh -- secure shell client
• samba -- samba share client/server
• kernel module, which supports SMSC LAN9514 LAN chip
• some additional packages you may need
The OS may be configured on mentioned above site. Downloaded image
must be unpacked in ext-partition of the SD card excluding /boot
directory. From the boot directory you should take uImage and place it in
root directory of FAT32 partition. Bootloaders x-loader and u-boot should
be taken from demonstration SD card. Of course you may compile them
by your own if you want. The next step is to configure transmission and
samba. You may set them via RS-232 or SSH connection. In the case of
RS-232 use screen utility or putty.
25
26.
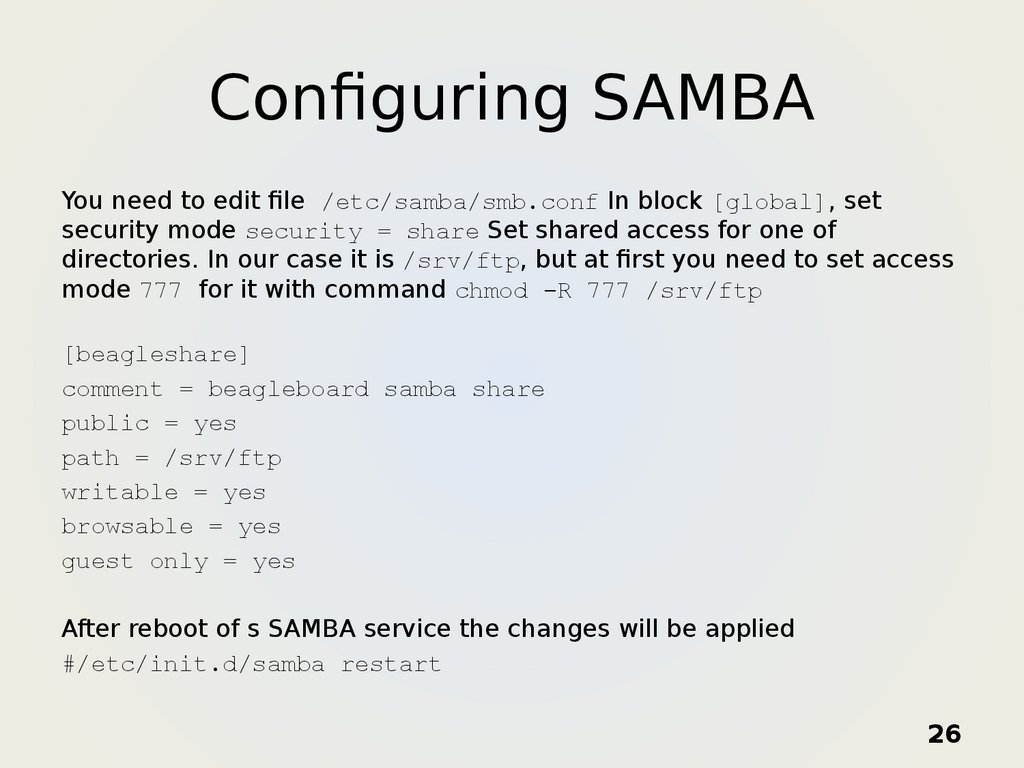
Configuring SAMBAYou need to edit file /etc/samba/smb.conf In block [global], set
security mode security = share Set shared access for one of
directories. In our case it is /srv/ftp, but at first you need to set access
mode 777 for it with command chmod -R 777 /srv/ftp
[beagleshare]
comment = beagleboard samba share
public = yes
path = /srv/ftp
writable = yes
browsable = yes
guest only = yes
After reboot of s SAMBA service the changes will be applied
#/etc/init.d/samba restart
26
27.
Configuring TransmissionThe configuration of Transmission is stored in
~/.config/transmission-daemon/settings.json.
We are interested in following fields:
"download-dir": "/srv/ftp" – directory for
downloading torrent-files
"rpc-port": 9091 – port of Transmission WEB
interface
"rpc-whitelist": "192.168.13.*" – subnet, from
which access to WEB interface enabled
"rpc-whitelist-enabled": true – enable whitelist
of IP addresses
27
28.
ConclusionsExcept mentioned above network applications,
Beagleboard may be successfully used as WEBserver, you may attach headphones and display to
it. This fact gives a space for fantasy. The OMAP3
processor is suitable for network solutions, but its
potential not limited only by network applications,
originally it was developed for portable multimedia
devices and has significant capabilities for sound
and graphics processing. Moreover it is one of the
best solutions for embedded systems learning
process.
28
29.
The endQuestions?