


 Информатика
Похожие презентации:


Technical Information samsung S1060
1.
Technical Informationsamsung S1060
Samsung camera
SAMSUNG TECHWIN
2.
ContentsPart 1. Firmware
Part 2. Adjustment
Part 3. Disassembly
3.
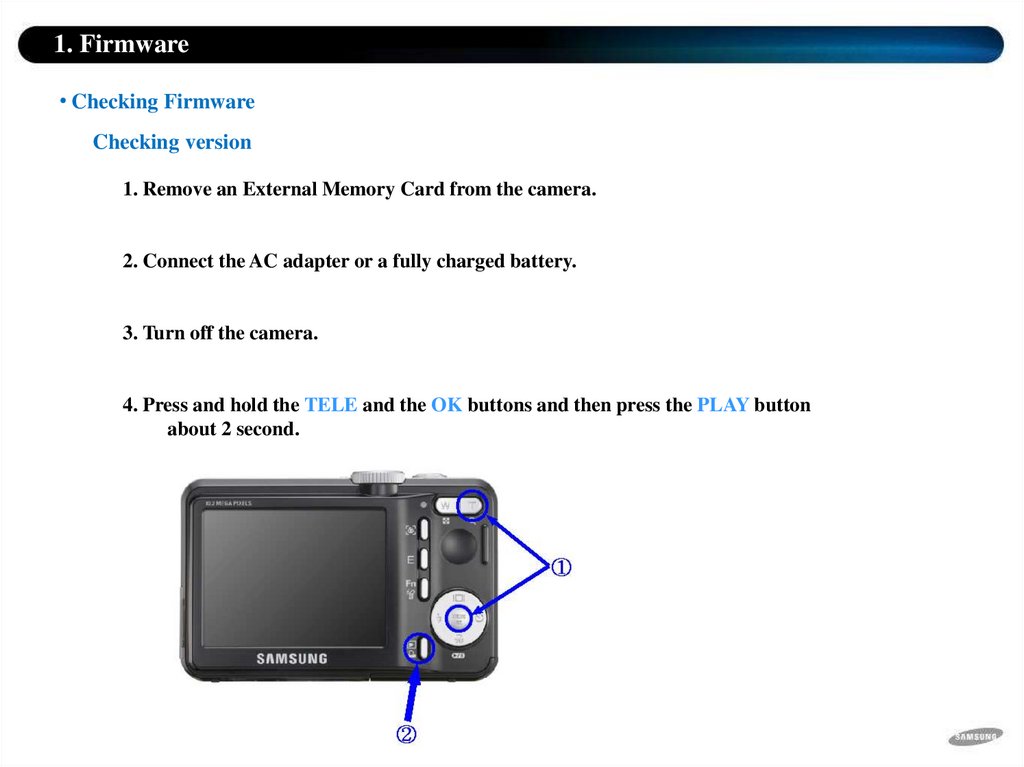
1. FirmwareChecking Firmware
Checking version
1. Remove an External Memory Card from the camera.
2. Connect the AC adapter or a fully charged battery.
3. Turn off the camera.
4. Press and hold the TELE and the OK buttons and then press the PLAY button
about 2 second.
4.
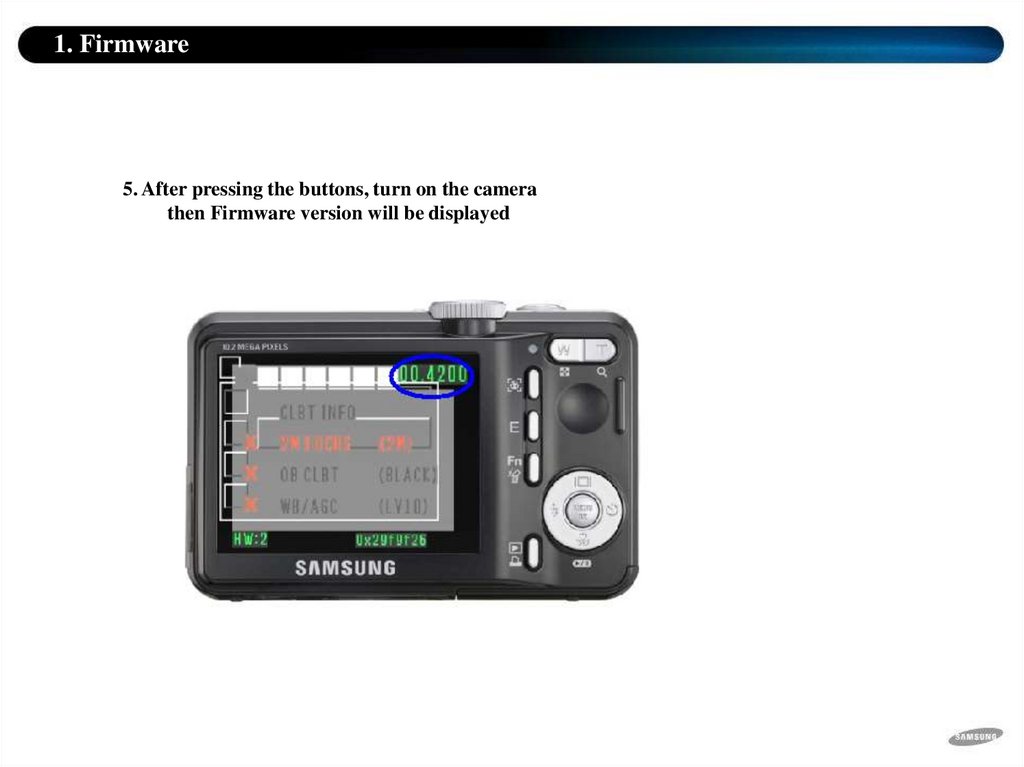
1. Firmware5. After pressing the buttons, turn on the camera
then Firmware version will be displayed
5.
1. FirmwareUpgrading Firmware
General Firmware
1. Insert a SD memory card that has the Firmware File.
* Be sure that make back-up the adjustment data, before upgraded the firmware.
Otherwise, all adjustment data might be initialized.
In addition, the firmware file name must be “s4105.elf".
2. Use the DC adapter or a full- charged battery.
* To upgrade the Firmware,
all of the battery level indicator on the LCD monitor must be displayed.
3. Turn off the camera.
6.
1. Firmware4. Press and hold the WIDE buttons and then press the PLAY button.
7.
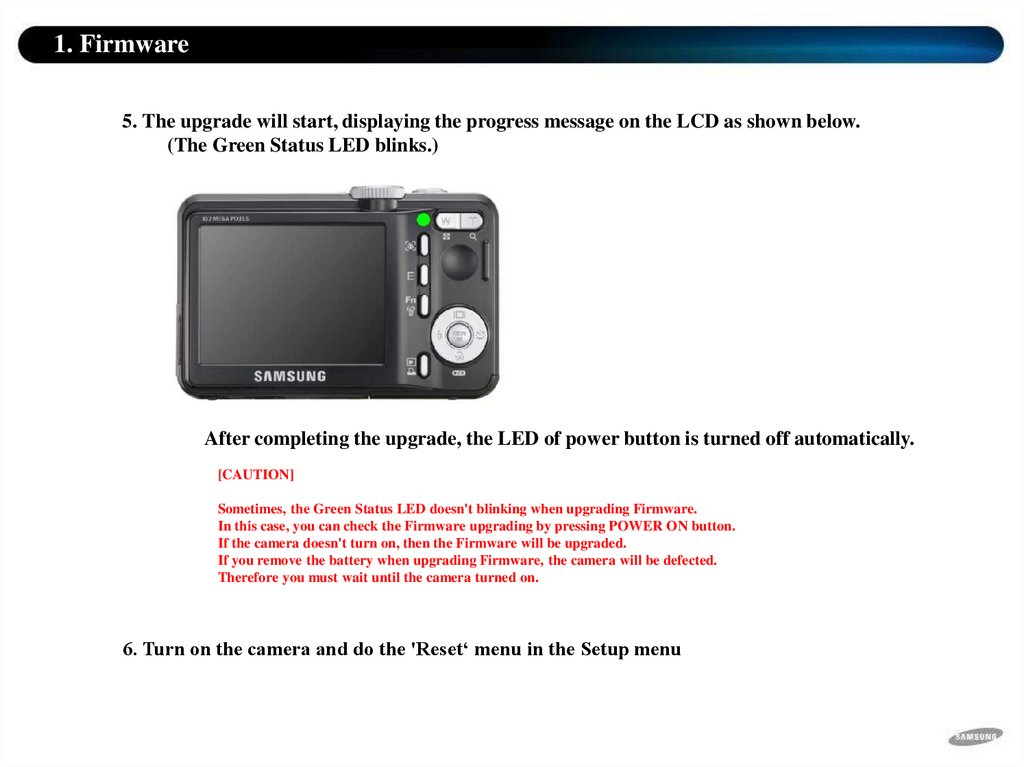
1. Firmware5. The upgrade will start, displaying the progress message on the LCD as shown below.
(The Green Status LED blinks.)
After completing the upgrade, the LED of power button is turned off automatically.
[CAUTION]
Sometimes, the Green Status LED doesn't blinking when upgrading Firmware.
In this case, you can check the Firmware upgrading by pressing POWER ON button.
If the camera doesn't turn on, then the Firmware will be upgraded.
If you remove the battery when upgrading Firmware, the camera will be defected.
Therefore you must wait until the camera turned on.
6. Turn on the camera and do the 'Reset‘ menu in the Setup menu
8.
2. AdjustmentEEPROM READ
To read the data of EEPROM, refer to the following.
<Reference - Equipment>
① JACK BOARD for adjustment
② SPECAL CABLE(USB)
③EEPROM TOOL Program
④TEST MODE Driver
⑤Camera for extracting the standard DATA
9.
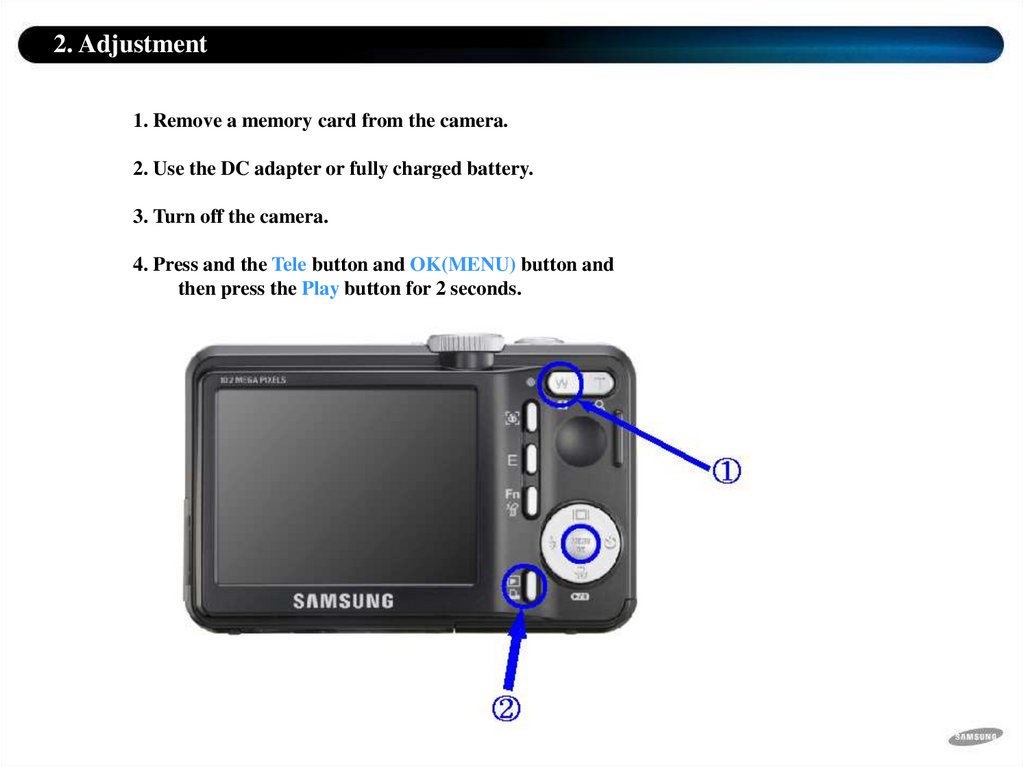
2. Adjustment1. Remove a memory card from the camera.
2. Use the DC adapter or fully charged battery.
3. Turn off the camera.
4. Press and the Tele button and OK(MENU) button and
then press the Play button for 2 seconds.
10.
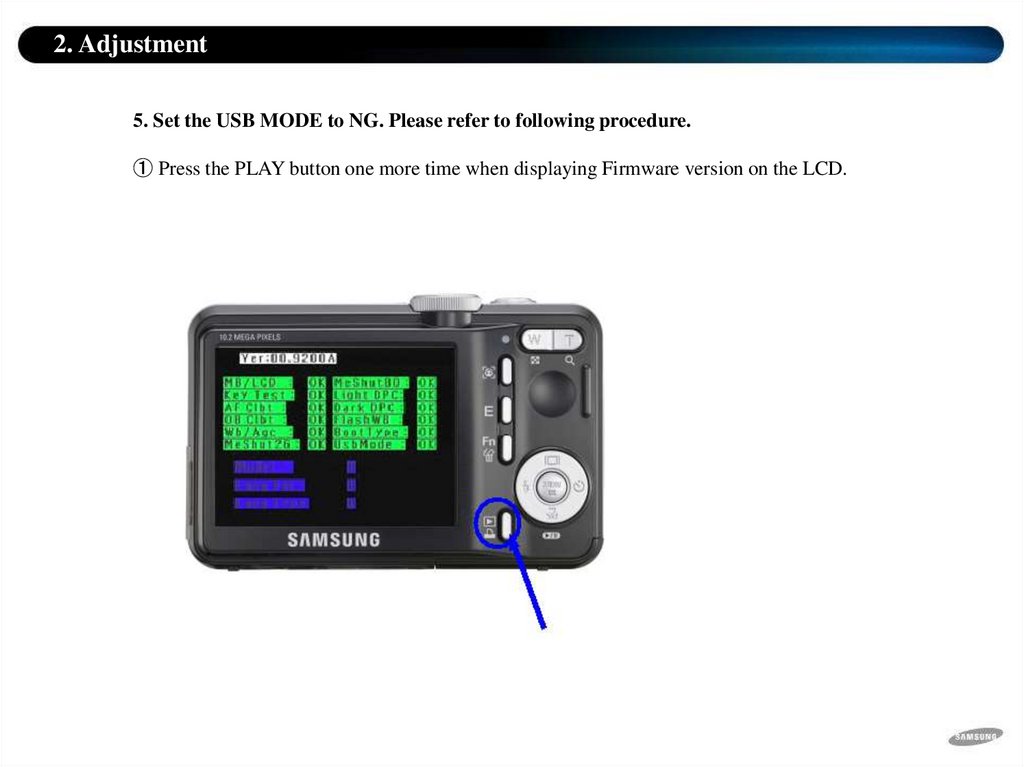
2. Adjustment5. Set the USB MODE to NG. Please refer to following procedure.
① Press the PLAY button one more time when displaying Firmware version on the LCD.
11.
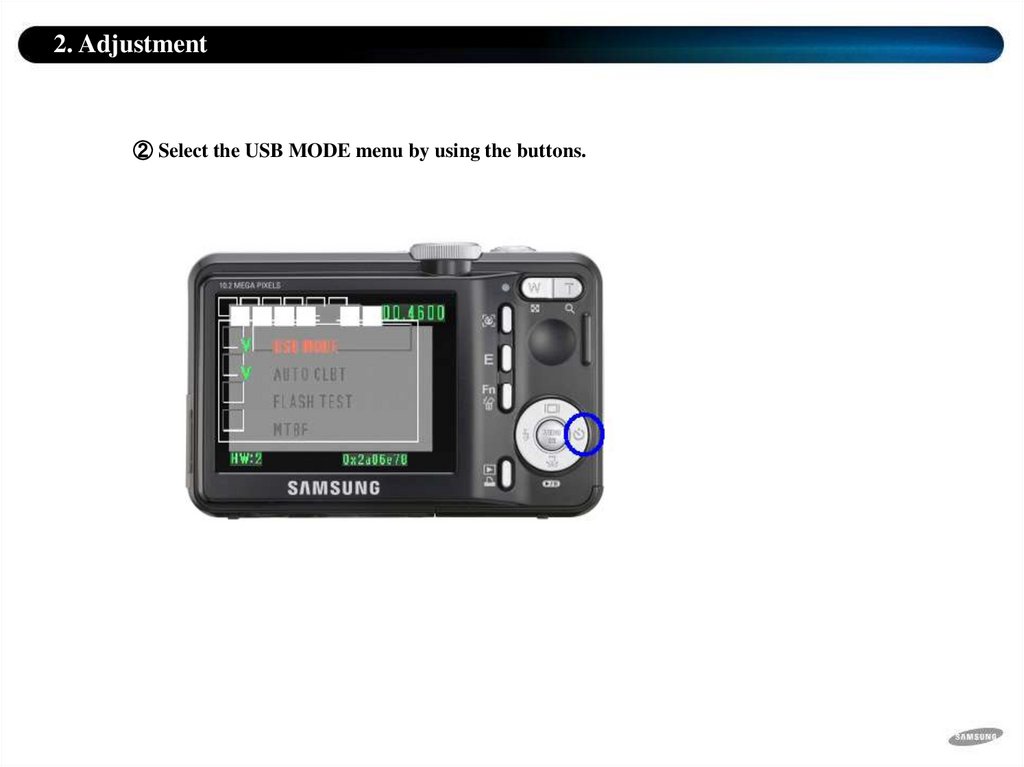
2. Adjustment② Select the USB MODE menu by using the buttons.
12.
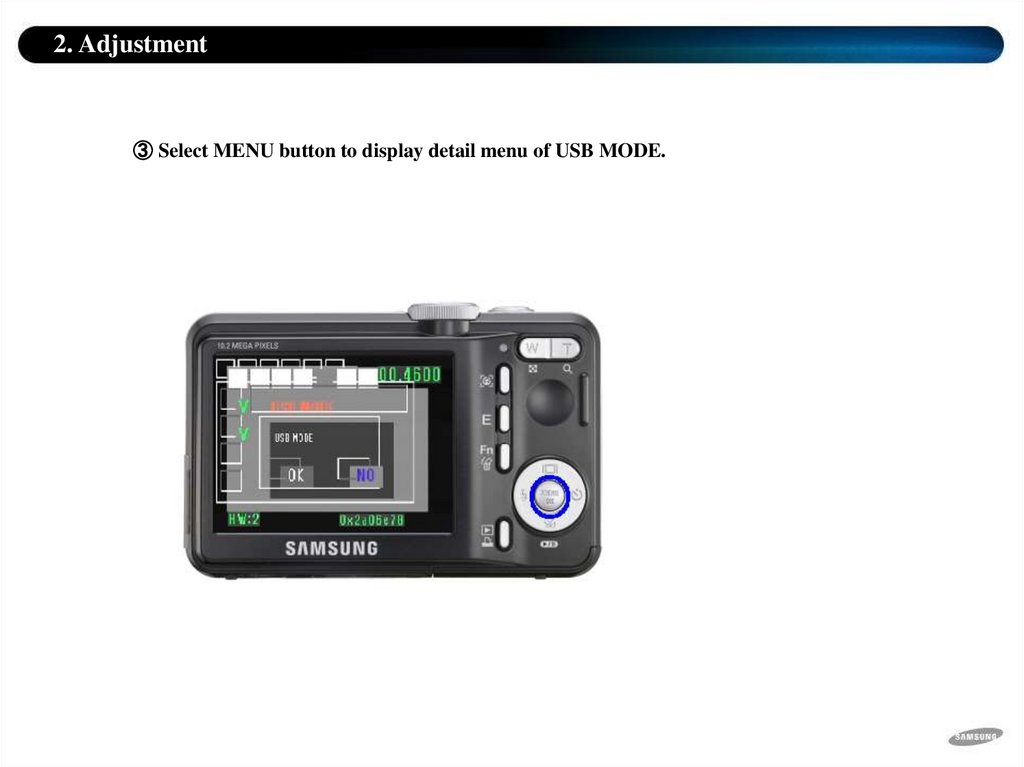
2. Adjustment③ Select MENU button to display detail menu of USB MODE.
13.
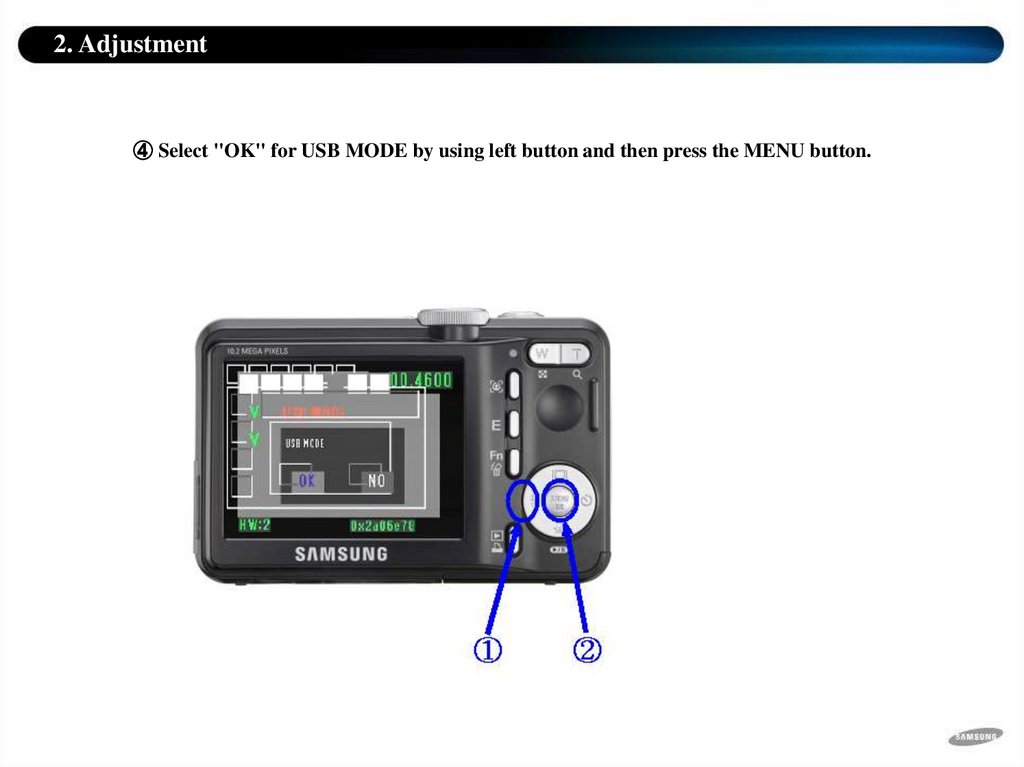
2. Adjustment④ Select "OK" for USB MODE by using left button and then press the MENU button.
14.
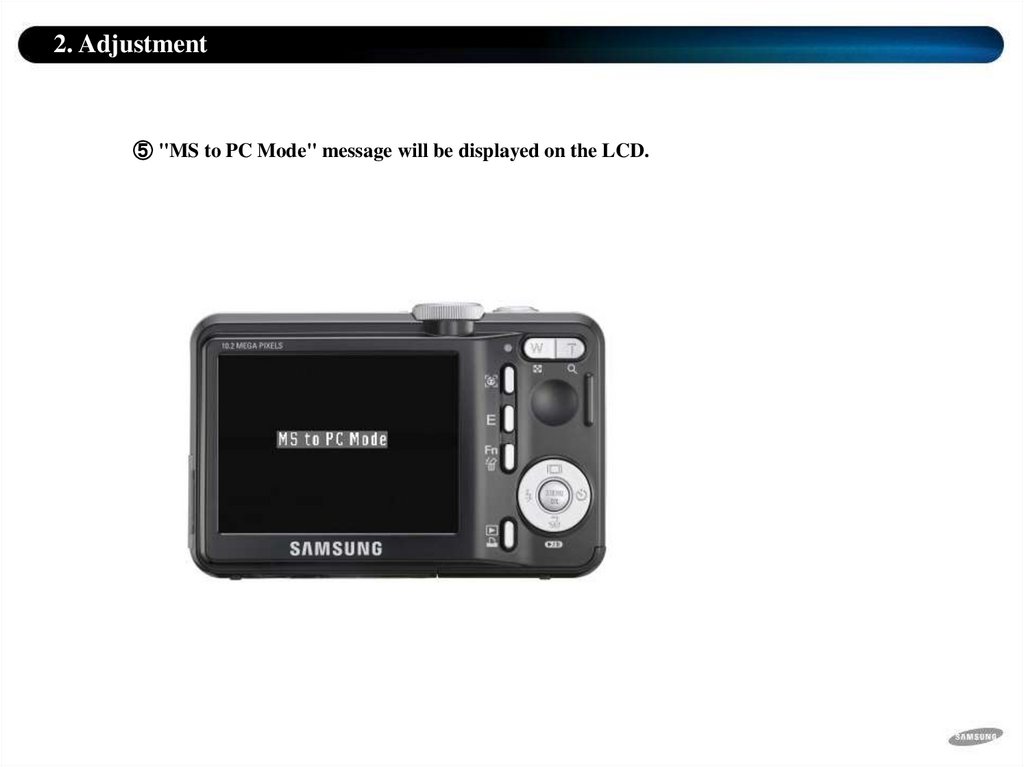
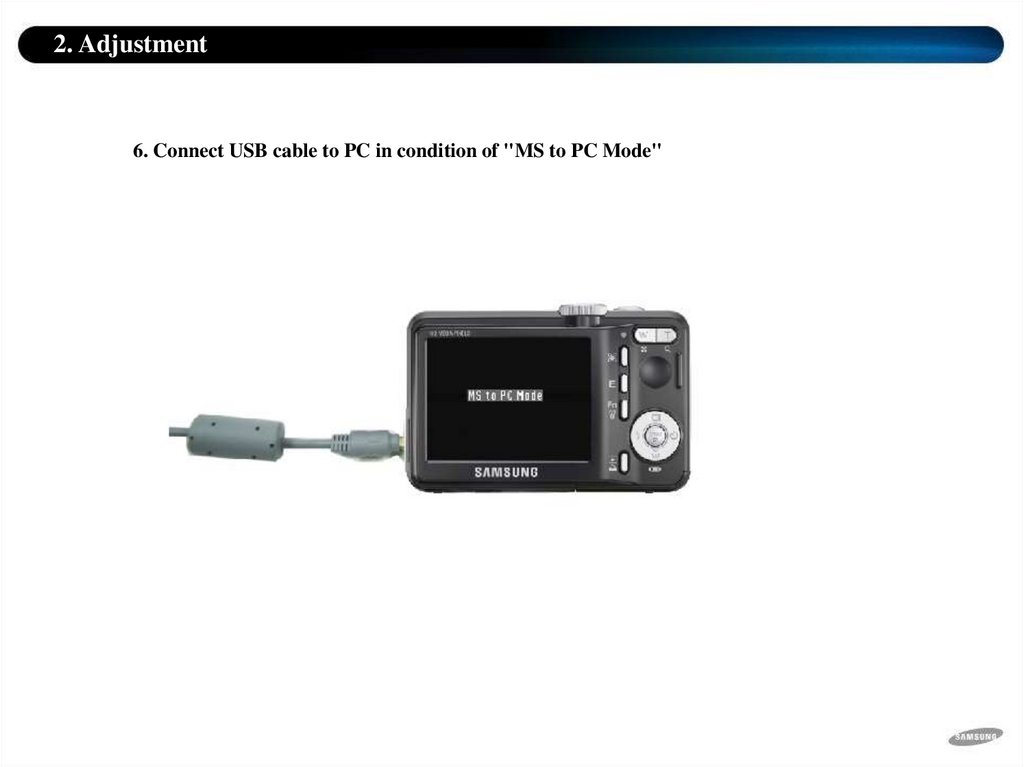
2. Adjustment⑤ "MS to PC Mode" message will be displayed on the LCD.
15.
2. Adjustment6. Connect USB cable to PC in condition of "MS to PC Mode"
16.
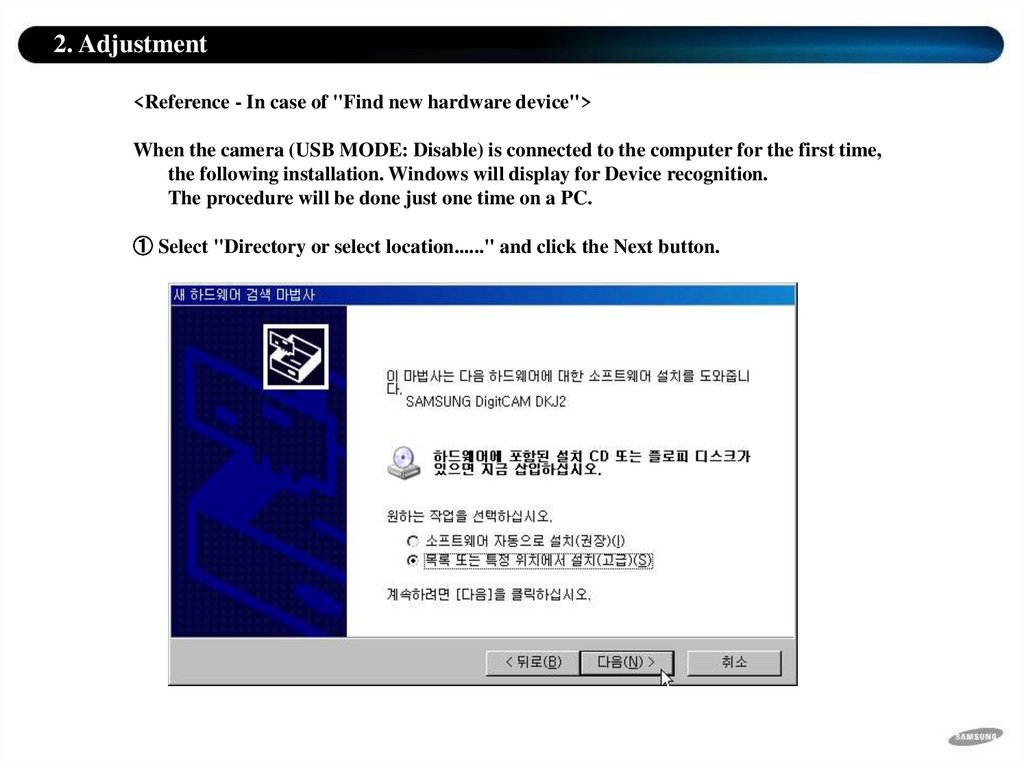
2. Adjustment<Reference - In case of "Find new hardware device">
When the camera (USB MODE: Disable) is connected to the computer for the first time,
the following installation. Windows will display for Device recognition.
The procedure will be done just one time on a PC.
① Select "Directory or select location......" and click the Next button.
17.
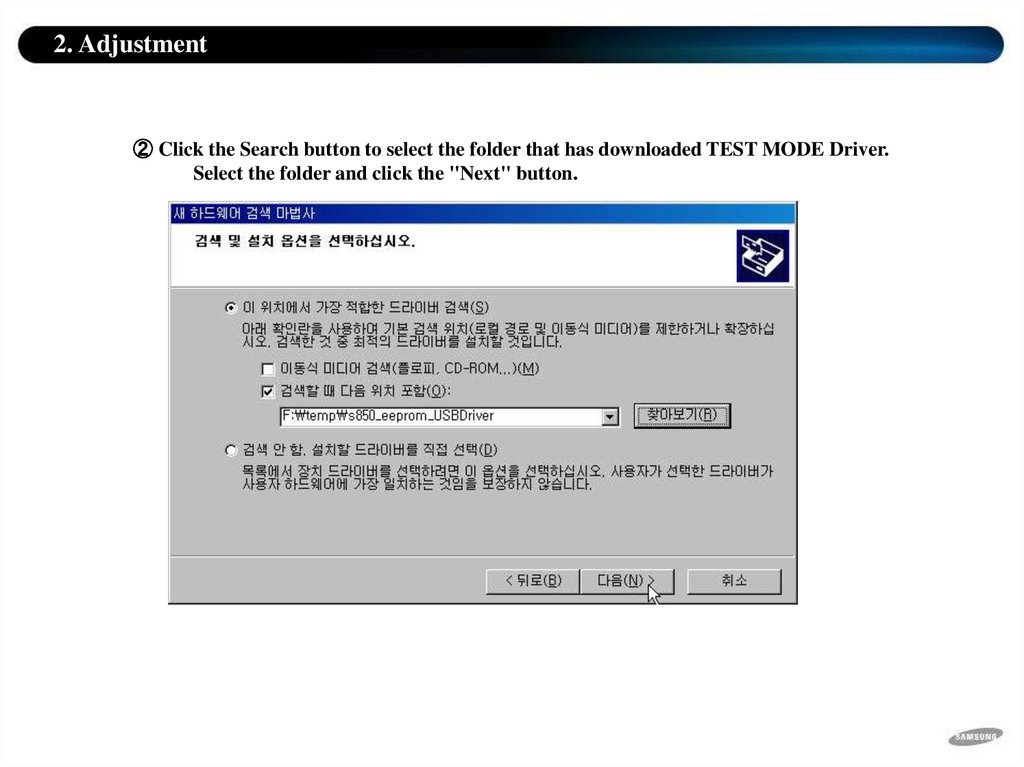
2. Adjustment② Click the Search button to select the folder that has downloaded TEST MODE Driver.
Select the folder and click the "Next" button.
18.
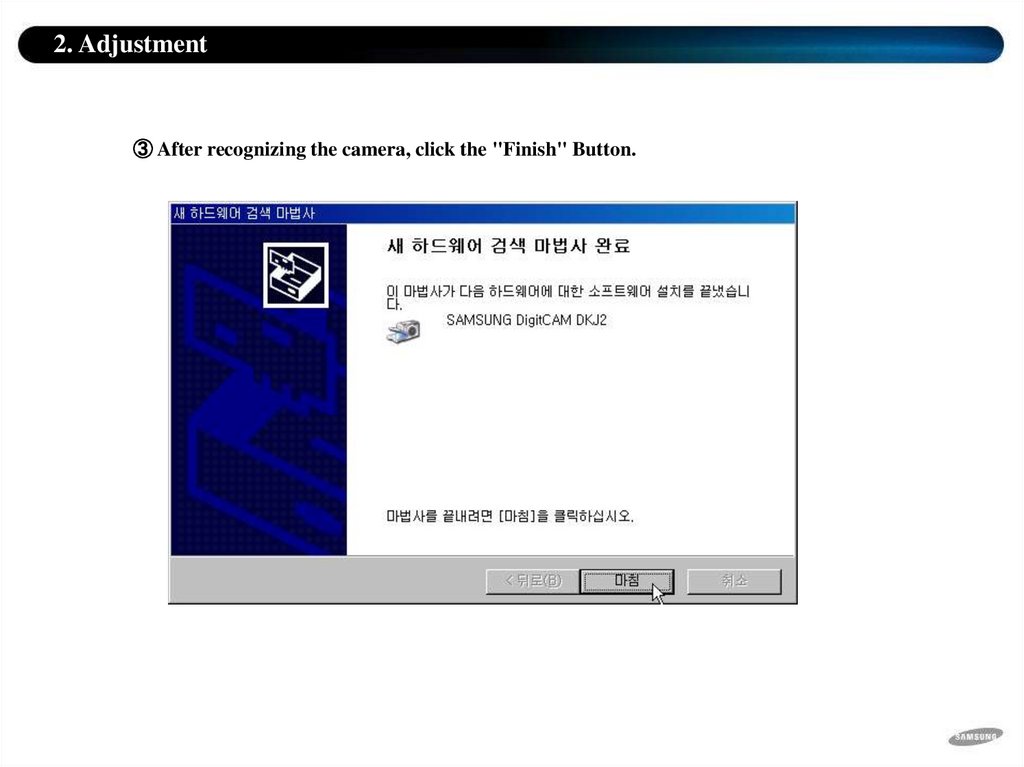
2. Adjustment③ After recognizing the camera, click the "Finish" Button.
19.
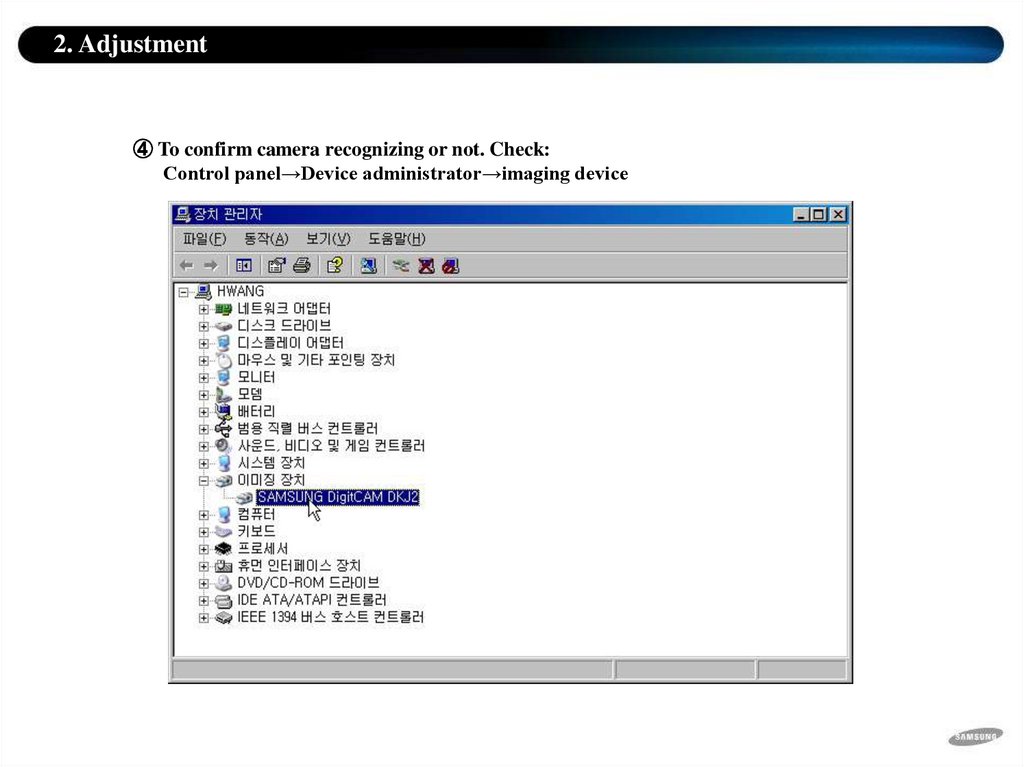
2. Adjustment④ To confirm camera recognizing or not. Check:
Control panel→Device administrator→imaging device
20.
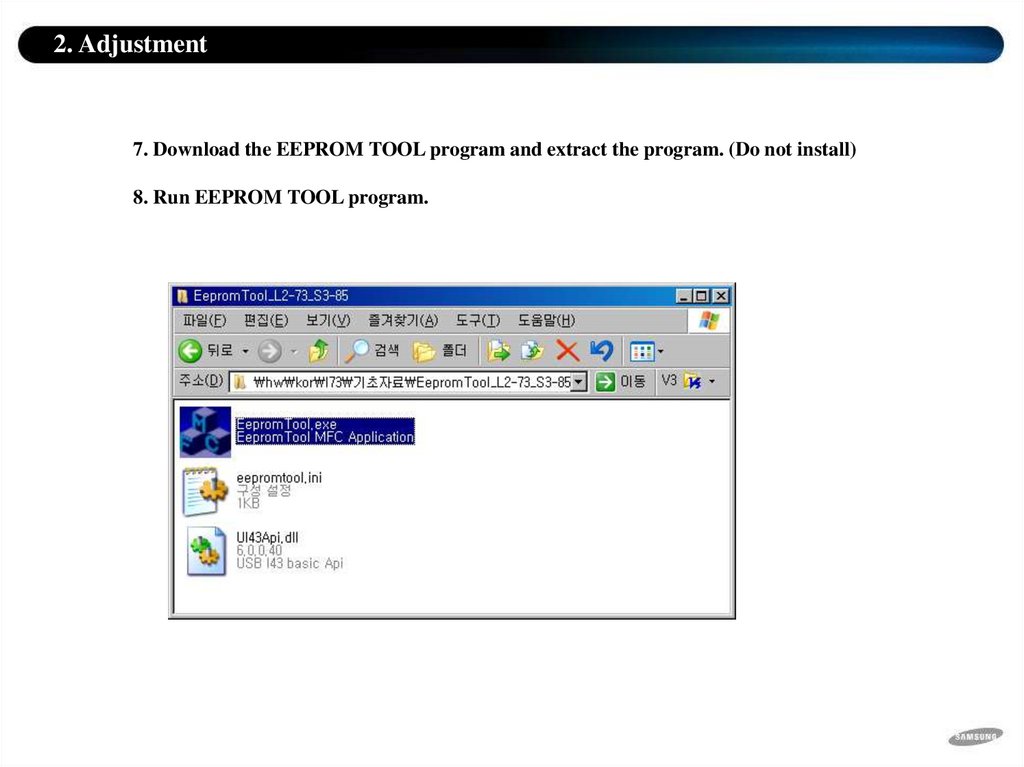
2. Adjustment7. Download the EEPROM TOOL program and extract the program. (Do not install)
8. Run EEPROM TOOL program.
21.
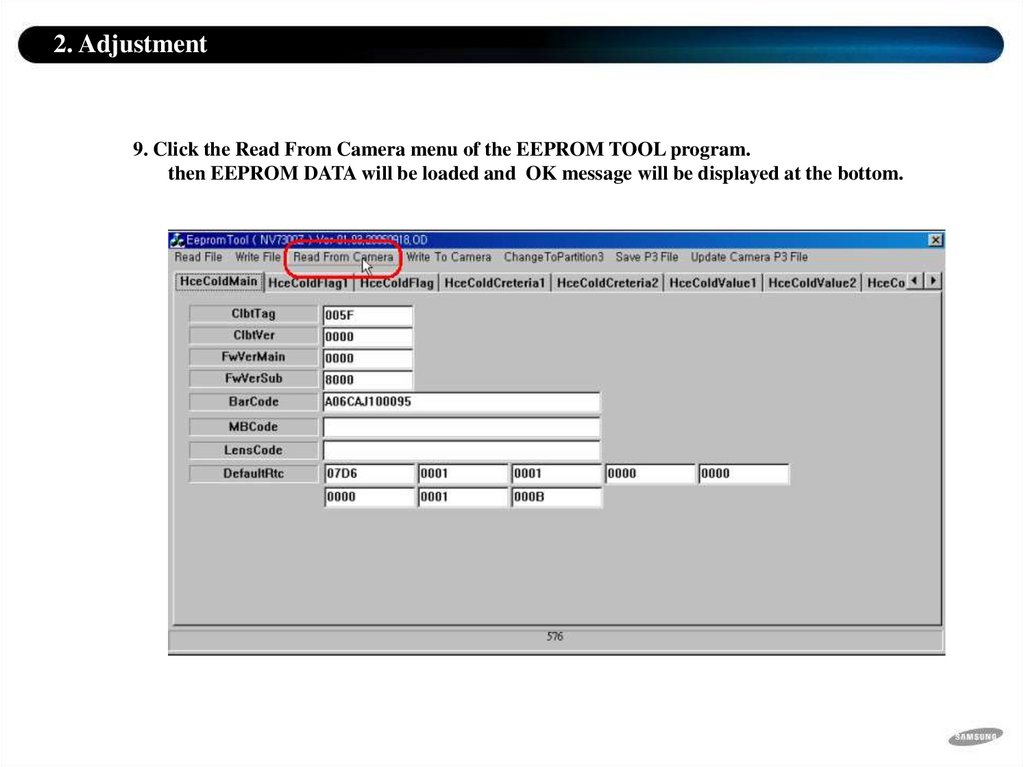
2. Adjustment9. Click the Read From Camera menu of the EEPROM TOOL program.
then EEPROM DATA will be loaded and OK message will be displayed at the bottom.
22.
2. Adjustment10. Click the Write File button to save the EEPROM DATA on a folder.
23.
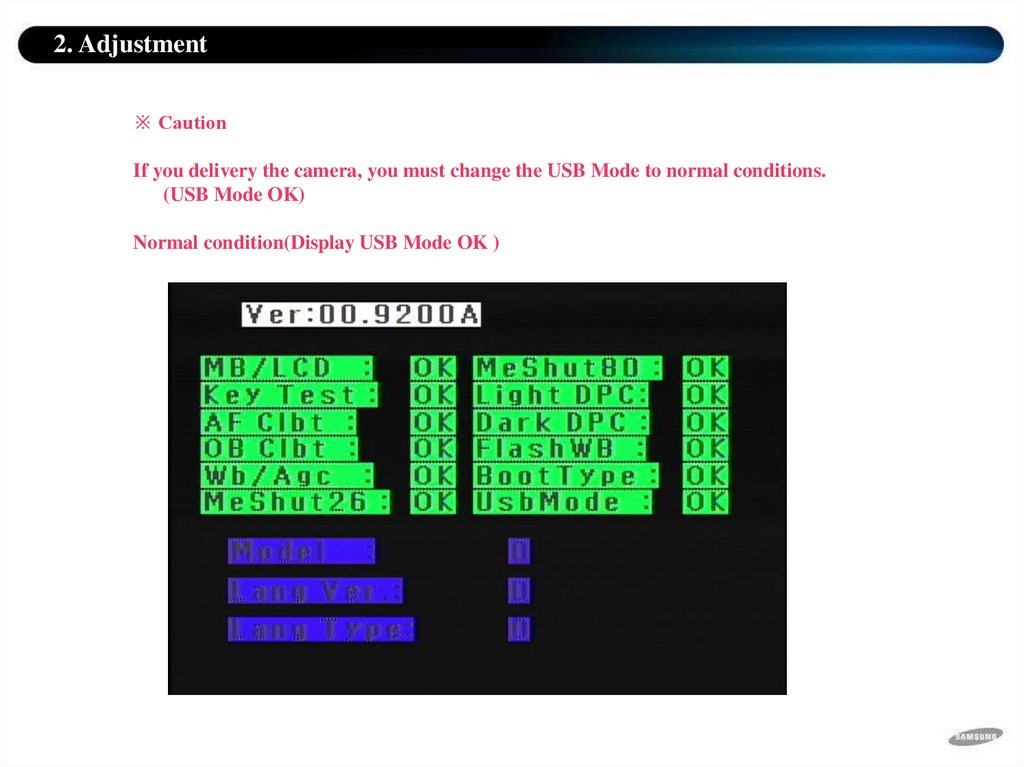
2. Adjustment※ Caution
If you delivery the camera, you must change the USB Mode to normal conditions.
(USB Mode OK)
Normal condition(Display USB Mode OK )
24.
2. AdjustmentUn-normal condition(Display USB Mode NG)
25.
2. AdjustmentEEPROM WRITE
To write the data of EEPROM, refer to the following.
<Reference - Equipment>
① JACK BOARD for adjustment
② SPECAL CABLE(USB)
③EEPROM TOOL Program
④TEST MODE Driver
⑤Camera for extracting the standard DATA
26.
2. Adjustment1. Remove a memory card from the camera.
2. Use the DC adapter or fully charged battery.
3. Turn off the camera.
4. Press and the Tele button and OK(MENU) button and
then press the Play button for 2 seconds.
27.
2. Adjustment5. Set the USB MODE to NG. Please refer to following procedure.
① Press the PLAY button one more time when displaying Firmware version on the LCD.
28.
2. Adjustment② Select the USB MODE menu by using the buttons.
29.
2. Adjustment③ Select MENU button to display detail menu of USB MODE.
30.
2. Adjustment④ Select "OK" for USB MODE by using left button and then press the MENU button.
31.
2. Adjustment⑤ "MS to PC Mode" message will be displayed on the LCD.
32.
2. Adjustment6. Connect USB cable to PC in condition of "MS to PC Mode"
33.
2. Adjustment<Reference - In case of "Find new hardware device">
When the camera (USB MODE: Disable) is connected to the computer for the first time,
the following installation. Windows will display for Device recognition.
The procedure will be done just one time on a PC.
① Select "Directory or select location......" and click the Next button.
34.
2. Adjustment② Click the Search button to select the folder that has downloaded TEST MODE Driver.
Select the folder and click the "Next" button.
35.
2. Adjustment③ After recognizing the camera, click the "Finish" Button.
36.
2. Adjustment④ To confirm camera recognizing or not. Check:
Control panel→Device administrator→imaging device
37.
2. Adjustment7. Download the EEPROM TOOL program and extract the program. (Do not install)
8. Run EEPROM TOOL program.
38.
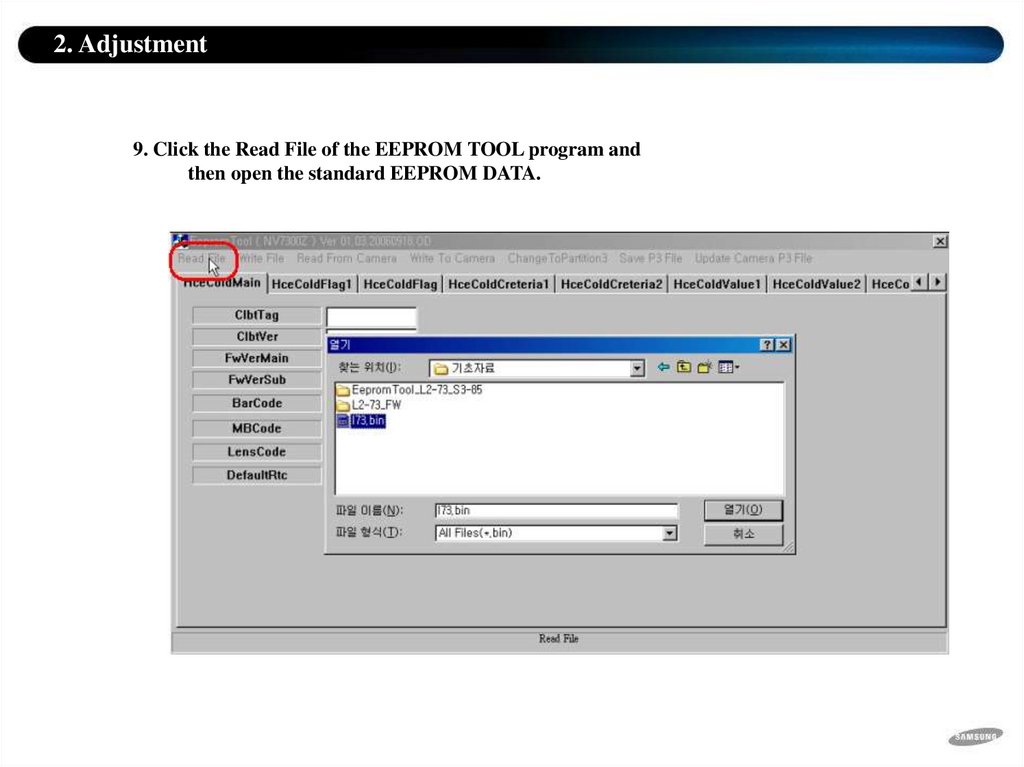
2. Adjustment9. Click the Read File of the EEPROM TOOL program and
then open the standard EEPROM DATA.
39.
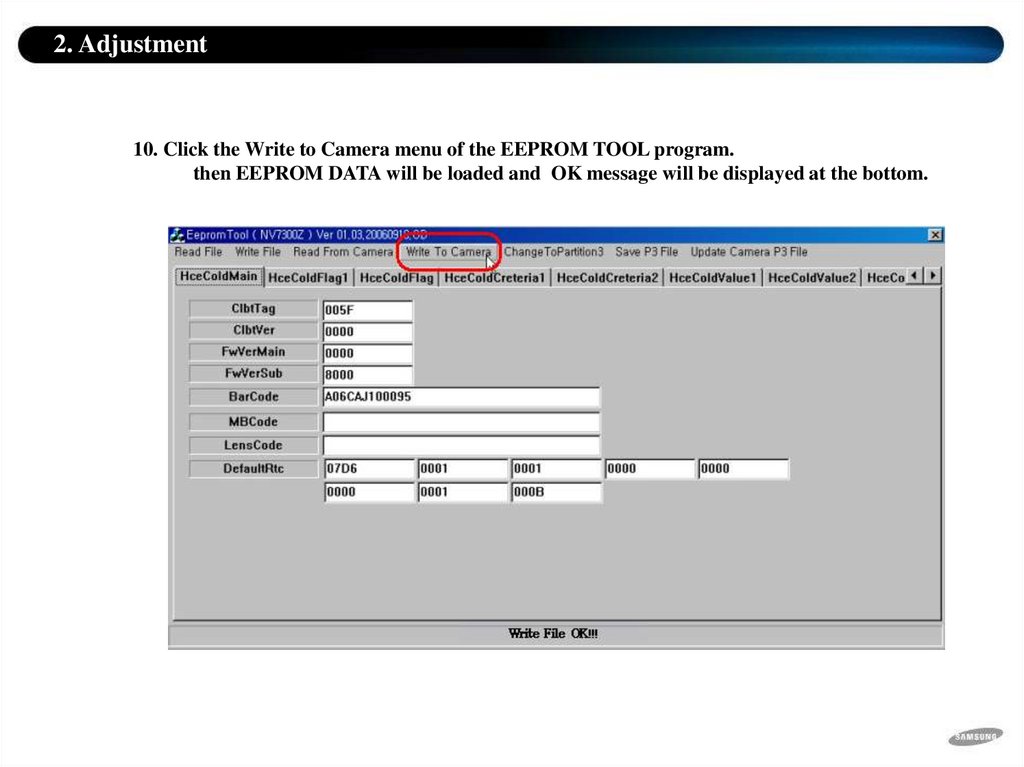
2. Adjustment10. Click the Write to Camera menu of the EEPROM TOOL program.
then EEPROM DATA will be loaded and OK message will be displayed at the bottom.
40.
2. Adjustment※ Caution
If you delivery the camera, you must change the USB Mode to normal conditions.
(USB Mode OK)
Normal condition(Display USB Mode OK )
41.
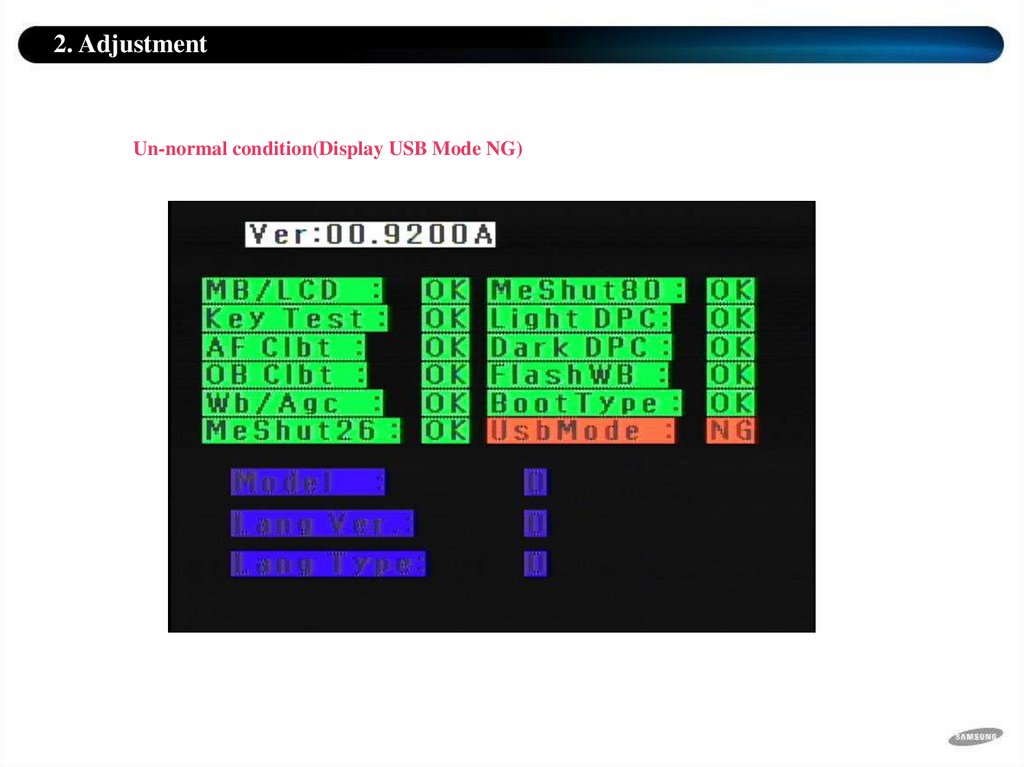
2. AdjustmentUn-normal condition(Display USB Mode NG)
42.
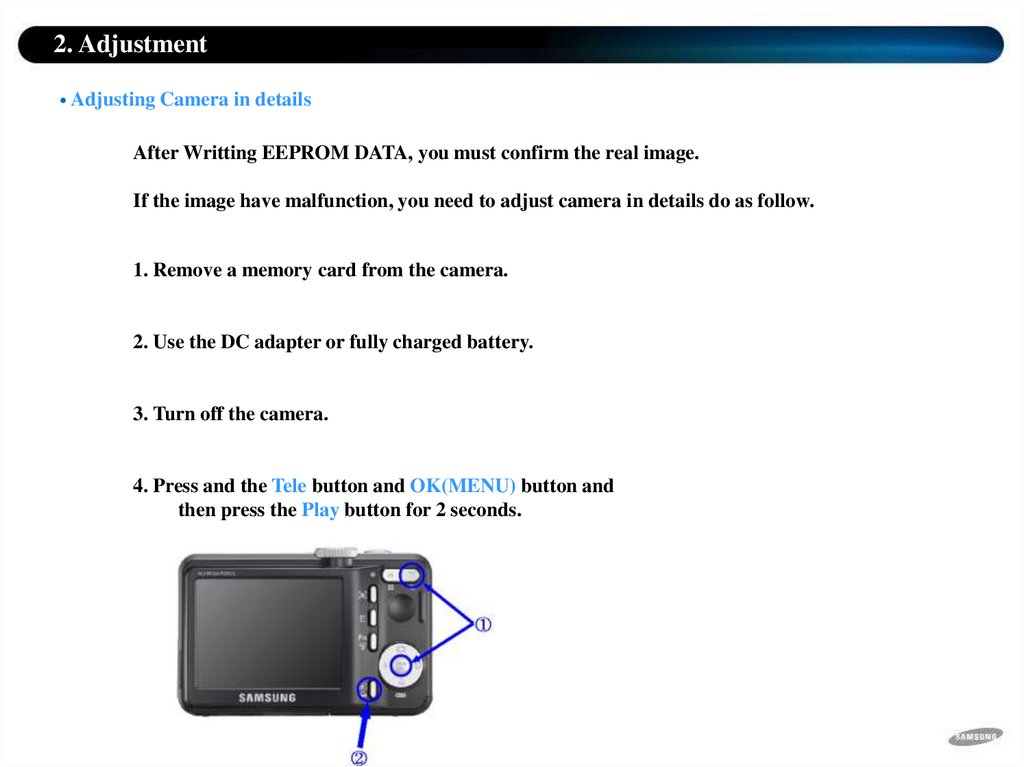
2. AdjustmentAdjusting Camera in details
After Writting EEPROM DATA, you must confirm the real image.
If the image have malfunction, you need to adjust camera in details do as follow.
1. Remove a memory card from the camera.
2. Use the DC adapter or fully charged battery.
3. Turn off the camera.
4. Press and the Tele button and OK(MENU) button and
then press the Play button for 2 seconds.
43.
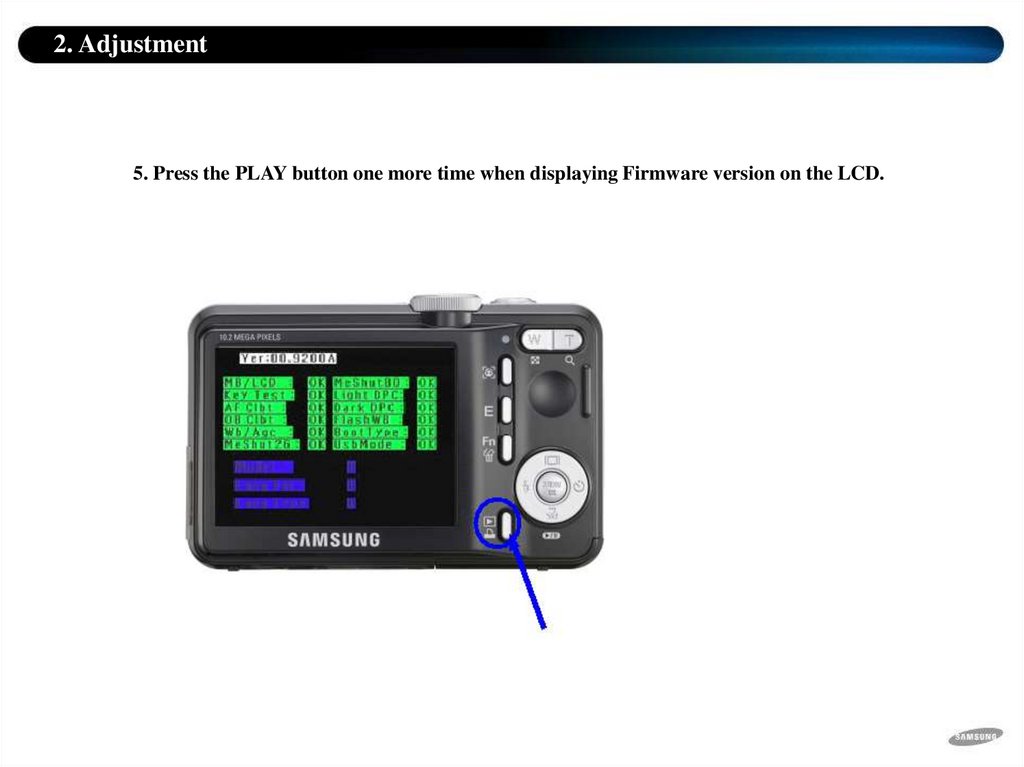
2. Adjustment5. Press the PLAY button one more time when displaying Firmware version on the LCD.
44.
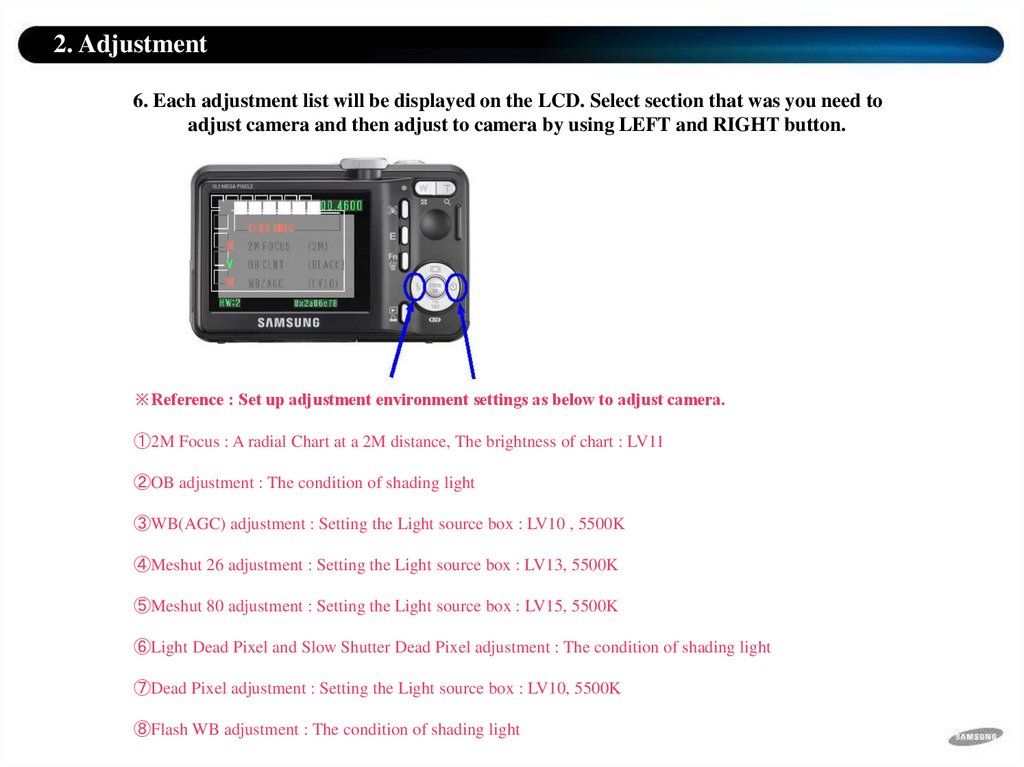
2. Adjustment6. Each adjustment list will be displayed on the LCD. Select section that was you need to
adjust camera and then adjust to camera by using LEFT and RIGHT button.
※Reference : Set up adjustment environment settings as below to adjust camera.
①2M Focus : A radial Chart at a 2M distance, The brightness of chart : LV11
②OB adjustment : The condition of shading light
③WB(AGC) adjustment : Setting the Light source box : LV10 , 5500K
④Meshut 26 adjustment : Setting the Light source box : LV13, 5500K
⑤Meshut 80 adjustment : Setting the Light source box : LV15, 5500K
⑥Light Dead Pixel and Slow Shutter Dead Pixel adjustment : The condition of shading light
⑦Dead Pixel adjustment : Setting the Light source box : LV10, 5500K
⑧Flash WB adjustment : The condition of shading light
45.
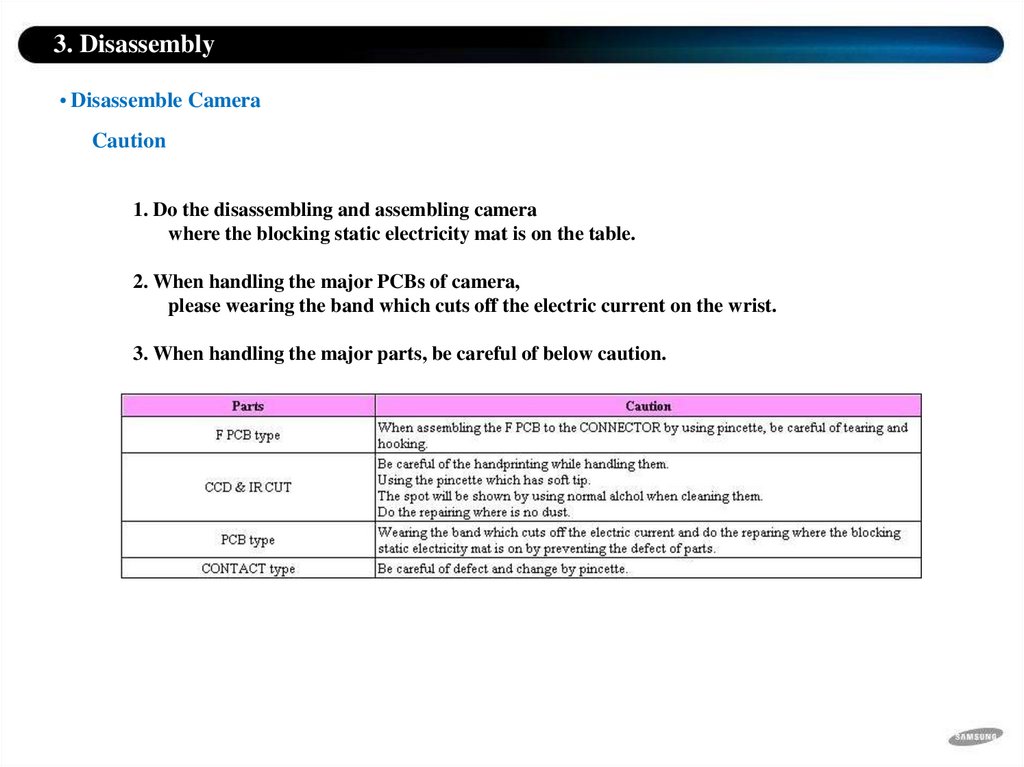
3. DisassemblyDisassemble Camera
Caution
1. Do the disassembling and assembling camera
where the blocking static electricity mat is on the table.
2. When handling the major PCBs of camera,
please wearing the band which cuts off the electric current on the wrist.
3. When handling the major parts, be careful of below caution.
46.
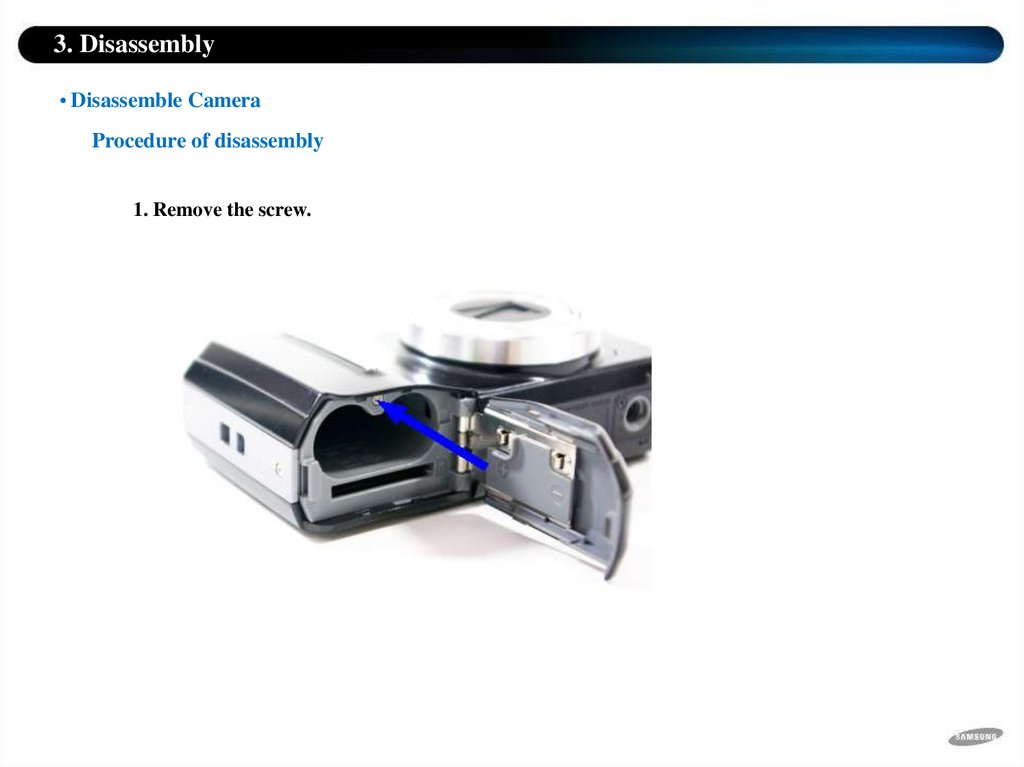
3. DisassemblyDisassemble Camera
Procedure of disassembly
1. Remove the screw.
47.
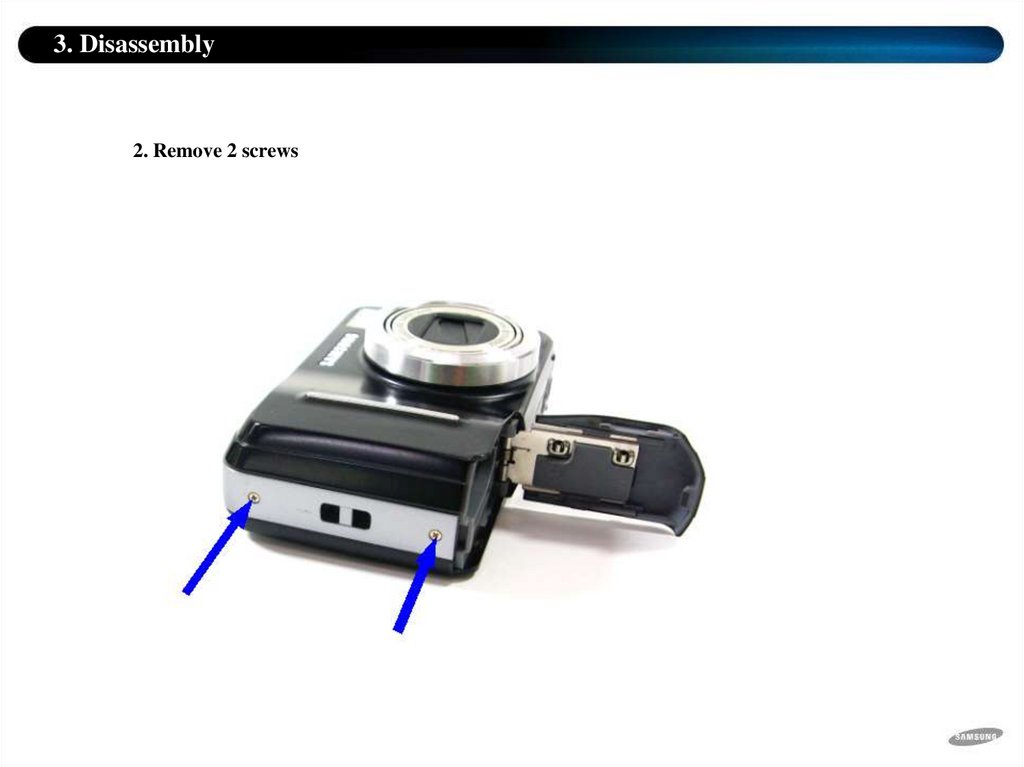
3. Disassembly2. Remove 2 screws
48.
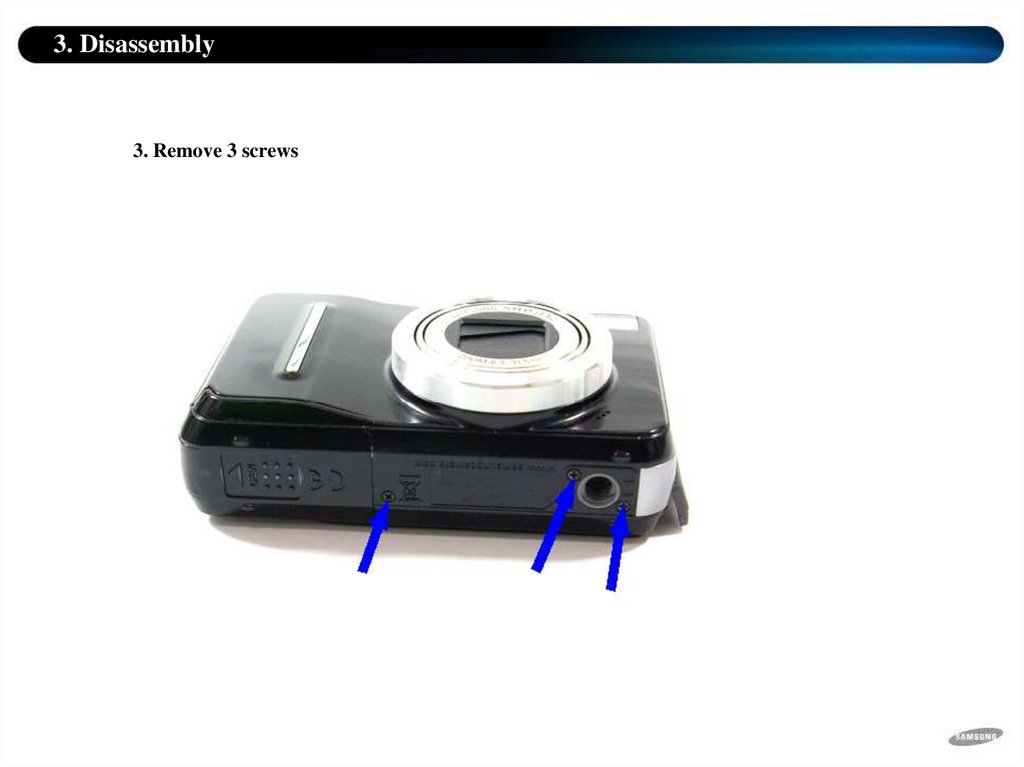
3. Disassembly3. Remove 3 screws
49.
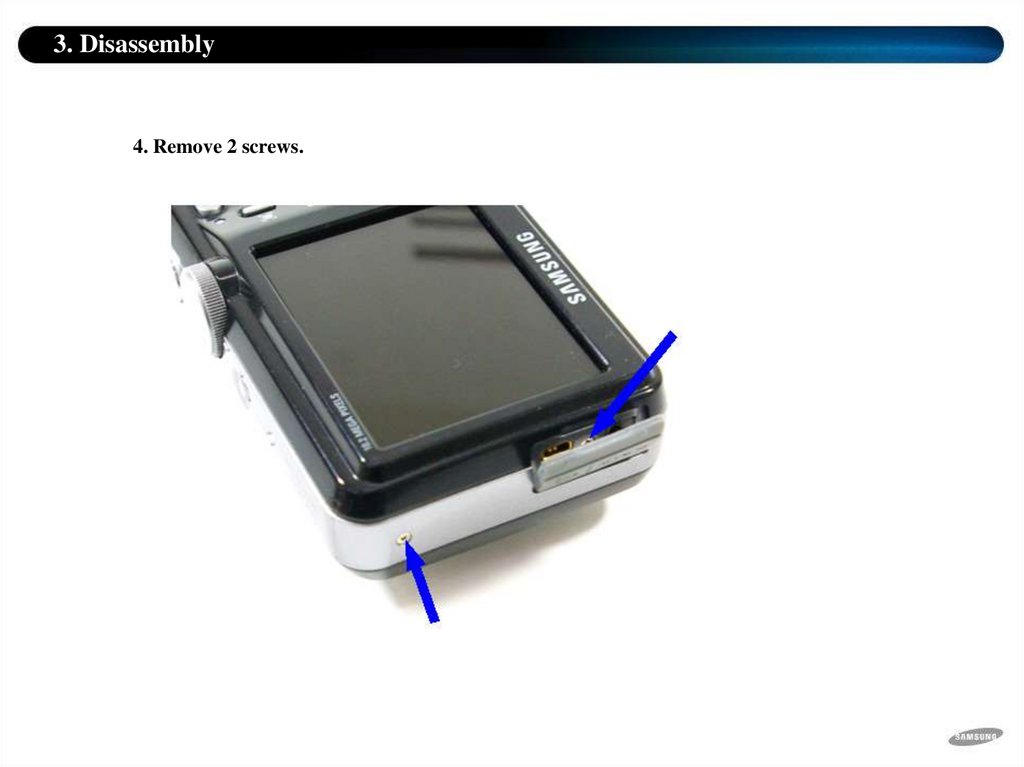
3. Disassembly4. Remove 2 screws.
50.
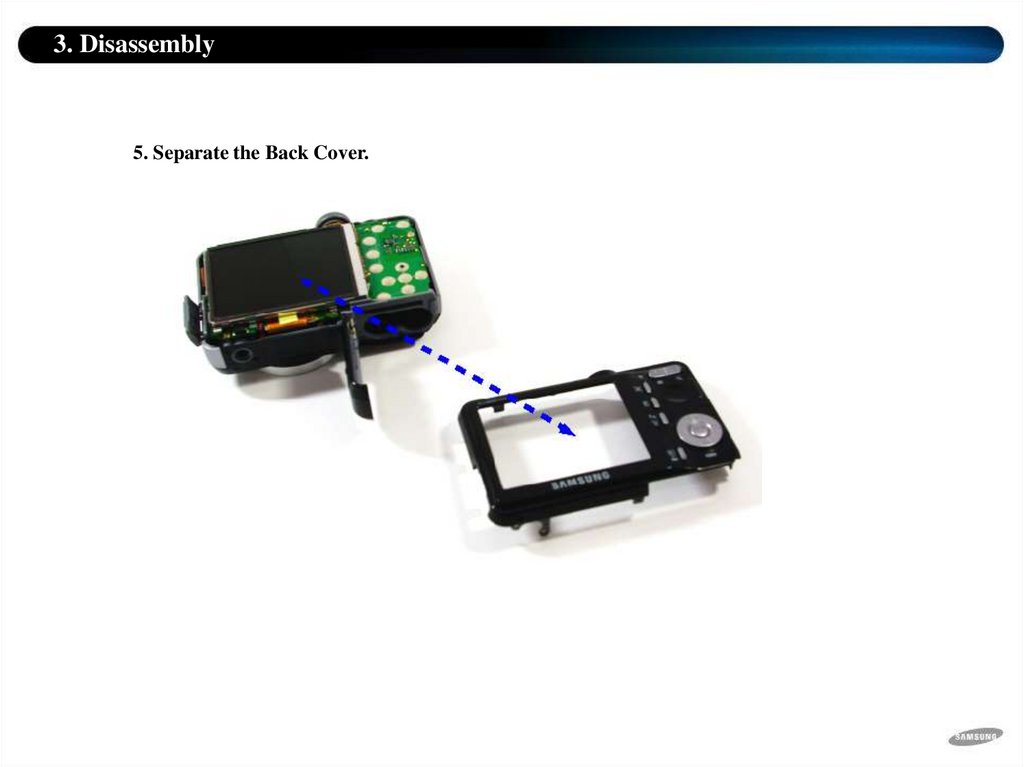
3. Disassembly5. Separate the Back Cover.
51.
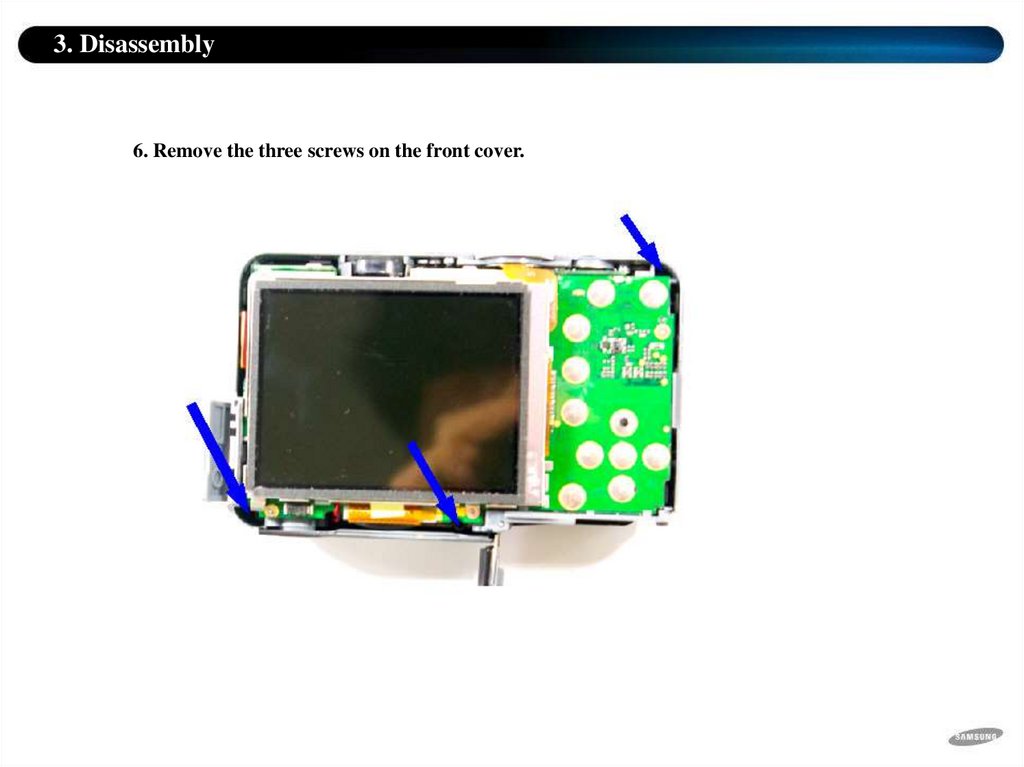
3. Disassembly6. Remove the three screws on the front cover.
52.
3. Disassembly7. Remove the two screws from the LCD Plate.
53.
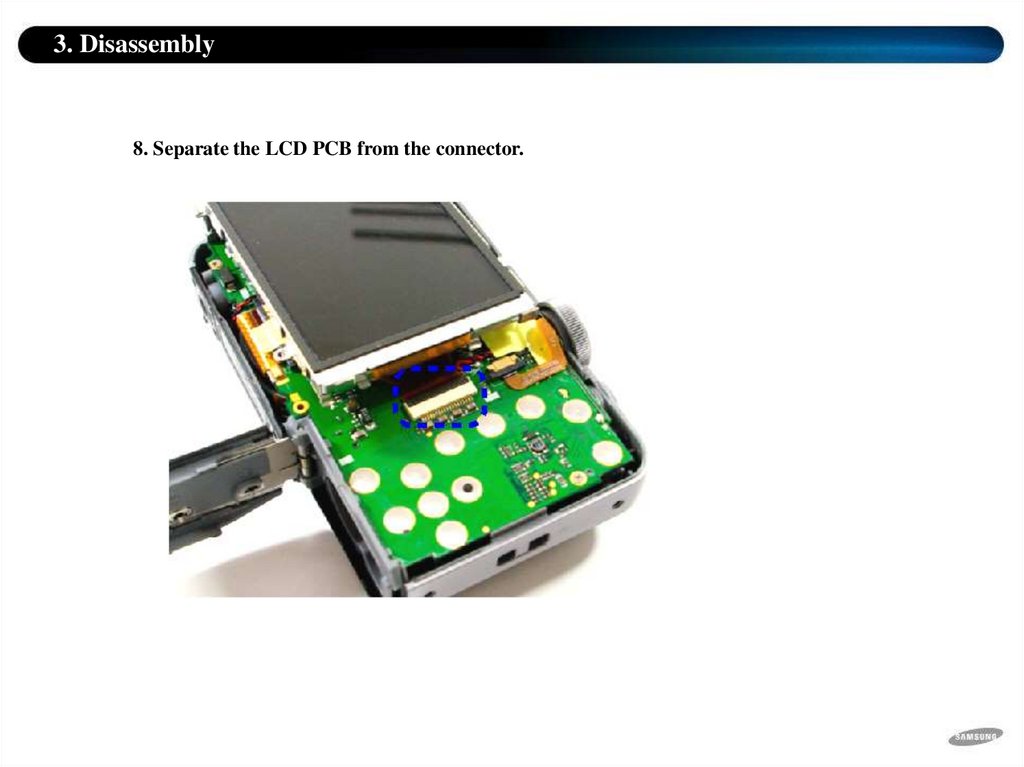
3. Disassembly8. Separate the LCD PCB from the connector.
54.
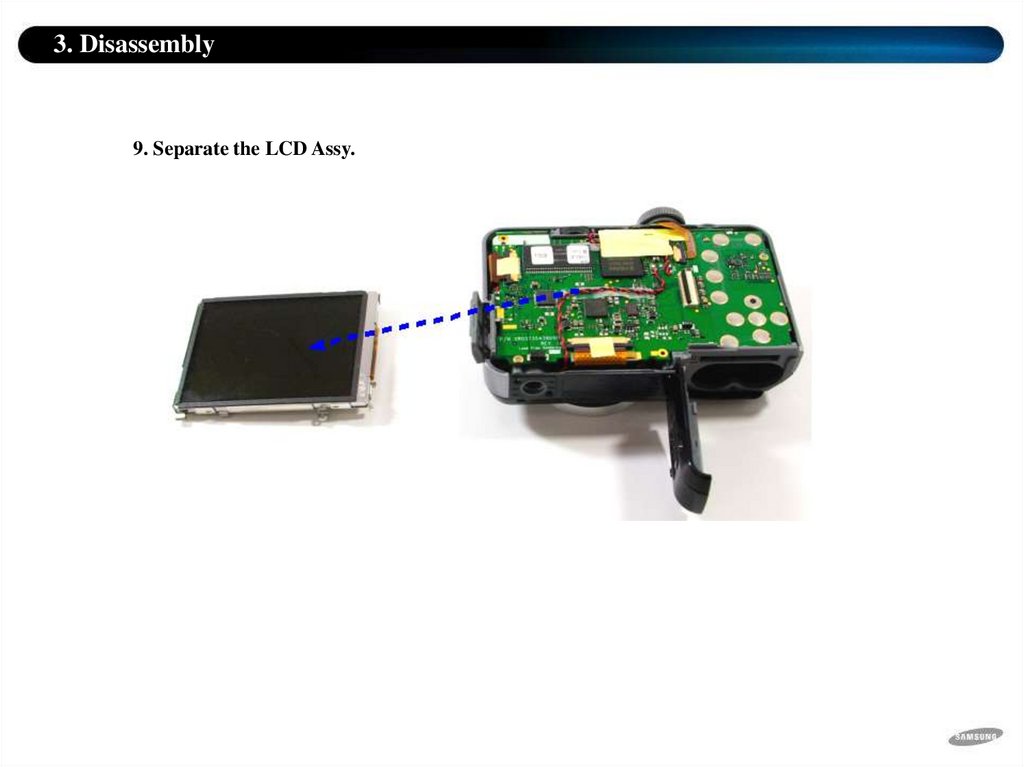
3. Disassembly9. Separate the LCD Assy.
55.
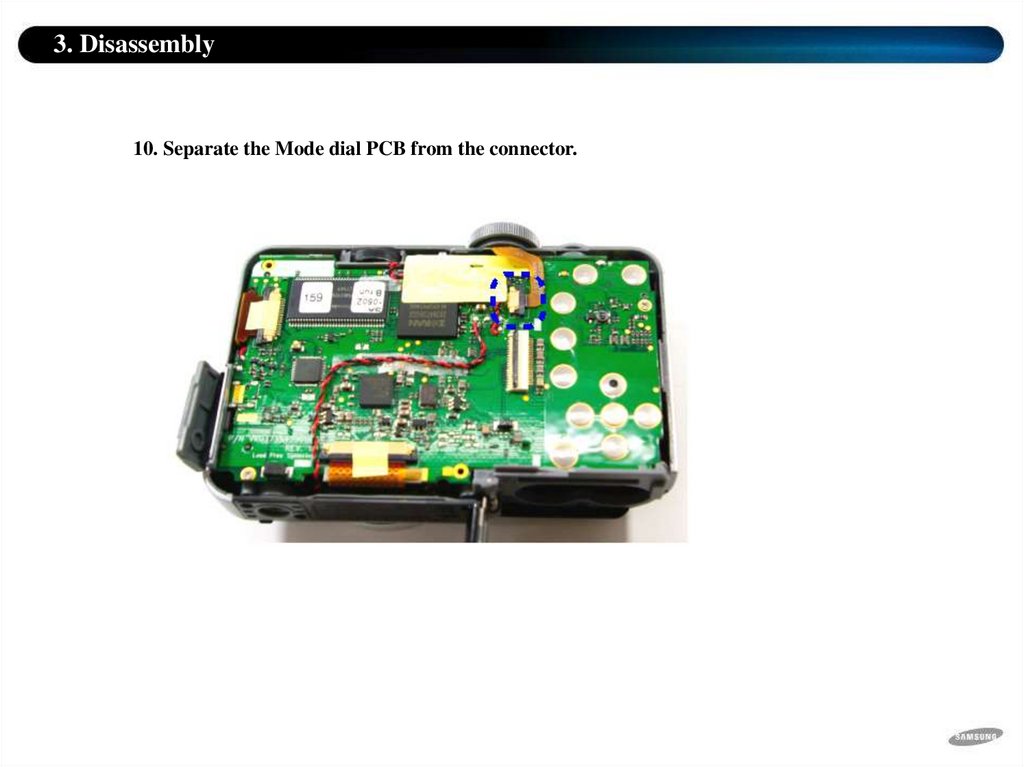
3. Disassembly10. Separate the Mode dial PCB from the connector.
56.
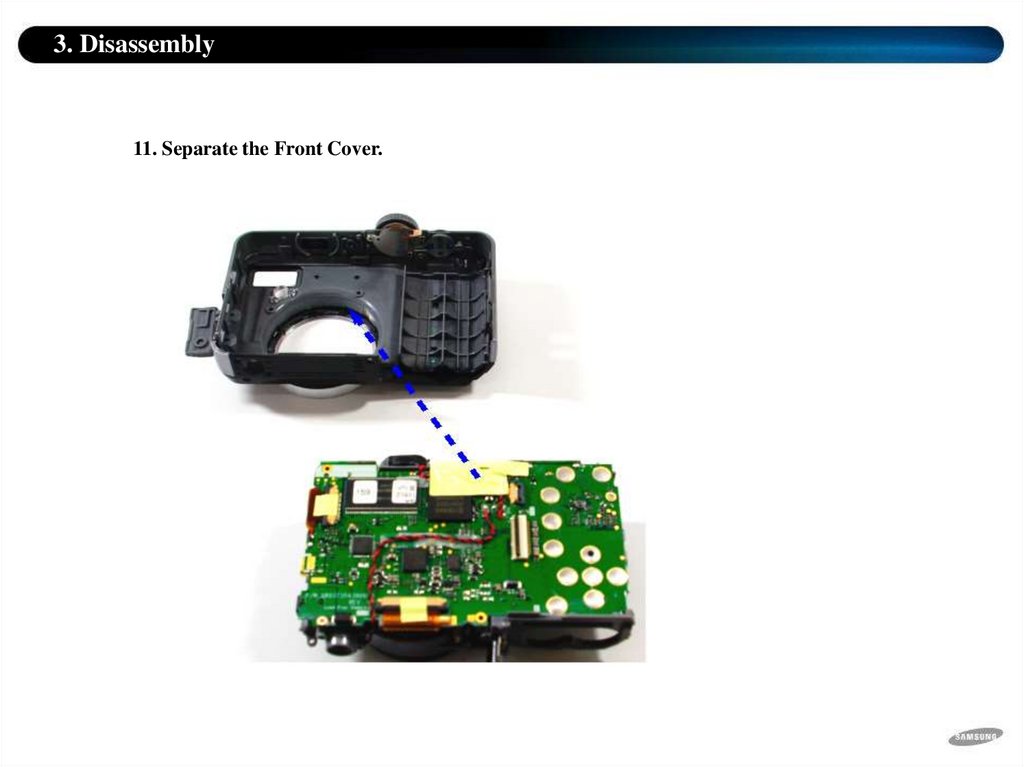
3. Disassembly11. Separate the Front Cover.
57.
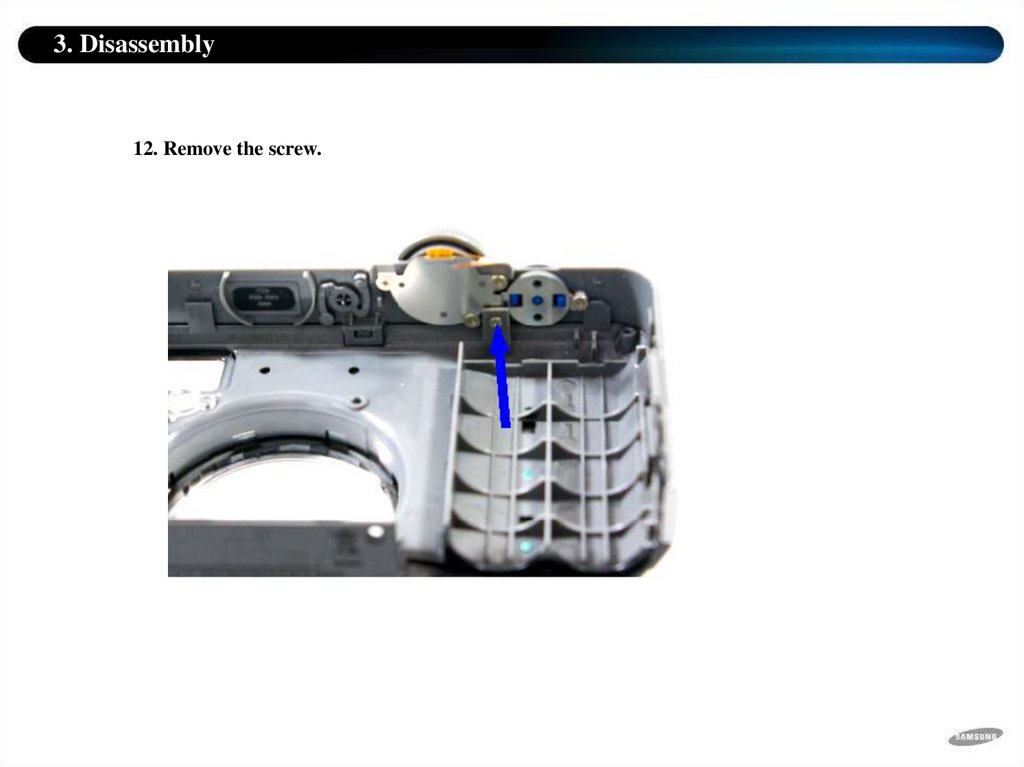
3. Disassembly12. Remove the screw.
58.
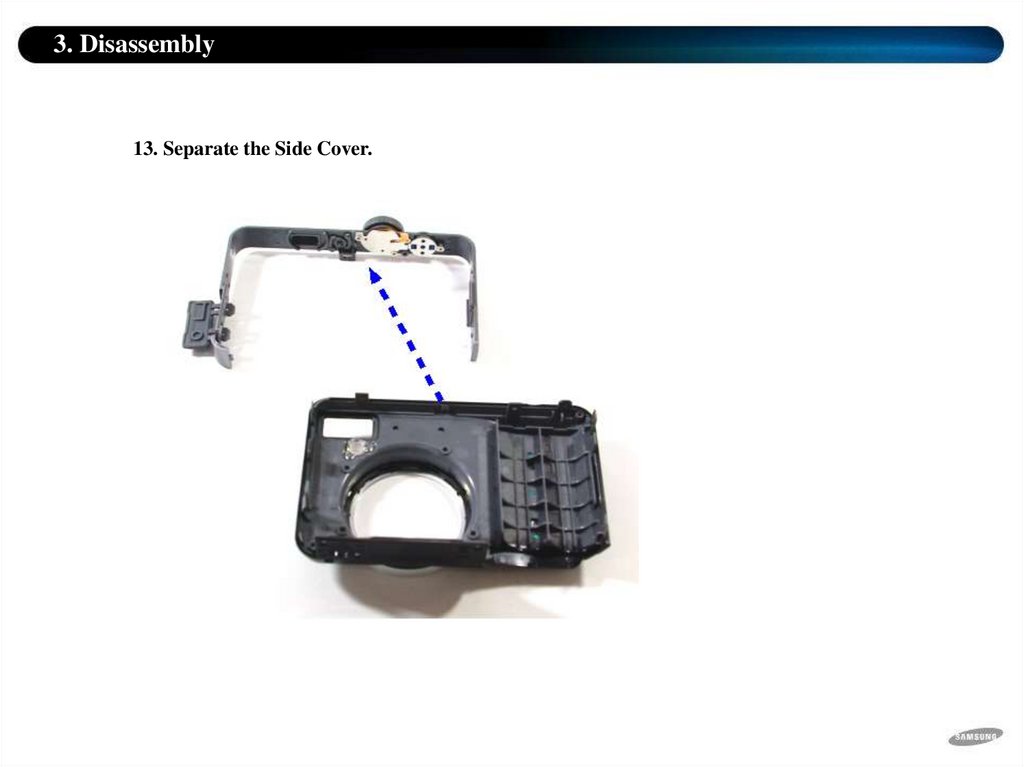
3. Disassembly13. Separate the Side Cover.
59.
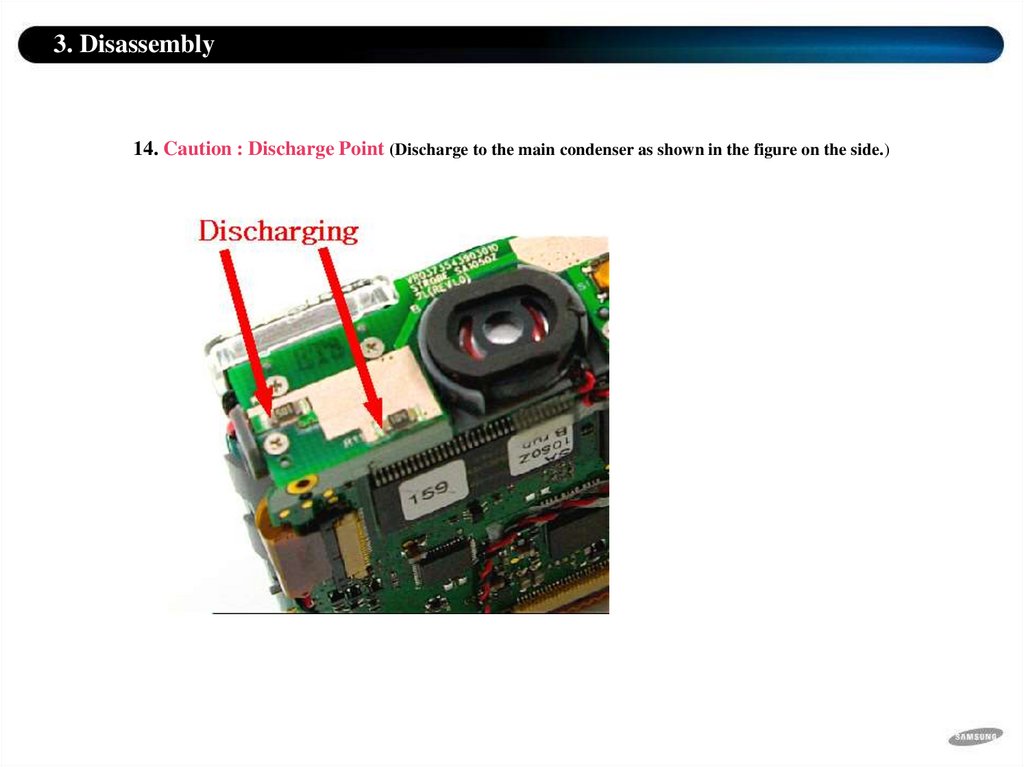
3. Disassembly14. Caution : Discharge Point (Discharge to the main condenser as shown in the figure on the side.)
60.
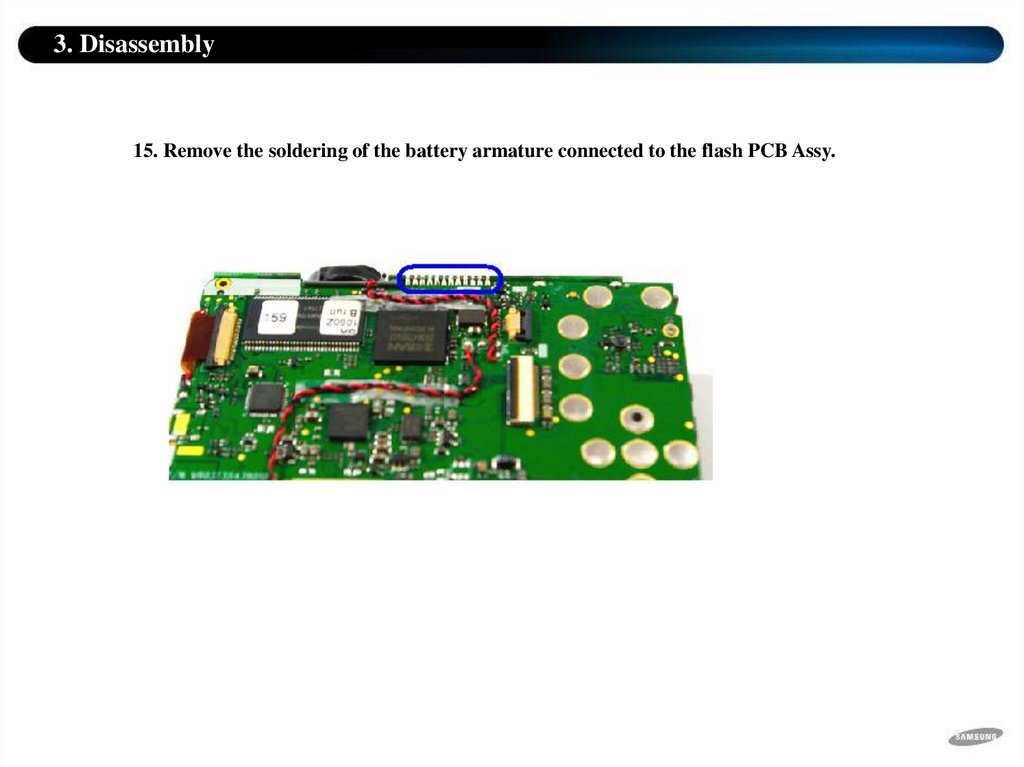
3. Disassembly15. Remove the soldering of the battery armature connected to the flash PCB Assy.
61.
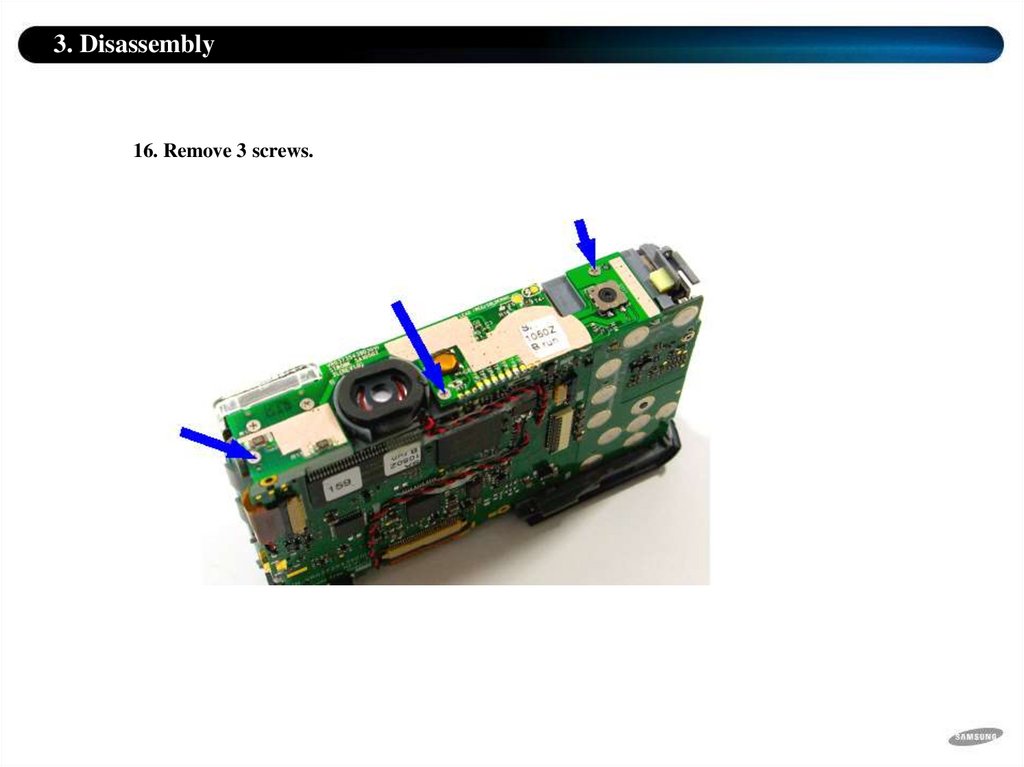
3. Disassembly16. Remove 3 screws.
62.
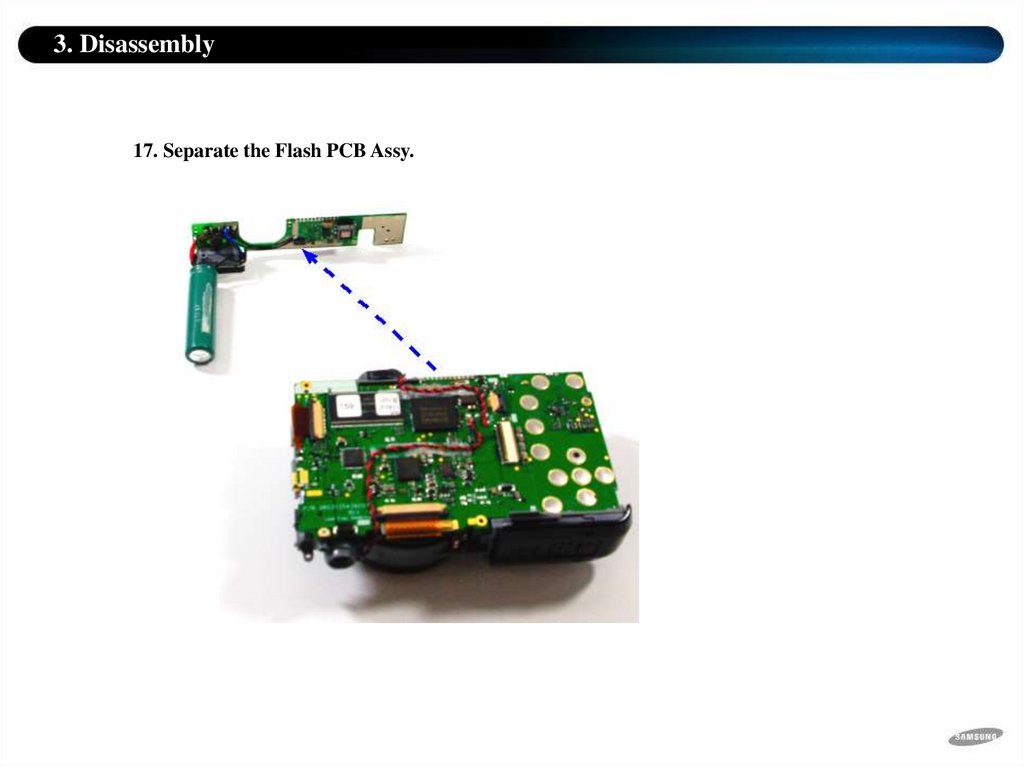
3. Disassembly17. Separate the Flash PCB Assy.
63.
3. Disassembly18. Disconnect the wires (left hand side - red, black) for the microphone and the wires
for the speaker (right hand side - black, red).
64.
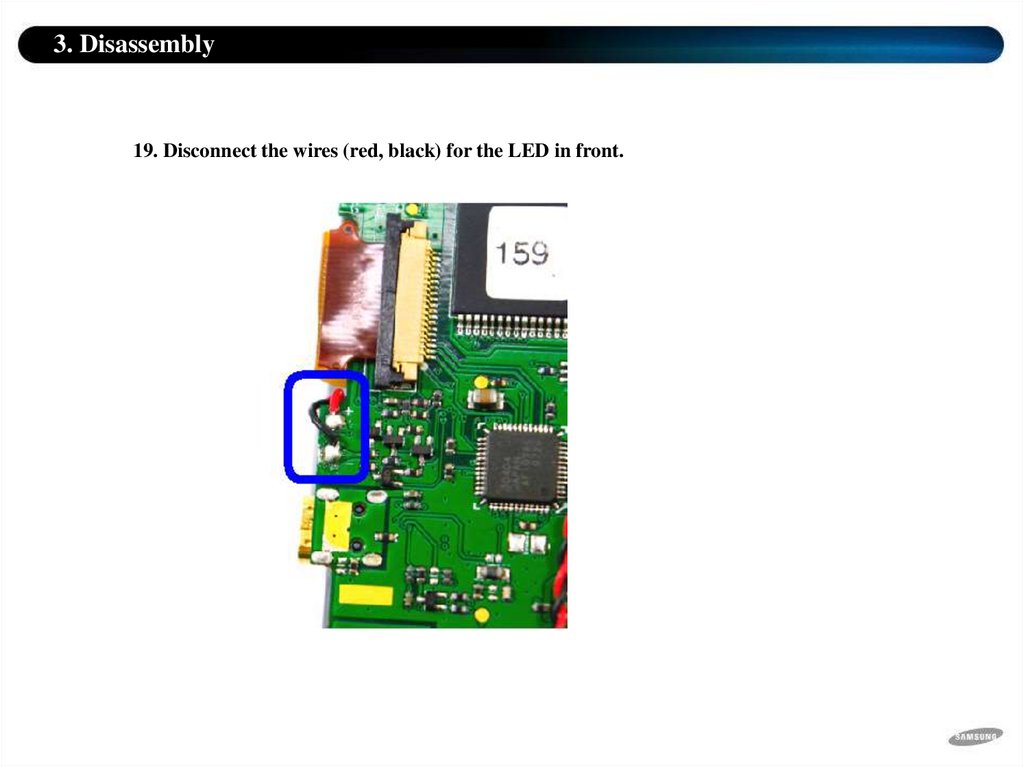
3. Disassembly19. Disconnect the wires (red, black) for the LED in front.
65.
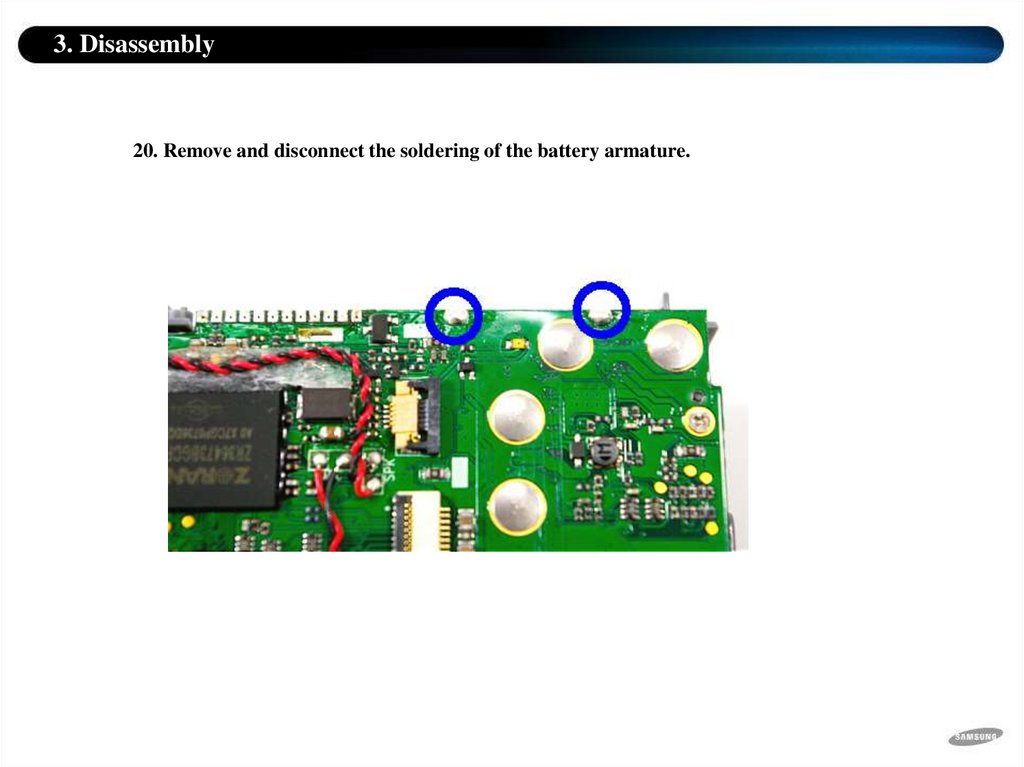
3. Disassembly20. Remove and disconnect the soldering of the battery armature.
66.
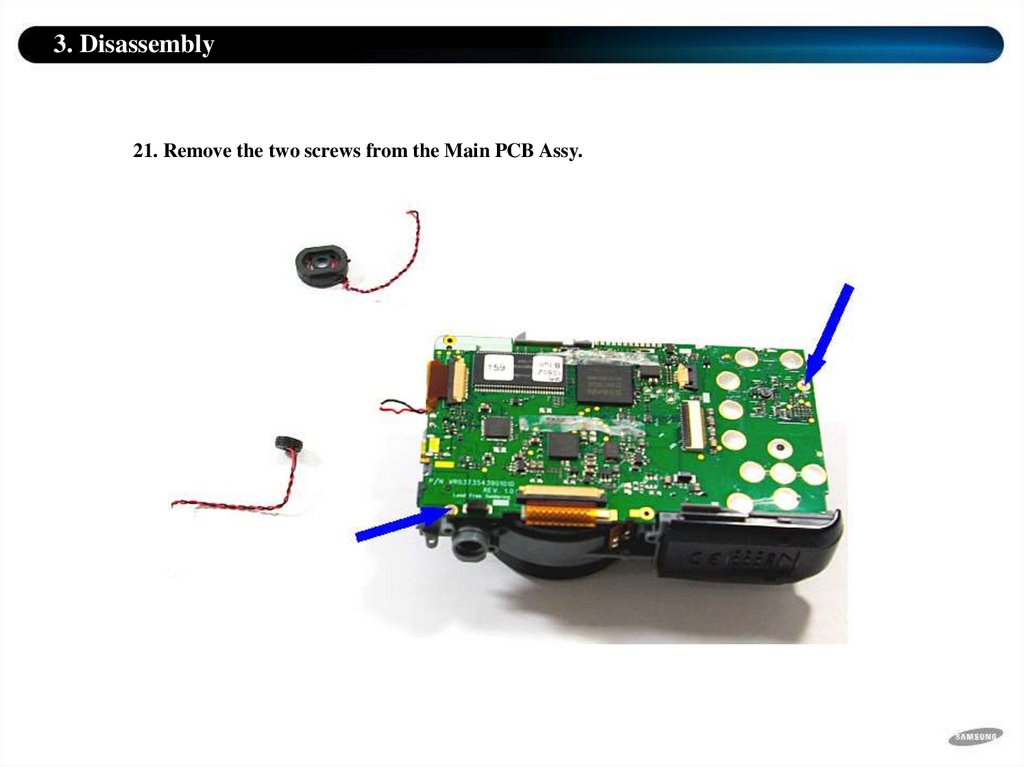
3. Disassembly21. Remove the two screws from the Main PCB Assy.
67.
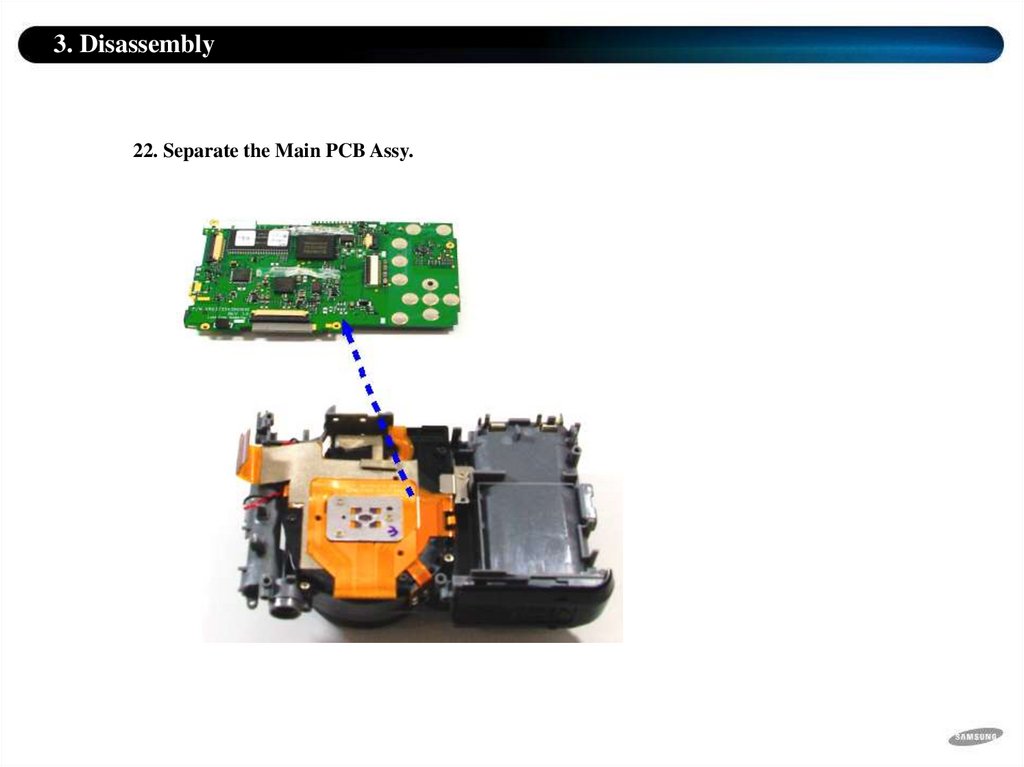
3. Disassembly22. Separate the Main PCB Assy.
68.
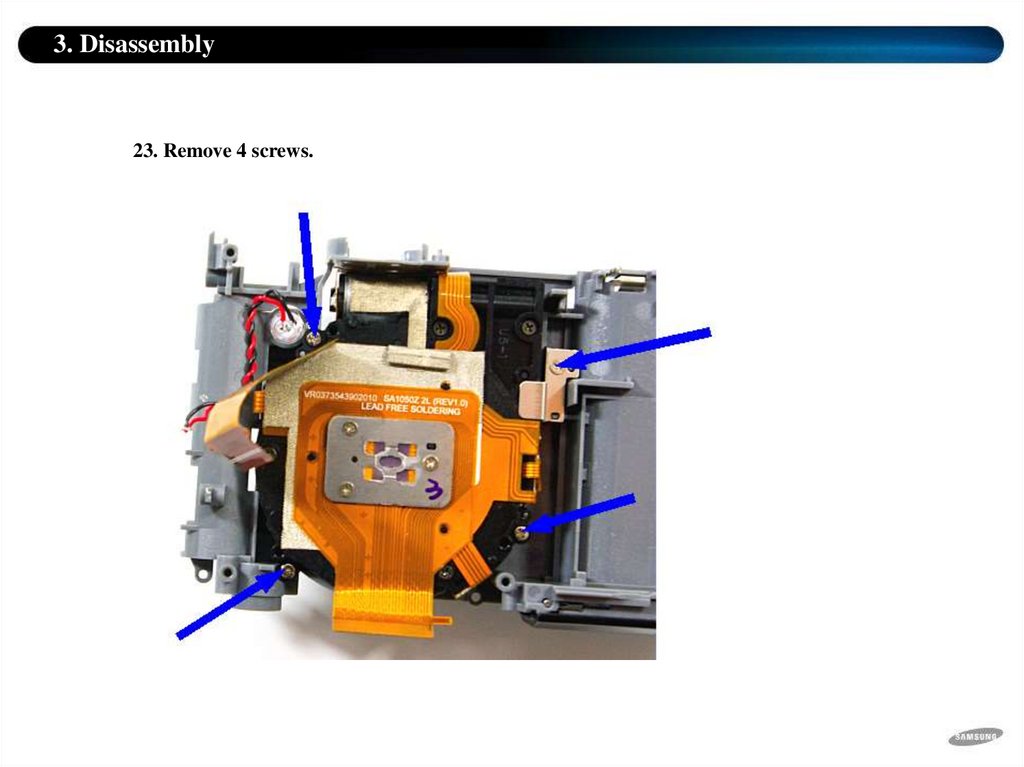
3. Disassembly23. Remove 4 screws.
69.
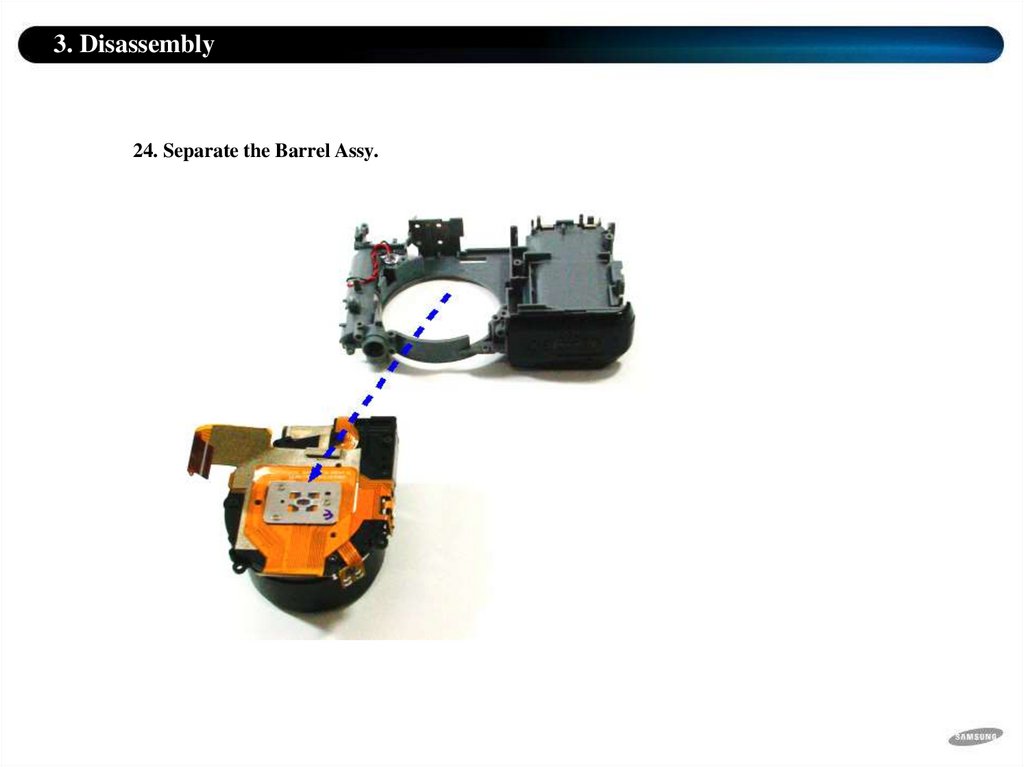
3. Disassembly24. Separate the Barrel Assy.
70.
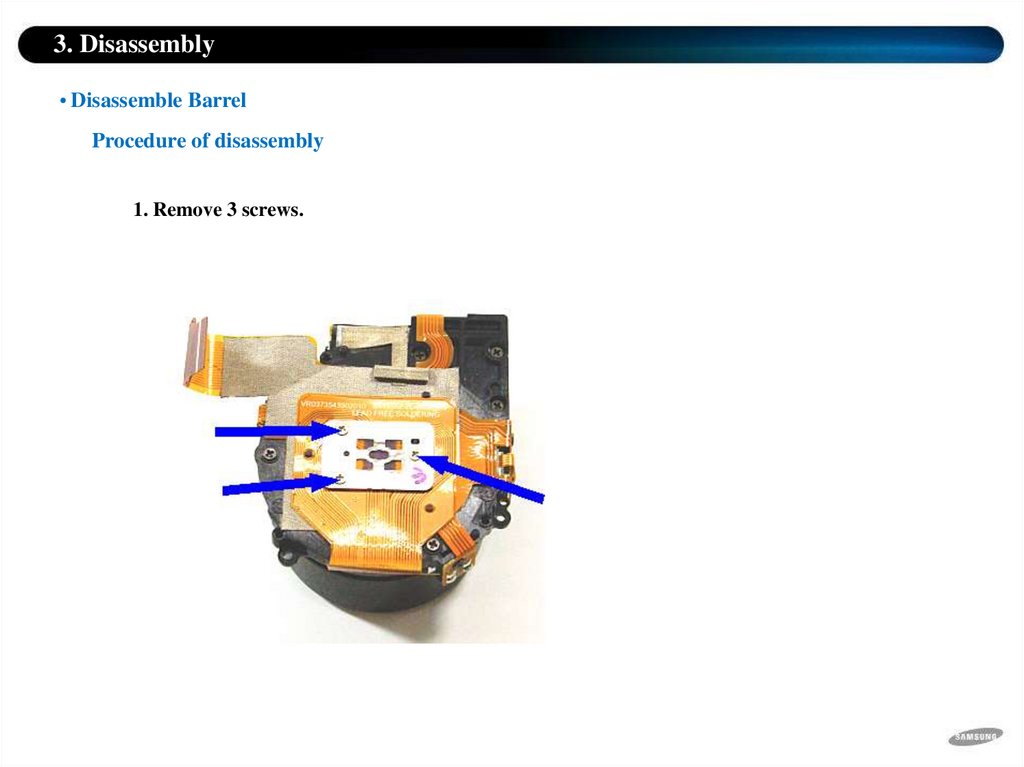
3. DisassemblyDisassemble Barrel
Procedure of disassembly
1. Remove 3 screws.
71.
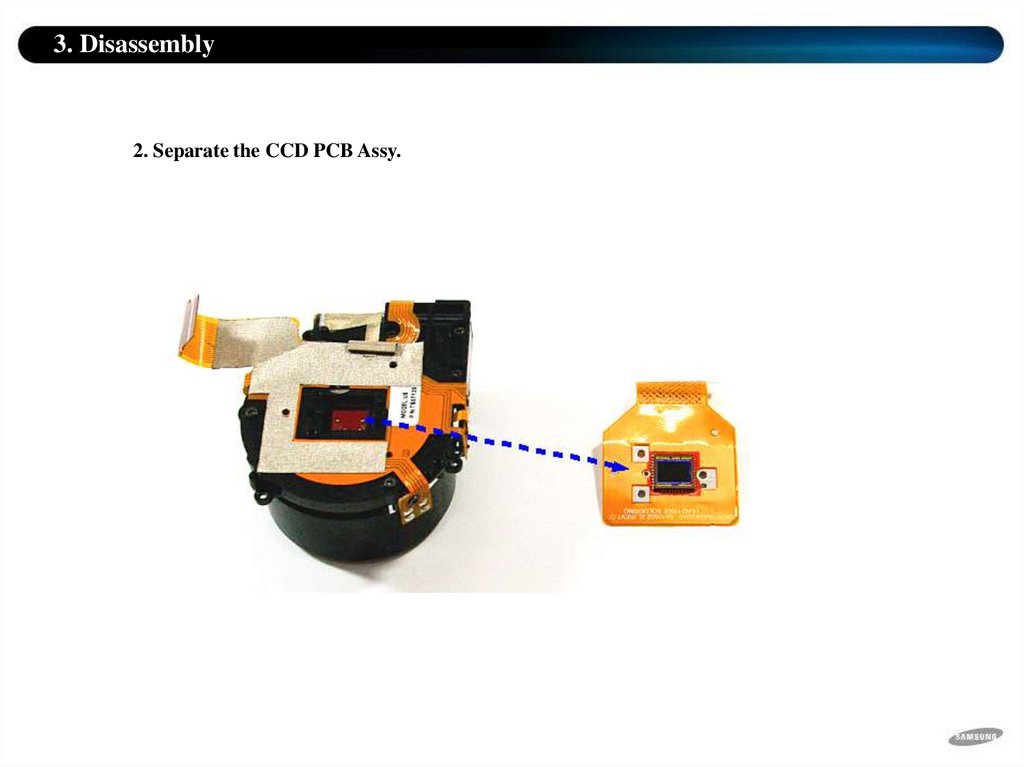
3. Disassembly2. Separate the CCD PCB Assy.
72.
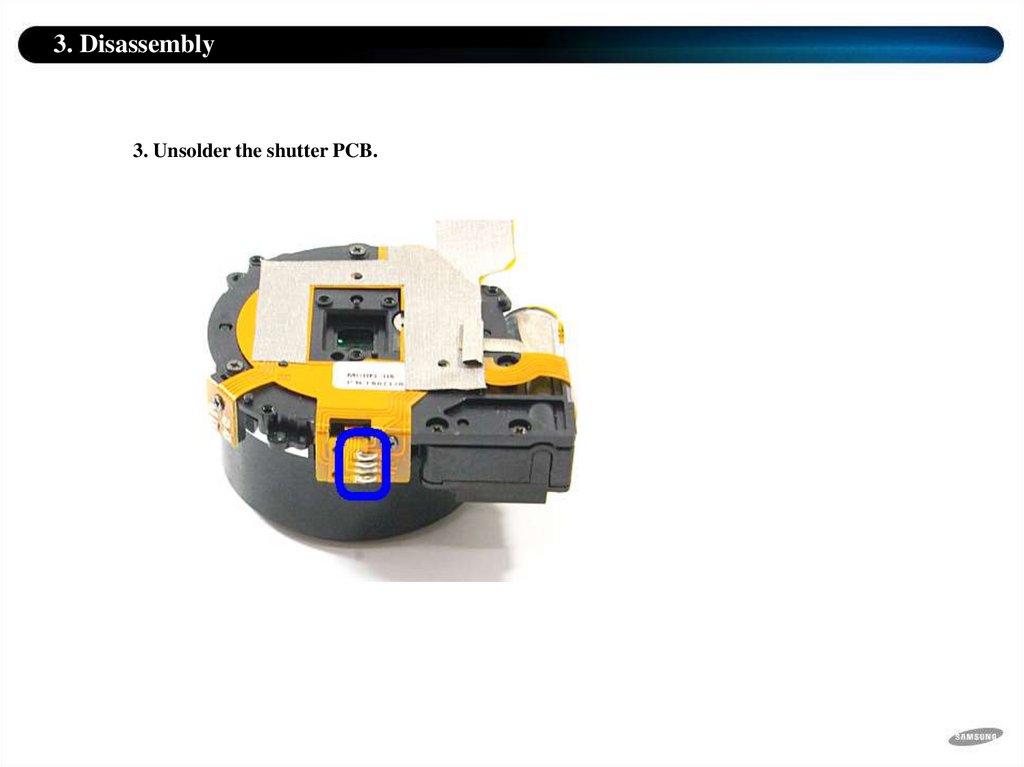
3. Disassembly3. Unsolder the shutter PCB.
73.
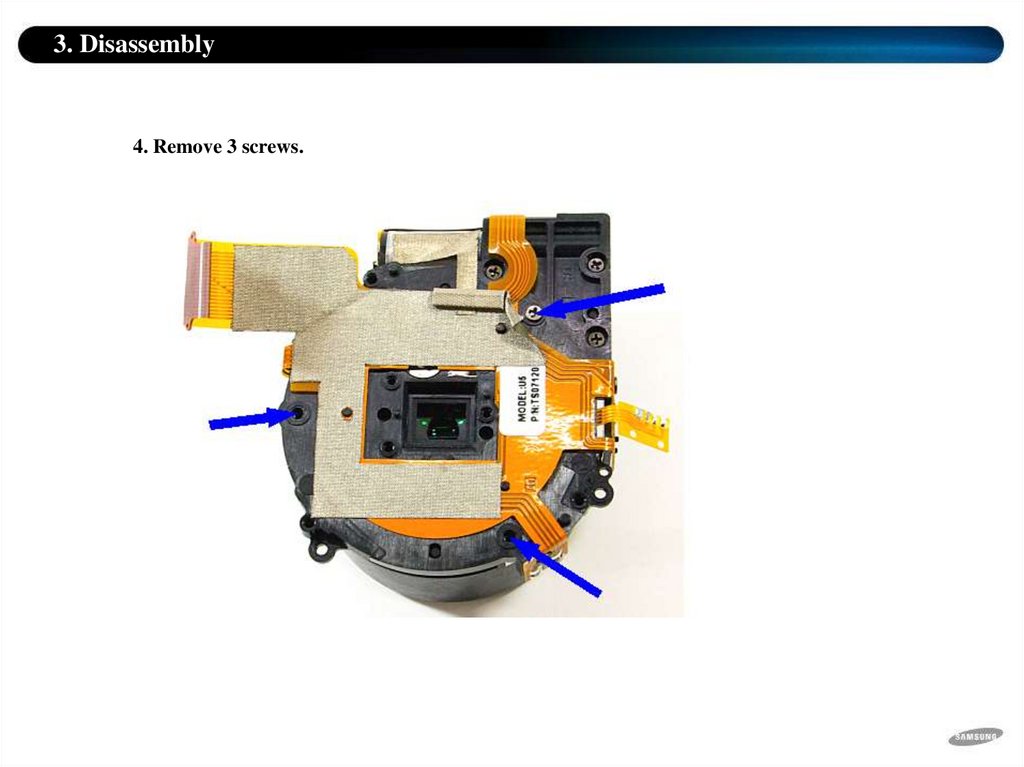
3. Disassembly4. Remove 3 screws.
74.
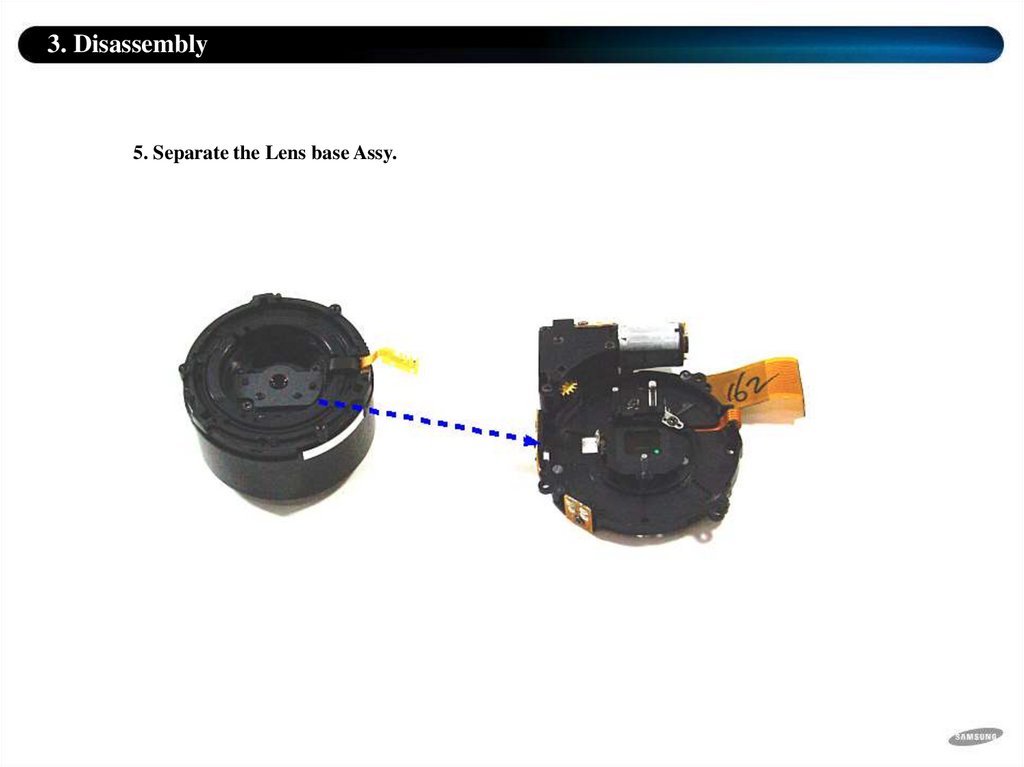
3. Disassembly5. Separate the Lens base Assy.
75.
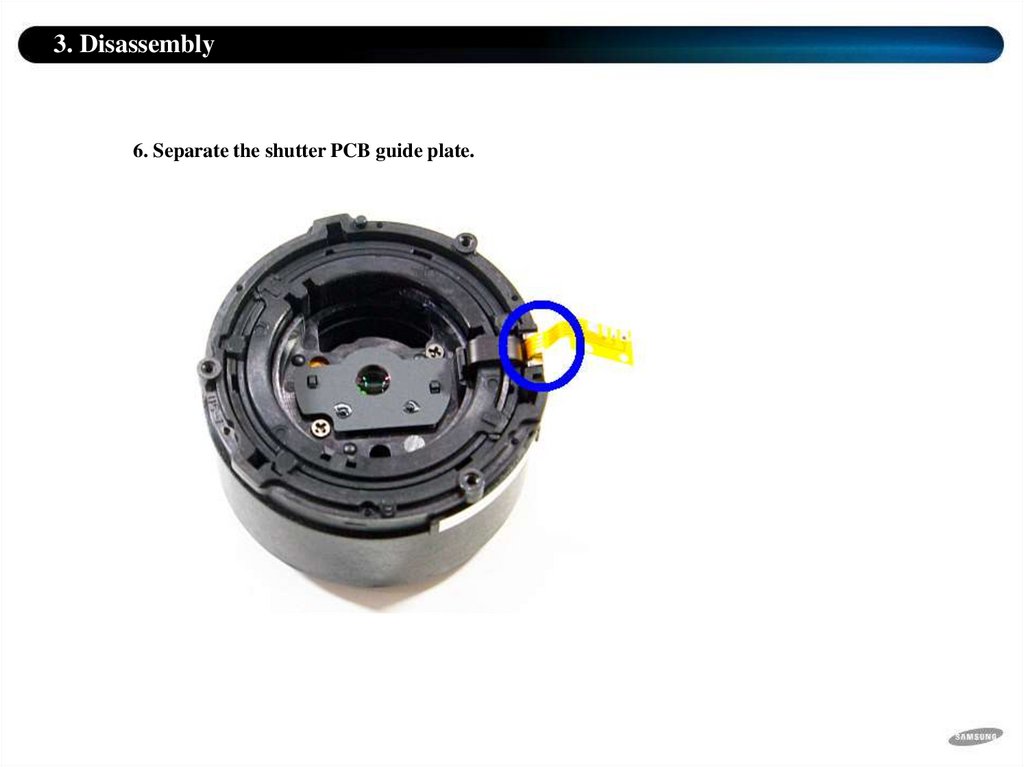
3. Disassembly6. Separate the shutter PCB guide plate.
76.
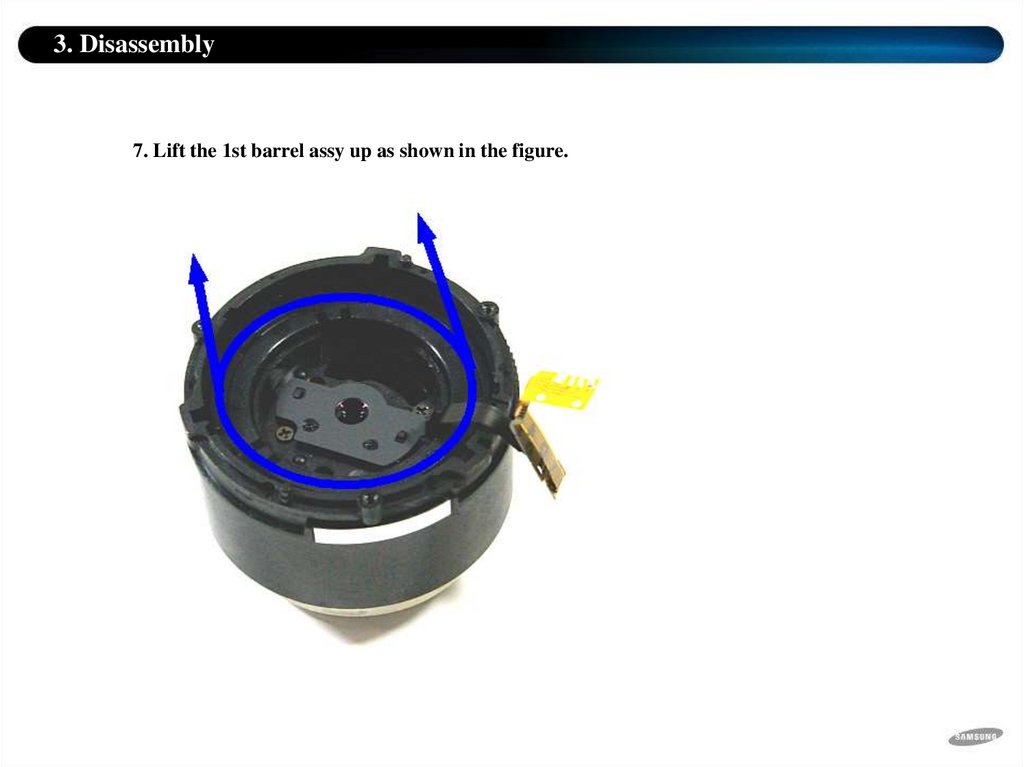
3. Disassembly7. Lift the 1st barrel assy up as shown in the figure.
77.
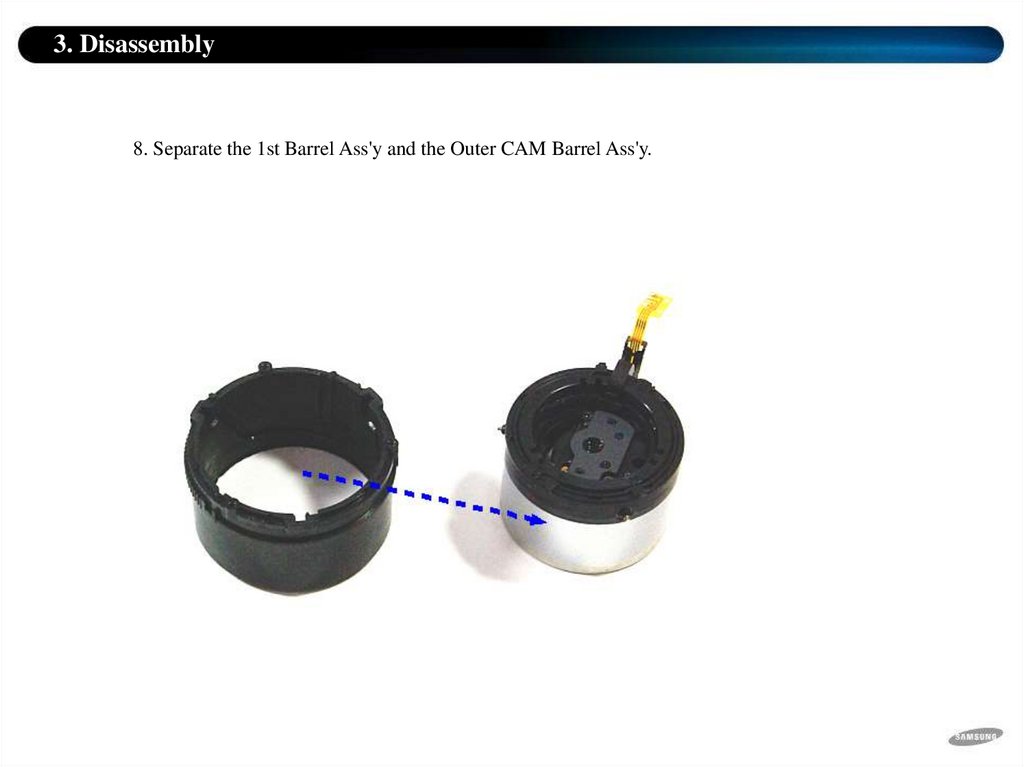
3. Disassembly8. Separate the 1st Barrel Ass'y and the Outer CAM Barrel Ass'y.
78.
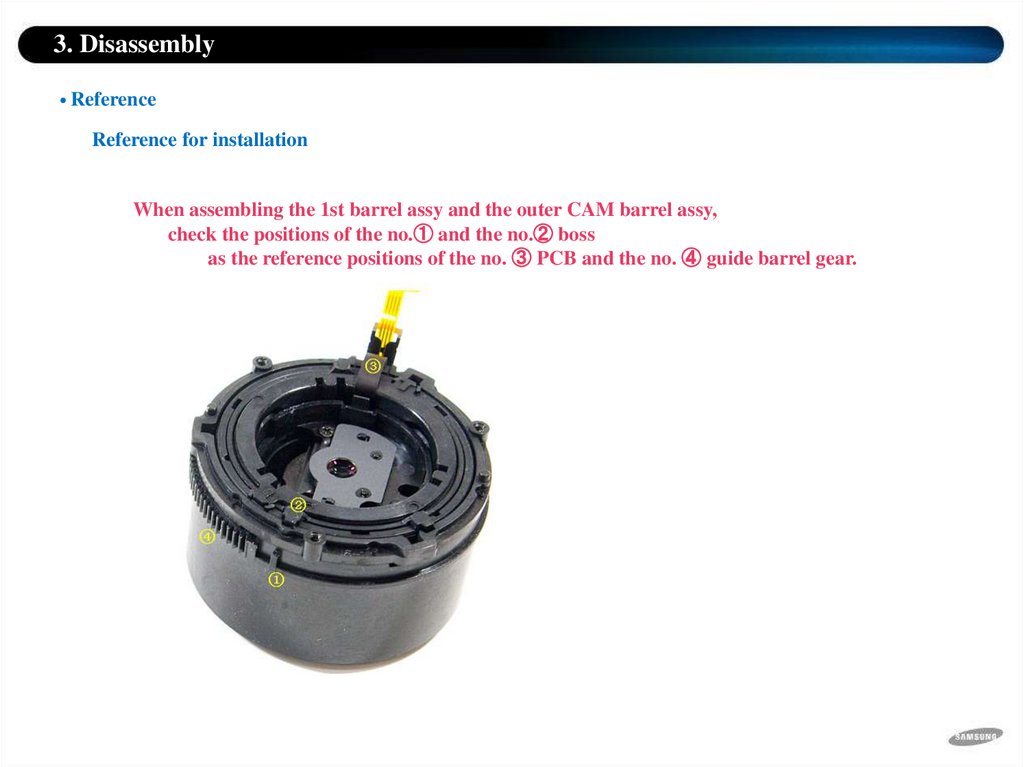
3. DisassemblyReference
Reference for installation
When assembling the 1st barrel assy and the outer CAM barrel assy,
check the positions of the no.① and the no.② boss
as the reference positions of the no. ③ PCB and the no. ④ guide barrel gear.
79.
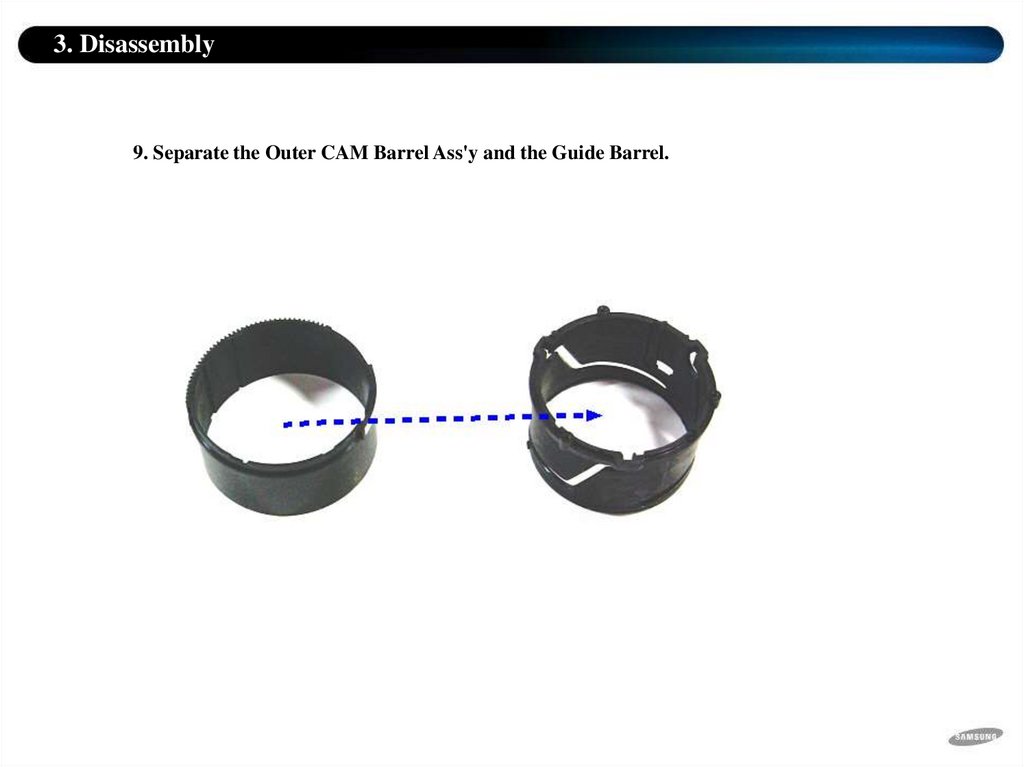
3. Disassembly9. Separate the Outer CAM Barrel Ass'y and the Guide Barrel.
80.
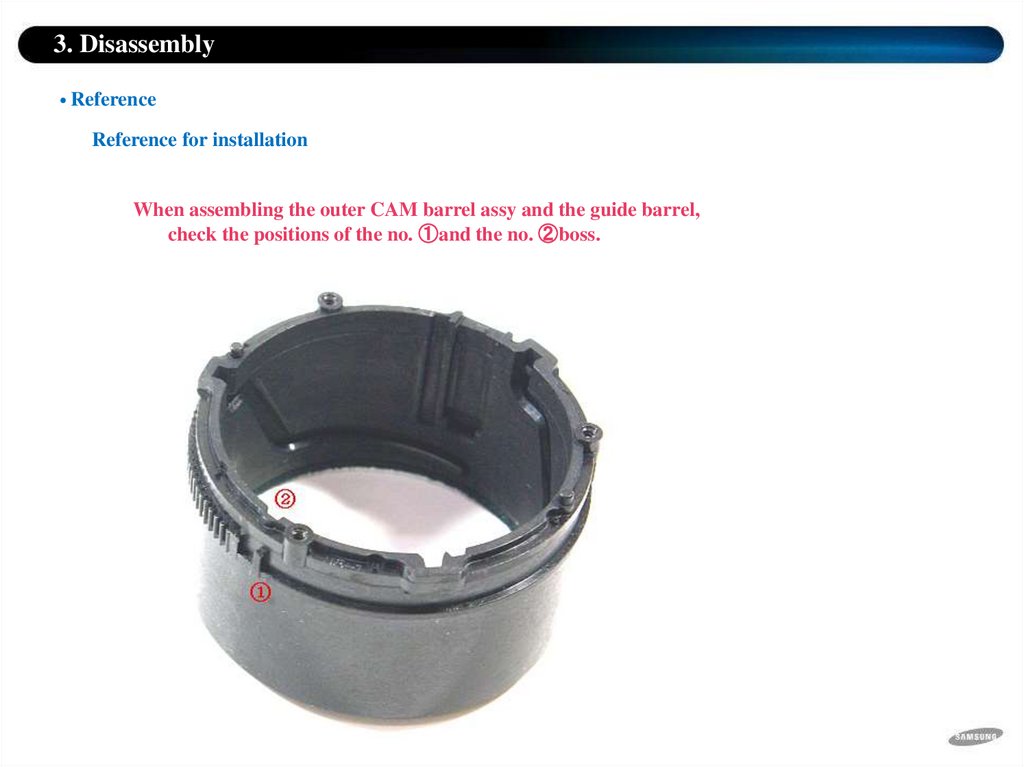
3. DisassemblyReference
Reference for installation
When assembling the outer CAM barrel assy and the guide barrel,
check the positions of the no. ①and the no. ②boss.
81.
3. Disassembly10. Lift the 2nd barrel assy up as shown in the figure.
82.
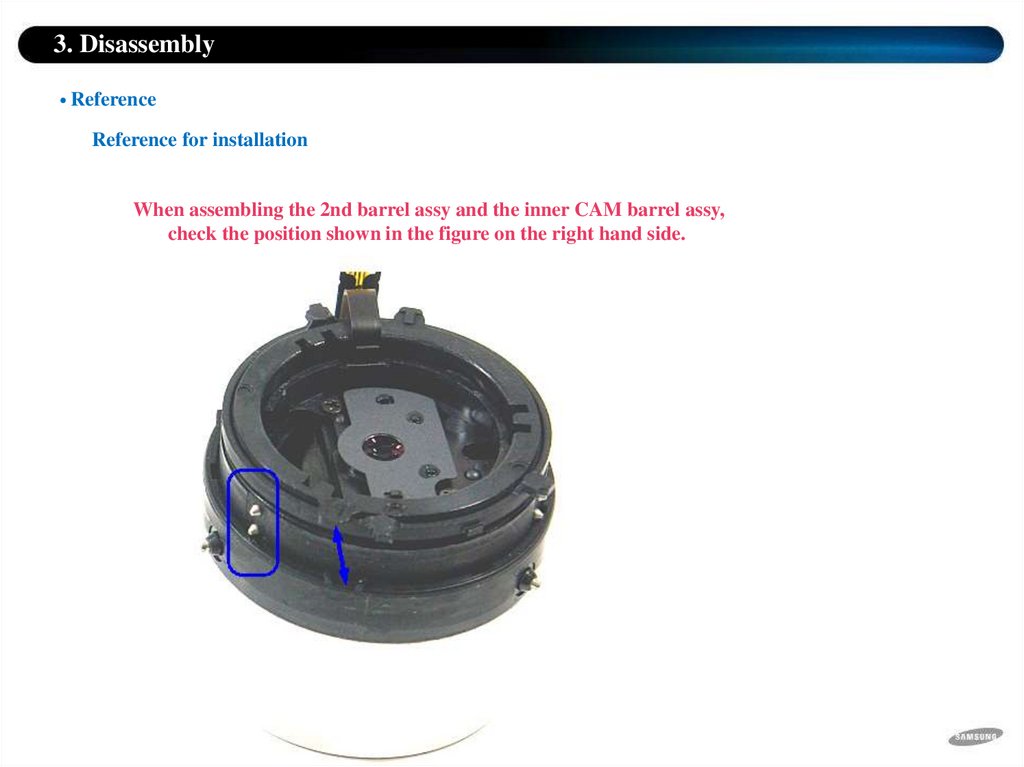
3. DisassemblyReference
Reference for installation
When assembling the 2nd barrel assy and the inner CAM barrel assy,
check the position shown in the figure on the right hand side.
83.
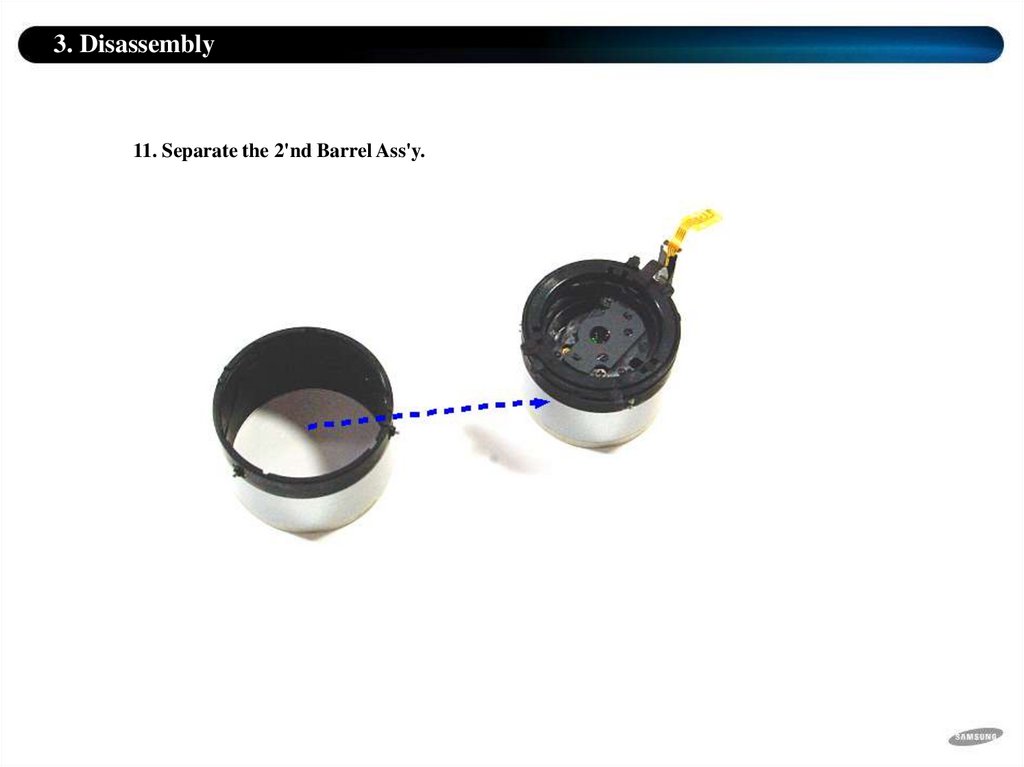
3. Disassembly11. Separate the 2'nd Barrel Ass'y.
84.
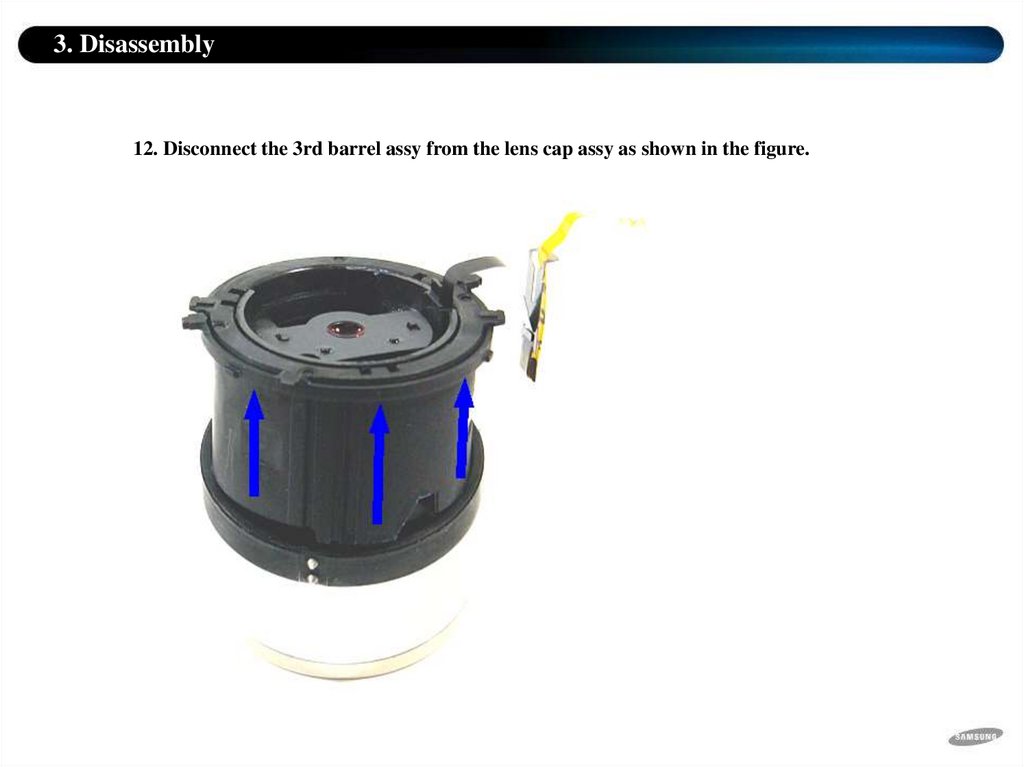
3. Disassembly12. Disconnect the 3rd barrel assy from the lens cap assy as shown in the figure.
85.
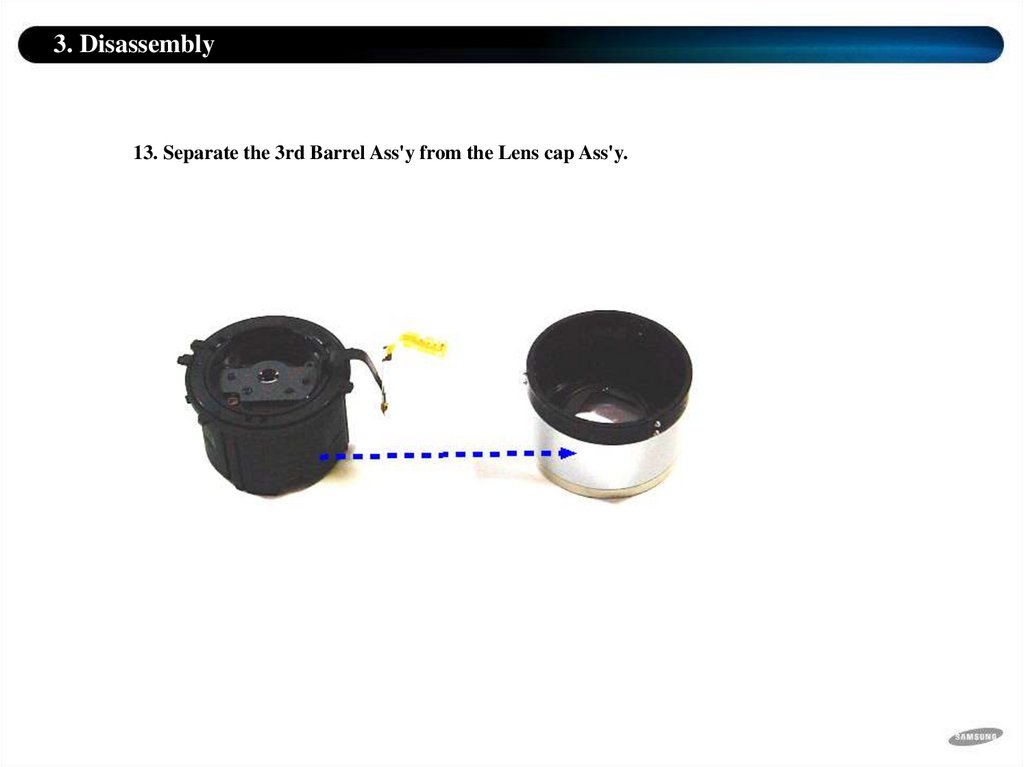
3. Disassembly13. Separate the 3rd Barrel Ass'y from the Lens cap Ass'y.
86.
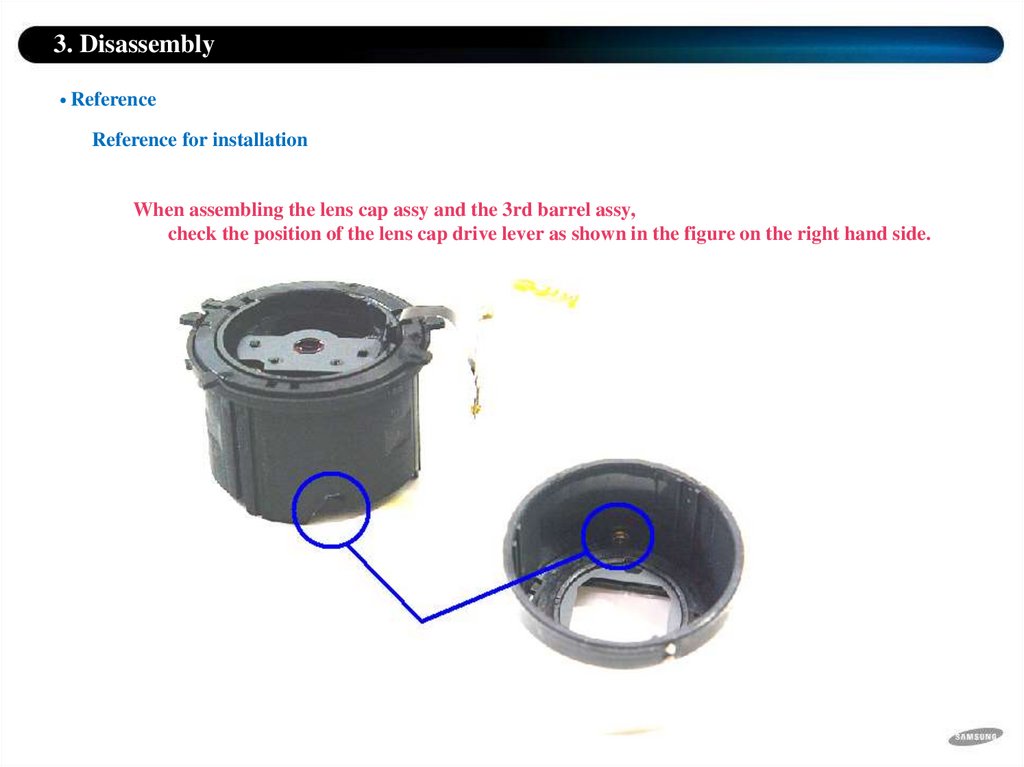
3. DisassemblyReference
Reference for installation
When assembling the lens cap assy and the 3rd barrel assy,
check the position of the lens cap drive lever as shown in the figure on the right hand side.
87.
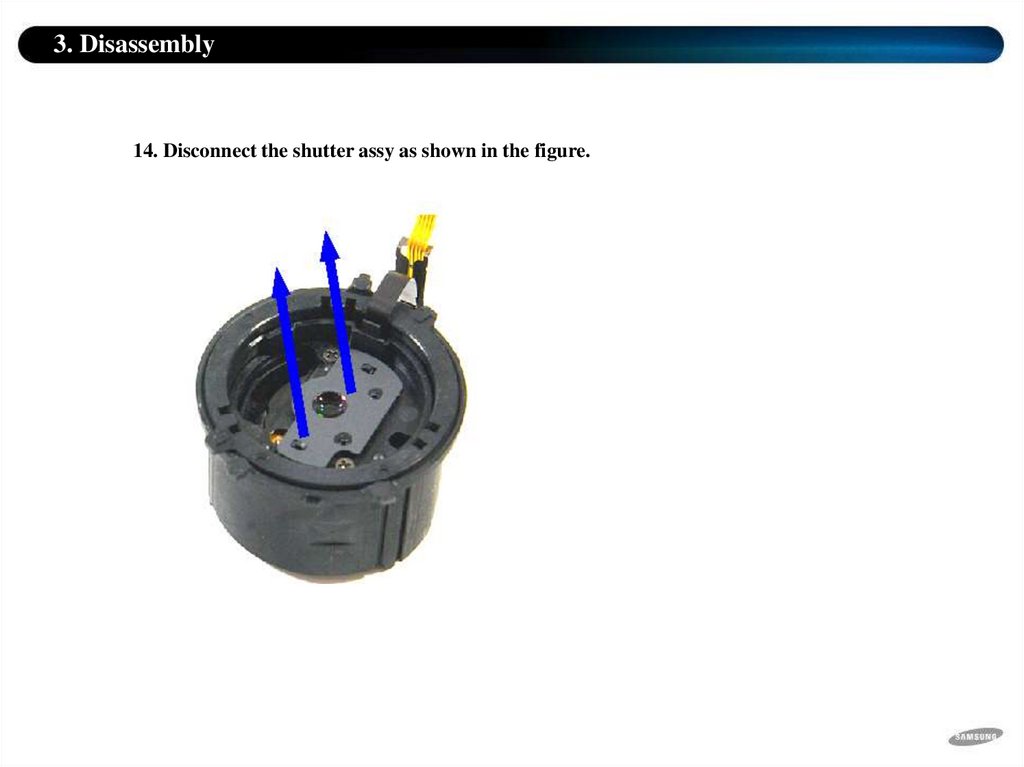
3. Disassembly14. Disconnect the shutter assy as shown in the figure.
88.
3. DisassemblyReference
Reference for installation
When assembling the shutter assy, check the positions of the two bosses
as shown in the figure on the right hand side.
89.
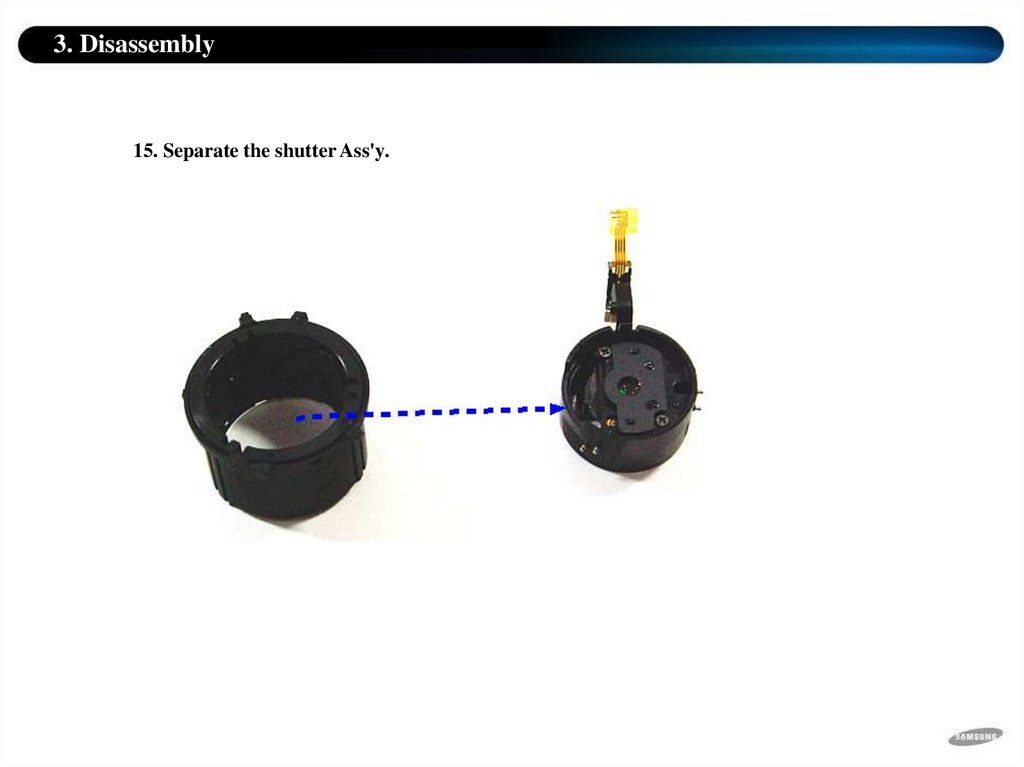
3. Disassembly15. Separate the shutter Ass'y.
90.
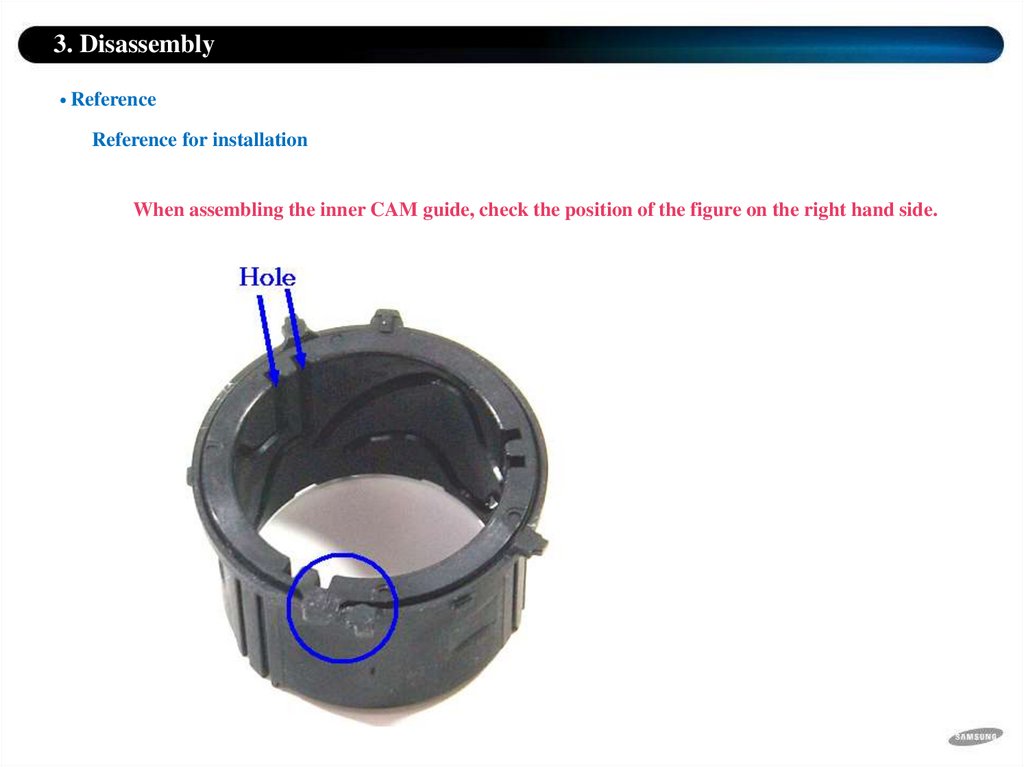
3. DisassemblyReference
Reference for installation
When assembling the inner CAM guide, check the position of the figure on the right hand side.
91.
3. Disassembly16. Separate the Inner CAM Guide.
92.
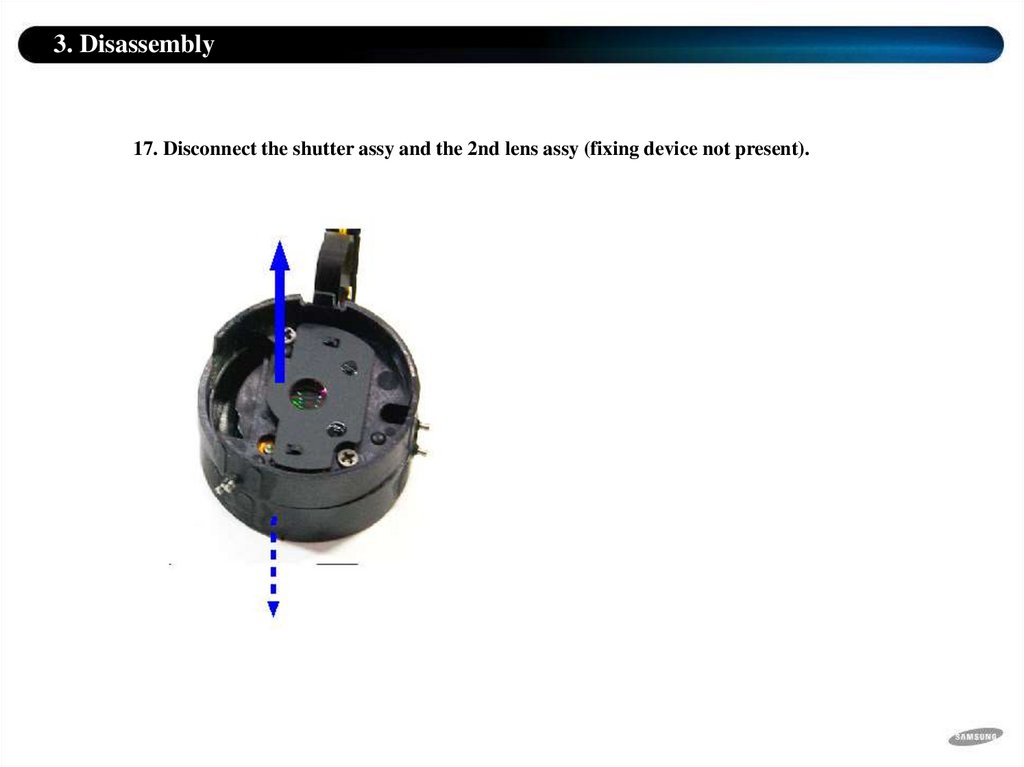
3. Disassembly17. Disconnect the shutter assy and the 2nd lens assy (fixing device not present).
93.
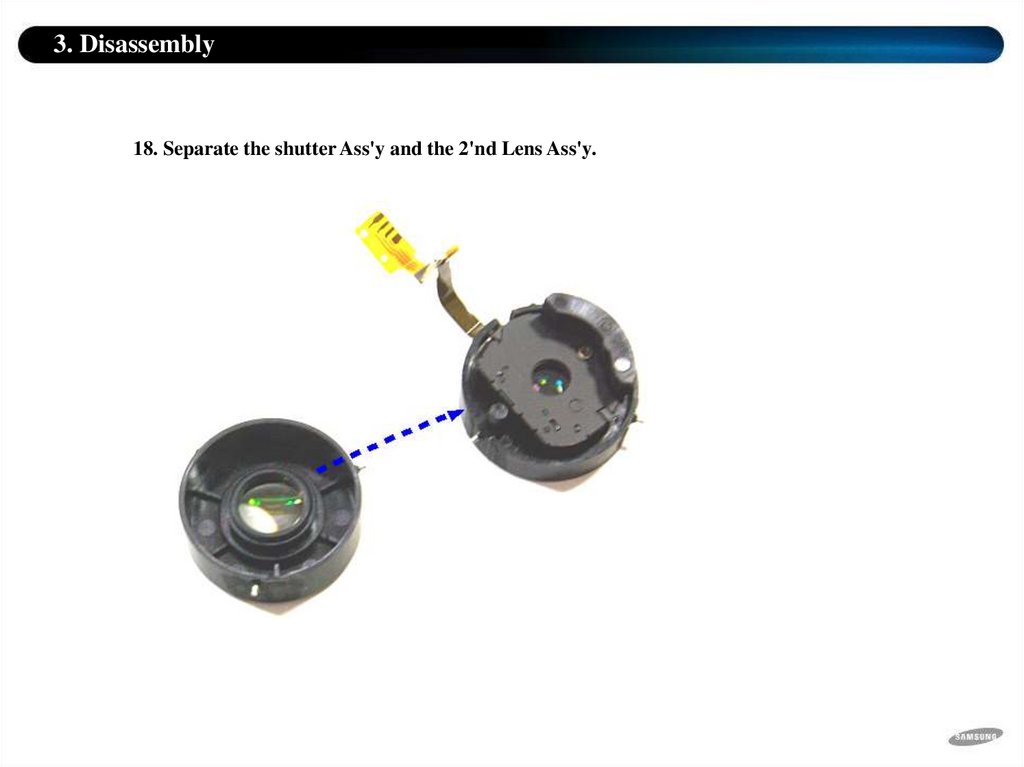
3. Disassembly18. Separate the shutter Ass'y and the 2'nd Lens Ass'y.
94.
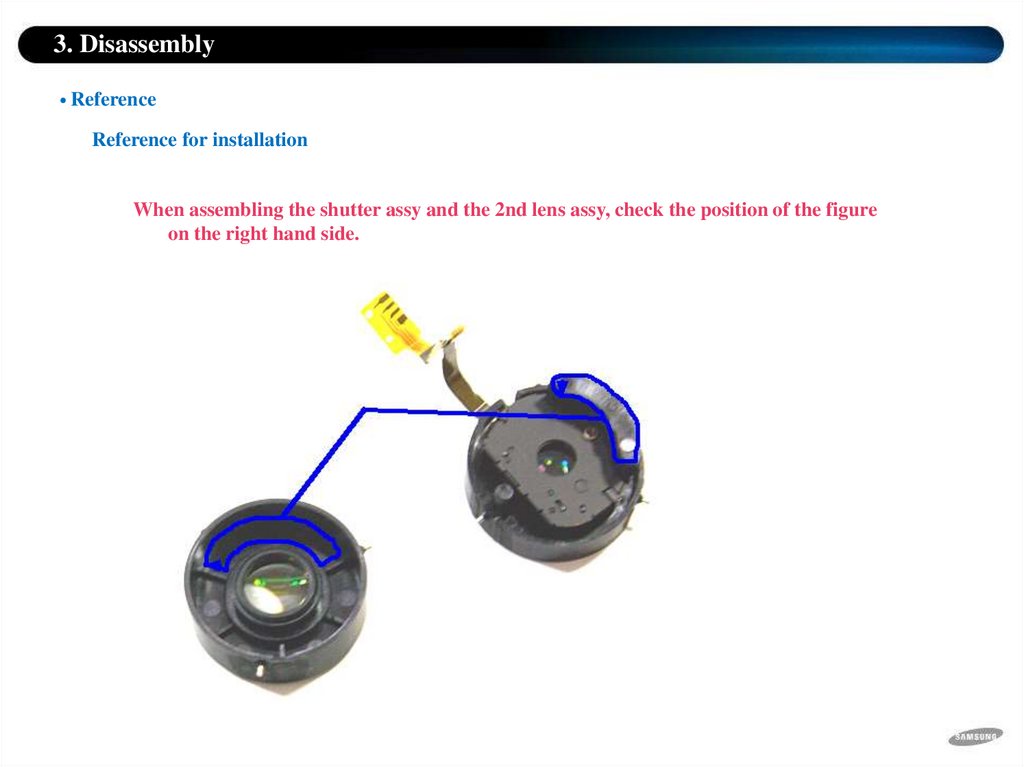
3. DisassemblyReference
Reference for installation
When assembling the shutter assy and the 2nd lens assy, check the position of the figure
on the right hand side.