


 Программное обеспечение
Похожие презентации:


 & MDOS Onboarding Training Global Partner Onboarding Team")

Global Media Transfer (GMT)
1.
Global Media Transfer(GMT)
Reference Guide
Edition 1.0
2.
Table of ContentsPreface
1-1
About This Guide . . . . . . . . . . . . . . . . . . . . . . . . . . . . . . . . . . . . . . . . . . . . . . . . . . . . 1-1
Other Support Documents. . . . . . . . . . . . . . . . . . . . . . . . . . . . . . . . . . . . . . . . . . . . . 1-1
Conventions In This Guide . . . . . . . . . . . . . . . . . . . . . . . . . . . . . . . . . . . . . . . . . . . . 1-2
Typographical Conventions . . . . . . . . . . . . . . . . . . . . . . . . . . . . . . . . . . . . . . . . . . 1-2
Notational Conventions . . . . . . . . . . . . . . . . . . . . . . . . . . . . . . . . . . . . . . . . . . . . . . 1-3
Your Feedback Requested . . . . . . . . . . . . . . . . . . . . . . . . . . . . . . . . . . . . . . . . . . . . 1-3
Introduction
2-1
GMT Features . . . . . . . . . . . . . . . . . . . . . . . . . . . . . . . . . . . . . . . . . . . . . . . . . . . . . . . 2-2
GMT System Components. . . . . . . . . . . . . . . . . . . . . . . . . . . . . . . . . . . . . . . . . . . . . 2-3
Requester . . . . . . . . . . . . . . . . . . . . . . . . . . . . . . . . . . . . . . . . . . . . . . . . . . . . . . . . 2-3
Distributor . . . . . . . . . . . . . . . . . . . . . . . . . . . . . . . . . . . . . . . . . . . . . . . . . . . . . . . . 2-4
Fiber vs. Baseband Routing . . . . . . . . . . . . . . . . . . . . . . . . . . . . . . . . . . . . . . . 2-4
GMT List . . . . . . . . . . . . . . . . . . . . . . . . . . . . . . . . . . . . . . . . . . . . . . . . . . . . . . . . . 2-6
ID List Placement Criteria . . . . . . . . . . . . . . . . . . . . . . . . . . . . . . . . . . . . . . . . . 2-7
Fundamental GMT Configurations . . . . . . . . . . . . . . . . . . . . . . . . . . . . . . . . . . . . . . 2-7
Basic GMT (baseband) configuration . . . . . . . . . . . . . . . . . . . . . . . . . . . . . . . . . . 2-10
Air/Protect configuration . . . . . . . . . . . . . . . . . . . . . . . . . . . . . . . . . . . . . . . . . . . . 2-12
Multirequester . . . . . . . . . . . . . . . . . . . . . . . . . . . . . . . . . . . . . . . . . . . . . . . . . . . . 2-15
Multiple Distributors. . . . . . . . . . . . . . . . . . . . . . . . . . . . . . . . . . . . . . . . . . . . . . . . 2-16
1
3.
Multiple GMT Lists . . . . . . . . . . . . . . . . . . . . . . . . . . . . . . . . . . . . . . . . . . . . . . . . 2-19GMT List Options & Attributes . . . . . . . . . . . . . . . . . . . . . . . . . . . . . . . . . . . . . . . . 2-21
List Attributes . . . . . . . . . . . . . . . . . . . . . . . . . . . . . . . . . . . . . . . . . . . . . . . . . . . .
Columns. . . . . . . . . . . . . . . . . . . . . . . . . . . . . . . . . . . . . . . . . . . . . . . . . . . . . .
List Colors . . . . . . . . . . . . . . . . . . . . . . . . . . . . . . . . . . . . . . . . . . . . . . . . . . . .
On-Air Focus . . . . . . . . . . . . . . . . . . . . . . . . . . . . . . . . . . . . . . . . . . . . . . . . . .
2-22
2-22
2-25
2-28
List Options . . . . . . . . . . . . . . . . . . . . . . . . . . . . . . . . . . . . . . . . . . . . . . . . . . . . . .
Counts . . . . . . . . . . . . . . . . . . . . . . . . . . . . . . . . . . . . . . . . . . . . . . . . . . . . . . .
Times . . . . . . . . . . . . . . . . . . . . . . . . . . . . . . . . . . . . . . . . . . . . . . . . . . . . . . . .
Threading. . . . . . . . . . . . . . . . . . . . . . . . . . . . . . . . . . . . . . . . . . . . . . . . . . . . .
Tensioning . . . . . . . . . . . . . . . . . . . . . . . . . . . . . . . . . . . . . . . . . . . . . . . . . . . .
Skip Control . . . . . . . . . . . . . . . . . . . . . . . . . . . . . . . . . . . . . . . . . . . . . . . . . . .
Miscellaneous . . . . . . . . . . . . . . . . . . . . . . . . . . . . . . . . . . . . . . . . . . . . . . . . .
2-28
2-29
2-29
2-30
2-31
2-32
2-33
Configuring GMT
3-1
Configuring Software Components . . . . . . . . . . . . . . . . . . . . . . . . . . . . . . . . . . . . . 3-1
Configuring Requesters . . . . . . . . . . . . . . . . . . . . . . . . . . . . . . . . . . . . . . . . . . . . .
General . . . . . . . . . . . . . . . . . . . . . . . . . . . . . . . . . . . . . . . . . . . . . . . . . . . . . . .
Qualifiers . . . . . . . . . . . . . . . . . . . . . . . . . . . . . . . . . . . . . . . . . . . . . . . . . . . . . .
Routing . . . . . . . . . . . . . . . . . . . . . . . . . . . . . . . . . . . . . . . . . . . . . . . . . . . . . . .
Destination. . . . . . . . . . . . . . . . . . . . . . . . . . . . . . . . . . . . . . . . . . . . . . . . . . . . .
Distributor . . . . . . . . . . . . . . . . . . . . . . . . . . . . . . . . . . . . . . . . . . . . . . . . . . . . .
3-2
3-3
3-5
3-6
3-7
3-7
Configuring Multirequesters . . . . . . . . . . . . . . . . . . . . . . . . . . . . . . . . . . . . . . . . . . 3-8
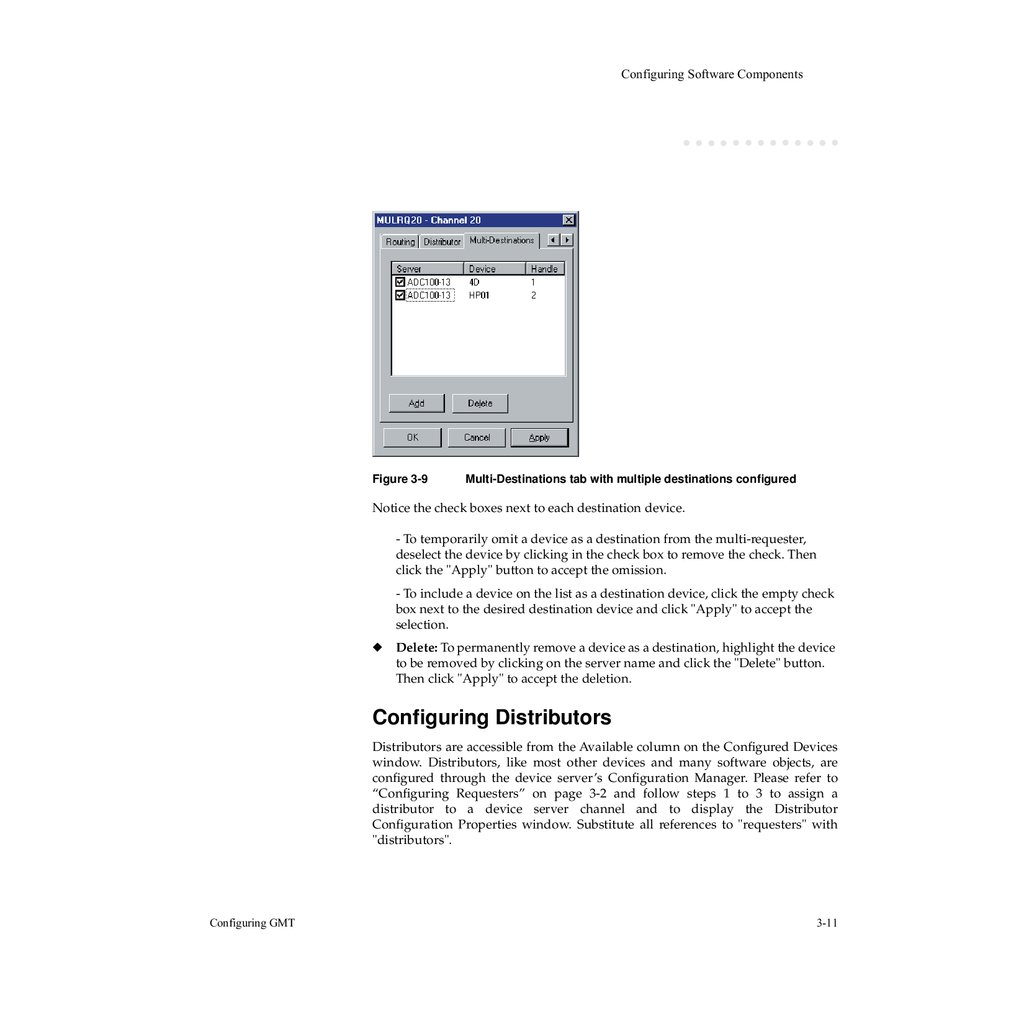
Multi-Destinations . . . . . . . . . . . . . . . . . . . . . . . . . . . . . . . . . . . . . . . . . . . . . . . 3-9
Configuring Distributors . . . . . . . . . . . . . . . . . . . . . . . . . . . . . . . . . . . . . . . . . . . .
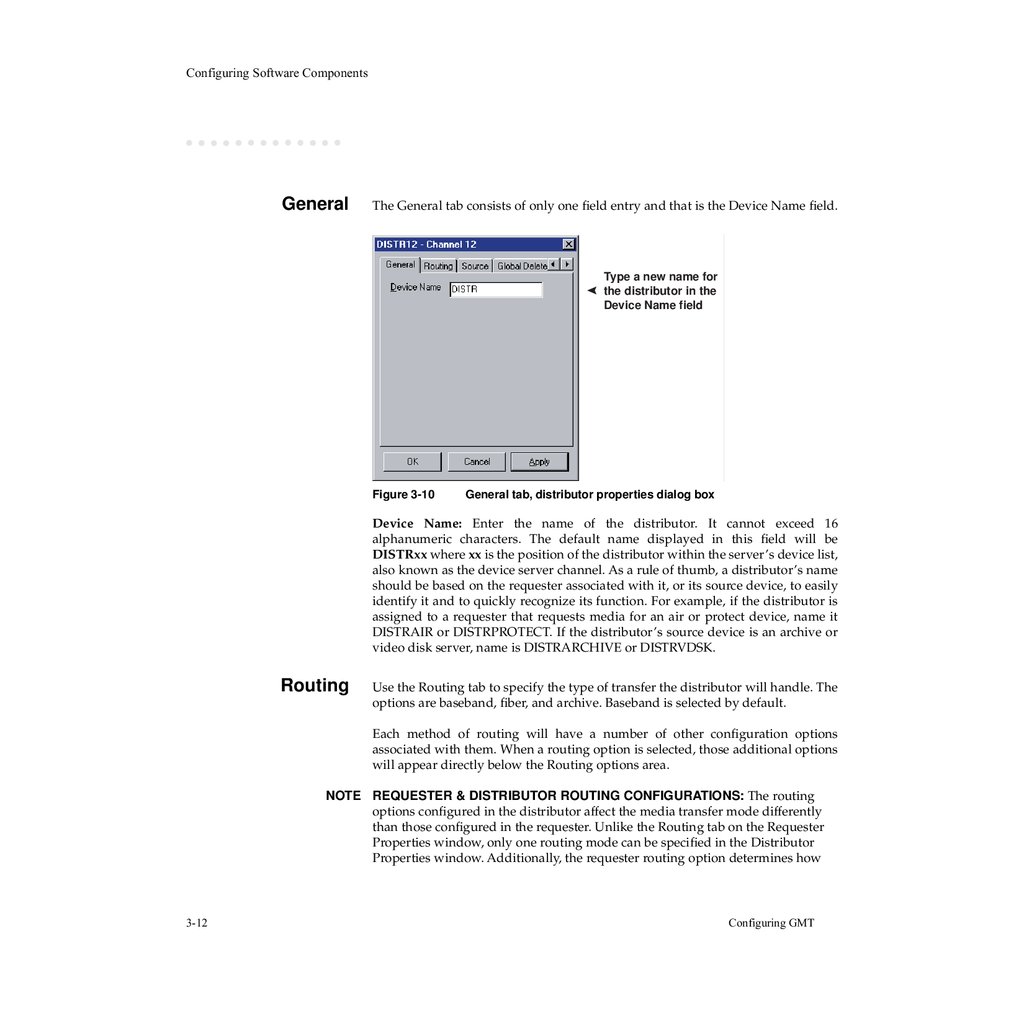
General . . . . . . . . . . . . . . . . . . . . . . . . . . . . . . . . . . . . . . . . . . . . . . . . . . . . . .
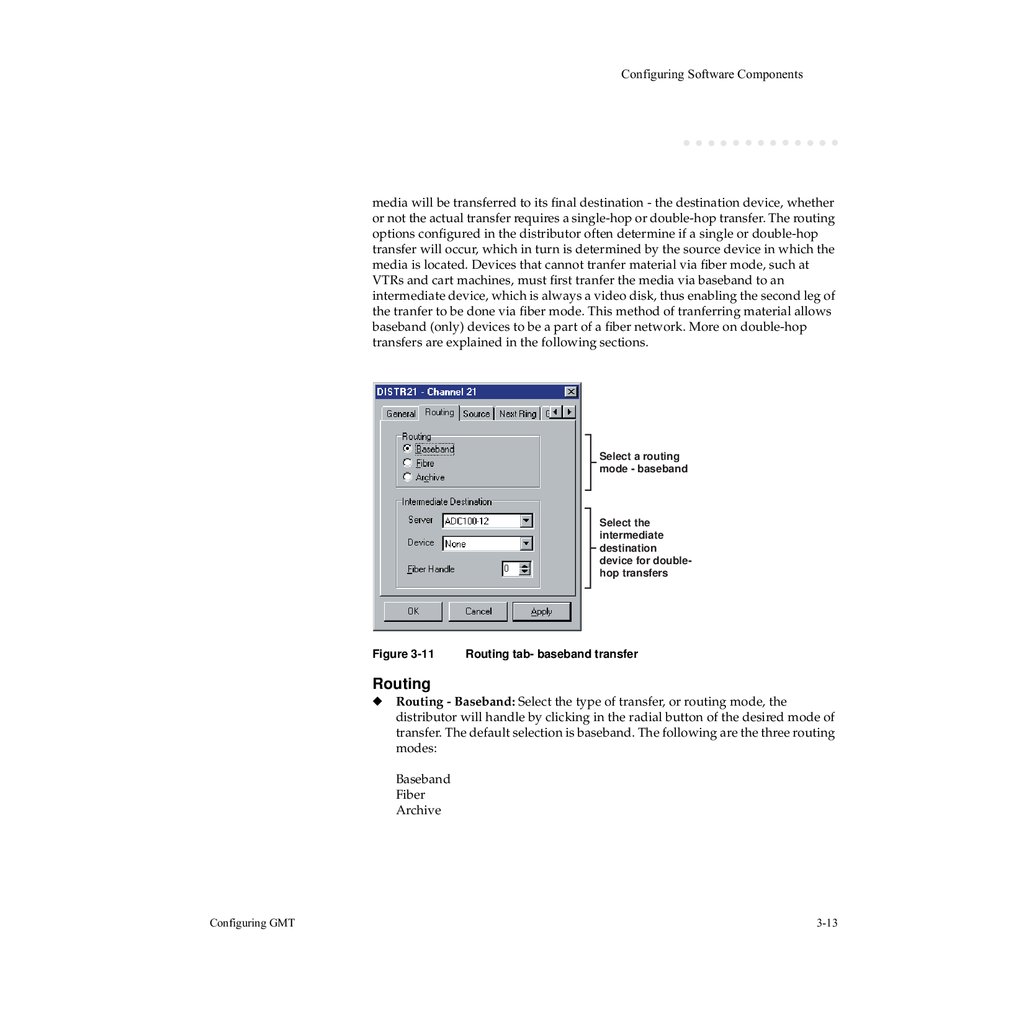
Routing . . . . . . . . . . . . . . . . . . . . . . . . . . . . . . . . . . . . . . . . . . . . . . . . . . . . . .
Source . . . . . . . . . . . . . . . . . . . . . . . . . . . . . . . . . . . . . . . . . . . . . . . . . . . . . . .
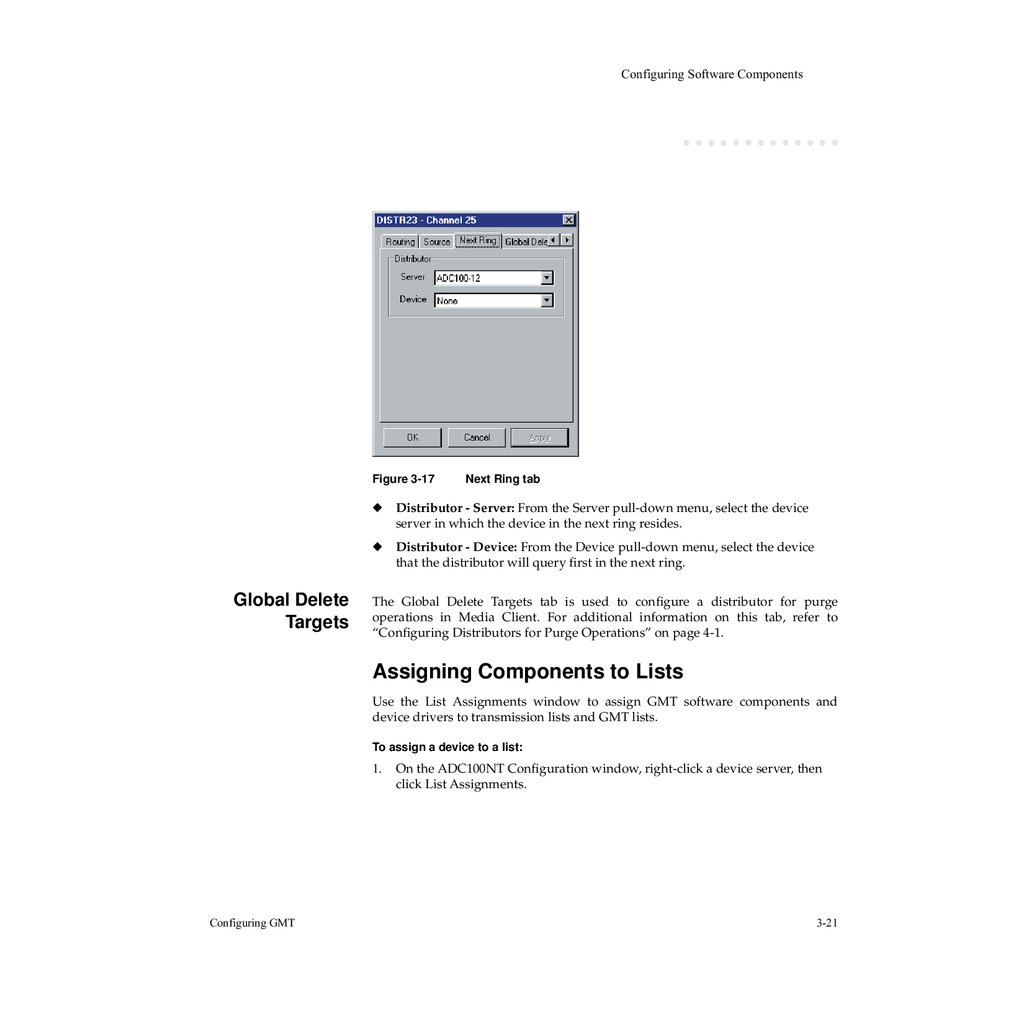
Next Ring . . . . . . . . . . . . . . . . . . . . . . . . . . . . . . . . . . . . . . . . . . . . . . . . . . . . .
Global Delete Targets . . . . . . . . . . . . . . . . . . . . . . . . . . . . . . . . . . . . . . . . . . .
3-11
3-12
3-12
3-19
3-20
3-21
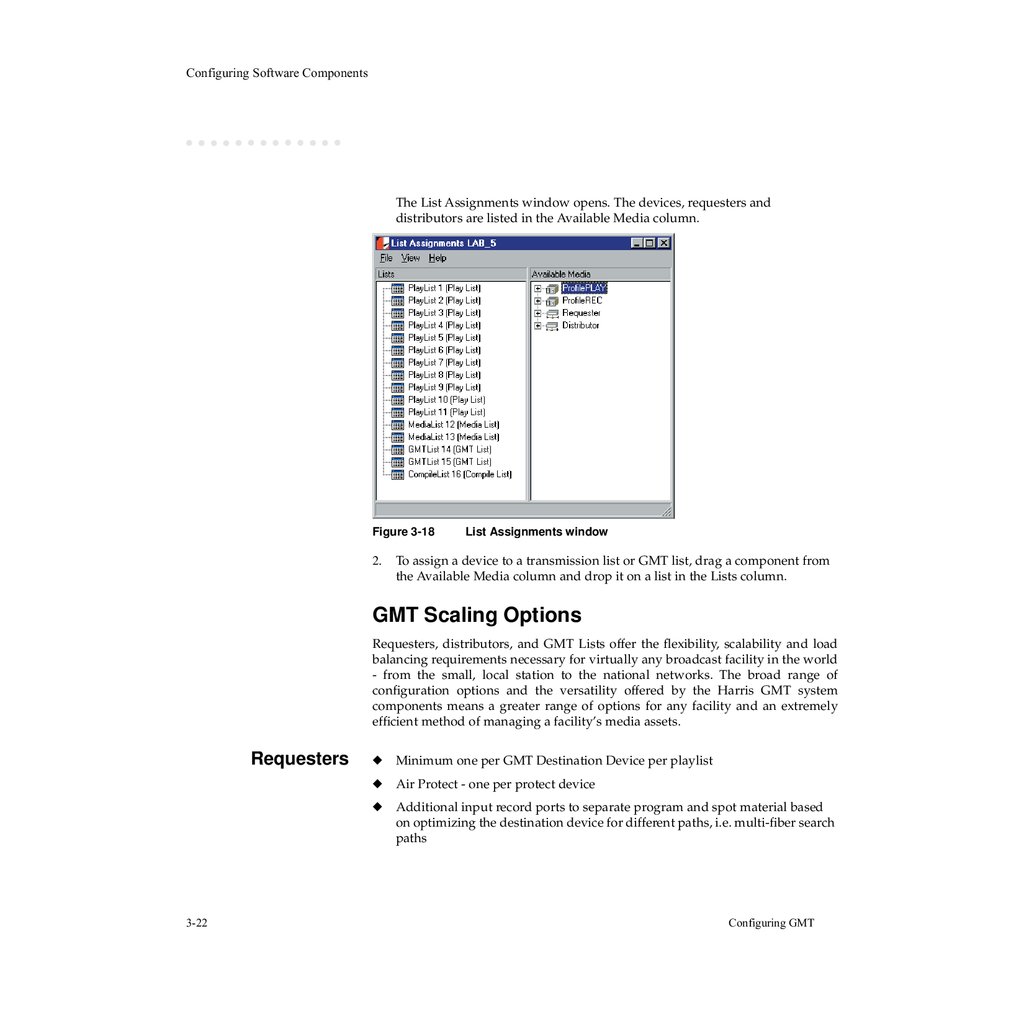
Assigning Components to Lists. . . . . . . . . . . . . . . . . . . . . . . . . . . . . . . . . . . . . . . 3-21
2
4.
GMT Scaling Options . . . . . . . . . . . . . . . . . . . . . . . . . . . . . . . . . . . . . . . . . . . . . .Requesters . . . . . . . . . . . . . . . . . . . . . . . . . . . . . . . . . . . . . . . . . . . . . . . . . . .
Distributors. . . . . . . . . . . . . . . . . . . . . . . . . . . . . . . . . . . . . . . . . . . . . . . . . . . .
GMT Lists . . . . . . . . . . . . . . . . . . . . . . . . . . . . . . . . . . . . . . . . . . . . . . . . . . . .
3-22
3-22
3-23
3-23
Assigning Distributors . . . . . . . . . . . . . . . . . . . . . . . . . . . . . . . . . . . . . . . . . . . . . . 3-23
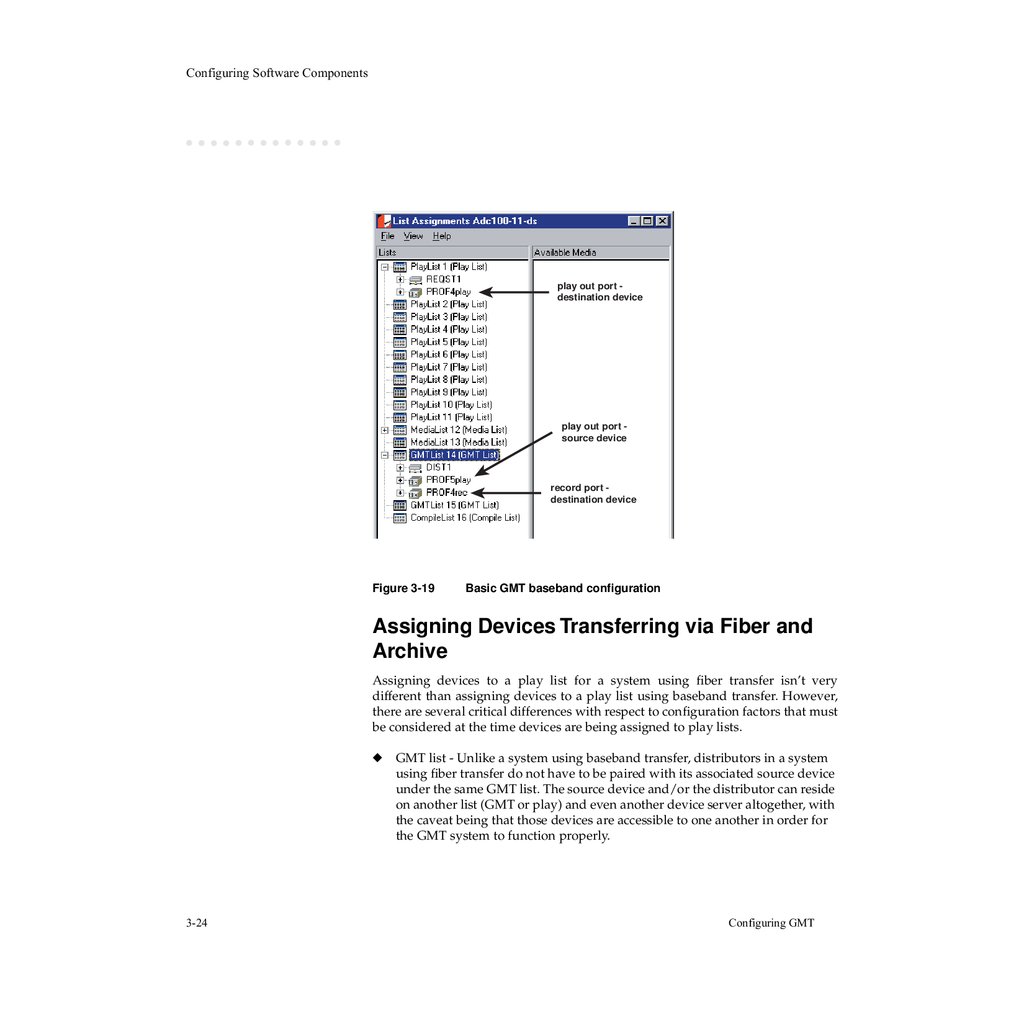
Assigning Devices Transferring via Baseband . . . . . . . . . . . . . . . . . . . . . . . . . . . 3-23
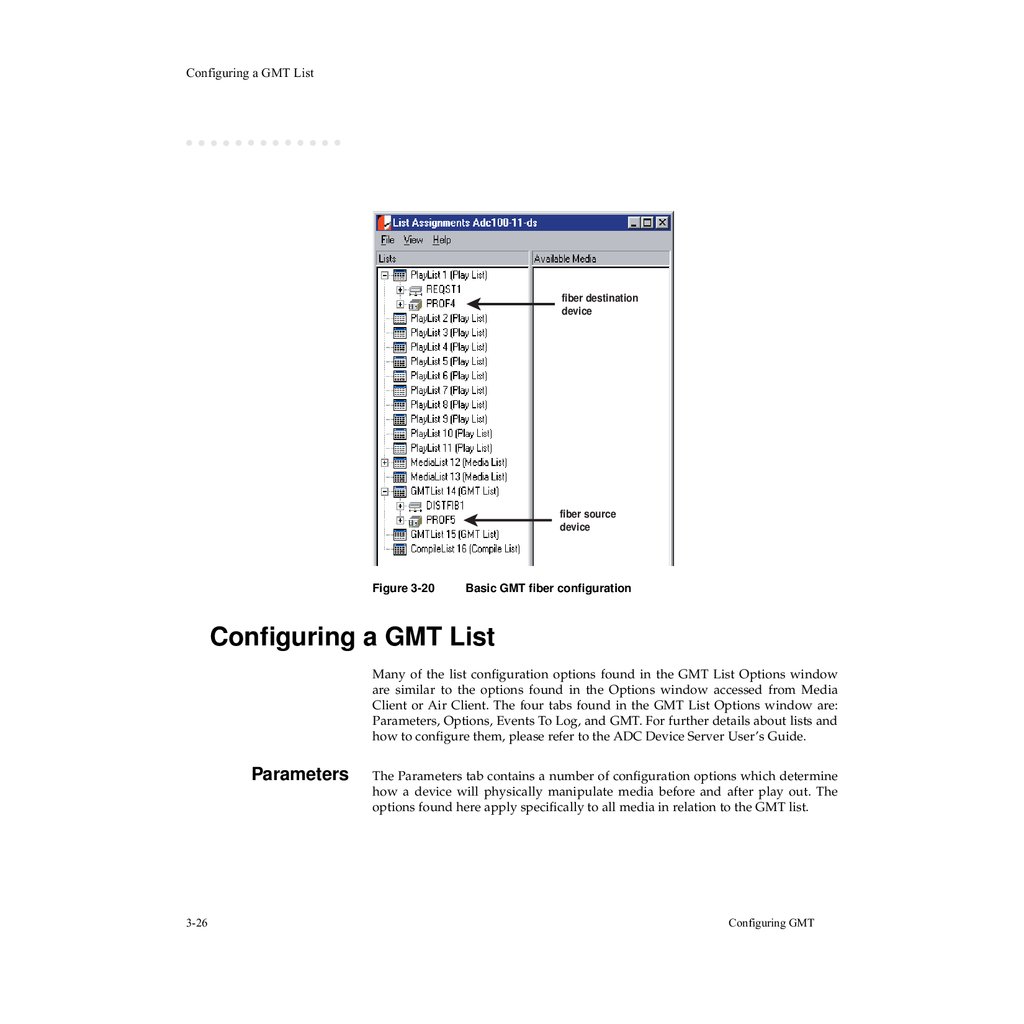
Assigning Devices Transferring via Fiber and Archive . . . . . . . . . . . . . . . . . . . . . 3-24
Configuring a GMT List . . . . . . . . . . . . . . . . . . . . . . . . . . . . . . . . . . . . . . . . . . . . . .
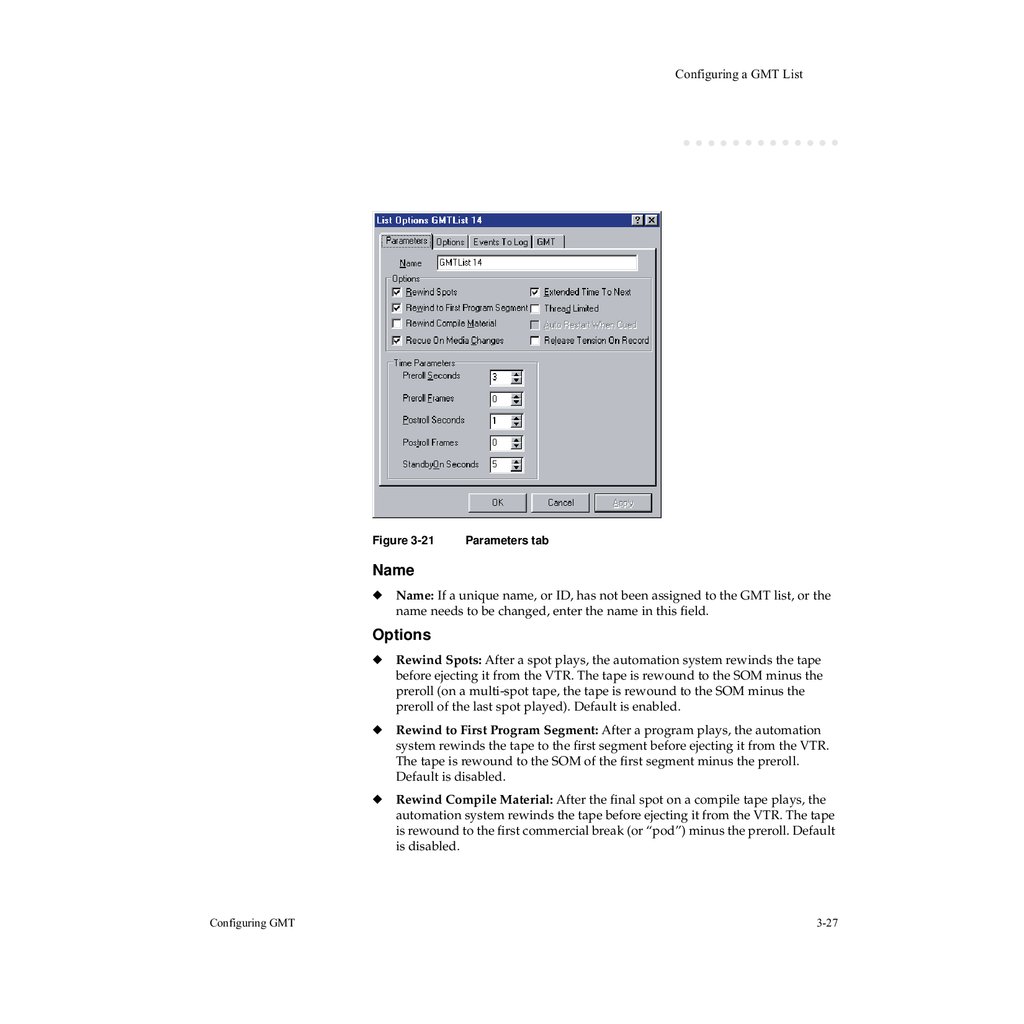
Parameters . . . . . . . . . . . . . . . . . . . . . . . . . . . . . . . . . . . . . . . . . . . . . . . . . . .
Options . . . . . . . . . . . . . . . . . . . . . . . . . . . . . . . . . . . . . . . . . . . . . . . . . . . . . .
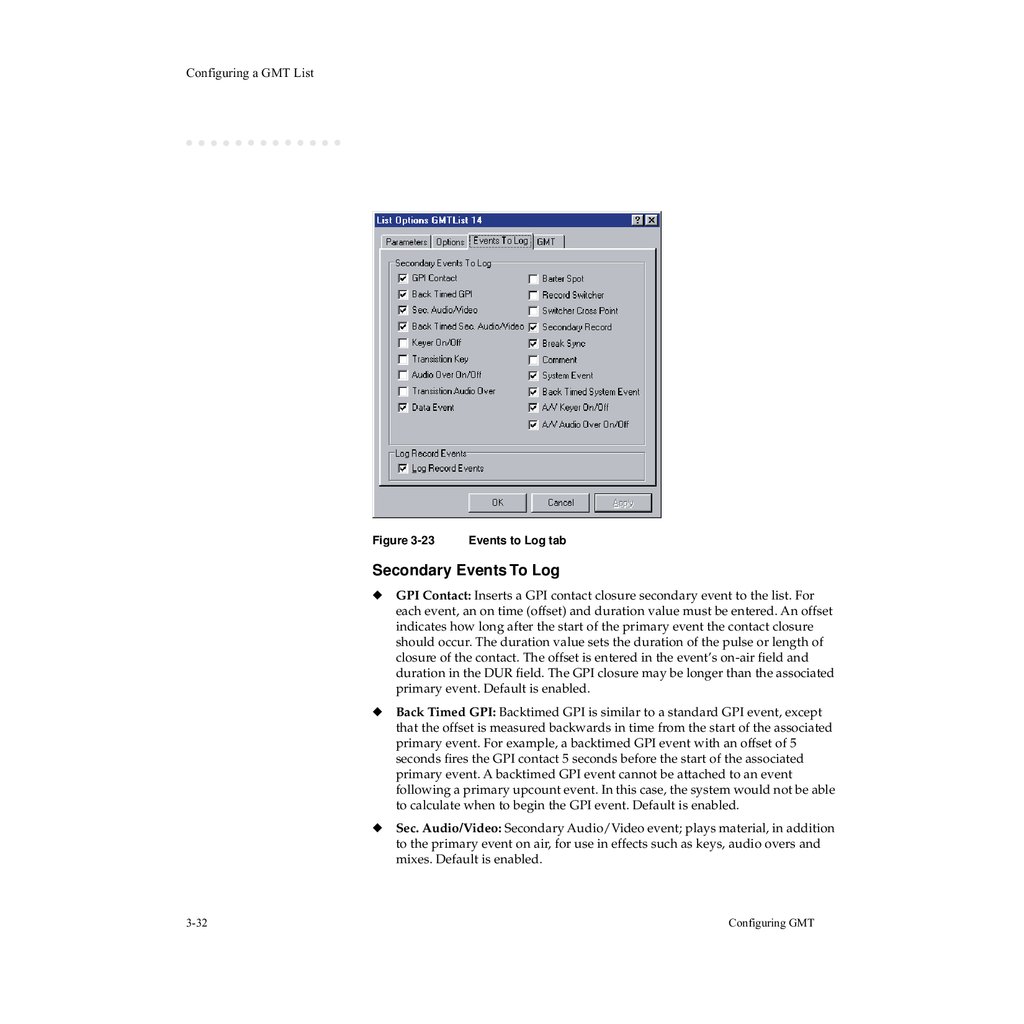
Events To Log . . . . . . . . . . . . . . . . . . . . . . . . . . . . . . . . . . . . . . . . . . . . . . . . .
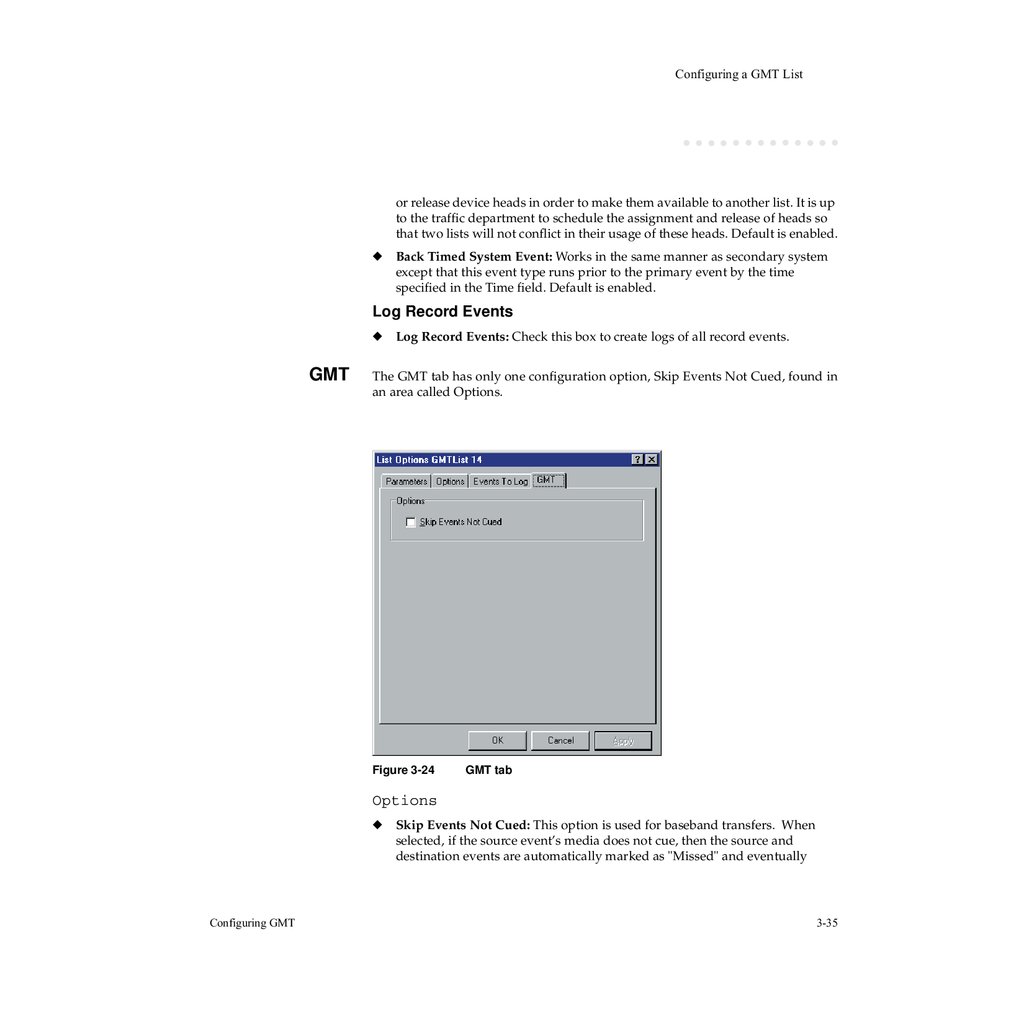
GMT. . . . . . . . . . . . . . . . . . . . . . . . . . . . . . . . . . . . . . . . . . . . . . . . . . . . . . . . .
GMT Purge and Archive
3-26
3-26
3-28
3-31
3-35
4-1
Purging with GMT. . . . . . . . . . . . . . . . . . . . . . . . . . . . . . . . . . . . . . . . . . . . . . . . . . . . 4-1
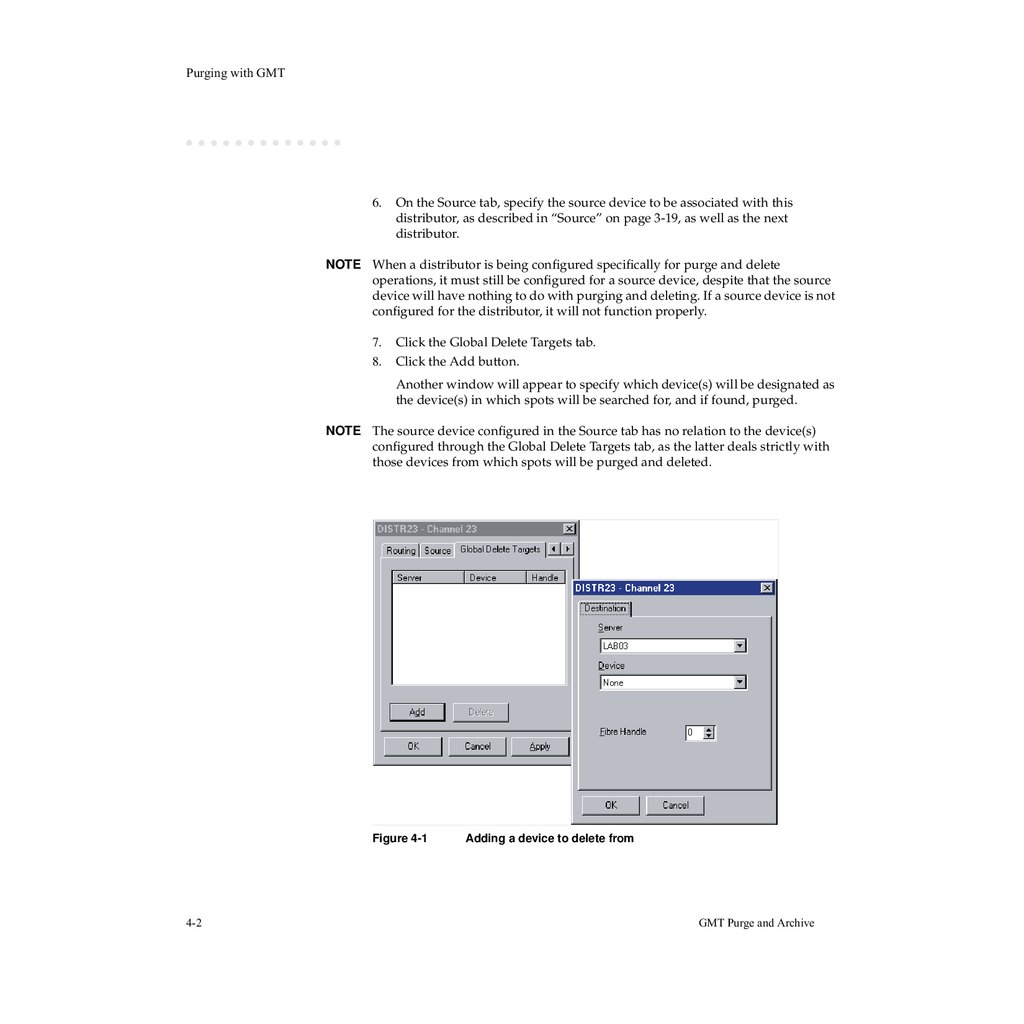
Configuring Distributors for Purge Operations . . . . . . . . . . . . . . . . . . . . . . . . . . . . 4-1
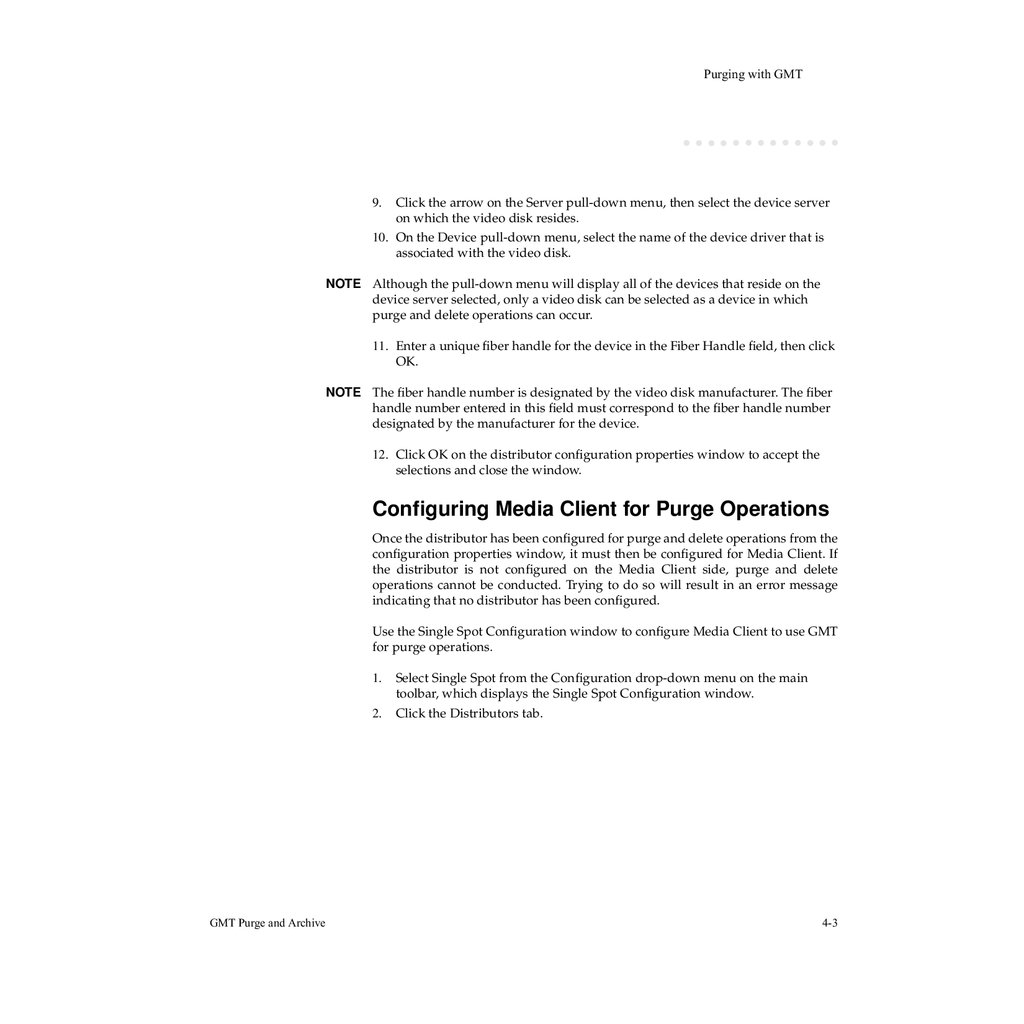
Configuring Media Client for Purge Operations . . . . . . . . . . . . . . . . . . . . . . . . . . . 4-3
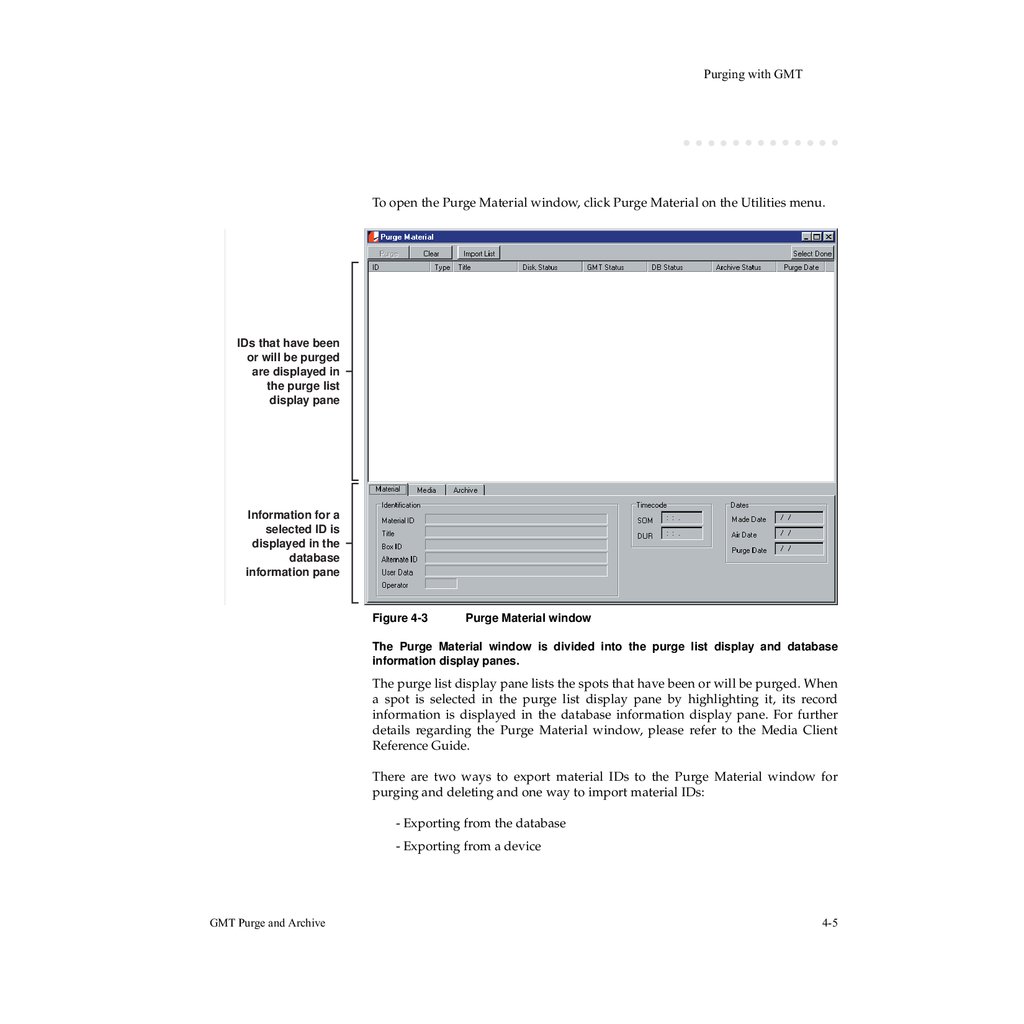
Exporting/Importing IDs to the Purge Material Window . . . . . . . . . . . . . . . . . . . . . 4-4
Exporting From the Database. . . . . . . . . . . . . . . . . . . . . . . . . . . . . . . . . . . . . . 4-6
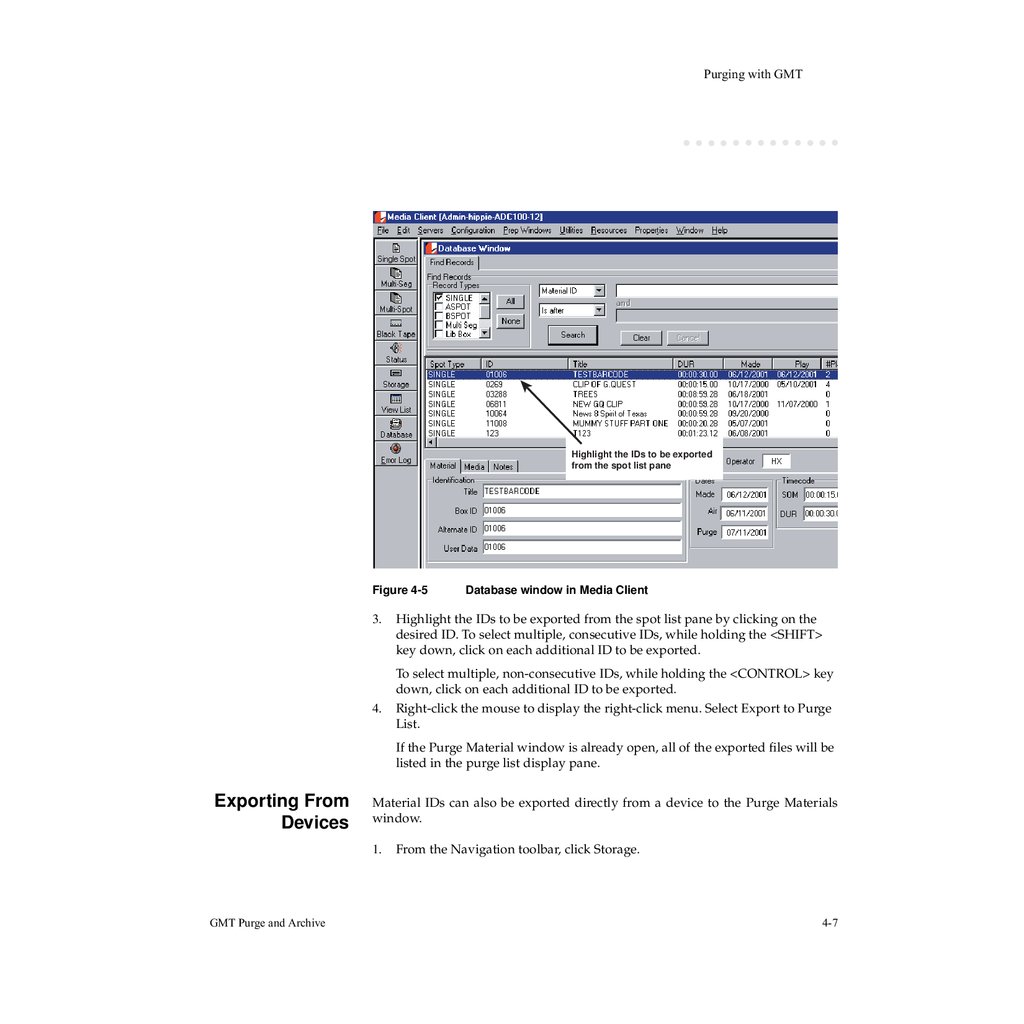
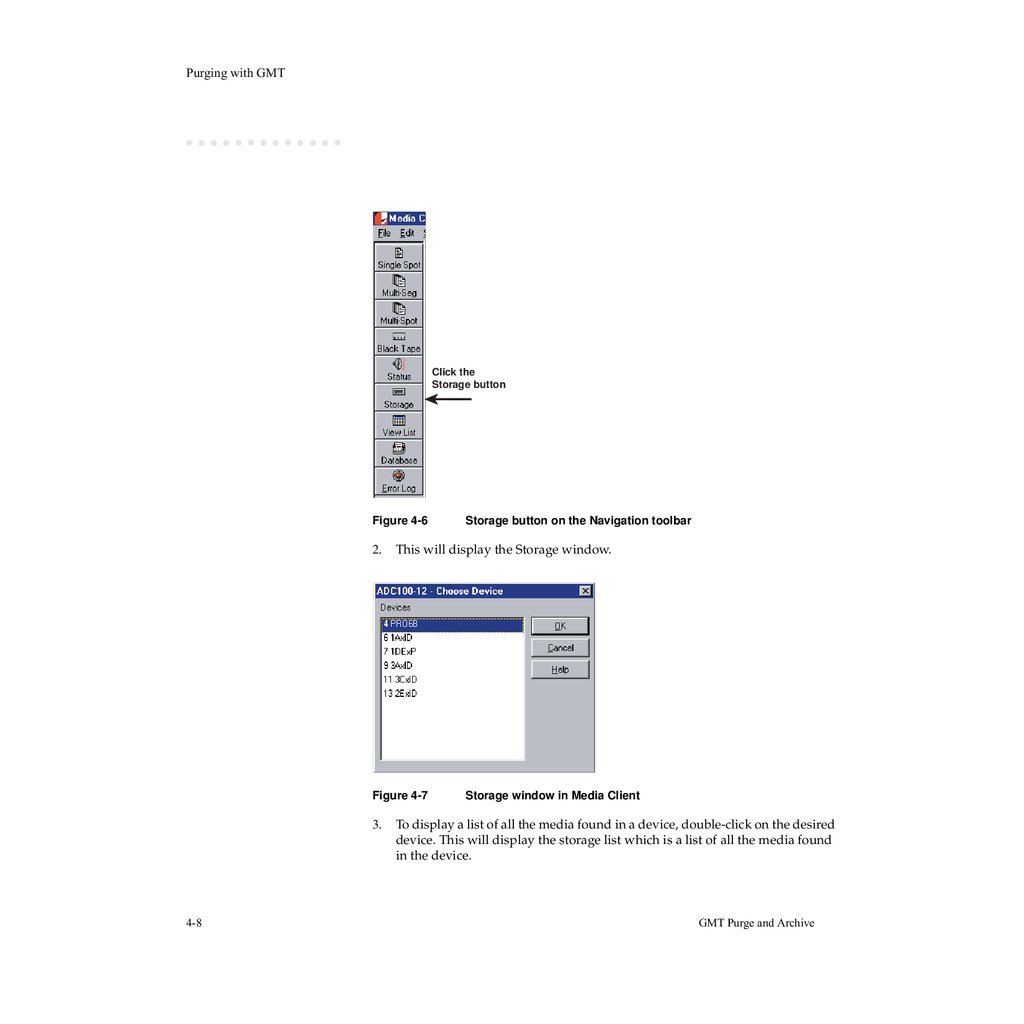
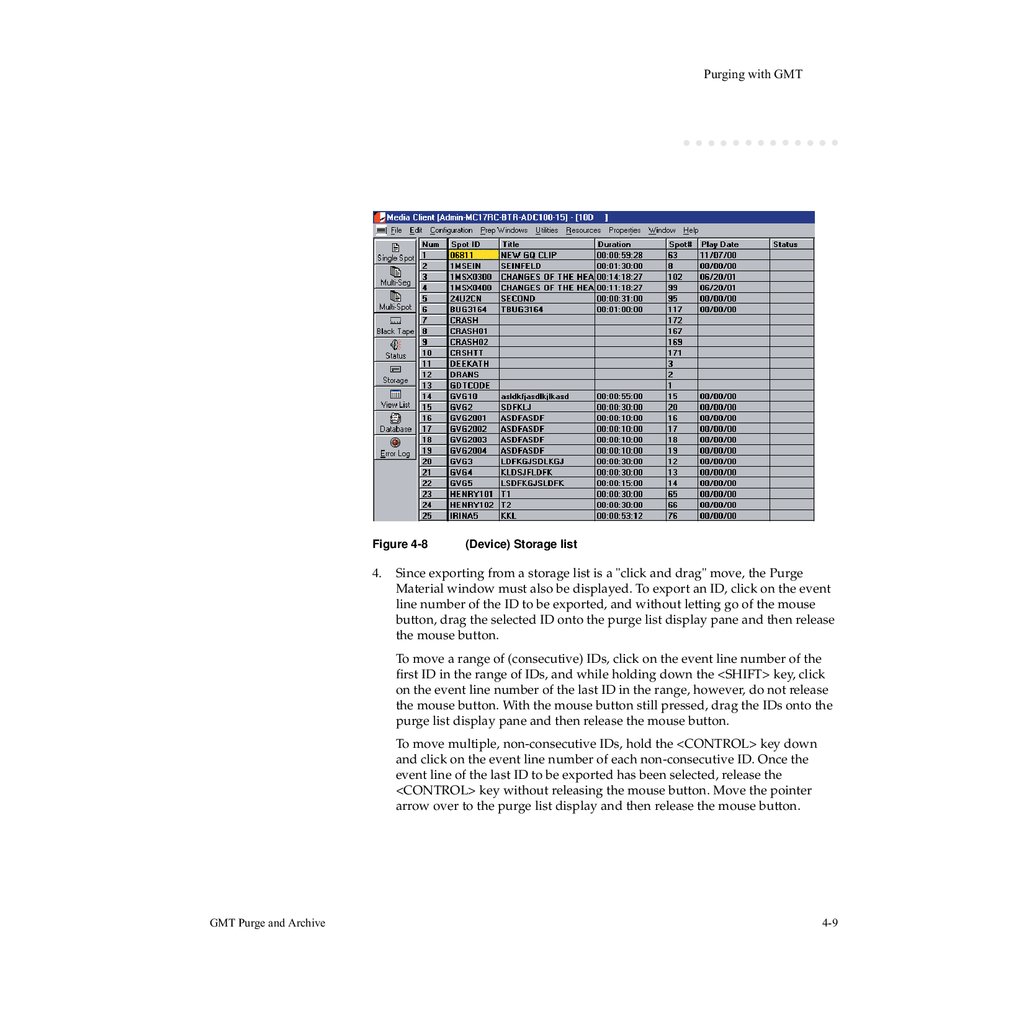
Exporting From Devices . . . . . . . . . . . . . . . . . . . . . . . . . . . . . . . . . . . . . . . . . . 4-7
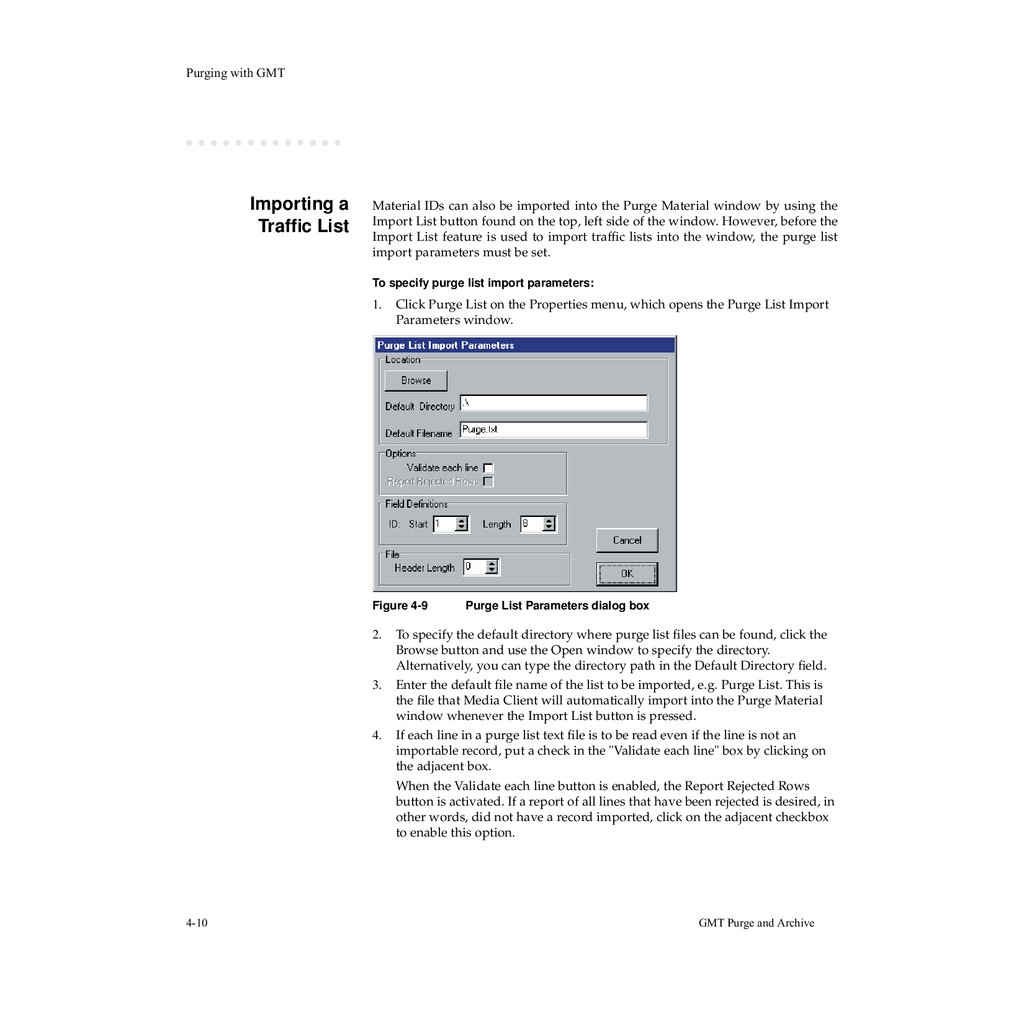
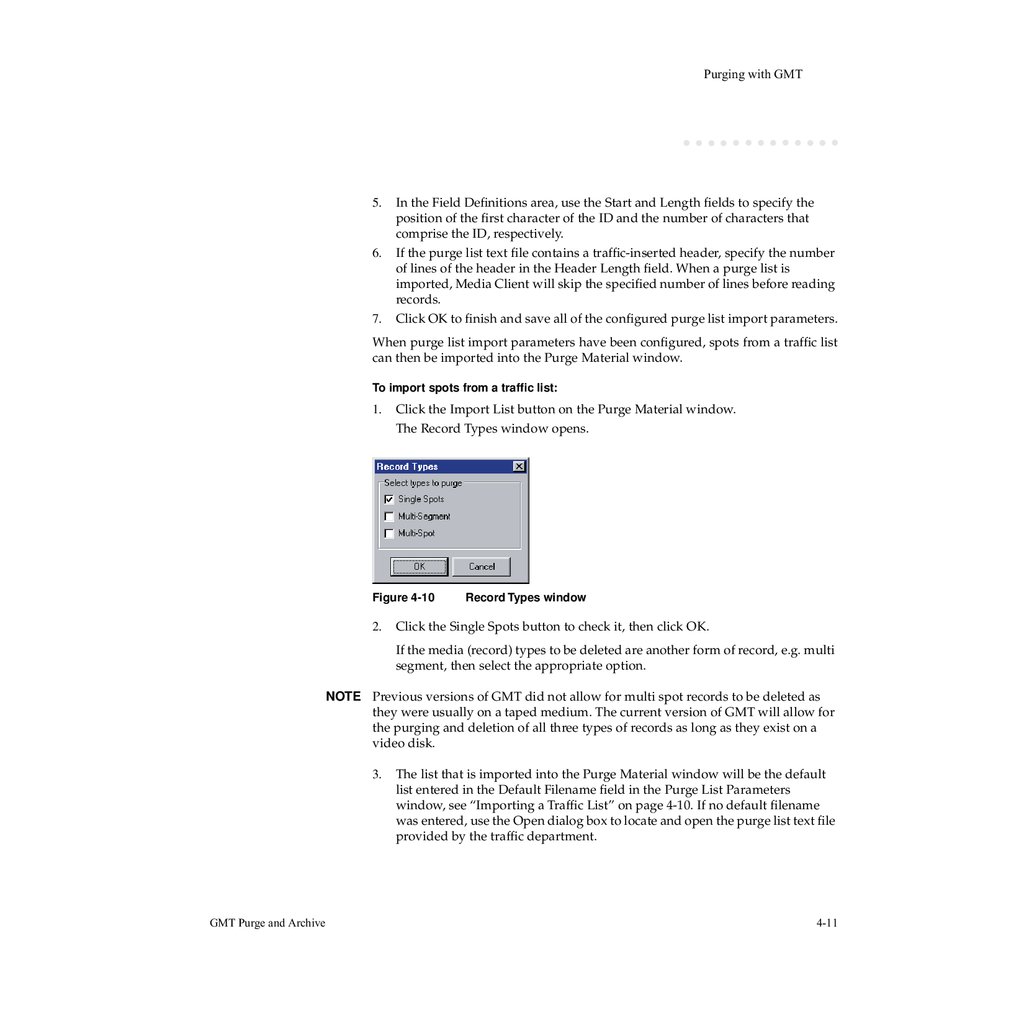
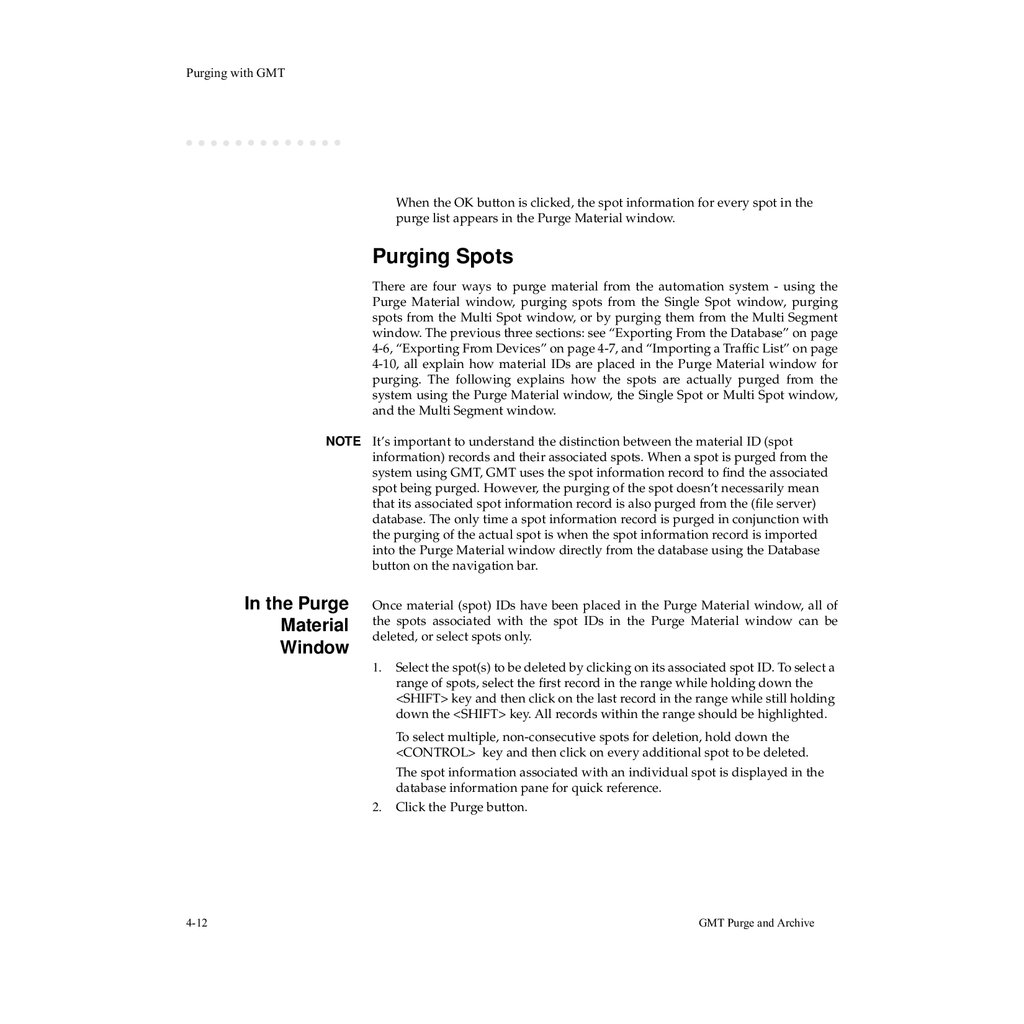
Importing a Traffic List . . . . . . . . . . . . . . . . . . . . . . . . . . . . . . . . . . . . . . . . . . . 4-10
Purging Spots . . . . . . . . . . . . . . . . . . . . . . . . . . . . . . . . . . . . . . . . . . . . . . . . . . . .
In the Purge Material Window . . . . . . . . . . . . . . . . . . . . . . . . . . . . . . . . . . . . .
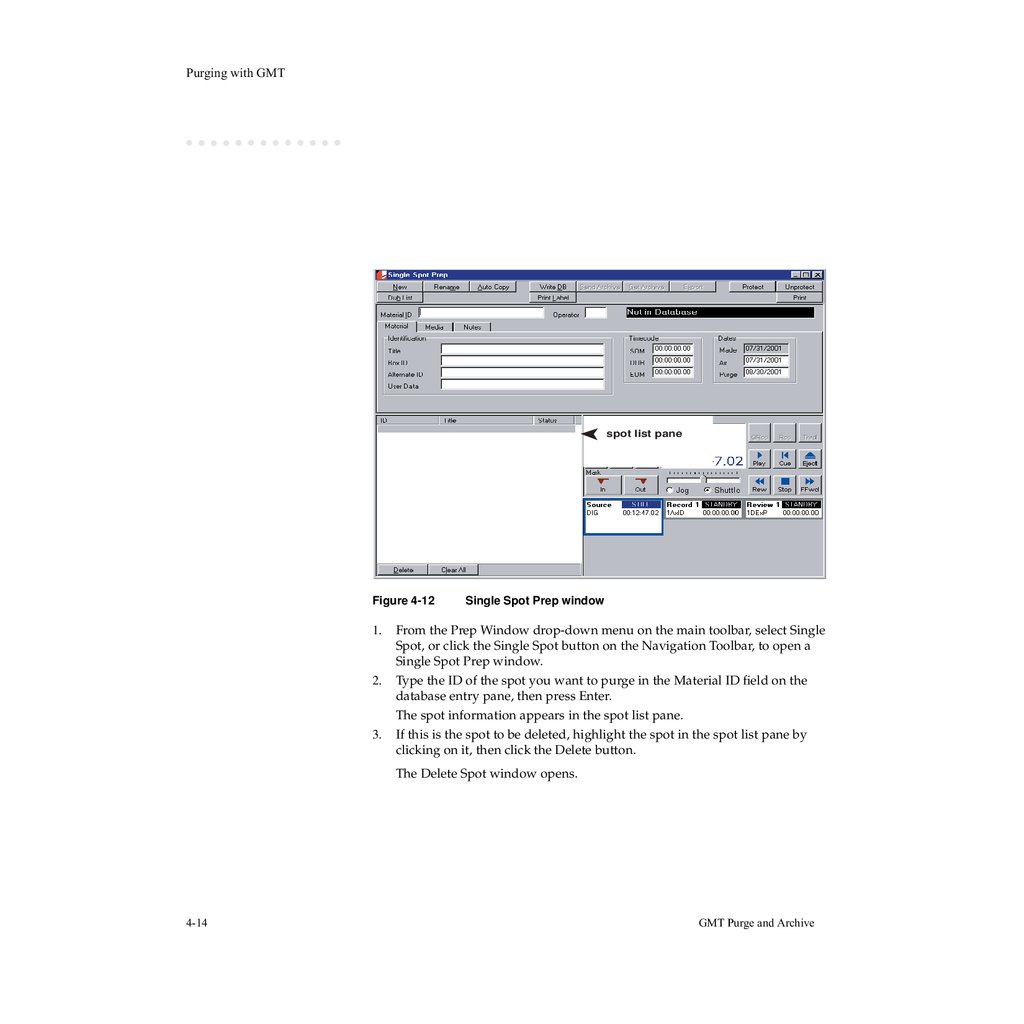
In a Single Spot Prep Window . . . . . . . . . . . . . . . . . . . . . . . . . . . . . . . . . . . . .
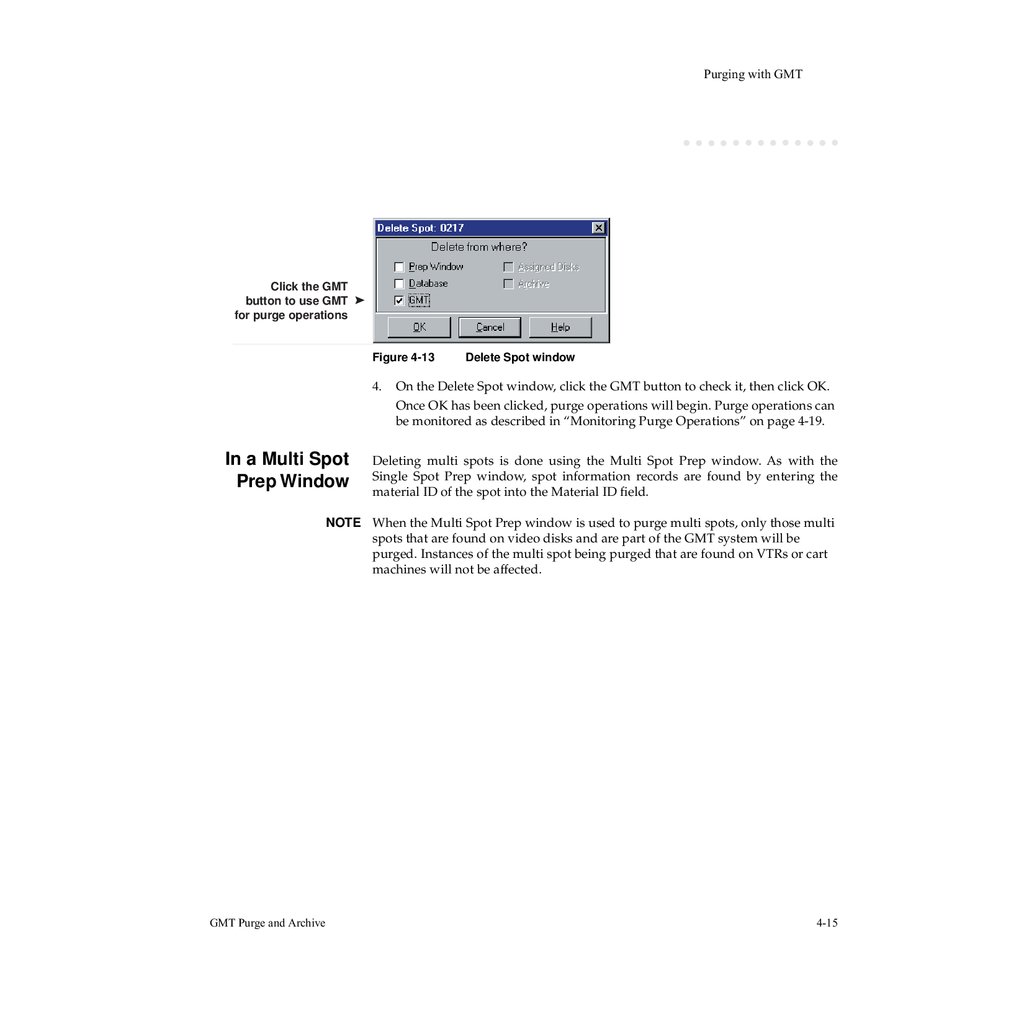
In a Multi Spot Prep Window . . . . . . . . . . . . . . . . . . . . . . . . . . . . . . . . . . . . . .
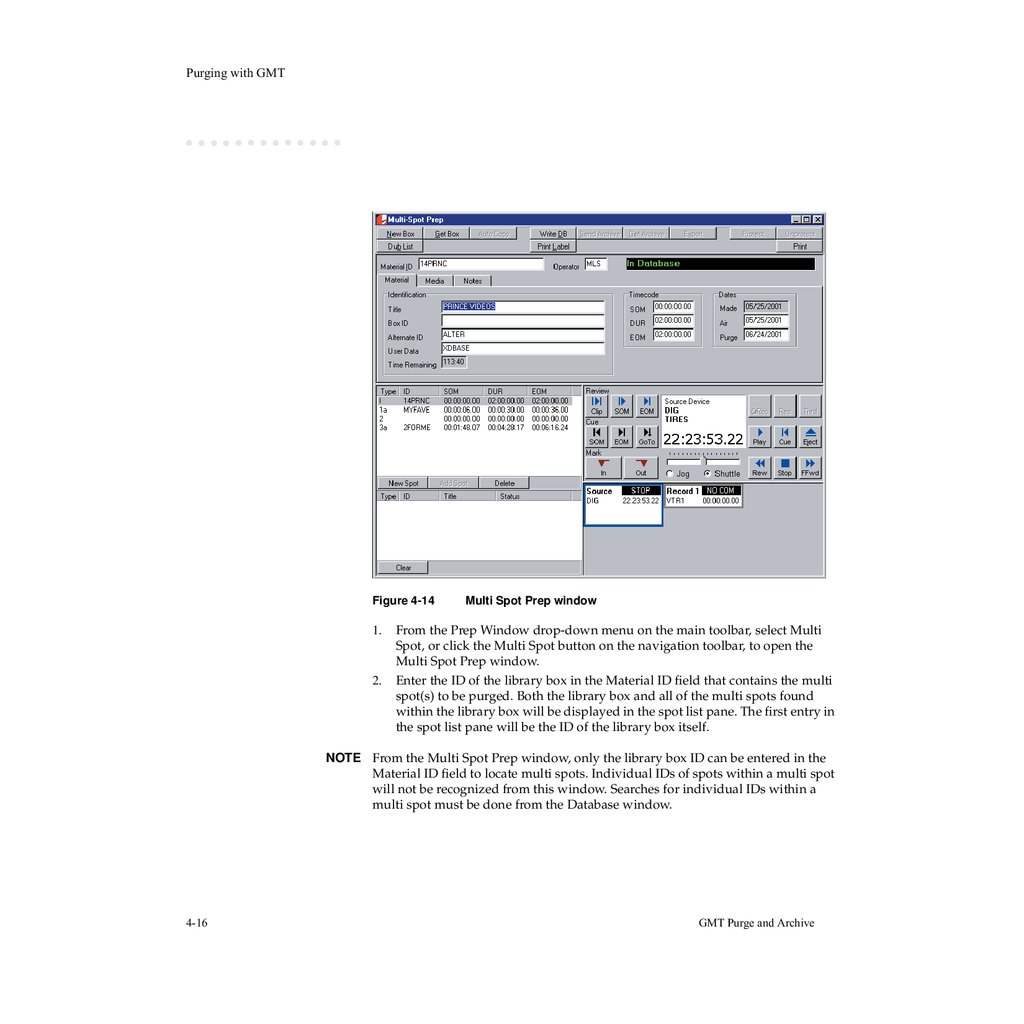
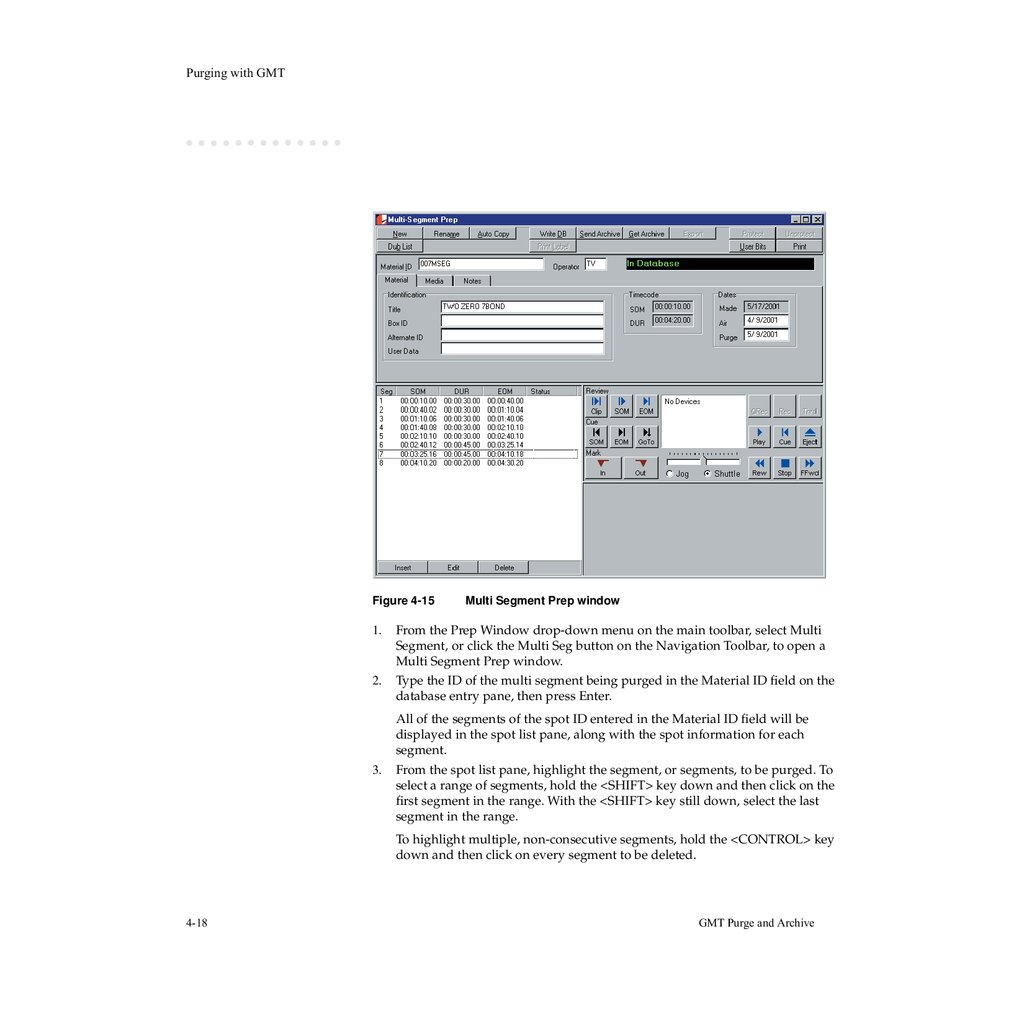
In a Multi Segment Prep Window . . . . . . . . . . . . . . . . . . . . . . . . . . . . . . . . . .
4-12
4-12
4-13
4-15
4-17
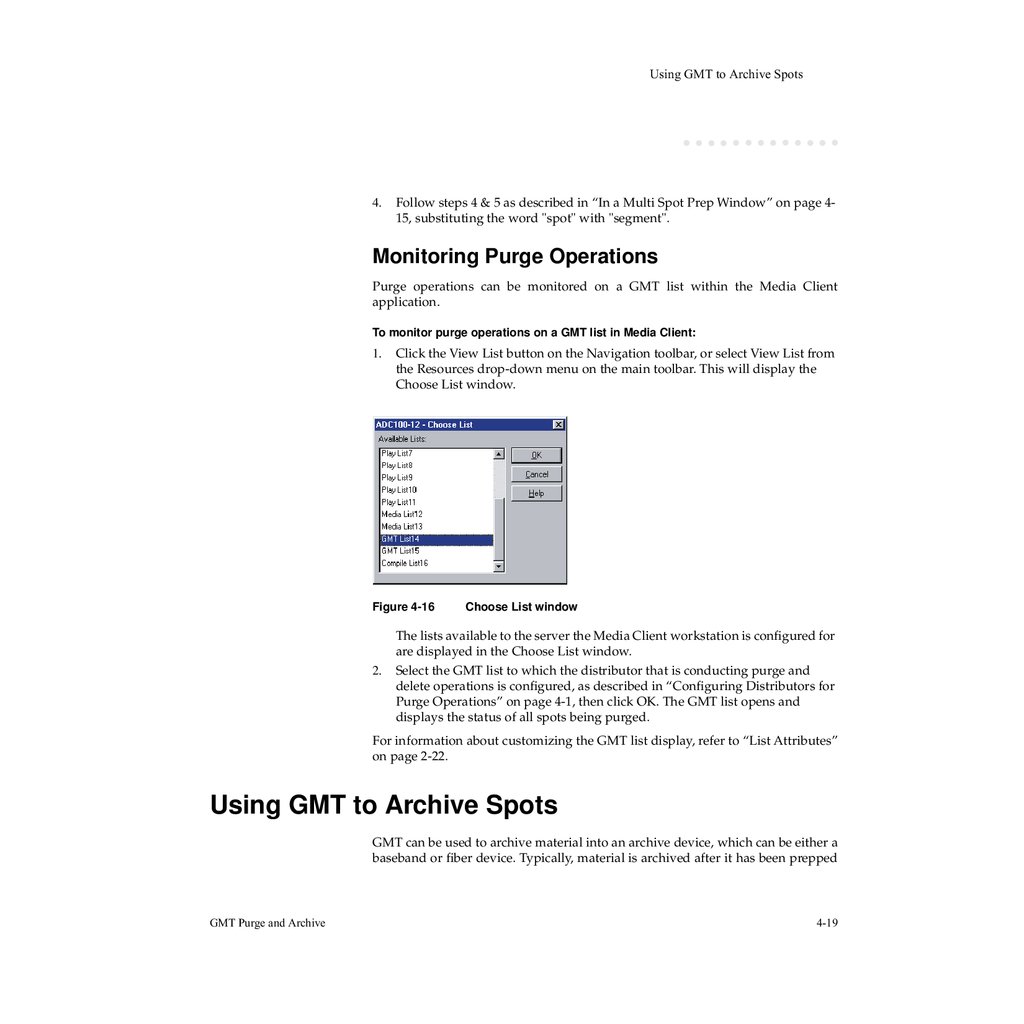
Monitoring Purge Operations . . . . . . . . . . . . . . . . . . . . . . . . . . . . . . . . . . . . . . . . 4-19
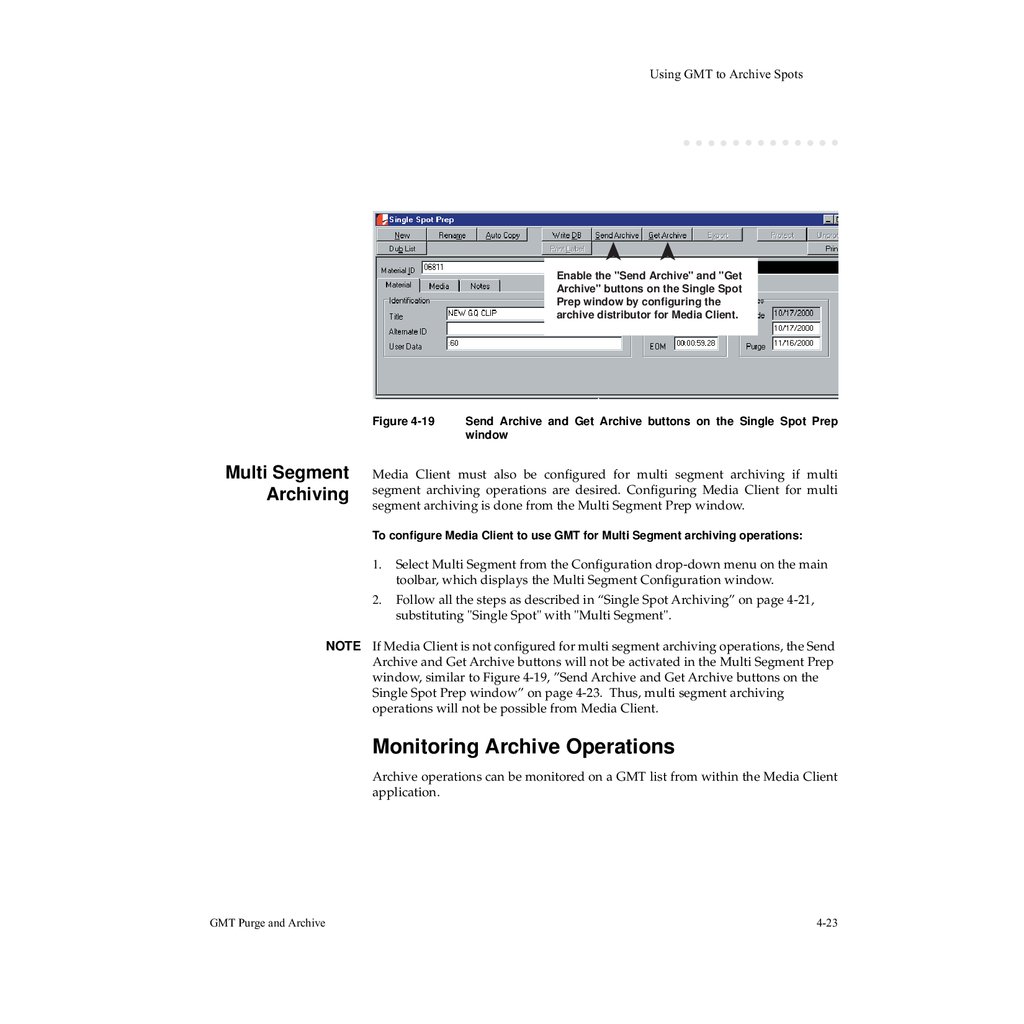
Using GMT to Archive Spots . . . . . . . . . . . . . . . . . . . . . . . . . . . . . . . . . . . . . . . . . . 4-19
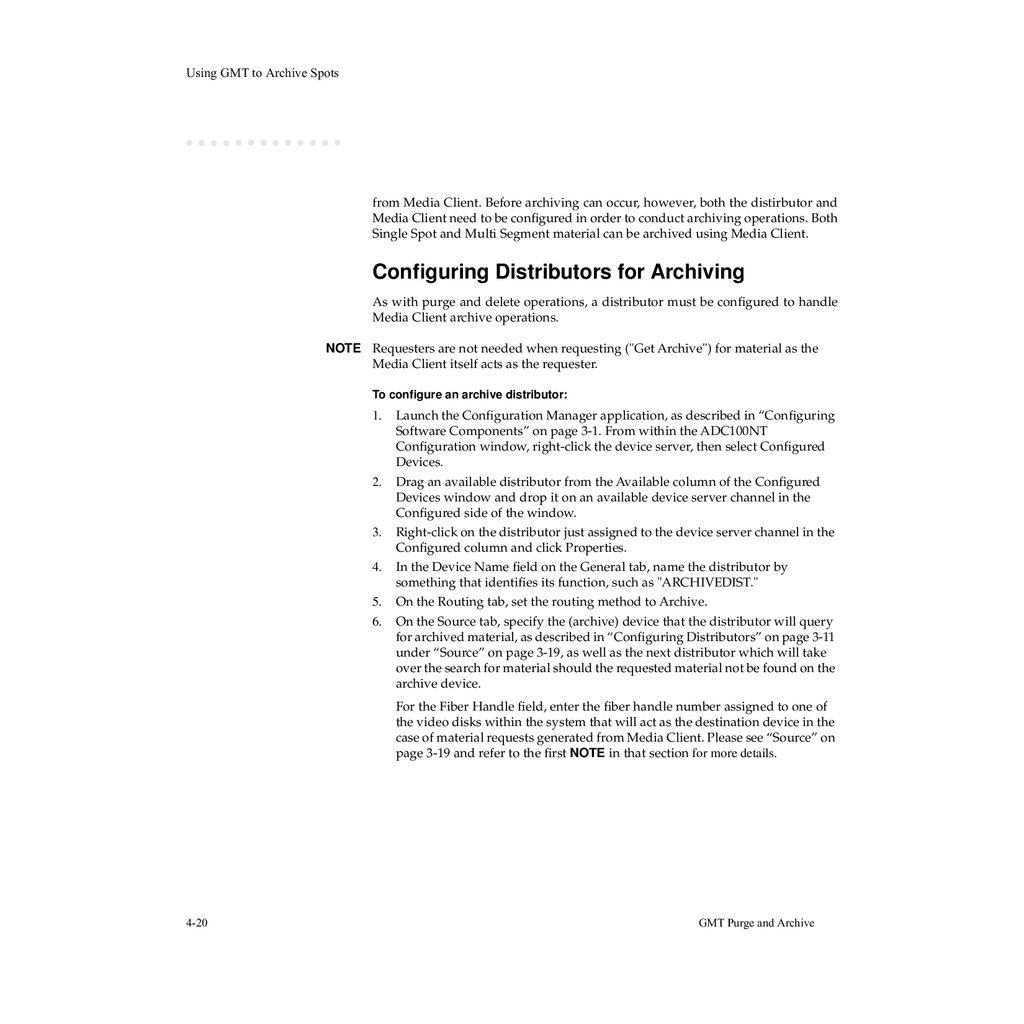
Configuring Distributors for Archiving . . . . . . . . . . . . . . . . . . . . . . . . . . . . . . . . . . 4-20
3
5.
Configuring Media Client for GMT Archiving. . . . . . . . . . . . . . . . . . . . . . . . . . . . . 4-21Single Spot Archiving . . . . . . . . . . . . . . . . . . . . . . . . . . . . . . . . . . . . . . . . . . . 4-21
Multi Segment Archiving . . . . . . . . . . . . . . . . . . . . . . . . . . . . . . . . . . . . . . . . . 4-23
Monitoring Archive Operations . . . . . . . . . . . . . . . . . . . . . . . . . . . . . . . . . . . . . . . 4-23
4
6.
1Preface
The Harris GMT Reference Guide describes the functionality and
configuration of GMT Version 9.6. It is intended for broadcast engineers,
Harris customer support personnel, or anyone who installs, configures,
maintains, troubleshoots, or administers the Harris automation network
in a broadcast facility. To understand the concepts and perform the tasks
described in this guide, you are required to be familiar with the Harris
automation system, particularly the ADC Device Server, Air Client and
Media Client.
About This Guide
If you are new to GMT, Chapter 2, Introduction, presents a carefully
paced introduction to the fundamentals of GMT configuration. Use the
information in this chapter to determine how GMT can be used to
manage missing media in your broadcast facility.
After designing an approach to apply GMT to your automation network,
Chapter 3, Configuring GMT, describes how to use the Configuration
Manager application to configure GMT software components and assign
them to the transmission and GMT lists to achieve GMT’s intended
functionality.
To learn how to enhance purge and archive operations in Media Client
using GMT, read Chapter 4, GMT Purge and Archive, which describes
how to configure purge and archive distributors and Media Client for use
with GMT.
Other Support Documents
In addition to this guide, you may require additional documentation that
did not come with GMT, as GMT extends the capabilities of the Harris
automation system and is not a stand alone system. Several components
of the Harris automation system are vital to the proper configuration and
operation of the GMT system.
◆
Preface
Air Client Reference Guide: Details the operation and functionality
of Air Client, which controls all of the lists available to the Harris
1-1
7.
Conventions In This Guideautomation system, which includes the GMT list. Some topics relevant to
GMT which are found in this manual are: configuring lists, how to import a
playlist into a transmission list window, what a missing media event is, and
adding or deleting events to/from the play/transmission/GMT list.
◆
Media Client Reference Guide: Details the operation and functionality of
Media Client, which is used for prepping, purging and archiving media.
Familiarity with Media Client is necessary if GMT is to be used for purge and
archive operations, as both Media Client and distributors need to be
configured specifically for this purpose. This guide also describes the features
and functions of the database and various prep windows, e.g. single spot and
multi spot, which are used to locate both material IDs and their associated
spots for purging and archiving.
◆
ADC Device Server User’s Guide: Describes the operation and functionality
of the ADC Device Server software, especially the Configuration Manager.
The Configuration Manager, also known as the Config. Tool, is necessary for
configuring and assigning the many software components used by the GMT
system, such as requesters and distributors, in addition to the many devices
that are a part of the Harris automation system. Additionally, this manual
details the configuration parameters for all forms of play lists.
Although this manual details those issues directly relevant to the operation and
functionality of the GMT system, it is recommended that you become familiar
with all of the above products and manuals before configuring the GMT system.
Conventions In This Guide
There are several conventions used in this guide to increase readability and draw
attention to important information.
Typographical Conventions
The following typographic conventions are used in this guide:
◆
The Courier font is applied to text that is entered by the user in a field on a
dialog box.
Example: D:\CD Title\Folder\Setup.exe is what is typed, whereas
any surrounding text not in Courier would not be typed.
◆
1-2
Brackets [ ] surround text that defines a parameter of a command line or
dynamic system data that is returned by the computer to the user via a
message window or dialog box.
Preface
8.
Your Feedback RequestedExample: An alert message window might state, "Driver [driver name] is
already in use," whereas "driver name" is the name of the driver, not the
actual text output to the screen.
Notational Conventions
The following notational conventions are used in this guide:
NOTE A note contains important information you need to be aware of for the successful
configuration and operation of GMT.
WARNING
A warning identifies actions or conditions which may cause undesirable
consequences.
Your Feedback Requested
The information contained in this guide has been thoroughly tested and verified.
However, should you discover errors or have suggestions for future publishings,
contact Harris at:
Harris Automation Solutions
ATTN: Technical Publications Department
1134 E. Arques Avenue
Sunnyvale, CA 94086
(650) 595-8200
(650) 595-8398 (FAX)
You can also send e-mail to hastechpubs@harris.com.
If you want to receive notification when the GMT documentation is updated or
changed, send e-mail to docupdate@louth.com.
Please specify the product you wish to receive documentation updates and
changes for in the Subject header of the e-mail.
NOTE Your e-mail address will be kept confidential and will not be shared with any
other company. Also, it will not be used for any other purpose than what is
specified in this guide.
Preface
1-3
9.
Your Feedback Requested1-4
Preface
10.
2Introduction
GMT, or Global Media Transfer, is Harris Automation’s system for
controlling media movement within a broadcast facility. GMT works in
conjunction with the On-Air automation system. A transmission list will
ask GMT to find media (A.K.A. material or spot) that cannot be found in
the devices assigned to it. GMT will find and move the media to a
destination device (videodisk server) assigned to the transmission list via
baseband, fiber, or archive transfer. The transmission list can then air this
media. Briefly, the main tasks of GMT are:
1. Find media/material needed by an on-air transmission list or play list.
2. Copy that media to a videodisk server serving that list.
3. Monitor the movement of material.
4. Log the movement of material.
5. Provide automatic media duplication on multiple videodisk servers for air
protection.
By accomplishing these tasks, GMT extends the level of automation
beyond the basic "to-air system". By moving the media handling to the
automation system, less manual operator intervention is required and
better use of expensive videodisk server space is obtained.
GMT is comprised of software objects called requesters, distributors, and
GMT lists. They are configured in the Harris ADC Device Server
Configuration Manager and work with other software components
(transmission lists and device drivers) to provide GMT’s functionality.
A requester is a software object that sends the ID of a missing event to
distributors. When the distributor receives the ID of a missing event, it
interfaces with the device drivers of available devices to determine which
device contains the requested media. If a device contains the requested
media, the distributor sends the ID to its associated GMT list. Typically,
IDs are placed on the GMT list in the order they are received and, similar
to a transmission list, the transfer of each event’s media is initiated
consecutively, from the first event received to the last. When an ID is
encountered in the GMT list, either the GMT list (baseband transfer) or
the associated distributor (fiber transfer) initiates the commands to
Introduction
2-1
11.
GMT Featurestransfer the media to the device on which it was originally requested, which is
commonly designated the "destination device".
GMT Features
Harris’ GMT offers a number of features that not only enables it to find and move
media within an automation system, but also provides for a number of other key
system functions:
2-2
◆
System scalability - GMT is a scalable system that can be configured with
multiple media sources and media destinations. As new video servers, cart
machines, etc. are added to the site, GMT can expand to include these devices
within its scope.
◆
Real-time (baseband/601 video) copies - GMT provides baseband, fiber, or
archive and serial digital real-time transfers from multiple sources to multiple
destinations. GMT, for example, can be configured to do on-demand transfers
from a cart machine to air and protect video servers. These transfers, initiated
by missing material on a play list, will automatically record the material into
all destination video servers simultaneously. This is analogous to baseband
caching.
◆
Operation, error handling, and operator feedback - GMT operates in a
closed loop fashion within itself, in that each GMT operation or request is
followed by a response within the system. For media location and transfer,
the result of the operations are reflected on both the play list requesting the
work and on the GMT list controlling the work.
◆
As run logging of transfer events - GMT is list driven and all operations are
run as events on a GMT list. Separate As-run logging of the GMT list(s) can be
done to track the operation of GMT.
◆
Support for failsafe and redundant operation - GMT can be configured to
support video servers set up in an air/protect configuration.
◆
GMT System Components - GMT currently is based on three intelligent
software objects - Requesters, Distributors, and GMT Lists.
Introduction
12.
GMT System ComponentsGMT System Components
Requester
A requester is a software object that is assigned to a play/transmission list and
collects and handles requests for material required for playback and/or air-out.
These material requirements are "packaged" by the requester and forwarded to a
pre-configured distributor object(s).
The requester represents a device's requirement for material based on either a
push model (pre-loading of material) or pull model (static or running play list/
transmission list). The requester object is assigned to each play list. Like a device,
the requester has a number of parameters that may be configured through its
configuration properties window. The requester defines the destination.
- Push List: The push list model will have requesters, but no devices, assigned
to the play (push) list. The requesters will request for material from its
associated distributors, which in turn will query its source devices. If the
material exists on (one of) the source device, the distributor will send the
material to the destination device associated with the requester and note the
transfer of the material on the push list.
NOTE The push list model can only be used in a system utilizing fiber transfer.
Whenever a fiber routing mode is used, it’s the distributor that actually initializes
the transfer of material.
- Pull List: The pull list model will pull requested material from a source
device and place them into the destination device associated with the
requester.
Many systems will require only a single requester per play list to handle material
requests. However, additional requesters may be added to isolate which type of
material (program, commercials, etc.) will be requested from a particular set of
distributors. Air protect would require a second requester for each protecting
device, resolving fail-over and fail-back situations. Additional requesters are only
required if specific optimization of the destination or record device is required
and possible. This is used to further define which material may be stored in a
video server(s) to maximize storage space.
A multi-requester is identical to a requester but allows the specification of more
than one destination for material. Multi-requesters are used to push material to
multiple destinations and are used by some installations to duplicate material on
Introduction
2-3
13.
GMT System Componentsmultiple video servers, which feed different air channels. Further details on multirequesters are found later in this chapter.
Distributor
A distributor is associated with a specific source device object, the device from
which the media event is received, and is assigned to a GMT List in a system
using baseband routing. Systems using fiber routing are not restricted by a
"source/distibutor/GMT list" configuration. The source device for a distributor
may be a cart machine, a VTR, or a play port of a video disk server. A distributor
receives requests from one or more requesters, or from another distributor in the
search path.
Fiber vs.
Baseband
Routing
The routing method a system uses determines how the distributor will handle a
request. If a fiber distributor is capable of handling a request, it will build a
transfer command for the requested media and put it on the GMT list, thus
absolving itself of the request for the moment. When the request is ready for
processing, the distributor will load the event back from the GMT list and send
the transfer command to either the source or destination device (configurable) to
execute the fiber or archive transfer of the event’s media. The status of the transfer
will be reflected in the event line associated with the media being transferred. If
the distributor is not capable of handling the request, it will either pass the
request to another distributor (if configured to do so), or return it back to the
requester with error information.
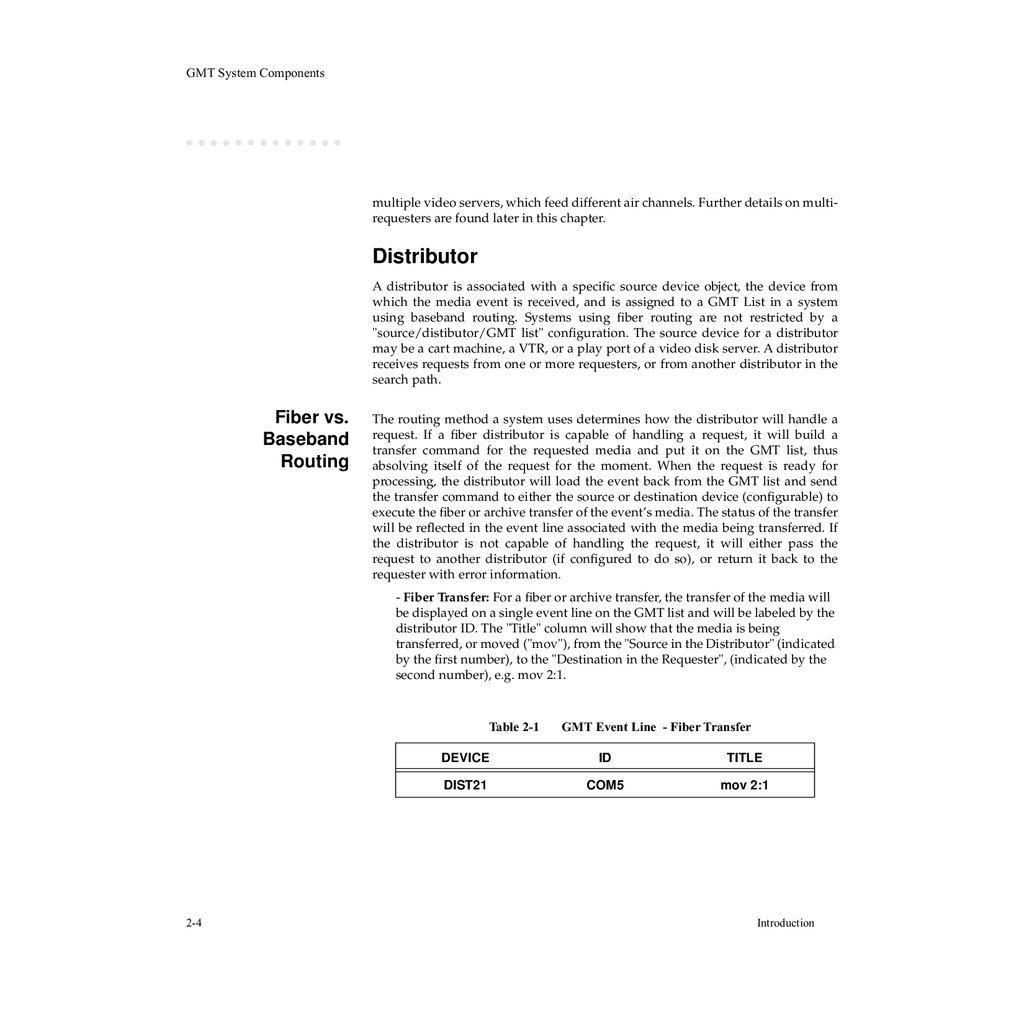
- Fiber Transfer: For a fiber or archive transfer, the transfer of the media will
be displayed on a single event line on the GMT list and will be labeled by the
distributor ID. The "Title" column will show that the media is being
transferred, or moved ("mov"), from the "Source in the Distributor" (indicated
by the first number), to the "Destination in the Requester", (indicated by the
second number), e.g. mov 2:1.
Table 2-1
2-4
GMT Event Line - Fiber Transfer
DEVICE
ID
TITLE
DIST21
COM5
mov 2:1
Introduction
14.
GMT System ComponentsIn a baseband transfer, it’s the GMT list that sends out the command to initiate a
transfer. The distributor will notify the GMT list if a media is available in the
source device for transfer. If it is, when the GMT list is ready to transfer the
material, it will send a command to the source device to play out the material, and
at the same time, it will send out a command to the destination device to record
the requested material. The status of the transfer will be reflected on two event
lines in the GMT list: one for play out and one for the record.
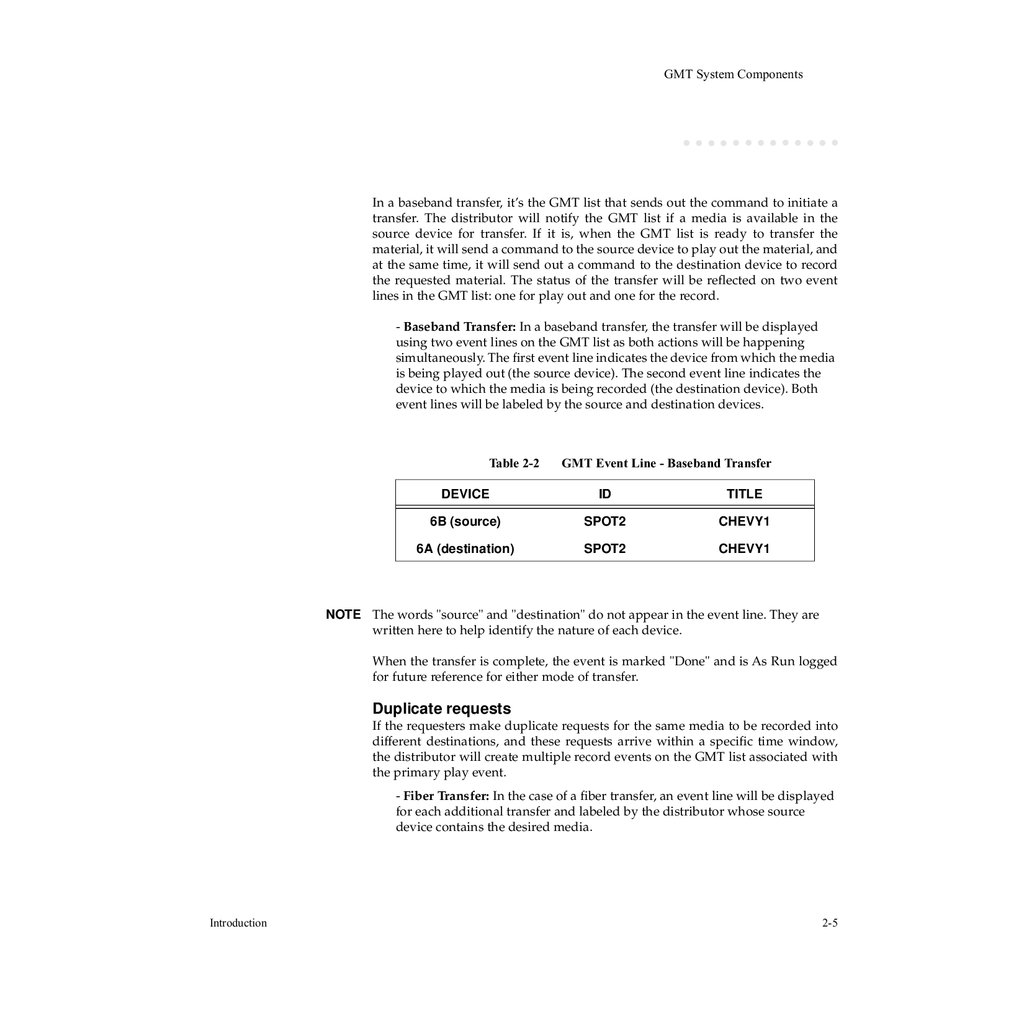
- Baseband Transfer: In a baseband transfer, the transfer will be displayed
using two event lines on the GMT list as both actions will be happening
simultaneously. The first event line indicates the device from which the media
is being played out (the source device). The second event line indicates the
device to which the media is being recorded (the destination device). Both
event lines will be labeled by the source and destination devices.
Table 2-2
GMT Event Line - Baseband Transfer
DEVICE
ID
TITLE
6B (source)
SPOT2
CHEVY1
6A (destination)
SPOT2
CHEVY1
NOTE The words "source" and "destination" do not appear in the event line. They are
written here to help identify the nature of each device.
When the transfer is complete, the event is marked "Done" and is As Run logged
for future reference for either mode of transfer.
Duplicate requests
If the requesters make duplicate requests for the same media to be recorded into
different destinations, and these requests arrive within a specific time window,
the distributor will create multiple record events on the GMT list associated with
the primary play event.
- Fiber Transfer: In the case of a fiber transfer, an event line will be displayed
for each additional transfer and labeled by the distributor whose source
device contains the desired media.
Introduction
2-5
15.
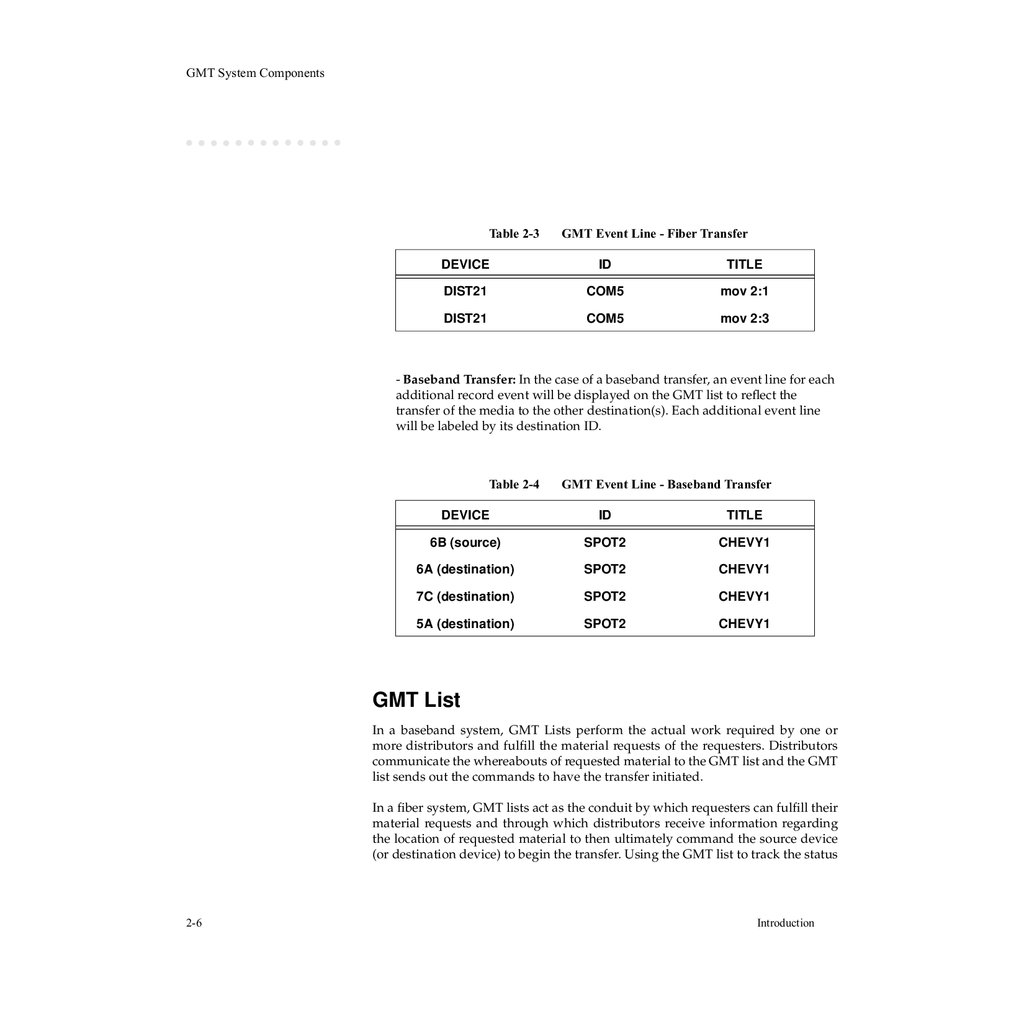
GMT System ComponentsTable 2-3
GMT Event Line - Fiber Transfer
DEVICE
ID
TITLE
DIST21
COM5
mov 2:1
DIST21
COM5
mov 2:3
- Baseband Transfer: In the case of a baseband transfer, an event line for each
additional record event will be displayed on the GMT list to reflect the
transfer of the media to the other destination(s). Each additional event line
will be labeled by its destination ID.
Table 2-4
GMT Event Line - Baseband Transfer
DEVICE
ID
TITLE
6B (source)
SPOT2
CHEVY1
6A (destination)
SPOT2
CHEVY1
7C (destination)
SPOT2
CHEVY1
5A (destination)
SPOT2
CHEVY1
GMT List
In a baseband system, GMT Lists perform the actual work required by one or
more distributors and fulfill the material requests of the requesters. Distributors
communicate the whereabouts of requested material to the GMT list and the GMT
list sends out the commands to have the transfer initiated.
In a fiber system, GMT lists act as the conduit by which requesters can fulfill their
material requests and through which distributors receive information regarding
the location of requested material to then ultimately command the source device
(or destination device) to begin the transfer. Using the GMT list to track the status
2-6
Introduction
16.
Fundamental GMT Configurationsof the search for the requested material is especially useful in systems using a next
ring configuration or an intermediate device to connect baseband (only) devices
with a fiber network.
The list provides a straightforward method by which to construct the GMT
system and inherently provides accurate As Run logging and error reporting
mechanisms to track processes. Many systems may require only a single GMT list,
regardless of scale. However, there may be logical or physical separations within
a global system that benefit from additional GMT Lists. News, programming,
traffic, and operations are examples of different departments that have unique or
conflicting requirements for material movement or access. The GMT list, when
configured, may contain fiber and baseband devices as well as its own
distributors and archive devices.
ID List
Placement
Criteria
When a distributor sends an ID to a GMT list, it is placed on the GMT list
according to specific criteria. Typically, IDs are placed on a GMT list in the order
received, except in the following situations:
◆
Weighting is applied by the requester that received the material request. For
information on weighting, refer to “General” on page 3-3 under the
"Configuring Requesters" section.
◆
An event on the GMT list is reordered.
An event can be reordered on the list by clicking-and-dragging on its event
number and placing it over the new event number to which it will be
assigned. Once over the new event number, release the mouse button to
reorder the event. The event the reordered event is replacing, and all
following events, will be reordered sequentially starting from the event
number of the reordered event.
◆
An event is deleted from the GMT list.
Events will be reordered when an event, or events, are deleted from the GMT
list. To delete an event from the list, click on the event number of the event
being deleted. When the event line is highlighted, press the <DELETE> key to
delete the event. When an event is deleted, its Status for the event will be
shown as "Failed" on the GMT list.
Fundamental GMT Configurations
The following sections describe where GMT software components are assigned
and how GMT and other Harris software components interoperate in five
Introduction
2-7
17.
Fundamental GMT Configurationsfundamental configurations: basic, air/protect, multirequester configuration,
multiple distributors, and multiple GMT lists.
NOTE The configurations in this chapter are for reference only. They are not intended to
recommend any particular installation method. GMT is highly-scalable and can
be installed in numerous ways to fit the requirements of your broadcast facility.
Each configuration is accompanied by detailed descriptions and illustrations of
how it locates missing media and moves it to the appropriate device. The
concepts introduced in each configuration should be helpful in assessing how
GMT can be installed in a facility.
Visualizing and comprehending the way GMT works can be difficult. Throughout
much of this chapter, graphical representations of requesters, distributors, GMT
lists, transmission lists, and device drivers will be used to show the flow of
requests, commands, and/or queries to describe how the system works, all in an
attempt to find media within the automation system. GMT, in many ways, is
basically a series of requests, commands, and queries which are used to track
down the location of media, and if found, to have the automation system move
the spot to where it needs to be. The communication that occurs between the
various software objects is a separate activity from the actual tranferral of the
media. The transfer of media between devices is the result of the communication
that takes place between the software objects.
The following figure depicts the basic configuration of a transmission list and a
GMT list found within the List Assignments window in the Configuration
Manager, A.K.A. Config. Tool. As with most all devices within the automation
system, the configuration of all the software objects is done using the Config. Tool.
2-8
Introduction
18.
Fundamental GMT ConfigurationsTransmission List
GMT List
Figure 2-1
The basic components of a GMT (baseband) configuration as
shown in the Configuration Manager
The following table defines the symbol for each software object with a short,
accompanying description.
COMPONENT
ICON
DESCRIPTION
The "List" icon is used for both the transmission list and the GMT list, or any
form of list for that matter. Although a title and border are used to separate
components assigned to each list, an icon is used to show the list’s role in
GMT operations.
The transmission list is used to describe a play list that is in a transmission
list window in Air Client. This may appear to be confusing because
transmission lists are labeled "Play Lists" in the Configuration Manager.
Introduction
2-9
19.
Fundamental GMT ConfigurationsCOMPONENT
ICON
DESCRIPTION
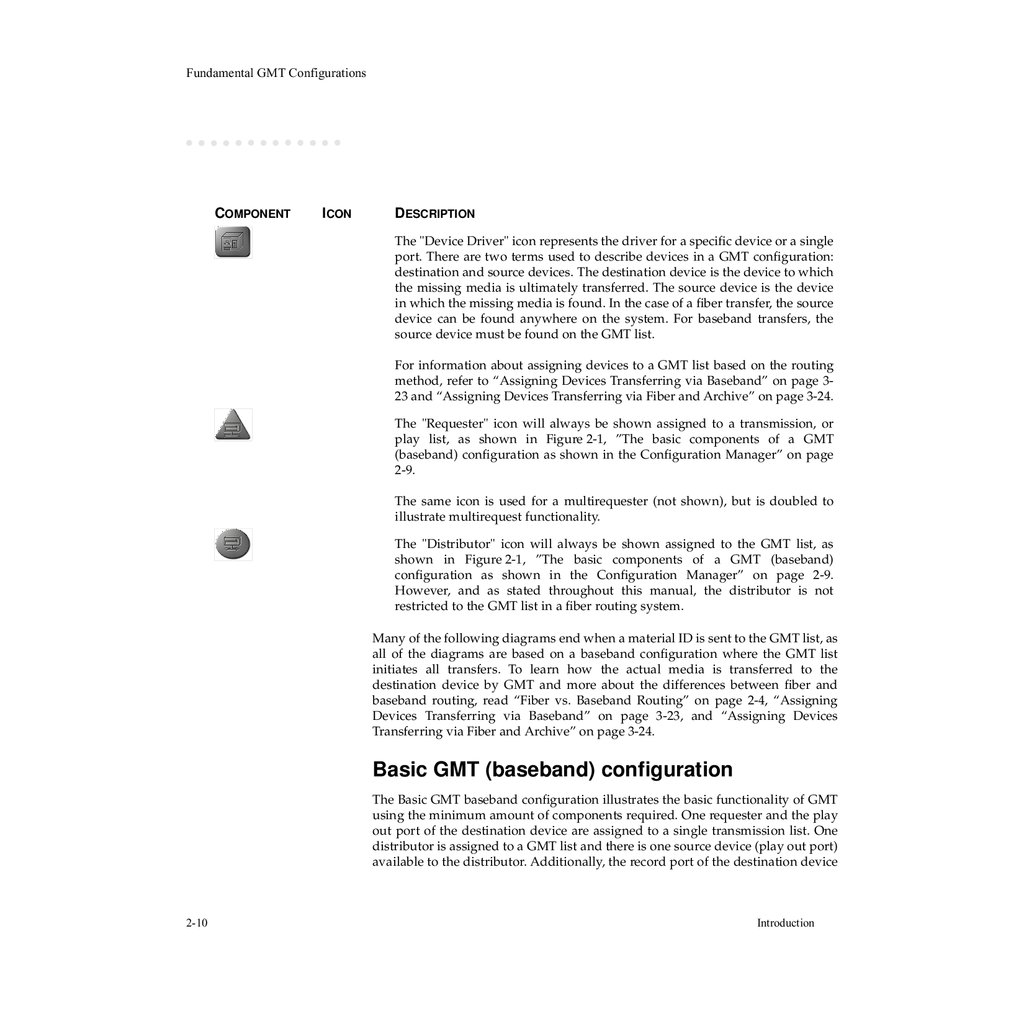
The "Device Driver" icon represents the driver for a specific device or a single
port. There are two terms used to describe devices in a GMT configuration:
destination and source devices. The destination device is the device to which
the missing media is ultimately transferred. The source device is the device
in which the missing media is found. In the case of a fiber transfer, the source
device can be found anywhere on the system. For baseband transfers, the
source device must be found on the GMT list.
For information about assigning devices to a GMT list based on the routing
method, refer to “Assigning Devices Transferring via Baseband” on page 323 and “Assigning Devices Transferring via Fiber and Archive” on page 3-24.
The "Requester" icon will always be shown assigned to a transmission, or
play list, as shown in Figure 2-1, ”The basic components of a GMT
(baseband) configuration as shown in the Configuration Manager” on page
2-9.
The same icon is used for a multirequester (not shown), but is doubled to
illustrate multirequest functionality.
The "Distributor" icon will always be shown assigned to the GMT list, as
shown in Figure 2-1, ”The basic components of a GMT (baseband)
configuration as shown in the Configuration Manager” on page 2-9.
However, and as stated throughout this manual, the distributor is not
restricted to the GMT list in a fiber routing system.
Many of the following diagrams end when a material ID is sent to the GMT list, as
all of the diagrams are based on a baseband configuration where the GMT list
initiates all transfers. To learn how the actual media is transferred to the
destination device by GMT and more about the differences between fiber and
baseband routing, read “Fiber vs. Baseband Routing” on page 2-4, “Assigning
Devices Transferring via Baseband” on page 3-23, and “Assigning Devices
Transferring via Fiber and Archive” on page 3-24.
Basic GMT (baseband) configuration
The Basic GMT baseband configuration illustrates the basic functionality of GMT
using the minimum amount of components required. One requester and the play
out port of the destination device are assigned to a single transmission list. One
distributor is assigned to a GMT list and there is one source device (play out port)
available to the distributor. Additionally, the record port of the destination device
2-10
Introduction
20.
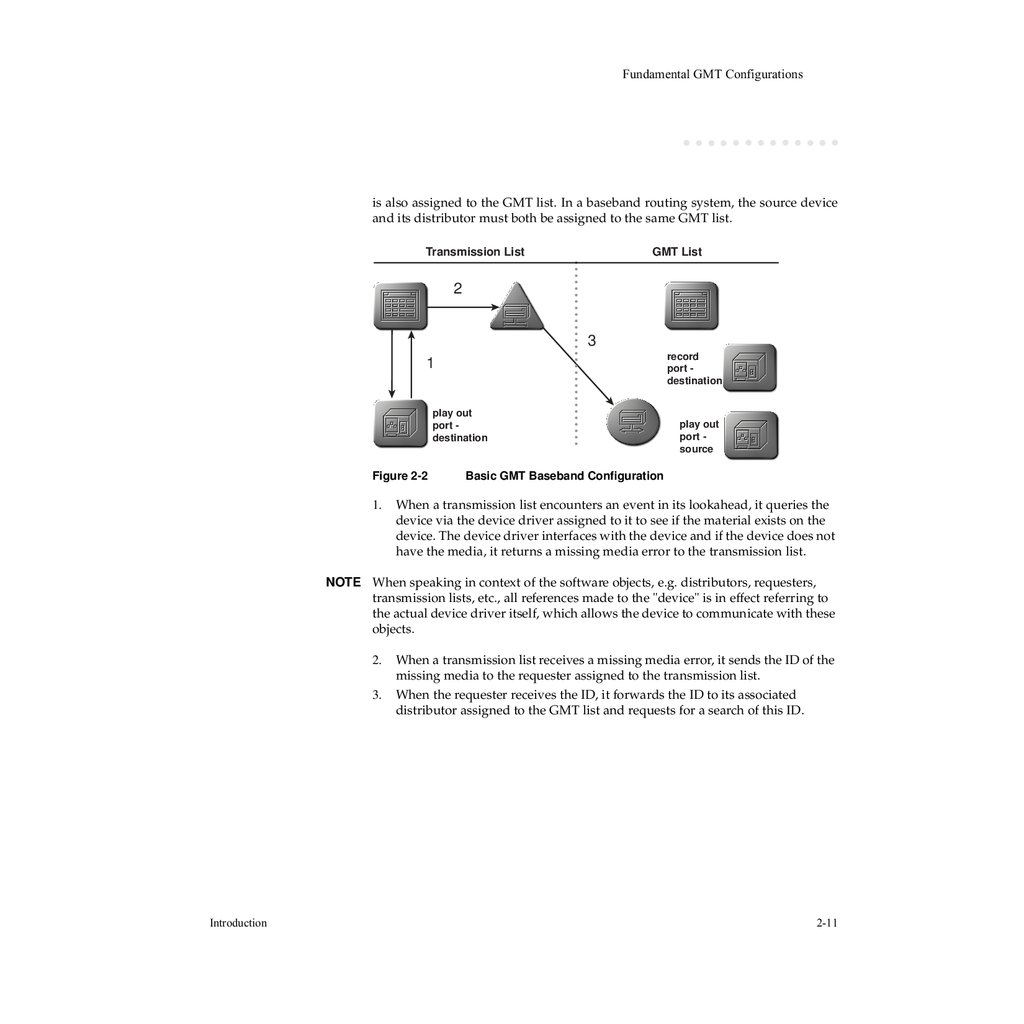
Fundamental GMT Configurationsis also assigned to the GMT list. In a baseband routing system, the source device
and its distributor must both be assigned to the same GMT list.
Transmission List
GMT List
2
3
record
port destination
1
play out
port destination
Figure 2-2
1.
play out
port source
Basic GMT Baseband Configuration
When a transmission list encounters an event in its lookahead, it queries the
device via the device driver assigned to it to see if the material exists on the
device. The device driver interfaces with the device and if the device does not
have the media, it returns a missing media error to the transmission list.
NOTE When speaking in context of the software objects, e.g. distributors, requesters,
transmission lists, etc., all references made to the "device" is in effect referring to
the actual device driver itself, which allows the device to communicate with these
objects.
2.
3.
Introduction
When a transmission list receives a missing media error, it sends the ID of the
missing media to the requester assigned to the transmission list.
When the requester receives the ID, it forwards the ID to its associated
distributor assigned to the GMT list and requests for a search of this ID.
2-11
21.
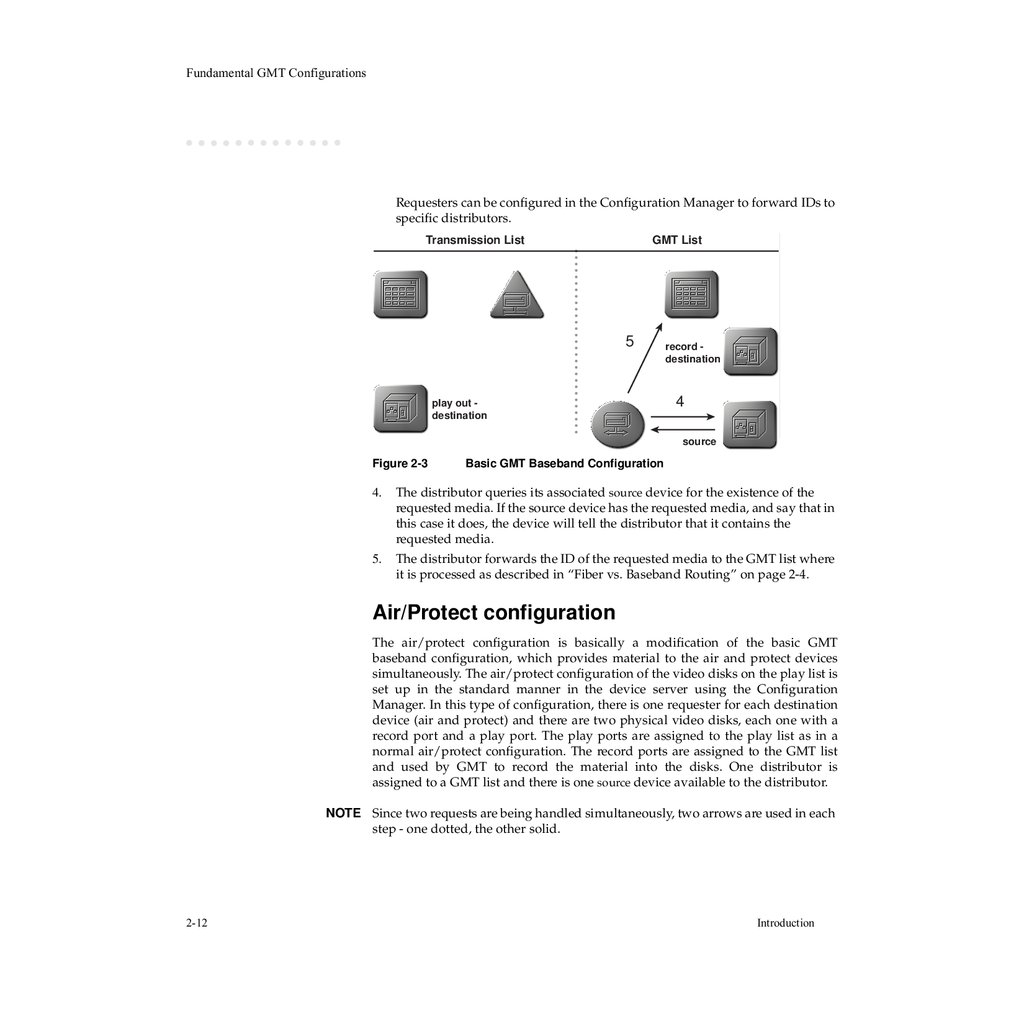
Fundamental GMT ConfigurationsRequesters can be configured in the Configuration Manager to forward IDs to
specific distributors.
Transmission List
GMT List
5
play out destination
record destination
4
source
Figure 2-3
4.
5.
Basic GMT Baseband Configuration
The distributor queries its associated source device for the existence of the
requested media. If the source device has the requested media, and say that in
this case it does, the device will tell the distributor that it contains the
requested media.
The distributor forwards the ID of the requested media to the GMT list where
it is processed as described in “Fiber vs. Baseband Routing” on page 2-4.
Air/Protect configuration
The air/protect configuration is basically a modification of the basic GMT
baseband configuration, which provides material to the air and protect devices
simultaneously. The air/protect configuration of the video disks on the play list is
set up in the standard manner in the device server using the Configuration
Manager. In this type of configuration, there is one requester for each destination
device (air and protect) and there are two physical video disks, each one with a
record port and a play port. The play ports are assigned to the play list as in a
normal air/protect configuration. The record ports are assigned to the GMT list
and used by GMT to record the material into the disks. One distributor is
assigned to a GMT list and there is one source device available to the distributor.
NOTE Since two requests are being handled simultaneously, two arrows are used in each
step - one dotted, the other solid.
2-12
Introduction
22.
Fundamental GMT ConfigurationsTransmission List
1
Air play port
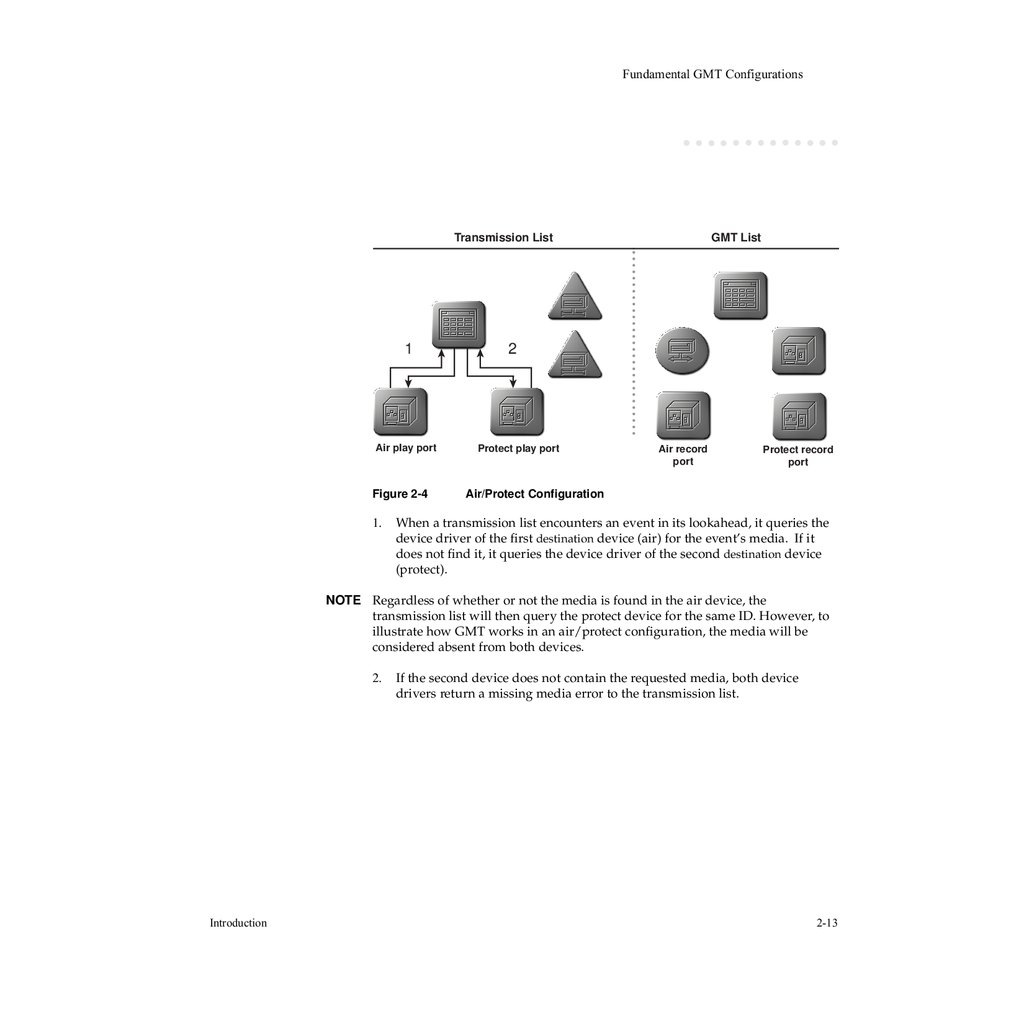
Figure 2-4
1.
GMT List
2
Protect play port
Air record
port
Protect record
port
Air/Protect Configuration
When a transmission list encounters an event in its lookahead, it queries the
device driver of the first destination device (air) for the event’s media. If it
does not find it, it queries the device driver of the second destination device
(protect).
NOTE Regardless of whether or not the media is found in the air device, the
transmission list will then query the protect device for the same ID. However, to
illustrate how GMT works in an air/protect configuration, the media will be
considered absent from both devices.
2.
Introduction
If the second device does not contain the requested media, both device
drivers return a missing media error to the transmission list.
2-13
23.
Fundamental GMT ConfigurationsTransmission List
3
GMT List
4
6
7b
5
Air play
port
Protect play
port
7a
Air record
port
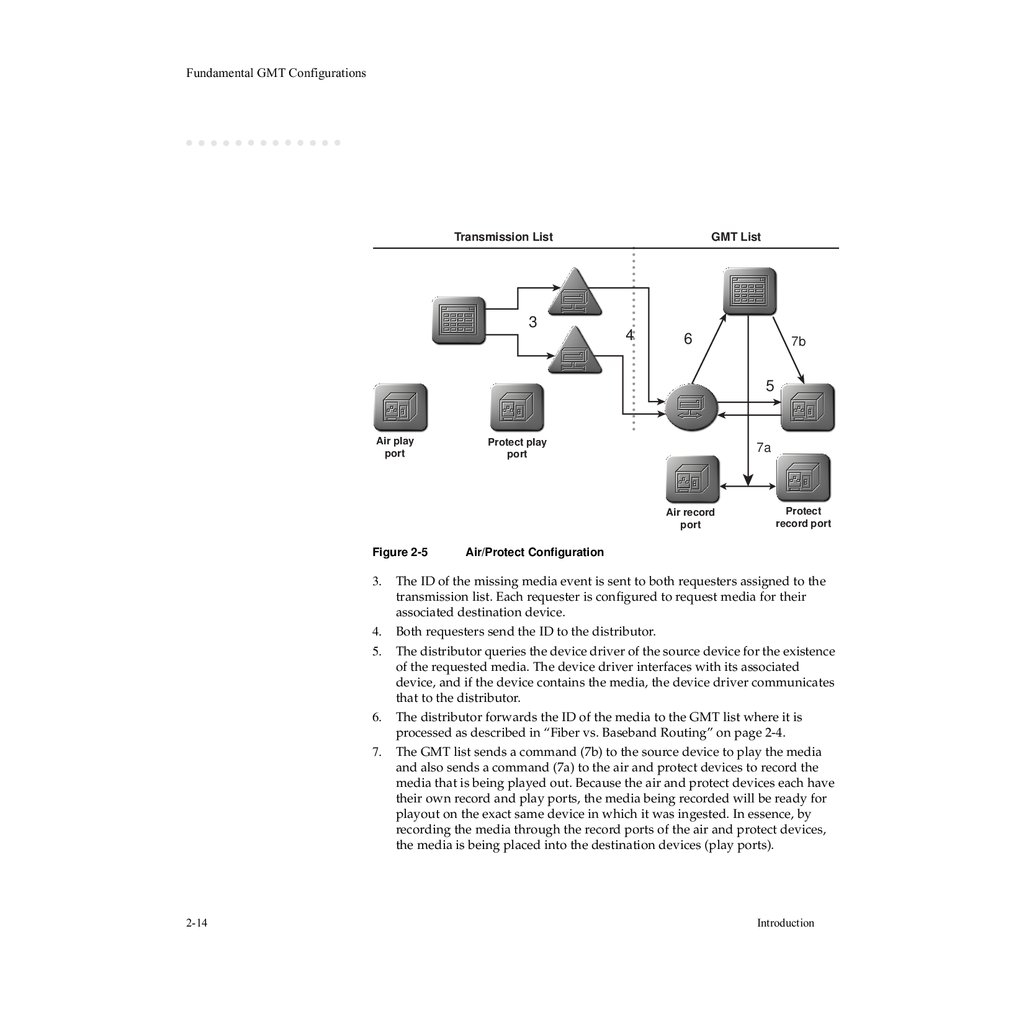
Figure 2-5
3.
4.
5.
6.
7.
2-14
Protect
record port
Air/Protect Configuration
The ID of the missing media event is sent to both requesters assigned to the
transmission list. Each requester is configured to request media for their
associated destination device.
Both requesters send the ID to the distributor.
The distributor queries the device driver of the source device for the existence
of the requested media. The device driver interfaces with its associated
device, and if the device contains the media, the device driver communicates
that to the distributor.
The distributor forwards the ID of the media to the GMT list where it is
processed as described in “Fiber vs. Baseband Routing” on page 2-4.
The GMT list sends a command (7b) to the source device to play the media
and also sends a command (7a) to the air and protect devices to record the
media that is being played out. Because the air and protect devices each have
their own record and play ports, the media being recorded will be ready for
playout on the exact same device in which it was ingested. In essence, by
recording the media through the record ports of the air and protect devices,
the media is being placed into the destination devices (play ports).
Introduction
24.
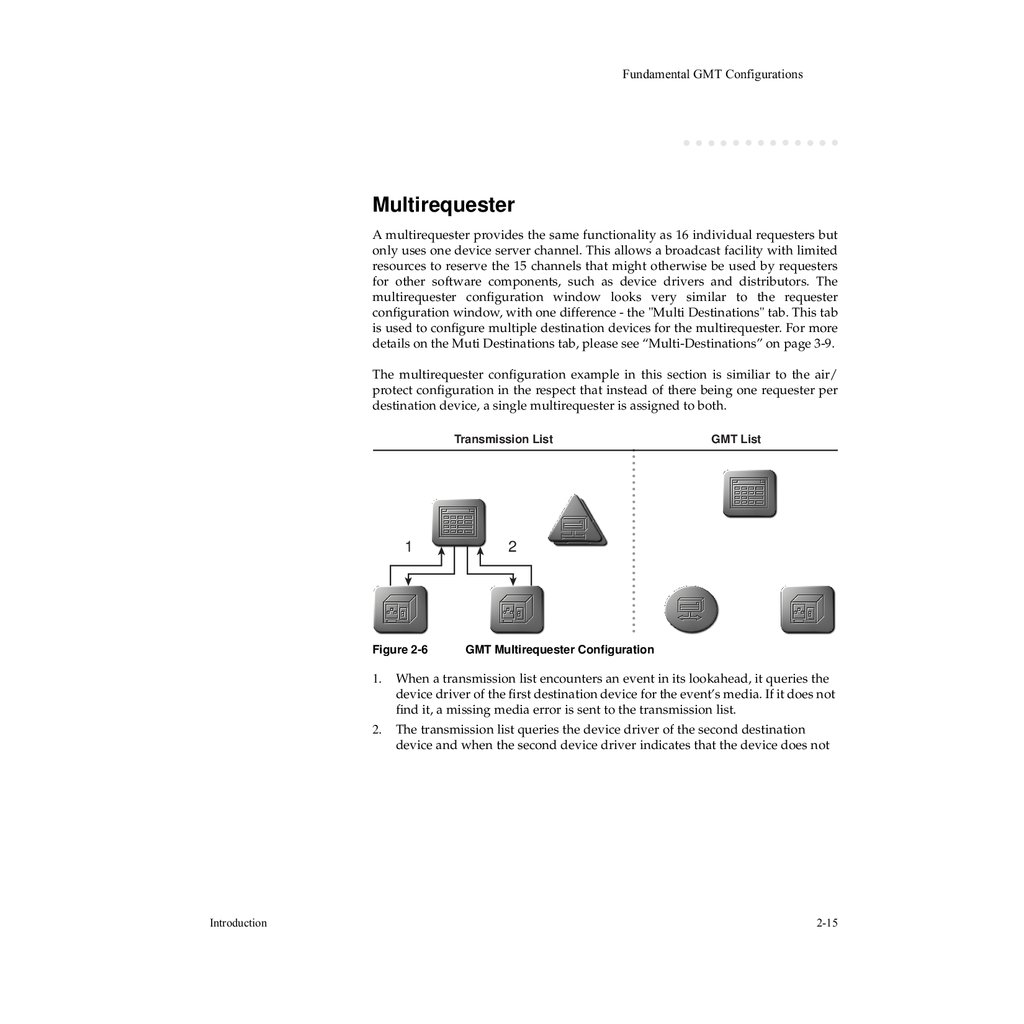
Fundamental GMT ConfigurationsMultirequester
A multirequester provides the same functionality as 16 individual requesters but
only uses one device server channel. This allows a broadcast facility with limited
resources to reserve the 15 channels that might otherwise be used by requesters
for other software components, such as device drivers and distributors. The
multirequester configuration window looks very similar to the requester
configuration window, with one difference - the "Multi Destinations" tab. This tab
is used to configure multiple destination devices for the multirequester. For more
details on the Muti Destinations tab, please see “Multi-Destinations” on page 3-9.
The multirequester configuration example in this section is similiar to the air/
protect configuration in the respect that instead of there being one requester per
destination device, a single multirequester is assigned to both.
Transmission List
1
Figure 2-6
1.
2.
Introduction
GMT List
2
GMT Multirequester Configuration
When a transmission list encounters an event in its lookahead, it queries the
device driver of the first destination device for the event’s media. If it does not
find it, a missing media error is sent to the transmission list.
The transmission list queries the device driver of the second destination
device and when the second device driver indicates that the device does not
2-15
25.
Fundamental GMT Configurationscontain the event’s media, a missing media error is returned to the
transmission list.
Transmission List
GMT List
3
4
6
5
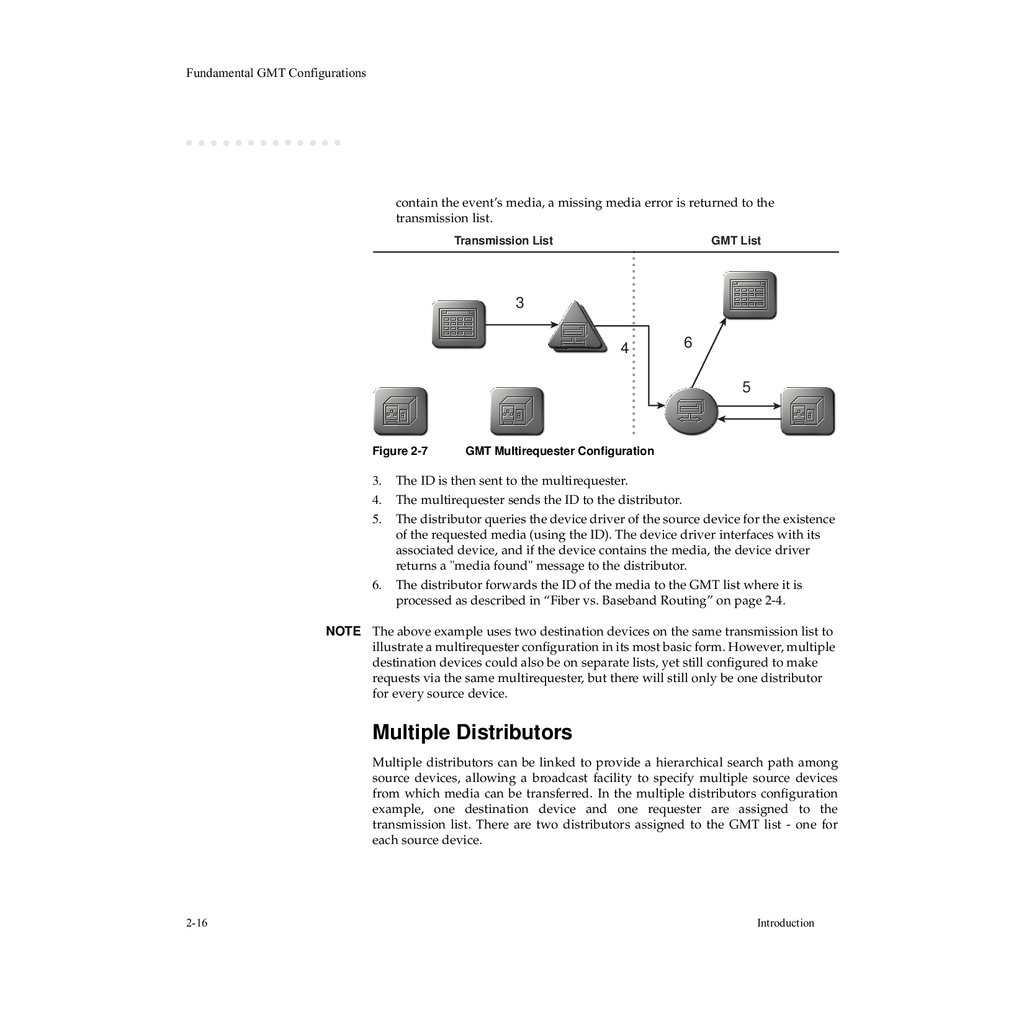
Figure 2-7
3.
4.
5.
6.
GMT Multirequester Configuration
The ID is then sent to the multirequester.
The multirequester sends the ID to the distributor.
The distributor queries the device driver of the source device for the existence
of the requested media (using the ID). The device driver interfaces with its
associated device, and if the device contains the media, the device driver
returns a "media found" message to the distributor.
The distributor forwards the ID of the media to the GMT list where it is
processed as described in “Fiber vs. Baseband Routing” on page 2-4.
NOTE The above example uses two destination devices on the same transmission list to
illustrate a multirequester configuration in its most basic form. However, multiple
destination devices could also be on separate lists, yet still configured to make
requests via the same multirequester, but there will still only be one distributor
for every source device.
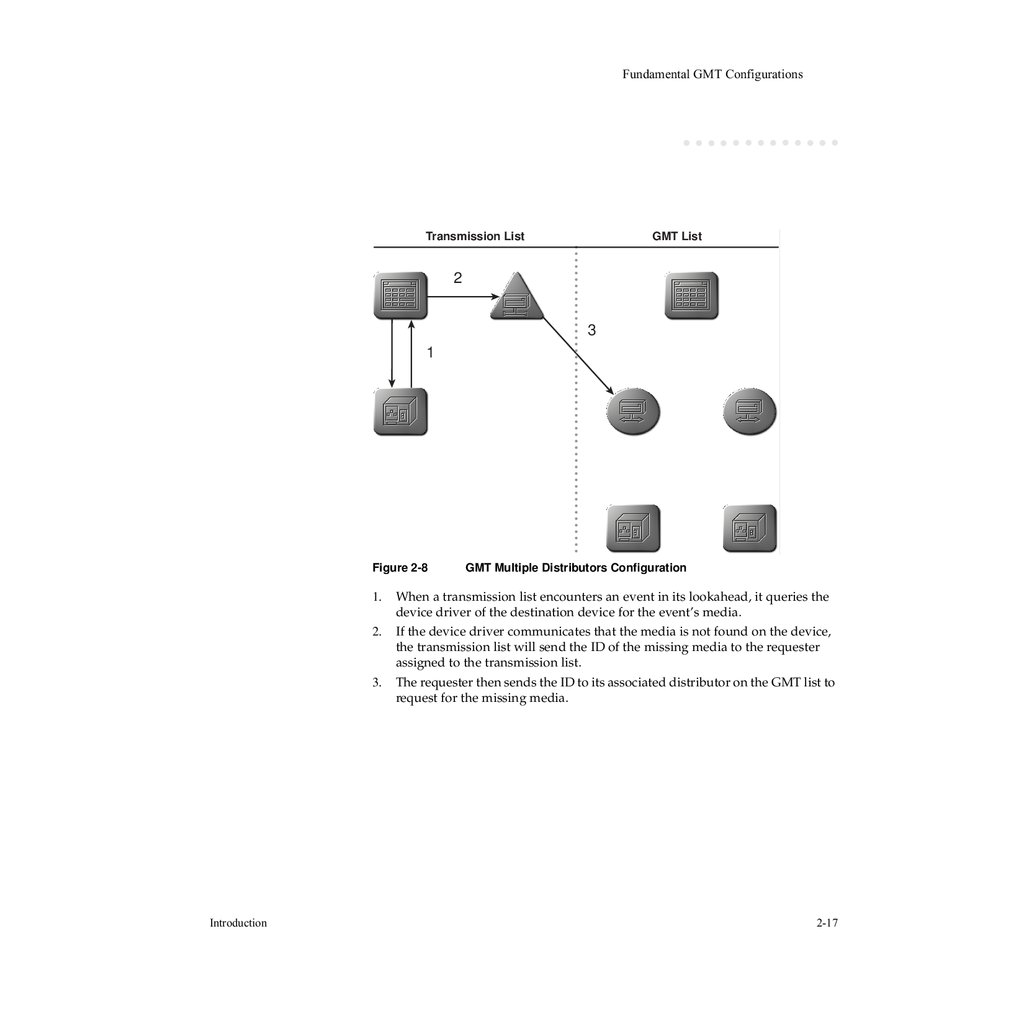
Multiple Distributors
Multiple distributors can be linked to provide a hierarchical search path among
source devices, allowing a broadcast facility to specify multiple source devices
from which media can be transferred. In the multiple distributors configuration
example, one destination device and one requester are assigned to the
transmission list. There are two distributors assigned to the GMT list - one for
each source device.
2-16
Introduction
26.
Fundamental GMT ConfigurationsTransmission List
GMT List
2
3
1
Figure 2-8
1.
2.
3.
Introduction
GMT Multiple Distributors Configuration
When a transmission list encounters an event in its lookahead, it queries the
device driver of the destination device for the event’s media.
If the device driver communicates that the media is not found on the device,
the transmission list will send the ID of the missing media to the requester
assigned to the transmission list.
The requester then sends the ID to its associated distributor on the GMT list to
request for the missing media.
2-17
27.
Fundamental GMT ConfigurationsTransmission List
GMT List
7
5
4
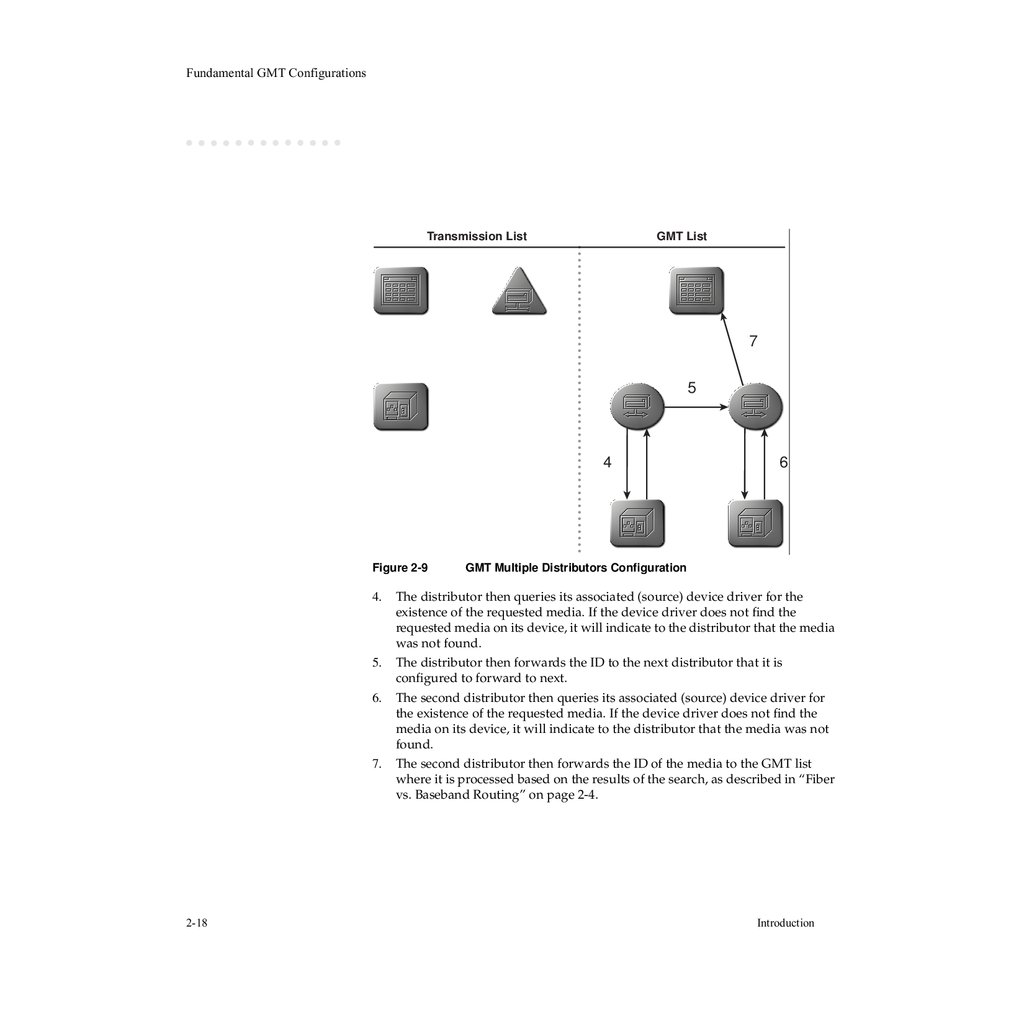
Figure 2-9
4.
5.
6.
7.
2-18
6
GMT Multiple Distributors Configuration
The distributor then queries its associated (source) device driver for the
existence of the requested media. If the device driver does not find the
requested media on its device, it will indicate to the distributor that the media
was not found.
The distributor then forwards the ID to the next distributor that it is
configured to forward to next.
The second distributor then queries its associated (source) device driver for
the existence of the requested media. If the device driver does not find the
media on its device, it will indicate to the distributor that the media was not
found.
The second distributor then forwards the ID of the media to the GMT list
where it is processed based on the results of the search, as described in “Fiber
vs. Baseband Routing” on page 2-4.
Introduction
28.
Fundamental GMT ConfigurationsMultiple GMT Lists
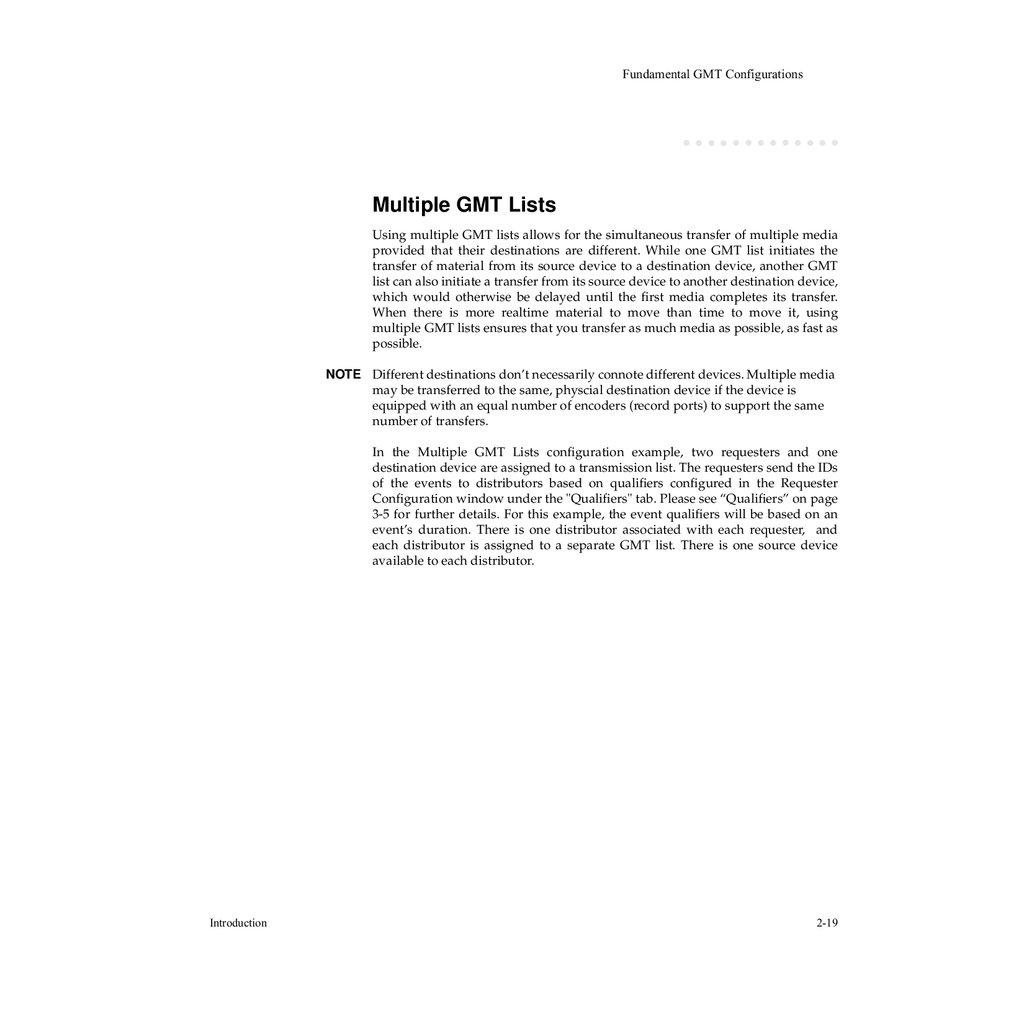
Using multiple GMT lists allows for the simultaneous transfer of multiple media
provided that their destinations are different. While one GMT list initiates the
transfer of material from its source device to a destination device, another GMT
list can also initiate a transfer from its source device to another destination device,
which would otherwise be delayed until the first media completes its transfer.
When there is more realtime material to move than time to move it, using
multiple GMT lists ensures that you transfer as much media as possible, as fast as
possible.
NOTE Different destinations don’t necessarily connote different devices. Multiple media
may be transferred to the same, physcial destination device if the device is
equipped with an equal number of encoders (record ports) to support the same
number of transfers.
In the Multiple GMT Lists configuration example, two requesters and one
destination device are assigned to a transmission list. The requesters send the IDs
of the events to distributors based on qualifiers configured in the Requester
Configuration window under the "Qualifiers" tab. Please see “Qualifiers” on page
3-5 for further details. For this example, the event qualifiers will be based on an
event’s duration. There is one distributor associated with each requester, and
each distributor is assigned to a separate GMT list. There is one source device
available to each distributor.
Introduction
2-19
29.
Fundamental GMT ConfigurationsTransmission List
GMT List A
GMT List B
2
3
1
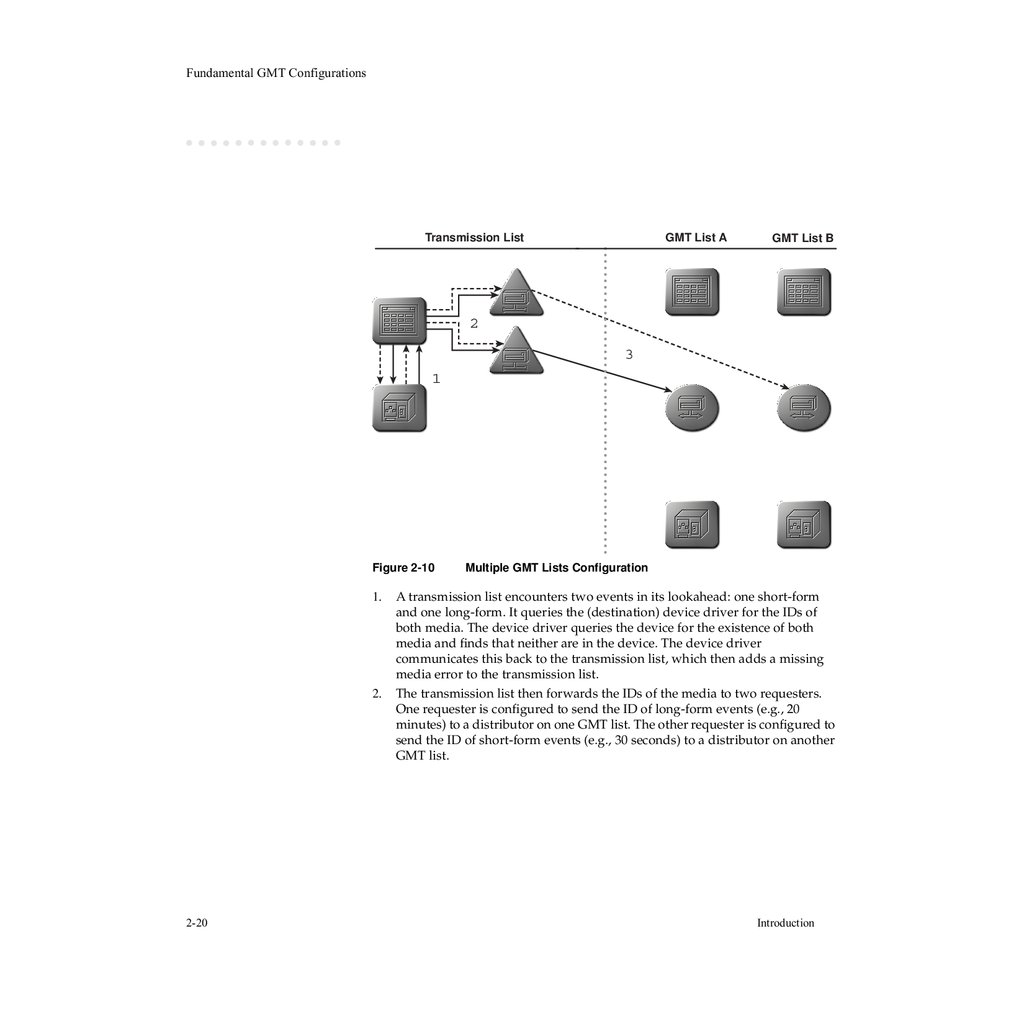
Figure 2-10
1.
2.
2-20
Multiple GMT Lists Configuration
A transmission list encounters two events in its lookahead: one short-form
and one long-form. It queries the (destination) device driver for the IDs of
both media. The device driver queries the device for the existence of both
media and finds that neither are in the device. The device driver
communicates this back to the transmission list, which then adds a missing
media error to the transmission list.
The transmission list then forwards the IDs of the media to two requesters.
One requester is configured to send the ID of long-form events (e.g., 20
minutes) to a distributor on one GMT list. The other requester is configured to
send the ID of short-form events (e.g., 30 seconds) to a distributor on another
GMT list.
Introduction
30.
GMT List Options & Attributes3.
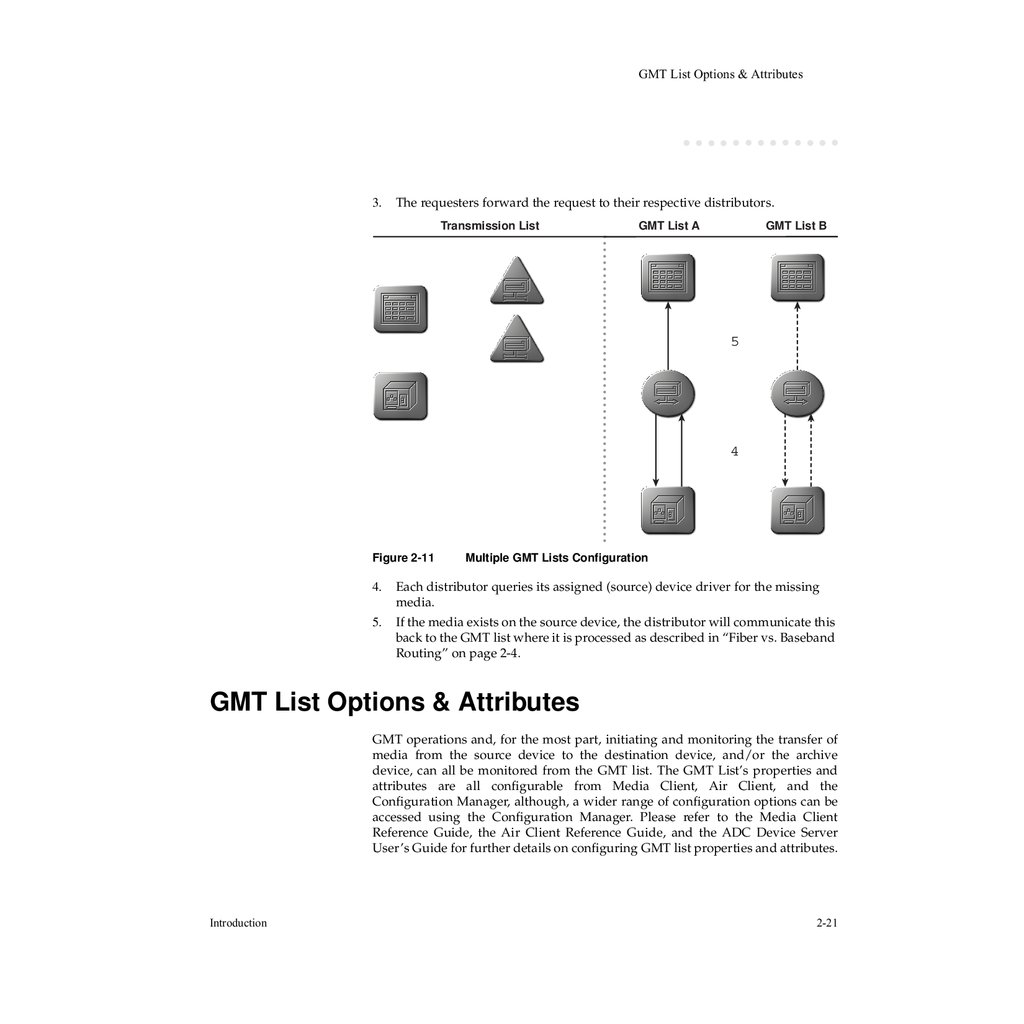
The requesters forward the request to their respective distributors.
Transmission List
GMT List A
GMT List B
5
4
Figure 2-11
4.
5.
Multiple GMT Lists Configuration
Each distributor queries its assigned (source) device driver for the missing
media.
If the media exists on the source device, the distributor will communicate this
back to the GMT list where it is processed as described in “Fiber vs. Baseband
Routing” on page 2-4.
GMT List Options & Attributes
GMT operations and, for the most part, initiating and monitoring the transfer of
media from the source device to the destination device, and/or the archive
device, can all be monitored from the GMT list. The GMT List’s properties and
attributes are all configurable from Media Client, Air Client, and the
Configuration Manager, although, a wider range of configuration options can be
accessed using the Configuration Manager. Please refer to the Media Client
Reference Guide, the Air Client Reference Guide, and the ADC Device Server
User’s Guide for further details on configuring GMT list properties and attributes.
Introduction
2-21
31.
GMT List Options & AttributesTo open a GMT list window in Air Client, click the list icon found on the toolbar at
the top of the screen, or select View List from the Resources drop-down menu. To
view the GMT list in Media Client, click the list icon on the Navigation toolbar or
select View List from the Resources drop-down menu on the main toolbar. The
GMT lists for both clients are very similar in both appearances and features. All
features discussed herein with respect to the Media Client and Air Client are
described in further detail in their respective manuals.
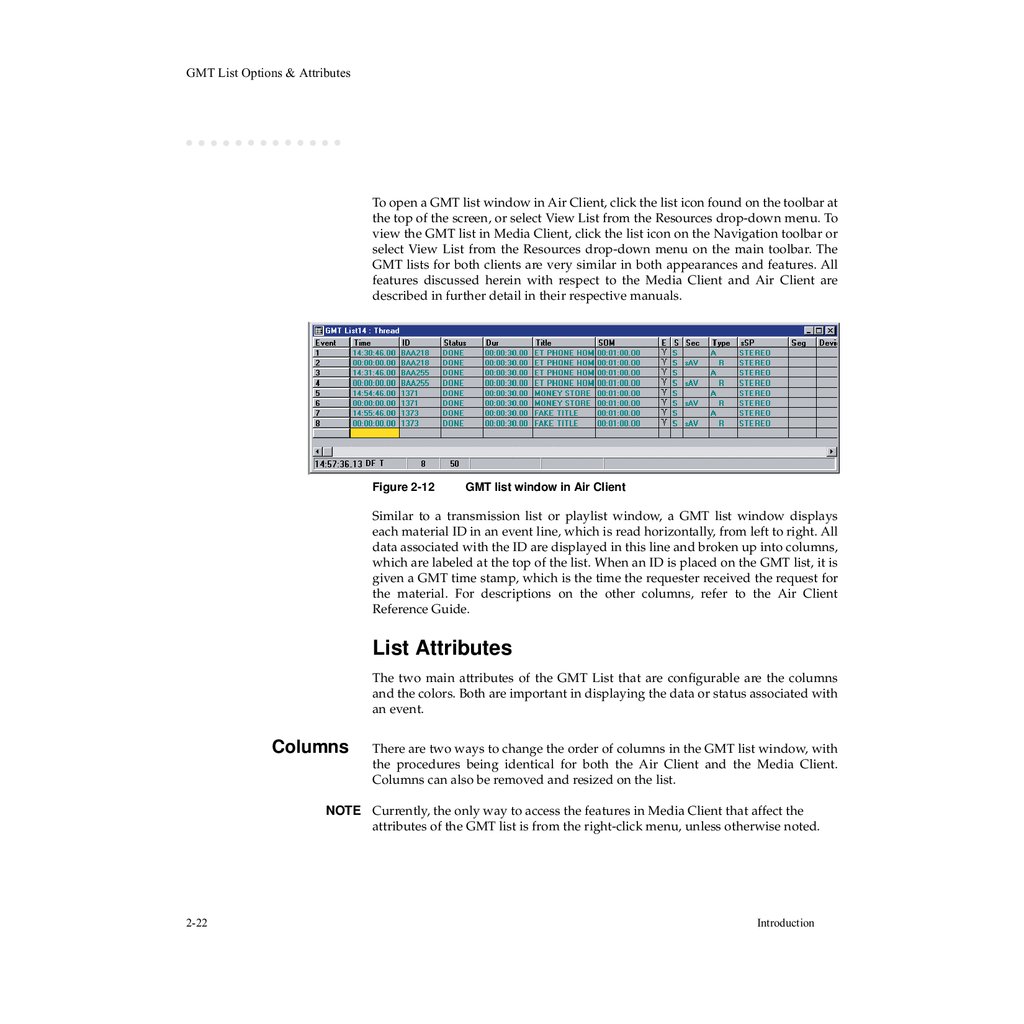
Figure 2-12
GMT list window in Air Client
Similar to a transmission list or playlist window, a GMT list window displays
each material ID in an event line, which is read horizontally, from left to right. All
data associated with the ID are displayed in this line and broken up into columns,
which are labeled at the top of the list. When an ID is placed on the GMT list, it is
given a GMT time stamp, which is the time the requester received the request for
the material. For descriptions on the other columns, refer to the Air Client
Reference Guide.
List Attributes
The two main attributes of the GMT List that are configurable are the columns
and the colors. Both are important in displaying the data or status associated with
an event.
Columns
There are two ways to change the order of columns in the GMT list window, with
the procedures being identical for both the Air Client and the Media Client.
Columns can also be removed and resized on the list.
NOTE Currently, the only way to access the features in Media Client that affect the
attributes of the GMT list is from the right-click menu, unless otherwise noted.
2-22
Introduction
32.
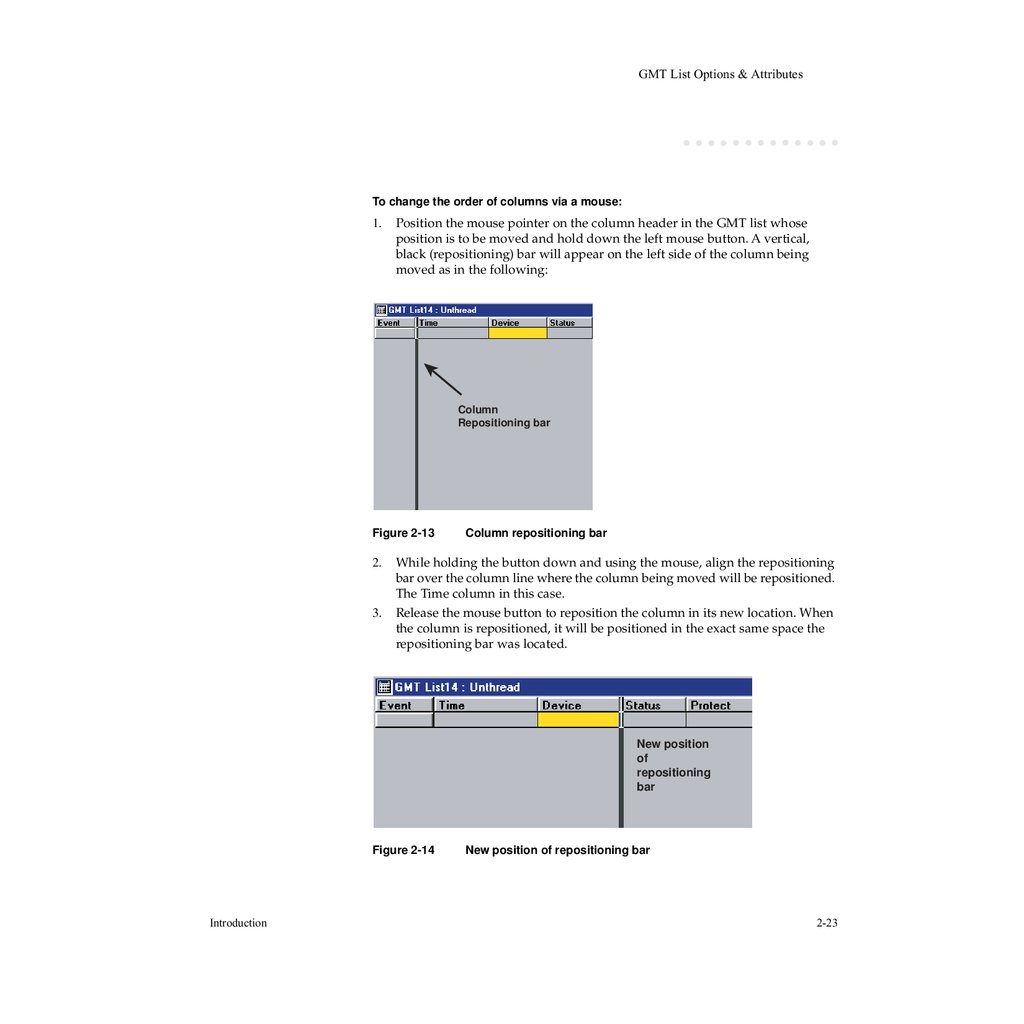
GMT List Options & AttributesTo change the order of columns via a mouse:
1.
Position the mouse pointer on the column header in the GMT list whose
position is to be moved and hold down the left mouse button. A vertical,
black (repositioning) bar will appear on the left side of the column being
moved as in the following:
Column
Repositioning bar
Figure 2-13
2.
3.
Column repositioning bar
While holding the button down and using the mouse, align the repositioning
bar over the column line where the column being moved will be repositioned.
The Time column in this case.
Release the mouse button to reposition the column in its new location. When
the column is repositioned, it will be positioned in the exact same space the
repositioning bar was located.
New position
of
repositioning
bar
Figure 2-14
Introduction
New position of repositioning bar
2-23
33.
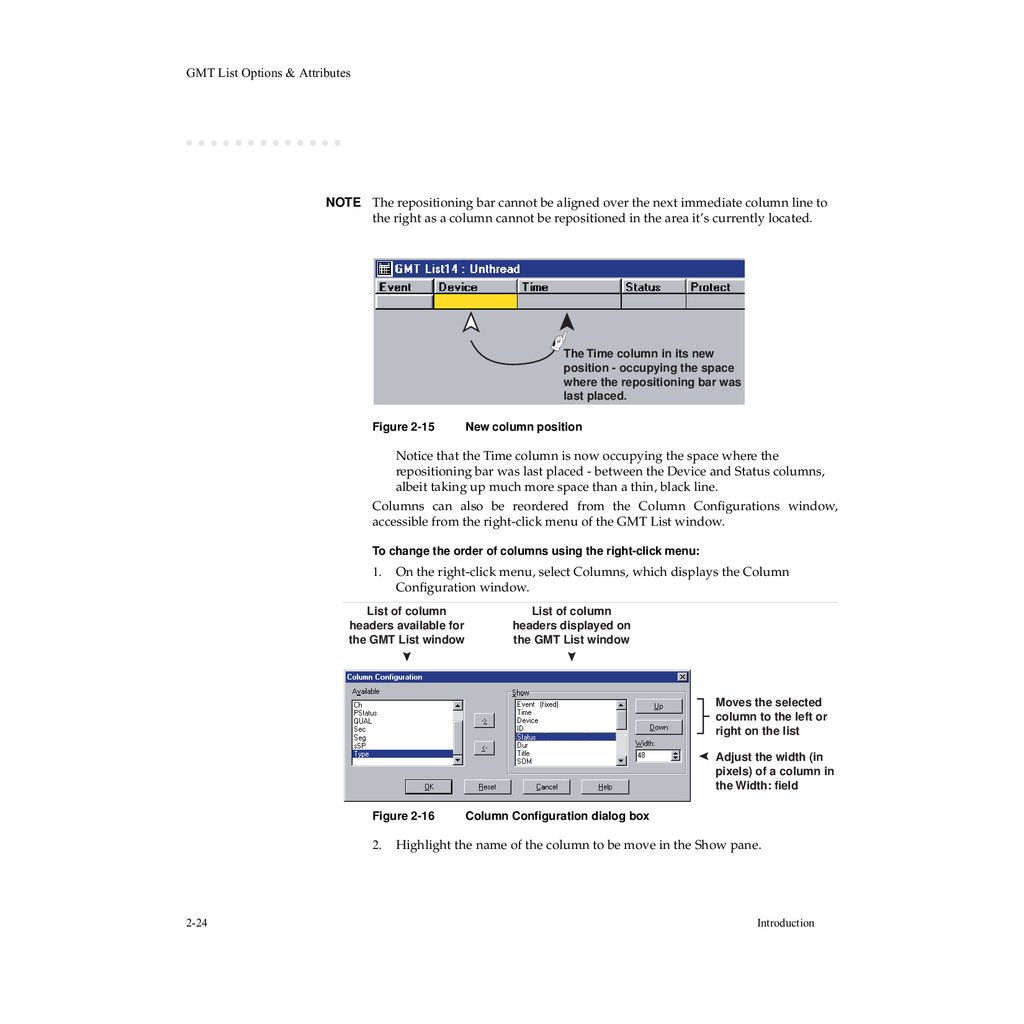
GMT List Options & AttributesNOTE The repositioning bar cannot be aligned over the next immediate column line to
the right as a column cannot be repositioned in the area it’s currently located.
The Time column in its new
position - occupying the space
where the repositioning bar was
last placed.
Figure 2-15
New column position
Notice that the Time column is now occupying the space where the
repositioning bar was last placed - between the Device and Status columns,
albeit taking up much more space than a thin, black line.
Columns can also be reordered from the Column Configurations window,
accessible from the right-click menu of the GMT List window.
To change the order of columns using the right-click menu:
1.
On the right-click menu, select Columns, which displays the Column
Configuration window.
List of column
headers available for
the GMT List window
List of column
headers displayed on
the GMT List window
Moves the selected
column to the left or
right on the list
Adjust the width (in
pixels) of a column in
the Width: field
Figure 2-16
2.
2-24
Column Configuration dialog box
Highlight the name of the column to be move in the Show pane.
Introduction
34.
GMT List Options & Attributes3.
To move the column further to the left side of the GMT list window, click the
Up button.
To move the column further to the right side of the GMT list window, click the
Down button.
The Column Configuration window can also be used to show, hide, and resize
columns as well.
To show, remove or resize a column:
1.
2.
3.
4.
List Colors
In the Show pane, highlight the name of the column you want to remove from
the GMT list.
To remove the column, click the left arrow button, located between the
Available and Show panes, or double-click the highlighted column. The
column name will appear in the Available pane, indicating that it will no
longer be displayed in the GMT List window.
To show a column, highlight the name of the column in the Available pane,
then click the right arrow button, located between the Available and Show
panes. The column name will appear in the Show pane, indicating that it will
be displayed in the GMT List window.
To resize a column, highlight the name in the Show pane and specify a new
width (in pixels) in the Width: field. Alternatively, you can use the Arrow Up
and Arrow Down buttons on the Width field to increase or decrease the
selected column’s width, respectively.
The colors associated with numerous GMT list operations, such as statuses, event
types, and editing (Revise Mode Highlight), are configurable.
To change event colors based on type or status:
1.
Introduction
From the GMT List window, right-click the mouse to display the right-click
menu, and from the right-click menu, select Colors. This will display the
Select Colors window.
2-25
35.
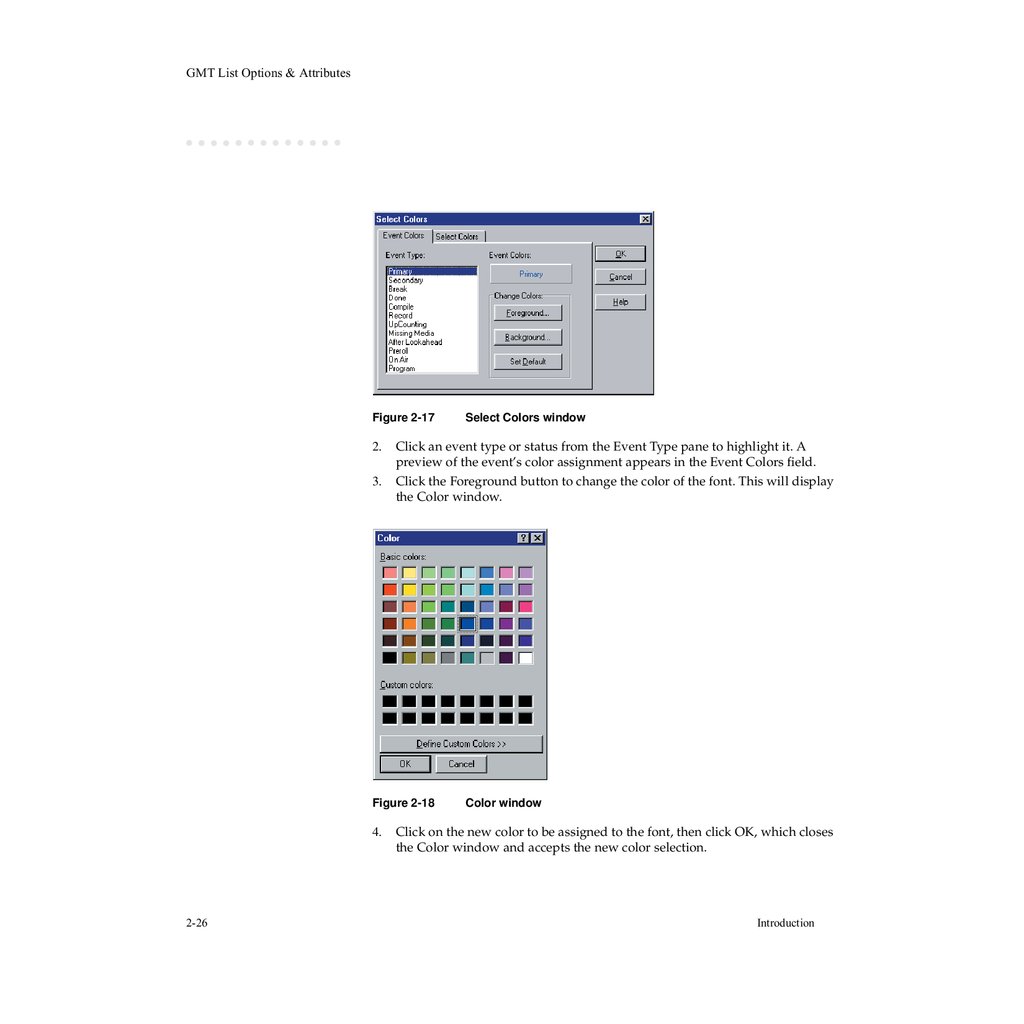
GMT List Options & AttributesFigure 2-17
2.
3.
Click an event type or status from the Event Type pane to highlight it. A
preview of the event’s color assignment appears in the Event Colors field.
Click the Foreground button to change the color of the font. This will display
the Color window.
Figure 2-18
4.
2-26
Select Colors window
Color window
Click on the new color to be assigned to the font, then click OK, which closes
the Color window and accepts the new color selection.
Introduction
36.
GMT List Options & Attributes5.
6.
The modified color for the associated event type or status appears in the
Event Colors field. To change the color of the font again, click the Foreground
button again and select a new color from the Color window.
Click the Background button to change the background of the field for the
selected event type or status. The will display the Color window.
Click on the new color to be assigned to the event’s background, then click
OK, which accepts the new color selection and closes the Color window.
Once all color assignments have been completed, click OK to close the Select
Colors window, or to revert to the Harris-recommended default color
combinations, click the Set Default button, then click OK.
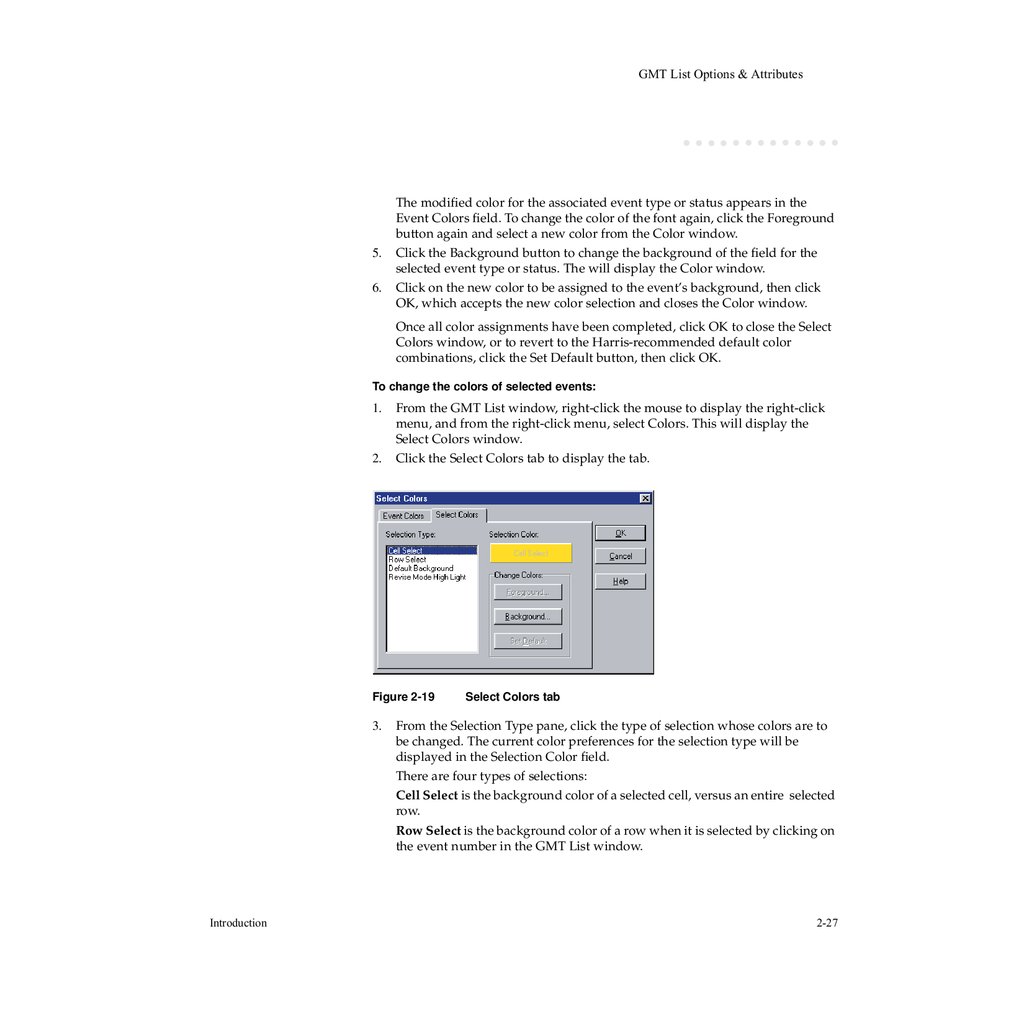
To change the colors of selected events:
1.
2.
From the GMT List window, right-click the mouse to display the right-click
menu, and from the right-click menu, select Colors. This will display the
Select Colors window.
Click the Select Colors tab to display the tab.
Figure 2-19
3.
Introduction
Select Colors tab
From the Selection Type pane, click the type of selection whose colors are to
be changed. The current color preferences for the selection type will be
displayed in the Selection Color field.
There are four types of selections:
Cell Select is the background color of a selected cell, versus an entire selected
row.
Row Select is the background color of a row when it is selected by clicking on
the event number in the GMT List window.
2-27
37.
GMT List Options & Attributes4.
5.
Default Background is the background color of an event when it is not
selected and its color is not changed on the Event Colors tab.
Revise Mode High Light is the row color when any data in a cell within the
row is being revised. The Revise Mode High Light color signifies that changes
to any data in the event line can be made.
To change data within a cell, which activates the revise mode color, click on
any cell within the row where changes are to be made. Then click Events from
the main toolbar, and from the Events drop-down menu, select Revise. The
entire row in which the active cell is located will then be highlighted in the
revise mode color.
To change the background color of a selected event in the GMT list window,
click the Background button. This will display the Color window where
background colors can be assigned.
Click a color on the Color window, then click OK. A preview of the selected
color is displayed in the Selection Color field.
To accept all color selections for each selection type, click OK. To revert to the
Harris-recommended default colors, click the Set Default button.
On-Air Focus
The On-Air Focus feature highlights the active cell of an event whose media is
currently being transferred and ensures that it remains visible within the GMT
List window. If the next event to be processed is not visible on the GMT List
window, On-Air Focus will make it visible shortly before the transfer begins and
will highlight the active cell.
To change the on-air focus:
1.
2.
To activate the On-Air Focus feature, with the GMT List window is displayed,
right-click the mouse to display the right-click menu.
Highlight and then click the On-Air Focus option, which will enable it. To
verify that it has been enabled, right-click again to display the menu and there
should be a check mark next to the On-Air Focus option.
List Options
Many of the list options found in the Options window in either Air Client or
Media Client are also found in the GMT List Properties window, the latter of
which is accessed from the Configuration Manager. Any changes made to
configuration options that are common to both clients and the Configuration
Manager will be reflected in all instances of those configuration options.
2-28
Introduction
38.
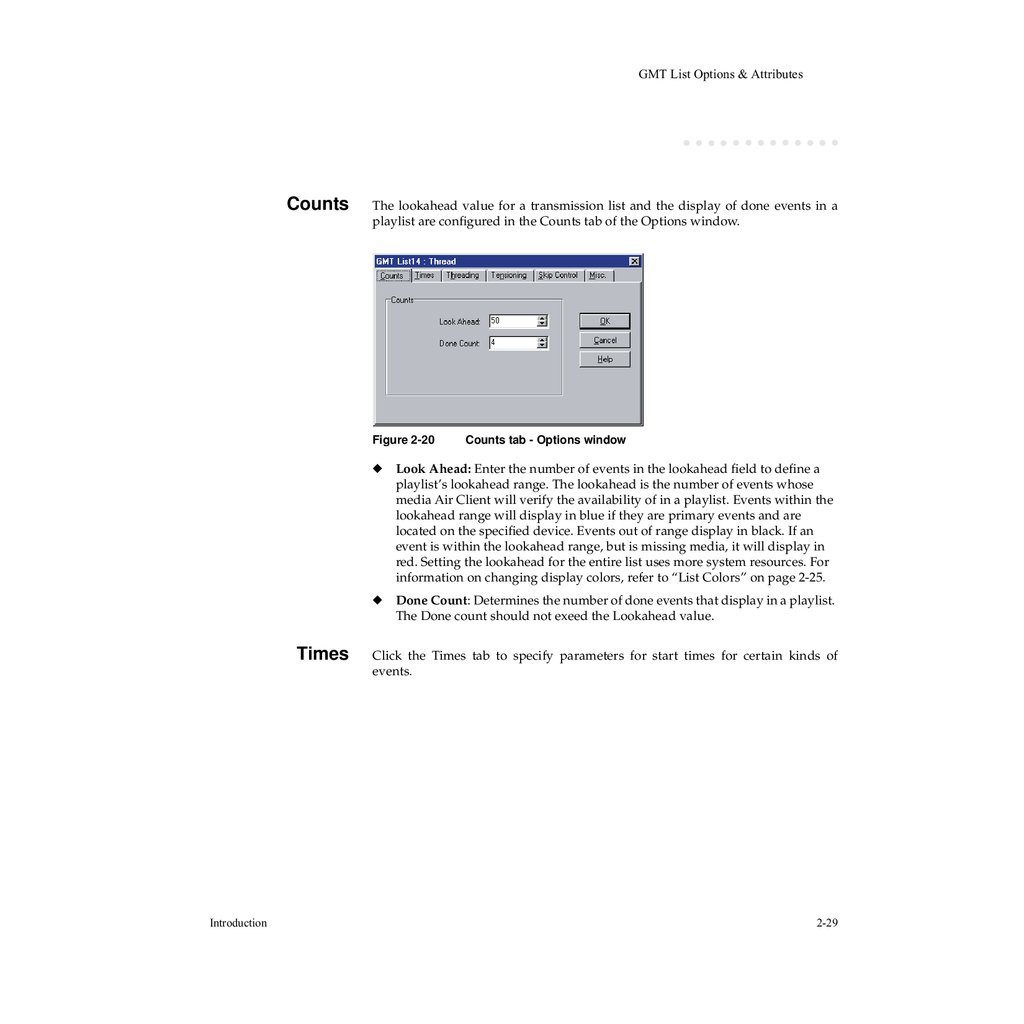
GMT List Options & AttributesCounts
The lookahead value for a transmission list and the display of done events in a
playlist are configured in the Counts tab of the Options window.
Figure 2-20
Times
Introduction
Counts tab - Options window
◆
Look Ahead: Enter the number of events in the lookahead field to define a
playlist’s lookahead range. The lookahead is the number of events whose
media Air Client will verify the availability of in a playlist. Events within the
lookahead range will display in blue if they are primary events and are
located on the specified device. Events out of range display in black. If an
event is within the lookahead range, but is missing media, it will display in
red. Setting the lookahead for the entire list uses more system resources. For
information on changing display colors, refer to “List Colors” on page 2-25.
◆
Done Count: Determines the number of done events that display in a playlist.
The Done count should not exeed the Lookahead value.
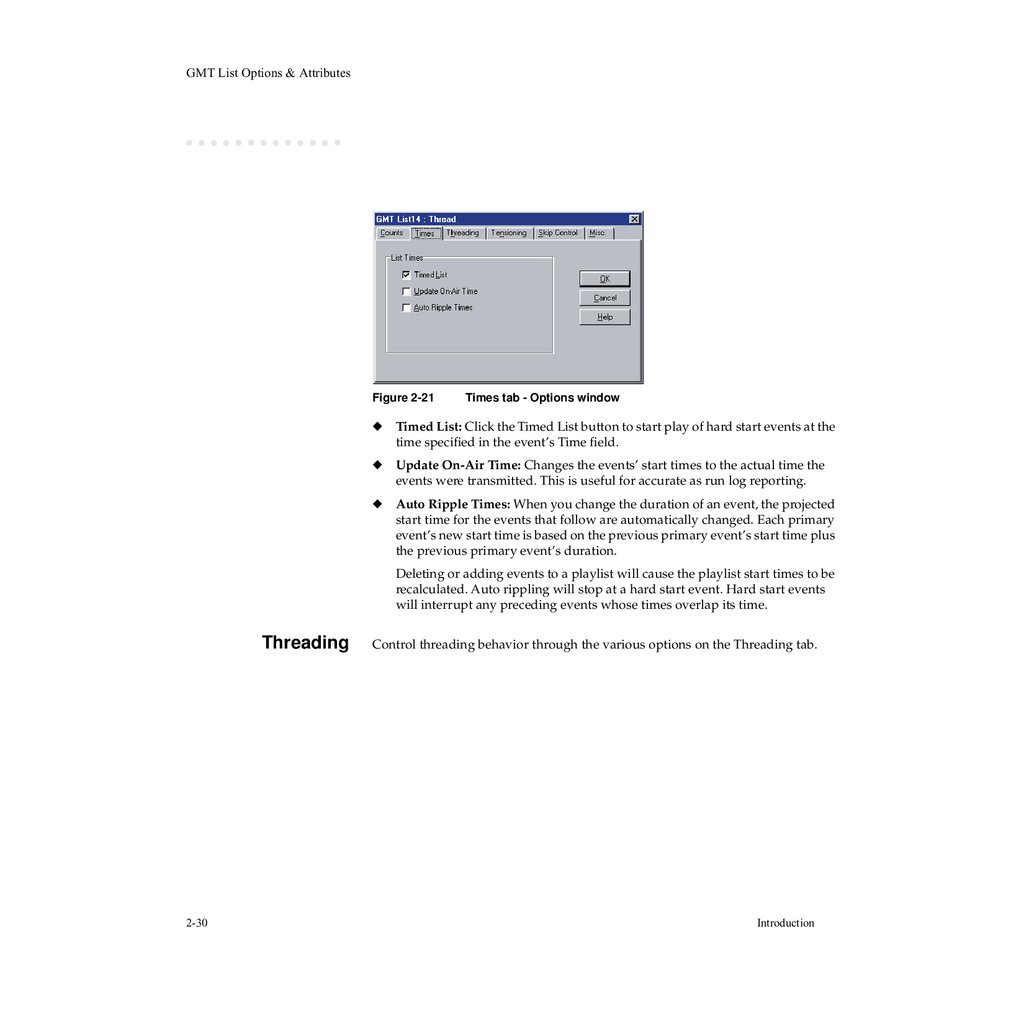
Click the Times tab to specify parameters for start times for certain kinds of
events.
2-29
39.
GMT List Options & AttributesFigure 2-21
Times tab - Options window
◆
Timed List: Click the Timed List button to start play of hard start events at the
time specified in the event’s Time field.
◆
Update On-Air Time: Changes the events’ start times to the actual time the
events were transmitted. This is useful for accurate as run log reporting.
◆
Auto Ripple Times: When you change the duration of an event, the projected
start time for the events that follow are automatically changed. Each primary
event’s new start time is based on the previous primary event’s start time plus
the previous primary event’s duration.
Deleting or adding events to a playlist will cause the playlist start times to be
recalculated. Auto rippling will stop at a hard start event. Hard start events
will interrupt any preceding events whose times overlap its time.
Threading
2-30
Control threading behavior through the various options on the Threading tab.
Introduction
40.
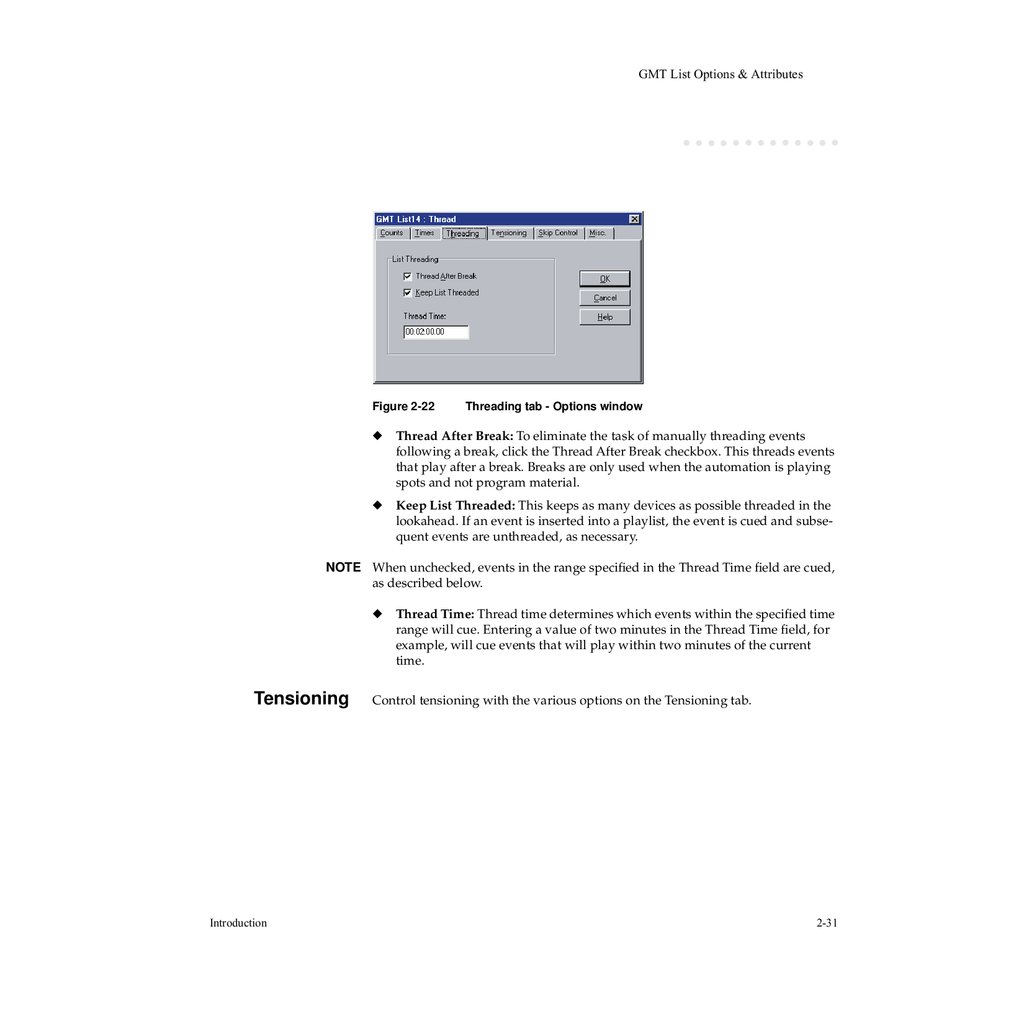
GMT List Options & AttributesFigure 2-22
Threading tab - Options window
◆
Thread After Break: To eliminate the task of manually threading events
following a break, click the Thread After Break checkbox. This threads events
that play after a break. Breaks are only used when the automation is playing
spots and not program material.
◆
Keep List Threaded: This keeps as many devices as possible threaded in the
lookahead. If an event is inserted into a playlist, the event is cued and subsequent events are unthreaded, as necessary.
NOTE When unchecked, events in the range specified in the Thread Time field are cued,
as described below.
◆
Tensioning
Introduction
Thread Time: Thread time determines which events within the specified time
range will cue. Entering a value of two minutes in the Thread Time field, for
example, will cue events that will play within two minutes of the current
time.
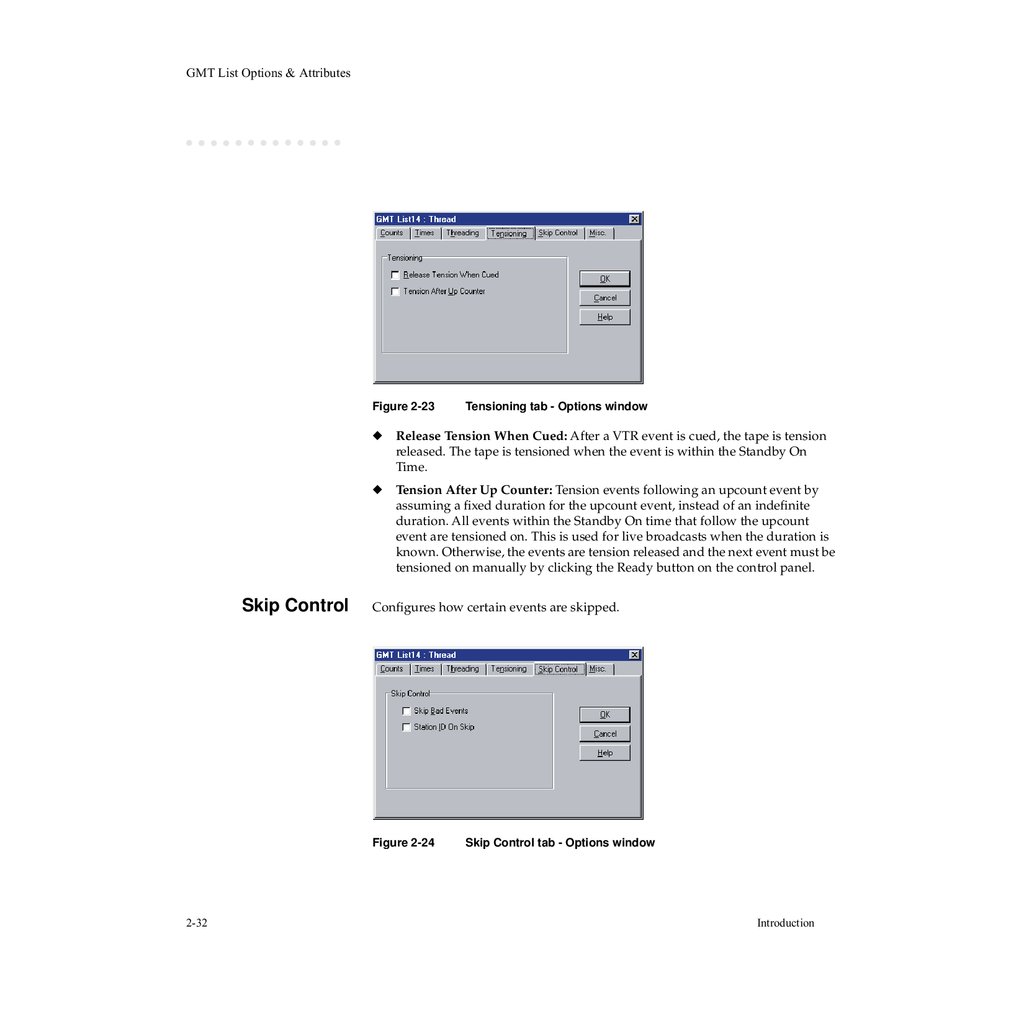
Control tensioning with the various options on the Tensioning tab.
2-31
41.
GMT List Options & AttributesFigure 2-23
Skip Control
◆
Release Tension When Cued: After a VTR event is cued, the tape is tension
released. The tape is tensioned when the event is within the Standby On
Time.
◆
Tension After Up Counter: Tension events following an upcount event by
assuming a fixed duration for the upcount event, instead of an indefinite
duration. All events within the Standby On time that follow the upcount
event are tensioned on. This is used for live broadcasts when the duration is
known. Otherwise, the events are tension released and the next event must be
tensioned on manually by clicking the Ready button on the control panel.
Configures how certain events are skipped.
Figure 2-24
2-32
Tensioning tab - Options window
Skip Control tab - Options window
Introduction
42.
GMT List Options & AttributesMiscellaneous
◆
Skip Bad Events: Click the Skip Bad Events checkbox to skip any event with
a media error, such as missing media or a tape jam. If there are consecutive
bad events in a playlist, only the first bad event is skipped. Click the Play button on the control panel to skip the remaining consecutive bad events. If the
Skip Bad Events button is unchecked, the list will stop playing. Remove the
bad event from the playlist and click Play to restart.
◆
Station ID On Skip: Use the Station ID On Skip button to switch to the Logo
input when Skip is clicked on the control panel. Configure the Logo input in
the device server through the switcher’s device parameters.
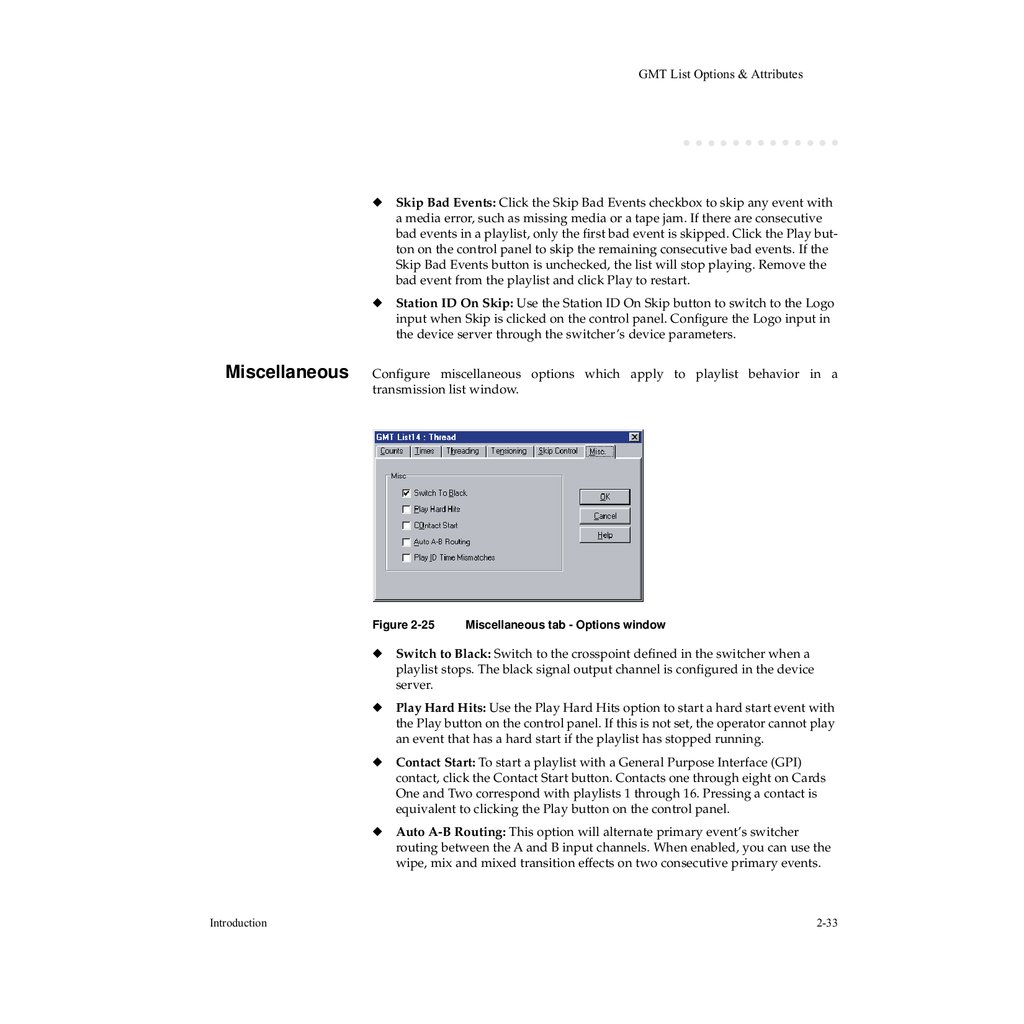
Configure miscellaneous options which apply to playlist behavior in a
transmission list window.
Figure 2-25
Introduction
Miscellaneous tab - Options window
◆
Switch to Black: Switch to the crosspoint defined in the switcher when a
playlist stops. The black signal output channel is configured in the device
server.
◆
Play Hard Hits: Use the Play Hard Hits option to start a hard start event with
the Play button on the control panel. If this is not set, the operator cannot play
an event that has a hard start if the playlist has stopped running.
◆
Contact Start: To start a playlist with a General Purpose Interface (GPI)
contact, click the Contact Start button. Contacts one through eight on Cards
One and Two correspond with playlists 1 through 16. Pressing a contact is
equivalent to clicking the Play button on the control panel.
◆
Auto A-B Routing: This option will alternate primary event’s switcher
routing between the A and B input channels. When enabled, you can use the
wipe, mix and mixed transition effects on two consecutive primary events.
2-33
43.
GMT List Options & AttributesOtherwise, attempting to do so would cause the transmission to transmit a
black screen on the output channel.
◆
Play ID Title Mismatches: ID Title mismatch checks ID title pairs from the
transmission list against the database and cassette in a cart machine.
Normally, the ID and titles on the transmission list will match the database
and cassette and no errors will be generated by the system when a list is
loaded.
NOTE This feature is only supported for the Sony LMS environment and requires the
use of a tape preparation database product, such as Media Client.
2-34
Introduction
44.
3Configuring GMT
This chapter describes how to use the Configuration Manager to configure the
various software objects that comprise the GMT system. It also discusses how to
assign requesters, distributors, and devices to play (transmission) lists and GMT
lists based upon the mode of transfer a system uses and how to configure the
GMT list on a device server. For extensive details on configuring devices,
configuring lists, assigning software objects to device server channels, and using
the Configuration Manager, please refer to the ADC Device Server User’s Guide.
Configuring Software Components
Configuring the software components that make up GMT isn’t very different than
configuring other types of lists and devices for a device server. GMT lists, for the
most part, are configured exactly as play lists are, and requesters and distributors
are assigned to channels and lists much like the way devices are. The main
differences in configuring them would be the actual configuration parameters
found within the properties window of each object and/or list. However, the first
step in the configuration process is identical to all others and that’s assigning an
object to a device server channel by using the Configuration Manager. Please see
"ADC Device Server User Guide" for further details.
To launch the Configuration Manager and configure devices:
1.
2.
3.
Configuring GMT
On the client that the Configuration Manager application is installed on,
double-click the Configuration Manager icon located on the desktop to
launch the application.
The Password dialog box appears.
Enter the password in the Enter Password field, then click OK.
If you entered the correct password, the ADC100NT Configuration window
opens. If you did not, an Error dialog box notifies you when you click OK,
then the Configuration Manager application closes.
In the ADC100NT Configuration window, right-click the device server and
then highlight "Configured Devices".
3-1
45.
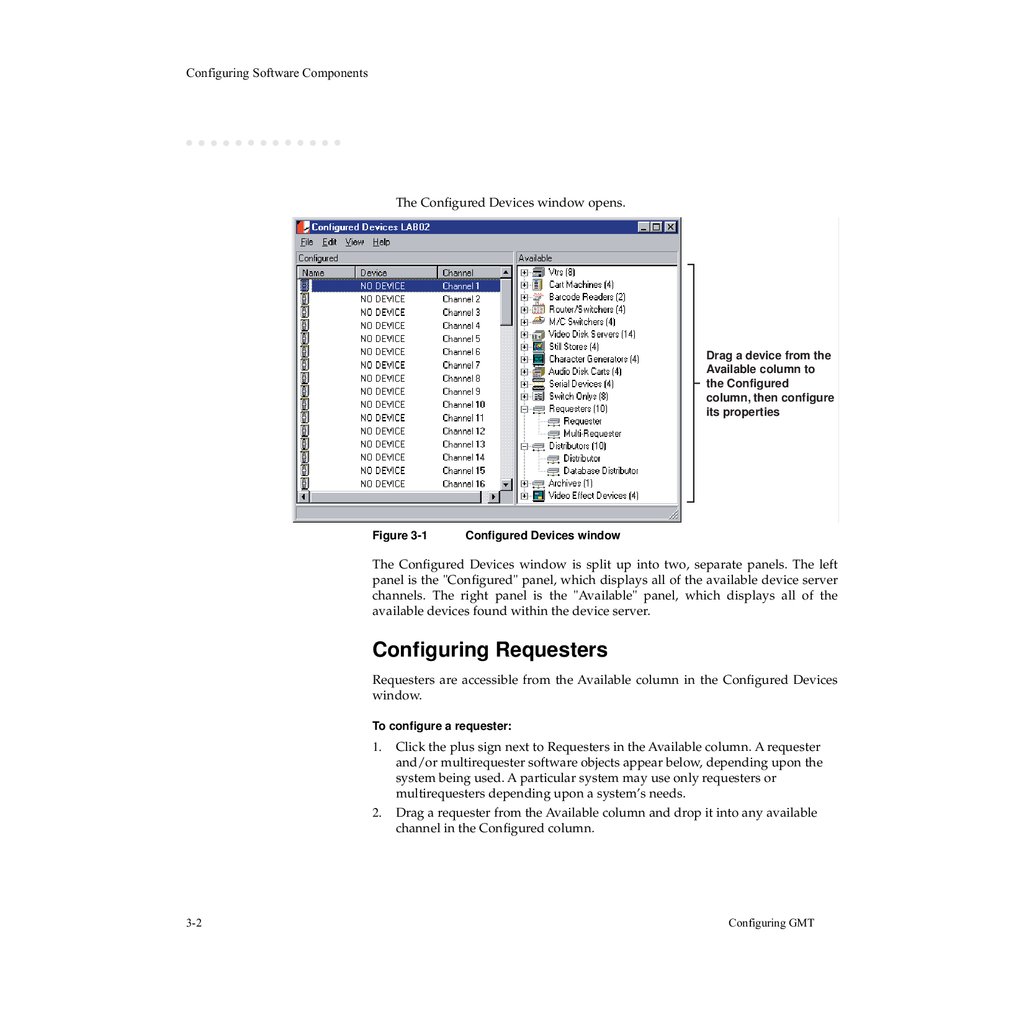
Configuring Software ComponentsThe Configured Devices window opens.
Drag a device from the
Available column to
the Configured
column, then configure
its properties
Figure 3-1
Configured Devices window
The Configured Devices window is split up into two, separate panels. The left
panel is the "Configured" panel, which displays all of the available device server
channels. The right panel is the "Available" panel, which displays all of the
available devices found within the device server.
Configuring Requesters
Requesters are accessible from the Available column in the Configured Devices
window.
To configure a requester:
1.
2.
3-2
Click the plus sign next to Requesters in the Available column. A requester
and/or multirequester software objects appear below, depending upon the
system being used. A particular system may use only requesters or
multirequesters depending upon a system’s needs.
Drag a requester from the Available column and drop it into any available
channel in the Configured column.
Configuring GMT
46.
Configuring Software ComponentsNOTE Before configuring any of the software objects for GMT, all actual devices should
be configured first in the earlier channels so that requesters and distributors can
be configured for the lower channels. Typically, requesters and distributors come
after all actual devices and switch onlys.
3.
General
The requester will appear in the channel in which it was placed and a name
will automatically be assigned to the requester in the format:
REQST[device server channel]
Right-click the requester that was just added to the Configured column, then
click Properties. The device properties window for the requester will appear
with the General Tab, the first of several tabs, displayed first.
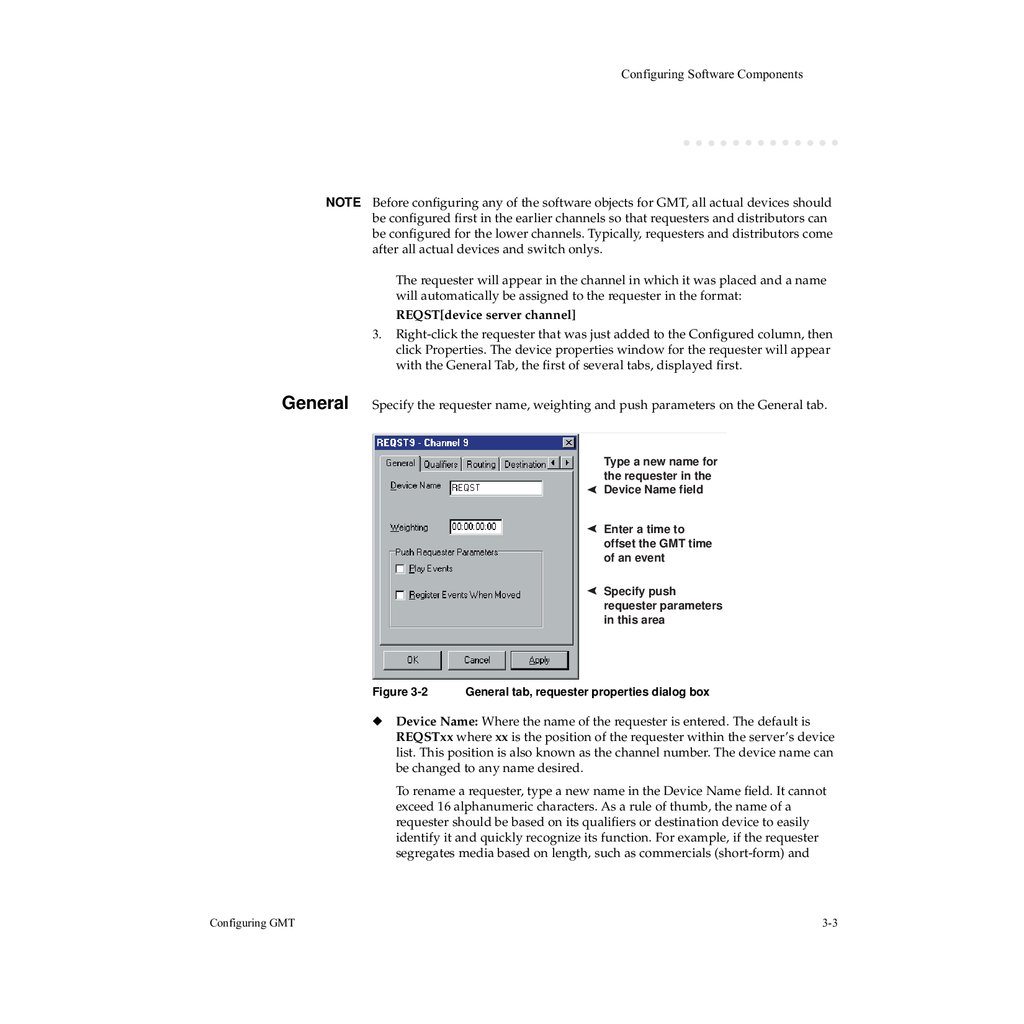
Specify the requester name, weighting and push parameters on the General tab.
Type a new name for
the requester in the
Device Name field
Enter a time to
offset the GMT time
of an event
Specify push
requester parameters
in this area
Figure 3-2
◆
General tab, requester properties dialog box
Device Name: Where the name of the requester is entered. The default is
REQSTxx where xx is the position of the requester within the server’s device
list. This position is also known as the channel number. The device name can
be changed to any name desired.
To rename a requester, type a new name in the Device Name field. It cannot
exceed 16 alphanumeric characters. As a rule of thumb, the name of a
requester should be based on its qualifiers or destination device to easily
identify it and quickly recognize its function. For example, if the requester
segregates media based on length, such as commercials (short-form) and
Configuring GMT
3-3
47.
Configuring Software Componentsprograms (long-form), name it REQSTCOM or REQSTPROG. If the requester
is assigned to an air or protect device, name it REQSTAIR or
REQSTPROTECT.
◆
Weighting: Weighting is a value used to off set the time stamp of an event on
the GMT list. The time stamp in this regard is the time in which the request
from the play list is made to the requester for an ID. Each successive ID that is
requested increments the time stamp by the duration of the requested ID plus
the time stamp of the previous ID. The weighting option adds the value
entered in the weighting field with the time stamps of each requested ID. The
purpose of this is to prevent confusion by the GMT system as to which IDs
have on-air priority.
For example, if a request for an event in the transmission list is received by a
requester at 12:00:00.00, it will be time stamped on the GMT list with this
time. However, if the value in the Weighting field is 00:30:00.00, then the time
stamp will be 12:30:00.00 to reflect the value of the Weighting field. If a second
event on the transmission list is requested and its duration is 00:00:30:00, then
the second event will be time stamped as 12:30:30:00, so on and so forth.
A system using two play lists is an example where the use of the Weighting
field may be most applicable, where one list is active (in transmission) and the
other list is inactive. If both play lists request for an event at the same time, or
in close proximity to each other, the system will not be able to determine
which event has priority unless one of the requesters assigned to a play list is
weighted.
Push Requester Parameters
These configuration parameters are designed to be used with a requester that is
configured for "Push List" operations. Both features can operate as stand-alone
functions as well as in tandem.
3-4
◆
Play Event: Enabling this option allows for As-run logs to be generated for
events that have been loaded on the push list for media that has been moved
from a source device to a destination device (not assigned to the push list).
Once the events have been loaded onto the push list, double-click the list to
display the software control panel on Air Client. To create the As-run log,
press the Play button on the control panel.
◆
Register Events When Moved: When an event’s media is requested by the
requester, its status is displayed as "requested" and is red in the push list.
When the event is transferred, the "requested" status is removed but the event
remains red. To register the media transfer by changing the event color to
blue, check the Register Events When Moved box.
Configuring GMT
48.
Configuring Software ComponentsNOTE If both buttons are checked and the requester is assigned to a push list, the event’s
status is "play" when transferring and "done" when it is transferred.
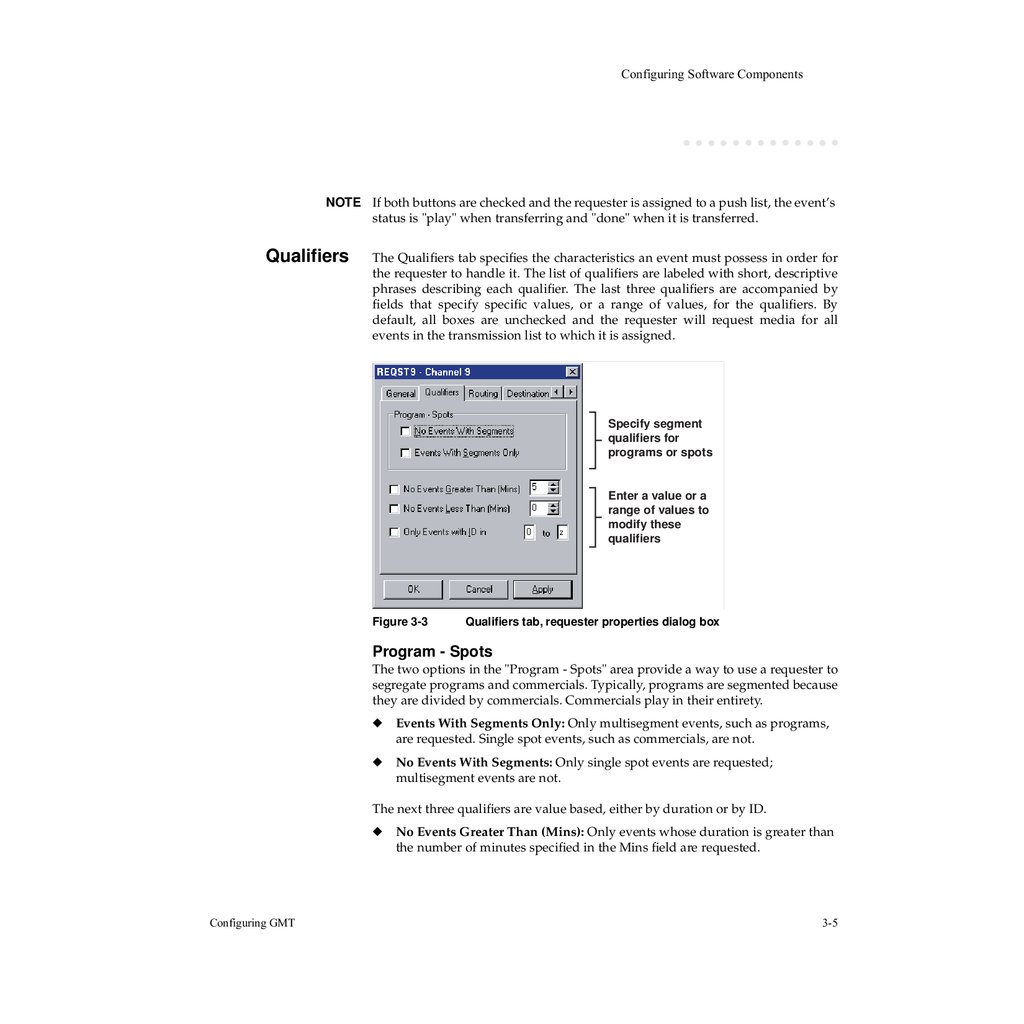
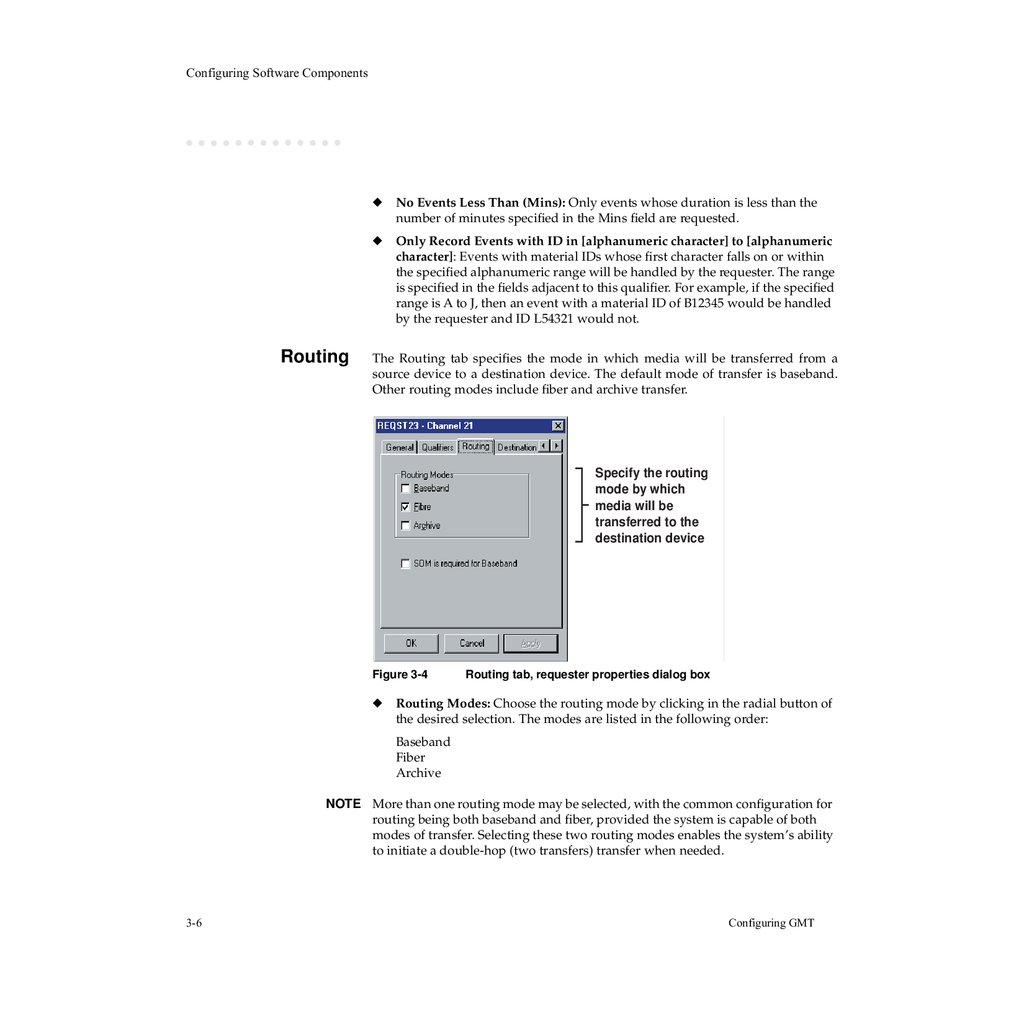
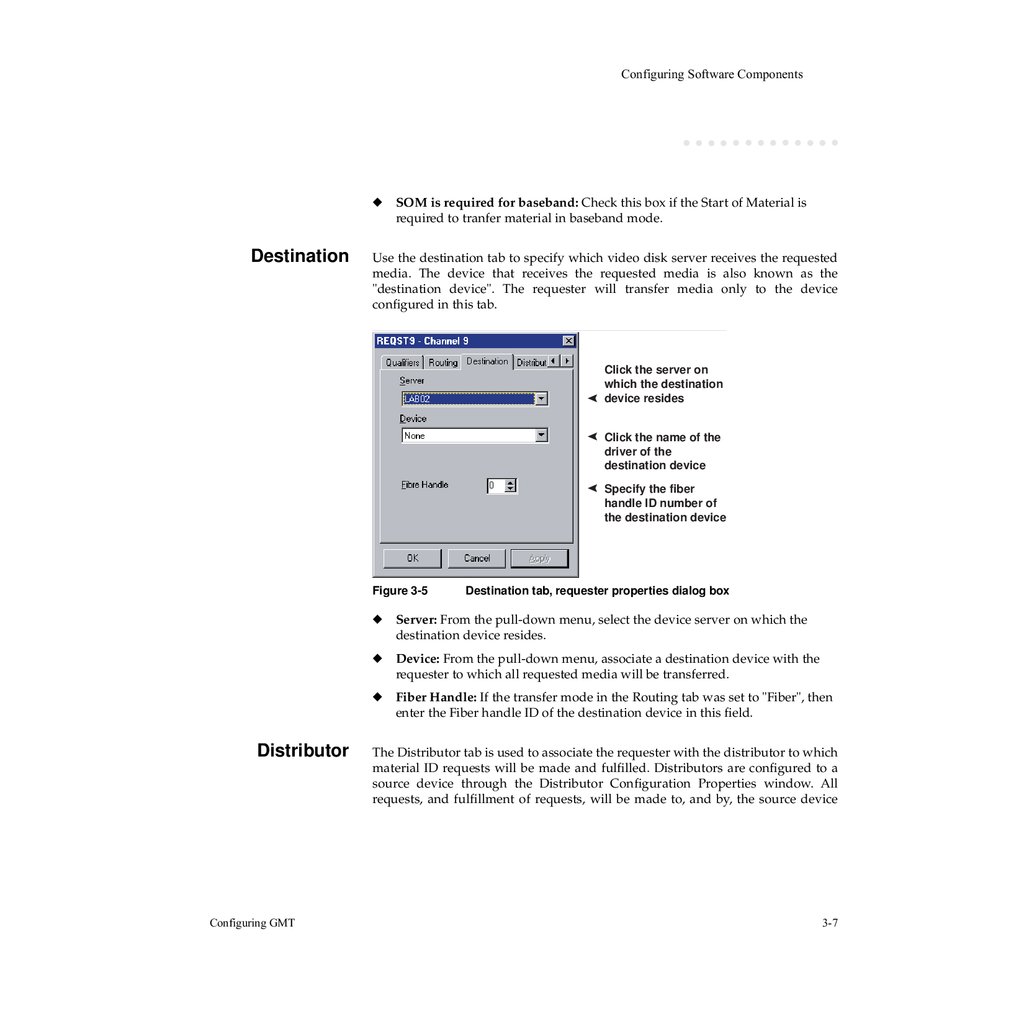
Qualifiers
The Qualifiers tab specifies the characteristics an event must possess in order for
the requester to handle it. The list of qualifiers are labeled with short, descriptive
phrases describing each qualifier. The last three qualifiers are accompanied by
fields that specify specific values, or a range of values, for the qualifiers. By
default, all boxes are unchecked and the requester will request media for all
events in the transmission list to which it is assigned.
Specify segment
qualifiers for
programs or spots
Enter a value or a
range of values to
modify these
qualifiers
Figure 3-3
Qualifiers tab, requester properties dialog box
Program - Spots
The two options in the "Program - Spots" area provide a way to use a requester to
segregate programs and commercials. Typically, programs are segmented because
they are divided by commercials. Commercials play in their entirety.
◆
Events With Segments Only: Only multisegment events, such as programs,
are requested. Single spot events, such as commercials, are not.
◆
No Events With Segments: Only single spot events are requested;
multisegment events are not.
The next three qualifiers are value based, either by duration or by ID.
◆
Configuring GMT
No Events Greater Than (Mins): Only events whose duration is greater than
the number of minutes specified in the Mins field are requested.
3-5
49.
Configuring Software ComponentsRouting
◆
No Events Less Than (Mins): Only events whose duration is less than the
number of minutes specified in the Mins field are requested.
◆
Only Record Events with ID in [alphanumeric character] to [alphanumeric
character]: Events with material IDs whose first character falls on or within
the specified alphanumeric range will be handled by the requester. The range
is specified in the fields adjacent to this qualifier. For example, if the specified
range is A to J, then an event with a material ID of B12345 would be handled
by the requester and ID L54321 would not.
The Routing tab specifies the mode in which media will be transferred from a
source device to a destination device. The default mode of transfer is baseband.
Other routing modes include fiber and archive transfer.
Specify the routing
mode by which
media will be
transferred to the
destination device
Figure 3-4
◆
Routing tab, requester properties dialog box
Routing Modes: Choose the routing mode by clicking in the radial button of
the desired selection. The modes are listed in the following order:
Baseband
Fiber
Archive
NOTE More than one routing mode may be selected, with the common configuration for
routing being both baseband and fiber, provided the system is capable of both
modes of transfer. Selecting these two routing modes enables the system’s ability
to initiate a double-hop (two transfers) transfer when needed.
3-6
Configuring GMT
50.
Configuring Software Components◆
Destination
SOM is required for baseband: Check this box if the Start of Material is
required to tranfer material in baseband mode.
Use the destination tab to specify which video disk server receives the requested
media. The device that receives the requested media is also known as the
"destination device". The requester will transfer media only to the device
configured in this tab.
Click the server on
which the destination
device resides
Click the name of the
driver of the
destination device
Specify the fiber
handle ID number of
the destination device
Figure 3-5
Distributor
Configuring GMT
Destination tab, requester properties dialog box
◆
Server: From the pull-down menu, select the device server on which the
destination device resides.
◆
Device: From the pull-down menu, associate a destination device with the
requester to which all requested media will be transferred.
◆
Fiber Handle: If the transfer mode in the Routing tab was set to "Fiber", then
enter the Fiber handle ID of the destination device in this field.
The Distributor tab is used to associate the requester with the distributor to which
material ID requests will be made and fulfilled. Distributors are configured to a
source device through the Distributor Configuration Properties window. All
requests, and fulfillment of requests, will be made to, and by, the source device
3-7
51.
Configuring Software Componentsassociated with the distributor configured in the Distributor Configuration
Properties window.
Select the server to
which the distributor
is assigned
Select the distributor
to which material ID
requests will be made
by the requester
Figure 3-6
Distributor tab, requester properties dialog box
◆
Server: Select the device server on which the distributor resides.
◆
Device: After selecting the device server, select the distributor to which
material ID requests will be made by the requester.
Configuring Multirequesters
Most of the configuration options found in the Multi-requester Configuration
Properties window are similar to those found in the Requester Configuration
Properties window with several differences. Chief among these differences is the
ability to configure multiple destinations using the Multi-Destinations tab.
Please refer to the corresponding sections in "Configuring Requesters" for details
on the following multirequester tabs:
General - “General” on page 3-3
NOTE With respect to the multirequester, the weighting value entered in the Weighting
field will be applied to the time stamp of the requested material as if there were
only one configured destination device. However, all lists associated with the
multirequester via the destination devices configured for it will all reflect identical
time stamps, that is, they will all be weighted with the same weighting value.
3-8
Configuring GMT
52.
Configuring Software ComponentsQualifiers - “Qualifiers” on page 3-5
Routing - “Routing” on page 3-6
Distributor - “Distributor” on page 3-7
MultiDestinations
The Multi-Destinations tab is used to configure the multi-requester for multiple
destination devices, giving it the ability to associate multiple streams of the
requested material to multiple devices and multiple lists. The destination devices
can reside on other device servers as long as the device servers are part of the
automation network and GMT has access to them.
To add multi-destinations for the multi-requester, two windows will be used. The
first is the Multi-Requester Configuration Properties window with the MultiDestinations tab on display. Clicking the Add button will display the second
window used in the process - the Destinations window.
Figure 3-7
◆
Configuring GMT
Multi-Destinations tab
Add: Use the Add button to add destination devices for the multi-requester.
When the Add button is clicked, the following window will appear:
3-9
53.
Configuring Software ComponentsFigure 3-8
Destination window - Multi-Destinations tab
◆
Server: From the pull-down menu, select the device server on which the
destination device resides.
◆
Device: From the pull-down menu, associate a destination device with the
multi-requester to which all requested media will be transferred.
◆
Fiber Handle: If the transfer mode in the Routing tab was set to "Fiber", then
enter the Fiber handle ID of the destination device in this field.
Click "OK" to accept all of the selections, or "Cancel" to cancel and start over.
Clicking the "OK" button will display the Muli-Destinations tab again displaying
the destination device just added, as in the following example:
3-10
Configuring GMT
54.
Configuring Software ComponentsFigure 3-9
Multi-Destinations tab with multiple destinations configured
Notice the check boxes next to each destination device.
- To temporarily omit a device as a destination from the multi-requester,
deselect the device by clicking in the check box to remove the check. Then
click the "Apply" button to accept the omission.
- To include a device on the list as a destination device, click the empty check
box next to the desired destination device and click "Apply" to accept the
selection.
◆
Delete: To permanently remove a device as a destination, highlight the device
to be removed by clicking on the server name and click the "Delete" button.
Then click "Apply" to accept the deletion.
Configuring Distributors
Distributors are accessible from the Available column on the Configured Devices
window. Distributors, like most other devices and many software objects, are
configured through the device server’s Configuration Manager. Please refer to
“Configuring Requesters” on page 3-2 and follow steps 1 to 3 to assign a
distributor to a device server channel and to display the Distributor
Configuration Properties window. Substitute all references to "requesters" with
"distributors".
Configuring GMT
3-11
55.
Configuring Software ComponentsGeneral
The General tab consists of only one field entry and that is the Device Name field.
Type a new name for
the distributor in the
Device Name field
Figure 3-10
General tab, distributor properties dialog box
Device Name: Enter the name of the distributor. It cannot exceed 16
alphanumeric characters. The default name displayed in this field will be
DISTRxx where xx is the position of the distributor within the server’s device list,
also known as the device server channel. As a rule of thumb, a distributor’s name
should be based on the requester associated with it, or its source device, to easily
identify it and to quickly recognize its function. For example, if the distributor is
assigned to a requester that requests media for an air or protect device, name it
DISTRAIR or DISTRPROTECT. If the distributor’s source device is an archive or
video disk server, name is DISTRARCHIVE or DISTRVDSK.
Routing
Use the Routing tab to specify the type of transfer the distributor will handle. The
options are baseband, fiber, and archive. Baseband is selected by default.
Each method of routing will have a number of other configuration options
associated with them. When a routing option is selected, those additional options
will appear directly below the Routing options area.
NOTE REQUESTER & DISTRIBUTOR ROUTING CONFIGURATIONS: The routing
options configured in the distributor affect the media transfer mode differently
than those configured in the requester. Unlike the Routing tab on the Requester
Properties window, only one routing mode can be specified in the Distributor
Properties window. Additionally, the requester routing option determines how
3-12
Configuring GMT
56.
Configuring Software Componentsmedia will be transferred to its final destination - the destination device, whether
or not the actual transfer requires a single-hop or double-hop transfer. The routing
options configured in the distributor often determine if a single or double-hop
transfer will occur, which in turn is determined by the source device in which the
media is located. Devices that cannot tranfer material via fiber mode, such at
VTRs and cart machines, must first tranfer the media via baseband to an
intermediate device, which is always a video disk, thus enabling the second leg of
the tranfer to be done via fiber mode. This method of tranferring material allows
baseband (only) devices to be a part of a fiber network. More on double-hop
transfers are explained in the following sections.
Select a routing
mode - baseband
Select the
intermediate
destination
device for doublehop transfers
Figure 3-11
Routing tab- baseband transfer
Routing
◆
Routing - Baseband: Select the type of transfer, or routing mode, the
distributor will handle by clicking in the radial button of the desired mode of
transfer. The default selection is baseband. The following are the three routing
modes:
Baseband
Fiber
Archive
Configuring GMT
3-13
57.
Configuring Software ComponentsWhen baseband (default) mode is selected, a number of additional
configuration options will be displayed below the Routing area, in an area
called the Intermediate Device.
◆
Intermediate Device
The intermediate device is used when the distributor cannot initiate a media
transfer because the source device in which the media is located cannot
transfer material via fiber mode, e.g. a VTR or cart machine. In order to
facilitate the transfer, an intermediate device must be used, which is always a
video disk. When the intermediate device receives the media, it then changes
roles and becomes the source device. At this point, the media transfer to the
destination device can now be completed via fiber transfer.
NOTE Typically, in a system using an intermediate device to enable double-hop
transfers, there will be at least two device servers - one where the transmission list
resides and one where the GMT list resides. Figures 3-12 and 3-13 represent a two
device server configuration, where the transmission list and its assigned
components reside on one device server and the GMT list and its assigned
components reside on another.
◆
Server: Select the device server in which the intermediate device resides.
◆
Device: Select the video disk that will act as the intermediate device in order
to complete the double-hop transfer of the media to its final destination.
◆
Fiber Handle: Enter the fiber handle number of the intermediate device. As
the intermediate device will tranfer the media to the destination device via
fiber transfer, the fiber handle number must be entered as the intermediate
device’s associated (fiber) distributor will communicate this information to
the requester that originally requested the media.
The following diagram is a representation of the flow of communication between
the various software objects in GMT and the actual transfer of media using the
intermediate device and the double-hop transfer.
3-14
Configuring GMT
58.
Configuring Software ComponentsGMT1
ADC100NT #2
X-LIST 1
ADC100NT #1
1
DISTFIB1
fiber distributor source device is
DISK2 (the
intermediate device
DISK1 destination
device
5
3
4
2
REQMAIN
requester - fiber
AND baseband
transfer enabled
DISK2 intermediate disk
(fiber handle - 2)
6
DISTBB1 (configured
next distributor)
baseband distributor source device is VTRA
8
7
VTRA - source
device for
DISTBB1
Figure 3-12
Fiber routing configuration using an intermediate device Distributor
1. The transmission list (X--LIST) queries the destination device (DISK1) for the
existence of media associated with an event in its play list.
2. The media is not found in DISK1, so X-LIST sends a command to the requester
(REQMAIN) to search for the media.
3. REQMAIN requests for the media from its associated fiber distributor (DISTFIB1).
4. DISTFIB1 queries its source device (DISK2), which in this case, is also the
intermediate device.
5. The material is not currently found in DISK2 and it communicates this back to
Configuring GMT
3-15
59.
Configuring Software ComponentsDISTFIB1.
6. The search for the media is then passed on to DISTFIB1’s configured next
distributor (DISTBB1), a baseband distributor.
7. DISTBB1 queries its associated source device (VTRA) for the existence of the
media.
8. VTRA communicates to DISTBB1 that it has the media.
GMT1
ADC100NT #2
X-LIST 1
ADC100NT #1
11
9
DISTFIB1
fiber distributor source device is
DISK2 (the
intermediate device
DISK1 destination
device
13
12
10
REQMAIN
requester - fiber
AND baseband
transfer enabled
DISK2 intermediate disk
(fiber handle - 2)
DISTBB1 (configured
next distributor)
baseband distributor source device is VTRA
10
VTRA - source
device for
DISTBB1
Figure 3-13
Fiber routing configuration using an intermediate device Distributor
9. DISTBB1 notifies GMT1 that VTRA has the requested media.
10. In turn, GMT1 sends a command to VTRA to play out the media, and at the same
3-16
Configuring GMT
60.
Configuring Software Componentstime, sends a command to DISK2 to record the media. The play out and record
statuses are indicated on the GMT list.
11. As the media is being ingested into DISK2, GMT1 communicates to DISTFIB1 that
the requested media is now located in DISK2. DISTFIB1 then builds a transfer
command and stores it on GMT1. It will use the transfer command to initiate the
transfer from DISK2 to DISK1.
12. When the media is ready to be transferred to its final destination, DISTFIB1
retrieves the transfer command from GMT1 and sends it to DISK2 to transfer the
requested media to DISK1.
NOTE Which device, source or destination, receives the transfer command from the fiber
distributor is configured in the Distributor Properties window in the Routing tab
when "fiber" is selected as the mode of transfer.
13. DISK2 transfers the requested media to DISK1. The status of the transfer will be
displayed on the GMT list in the form of "MOV 2:1".
What’s just been described above is called a "double-hop" transfer, where the first
leg of the media transfer is done via baseband because the device in which the
media is located is a baseband (only) device. The second, and final, leg of the
transfer is done via fiber mode. Integrating baseband (only) devices into a fiber
network will always require the use of an intermediate device which will always
be a video disk, thus resulting in a double-hop transfer.
Figure 3-14
Configuring GMT
Routing tab - Fiber transfer
3-17
61.
Configuring Software Components◆
Routing - Fiber: When the fiber routing mode is selected, the accompanying
configuration options are found in an area called "Send disk command to".
The two options found here, "Destination" and "Source", determine which
device, destination or source, will receive the command to initiate the
transfer. If a fiber distributor is able to handle a request for material, it will
build a transfer command for the requested material and place it on the GMT
list. When the transfer is ready to be initiated, the distributor will take the
transfer command back from the GMT list and send the command to a
designated device - destination or source.
◆
Destination: Click this radial button if the command to transfer material is to
be sent to the destination device from the fiber distributor. By selecting this
option, when the fiber distributor receives the transfer command it
constructed back from the GMT list, it will send this command to the
destination device to have it initiate the transfer of the media from the source
device.
◆
Source: Click this radial button if the command to transfer material is to be
sent to the source device from the fiber distributor. By selecting this option,
when the fiber distributor receives the transfer command it constructed back
from the GMT list, it will send this command to the source device to have it
initiate the transfer of the media to the destination device.
Figure 3-15
3-18
Routing tab - Archive transfer
Configuring GMT
62.
Configuring Software ComponentsSource
◆
Routing - Archive: The archive routing mode only has one additional
configuration option accompanying it.
◆
Single-Hop Archive Transfer Only: When the Single-Hop Archive Transfer
Only button is checked, all archive transfers must require a single-hop (one
transfer) in order to transfer material to its destination device. Selecting this
option means that media stored in baseband archive devices, yet are a part of
a fiber network, will not be able to be transferred to any destination device
that is part of the fiber network, as it would require a double-hop transfer.
Additionally, archive devices that have fiber connectivity, yet are part of the
inner ring in a "next ring" configuration, could also require a double-hop
transfer to move media to a device located in the outer ring. Consequently,
having the Single-Hop Transfer Only enabled would prevent this.
Use the Source tab to associate the distributor with its source device (the device
the distributor queries in search of requested media) and to link the distributor to
other distributors to provide a hierarchical search path, as described in “Multiple
Distributors” on page 2-16.
Figure 3-16
Configuring GMT
Source tab
◆
Server: Select the device server the source device resides in from the Server
pull-down menu.
◆
Device: After making the device server selection, select the name of the
source device from the Device pull-down menu.
3-19
63.
Configuring Software Components◆
Fiber Handle: If the source device is a video disk server, type the fiber handle
address in the Fiber Handle field or use the scroll forward/backward arrows
to make a selection.
NOTE In the case of configuring a distributor as an archive distributor, the Fiber Handle
entry also designates the video disk that will act as the second source device, in
addition to the archive device. For material requests originating from a Media
Client, the fiber handle entry designates the video disk acting as the destination
device. Please see “Single Spot Archiving” on page 4-21 for further details on the
latter.
Next Ring
3-20
◆
Wait until missing media is available: Typically, an event is not placed on a
GMT list until the distributor locates its media on a device. If this button is
checked, the event will be placed on the GMT list before the event’s media is
found and is displayed in red. When the distributor finds the media, then the
event is displayed in blue. This feature is useful in being able to visibly keep
track of the statuses of missing media. This feature is only available for
baseband and archive transfers.
◆
Next Distributor: To link the distributor with another distributor, or the "next
distributor", select the distributor from the Next Distributor pull-down menu.
The next distributor is the distributor that takes up the search for a requested
media when the initial distributor’s source device does not have the
requested media. If the distributor is the last distributor in the hiearachical
search path, link it to the first distributor. Distributors should be linked from
the most likely to the least likely source.
The Next Ring tab is used to configure the distributor for the first device it will
query in the next ring and the device server in which it resides. When a request
for material returns back to the distributor that received the initial request after all
associated devices in the first ring have been queried, and the material has still
not been found, the distributor forwards the request to the device configured in
the Next Ring tab to continue the search for the material.
Configuring GMT
64.
Configuring Software ComponentsFigure 3-17
Global Delete
Targets
Next Ring tab
◆
Distributor - Server: From the Server pull-down menu, select the device
server in which the device in the next ring resides.
◆
Distributor - Device: From the Device pull-down menu, select the device
that the distributor will query first in the next ring.
The Global Delete Targets tab is used to configure a distributor for purge
operations in Media Client. For additional information on this tab, refer to
“Configuring Distributors for Purge Operations” on page 4-1.
Assigning Components to Lists
Use the List Assignments window to assign GMT software components and
device drivers to transmission lists and GMT lists.
To assign a device to a list:
1.
Configuring GMT
On the ADC100NT Configuration window, right-click a device server, then
click List Assignments.
3-21
65.
Configuring Software ComponentsThe List Assignments window opens. The devices, requesters and
distributors are listed in the Available Media column.
Figure 3-18
2.
List Assignments window
To assign a device to a transmission list or GMT list, drag a component from
the Available Media column and drop it on a list in the Lists column.
GMT Scaling Options
Requesters, distributors, and GMT Lists offer the flexibility, scalability and load
balancing requirements necessary for virtually any broadcast facility in the world
- from the small, local station to the national networks. The broad range of
configuration options and the versatility offered by the Harris GMT system
components means a greater range of options for any facility and an extremely
efficient method of managing a facility’s media assets.
Requesters
3-22
◆
Minimum one per GMT Destination Device per playlist
◆
Air Protect - one per protect device
◆
Additional input record ports to separate program and spot material based
on optimizing the destination device for different paths, i.e. multi-fiber search
paths
Configuring GMT
66.
Configuring Software ComponentsDistributors
GMT Lists
◆
Minimum one per each source device.
◆
Hierarchical decision making for moving material (example fiber first then
baseband)
◆
Media Source Optimization, such as using an Archive to achieve a quicker,
more efficient usage of a device.
Additional GMT lists are usually only necessary when a single system is
segmented in order to limit or control access, such as news versus on-air, long
form programming versus commercial spots or separating broadcast coverage
areas, etc.
Assigning Distributors
The source device for a distributor is the output, or play out, port of a video disk.
On video disk servers, multiple distributors can be assigned to one port for
simultaneous transfer of media on a single fiber channel to multiple destinations.
Assigning Devices Transferring via Baseband
In a baseband configuration, the play out port of a baseband source device will be
assigned to the GMT list. The record port of a baseband destination device will
also be assigned to the same GMT list as the source device. Additionally, in order
to play out the transferred material, a play out port of the same destination device
must be assigned to the transmission list. When a requested media is found in the
source device, and this is communicated back to the GMT list, the GMT list will
send a command to the source device to play out the media, while at the same
time, it will send a command to the record port of the destination device to record
the media. Once the media has been ingested into the destination device, the play
out port of the destination device is now capable of playing out the media.
The following represents how a basic GMT baseband configuration might look in
the List Assignments window.
Configuring GMT
3-23
67.
Configuring Software Componentsplay out port destination device
play out port source device
record port destination device
Figure 3-19
Basic GMT baseband configuration
Assigning Devices Transferring via Fiber and
Archive
Assigning devices to a play list for a system using fiber transfer isn’t very
different than assigning devices to a play list using baseband transfer. However,
there are several critical differences with respect to configuration factors that must
be considered at the time devices are being assigned to play lists.
◆
3-24
GMT list - Unlike a system using baseband transfer, distributors in a system
using fiber transfer do not have to be paired with its associated source device
under the same GMT list. The source device and/or the distributor can reside
on another list (GMT or play) and even another device server altogether, with
the caveat being that those devices are accessible to one another in order for
the GMT system to function properly.
Configuring GMT
68.
Configuring Software Components◆
Push list - Similar to what is noted above, only with respect to a requester, the
push list model does not require the destination device to be assigned to the
same play list as its associated requester. The requester must, however, be
assigned to the list that is acting as the push list with the destination device
assigned to the transmission list that is to go on-air.
◆
Fiber Handle addresses - Video disks are assigned fiber handles, along with
associated IP addresses, by their manufacturers, which are used to identify a
device and to direct the flow of media to a destination.
◆
Double-hop transfer - Automation systems integrating a fiber system with a
baseband and/or archive transfer system will oftentimes require intermediate
devices (always a video disk), therefore, requiring double-hop transfers to
complete transfers between baseband (only) devices and fiber devices. The
only way to integrate baseband (only) devices into a fiber network is to use a
fiber device (video disk) as the intermediate device between the baseband
(only)devices and the fiber network.
The following figure represents the most basic GMT fiber configuration.
Configuring GMT
3-25
69.
Configuring a GMT Listfiber destination
device
fiber source
device
Figure 3-20
Basic GMT fiber configuration
Configuring a GMT List
Many of the list configuration options found in the GMT List Options window
are similar to the options found in the Options window accessed from Media
Client or Air Client. The four tabs found in the GMT List Options window are:
Parameters, Options, Events To Log, and GMT. For further details about lists and
how to configure them, please refer to the ADC Device Server User’s Guide.
Parameters
3-26
The Parameters tab contains a number of configuration options which determine
how a device will physically manipulate media before and after play out. The
options found here apply specifically to all media in relation to the GMT list.
Configuring GMT
70.
Configuring a GMT ListFigure 3-21
Parameters tab
Name
◆
Name: If a unique name, or ID, has not been assigned to the GMT list, or the
name needs to be changed, enter the name in this field.
Options
Configuring GMT
◆
Rewind Spots: After a spot plays, the automation system rewinds the tape
before ejecting it from the VTR. The tape is rewound to the SOM minus the
preroll (on a multi-spot tape, the tape is rewound to the SOM minus the
preroll of the last spot played). Default is enabled.
◆
Rewind to First Program Segment: After a program plays, the automation
system rewinds the tape to the first segment before ejecting it from the VTR.
The tape is rewound to the SOM of the first segment minus the preroll.
Default is disabled.
◆
Rewind Compile Material: After the final spot on a compile tape plays, the
automation system rewinds the tape before ejecting it from the VTR. The tape
is rewound to the first commercial break (or “pod”) minus the preroll. Default
is disabled.
3-27
71.
Configuring a GMT List◆
Extended Time to Next: The Time to Next functionality has been enhanced on
a transmission play list. Default is enabled.
The major Time to Next enhancements are:
- When the termination event is an O (hard start) event the Time To Next
display includes the running short value.
- Zero duration up counters no longer stop the rippling.
- When in an up counter, if an O event exists as the termination event, the
Time To Next computation computes without any long or short value. It
displays exactly how long until the hard timed start begins.
◆
Thread Limited: A new list configuration, Thread Limited is available for
controlling threading on a list. By enabling the Thread Limited option, nonthreaded but blue (registered) events count toward the total thread time as if
they were threaded. Default is disabled.
◆
Auto Restart When Cued: Allows a missing event to automatically start
when cued. If disabled, the automation system marks the event as missing
and does not automatically cue the event when located. Default is disabled.
Time Parameters
Options
3-28
◆
Preroll Seconds: Define the number of preroll seconds to be used for the
selected list. The valid range is 0-59 seconds. Default is 3 seconds.
◆
Preroll Frames: Define the number of preroll frames to be used for the
selected list. The valid range is 0-29 frames. Default is 0.
◆
Postroll Seconds: Define a length of time, in seconds, the automation system
plays the current event beyond its duration if it has not yet switched to the
next event. The valid range is 0-59 seconds. Default is 1 second.
◆
Postroll Frames: Define a length of time, in frames, the automation system
plays the current event beyond its duration if it has not yet switched to the
next event. The valid range is 0-29 frames. Default is 0.
◆
StandbyOn Seconds: The amount of time the automation system keeps the
VTR in tension after cueing an event. The valid range is 10-59 seconds.
Default is 30 seconds.
The Options tab contains a list of configuration options that, for the most part,
determine how the GMT list will affect
Configuring GMT
72.
Configuring a GMT ListFigure 3-22
Options tab
Options
Configuring GMT
◆
Switch to Black: Switches to black on the output channel whenever the lists
stops. Default is enabled.
◆
Play Hard Hits: Enables a hard start event to be started by an operator
pressing the play button on the Control Panel. When disabled, an operator is
unable to start a hard start event unless they clear the hard start type. Default
is disabled.
◆
COntact Start: Enables the Transmission list to be started by a GPI (General
Purpose Interface) contact. The GPI contact is equivalent to selecting Play on
the Control Panel. Playlists 1 through 16 correspond to contacts 1 to 8 of Card
One/Two, respectively. Default is disabled.
◆
Auto A-B Routing: Overrides an event’s channel settings (displayed in
Transmission window's CH column in Air Client). During transmission,
successive primary events are routed alternatively through switching
channels A and B. This function is useful to ensure that two successive events
are not played through the same channel (which is needed when transition
effects such as mixes are defined between events). Make sure both A and B
3-29
73.
Configuring a GMT Listchannel A/V parameters are configured in all devices that are used. Default is
disabled.
3-30
◆
Play ID Title Mismatches: (Optional feature) Allows mismatched events to
play. Default is enabled. Skip Bad Events: Enables the list to skip bad events.
A “bad” event is an event that is unable to play, such as unavailable media or
an event that causes an error during transmission (due to a tape jam or tape
running short, etc.). If consecutive bad events are encountered, only the first
bad event is skipped. In order to skip the following events you must use the
Play button in the Control Panel. If this option is disabled, the list stops
running when a bad event is encountered. To restart the list if this occurs, cut
the bad event from the list and press Play. Default is enabled.
◆
Station ID On Skip: When this option is enabled and a Skip command is
issued, the system automatically switches to the Logo input. The Logo input
is configured in the Device Server through the switcher’s device parameters.
Default is disabled.
◆
Release Tension When Cued: Places tape events into tension release when
they are cued. The events are readied at the Standby On time before they are
due to roll. Default is disabled.
◆
Timed List: Enables the list to play Hard Start events at their specified start
times. Default is enabled.
◆
Update On-Air Time: After each event plays, the system updates the event’s
time to the actual time that the event was transmitted. This information is also
written to the As-Run Log (if logging is enabled). Default is enabled.
◆
Auto Ripple Times: The system recalculates the projected start times for the
events in the list dynamically during playout (up to the first hard start event
encountered) and updates the event times accordingly. The calculation
assumes that the Duration field for up-counting events is accurately set.
Default is disabled.
◆
Tension After Up Counter: The next Standby On time (in seconds) worth of
events that follow an up-count event are tensioned on. If this option is
disabled, the events are tension released and the next event may only be
tensioned on manually by pressing Ready in the Control Panel. Default is
disabled.
◆
Thread After Break: Controls whether or not events are threaded following a
break. If this parameter is disabled, no events are threaded after the break.
The events must then be individually threaded once the list reaches the break,
or the Program Run button must be pressed after the break event is reached.
Default is enabled.
Configuring GMT
74.
Configuring a GMT List◆
Keep List Threaded: This option keeps as many devices threaded as possible,
at all times. If an event is inserted into the list to be played, the event is
immediately cued and subsequent events unthreaded as necessary. When
enabled, thread time is not used. When disabled, events are cued only within
the thread times. Default is disabled.
Done Count
A Done Count is the number of completed events that displays in the
Transmission List window on the Air Client. The valid range is from 1 to 20
events. Default is 4 events.
Thread Time
The amount of time a cart machine loads and threads a tape in a VTR prior to its
scheduled on-air time. The valid range is from 0 to 23:59:59:29 (23 hours, 59
minutes, 59 seconds, and 29 frames). Default is 2 minutes. If the Keep List
Threaded box is enabled, that setting overrides the Thread Time setting here.
Events To Log
Configuring GMT
All events to be logged for the GMT list are configured from this tab. For a
detailed explanation of the following options, please see the Air Client User’s
Guide.
3-31
75.
Configuring a GMT ListFigure 3-23
Events to Log tab
Secondary Events To Log
3-32
◆
GPI Contact: Inserts a GPI contact closure secondary event to the list. For
each event, an on time (offset) and duration value must be entered. An offset
indicates how long after the start of the primary event the contact closure
should occur. The duration value sets the duration of the pulse or length of
closure of the contact. The offset is entered in the event’s on-air field and
duration in the DUR field. The GPI closure may be longer than the associated
primary event. Default is enabled.
◆
Back Timed GPI: Backtimed GPI is similar to a standard GPI event, except
that the offset is measured backwards in time from the start of the associated
primary event. For example, a backtimed GPI event with an offset of 5
seconds fires the GPI contact 5 seconds before the start of the associated
primary event. A backtimed GPI event cannot be attached to an event
following a primary upcount event. In this case, the system would not be able
to calculate when to begin the GPI event. Default is enabled.
◆
Sec. Audio/Video: Secondary Audio/Video event; plays material, in addition
to the primary event on air, for use in effects such as keys, audio overs and
mixes. Default is enabled.
Configuring GMT
76.
Configuring a GMT List◆
Back Timed Sec. Audio/Video: Same as Sec. Audio/Video except the
secondary’s on-air time is the amount of time before the primary event
begins. In the event Type field, these events are inserted with types P and T
(but not A). No switching is done on these events unless this is changed.
These events can be used as a key/audio over inputs to a master control
switcher. Default is enabled.
◆
Keyer On/Off: Allows events to have an offset from the beginning of the
event to be specified. Define a secondary Keyer event in which a hole is cut in
the associated primary event’s video output and is filled with the output of
the Keyer source. Default is disabled.
◆
Transition Key: Similar to Keyer On/Off (above), except that the keyer is
brought up at the start of its associated primary event with the same
transition type. This type of secondary event has a configuration dialog box
similar to Keyer On/Off; however, for the transition key, the value of the
offset cannot be set. It is possible to define a transition key event so it lasts as
long as the primary event. To do this, make the duration field blank. If the key
hold option is on, the key is held over the transition in the same way as an
ordinary secondary keyer event. Default is disabled.
◆
Audio Over On/Off: The Audio Over secondary event is used to add another
audio source over the primary audio/video source. The audio over source
may replace the primary audio source or be mixed with it. Default is disabled.
◆
Transition Audio Over: Allows you to specify a secondary audio event to
coincide with the primary event in the same manner as a transition keyer
event, as described in Keyer On/Off (above). This event has a set of options
that are identical to the audio over on/off secondary event, except that the
ontime option is missing (the ontime for a transition audio over event is set to
0). In order to have the secondary audio event end at the same time as its
primary event, make the duration field blank. Default is disabled.
◆
Data Event: This type of secondary event is associated with a device but does
not generate any video output. Instead, the action specified by the event is
performed at the time the event would be put on air, had the event been
associated with a video device.
For video disk servers, a data event is used to control and automate the
deletion of spots from the server. The use of this event with video disk servers
requires an accurate scheduler or traffic program. If the events are not used
carefully, spots may be accidentally deleted in the video disk server.
Secondary data events are used to command serial devices requiring a simple
command that does not need to run a countdown on the time
of an event. Default is enabled.
Configuring GMT
3-33
77.
Configuring a GMT List◆
Barter Spot: Barter spot events are associated with a primary event and are
logged to the asrun log when the primary event runs to completion and is
logged. Barter spot events are treated as comments by the automation system
and are not played. Default is disabled.
◆
Record Switcher: A secondary event that performs extra switching for inputs.
During a recording, this switches to the secondary event’s source. The name
of the source to switch to is entered in the title field. This name must also be in
the source name table for the switcher that is supplying the video to the
record device.
The event is only performed if the primary event’s device has the A/V data
parameters configured to specify the switcher number that has the matching
name in its source name table. Default is disabled.
◆
Switcher Cross Point: This is a secondary event that performs extra switching
for outputs. While an event plays, this function switches to the secondary
event’s source:destination. This type of secondary event allows the control of
multiple crosspoints during one primary event. Default is disabled.
◆
Secondary Record: This type of secondary event allows for the automatic
recording and segmenting of live program material for immediate playback
to air. Unlike most record events, this event is used in a list that combines
record and playback activities. A secondary record event is attached to each
primary event that is being recorded. Default is enabled.
◆
Break Sync: Break sync contains an estimated time of day a pod will run, a
deviation time and a time for a window of opportunity for the operator to
react to the event.
This event is normally used on a list that contains only pods/breaks of
commericals. The pods are separated by either an upcount event or by this
Break sync event. The pods are triggered to run by an external contact closure
(GPI) or by clicking Play on the control panel. In normal operation, a contact
closure/play button is detected and the next pod on the list is played. The
break sync event is marked DONE immediately. The pod plays out until
either an upcount event, break sync event or the end of the list is encountered.
Default is enabled.
3-34
◆
Comment: Use this secondary event to enter notes into the playlist.
Comments are ignored during transmission. Any text may be inserted into
the title field of a comment. Default is disabled.
◆
System Event: Allows the traffic system to schedule device (resource)
assignments during the execution of a transmission list. Like all secondary
events, this type of event is attached to a primary event. When this event type
is run, it is able to move unowned device heads to the list running this event
Configuring GMT
78.
Configuring a GMT Listor release device heads in order to make them available to another list. It is up
to the traffic department to schedule the assignment and release of heads so
that two lists will not conflict in their usage of these heads. Default is enabled.
◆
Back Timed System Event: Works in the same manner as secondary system
except that this event type runs prior to the primary event by the time
specified in the Time field. Default is enabled.
Log Record Events
◆
GMT
Log Record Events: Check this box to create logs of all record events.
The GMT tab has only one configuration option, Skip Events Not Cued, found in
an area called Options.
Figure 3-24
GMT tab
Options
◆
Configuring GMT
Skip Events Not Cued: This option is used for baseband transfers. When
selected, if the source event’s media does not cue, then the source and
destination events are automatically marked as "Missed" and eventually
3-35
79.
Configuring a GMT Listremoved from the GMT list. If the option is not selected, then the events
remain on the list allowing the operator to intervene in the GMT list and
correct the source event so that it can be re-cued.
3-36
Configuring GMT
80.
4GMT Purge and Archive
This chapter describes how to configure the GMT list and Media Client for purge
and archive operations.
Purging with GMT
GMT automatically locates the device to purge a spot from when the spot cannot
be found on the device in which it was originally recorded. The device(s) GMT
will search to conduct purge and delete operations is configured in the Global
Delete Targets tab found in the Distributor Configuration Properties window.
Configuring Distributors for Purge Operations
Before GMT can be used for purge operations, a distributor must be configured
specifically for it from two different places - from the Global Delete Targets tab
found in the Distributor Configuration Properties window and from Media
Client. First, the distributor used specifically for purging and deleting must be
configured using the Configuration Manager. Once the configuration process on
this end is completed, the same distributor must then be configured for Media
Client. For more details about configuring Media Client for purge operations,
please refer to the Media Client Reference Guide.
To configure a distributor for purging operations using the Configuration Manager:
1.
2.
3.
4.
5.
Launch the Configuration Manager application, as described in “Configuring
Software Components” on page 3-1, and in the ADC100NT Configuration
window, right-click the device server, then click List Assignments.
Drag an available distributor from the Available Media column of the List
Assignments window and assign it to a GMT list by dropping it on the GMT
list which will initiate purge operations.
Right-click on the distributor and select Properties.
In the Device Name field on the General tab, name the distributor by
something that identifies its function, such as "DELETEDIST."
On the Routing tab, set the routing method to Fiber.
NOTE Only fiber transfers are supported for purge and delete operations.
GMT Purge and Archive
4-1
81.
Purging with GMT6.
On the Source tab, specify the source device to be associated with this
distributor, as described in “Source” on page 3-19, as well as the next
distributor.
NOTE When a distributor is being configured specifically for purge and delete
operations, it must still be configured for a source device, despite that the source
device will have nothing to do with purging and deleting. If a source device is not
configured for the distributor, it will not function properly.
7.
8.
Click the Global Delete Targets tab.
Click the Add button.
Another window will appear to specify which device(s) will be designated as
the device(s) in which spots will be searched for, and if found, purged.
NOTE The source device configured in the Source tab has no relation to the device(s)
configured through the Global Delete Targets tab, as the latter deals strictly with
those devices from which spots will be purged and deleted.
Figure 4-1
4-2
Adding a device to delete from
GMT Purge and Archive
82.
Purging with GMTClick the arrow on the Server pull-down menu, then select the device server
on which the video disk resides.
10. On the Device pull-down menu, select the name of the device driver that is
associated with the video disk.
9.
NOTE Although the pull-down menu will display all of the devices that reside on the
device server selected, only a video disk can be selected as a device in which
purge and delete operations can occur.
11. Enter a unique fiber handle for the device in the Fiber Handle field, then click
OK.
NOTE The fiber handle number is designated by the video disk manufacturer. The fiber
handle number entered in this field must correspond to the fiber handle number
designated by the manufacturer for the device.
12. Click OK on the distributor configuration properties window to accept the
selections and close the window.
Configuring Media Client for Purge Operations
Once the distributor has been configured for purge and delete operations from the
configuration properties window, it must then be configured for Media Client. If
the distributor is not configured on the Media Client side, purge and delete
operations cannot be conducted. Trying to do so will result in an error message
indicating that no distributor has been configured.
Use the Single Spot Configuration window to configure Media Client to use GMT
for purge operations.
1.
2.
GMT Purge and Archive
Select Single Spot from the Configuration drop-down menu on the main
toolbar, which displays the Single Spot Configuration window.
Click the Distributors tab.
4-3
83.
Purging with GMTFigure 4-2
3.
Distributor tab on the Single Spot Configuration window
From the Delete pull-down menu, select the name of the distributor that was
configured in “Configuring Distributors for Purge Operations” on page 4-1,
then click Save to accept the selection.
Exporting/Importing IDs to the Purge Material
Window
If all of the configuration procedures described in the preceding pages are done
correctly, the purge and delete operations conducted from the Purge Material
window should function properly. The Purge Material window is used to list the
material IDs of spots that are to be deleted and to be able to view ID information
associated with each spot. When the Purge button on the window is pressed,
GMT will search for all of the IDs listed in the Purge Material window in all of the
devices configured in the Global Delete Targets tab. GMT will then sequentially
purge and delete each spot as it finds them in the configured devices, displaying
the status of each spot in an event line on the GMT list.
4-4
GMT Purge and Archive
84.
Purging with GMTTo open the Purge Material window, click Purge Material on the Utilities menu.
IDs that have been
or will be purged
are displayed in
the purge list
display pane
Information for a
selected ID is
displayed in the
database
information pane
Figure 4-3
Purge Material window
The Purge Material window is divided into the purge list display and database
information display panes.
The purge list display pane lists the spots that have been or will be purged. When
a spot is selected in the purge list display pane by highlighting it, its record
information is displayed in the database information display pane. For further
details regarding the Purge Material window, please refer to the Media Client
Reference Guide.
There are two ways to export material IDs to the Purge Material window for
purging and deleting and one way to import material IDs:
- Exporting from the database
- Exporting from a device
GMT Purge and Archive
4-5
85.
Purging with GMT- Importing a traffic list through the Material Purge window
Exporting From
the Database
Material IDs can be exported directly from the (file server) database into the
Purge Materials window.
NOTE When exporting material IDs from the database into the Purge Material window,
every record associated with a spot being purged will also be deleted from the
database. The purging of material ID records only occurs when material IDs are
exported to the Purge Material window using the database button.
1.
From the Navigation toolbar, click the Database button.
Click the
Database button
Figure 4-4
2.
4-6
Database button on the Navigation toolbar
This will display the Database window.
GMT Purge and Archive
86.
Purging with GMTHighlight the IDs to be exported
from the spot list pane
Figure 4-5
3.
4.
Database window in Media Client
Highlight the IDs to be exported from the spot list pane by clicking on the
desired ID. To select multiple, consecutive IDs, while holding the <SHIFT>
key down, click on each additional ID to be exported.
To select multiple, non-consecutive IDs, while holding the <CONTROL> key
down, click on each additional ID to be exported.
Right-click the mouse to display the right-click menu. Select Export to Purge
List.
If the Purge Material window is already open, all of the exported files will be
listed in the purge list display pane.
Exporting From
Devices
Material IDs can also be exported directly from a device to the Purge Materials
window.
1.
GMT Purge and Archive
From the Navigation toolbar, click Storage.
4-7
87.
Purging with GMTClick the
Storage button
Figure 4-6
2.
This will display the Storage window.
Figure 4-7
3.
4-8
Storage button on the Navigation toolbar
Storage window in Media Client
To display a list of all the media found in a device, double-click on the desired
device. This will display the storage list which is a list of all the media found
in the device.
GMT Purge and Archive
88.
Purging with GMTFigure 4-8
4.
(Device) Storage list
Since exporting from a storage list is a "click and drag" move, the Purge
Material window must also be displayed. To export an ID, click on the event
line number of the ID to be exported, and without letting go of the mouse
button, drag the selected ID onto the purge list display pane and then release
the mouse button.
To move a range of (consecutive) IDs, click on the event line number of the
first ID in the range of IDs, and while holding down the <SHIFT> key, click
on the event line number of the last ID in the range, however, do not release
the mouse button. With the mouse button still pressed, drag the IDs onto the
purge list display pane and then release the mouse button.
To move multiple, non-consecutive IDs, hold the <CONTROL> key down
and click on the event line number of each non-consecutive ID. Once the
event line of the last ID to be exported has been selected, release the
<CONTROL> key without releasing the mouse button. Move the pointer
arrow over to the purge list display and then release the mouse button.
GMT Purge and Archive
4-9
89.
Purging with GMTImporting a
Traffic List
Material IDs can also be imported into the Purge Material window by using the
Import List button found on the top, left side of the window. However, before the
Import List feature is used to import traffic lists into the window, the purge list
import parameters must be set.
To specify purge list import parameters:
1.
Click Purge List on the Properties menu, which opens the Purge List Import
Parameters window.
Figure 4-9
2.
3.
4.
4-10
Purge List Parameters dialog box
To specify the default directory where purge list files can be found, click the
Browse button and use the Open window to specify the directory.
Alternatively, you can type the directory path in the Default Directory field.
Enter the default file name of the list to be imported, e.g. Purge List. This is
the file that Media Client will automatically import into the Purge Material
window whenever the Import List button is pressed.
If each line in a purge list text file is to be read even if the line is not an
importable record, put a check in the "Validate each line" box by clicking on
the adjacent box.
When the Validate each line button is enabled, the Report Rejected Rows
button is activated. If a report of all lines that have been rejected is desired, in
other words, did not have a record imported, click on the adjacent checkbox
to enable this option.
GMT Purge and Archive
90.
Purging with GMT5.
6.
7.
In the Field Definitions area, use the Start and Length fields to specify the
position of the first character of the ID and the number of characters that
comprise the ID, respectively.
If the purge list text file contains a traffic-inserted header, specify the number
of lines of the header in the Header Length field. When a purge list is
imported, Media Client will skip the specified number of lines before reading
records.
Click OK to finish and save all of the configured purge list import parameters.
When purge list import parameters have been configured, spots from a traffic list
can then be imported into the Purge Material window.
To import spots from a traffic list:
1.
Click the Import List button on the Purge Material window.
The Record Types window opens.
Figure 4-10
2.
Record Types window
Click the Single Spots button to check it, then click OK.
If the media (record) types to be deleted are another form of record, e.g. multi
segment, then select the appropriate option.
NOTE Previous versions of GMT did not allow for multi spot records to be deleted as
they were usually on a taped medium. The current version of GMT will allow for
the purging and deletion of all three types of records as long as they exist on a
video disk.
3.
GMT Purge and Archive
The list that is imported into the Purge Material window will be the default
list entered in the Default Filename field in the Purge List Parameters
window, see “Importing a Traffic List” on page 4-10. If no default filename
was entered, use the Open dialog box to locate and open the purge list text file
provided by the traffic department.
4-11
91.
Purging with GMTWhen the OK button is clicked, the spot information for every spot in the
purge list appears in the Purge Material window.
Purging Spots
There are four ways to purge material from the automation system - using the
Purge Material window, purging spots from the Single Spot window, purging
spots from the Multi Spot window, or by purging them from the Multi Segment
window. The previous three sections: see “Exporting From the Database” on page
4-6, “Exporting From Devices” on page 4-7, and “Importing a Traffic List” on page
4-10, all explain how material IDs are placed in the Purge Material window for
purging. The following explains how the spots are actually purged from the
system using the Purge Material window, the Single Spot or Multi Spot window,
and the Multi Segment window.
NOTE It’s important to understand the distinction between the material ID (spot
information) records and their associated spots. When a spot is purged from the
system using GMT, GMT uses the spot information record to find the associated
spot being purged. However, the purging of the spot doesn’t necessarily mean
that its associated spot information record is also purged from the (file server)
database. The only time a spot information record is purged in conjunction with
the purging of the actual spot is when the spot information record is imported
into the Purge Material window directly from the database using the Database
button on the navigation bar.
In the Purge
Material
Window
Once material (spot) IDs have been placed in the Purge Material window, all of
the spots associated with the spot IDs in the Purge Material window can be
deleted, or select spots only.
1.
2.
4-12
Select the spot(s) to be deleted by clicking on its associated spot ID. To select a
range of spots, select the first record in the range while holding down the
<SHIFT> key and then click on the last record in the range while still holding
down the <SHIFT> key. All records within the range should be highlighted.
To select multiple, non-consecutive spots for deletion, hold down the
<CONTROL> key and then click on every additional spot to be deleted.
The spot information associated with an individual spot is displayed in the
database information pane for quick reference.
Click the Purge button.
GMT Purge and Archive
92.
Purging with GMTThe Purge dialog box opens.
Click the GMT
button to use GMT
for purge operations
Figure 4-11
3.
In a Single Spot
Prep Window
GMT Purge and Archive
Purge dialog box
In the Purge From area on the Purge dialog box, click the GMT button to
check it, then click OK, which will initiate purge operations. Purge operations
can be monitored as described in “Monitoring Purge Operations” on page 419.
Spots can also be purged from the Single Spot Prep window. Deleting, or purging,
from the Single Spot Prep window allows for more immediate access to spot
information, as opposed to using the Purge Material window which needs to
have spot information exported to it, or imported, from other sources.
Additionally, whereas the Purge Material window displays all the spots within a
specified source, the Single Spot Prep window displays only the spot information
for the spot ID entered into the Material ID field. Also, only one spot at a time can
be purged from the Single Spot Prep window.
4-13
93.
Purging with GMTspot list pane
Figure 4-12
1.
2.
3.
Single Spot Prep window
From the Prep Window drop-down menu on the main toolbar, select Single
Spot, or click the Single Spot button on the Navigation Toolbar, to open a
Single Spot Prep window.
Type the ID of the spot you want to purge in the Material ID field on the
database entry pane, then press Enter.
The spot information appears in the spot list pane.
If this is the spot to be deleted, highlight the spot in the spot list pane by
clicking on it, then click the Delete button.
The Delete Spot window opens.
4-14
GMT Purge and Archive
94.
Purging with GMTClick the GMT
button to use GMT
for purge operations
Figure 4-13
4.
In a Multi Spot
Prep Window
Delete Spot window
On the Delete Spot window, click the GMT button to check it, then click OK.
Once OK has been clicked, purge operations will begin. Purge operations can
be monitored as described in “Monitoring Purge Operations” on page 4-19.
Deleting multi spots is done using the Multi Spot Prep window. As with the
Single Spot Prep window, spot information records are found by entering the
material ID of the spot into the Material ID field.
NOTE When the Multi Spot Prep window is used to purge multi spots, only those multi
spots that are found on video disks and are part of the GMT system will be
purged. Instances of the multi spot being purged that are found on VTRs or cart
machines will not be affected.
GMT Purge and Archive
4-15
95.
Purging with GMTFigure 4-14
1.
2.
Multi Spot Prep window
From the Prep Window drop-down menu on the main toolbar, select Multi
Spot, or click the Multi Spot button on the navigation toolbar, to open the
Multi Spot Prep window.
Enter the ID of the library box in the Material ID field that contains the multi
spot(s) to be purged. Both the library box and all of the multi spots found
within the library box will be displayed in the spot list pane. The first entry in
the spot list pane will be the ID of the library box itself.
NOTE From the Multi Spot Prep window, only the library box ID can be entered in the
Material ID field to locate multi spots. Individual IDs of spots within a multi spot
will not be recognized from this window. Searches for individual IDs within a
multi spot must be done from the Database window.
4-16
GMT Purge and Archive
96.
Purging with GMT3.
From the spot list pane, highlight the spot, or spots, to be purged. To select a
range of spots, hold the <SHIFT> key down and then click on the first spot in
the range. With the <SHIFT> key still down, select the last spot in the range.
To highlight multiple, non-consecutive spots, hold the <CONTROL> key
down and then click on every spot to be deleted.
NOTE Deleting the library box itself will delete the library box and all of the spots found
within it.
4.
5.
Once all of the spots have been selected, press the Delete button located under
the spot list pane. The Delete Spot window will then be displayed.
On the Delete Spot window, place a check in the button next to the GMT
option by clicking it and then press OK.
Once OK has been clicked, purge operations will begin. Purge operations can
be monitored as described in “Monitoring Purge Operations” on page 4-19.
In a Multi
Segment Prep
Window
GMT Purge and Archive
Deleting a spot from the Multi Segment Prep window is very similar to deleting
them from the Single Spot Prep and Multi Spot Prep windows.
4-17
97.
Purging with GMTFigure 4-15
1.
2.
3.
Multi Segment Prep window
From the Prep Window drop-down menu on the main toolbar, select Multi
Segment, or click the Multi Seg button on the Navigation Toolbar, to open a
Multi Segment Prep window.
Type the ID of the multi segment being purged in the Material ID field on the
database entry pane, then press Enter.
All of the segments of the spot ID entered in the Material ID field will be
displayed in the spot list pane, along with the spot information for each
segment.
From the spot list pane, highlight the segment, or segments, to be purged. To
select a range of segments, hold the <SHIFT> key down and then click on the
first segment in the range. With the <SHIFT> key still down, select the last
segment in the range.
To highlight multiple, non-consecutive segments, hold the <CONTROL> key
down and then click on every segment to be deleted.
4-18
GMT Purge and Archive
98.
Using GMT to Archive Spots4.
Follow steps 4 & 5 as described in “In a Multi Spot Prep Window” on page 415, substituting the word "spot" with "segment".
Monitoring Purge Operations
Purge operations can be monitored on a GMT list within the Media Client
application.
To monitor purge operations on a GMT list in Media Client:
1.
Click the View List button on the Navigation toolbar, or select View List from
the Resources drop-down menu on the main toolbar. This will display the
Choose List window.
Figure 4-16
2.
Choose List window
The lists available to the server the Media Client workstation is configured for
are displayed in the Choose List window.
Select the GMT list to which the distributor that is conducting purge and
delete operations is configured, as described in “Configuring Distributors for
Purge Operations” on page 4-1, then click OK. The GMT list opens and
displays the status of all spots being purged.
For information about customizing the GMT list display, refer to “List Attributes”
on page 2-22.
Using GMT to Archive Spots
GMT can be used to archive material into an archive device, which can be either a
baseband or fiber device. Typically, material is archived after it has been prepped
GMT Purge and Archive
4-19
99.
Using GMT to Archive Spotsfrom Media Client. Before archiving can occur, however, both the distirbutor and
Media Client need to be configured in order to conduct archiving operations. Both
Single Spot and Multi Segment material can be archived using Media Client.
Configuring Distributors for Archiving
As with purge and delete operations, a distributor must be configured to handle
Media Client archive operations.
NOTE Requesters are not needed when requesting ("Get Archive") for material as the
Media Client itself acts as the requester.
To configure an archive distributor:
1.
2.
3.
4.
5.
6.
Launch the Configuration Manager application, as described in “Configuring
Software Components” on page 3-1. From within the ADC100NT
Configuration window, right-click the device server, then select Configured
Devices.
Drag an available distributor from the Available column of the Configured
Devices window and drop it on an available device server channel in the
Configured side of the window.
Right-click on the distributor just assigned to the device server channel in the
Configured column and click Properties.
In the Device Name field on the General tab, name the distributor by
something that identifies its function, such as "ARCHIVEDIST."
On the Routing tab, set the routing method to Archive.
On the Source tab, specify the (archive) device that the distributor will query
for archived material, as described in “Configuring Distributors” on page 3-11
under “Source” on page 3-19, as well as the next distributor which will take
over the search for material should the requested material not be found on the
archive device.
For the Fiber Handle field, enter the fiber handle number assigned to one of
the video disks within the system that will act as the destination device in the
case of material requests generated from Media Client. Please see “Source” on
page 3-19 and refer to the first NOTE in that section for more details.
4-20
GMT Purge and Archive
100.
Using GMT to Archive SpotsFor archive distributors,
the Fiber Handle entry
should be the fiber handle
number of a video disk
acting as the destination
device in the case of
material requests made
from a Media Client.
Figure 4-17
7.
Distributor Configuration Properties window - Archive Distributor
Requests for material from the archive device occurs when, from the Media
Client, the Get Archive button is pressed from the Single Spot Prep window.
Follow all other configuration procedures for distributors, as described in
“Configuring Distributors” on page 3-11.
Configuring Media Client for GMT Archiving
If material is to be archived after prepping, or if archived material is to be
requested via Media Client, then Media Client must also be configured for
archiving procedures.
Single Spot
Archiving
Media Client is capable of archiving two types of material: Single Spot and Multi
Segment. The following describes how to configure Media Client for Single Spot
archiving.
To configure Media Client to use GMT for Single Spot archiving operations:
1.
GMT Purge and Archive
Select Single Spot from the Configuration drop-down menu on the main
toolbar, which displays the Single Spot Configuration window.
4-21
101.
Using GMT to Archive Spots2.
From the Single Spot Configuration window, click the Archive tab.
Figure 4-18
3.
4.
5.
6.
Archive tab on the Single Spot Configuration window
On the Type drop-down menu, select Distributor, which activates the
Distributor drop-down menu.
Select the archive distributor responsible for archive operations, as described
in “Configuring Distributors for Archiving” on page 4-20.
In the Group ID field, enter the Group ID, which is normally predetermined
at the time the automation system was installed.
Click Save to close the window and save the configuration.
NOTE If Media Client is not configured for single spot archiving operations, the Send
Archive and Get Archive buttons will not be activated, thus, single spot archiving
operations will not be possible from Media Client.
4-22
GMT Purge and Archive
102.
Using GMT to Archive SpotsEnable the "Send Archive" and "Get
Archive" buttons on the Single Spot
Prep window by configuring the
archive distributor for Media Client.
Figure 4-19
Multi Segment
Archiving
Send Archive and Get Archive buttons on the Single Spot Prep
window
Media Client must also be configured for multi segment archiving if multi
segment archiving operations are desired. Configuring Media Client for multi
segment archiving is done from the Multi Segment Prep window.
To configure Media Client to use GMT for Multi Segment archiving operations:
1.
2.
Select Multi Segment from the Configuration drop-down menu on the main
toolbar, which displays the Multi Segment Configuration window.
Follow all the steps as described in “Single Spot Archiving” on page 4-21,
substituting "Single Spot" with "Multi Segment".
NOTE If Media Client is not configured for multi segment archiving operations, the Send
Archive and Get Archive buttons will not be activated in the Multi Segment Prep
window, similar to Figure 4-19, ”Send Archive and Get Archive buttons on the
Single Spot Prep window” on page 4-23. Thus, multi segment archiving
operations will not be possible from Media Client.
Monitoring Archive Operations
Archive operations can be monitored on a GMT list from within the Media Client
application.
GMT Purge and Archive
4-23
103.
Using GMT to Archive SpotsTo monitor archive operations on a GMT list in Media Client:
1.
2.
Click the View List button on the Navigation toolbar. This will display the
Choose List window. All of the lists available to the device server the Media
Client workstation is configured for are displayed in the Choose List window.
Click the GMT list to which the archive distributor is configured, then click
OK.
The GMT list opens and displays the status (and other information) of each
spot being purged.
For information about customizing the GMT list display, refer to “List Attributes”
on page 2-22.
4-24
GMT Purge and Archive