


 Программное обеспечение
Похожие презентации:


MLP Magic Lantern Processor
1. MLP Magic Lantern Processor
MLPMagic
What,s MLP about? p2
RAW/MLV processing p3
CR2_HDR_enfuse processing p4
CR2 dualiso processing p5
MOV processing p6
HDR mov processing - tblend filter p7
HDR mov processing p8
HDR MLV RAW dng processing - tblend filter p9
HDR MLV RAW dng processing p10
RAW/MLV dualiso processing p11
MLVFS folder dng processing p12
Scene folder processing p13
RAW MLV previews (including HDR previews) p14
Set a ProRes4444 or dng output folder p15
dcraw_FFmpeg_settings p16
Creating looks p17
White balance manipulation p18
CR2 wb handling p18
dcraw_white_balance_presets p18
02_cr2hdr-r_white_balance p18
A_lut_hold recipe,s p19
looks_creator.command p20
FFplay mediaplayer p21
Install notes FFplay p22
mpv player p23
Darkframe processing 24 – 27
Output to exr or dpx 28
Lantern Processor
2.
Word of advice. All processes should be run separately. Keep different files and processes separated ifnot stated otherwise. It,s all up to you to test and validate this workflow. I leave no guarantees. It
should be treated as beta.
What,s MLP about?
MLP works with the following files:
RAW/MLV to dng conversion. Files workable in DaVinci Resolve(embeds audio) and Premiere Pro
RAW/MLV and folders of dng files to ProRes4444 files
Dual iso CR2 still images are converted to workable DNG files with correct white balance
HDR conversion both MLV/RAW and H264 mov files
Dual iso dng sequences are handled automatically coming from RAW/MLV files
RAW/MLV/dng/DNG/mov preview processor
Processes are multithreaded
By right clicking a folder, containing any of the above mentioned files, and when selecting MLP from the contextual services
menu to specified folder two additional folders will be created prior to running any further processing:
A_dan_log_3d_luts
A_lut_hold
By adding these folders you are able to add or change different settings before continuing processing such as white
balance, brightness, gamma, add different luts. You are also able to change settings for HDR processing.
Adding setting files is easy. Simply pick something from the “A_dan_log_3d_luts” and put it in the “A_lut_hold” and then
start processing you files. The tricky part is to find the right combinations for how you want your files to be processed.
Whatever setting you create will be viewable as preview tif files if right clicking a RAW,MLV,dng,DNG or mov file directly.
3.
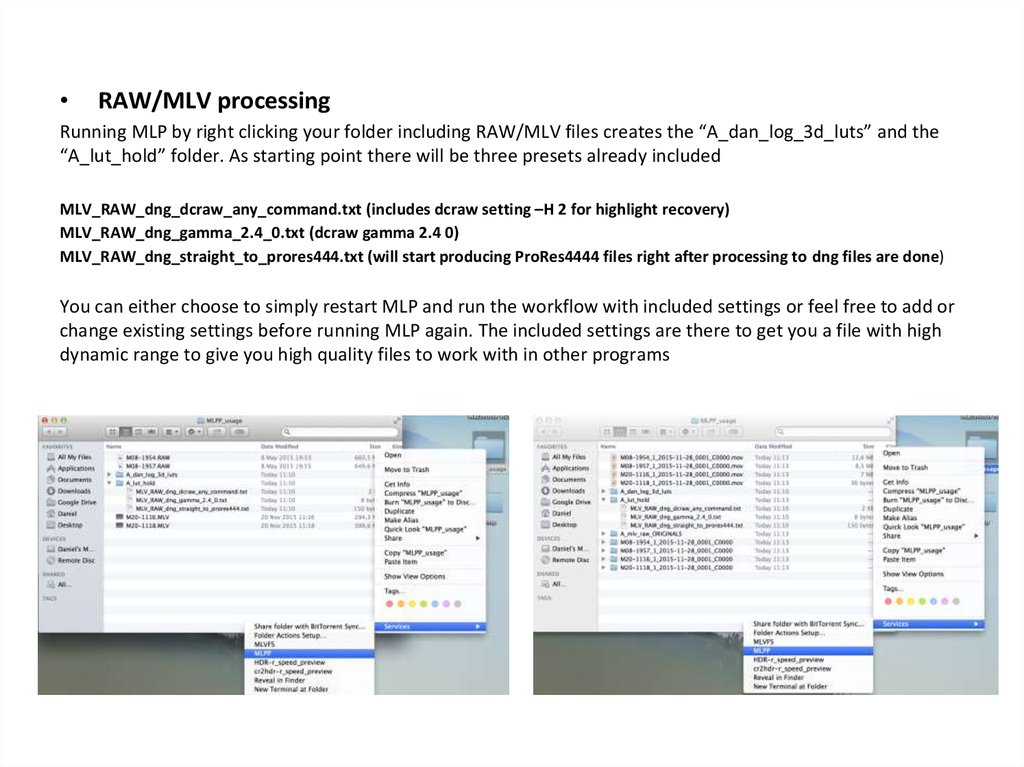
RAW/MLV processing
Running MLP by right clicking your folder including RAW/MLV files creates the “A_dan_log_3d_luts” and the
“A_lut_hold” folder. As starting point there will be three presets already included
MLV_RAW_dng_dcraw_any_command.txt (includes dcraw setting –H 2 for highlight recovery)
MLV_RAW_dng_gamma_2.4_0.txt (dcraw gamma 2.4 0)
MLV_RAW_dng_straight_to_prores444.txt (will start producing ProRes4444 files right after processing to dng files are done)
You can either choose to simply restart MLP and run the workflow with included settings or feel free to add or
change existing settings before running MLP again. The included settings are there to get you a file with high
dynamic range to give you high quality files to work with in other programs
4.
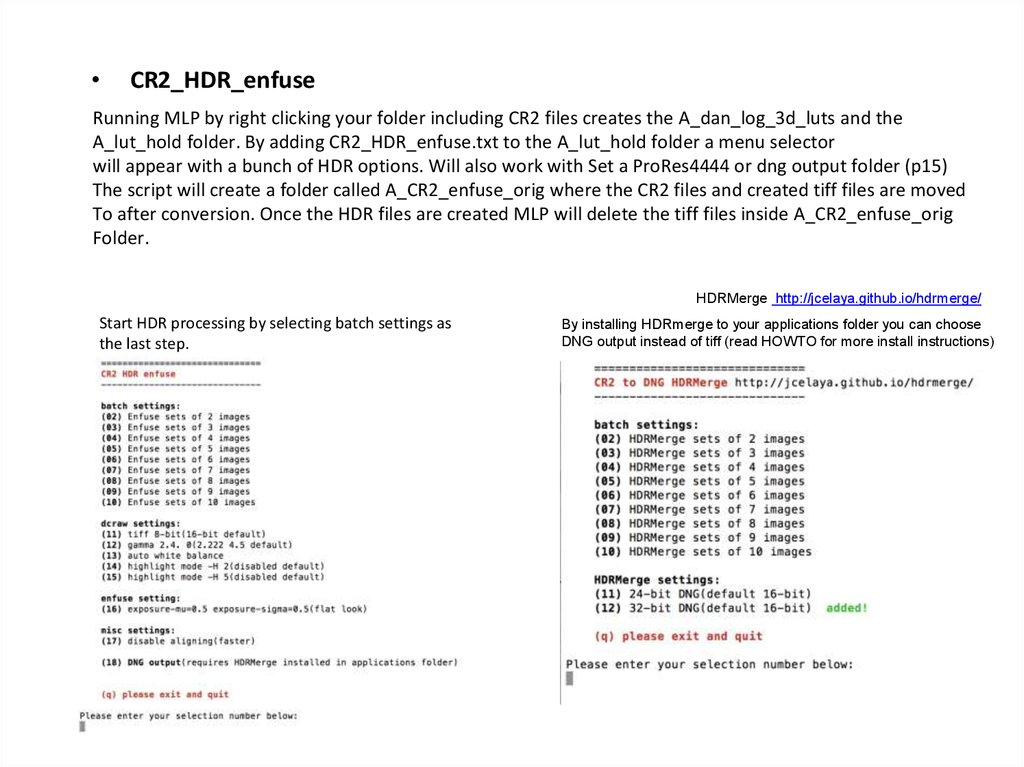
CR2_HDR_enfuse
Running MLP by right clicking your folder including CR2 files creates the A_dan_log_3d_luts and the
A_lut_hold folder. By adding CR2_HDR_enfuse.txt to the A_lut_hold folder a menu selector
will appear with a bunch of HDR options. Will also work with Set a ProRes4444 or dng output folder (p15)
The script will create a folder called A_CR2_enfuse_orig where the CR2 files and created tiff files are moved
To after conversion. Once the HDR files are created MLP will delete the tiff files inside A_CR2_enfuse_orig
Folder.
HDRMerge http://jcelaya.github.io/hdrmerge/
Start HDR processing by selecting batch settings as
the last step.
By installing HDRmerge to your applications folder you can choose
DNG output instead of tiff (read HOWTO for more install instructions)
5.
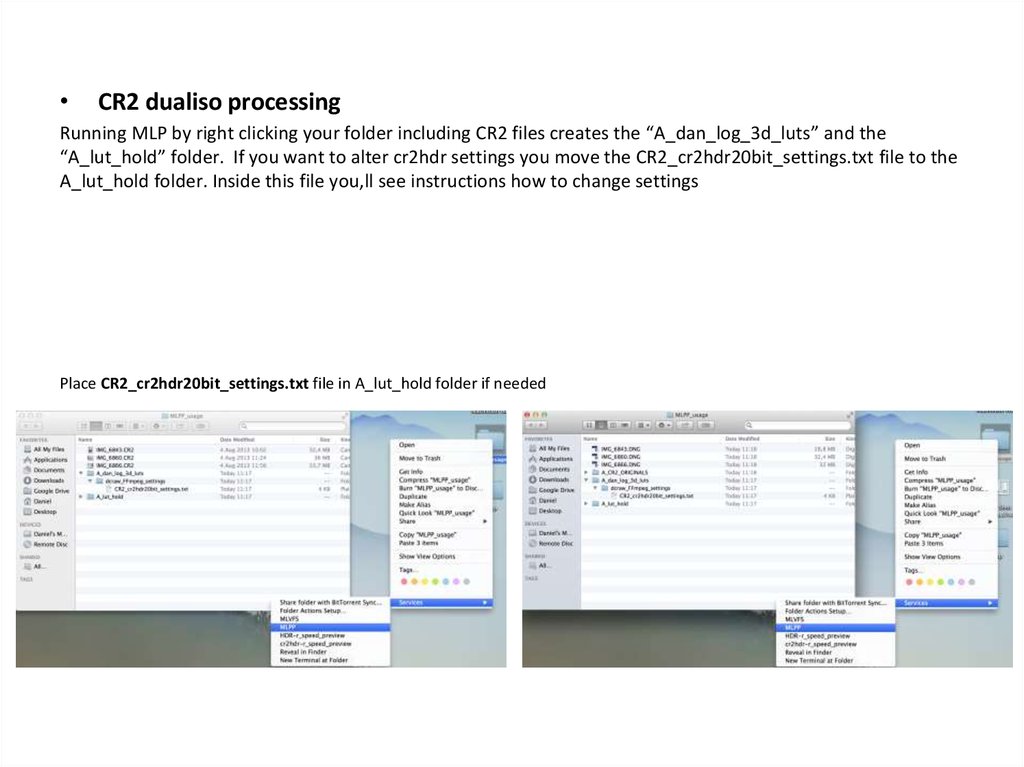
CR2 dualiso processing
Running MLP by right clicking your folder including CR2 files creates the “A_dan_log_3d_luts” and the
“A_lut_hold” folder. If you want to alter cr2hdr settings you move the CR2_cr2hdr20bit_settings.txt file to the
A_lut_hold folder. Inside this file you,ll see instructions how to change settings
Place CR2_cr2hdr20bit_settings.txt file in A_lut_hold folder if needed
6. MOV processing MLP allows for processing of regular H264 files. When selecting the MOV_regular.txt file and moving it to the
A_lut_hold folder MLP will process regularnon HDR files and by default export them to ProRes4444. You can add up to three 3d luts in the
A_lut_hold folder to change looks. You can change the output or the scale settings by adding and
changing inside the following files.
FFmpeg_settings.txt
MLV_RAW_MOV_dng_scale.txt
After processing the originals will be moved to a folder called A_MLP_originals. The processed files will
have the prefix MLP_ on them.
Disable the default sharpen filter by adding.
HDR_MOV_disable_sharpening.txt
Previewing
When right clicking the file it will be played in mpv or FFplay media player. For a built in *histogram or
*waveform view add any of these two files to the A_lut_hold folder.
FFplay_Histogram.txt
FFplay_Waveform.txt
*will need FFplay to be installed. Check page 23
7. HDR mov processing - tblend filter Running MLP by right clicking your folder including mov, MOV files creates the
“A_dan_log_3d_luts” andthe “A_lut_hold” folder. The tblend filter also works in conjunction with MLVFS.
By adding the HDR_tblend_average.txt to the A_lut hold folder you will have a very fast HDR
transcoding processor. FFmpeg includes an average filter and when used it will average every other
frame in your HDR file. This means you can skip enfuse completely and simply export straight to
ProRes4444. This time with no dropped frames. If footage is filmed in 50 fps you will end up with 50fps.
Recommended that you use the HDR_tblend_average_half_FPS.txt file if you aim for 24, 25 or 30 fps
working with files originally filmed in 48, 50 or 60 fps.
Preview
You can preview HDR footage and applied effects through mpv or FFplay in realtime by right clicking a
H264 MOV file. If no HDR_tblend_average.txt is present MLP will create a preview tif file instead.
When ready to start processing simply right click the folder containing your footage.
8.
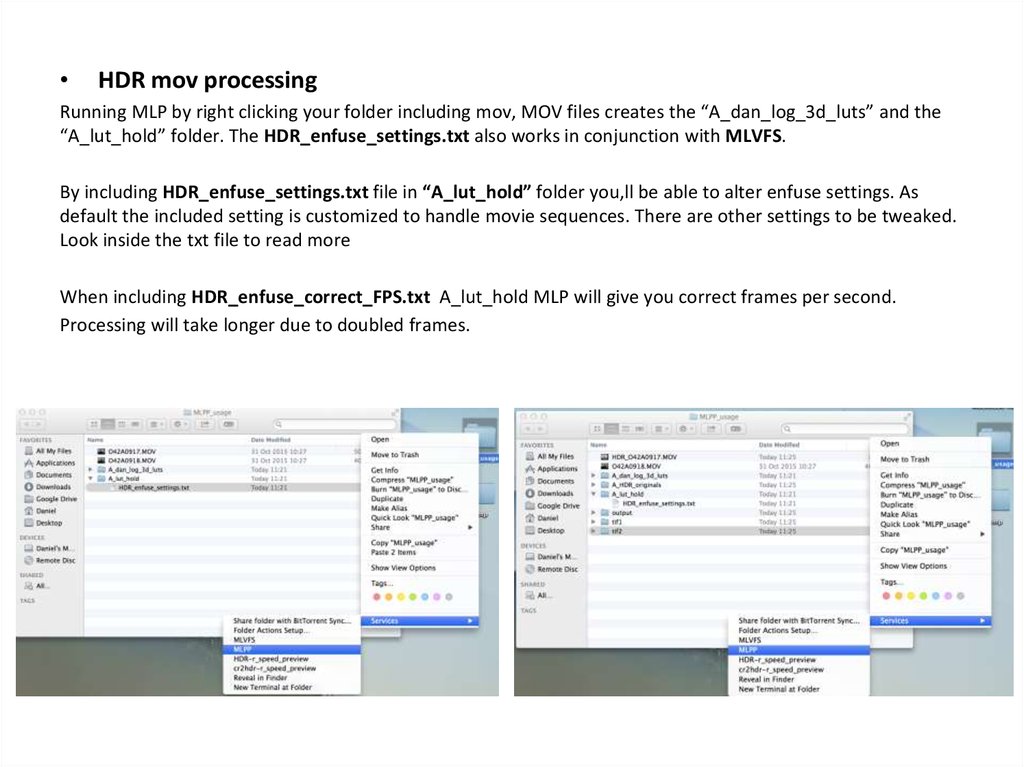
HDR mov processing
Running MLP by right clicking your folder including mov, MOV files creates the “A_dan_log_3d_luts” and the
“A_lut_hold” folder. The HDR_enfuse_settings.txt also works in conjunction with MLVFS.
By including HDR_enfuse_settings.txt file in “A_lut_hold” folder you,ll be able to alter enfuse settings. As
default the included setting is customized to handle movie sequences. There are other settings to be tweaked.
Look inside the txt file to read more
When including HDR_enfuse_correct_FPS.txt A_lut_hold MLP will give you correct frames per second.
Processing will take longer due to doubled frames.
Use HDR_enfuse_settings.txt file to optimize enfuse settings
9.
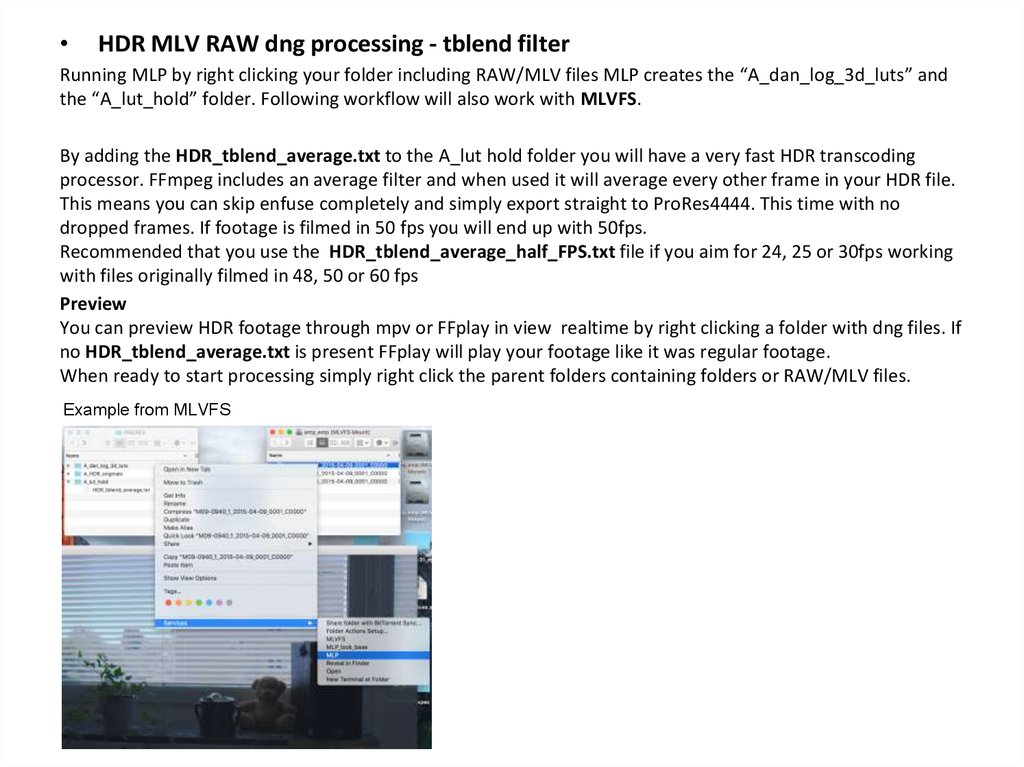
HDR MLV RAW dng processing - tblend filter
Running MLP by right clicking your folder including RAW/MLV files MLP creates the “A_dan_log_3d_luts” and
the “A_lut_hold” folder. Following workflow will also work with MLVFS.
By adding the HDR_tblend_average.txt to the A_lut hold folder you will have a very fast HDR transcoding
processor. FFmpeg includes an average filter and when used it will average every other frame in your HDR file.
This means you can skip enfuse completely and simply export straight to ProRes4444. This time with no
dropped frames. If footage is filmed in 50 fps you will end up with 50fps.
Recommended that you use the HDR_tblend_average_half_FPS.txt file if you aim for 24, 25 or 30fps working
with files originally filmed in 48, 50 or 60 fps
Preview
You can preview HDR footage through mpv or FFplay in view realtime by right clicking a folder with dng files. If
no HDR_tblend_average.txt is present FFplay will play your footage like it was regular footage.
When ready to start processing simply right click the parent folders containing folders or RAW/MLV files.
Example from MLVFS
10.
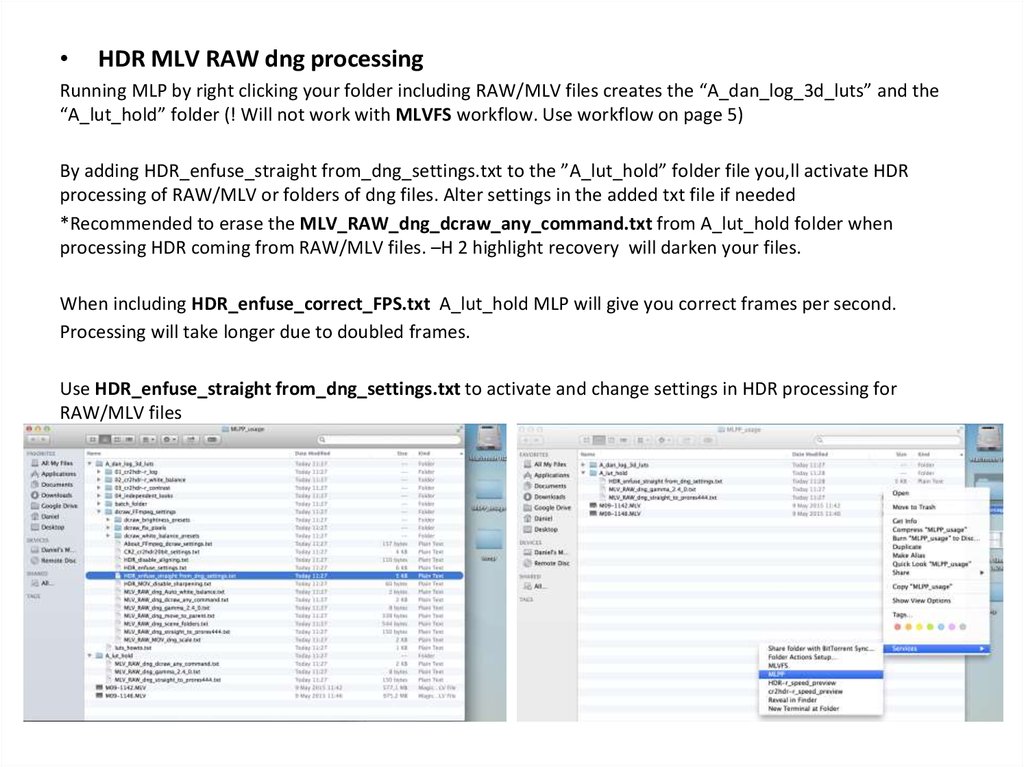
HDR MLV RAW dng processing
Running MLP by right clicking your folder including RAW/MLV files creates the “A_dan_log_3d_luts” and the
“A_lut_hold” folder (! Will not work with MLVFS workflow. Use workflow on page 5)
By adding HDR_enfuse_straight from_dng_settings.txt to the ”A_lut_hold” folder file you,ll activate HDR
processing of RAW/MLV or folders of dng files. Alter settings in the added txt file if needed
*Recommended to erase the MLV_RAW_dng_dcraw_any_command.txt from A_lut_hold folder when
processing HDR coming from RAW/MLV files. –H 2 highlight recovery will darken your files.
When including HDR_enfuse_correct_FPS.txt A_lut_hold MLP will give you correct frames per second.
Processing will take longer due to doubled frames.
Use HDR_enfuse_straight from_dng_settings.txt to activate and change settings in HDR processing for
RAW/MLV files
11.
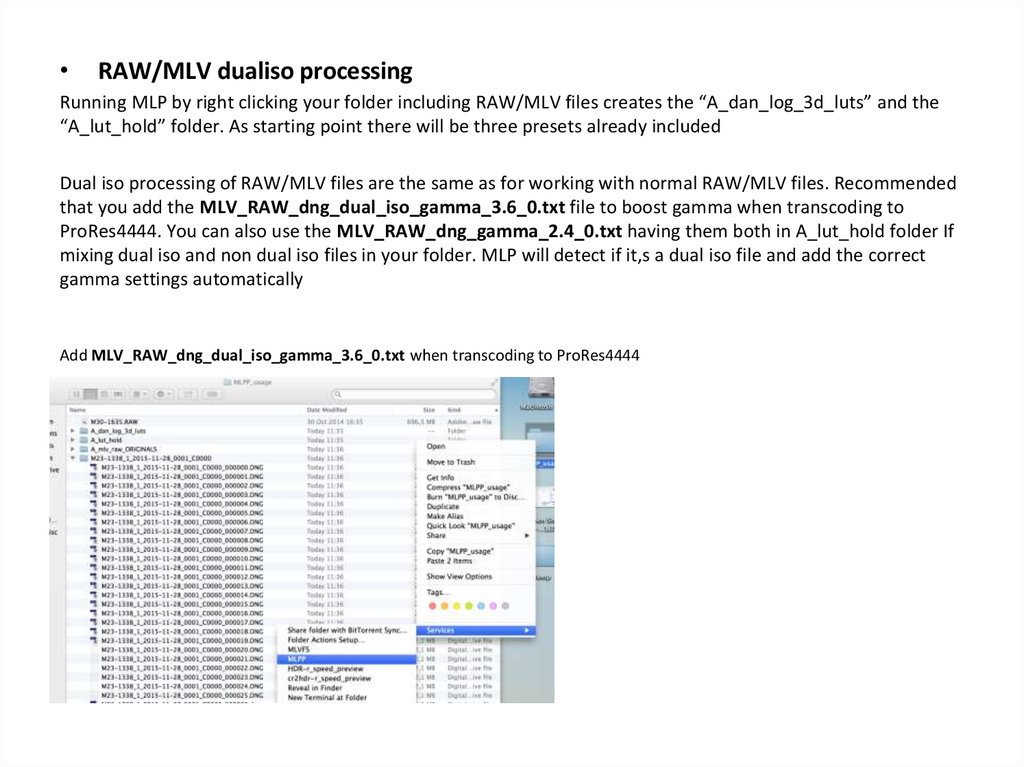
RAW/MLV dualiso processing
Running MLP by right clicking your folder including RAW/MLV files creates the “A_dan_log_3d_luts” and the
“A_lut_hold” folder. As starting point there will be three presets already included
Dual iso processing of RAW/MLV files are the same as for working with normal RAW/MLV files. Recommended
that you add the MLV_RAW_dng_dual_iso_gamma_3.6_0.txt file to boost gamma when transcoding to
ProRes4444. You can also use the MLV_RAW_dng_gamma_2.4_0.txt having them both in A_lut_hold folder If
mixing dual iso and non dual iso files in your folder. MLP will detect if it,s a dual iso file and add the correct
gamma settings automatically
Add MLV_RAW_dng_dual_iso_gamma_3.6_0.txt when transcoding to ProRes4444
12.
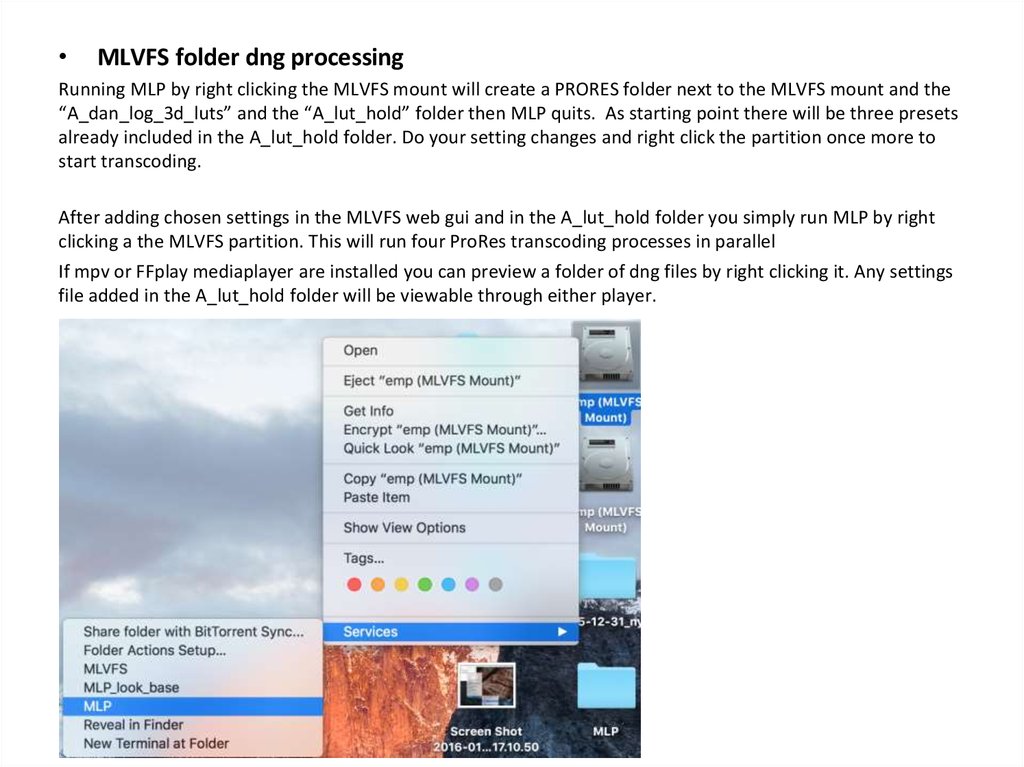
MLVFS folder dng processing
Running MLP by right clicking the MLVFS mount will create a PRORES folder next to the MLVFS mount and the
“A_dan_log_3d_luts” and the “A_lut_hold” folder then MLP quits. As starting point there will be three presets
already included in the A_lut_hold folder. Do your setting changes and right click the partition once more to
start transcoding.
After adding chosen settings in the MLVFS web gui and in the A_lut_hold folder you simply run MLP by right
clicking a the MLVFS partition. This will run four ProRes transcoding processes in parallel
If mpv or FFplay mediaplayer are installed you can preview a folder of dng files by right clicking it. Any settings
file added in the A_lut_hold folder will be viewable through either player.
13.
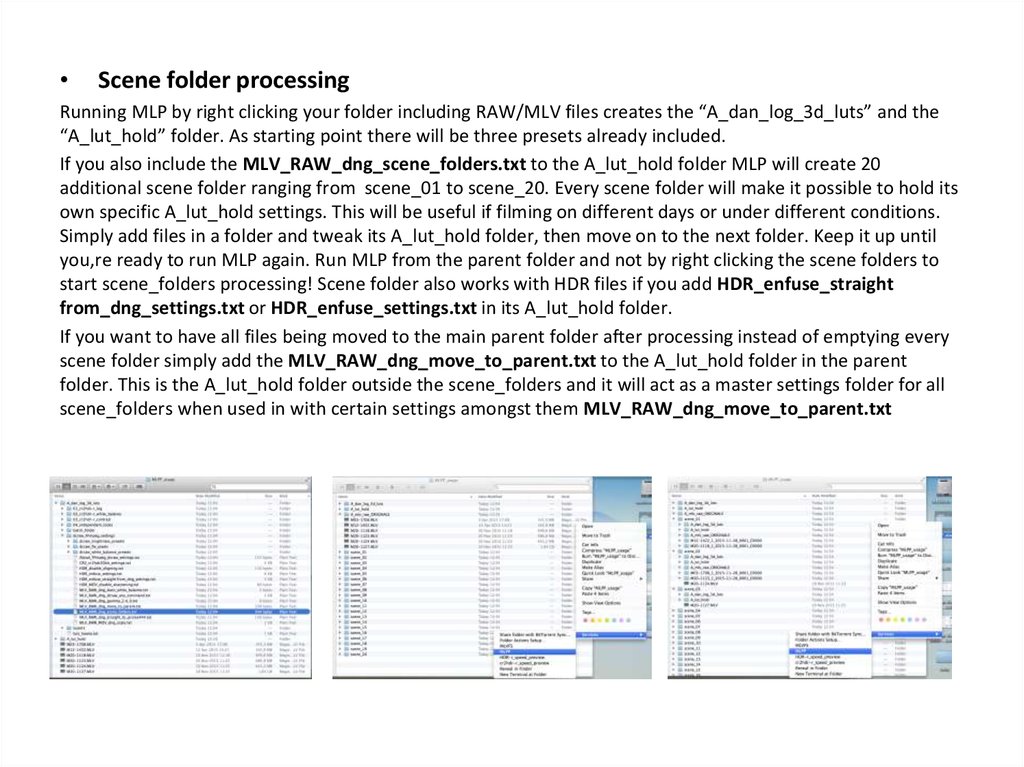
Scene folder processing
Running MLP by right clicking your folder including RAW/MLV files creates the “A_dan_log_3d_luts” and the
“A_lut_hold” folder. As starting point there will be three presets already included.
If you also include the MLV_RAW_dng_scene_folders.txt to the A_lut_hold folder MLP will create 20
additional scene folder ranging from scene_01 to scene_20. Every scene folder will make it possible to hold its
own specific A_lut_hold settings. This will be useful if filming on different days or under different conditions.
Simply add files in a folder and tweak its A_lut_hold folder, then move on to the next folder. Keep it up until
you,re ready to run MLP again. Run MLP from the parent folder and not by right clicking the scene folders to
start scene_folders processing! Scene folder also works with HDR files if you add HDR_enfuse_straight
from_dng_settings.txt or HDR_enfuse_settings.txt in its A_lut_hold folder.
If you want to have all files being moved to the main parent folder after processing instead of emptying every
scene folder simply add the MLV_RAW_dng_move_to_parent.txt to the A_lut_hold folder in the parent
folder. This is the A_lut_hold folder outside the scene_folders and it will act as a master settings folder for all
scene_folders when used in with certain settings amongst them MLV_RAW_dng_move_to_parent.txt
14.
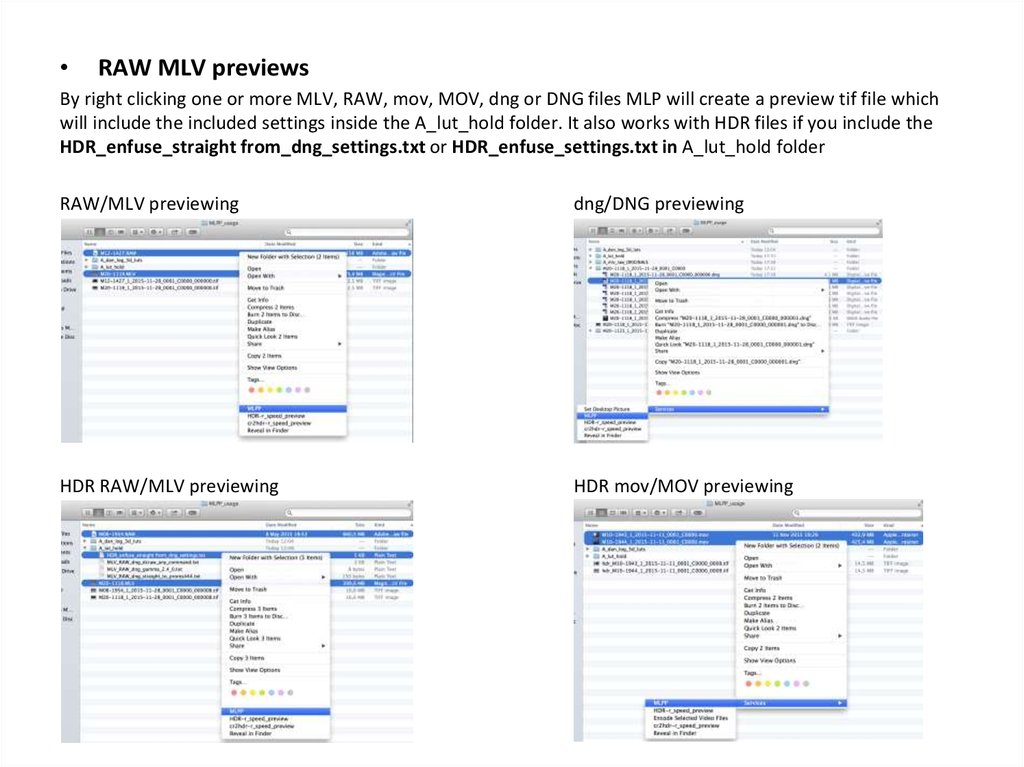
RAW MLV previews
By right clicking one or more MLV, RAW, mov, MOV, dng or DNG files MLP will create a preview tif file which
will include the included settings inside the A_lut_hold folder. It also works with HDR files if you include the
HDR_enfuse_straight from_dng_settings.txt or HDR_enfuse_settings.txt in A_lut_hold folder
RAW/MLV previewing
dng/DNG previewing
HDR RAW/MLV previewing
HDR mov/MOV previewing
15.
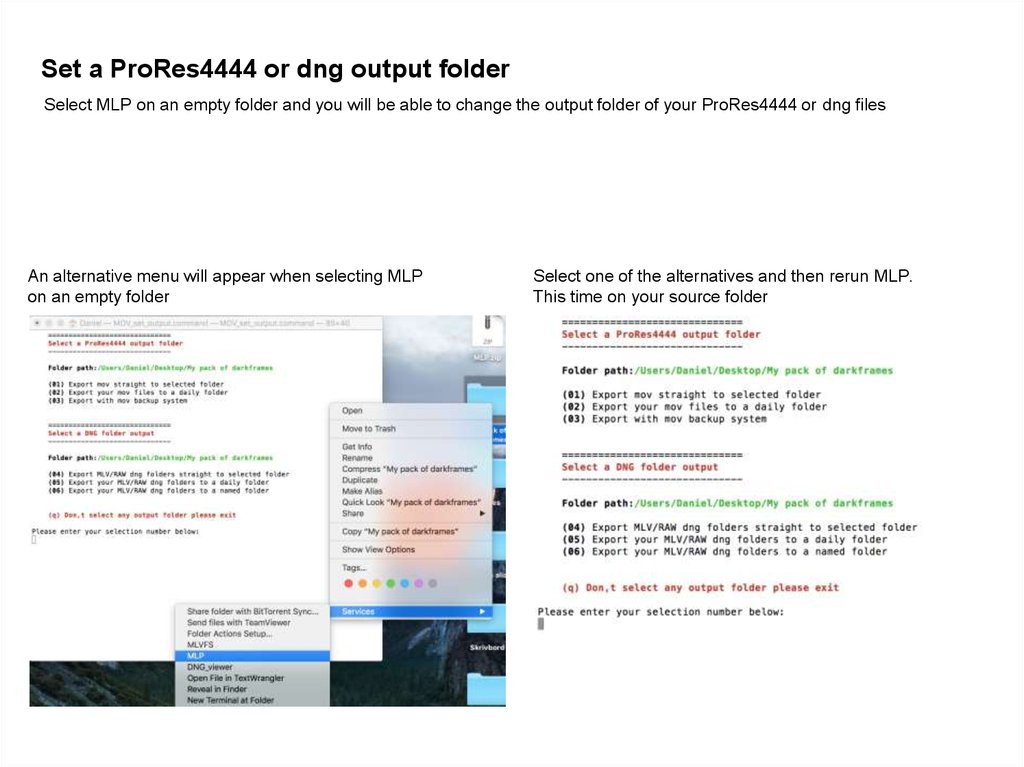
Set a ProRes4444 or dng output folderSelect MLP on an empty folder and you will be able to change the output folder of your ProRes4444 or dng files
An alternative menu will appear when selecting MLP
on an empty folder
Select one of the alternatives and then rerun MLP.
This time on your source folder
16.
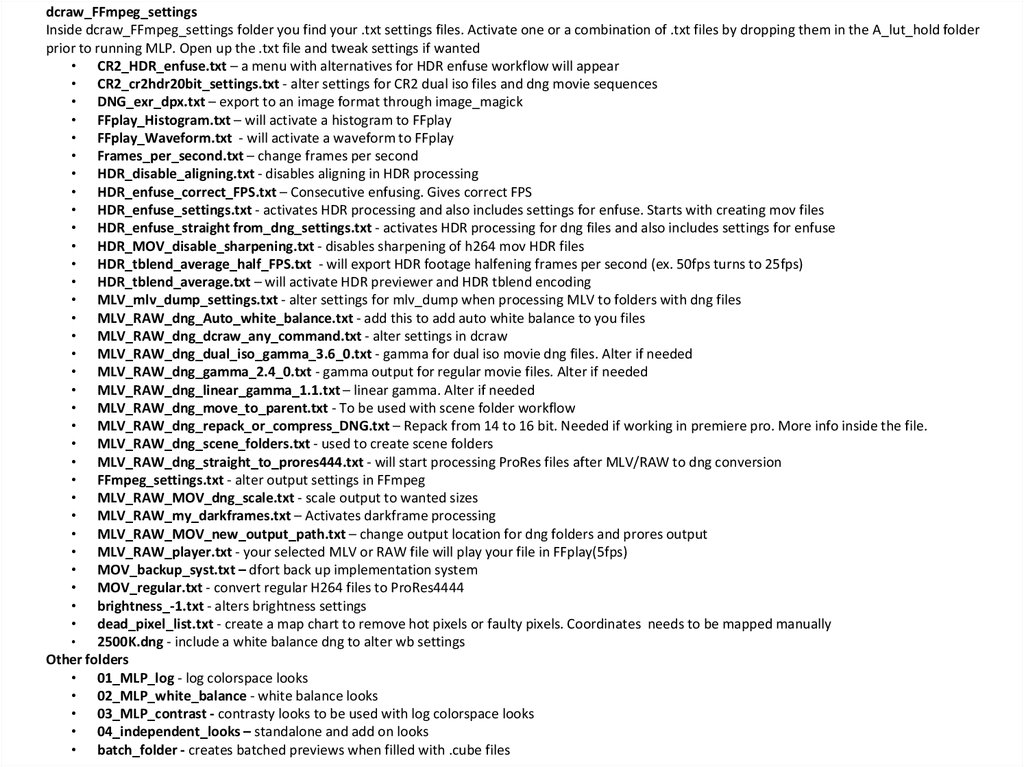
dcraw_FFmpeg_settingsInside dcraw_FFmpeg_settings folder you find your .txt settings files. Activate one or a combination of .txt files by dropping them in the A_lut_hold folder
prior to running MLP. Open up the .txt file and tweak settings if wanted
• CR2_HDR_enfuse.txt – a menu with alternatives for HDR enfuse workflow will appear
• CR2_cr2hdr20bit_settings.txt - alter settings for CR2 dual iso files and dng movie sequences
• DNG_exr_dpx.txt – export to an image format through image_magick
• FFplay_Histogram.txt – will activate a histogram to FFplay
• FFplay_Waveform.txt - will activate a waveform to FFplay
• Frames_per_second.txt – change frames per second
• HDR_disable_aligning.txt - disables aligning in HDR processing
• HDR_enfuse_correct_FPS.txt – Consecutive enfusing. Gives correct FPS
• HDR_enfuse_settings.txt - activates HDR processing and also includes settings for enfuse. Starts with creating mov files
• HDR_enfuse_straight from_dng_settings.txt - activates HDR processing for dng files and also includes settings for enfuse
• HDR_MOV_disable_sharpening.txt - disables sharpening of h264 mov HDR files
• HDR_tblend_average_half_FPS.txt - will export HDR footage halfening frames per second (ex. 50fps turns to 25fps)
• HDR_tblend_average.txt – will activate HDR previewer and HDR tblend encoding
• MLV_mlv_dump_settings.txt - alter settings for mlv_dump when processing MLV to folders with dng files
• MLV_RAW_dng_Auto_white_balance.txt - add this to add auto white balance to you files
• MLV_RAW_dng_dcraw_any_command.txt - alter settings in dcraw
• MLV_RAW_dng_dual_iso_gamma_3.6_0.txt - gamma for dual iso movie dng files. Alter if needed
• MLV_RAW_dng_gamma_2.4_0.txt - gamma output for regular movie files. Alter if needed
• MLV_RAW_dng_linear_gamma_1.1.txt – linear gamma. Alter if needed
• MLV_RAW_dng_move_to_parent.txt - To be used with scene folder workflow
• MLV_RAW_dng_repack_or_compress_DNG.txt – Repack from 14 to 16 bit. Needed if working in premiere pro. More info inside the file.
• MLV_RAW_dng_scene_folders.txt - used to create scene folders
• MLV_RAW_dng_straight_to_prores444.txt - will start processing ProRes files after MLV/RAW to dng conversion
• FFmpeg_settings.txt - alter output settings in FFmpeg
• MLV_RAW_MOV_dng_scale.txt - scale output to wanted sizes
• MLV_RAW_my_darkframes.txt – Activates darkframe processing
• MLV_RAW_MOV_new_output_path.txt – change output location for dng folders and prores output
• MLV_RAW_player.txt - your selected MLV or RAW file will play your file in FFplay(5fps)
• MOV_backup_syst.txt – dfort back up implementation system
• MOV_regular.txt - convert regular H264 files to ProRes4444
• brightness_-1.txt - alters brightness settings
• dead_pixel_list.txt - create a map chart to remove hot pixels or faulty pixels. Coordinates needs to be mapped manually
2500K.dng - include a white balance dng to alter wb settings
Other folders
• 01_MLP_log - log colorspace looks
• 02_MLP_white_balance - white balance looks
• 03_MLP_contrast - contrasty looks to be used with log colorspace looks
• 04_independent_looks – standalone and add on looks
• batch_folder - creates batched previews when filled with .cube files
17.
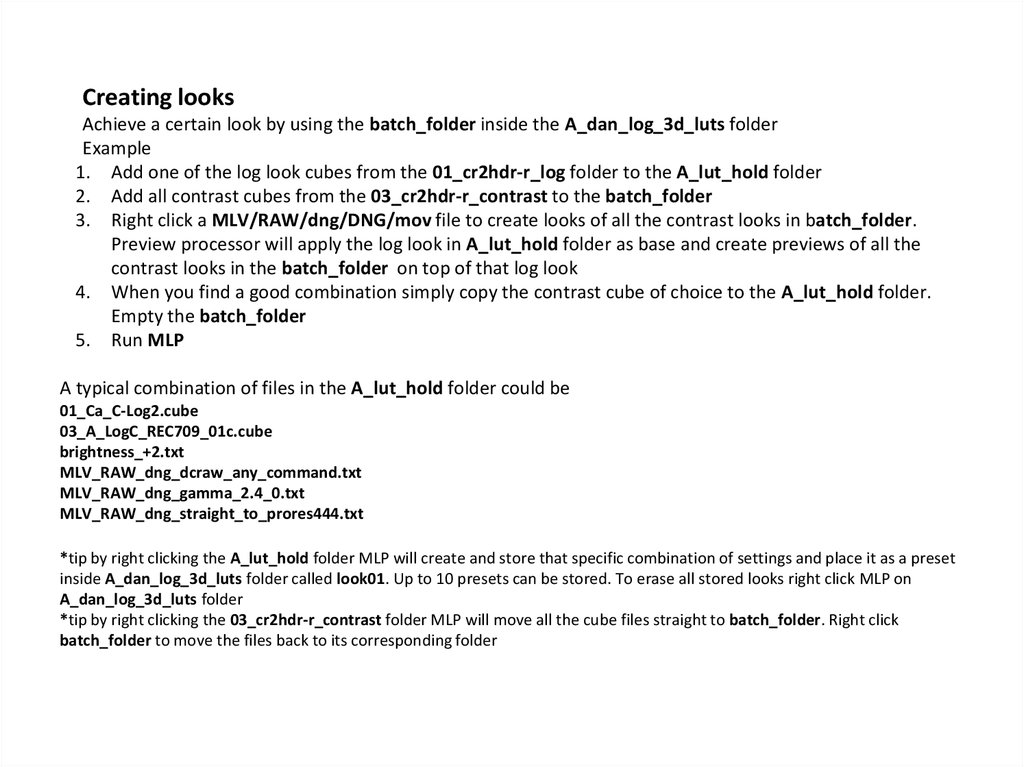
Creating looksAchieve a certain look by using the batch_folder inside the A_dan_log_3d_luts folder
Example
1. Add one of the log look cubes from the 01_cr2hdr-r_log folder to the A_lut_hold folder
2. Add all contrast cubes from the 03_cr2hdr-r_contrast to the batch_folder
3. Right click a MLV/RAW/dng/DNG/mov file to create looks of all the contrast looks in batch_folder.
Preview processor will apply the log look in A_lut_hold folder as base and create previews of all the
contrast looks in the batch_folder on top of that log look
4. When you find a good combination simply copy the contrast cube of choice to the A_lut_hold folder.
Empty the batch_folder
5. Run MLP
A typical combination of files in the A_lut_hold folder could be
01_Ca_C-Log2.cube
03_A_LogC_REC709_01c.cube
brightness_+2.txt
MLV_RAW_dng_dcraw_any_command.txt
MLV_RAW_dng_gamma_2.4_0.txt
MLV_RAW_dng_straight_to_prores444.txt
*tip by right clicking the A_lut_hold folder MLP will create and store that specific combination of settings and place it as a preset
inside A_dan_log_3d_luts folder called look01. Up to 10 presets can be stored. To erase all stored looks right click MLP on
A_dan_log_3d_luts folder
*tip by right clicking the 03_cr2hdr-r_contrast folder MLP will move all the cube files straight to batch_folder. Right click
batch_folder to move the files back to its corresponding folder
18.
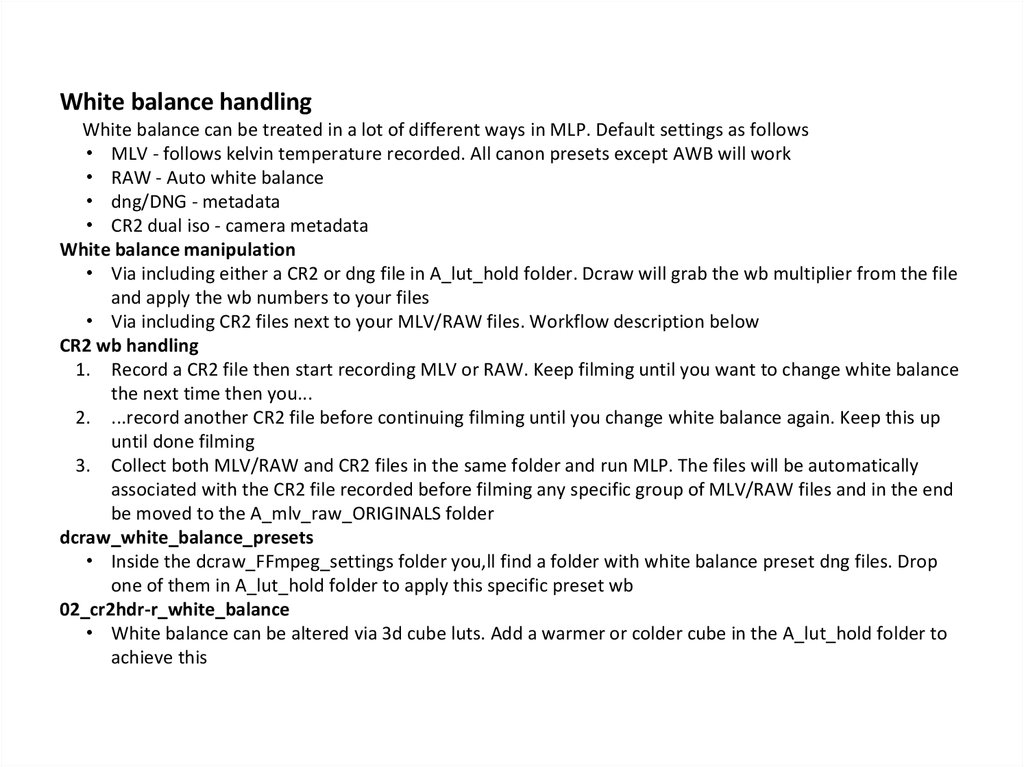
White balance handlingWhite balance can be treated in a lot of different ways in MLP. Default settings as follows
• MLV - follows kelvin temperature recorded. All canon presets except AWB will work
• RAW - Auto white balance
• dng/DNG - metadata
• CR2 dual iso - camera metadata
White balance manipulation
• Via including either a CR2 or dng file in A_lut_hold folder. Dcraw will grab the wb multiplier from the file
and apply the wb numbers to your files
• Via including CR2 files next to your MLV/RAW files. Workflow description below
CR2 wb handling
1. Record a CR2 file then start recording MLV or RAW. Keep filming until you want to change white balance
the next time then you...
2. ...record another CR2 file before continuing filming until you change white balance again. Keep this up
until done filming
3. Collect both MLV/RAW and CR2 files in the same folder and run MLP. The files will be automatically
associated with the CR2 file recorded before filming any specific group of MLV/RAW files and in the end
be moved to the A_mlv_raw_ORIGINALS folder
dcraw_white_balance_presets
• Inside the dcraw_FFmpeg_settings folder you,ll find a folder with white balance preset dng files. Drop
one of them in A_lut_hold folder to apply this specific preset wb
02_cr2hdr-r_white_balance
• White balance can be altered via 3d cube luts. Add a warmer or colder cube in the A_lut_hold folder to
achieve this
19.
A_lut_hold recipe,s (examples only)1.
Default combination. Boosts gamma and recover highlights -H 2 dcraw.
MLV_RAW_dng_dcraw_any_command.txt
MLV_RAW_dng_gamma_2.4_0.txt
MLV_RAW_dng_straight_to_prores444.txt
2.
Applies a log and REC709 look to the ProRes file
01_Ca_C-Log2.cube
03_A_LogC_REC709_01c.cube
brightness_+2.txt
MLV_RAW_dng_dcraw_any_command.txt
MLV_RAW_dng_gamma_2.4_0.txt
MLV_RAW_dng_straight_to_prores444.txt
3.
Activates enfuse and applies a wide gamut look. Change FFmpeg output of choice and also scale footage. Good for
04_HDR_MOV_Al_wide_gamut_01.cube
HDR_enfuse_settings.txt
FFmpeg_settings.txt
MLV_RAW_MOV_dng_scale.txt
4.
HDR of folders with dng files. Disables aligning for faster HDR processing
04_HDR_MOV_Al_wide_gamut_01.cube
HDR_disable_aligning.txt
HDR_enfuse_straight from_dng_settings.txt
FFmpeg_settings.txt
MLV_RAW_MOV_dng_scale.txt
5.
Gamma 3.6 for dual iso files
MLV_RAW_dng_dcraw_any_command.txt
MLV_RAW_dng_dual_iso_gamma_3.6_0.txt
MLV_RAW_dng_straight_to_prores444.txt
20. looks_creator.command When right clicking a folder with MLV/RAW or folders of dng files a shell script command will be copied
to the folder next to the A_lut_hold and A_dan_log_3d_luts. When double clicking thelooks_creator.command file a menu will open up and your folder will place itself next to the script. You
simply write the numbers of the item you want in copied into the A_lut_hold and hit enter.
The command will also start creating previews immidieately upon selecting an item. You control
processing by stopping or starting according to the menu at the bottom of every list. There are three
different lists to choose from.
!When you quit the command (q) it will erase any wav or *.WAV and MRX file in the folder! This is to
clean up files after previews or if using it in conjunction with MlRawViewer.
21. FFplay mediaplayer Will need FFplay installed through hombrew! See the next page. View your footage through FFplay
mediaplayer(part of FFmpeg). Will also work with HDR files when theHDR_enfuse_settings.txt, HDR_enfuse_straight_from_dng_settings.txt or HDR_tblend_average.txt is added to the
A_lut hold folder.
A simple media player which runs folders of dng files is provided. The media player pipes the dng files
from dcraw through FFmpeg to FFplay. The mediaplayer will reflect any changes made in the A_lut_hold
folder. Default settings are set to aspect ratio 800 x 450 but for speed reasons but you can alter both
output and aspect ratios through these two txt files.
FFplay will also work with MOV files. See page 5 and 6.
MLV_RAW_MOV_dng_scale.txt
FFmpeg_settings.txt
For a built in histogram or waveform view add any of these two files. To the A_lut_hold folder
FFplay_Histogram.txt
FFplay_Waveform.txt
Workflow
Right click on a folder of dng files either through MLVFS or converted inside MLP.
MLVFS
MLP with the FFplay_Histogram.txt file
22.
One reason to install FFplay is that you can use histogram and waveform monitor while viewing footage.If that isn,t important I recommend you stick with mpv player which you can install from HOWTO file. If you
choose to install FFplay that will be the preferred player over mpv.
Install notes FFplay
Following instructions will install FFplay and FFmpeg to your system. This is needed for FFplay to work.
Open up terminal
1 - Install homebrew by entering this command
ruby -e "$(curl -fsSL https://raw.githubusercontent.com/Homebrew/install/master/install)"
Press enter
2 - Install FFplay/FFmpeg by entering following in terminal
brew install ffmpeg --with-fdk-aac –with-sdl2
Press enter
23. mpv player When mpv player or FFplay is installed you will be able to preview following files - HDR footage – both mov and
folder of dng filesBy right clicking a folder with dng files or MOV files a mediaplayer will start and run a mediastream
showing any settings you added in the A_lut_hold folder. The player will work on folders in MLVFS as
well as MLP processed dng folders. When HDR_tblend_average.txt is added you can do a realtime
preview of how the processed HDR footage will look like. Add the HDR_tblend_average_half_FPS.txt
file to halfen fps. Normally if shooting 48, 50 or 60 fps to obtain regular fps footage.
- Regular footage
For the player to work with non HDR MOV files add the MOV_regular.txt file.
When viewing non HDR folders with dng files do not add the HDR_tblend_average.txt file.
24.
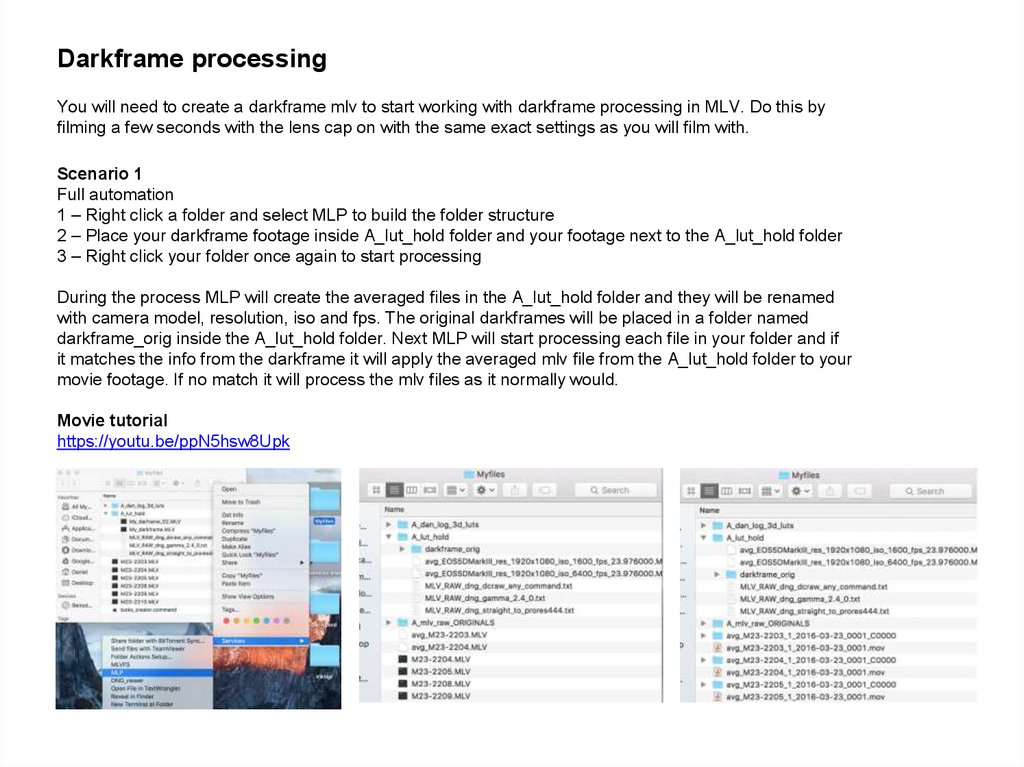
Darkframe processingYou will need to create a darkframe mlv to start working with darkframe processing in MLV. Do this by
filming a few seconds with the lens cap on with the same exact settings as you will film with.
Scenario 1
Full automation
1 – Right click a folder and select MLP to build the folder structure
2 – Place your darkframe footage inside A_lut_hold folder and your footage next to the A_lut_hold folder
3 – Right click your folder once again to start processing
During the process MLP will create the averaged files in the A_lut_hold folder and they will be renamed
with camera model, resolution, iso and fps. The original darkframes will be placed in a folder named
darkframe_orig inside the A_lut_hold folder. Next MLP will start processing each file in your folder and if
it matches the info from the darkframe it will apply the averaged mlv file from the A_lut_hold folder to your
movie footage. If no match it will process the mlv files as it normally would.
Movie tutorial
https://youtu.be/ppN5hsw8Upk
25.
Scenario 2Creating darkframe mlv files
1 – Right click on a folder containing your filmed darkframe footage
2 – Place your darkframe footage in the A_lut_hold folder
3 – Run MLP on the folder and your averaged darkframes will be created and renamed
Movie tutorial
https://youtu.be/JTRJD0SAA3s
26.
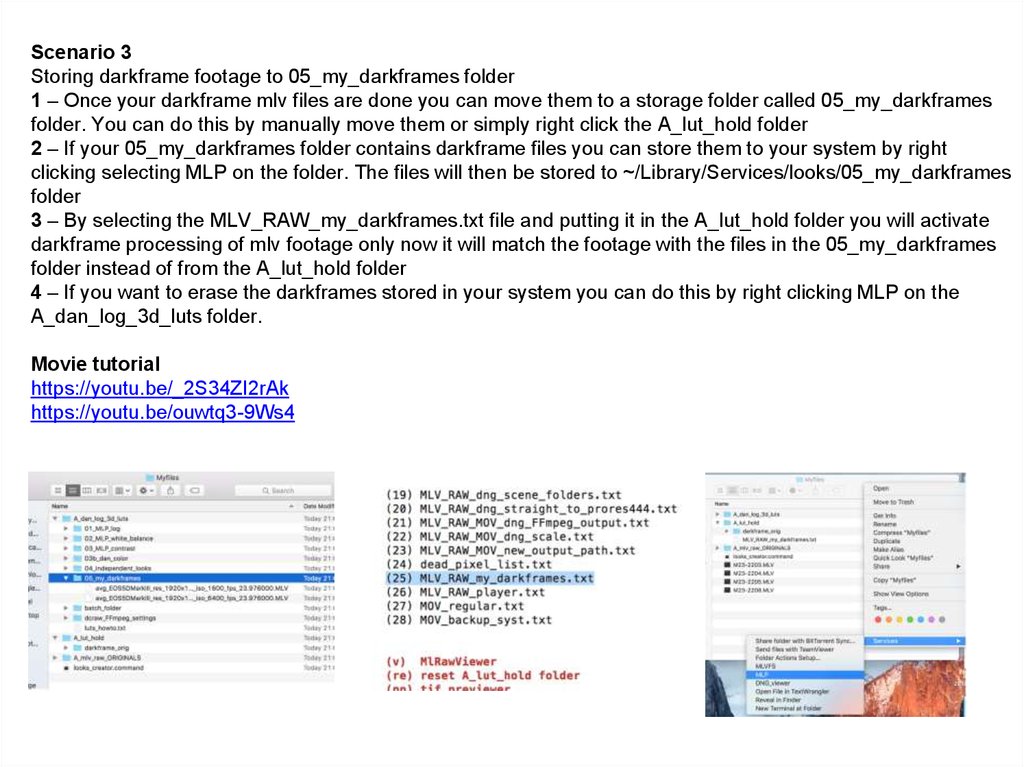
Scenario 3Storing darkframe footage to 05_my_darkframes folder
1 – Once your darkframe mlv files are done you can move them to a storage folder called 05_my_darkframes
folder. You can do this by manually move them or simply right click the A_lut_hold folder
2 – If your 05_my_darkframes folder contains darkframe files you can store them to your system by right
clicking selecting MLP on the folder. The files will then be stored to ~/Library/Services/looks/05_my_darkframes
folder
3 – By selecting the MLV_RAW_my_darkframes.txt file and putting it in the A_lut_hold folder you will activate
darkframe processing of mlv footage only now it will match the footage with the files in the 05_my_darkframes
folder instead of from the A_lut_hold folder
4 – If you want to erase the darkframes stored in your system you can do this by right clicking MLP on the
A_dan_log_3d_luts folder.
Movie tutorial
https://youtu.be/_2S34ZI2rAk
https://youtu.be/ouwtq3-9Ws4
27.
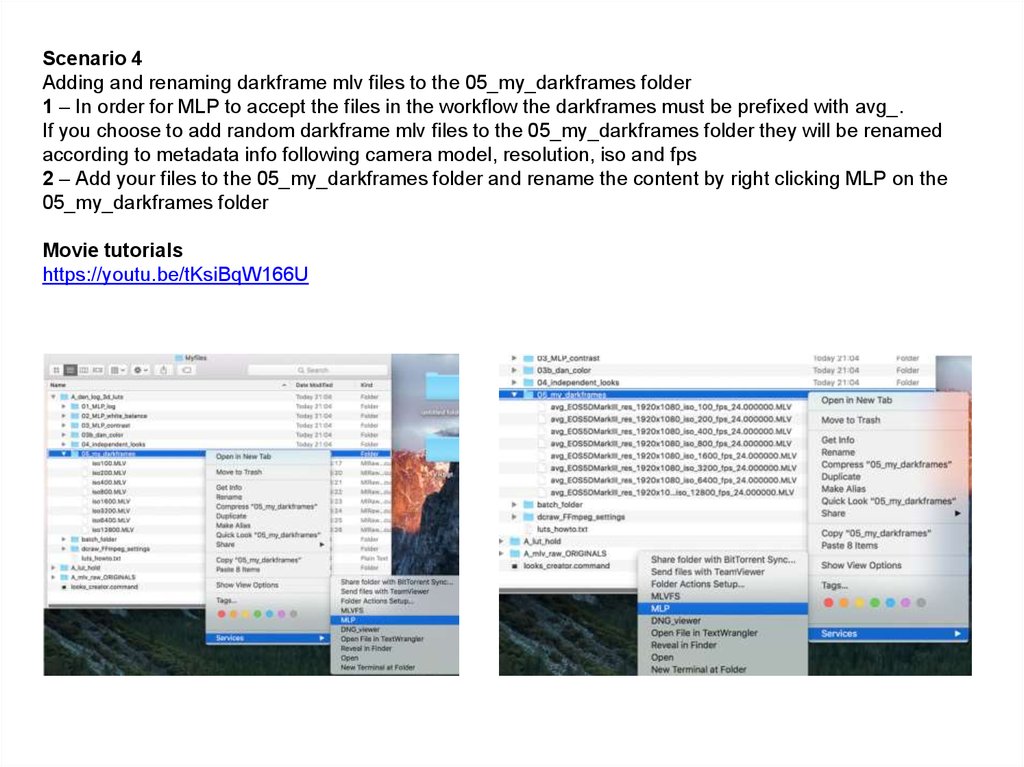
Scenario 4Adding and renaming darkframe mlv files to the 05_my_darkframes folder
1 – In order for MLP to accept the files in the workflow the darkframes must be prefixed with avg_.
If you choose to add random darkframe mlv files to the 05_my_darkframes folder they will be renamed
according to metadata info following camera model, resolution, iso and fps
2 – Add your files to the 05_my_darkframes folder and rename the content by right clicking MLP on the
05_my_darkframes folder
Movie tutorials
https://youtu.be/tKsiBqW166U
28.
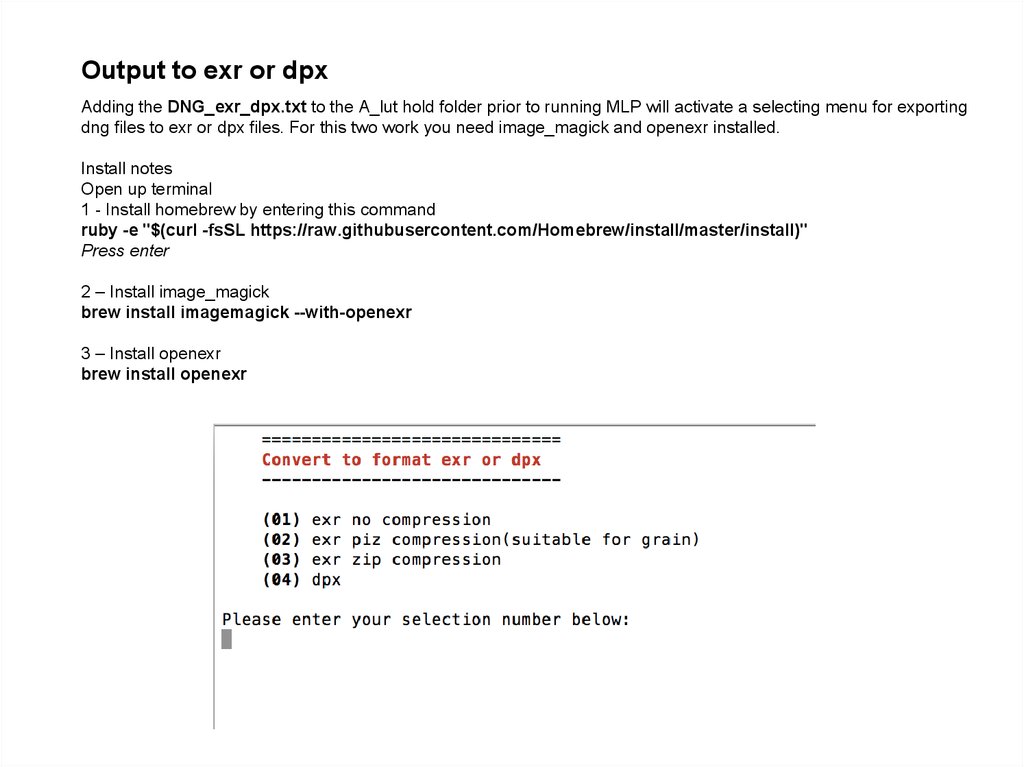
Output to exr or dpxAdding the DNG_exr_dpx.txt to the A_lut hold folder prior to running MLP will activate a selecting menu for exporting
dng files to exr or dpx files. For this two work you need image_magick and openexr installed.
Install notes
Open up terminal
1 - Install homebrew by entering this command
ruby -e "$(curl -fsSL https://raw.githubusercontent.com/Homebrew/install/master/install)"
Press enter
2 – Install image_magick
brew install imagemagick --with-openexr
3 – Install openexr
brew install openexr
29.
* This program is free software; you can redistribute it and/or* modify it under the terms of the GNU General Public License
* as published by the Free Software Foundation; either version 2
* of the License, or (at your option) any later version.
*
* This program is distributed in the hope that it will be useful,
* but WITHOUT ANY WARRANTY; without even the implied warranty of
* MERCHANTABILITY or FITNESS FOR A PARTICULAR PURPOSE. See the
* GNU General Public License for more details.
*
* You should have received a copy of the GNU General Public License
* along with this program; if not, write to the
* Free Software Foundation, Inc.,
* 51 Franklin Street, Fifth Floor,
* Boston, MA 02110-1301, USA.
© 2015 copyright Danne