Похожие презентации:
Basic Training
1. SUM3D Level 1 Basic Training
11.05.152. SUM3D Workflow
NEW JOB (.CAM)Import .STL
Import Stock (Nesting)
Calculation (NC FILE)
3. Interface
Zoom & Viewing ToolbarWorkflow Wizard
(Primary Toolbar)
Imported Strategy
Information
Equipment (Fixture / Stock Holder) – Work Area
Secondary Toolbar
Lower Information Bar
4. Changing the View with the Mouse
ROTATIONPANNING
+
+
(HOLD BOTH)
(HOLD BOTH)
ZOOM
5. Display Toolbar
Toggle Display of Curves (on/off)Toggle Display of Toolpaths (on/off)
Toggle Display of Rapids (on/off)
Toggle Transparency of Imported Items
Toggle Rendering of Surfaces
6. Display Toolbar (Detailed)
Display ToolbarRedraw (Re-Render)
Zoom & Panning Tools
Shaded Tool (Simulation)
Show Tool
7. Display Toolbar
Pre-Set ViewsThis toolbar allows us to quickly snap to different
viewing perspectives.
Right View - YZ
Front View - XZ
Top view XY
XZ Back View
YZ Left View
XY Bottom View
Isometric Views
8. Display Toolbar (Detailed)
Lower Information BarName of last .STL File Imported
Name of Strategy Imported
Material Expansion
Factor
Material Thickness
Material
Stock / Blank Name
9. Pre-Set Views
Main Toolbar (Medium Interface)10. Lower Information Bar
Main Toolbar (Medium Interface)New Job Creation
Import .STL file
Select / Create Stock
Create Program
When you are working in the Medium Level
of Interface or lower (Light, Low) – The
software will automatically guide you through
the required 4 steps in order to complete the
milling process.
Move / Rotate Items
Add Support Pins
Delete Items
Simulation
Optional Steps
11. Main Toolbar (Medium Interface)
Selection ToolbarThis toolbar will appear whenever you are performing an operation
that requires you to select one or more items.
(IE: Moving Objects / Removing Objects)
End Selection
Clear Selection List
Select by Layer
Add to Selection List
Select by Color
Remove from Selection List
12. Main Toolbar (Medium Interface)
Using the Mouse with theSelection Toolbar
Selection
End Selection
13. Main Toolbar (High / Maximum)
New Job CreationNew Job
This step creates a new empty .CAM file. All data for the current run
will be stored within this file including your imported .STL Files, Stock
and calculated toolpaths. During this first step, you will name your
Job, Select a Material and Machine to mill with, then click Save.
Note: By default, todays date & time will auto-populate the File Name
Field – You can use this or replace it with your own desired name. This
option can be toggled in the Default Settings.
14. Selection Toolbar
Import .STL fileNew Job
Import .STL
This step is where you select the files that you want to mill. It is
important to choose the correct type of restoration that you are
importing so the software applies the correct cutting strategies
during the milling process. You can also click on the Estimated
Height button to get the height information of the file selected fot
more suitable nesting.
Dynamic Item Preview
File Selection Window
Estimated Height
Object Type
15. Selection Toolbar (Detailed)
Import .STL file (Estimated Height)New Job
Import .STL
When you click on the Estimated Height Button during the Item Import
Step, you will be presented with Object height information as well as any
applicable scaled height when Expansion Factors are involved. The
software will default to 1.25 for Zirconia as a ballpark number. You can
also calculate these values with the Optimized Height by selecting the
check box. The numerical values will update when this is selected.
Optimized Height
16. Using the Mouse with the Selection Toolbar
Select or Create Stock / BlankNew Job
This is the step where you can import the stock (blank) to be
milled. You have the option to select from a previously used
Import .STL
stock or create a new one. When creating a new Zirconia Blank,
Select / Create Blank you would need to set your Shrinkage/Expansion Factor
according to the information printed on the stock. In the 2014
version of SUM3d, you can now assign a Lot Code to your blanks
for traceability.
17. New Job Creation
Start Calculation for MachiningNew Job
Import .STL
Select / Create Blank
Start Calculation
This step starts the calculation process of the configured tool-paths. If your strategy has
any options, this menu will pop up now to prompt user interaction.
You will also see a Tools Table Reminder window to help the user verify that tools are
loaded into the correct tool slots of the machine.
On some machines, you can have the option to automatically send the run to the Mill’s
controller software. This starts the machining process after the first Roughing Toolpath
is calculated. If you choose no to this option, you must wait until the calculation is
complete prior to manually uploading the job through the CNC Software.
If you are using the mono-strategy, you will also have access to tool life information.
This can be based on the tool’s cutting time or distance traveled during cutting.
18. Import .STL file
Demo of Main Steps19. Import .STL file (Estimated Height)
Importing Stock from a Picture• You can also import stock from a Bitmap or
JPEG Image (.BMP, .JPG)
– This can be useful in the case whrein your stock
file was lost / deleted or if you have partially used
stock that was milled using a different CAM.
20. Select or Create Stock / Blank
Importing Stock From a Picture• Image Pre-requisites:
– Ensure that the photo of your stock has a wide contrast
between the colors disc and the background.
• (IE: Zirconia Disc on a black backdrop)
– Avoid glossy surfaces
– It may be necessary to use Windows Paint to white out any
areas that have text printed on the disc as this can confuse
the CAM recognition of the machined surfaces as well. You
can also use the circle tool to enhance part borders.
– Crop the Image to the immediate area around the disc.
Unnecessary data in the photo makes it harder to identify
the partially machined stock.
21. Start Calculation for Machining
Importing Stock From a Picture• Import Process
– Start a new CAM File and skip the .STL Import Step to
proceed directly to the Import Stock Step. When you have
this window open: you’ll notice that you can see the
additional file extensions available for import. Simply
navigate to the location of your .BMP or .JPG file and
select it and click Open to proceed.
22. Demo of Main Steps
Importing Stock From a Picture• Import Process
– Because the image does not contain any information
about the disc, you will be prompted with the window
asking for details about the disc.
• Fill this out with the appropriate Thickness, Enlargement
Factor, Stock Name, etc.
23. Importing Stock from a Picture
Importing Stock From a Picture• Import Process
– We will now find that the stock has been imported properly and we can now
save it for future use.
– If you need to make additional changes such as the disc’s relative orientation
in the holder, you can do so with Rotation of the blank tool located in the
secondary toolbar.
• Using the + and – keys on your keyboard you can rotate the disc clockwise or counterclockwise.
24. Importing Stock From a Picture
Optional Steps - Move / Rotate PartsNew Job
This command allows the user to manually re-position
restorations by use of the mouse. You can move this in
the X, Y axes and also rotate the item.
After activating this button, select the part to move, rightclick on your mouse (The cursor will turn into a hand), and
by holding the left mouse button drag the selected part to
the destination point. Alternatively, you can click on the
desired destination point and the part will move to the
mouse. It is possible to rotate the part by using the “+”
and “-” keys.
Holding Shift with the + and – keys will perform a 180
degree rotation.
You can also use the Page Up and Page Down keys on your
keyboard to move the restoration up or down in the Z
Axis.
To confirm your move, right-click and select “OK” in the
displayed confirmation window.
Import .STL
Select / Create Blank
Start Calculation
Move / Rotate Parts
25. Importing Stock From a Picture
Optional Steps - Add Support PinsNew Job
Import .STL
Select / Create Blank
Start Calculation
Move / Rotate Parts
Add Support Pins
This command allows the user to manually place support pins between the
part and the stock. You can also perform part-to-part connectors which can
save space when milling.
When this button is used, you can choose to use Circular or Rectangular
shaped support pins.
• You can control the specific dimensions of the connector.
Simply clicking on the restoration will place your support pins perpendicular
to the part. The software will automatically connect this to the outer edge
of the part border.
If there are intersecting borders between two parts, the software will
connect the two items. This option can be toggled on and off in the Default
Settings.
26. Importing Stock From a Picture
Optional Steps - Remove Items• This command is used to erase a part of the
items' surfaces (teeth, connectors…). It is
Import .STL
possible to delete the parts one by one or by
Select / Create Blank
multiple selection.
New Job
Start Calculation
Move / Rotate Parts
Add Support Pins
Remove Items
• Once the part has been selected, right-click on
the mouse to confirm the deletion. The
selection window will return in case you want
to select more items for deletion.
• Click “ESC” or right mouse button to exit from
the command.
27. Importing Stock From a Picture
Optional Steps - SimulationNew Job
Import .STL
Select / Create Blank
Start Calculation
Move / Rotate Parts
Add Support Pins
Remove Items
Simulation
28. Optional Steps - Move / Rotate Parts
Demo of Optional Steps29. Optional Steps - Add Support Pins
Open JobThis command allows the operator to
select from an already existing CAM
file to work with. Simply select the
feature and click on a pre-existing
job, thick click Open.
30. Optional Steps - Remove Items
Automatic NestingThe Automatic Nesting operation is
automatically performed during the items’
import.
This button allows you to manually prompt
the use of the Automatic Nesting option,
even if it is turned off by default.
You would need to select all items for AutoNesting and confirm for the software to
auto-place these within the stock.
31. Optional Steps - Simulation
Create Vertical Support PinsThis command allows the creation of the
vertical sintering pins to keep objects
elevated and seated flat during the
sintering process.
Once the command has been activated it
will be possible to set:
a) Starting diameter of the pins
b) Ending diameter of the pins
By Simply clicking on the surface of the
item where you want to position the pin,
the system will automatically place the
Vertical Support Pins at a uniform angle for
sintering support.
32. Demo of Optional Steps
Modify Support Pin Trimming OptionsThis command allows you to specify
how the software will trim down the
Support Pins.
NO – BLUE – No Trimming
YES – GREEN – Complete Reduction
Partially – RED – Partial Reduction
33. Open Job
Create StabilizerThis commands automatically creates a
sintering stabilizer for large Zirconia arches
(more than 4 elements). Just click on the
bridge for which you want to create the
stabilizer after selecting this button. This
will allow the part to sit upright in the
sintering oven while making sure the
shrinkage is applied in a uniform manner.
Note: Not all sintering ovens may be able to
accommodate these bridge supports. In
these cases it would be best to utilize the
Vertical Support Pins instead.
34. Automatic Nesting
Modify Offset / Part Border ValuesOffset: 3
Offset: 5
This command allows the user to manually
specify thickness of the Offset / Part Border of
the part. The larger the value, the more space
will be hollowed out around the part when
roughing. This will ensure that the tool has
adequate clearance for milling operations
around the part. As a rule of thumb, this value
should be set to a minimum of the smallest
diameter of the tool you’re using for roughing
+ 50%. So if you’re using a 2mm tool to rough,
you would want a part border of at least 3mm
(2mm+1mm).
35. Zeta Align
Accurate PositioningThis tool allows for full control over
orientation and position of
restorations using angular or linear
steps.
36. Create Vertical Support Pins
Modify Shrinkage / Enlargement FactorThis command allows the user to change the shrinkage
factor. This overrides any Enlargement Factor that may
have been originally specified on the stock.
This feature can be useful for:
• Correcting the Shrinkage Rate if it was incorrectly
entered when the stock was initially created.
• Creating temporary teeth in PMMA and then
creating the same restoration in Zirconia.
37. Modify Support Pin Trimming Options
Automatically Detect Prep LineThis command allows the user to creates 2 curves to segment
off the margin / prep line and ensure that these areas are
properly identified during the milling process.
Once the feature has been selected, enter the thickness of the
margin (as designed in the CAD), click on any point inside the
prep area and the 2 curves will be generated.
The command stays active to allow you to select other points
inside the various restorations.
To finish, use the mouse’s right-click or ESC key on the
keyboard. Each set of curves are linked only to their respective
restoration.
NOTE: This information can be automatically imported when
the .STL File is imported if it is imported along with the
respective Margin Information File from the CAD.
38. Create Stabilizer
Manually Designate Prep LineAfter activating the feature, start by clicking the left mouse
button in the middle of the margin and by drawing a curve
outlining the margin as precisely as possible. When you get
close to where you initially started, just right-click with the
mouse and set the thickness of the margin. It is not
necessary to close the curve.
You cannot rotate the item while you’re specifying the
margin manually.
Each set of curves are linked only to their respective
restoration. Whenever you manually specify the Prepline
using this feature, you are overwriting any pre-existing
curves.
NOTE: This information can be automatically imported
when the .STL File is imported if it is imported along with
the respective Margin Information File from the CAD.
39. Modify Offset / Part Border Values
Define Area for Special MachiningThis feature allows you to manually draw an
area that you want to segregate for
machining. This can be used on a manual /
case-by-case basis or can be integrated into
the cutting strategy as an operation can be
specifically set to look for this curve before
applying it’s toolpaths within the bounds.
40. Accurate Positioning
Cylinder in MeshTypically, drilling axes will automatically be detected
but this tool exists for the rare instance where it is
not automatically found. This command reads
cylindrical surfaces to generate the drilling axis when
it is not present. SUM3D Dental will automatically
calculate the necessary surfaces. Once the command
is activated, select any point of the mesh inside the
screw channel. SUM3D Dental will detect the axis
and distance that will be used in the drilling
operations. This tool stays active to allow you to
create other drilling axes if needed for multiple
restorations.
To exit from the command, click right mouse button
or ESC key.
41. Modify Shrinkage / Enlargement Factor
Holes ClosingIn case you used the command to
create cylinders for the drilling or in
case the imported model presents
holes that are not closed, it could be
necessary to seal these holes to
avoid sending the tool into the holes
prematurely during the machining
process. This command allows the
user to create sealing surfaces or
plugs for the holes.
42. Automatically Detect Prep Line
Modify Hole DimensionHere you can change the values for the
diameter of the screw access hole inside the
implant/abutment making it larger / smaller.
This will override the design so caution
should be used when changing these
dimensions.
43. Manually Designate Prep Line
Replace InterfaceThis feature allows the user to replace the
interface geometry of an implant abutment using
a pre-existing library. More accurate geometry
files such as .IGES files can be used to achieve
superior fit and repeatability. Additionally,
custom strategies can be assigned to each
interface in the library. This ensures that every
interface is milled in the exact same manner
(toolpaths, speeds, feeds, step increments).
(For additional information on this feature or for
information on building your own libraries,
advanced training is required)
44. Define Area for Special Machining
Secondary Axis• This command defines the
secondary machining axis for
the bars and attachments. By
clicking on two points on the
bar sides, or on the bridge
attachments sides, it will
generate a curve identified by
'u' (on the layer identified by
'n') which can be selected
instead of the usual offset
curve.
45. Cylinder in Mesh
EngravingEngraving allows the manufacturer to mill an identification
code on the objects, to simplify the traceability in the phase
after machining (ie: sorting the units prior to sintering).
You can place text or numbers on the object, in any
direction, on the top or bottom (prep) side of it.
The engraving can be rotated during its positioning, by using
the "+", "-"
or "CTRL + Mouse Wheel".
It is also possible to change text size using “Shift + Mouse
Wheel".
46. Holes Closing
Change Object TypeThis command allows the operator to change the type of the selected
object after it has been imported.
After having executed the command and selecting the object, pressing
the right-click on the mouse, a selection list box appears to select the
desired object type.
This will change the object type for the item which will determine how
the Strategy treats the restoration.
NOTE: The curves that were created may be different because the item
was imported incorrectly. Changing the item type will not correct this
issue – in these rare cases, the object will need to be removed and reimported under the correct object type.
47. Modify Hole Dimension
Rotation of the BlankThis function allows you to rotate the disc within a fixure.
This could be particularly useful if a fixture clamps onto stock on
a side that still has material, yet you potentially cannot mill the
item because of it’s angled insertion direction causing a collision
with the fixture: You can simply rotate the stock to give the
machine extra clearance and ensure that the physical disc /
stock will match the same orientation in the mill.
To rotate the disc, select the icon and subsequently execute the
rotation using the ‘+’ and ‘-‘ keys on the keyboard.
48. Replace Interface
Delete CurvesThis option allows the operator to delete a part border that is showing present in
the software but may not have necessarily been machined out.
This can sometimes occur when an operator calculates a run but does not actually mill the run.
(Because the software automatically saves the partially used stock at the time of calculation)
49. Secondary Axis
InfoThis command allows the operator to select an
imported object and display all of the relevant
information related to it – this includes the Angle
deviation from the original, Part Height in the stock,
Object Type Selected during import step, Angular
Rotation for A & B Axes to be able to mill the item.
NOTE: It is important to note that when
troubleshooting an issue related to unexpected milling
results, this can be an invaluable tool to try and help
determine if the object was imported as the correct
type. For example: If a coping was imported as an
abutment
50. Engraving
Generate BlankThis command allows an
operator to create multiple
blanks very quickly and
store them directly in the
correct directories. This
could eliminate mistakes
that one could make while
trying to enter blanks
between production runs.
51. Change Object Type
Save Partially Used StockThis command allows the operator to
export the stock that is in the current
job and designates it as a used stock.
This can be useful for exporting a
disc under a different stock name or
simply updating a stock file.
52. Rotation of the Blank
Assign Machining statusOptional Module
53. Delete Curves
EquipmentThis command allows the user to
manually import the fixture of the
machine that holds the stock.
Files are stored in the directory:
C:\SUM\Dental\SUP
Collision Checks take this fixture into
account during the machining
calculations. Furthermore, using the
kinematics simulation module, the
simulation on the pc will be as close as
it gets to the real thing.
54. Info
Create ReportThis icon allows to create a personalized report
based on your current loaded job.
You can customize this report to show a
number of different relevant pieces of
information (ie: Lot Number, Stock Name, .STL
Filenames, Part Positions Relative to disc, etc.)
The files can be generated in .doc (Microsoft
Office Word), OpenOffice format or .RTF (Rich
Text Format)
The template name must have Teeth_ in the
first part of the name. In these templates there
are images and variables that will be updated
with the CAM data. Words and logos can be
modified.
55. Generate Blank
Milling Time CalculationUsing pre-determined time values assigned to
the machine in the Machines Archive, the
operator can calculate an estimated Milling Time
based on the contents of the current job. The
toolpaths must first be calculated for these
numbers to be accurate.
56. Save Partially Used Stock
Show residual materialIn order to use this feature, the calculation of the job
must first be completed. This function allows the user
to apply a color mapping to the surface of the .STL
which will indicate varying levels of thickness of the
material that will be left behind after the milling has
been completed. This will give the user a good idea of
any surfaces that may be left un-finished due to any
size / length constraints of tools, roughness of cut, etc.
57. Assign Machining status
Dimensional VerificationThis command allows the dimensional verification and certification of
the implants just after the machining, straight on the machines
equipped with the probe and the measuring software 3DFI.
This is not available on all machines.
58. Equipment
Demo of Secondary ToolbarButtons
59. Create Report
Default SettingsThis command displays the Default Settings Window. This is
where most of the pre-set behaviors of the software are stored
such as default directories and options during import.
After the setting of the parameters click on “Ok" to confirm.
All of these parameters are written in a file called TPSettings.ini
and are located in C:\SUM folder (For full versions of the SUM3D
software).
60. Milling Time Calculation
Default Settings – General ConfigurationToggle Interface Level
Icon Size
Engraving Settings
Logo Settings
Mesh Filtering
61. Show residual material
Default Settings – Database• Not Used for Dental
62. Dimensional Verification
Default Settings – Equipment• Default Directory for
the Fixtures / Holders
63. Demo of Secondary Toolbar Buttons
Default Settings – ToolsAbout Software
User Manual
Machines Archive
Tool Room / Archive
Materials Archive
64. Default Settings
– Materials Folders• Change the default
directory names that
the software will look
for depending on the
material chosen. This
only applies to
subdirectories under
the “DENTAL” folder.
65. Default Settings – General Configuration
Default Settings – Report• Report Output Format
• Report Template
• Default Directory for
Output
• Additional Report
Options
OR
66. Default Settings – Database
Default Settings – MarginsDefault Margin Thickness
• This value should
match the margin
thickness that you have
designed in the CAD
Software. This does not
change the thickness of
the actual design.
67. Default Settings – Equipment
Default Settings – Support PinsIn this setting tab we can
specify multiple optional
parameters for our Default
Support Pins based on
different Material Type and
Object Type. This allows us
to be flexible for each
different material demand.
We can control the
following defaults:
• Support Pin Sizes
• Enable Cuttable Pins
• Circular Support Pins or
Rectangular
68. Default Settings – Tools
Default Settings – Stock• Default Directories for
New / Used Stock.
• Stock Import Options
• Auto Nesting
• Part to Part
• Default Pin Cutting
Options
69. Default Settings – Materials Folders
Default Settings – Strategy• Default Directories for
Importing / Exporting
Strategies from.
• Strategy Lock
• Parallel Computing
(Multi-Core)
• Axes Definition
70. Default Settings – Report
Default Settings – Model Import• Default Directories for
Importing restorations
for milling
• Individualized Part
Borders / Offsets based
on materials.
• Mirroring Options
• Support Pin / Prep Line
Detection & Creation
• Preserve Orientation of
.STL Files Imported
• Percentage Scaling
Factors
• Options for Managing
& renaming Files
during Import.
71. Default Settings – Margins
Default Settings – Job Files• Default Directories for
placement of Job
(.CAM) Files.
• Automatic Job Naming
Toggle on/off.
72. Default Settings – Support Pins
Lava Ultimate / Vita EnamicBy following the logic of automated operations as
mentioned before, we can configure SUM3DDental to
machine Lava Ultimate / Vita Enamic and similarly
mounted stock on PINS.
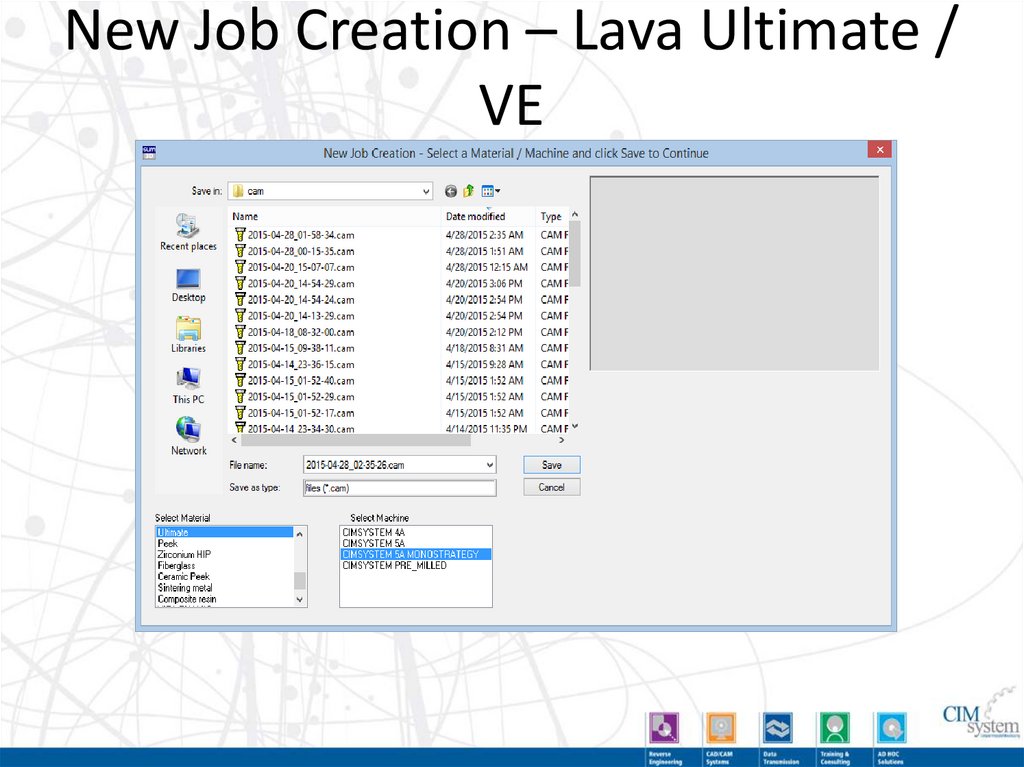
• When we choose Ultimate during the new job creation,
SUM3D Dental will automatically load the holder of the
blocks.
73. Default Settings – Stock
New Job Creation – Lava Ultimate /VE
74. Default Settings – Strategy
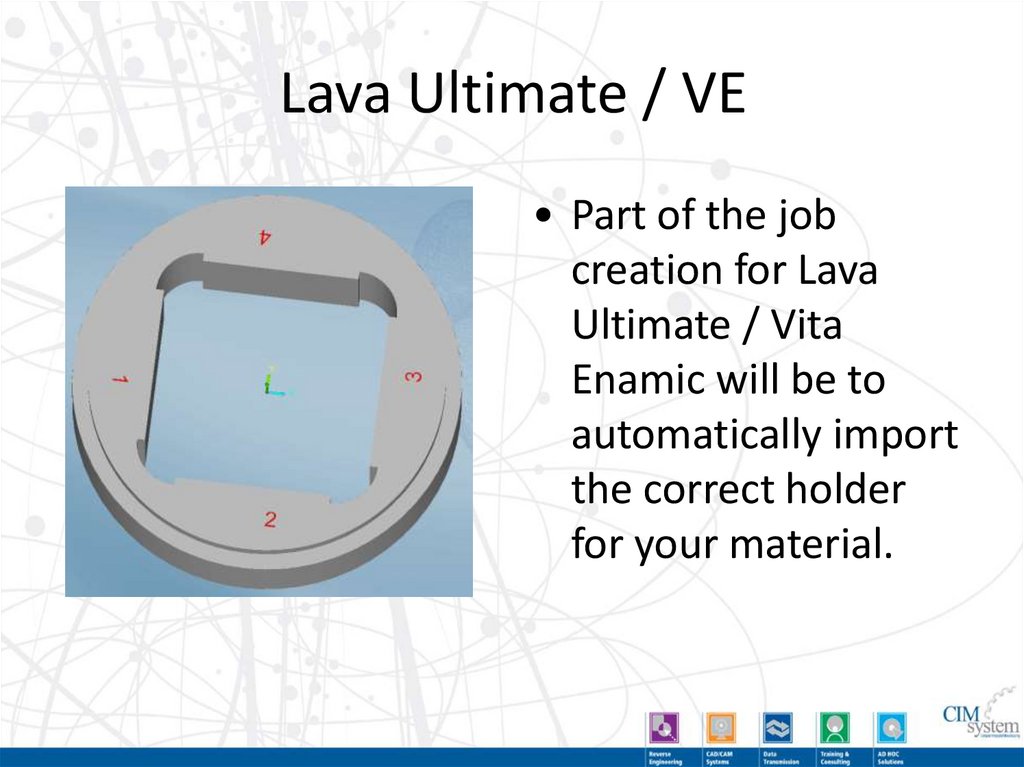
Lava Ultimate / VE• Part of the job
creation for Lava
Ultimate / Vita
Enamic will be to
automatically import
the correct holder
for your material.
75. Default Settings – Model Import
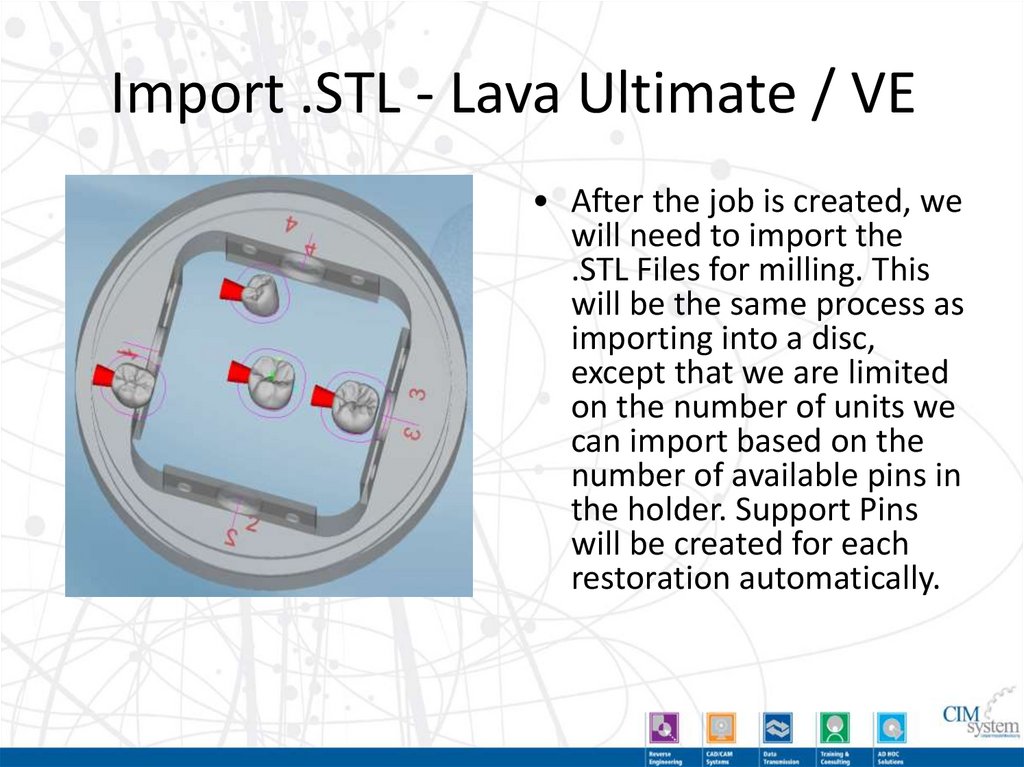
Import .STL - Lava Ultimate / VE• After the job is created, we
will need to import the
.STL Files for milling. This
will be the same process as
importing into a disc,
except that we are limited
on the number of units we
can import based on the
number of available pins in
the holder. Support Pins
will be created for each
restoration automatically.
76. Default Settings – Job Files
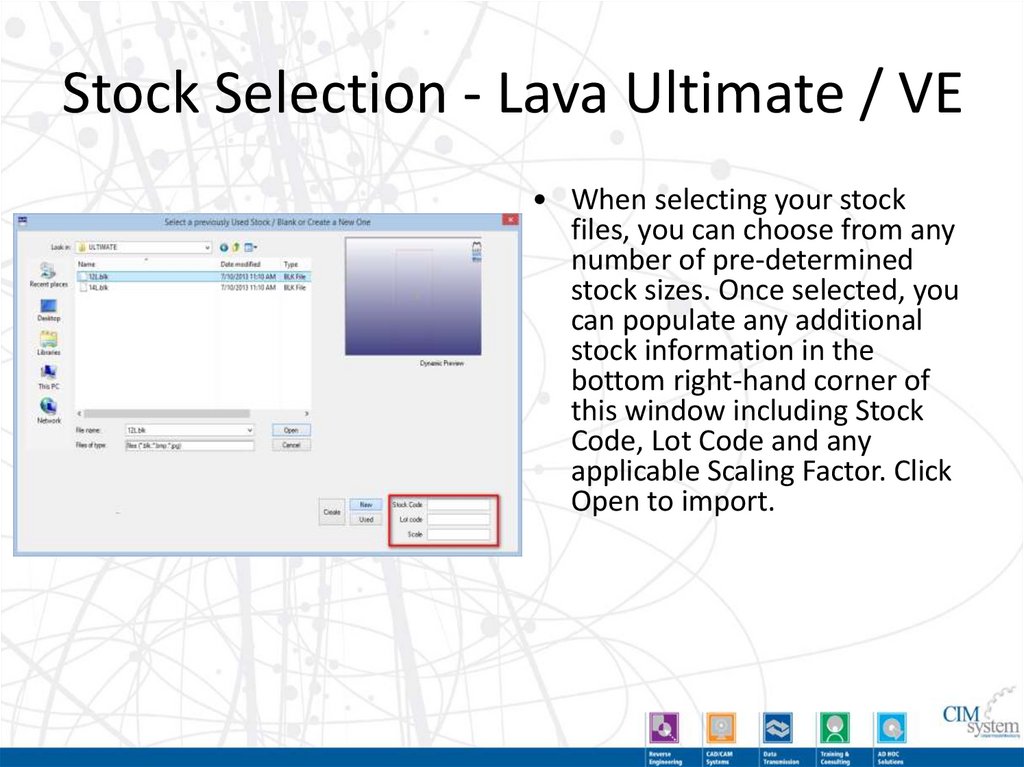
Stock Selection - Lava Ultimate / VE• When selecting your stock
files, you can choose from any
number of pre-determined
stock sizes. Once selected, you
can populate any additional
stock information in the
bottom right-hand corner of
this window including Stock
Code, Lot Code and any
applicable Scaling Factor. Click
Open to import.
77. Lava Ultimate / Vita Enamic
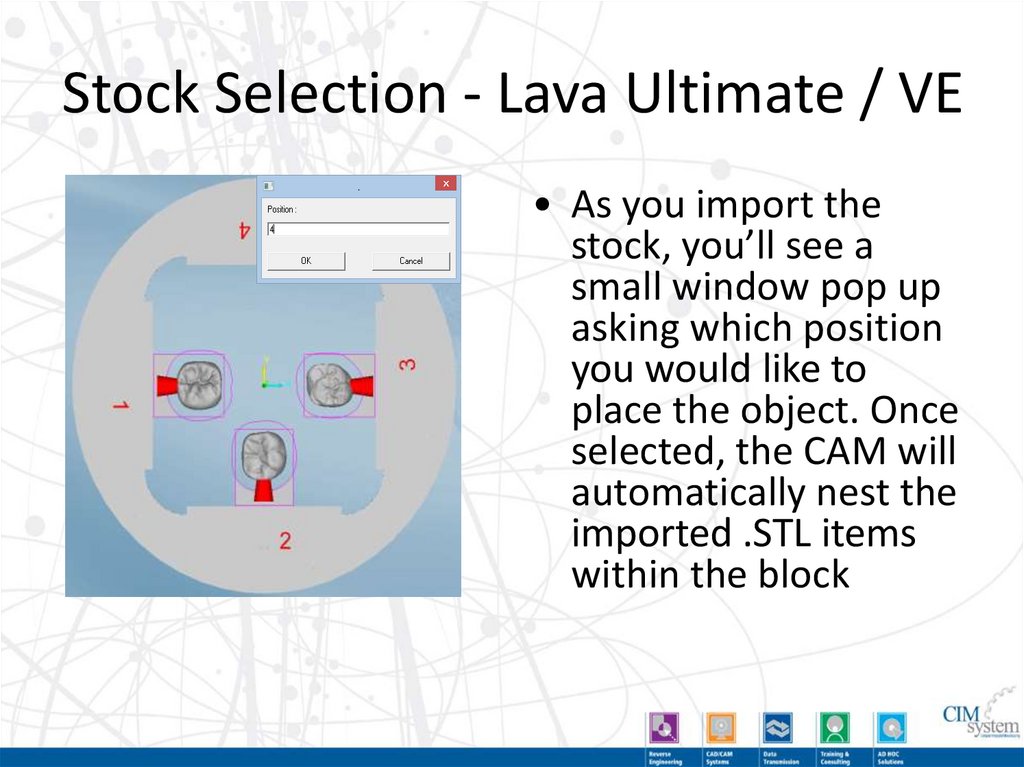
Stock Selection - Lava Ultimate / VE• As you import the
stock, you’ll see a
small window pop up
asking which position
you would like to
place the object. Once
selected, the CAM will
automatically nest the
imported .STL items
within the block
78. New Job Creation – Lava Ultimate / VE
Contact usUSA OFFICE:
ITALIAN OFFICE:
Michael Webb
President
webb@cimsystem.com
CIMsystem USA
4350 Brownsboro Road, STE 110
Louisville, KY 40207
Luigi Fanin
Chief Technical Officer
fanin@cimsystem.com
CIMSYSTEM s.r.l.
Via Monfalcone, 3
20092 Cinisello Balsamo (MI) Italy
Phone +1-502-893-4546
Mobile +1-502-536-0104
Phone +39 02 87213185
Fax +39 02 6129306
Web Site:
www.sum3ddental.com
www.cimsystem.com
www.rhinoplugins.com
Web Site:
www.sum3ddental.com
www.cimsystem.com
www.rhinoplugins.com


 Медицина
 Программное обеспечение


