
 Интернет
Похожие презентации:


Pyro Kings T9 guide
1.
Thanks to Julian Walfridsson and GC WU for helping to putthe first guide together. Also to KK for her permission to use
some initial Nordic set ups, I have tweaked some of the shots
with help from Julian.
Tour 9 shootout guideNew holes beta
2.
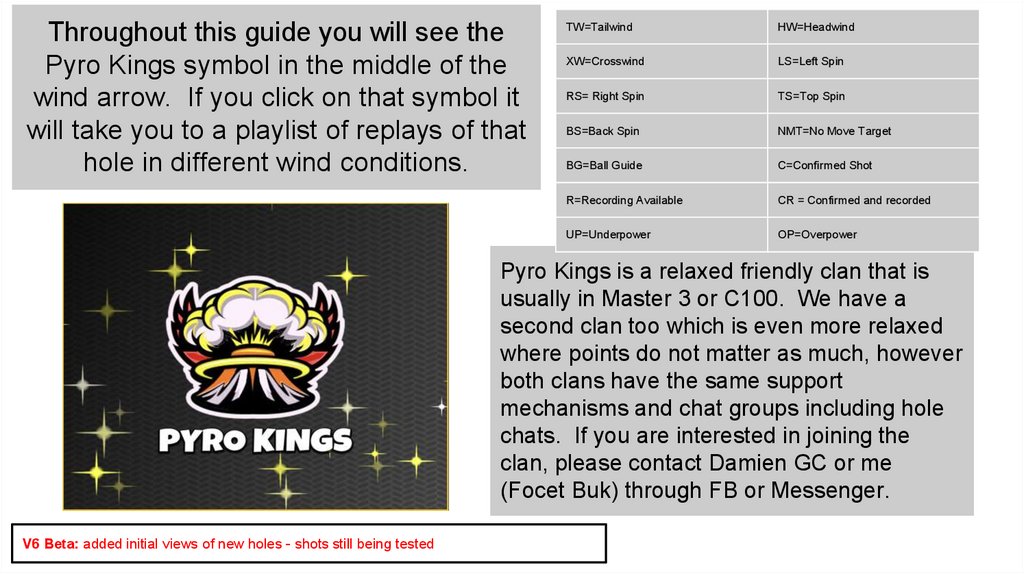
Throughout this guide you will see thePyro Kings symbol in the middle of the
wind arrow. If you click on that symbol it
will take you to a playlist of replays of that
hole in different wind conditions.
TW=Tailwind
HW=Headwind
XW=Crosswind
LS=Left Spin
RS= Right Spin
TS=Top Spin
BS=Back Spin
NMT=No Move Target
BG=Ball Guide
C=Confirmed Shot
R=Recording Available
CR = Confirmed and recorded
UP=Underpower
OP=Overpower
Pyro Kings is a relaxed friendly clan that is
usually in Master 3 or C100. We have a
second clan too which is even more relaxed
where points do not matter as much, however
both clans have the same support
mechanisms and chat groups including hole
chats. If you are interested in joining the
clan, please contact Damien GC or me
(Focet Buk) through FB or Messenger.
V6 Beta: added initial views of new holes - shots still being tested
3.
Pull Angles. Shot Power and adjusting to higher or lower pointsPull angles
This isn't always pointed out in the guide, but when there is a XW with TW, we will usually favour a pull
angle that takes us more towards the tee. Conversely, if there is a XW with HW we’ll use a pull angle that
takes us away from the tee. On some holes this does not matter, however, on others, where we need to be
precise with the landing spot, e.g. Milano 3, this can be critical. If you find yourself missing the landing spot
this will usually be the reason. I’ve linked an example… hit the Pyro kings image to take you there. You will
see my pull angle is what is called 12:01, which means as I adjust I am moving closer to the tee, meaning
any additional TW push I encounter should be compensated for. I then shouldn't miss the rough.
Shot power and adjusting to higher or lower points.
Another issue you may face is adjusting to a higher point or lower point. Sometimes we
have taken this into account in the shots we have set up. However, others we can't
because it depends on the strength of the wind as to whether you'll end up at a higher or
lower point. In the example given, we actually end up at a higher point. Due to the
mechanics of the game, this means that the ball will travel further than you intended.
Therefore, on that shot I underpowered it slightly too. The opposite happens when we
adjust to a lower point. I.e. the ball travels a shorter distance, so to compensate we
would either overpower slightly or push up slightly before we take our shot. If you find
you are missing shots, watch my replays back to see if I am using a pull angle and/or
over or underpowering slightly.
4.
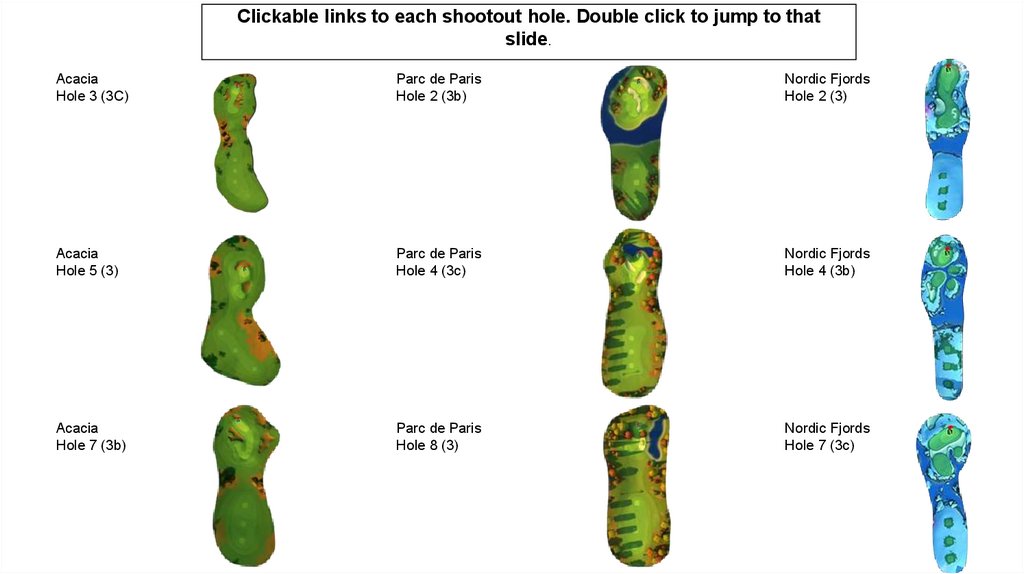
Clickable links to each shootout hole. Double click to jump to thatslide.
Acacia
Hole 3 (3C)
Parc de Paris
Hole 2 (3b)
Nordic Fjords
Hole 2 (3)
Acacia
Hole 5 (3)
Parc de Paris
Hole 4 (3c)
Nordic Fjords
Hole 4 (3b)
Acacia
Hole 7 (3b)
Parc de Paris
Hole 8 (3)
Nordic Fjords
Hole 7 (3c)
5.
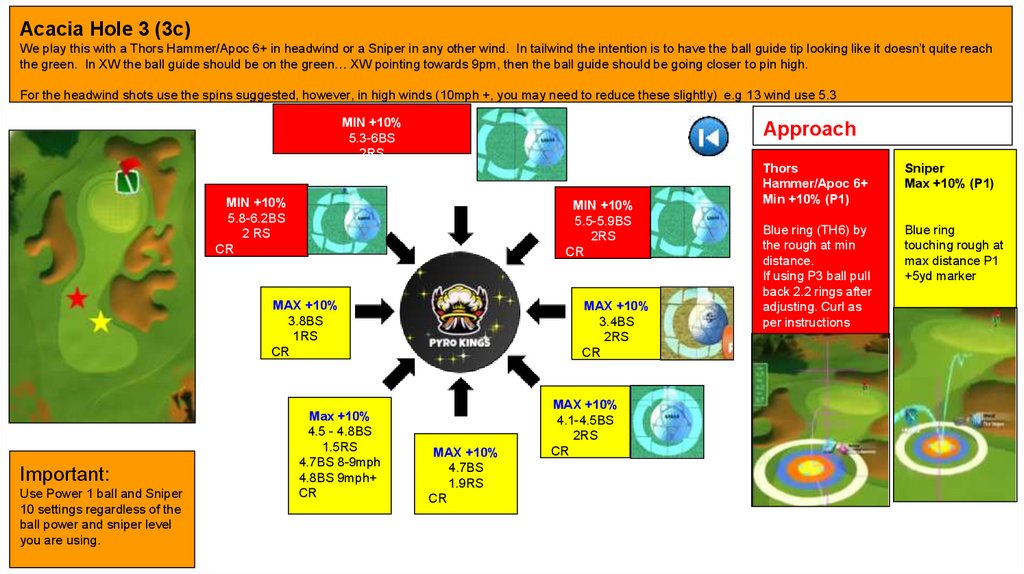
Acacia Hole 3 (3c)We play this with a Thors Hammer/Apoc 6+ in headwind or a Sniper in any other wind. In tailwind the intention is to have the ball guide tip looking like it doesn’t quite reach
the green. In XW the ball guide should be on the green… XW pointing towards 9pm, then the ball guide should be going closer to pin high.
For the headwind shots use the spins suggested, however, in high winds (10mph +, you may need to reduce these slightly) e.g 13 wind use 5.3
MIN +10%
5.3-6BS
2RS
Approach
CR
MIN +10%
5.8-6.2BS
2 RS
CR
MIN +10%
5.5-5.9BS
2RS
CR
MAX +10%
3.8BS
1RS
CR
Important:
Use Power 1 ball and Sniper
10 settings regardless of the
ball power and sniper level
you are using.
Max +10%
4.5 - 4.8BS
1.5RS
4.7BS 8-9mph
4.8BS 9mph+
CR
MAX +10%
3.4BS
2RS
CR
MAX +10%
4.7BS
1.9RS
CR
MAX +10%
4.1-4.5BS
2RS
CR
Thors
Hammer/Apoc 6+
Min +10% (P1)
Sniper
Max +10% (P1)
Blue ring (TH6) by
the rough at min
distance.
If using P3 ball pull
back 2.2 rings after
adjusting. Curl as
per instructions
Blue ring
touching rough at
max distance P1
+5yd marker
6.
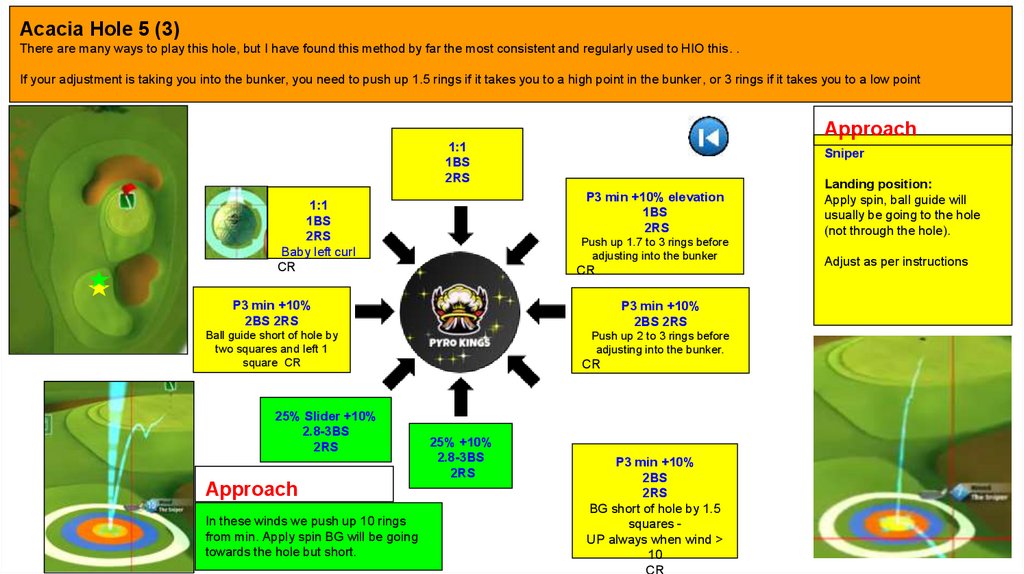
Acacia Hole 5 (3)There are many ways to play this hole, but I have found this method by far the most consistent and regularly used to HIO this. .
If your adjustment is taking you into the bunker, you need to push up 1.5 rings if it takes you to a high point in the bunker, or 3 rings if it takes you to a low point
Approach
1:1
1BS
2RS
Sniper
P3 min +10% elevation
1BS
2RS
1:1
1BS
2RS
Baby left curl
CR
Push up 1.7 to 3 rings before
adjusting into the bunker
CR
P3 min +10%
2BS 2RS
P3 min +10%
2BS 2RS
Ball guide short of hole by
two squares and left 1
square CR
Push up 2 to 3 rings before
adjusting into the bunker.
25% Slider +10%
2.8-3BS
2RS
Approach
In these winds we push up 10 rings
from min. Apply spin BG will be going
towards the hole but short.
CR
25% +10%
2.8-3BS
2RS
P3 min +10%
2BS
2RS
BG short of hole by 1.5
squares UP always when wind >
10
CR
Landing position:
Apply spin, ball guide will
usually be going to the hole
(not through the hole).
Adjust as per instructions
7.
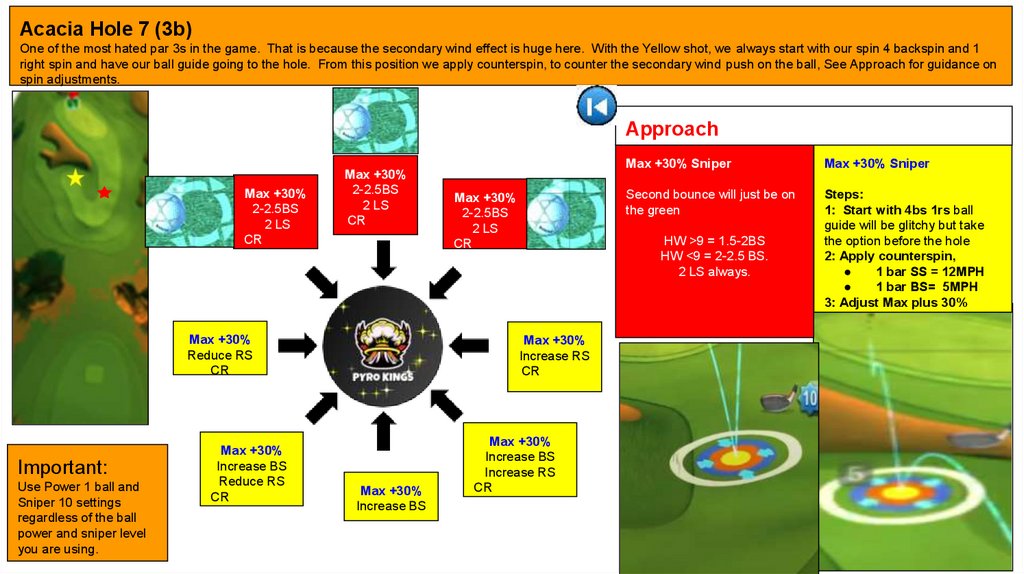
Acacia Hole 7 (3b)One of the most hated par 3s in the game. That is because the secondary wind effect is huge here. With the Yellow shot, we always start with our spin 4 backspin and 1
right spin and have our ball guide going to the hole. From this position we apply counterspin, to counter the secondary wind push on the ball, See Approach for guidance on
spin adjustments.
Approach
Max +30%
2-2.5BS
2 LS
CR
Max +30%
2-2.5BS
2 LS
CR
Max +30%
Reduce RS
CR
Important:
Use Power 1 ball and
Sniper 10 settings
regardless of the ball
power and sniper level
you are using.
Max +30%
Increase BS
Reduce RS
CR
Max +30%
2-2.5BS
2 LS
CR
Max +30% Sniper
Second bounce will just be on
the green
Steps:
1: Start with 4bs 1rs ball
guide will be glitchy but take
the option before the hole
2: Apply counterspin,
1 bar SS = 12MPH
1 bar BS= 5MPH
3: Adjust Max plus 30%
HW >9 = 1.5-2BS
HW <9 = 2-2.5 BS.
2 LS always.
Max +30%
Increase RS
CR
Max +30%
Increase BS
Max +30% Sniper
Max +30%
Increase BS
Increase RS
CR
8.
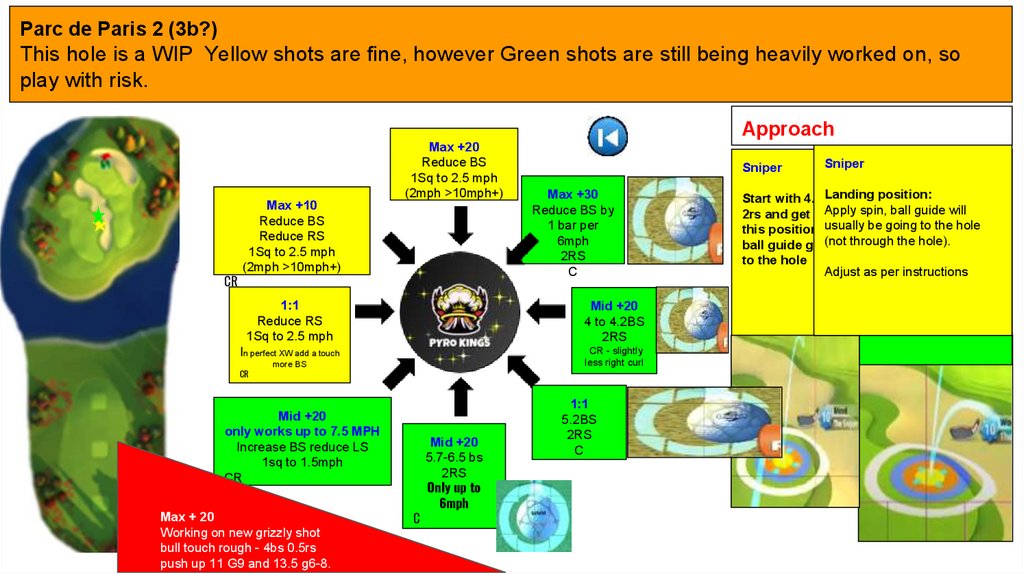
Parc de Paris 2 (3b?)This hole is a WIP Yellow shots are fine, however Green shots are still being heavily worked on, so
play with risk.
Approach
Max +20
Reduce BS
1Sq to 2.5 mph
(2mph >10mph+)
CR
Max +10
Reduce BS
Reduce RS
1Sq to 2.5 mph
(2mph >10mph+)
Sniper
Max +30
Reduce BS by
1 bar per
6mph
2RS
C
1:1
Reduce RS
1Sq to 2.5 mph
Mid +20
4 to 4.2BS
2RS
In perfect XW add a touch
CR - slightly
less right curl
CR
more BS
Mid +20
only works up to 7.5 MPH
Increase BS reduce LS
1sq to 1.5mph
CR
Max + 20
Working on new grizzly shot
bull touch rough - 4bs 0.5rs
push up 11 G9 and 13.5 g6-8.
C
Mid +20
5.7-6.5 bs
2RS
Only up to
6mph
1:1
5.2BS
2RS
C
Sniper Sniper
LandingStart
position:
Start with 4.5bs
with 5.2bs 2RS
Apply spin,
will
2rs and get into
Andball
getguide
into this
usually
be
going
to
the
this position position - ball hole
guide
(not through
the
hole). the
ball guide going
going
towards
to the hole
hole
Adjust as per instructions
Curl will vary
In TW over 6mph you
need to underpower
9.
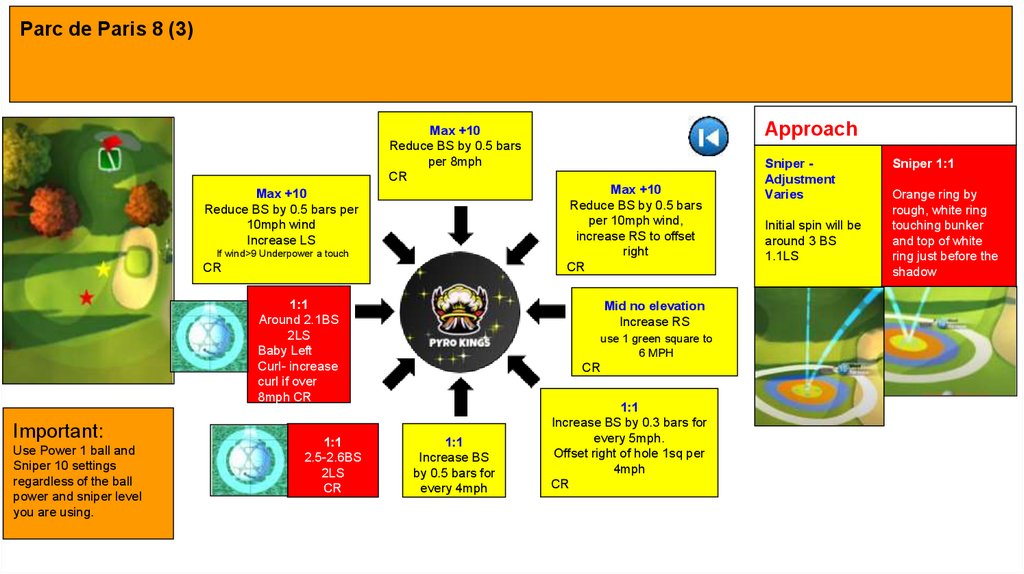
Parc de Paris 8 (3)Approach
Max +10
Reduce BS by 0.5 bars
per 8mph
CR
Max +10
Reduce BS by 0.5 bars
per 10mph wind,
increase RS to offset
right
CR
Max +10
Reduce BS by 0.5 bars per
10mph wind
Increase LS
If wind>9 Underpower a touch
CR
1:1
Around 2.1BS
2LS
Baby Left
Curl- increase
curl if over
8mph CR
Important:
Use Power 1 ball and
Sniper 10 settings
regardless of the ball
power and sniper level
you are using.
1:1
2.5-2.6BS
2LS
CR
Mid no elevation
Increase RS
use 1 green square to
6 MPH
CR
1:1
Increase BS
by 0.5 bars for
every 4mph
1:1
Increase BS by 0.3 bars for
every 5mph.
Offset right of hole 1sq per
4mph
CR
Sniper Adjustment
Varies
Initial spin will be
around 3 BS
1.1LS
Sniper 1:1
Orange ring by
rough, white ring
touching bunker
and top of white
ring just before the
shadow
10.
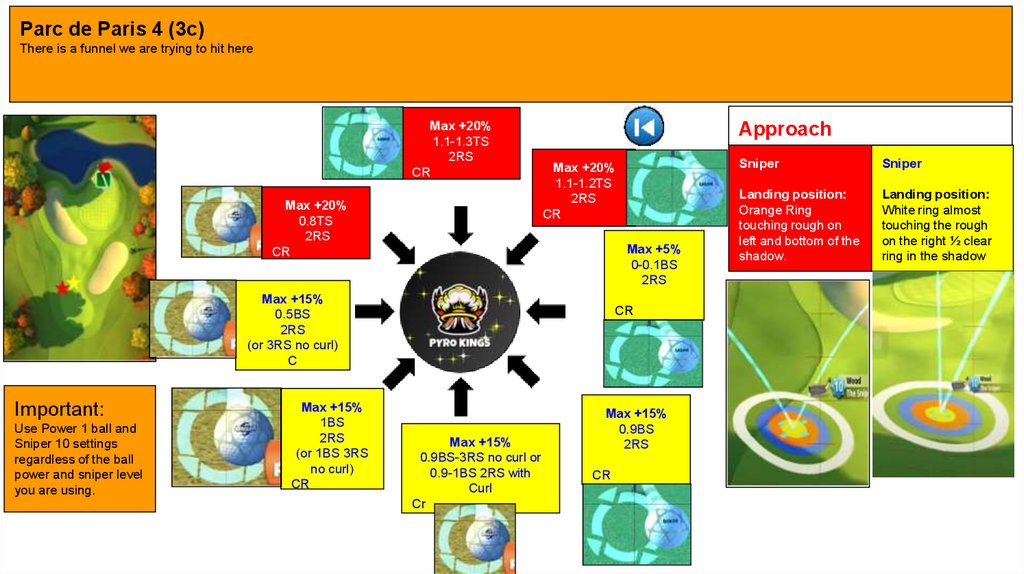
Parc de Paris 4 (3c)There is a funnel we are trying to hit here
Max +20%
1.1-1.3TS
2RS
CR
Max +20%
0.8TS
2RS
CR
Approach
Max +20%
1.1-1.2TS
2RS
CR
Max +5%
0-0.1BS
2RS
Max +15%
0.5BS
2RS
(or 3RS no curl)
C
Important:
Use Power 1 ball and
Sniper 10 settings
regardless of the ball
power and sniper level
you are using.
Max +15%
1BS
2RS
(or 1BS 3RS
no curl)
CR
CR
Max +15%
0.9BS-3RS no curl or
0.9-1BS 2RS with
Curl
Cr
Max +15%
0.9BS
2RS
CR
Sniper
Sniper
Landing position:
Orange Ring
touching rough on
left and bottom of the
shadow.
Landing position:
White ring almost
touching the rough
on the right ½ clear
ring in the shadow
11.
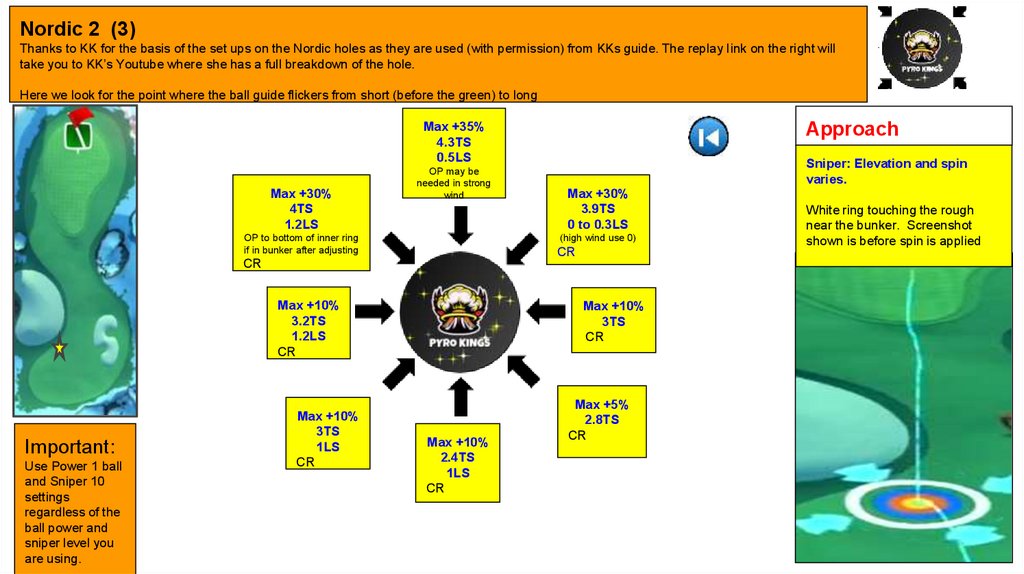
Nordic 2 (3)Thanks to KK for the basis of the set ups on the Nordic holes as they are used (with permission) from KKs guide. The replay link on the right will
take you to KK’s Youtube where she has a full breakdown of the hole.
Here we look for the point where the ball guide flickers from short (before the green) to long
Approach
Max +35%
4.3TS
0.5LS
Max +30%
4TS
1.2LS
OP may be
needed in strong
wind
OP to bottom of inner ring
if in bunker after adjusting
Sniper: Elevation and spin
varies.
Max +30%
3.9TS
0 to 0.3LS
(high wind use 0)
CR
CR
Max +10%
3.2TS
1.2LS
CR
Important:
Use Power 1 ball
and Sniper 10
settings
regardless of the
ball power and
sniper level you
are using.
Max +10%
3TS
1LS
CR
Max +10%
3TS
CR
Max +10%
2.4TS
1LS
CR
Max +5%
2.8TS
CR
White ring touching the rough
near the bunker. Screenshot
shown is before spin is applied
12.
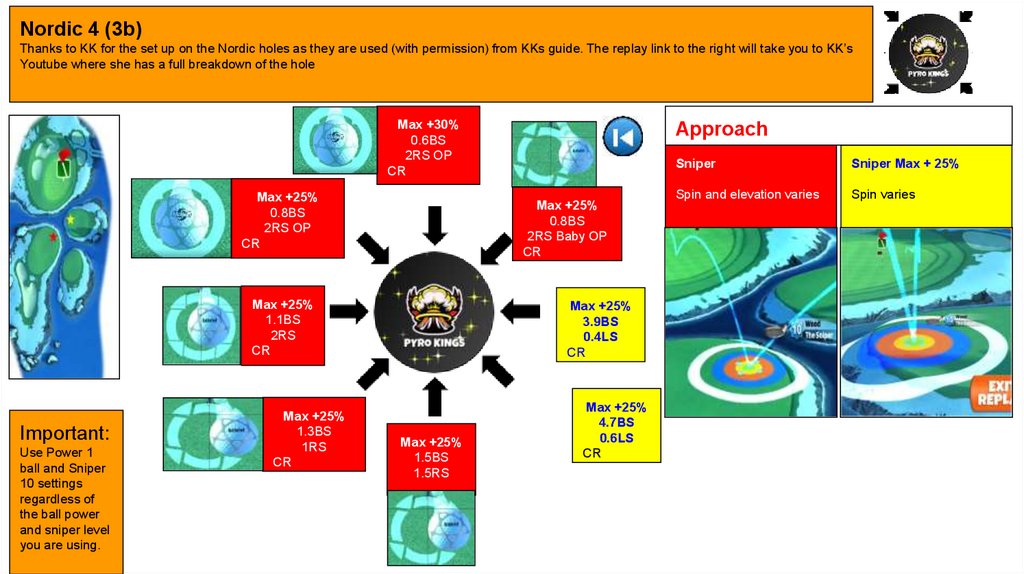
Nordic 4 (3b)Thanks to KK for the set up on the Nordic holes as they are used (with permission) from KKs guide. The replay link to the right will take you to KK’s
Youtube where she has a full breakdown of the hole
Max +30%
0.6BS
2RS OP
CR
Max +25%
0.8BS
2RS OP
CR
Max +25%
0.8BS
2RS Baby OP
CR
Max +25%
1.1BS
2RS
CR
Important:
Use Power 1
ball and Sniper
10 settings
regardless of
the ball power
and sniper level
you are using.
Max +25%
1.3BS
1RS
CR
Approach
Max +25%
3.9BS
0.4LS
CR
Max +25%
1.5BS
1.5RS
Max +25%
4.7BS
0.6LS
CR
Sniper
Sniper Max + 25%
Spin and elevation varies
Spin varies
13.
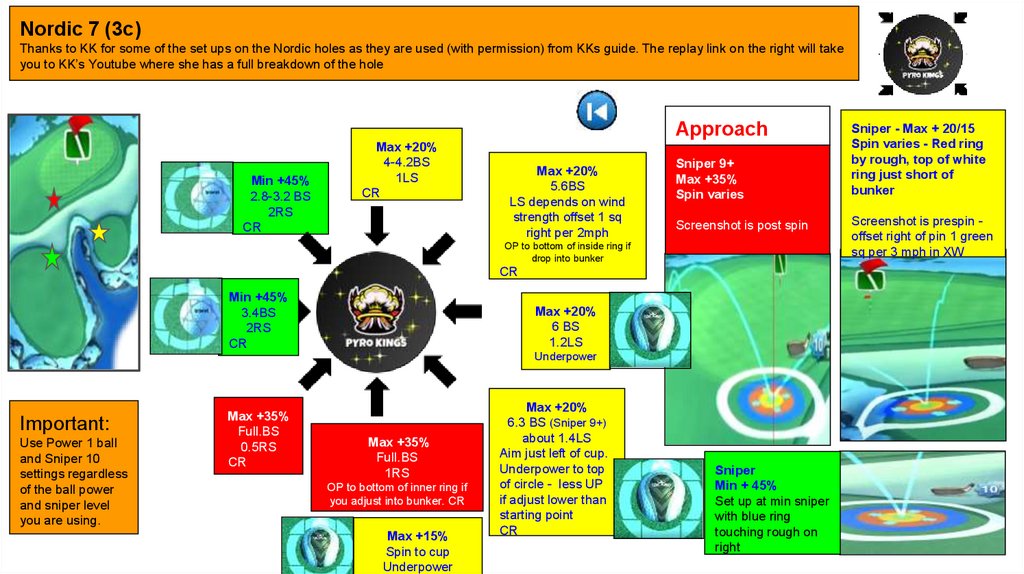
Nordic 7 (3c)Thanks to KK for some of the set ups on the Nordic holes as they are used (with permission) from KKs guide. The replay link on the right will take
you to KK’s Youtube where she has a full breakdown of the hole
Approach
Min +45%
2.8-3.2 BS
2RS
CR
Max +20%
4-4.2BS
1LS
CR
Max +20%
5.6BS
LS depends on wind
strength offset 1 sq
right per 2mph
Sniper 9+
Max +35%
Spin varies
Screenshot is post spin
OP to bottom of inside ring if
drop into bunker
CR
Min +45%
3.4BS
2RS
CR
Max +20%
6 BS
1.2LS
Underpower
Important:
Use Power 1 ball
and Sniper 10
settings regardless
of the ball power
and sniper level
you are using.
Max +35%
Full.BS
0.5RS
CR
Max +35%
Full.BS
1RS
OP to bottom of inner ring if
you adjust into bunker. CR
Max +15%
Spin to cup
Underpower
Max +20%
6.3 BS (Sniper 9+)
about 1.4LS
Aim just left of cup.
Underpower to top
of circle - less UP
if adjust lower than
starting point
CR
Sniper
Min + 45%
Set up at min sniper
with blue ring
touching rough on
right
Sniper - Max + 20/15
Spin varies - Red ring
by rough, top of white
ring just short of
bunker
Screenshot is prespin offset right of pin 1 green
sq per 3 mph in XW
14.
Tour 9 Shootout Archive● Milano
● Glenmonarch
● Shiruba Springs
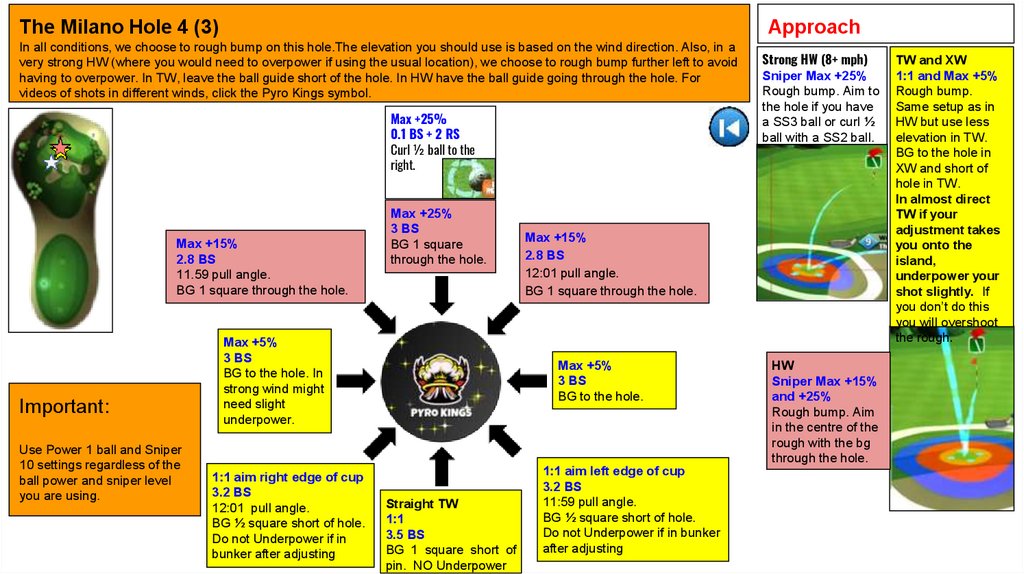
15.
ApproachThe Milano Hole 4 (3)
In all conditions, we choose to rough bump on this hole.The elevation you should use is based on the wind direction. Also, in a
very strong HW (where you would need to overpower if using the usual location), we choose to rough bump further left to avoid
having to overpower. In TW, leave the ball guide short of the hole. In HW have the ball guide going through the hole. For
videos of shots in different winds, click the Pyro Kings symbol.
Max +25%
0.1 BS + 2 RS
Curl ½ ball to the
right.
Max +15%
2.8 BS
11.59 pull angle.
BG 1 square through the hole.
Important:
Use Power 1 ball and Sniper
10 settings regardless of the
ball power and sniper level
you are using.
Max +25%
3 BS
BG 1 square
through the hole.
Max +5%
3 BS
BG to the hole. In
strong wind might
need slight
underpower.
1:1 aim right edge of cup
3.2 BS
12:01 pull angle.
BG ½ square short of hole.
Do not Underpower if in
bunker after adjusting
Max +15%
2.8 BS
12:01 pull angle.
BG 1 square through the hole.
Max +5%
3 BS
BG to the hole.
Straight TW
1:1
3.5 BS
BG 1 square short of
pin. NO Underpower
Strong HW (8+ mph)
Sniper Max +25%
Rough bump. Aim to
the hole if you have
a SS3 ball or curl ½
ball with a SS2 ball.
1:1 aim left edge of cup
3.2 BS
11:59 pull angle.
BG ½ square short of hole.
Do not Underpower if in bunker
after adjusting
HW
Sniper Max +15%
and +25%
Rough bump. Aim
in the centre of the
rough with the bg
through the hole.
TW and XW
1:1 and Max +5%
Rough bump.
Same setup as in
HW but use less
elevation in TW.
BG to the hole in
XW and short of
hole in TW.
In almost direct
TW if your
adjustment takes
you onto the
island,
underpower your
shot slightly. If
you don’t do this
you will overshoot
the rough.
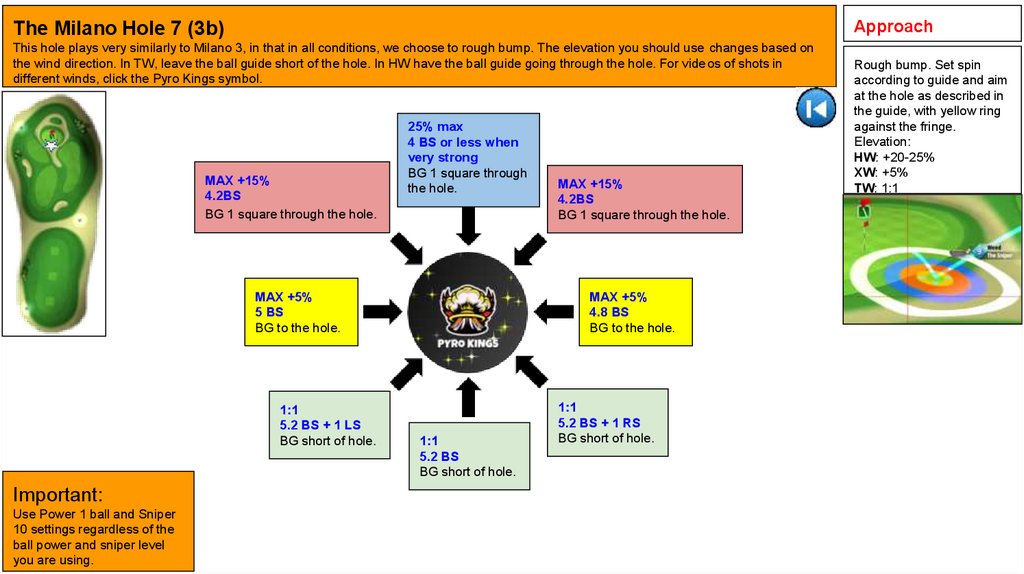
16.
ApproachThe Milano Hole 7 (3b)
This hole plays very similarly to Milano 3, in that in all conditions, we choose to rough bump. The elevation you should use changes based on
the wind direction. In TW, leave the ball guide short of the hole. In HW have the ball guide going through the hole. For videos of shots in
different winds, click the Pyro Kings symbol.
MAX +15%
4.2BS
BG 1 square through the hole.
25% max
4 BS or less when
very strong
BG 1 square through
the hole.
MAX +5%
5 BS
BG to the hole.
1:1
5.2 BS + 1 LS
BG short of hole.
Important:
Use Power 1 ball and Sniper
10 settings regardless of the
ball power and sniper level
you are using.
MAX +15%
4.2BS
BG 1 square through the hole.
MAX +5%
4.8 BS
BG to the hole.
1:1
5.2 BS
BG short of hole.
1:1
5.2 BS + 1 RS
BG short of hole.
Rough bump. Set spin
according to guide and aim
at the hole as described in
the guide, with yellow ring
against the fringe.
Elevation:
HW: +20-25%
XW: +5%
TW: 1:1
17.
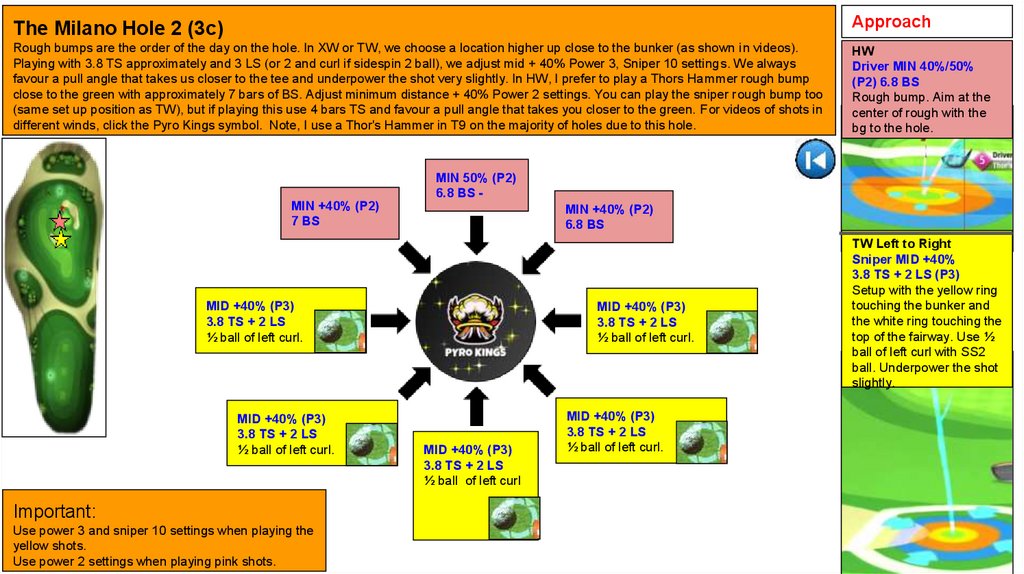
The Milano Hole 2 (3c)Approach
Rough bumps are the order of the day on the hole. In XW or TW, we choose a location higher up close to the bunker (as shown in videos).
Playing with 3.8 TS approximately and 3 LS (or 2 and curl if sidespin 2 ball), we adjust mid + 40% Power 3, Sniper 10 settings. We always
favour a pull angle that takes us closer to the tee and underpower the shot very slightly. In HW, I prefer to play a Thors Hammer rough bump
close to the green with approximately 7 bars of BS. Adjust minimum distance + 40% Power 2 settings. You can play the sniper rough bump too
(same set up position as TW), but if playing this use 4 bars TS and favour a pull angle that takes you closer to the green. For videos of shots in
different winds, click the Pyro Kings symbol. Note, I use a Thor's Hammer in T9 on the majority of holes due to this hole.
HW
Driver MIN 40%/50%
(P2) 6.8 BS
Rough bump. Aim at the
center of rough with the
bg to the hole.
MIN 50% (P2)
6.8 BS MIN +40% (P2)
7 BS
MIN +40% (P2)
6.8 BS
MID +40% (P3)
3.8 TS + 2 LS
½ ball of left curl.
MID +40% (P3)
3.8 TS + 2 LS
½ ball of left curl.
Important:
Use power 3 and sniper 10 settings when playing the
yellow shots.
Use power 2 settings when playing pink shots.
MID +40% (P3)
3.8 TS + 2 LS
½ ball of left curl.
MID +40% (P3)
3.8 TS + 2 LS
½ ball of left curl
MID +40% (P3)
3.8 TS + 2 LS
½ ball of left curl.
TW Left to Right
Sniper MID +40%
3.8 TS + 2 LS (P3)
Setup with the yellow ring
touching the bunker and
the white ring touching the
top of the fairway. Use ½
ball of left curl with SS2
ball. Underpower the shot
slightly.
18.
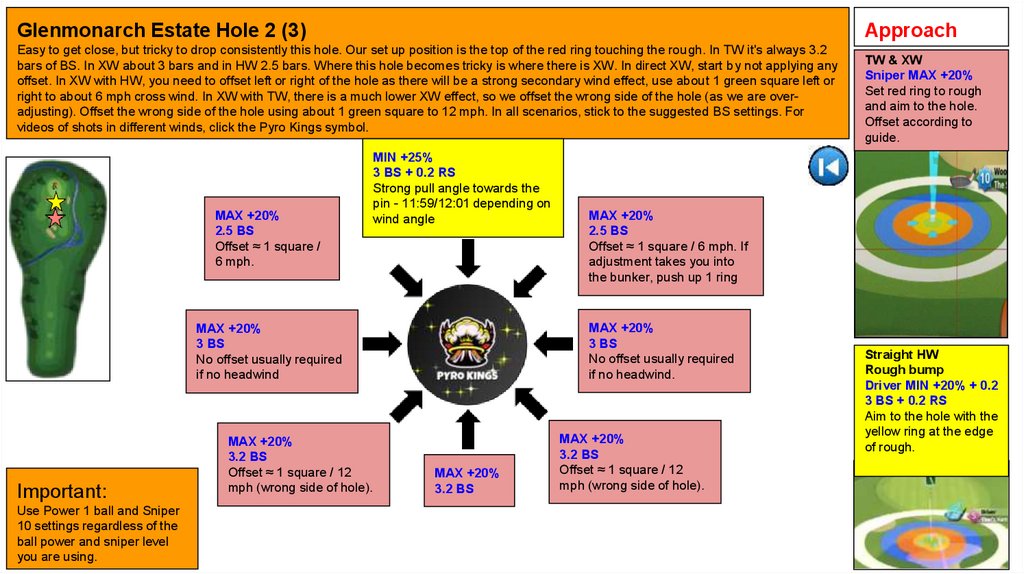
Glenmonarch Estate Hole 2 (3)Approach
Easy to get close, but tricky to drop consistently this hole. Our set up position is the top of the red ring touching the rough. In TW it's always 3.2
bars of BS. In XW about 3 bars and in HW 2.5 bars. Where this hole becomes tricky is where there is XW. In direct XW, start by not applying any
offset. In XW with HW, you need to offset left or right of the hole as there will be a strong secondary wind effect, use about 1 green square left or
right to about 6 mph cross wind. In XW with TW, there is a much lower XW effect, so we offset the wrong side of the hole (as we are overadjusting). Offset the wrong side of the hole using about 1 green square to 12 mph. In all scenarios, stick to the suggested BS settings. For
videos of shots in different winds, click the Pyro Kings symbol.
MAX +20%
2.5 BS
Offset ≈ 1 square /
6 mph.
MIN +25%
3 BS + 0.2 RS
Strong pull angle towards the
pin - 11:59/12:01 depending on
wind angle
Important:
Use Power 1 ball and Sniper
10 settings regardless of the
ball power and sniper level
you are using.
MAX +20%
3.2 BS
Offset ≈ 1 square / 12
mph (wrong side of hole).
MAX +20%
2.5 BS
Offset ≈ 1 square / 6 mph. If
adjustment takes you into
the bunker, push up 1 ring
MAX +20%
3 BS
No offset usually required
if no headwind.
MAX +20%
3 BS
No offset usually required
if no headwind
MAX +20%
3.2 BS
TW & XW
Sniper MAX +20%
Set red ring to rough
and aim to the hole.
Offset according to
guide.
MAX +20%
3.2 BS
Offset ≈ 1 square / 12
mph (wrong side of hole).
Straight HW
Rough bump
Driver MIN +20% + 0.2
3 BS + 0.2 RS
Aim to the hole with the
yellow ring at the edge
of rough.
19.
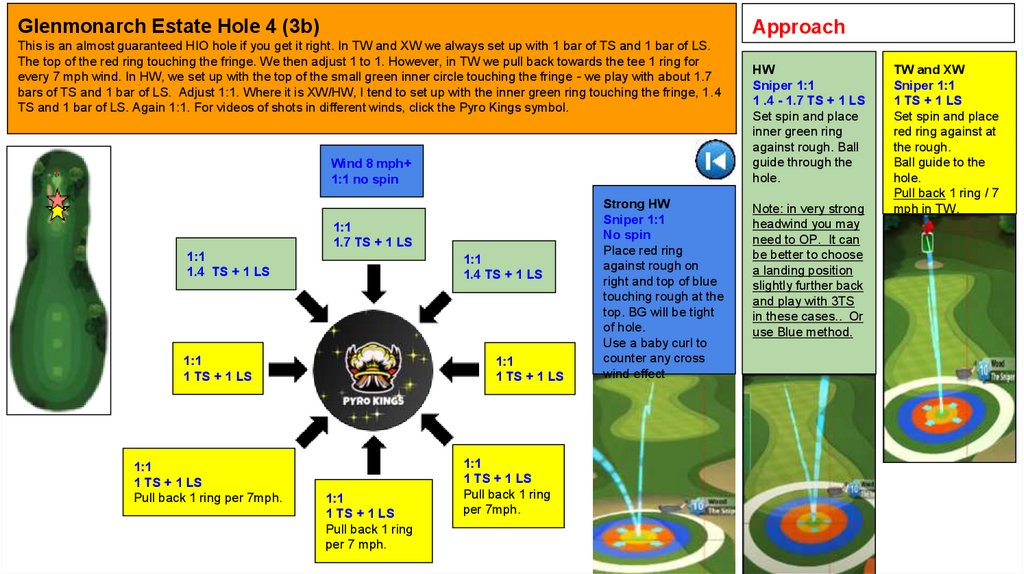
Glenmonarch Estate Hole 4 (3b)Approach
This is an almost guaranteed HIO hole if you get it right. In TW and XW we always set up with 1 bar of TS and 1 bar of LS.
The top of the red ring touching the fringe. We then adjust 1 to 1. However, in TW we pull back towards the tee 1 ring for
every 7 mph wind. In HW, we set up with the top of the small green inner circle touching the fringe - we play with about 1.7
bars of TS and 1 bar of LS. Adjust 1:1. Where it is XW/HW, I tend to set up with the inner green ring touching the fringe, 1.4
TS and 1 bar of LS. Again 1:1. For videos of shots in different winds, click the Pyro Kings symbol.
Wind 8 mph+
1:1 no spin
1:1
1.7 TS + 1 LS
1:1
1.4 TS + 1 LS
1:1
1.4 TS + 1 LS
1:1
1 TS + 1 LS
1:1
1 TS + 1 LS
Pull back 1 ring per 7mph.
1:1
1 TS + 1 LS
1:1
1 TS + 1 LS
Pull back 1 ring
per 7 mph.
1:1
1 TS + 1 LS
Pull back 1 ring
per 7mph.
Strong HW
Sniper 1:1
No spin
Place red ring
against rough on
right and top of blue
touching rough at the
top. BG will be tight
of hole.
Use a baby curl to
counter any cross
wind effect
HW
Sniper 1:1
1 .4 - 1.7 TS + 1 LS
Set spin and place
inner green ring
against rough. Ball
guide through the
hole.
Note: in very strong
headwind you may
need to OP. It can
be better to choose
a landing position
slightly further back
and play with 3TS
in these cases.. Or
use Blue method.
TW and XW
Sniper 1:1
1 TS + 1 LS
Set spin and place
red ring against at
the rough.
Ball guide to the
hole.
Pull back 1 ring / 7
mph in TW.
20.
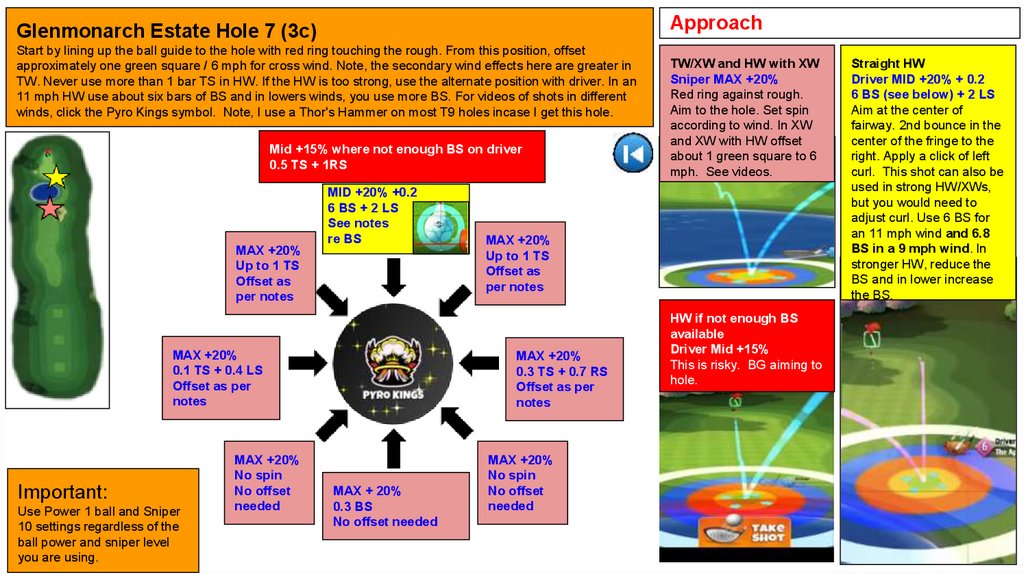
ApproachGlenmonarch Estate Hole 7 (3c)
Start by lining up the ball guide to the hole with red ring touching the rough. From this position, offset
approximately one green square / 6 mph for cross wind. Note, the secondary wind effects here are greater in
TW. Never use more than 1 bar TS in HW. If the HW is too strong, use the alternate position with driver. In an
11 mph HW use about six bars of BS and in lowers winds, you use more BS. For videos of shots in different
winds, click the Pyro Kings symbol. Note, I use a Thor's Hammer on most T9 holes incase I get this hole.
Mid +15% where not enough BS on driver
0.5 TS + 1RS
MAX +20%
Up to 1 TS
Offset as
per notes
MID +20% +0.2
6 BS + 2 LS
See notes
re BS
MAX +20%
0.1 TS + 0.4 LS
Offset as per
notes
Important:
Use Power 1 ball and Sniper
10 settings regardless of the
ball power and sniper level
you are using.
MAX +20%
No spin
No offset
needed
MAX +20%
Up to 1 TS
Offset as
per notes
MAX +20%
0.3 TS + 0.7 RS
Offset as per
notes
MAX + 20%
0.3 BS
No offset needed
TW/XW and HW with XW
Sniper MAX +20%
Red ring against rough.
Aim to the hole. Set spin
according to wind. In XW
and XW with HW offset
about 1 green square to 6
mph. See videos.
MAX +20%
No spin
No offset
needed
HW if not enough BS
available
Driver Mid +15%
This is risky. BG aiming to
hole.
Straight HW
Driver MID +20% + 0.2
6 BS (see below) + 2 LS
Aim at the center of
fairway. 2nd bounce in the
center of the fringe to the
right. Apply a click of left
curl. This shot can also be
used in strong HW/XWs,
but you would need to
adjust curl. Use 6 BS for
an 11 mph wind and 6.8
BS in a 9 mph wind. In
stronger HW, reduce the
BS and in lower increase
the BS.
21.
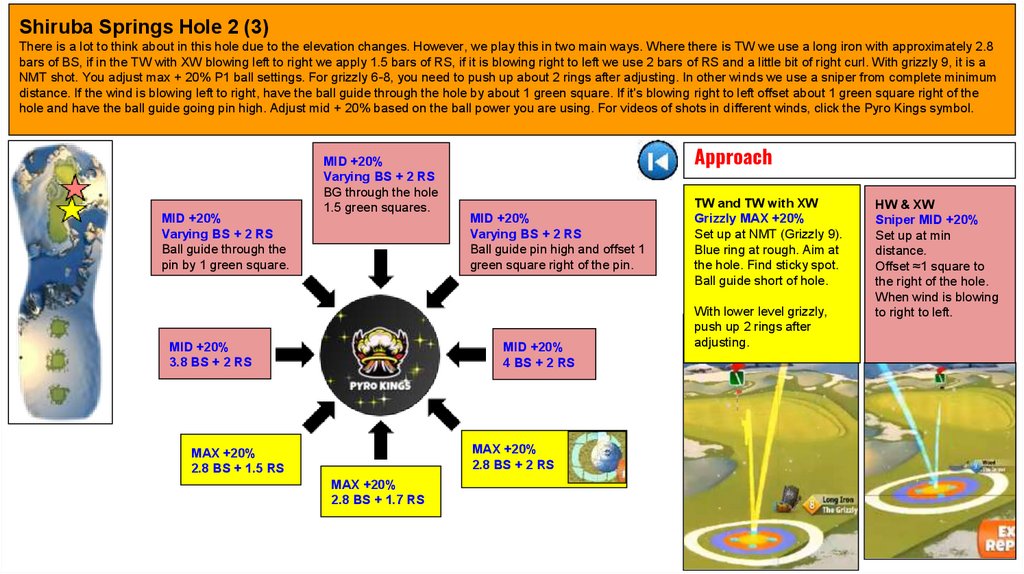
Shiruba Springs Hole 2 (3)There is a lot to think about in this hole due to the elevation changes. However, we play this in two main ways. Where there is TW we use a long iron with approximately 2.8
bars of BS, if in the TW with XW blowing left to right we apply 1.5 bars of RS, if it is blowing right to left we use 2 bars of RS and a little bit of right curl. With grizzly 9, it is a
NMT shot. You adjust max + 20% P1 ball settings. For grizzly 6-8, you need to push up about 2 rings after adjusting. In other winds we use a sniper from complete minimum
distance. If the wind is blowing left to right, have the ball guide through the hole by about 1 green square. If it's blowing right to left offset about 1 green square right of the
hole and have the ball guide going pin high. Adjust mid + 20% based on the ball power you are using. For videos of shots in different winds, click the Pyro Kings symbol.
MID +20%
Varying BS + 2 RS
Ball guide through the
pin by 1 green square.
MID +20%
Varying BS + 2 RS
BG through the hole
1.5 green squares.
MID +20%
3.8 BS + 2 RS
Approach
MID +20%
Varying BS + 2 RS
Ball guide pin high and offset 1
green square right of the pin.
MID +20%
4 BS + 2 RS
MAX +20%
2.8 BS + 2 RS
MAX +20%
2.8 BS + 1.5 RS
MAX +20%
2.8 BS + 1.7 RS
TW and TW with XW
Grizzly MAX +20%
Set up at NMT (Grizzly 9).
Blue ring at rough. Aim at
the hole. Find sticky spot.
Ball guide short of hole.
With lower level grizzly,
push up 2 rings after
adjusting.
HW & XW
Sniper MID +20%
Set up at min
distance.
Offset ≈1 square to
the right of the hole.
When wind is blowing
to right to left.
22.
Shiruba Springs Hole 4 (3b)This is a tricky hole to drop consistently. We choose a long iron when possible, but in HW we have to use a sniper sometimes. In TW/XW, we use the long iron. We set up
with anything from 0.3 TS (TW) to about 1.2 TS in XW. You need to offset the ball guide to the left or right of the hole depending on wind direction and adjust max + 20%.
The adjustment is max + 10 P1 settings In HW and we use the sniper. We apply maximum BS and set up with the ball guide to the hole. We then apply counter spin, by
reducing the amount of BS (about 1 bar to 5.5 mph) and sidespin (about 1 bar to 12mph), Finally, adjust for wind.
For videos of shots in different winds, click the Pyro Kings symbol.
MAX +10%
BS and SS will
vary (see notes)
MAX +10%
BS and SS will
vary (see notes)
MAX +20%
1.2 TS + offset
MAX +20%
1.2 TS + offset
Important:
Use Power 1 ball
settings regardless
of the ball power
you are using.
MAX +20%
Approx 0.6 TS +
offset left of the
hole.
Offset ≈ 1 green
square to 5 mph
Approach
MAX +10%
BS and SS will
vary (see notes)
MAX +20%
Approx
0.3 TS + 0.8 LS
MAX +20%
Approx 0.6 TS + offset right of
the hole.
Offset ≈ 1 green square to 5 mph.
HW
Sniper MAX +10%
Apply max BS, set up
red ring against bunker
and aim to the hole.
Set counterspin. See
orange box for
guidance.
TW/XW
Grizzly Max +20%
White ring against back
and front bunker.
Set TS according to
wind guide, remember
to offset left or right of
the hole to cater for the
secondary wind effect.
23.
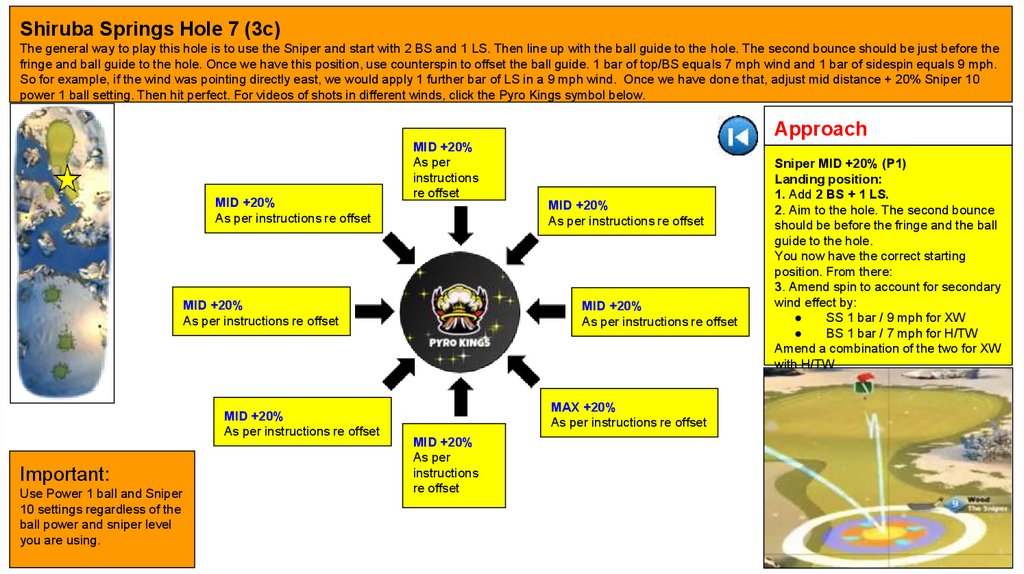
Shiruba Springs Hole 7 (3c)The general way to play this hole is to use the Sniper and start with 2 BS and 1 LS. Then line up with the ball guide to the hole. The second bounce should be just before the
fringe and ball guide to the hole. Once we have this position, use counterspin to offset the ball guide. 1 bar of top/BS equals 7 mph wind and 1 bar of sidespin equals 9 mph.
So for example, if the wind was pointing directly east, we would apply 1 further bar of LS in a 9 mph wind. Once we have done that, adjust mid distance + 20% Sniper 10
power 1 ball setting. Then hit perfect. For videos of shots in different winds, click the Pyro Kings symbol below.
Approach
MID +20%
As per instructions re offset
MID +20%
As per
instructions
re offset
MID +20%
As per instructions re offset
MID +20%
As per instructions re offset
MID +20%
As per instructions re offset
Important:
Use Power 1 ball and Sniper
10 settings regardless of the
ball power and sniper level
you are using.
MID +20%
As per instructions re offset
MAX +20%
As per instructions re offset
MID +20%
As per
instructions
re offset
Sniper MID +20% (P1)
Landing position:
1. Add 2 BS + 1 LS.
2. Aim to the hole. The second bounce
should be before the fringe and the ball
guide to the hole.
You now have the correct starting
position. From there:
3. Amend spin to account for secondary
wind effect by:
SS 1 bar / 9 mph for XW
BS 1 bar / 7 mph for H/TW
Amend a combination of the two for XW
with H/TW